| This page is under construction. Please excuse its informal appearance while it is being worked on. We hope to complete it as soon as possible! |
Pokemon Let's Go Pichu! and Pokemon Let's Go Togepi! are imagined remakes of Pokemon Gold & Silver for the Nintendo Switch. Released after Pokemon Scarlet & Violet, the games aim to be worthy successors to both Pokemon Let's Go Pikachu & Eevee, as well as fan-favorites Pokemon HeartGold & SoulSilver.
General Overview[]
The game largely seeks to replicate the gameplay from the original Pokemon Gold, Silver, and Crystal, with the addition of new content and modern quality-of-life changes for the convenience of the player. The player is tasked with traversing the Johto region in order to encounter wild Pokemon to add to their team or collection, seek out fellow Pokemon trainers for battles in which to gain experience and money, and become strong enough to take on eight Pokemon gyms and earn their badges, with the eventual goal of defeating the Elite Four and the current Champion of the Indigo Pokemon League, taking the title for themselves. Along the way, they will aid the various peoples of Johto they encounter, confront the remnants of the villainous Team Rocket in order to stymie their schemes, and seek legendary Pokemon like Suicune, Lugia, and Ho-Oh.
In addition to the above goals, the game also further develops the gameplay introduced in Let's Go Pikachu & Eevee: Players develop close bonds with a Partner Pokemon, encounter wild Pokemon in the otherworld, enter into a Pokemon Go-style minigame when attempting to capture them, and can use various types of Candies to directly increase a Pokemon's stats. The game is partially intended to introduce players whose first game was Let's Go Pikachu or Eevee to further concepts present in the mainline Pokemon games. In Let's Go Pichu & Togepi, the major new gameplay element introduced is held items, which can be equipped to a Pokemon to aid or otherwise alter its characteristics in battle.
Compared to the latest iteration of the Johto-based Pokemon games, HeartGold & SoulSilver, Let's Go Pichu & Togepi has both additional and altered content. A number of routes in Johto have been expanded, and two entirely new routes and one new dungeon have been added. More alterations have been added to the Kanto, through which the player can travel to after becoming Champion to earn its eight gym badges. The story has also been further developed, with a completely new Team Rocket subplot centering around Olivine City in Johto, and the scenario in Kanto being largely rewritten in order to focus on the remaining admins of Team Rocket and their further machinations in the region. The Pokeathlon minigames introduced in HeartGold & SoulSilver have been replaced by Pokemon Racing in Let's Go Pichu & Togepi, which aim to be just as engaging for players while expanding on the concept of rideable Pokemon, a staple of the Let's Go subseries. The features of the Battle Frontier of HeartGold & SoulSilver have been streamlined as the Battle Tower, in an effort to appeal to both older fans and those new to the Pokemon series's typical postgame content. Finally, Pokemon evolutions originating after the fourth generation of Pokemon games can now be obtained in Let's Go Pichu & Togepi.
Let's Go Pichu & Togepi maintains the online connectivity options that allow players to battle each other and trade Pokemon, making it possible to acquire Pokemon only available specifically in Let's Go Pichu or Let's Go Togepi. Players are also able to transfer Pokemon into Let's Go Pichu & Eevee from Pokemon Go, including the Meltan and new Sumitti lines, which only originate in Pokemon Go itself. In turn, most of the Pokemon captured or transferred to Let's Go Pichu & Togepi can be deposited into the Pokemon Bank, in order to store them or transfer them to other Pokemon titles.
Pokemon Let's Go Pichu & Togepi also has substantial DLC content in the form of the Sevii Island Adventures! campaign. Revisiting a newly-revamped and expanded Sevii Islands after their introduction in Pokemon FireRed & LeafGreen, the player can encounter over 100 Pokemon not available in the base Let's Go Pichu & Togepi games. In addition, the DLC has five new gym badges to obtain and a new story arc focusing on the Shadow Raiders, a mysterious new villanous team bent on stealing as many Pokemon as possible. The DLC also unlocks the Ultra Gym Challenge, in which the player must again face all 21 gym leaders of Johto, Kanto, and the Sevii Islands, each using much more difficult teams that will give even a Pokemon Champion a run for their money. The Sevii Island Adventures! DLC will go live six months after the release of Let's Go Pichu & Togepi, and can either be purchased seperately from the Nintendo Store for $19.95 USD, or as additional content present in later physical editions of the games
Story[]
Johto Story[]
The player is a young resident of New Bark Town in the Johto region. One day, the local Pokemon professor, Professor Elm, asks for the player's assistance to investigate Mr. Pokemon's latest claim of a groundbreaking discovery at his house in Route 30. To accompany them on their journey, the player is allowed to pick one of three Pokemon: Chikorita, Cyndaquil, and Totodile. The player makes it to Mr. Pokemon's house, where they are given a Pokemon egg. Professor Oak, who is also present, sees great potential in the player and uploads his Pokedex App to their Pokegear phone. Afterwards, the player receives a panicked phone call from Professor Elm, asking them to return to his lab right away.
On the way back to New Bark Town, the player encounters a young deliquent, who attacks them with a Chikorita, Cyndaquil, or Totodile. Upon beating him, he says that his name is Silver and declares that he will soon be the world's most powerful Pokemon trainer. The player returns to Professor Elm's lab, where they learn that Silver stole one of the Professor's three Pokemon. The professor decides to give his last Pokemon to Lyra, his lab assistant, for safekeeping. Upon investigating Mr. Pokemon's egg, it immediately hatches into either a Pichu (Let's Go Pichu) or a Togepi (Let's Go Togepi). The newborn Pokemon quickly forms a close bond with the player, becoming their Partner Pokemon.
With their starter and new Partner Pokemon in tow, the player acts on Professor Elm's suggestion to obtain the eight gym badges of the Johto region and test their mettle against the Elite Four and Champion at Indigo Plateau, starting with the gym in Violet City. As the player progresses, they begin to encounter members of Team Rocket, who are said to have been disbanded three years ago following a series of catastrophic defeats in the neighboring Kanto region. First, the player encounters Team Rocket at Slowpoke's Well near Azalea Town, where they are holding the wild Slowpoke population captive and harvesting their tails to sell as pricey delicacies. The player defeats Rocket admin Proton, the leader of this operation, freeing the Slowpoke and Azalea Town from Team Rocket's occupation. After escorting a lost woman named Naoko out of Ilex Forest, the player (though not the playable character) witnesses the Pokemon Celebi observing the playable character from afar.
Later on in Ecruteak City, the player ventures inside the city's Burnt Tower and encounters Eusine, a man obsessed with the legendary Pokemon Suicune. Following another battle with Silver, the player falls into the Burnt Tower's lower levels, where they awaken the Legendary Pokemon Raikou, Entei, and Suicune. Eusine tells the player that the three were throught to have been ressurected by another Pokemon who previously lived in the tower prior to it burning down, and leaves to go pursue Suicune across the Johto and Kanto regions.
Around Olivine City, the player learns that something has been tainting the ocean and fresh water in the area, making many Pokemon sick. This includes the Ampharos at Glitter Lighthouse, who is being looked after by Jasmine, Olivine's gym leader. She requests that the player find and eliminate the source of the pollution, and retrive medicine from a pharmacist in Cainwood City in order to cure Ampharos. The player investigates the nearby Bottling Plant and discovers that it has been taken over by Team Rocket admin Petrel, who is using the stream running by the plant to concoct Tonics, used by Team Rocket to strengthen their own Pokemon, and discharging the resulting waste products downstream. Petrel is defeated and the plant's owners quickly flush the pollutants, returning the water to its pristine state. The player is then able to traverse the ocean to Cainwood City and eventually locates its pharmacist assisting in the construction of the new Magnolia Outpost. With the pharmacist's medicine, Ampharos is quickly restored to health. The player catches another glimpse of Celebi after exiting Glitter Lighthouse.
The player progresses to Mahoghany Town, where they learn that the Magikarp at the nearby Lake of Rage have been spontaneously evolving into Gyarados and causing havok. The player quells an unusual red Gyarados and Celebi appears yet again, being seen directly by the playable character for the first time, before flying away. Afterwards, the player encounters Lance of the Elite Four, who requests the players assistance in investigating suspected Team Rocket activity in Mahoghany. The two quickly discover the presence of an subterranean hideout under Mahoghany's general store, but the player is sent down a trap door into a cell soon afterwards by Rocket admin Ariana, separating the player from their Partner Pokemon. A brief power outage allows the player to escape. Battling through the hideout, the player is eventually reunited with their Partner Pokemon, who is so overwhelmed with happiness that they immediately evolve into Partner Pikachu (Let's Go Pichu) or Partner Togetic (Let's Go Togepi). The player puts a stop to Team Rocket's larger plans, which was to force Pokemon to evolve using anomalous waves, by knocking out the Electrodes powering Team Rocket's equipment with the assistance of Lance.
After obtaining the eighth and final gym badge from Blackthorn Village, the player receives a call from Professor Elm, who reports seeing a strange broadcast originating from Goldenrod City, stating the the city and its Broadcast Tower is under attack by Team Rocket. After trying and failing to infiltrate the Rocket-occupied tower via disguise, the player navigates Goldenrod's underground to free the Broadcast Tower's manager, who has a passcode that grants the player access to the building. Fighting their way to the tower's top, the player will find Archer, the interim head of Team Rocket, who plans to use the tower to cause Pokemon throughout the region to go berzerk, but not before relaying a message to Team Rocket's former boss, Giovanni, pleading for him to return. The player defeats Archer, causing him to disband Team Rocket entirely. The player is given the Rainbow Feather (Let's Go Pichu) or the Silver Feather (Let's Go Togepi) by the grateful Broadcast Tower manager, allowing them to capture the legendary Pokemon Ho-Oh (Let's Go Pichu) or Lugia (Let's Go Togepi).
With Team Rocket seemingly gone for good, the player proceeds to Indigo Plateau to vie for the Championship title. Along the way, the player defeats Silver one last time, who concludes that he cannot raise his Pokemon via brute force alone, and resolves to be a kinder trainer. The player bests all the members of the Elite Four and is allowed to challenge the Pokemon Champion, who turns out to be Lance. After a climatic battle, the player emerges victorious, becoming the new Indigo League champion. The player and their team of Pokemon are recorded for posterity in the Hall of Fame, after which credits roll.
Kanto Story[]
Following their victory at Indigo Plateau, Professor Oak meets with the player at Elm's lab back in New Bark Town, suggesting that the player take on the eight gym leaders of the Kanto region. Boarding the S.S. Aqua in Olivine, the player soon reaches Vermilion City, and their adventures in the Kanto region begin. A large Snorlax is blocking the entrance to Diglett's Cave, preventing the player from reaching the Western portion of Kanto, but there's still plenty to see and do in the other parts of the region.
The player eventually reaches Cobalt Town, an emerging settlement built around the New Kanto Power Plant. The plant's manager invites the player on a tour and shows them the Dynamo Core, the experimental source of the plant's power. Suddenly, two of the accompanying scientists reveal themselves to be the Rocket admin Proton and a Rocket grunt in disguise. The Rocket grunt ambushes the player, and in the time that the player takes to battle them, Petrel has powered down the current to the Dynamo Core and absconded with it. According to the plant manager, without an electrical current to keep it stablized, the Dynamo Core will eventually become unstable and explode.
The player tracks Proton to Lavender Town, where he has fled into the Pokemon Catacombs. At a dead end, the player unexpectedly finds Petrel instead, being tormented by the vengeful spirit of a Marowak. The player quells the Marowak spirit in battle and learns from Petrel that he was actually the one who stole the Dynamo Core, and handed it off to the real Proton before heading into the Pokemon Catacombs as a distraction. The caretaker of the Pokemon Catacombs is grateful that the player stopped Petrel before he could disturb the peace of more Pokemon spirits, and gives the player the Poke Flute as a reward. With this, the player is able to awaken Snorlax and access the rest of Kanto.
Heading south of Pallet Town, the player briefly encounters Silver and Blue, one of Kanto's gym leaders, on Cinnabar Island, a former town devastated by a volcanic eruption. The player proceeds to New Cinnabar Town, where many of Cinnabar Island's former residents have relocated to. The player learns in New Cinnabar Town that the gym leader Blaine is missing. Returning to Cinnabar Island, Proton is seen entering the volcano through a secret entrance on a high ledge. Silver teaches the player's Partner Pokemon how to reach that ledge and the two proceed inside the volcano. The two discover Team Rocket has set up a base in the volcano and find Proton, Ariana, and Blaine. After being defeated, Ariana threatens to plunge the Dynamo Core into the volcano, causing another disastrous volcanic eruption, but Silver is able to talk her out of this. The player learns that Ariana is Silver's mother and Giovanni, the disappeared head of Team Rocket, is his father. Ariana and Proton are imprisoned for their crimes, but Silver promises to help his mother endure her punishment and process her grief. The Dynamo Core is returned to the New Kanto Power Plant, and the player is rewarded with the Silver Feather (Let's Go Pichu) or the Rainbow Feather (Let's Go Togepi).
After the player earns all eight of Kanto's gym badges, they are invited to defend their Championship title from Lyra, who herself has become a powerful Pokemon trainer. After the player defeats her, Professor Oak grants the player access to Champion's Field and Mt. Silver. Ascending up Mt. Silver, the player encounters the previous champion, Red, at the summit. The two engage in a climatic battle, but ultimately the player emerges victorious. As Red leaves to heal his team, the player takes his place on top of the literal and figurative mountain as one of the greatest Pokemon trainers of all time. Credits roll for a second time.
Sevii Island Adventures! Campaign[]
The player witnesses the theft of the Intrepid 1, an experimental submarine, and is asked by Julia, the submarine's engineer, to follow it to the Sevii Islands. The player is given a Rainbow Pass, allowing them to travel to and between the Sevii Islands on the S.S. Jetty, a small motorboat helmed by one Captain Jones. Arriving at One Island, the governor of the Sevii Islands has no leads on the Intrepid 1, but encourages the player to travel to Mt. Ember, where a local criminal gang, the Shadow Raiders, have recently been spotted. At Mt. Ember's peak, the player is ambushed by a large Turtonator and witnesses an admin of the Shadow Raiders, Torque, make off with a red gemstone. According to the governor, this is the Tierra Ruby, a sacred artifact the residents of the Sevii Islands were tasked with guarding long ago, and asks the player to make their way to Six Island to safeguard its counterpart, the Oceanic Sapphire.
While refueling on Two Island, the player hears that Lostelle, a young girl living in Two Town, has run way to find her abducted Psyduck. Tracking down her location to Three Island, the player finds Lostelle and her Psyduck in the Berry Forest, after defeating a rogue Hypno. Lostelle is returned to her home, but notes that said Hypno had been acting odd lately, usually being friendly to her. On Four Island, the player meets former Elite Four member Lorelei and assists her in investigating the sudden disappearance of many Pokemon on Four Island. At the opposite end of Icefall Cave, the pair discover an impromptu depot guarded by a the Shadow Raider admin Chassy, a few grunts and a malevolent Glalie, used to transport Pokemon off the island. Lorelei and the player are delayed long enough for the Shadow Raider's ship to depart, but Chassy accidently reveals the ship's destination as their secret warehouse on Five Island.
At Five Island, the player discovers said Shadow Raider warehouse, hidden in Five Isle Meadow. The player attempts to stop Chassy and Torque from loading up the Shadow Raider ship with more captured wild Pokemon. The player fails when Torque shoves a strange orange mineral, a Pain Shard, into a captive Breloom, causing it to go mad and immediately attack the player. Back at Five Town, a woman named Selphy asks the player for their assistance in rescuing some splunkers who have trespassed into Lost Cave. With Selphy's assistance, the player is able to navigate to the bottom of Lost Cave, where they encounter a Sableye tormenting a huddled Torque. After the player defeats the Sableye, Selphy notices that the Dotted Key that's normally present is missing, and insists that the player heads to the Dotted Hole on Six Island immediately, as the Oceanic Sapphire housed there is in imminent danger.
The player makes it to the Dotted Hole, whose entrance is already open. At the bottom, the player encounters a scientist named Gideon, who seizes the Oceanic Sapphire and sics an Aggron implanted with a Pain Shard on the player, before disappearing into a portal. Back at Six Town, the player fails to find Captain Jones or the S.S. Jetty, and is forced to explore the rest of Six Island. At Outcast Island, the player is swallowed by a Wailord with a Pain Shard, and finds Captain Jones in its stomach. Captain Jones reports that he saw the Shadow Raider ship headed towards Outcast Island and followed it, getting swallowed by Wailord in the process. The two manage to repair the S.S. Jetty and force their way out of Wailord's mouth, destroying its Pain Shadow soon afterwards. At the opposite end of Outcast Island, Captain Jones and the player find the Shadow Raider Fortress. They confront Axle, leader of the Shadow Raiders, who attempts to flee in the ship after being defeated. Captain Jones thought to moor the ship ahead of time, and the Shadow Raider ship is irrepairably damaged as it tries to disembark. Out of its broken hull emerges the Intrepid 1, on which Axle manages to escape.
Regrouping with Julia on Seven Island, the group decides that Axle must be sheltering on one of the Sevii Island's smaller, uncharted islands. The mythical and lost Island Charts may hold the coordinates to such islands, and to this end Julia teaches the player's Partner Pokemon how to safely dive underwater. Eventually, the player rediscovers the Island Chart leading to Isolated Atoll. There, the player finds an abyssal trench leading to an underwater base, which the player manages to infiltrate into following the S.S. Intrepid. Inside, the player quickly learns that the base was constructed by a group calling themselves Neo Team Rocket. At the core of the base, the player finds Axle, Gideon, and a man claiming to be Giovanni, the former head of Team Rocket.
The player learns that the Shadow Raiders abducted Pokemon throughout the Sevii Islands to have their genetics sequenced by Neo Team Rocket, with the ultimate aim of recreating the Pokemon Mewtwo, via a newly-synthesized specimen dubbed Meta Mewtwo. In order to ensure Meta Mewtwo's compliance, Gideon developed the Pain Shards, which cause Pokemon immense pain if they are disobedient. Meta Mewtwo emerges from its incubation chamber and is ordered by Giovanni to attack the player. The player and Meta Mewtwo engage in a prolonged battle, with Gideon using Tonics to bolster Meta Mewtwo's strength and strange waves to mutate it into different forms. Eventually, the player shatters Meta Mewtwo's Pain Shard. When this happens, Meta Mewtwo dissolves into a swirling miasma of malevolent psychic energy and pins a horrified Giovanni and Gideon against a wall. The player endures, however, eventually destroying Meta Mewtwo's core.
When the fight against Meta Mewtwo is finally over, Giovanni congratulates the player for possibly saving the entire world from Meta Mewtwo's unbridled wrath. Gideon then reveals his other invention: A portal generator, powered by the Tierra Ruby and Oceanic Sapphire, which can access Ultra Space, the dimension connecting dimensions. Giovanni and Gideon travel through a portal, eager to reestablish Team Rocket on a new, unsuspecting world. Immediately after this, the portal cuts out and a self-destruction sequence for the base begins. At the last second, time freezes and Celebi appears / emerges out of its Poke Ball (if previously captured by the player), transporting the player, Axle, and the remaining members of the Shadow Raiders and Neo Team Rocket to safety on Isolated Atoll. Unsure of what happened but nevertheless grateful to be alive, Captain Jones and the player leave the villains stranded on the atoll, with the intention of informing the authorities of their location and letting them sort it out.
Having earned the gym badges on One, Three, Five, and Seven Islands, the player is invited to face the Guardian of the Sevii Islands and claim their final gym badge. After a brutal gauntlet consisting of back-to-back battles with all of the previous gym leaders, the player eventually arrives at the Guardian, who is revealed to be Captain Jones. Jones profusely thanks the player for their assistance in protecting the Sevii Islands from the Shadow Raiders and Neo Team Rocket, and for serving as an inspiration for him to be more proactive and take his role as Guardian more seriously. An intense Pokemon battle follows, from which the player emerges the winner. Having earned all five of the Sevii Island's gym badges, the player is inducted as an honorary Guardian of the Sevii Islands and celebrations commence soon afterwards. Credits roll for a third time.
Characters[]
Protagonists & Rivals[]
| Name | Description |
|---|---|
| The Hero / Heroine | That's you, the player character. This boy or girl of variable description is a youth living in sleepy New Bark Town on the edge of the Johto region. Originally just another kid, the protagonist of Pokemon Let's Go Pichu & Togepi is thrust into their Pokemon adventure when Professor Elm asks them to run a simple favor a few routes over. Along the way, Professor Oak sees the potential in the protagonist and gives them access to his new Pokedex App. Their canonical names are Ethan (for the boy) and Kris (for the girl), meaning that, unlike the player characters of Let's Go Pikachu & Eevee, they are meant to be identical to the protagonists of the prior games set in the Johto region. |
| Partner Pokemon | Your Partner Pokemon is Pichu in Pokemon Let's Go Pichu, and Togepi in Let's Go Togepi. Originally obtained as a Pokemon Egg at Mr. Pokemon's house, your Partner Pokemon quickly hatches and forms a deep parental bond with the player, making them literally inseparable. Luckily, your Partner Pokemon proves much more capable than other members of their respective species, even more so when they evolve into their next evolutions partway into the games' story. Your Partner Pokemon can learn unique attacks from special Move Tutors throughout the world, as well as Secret Techniques, allowing them to help you navigate the overworld. It's also worth noting that your Partner Pokemon cannot evolve into the final forms of their respective lines (i.e., Raichu or Togekiss), and cannot be transferred outside of the game file that they originate in. |
| Lyra | A friendly girl that grew up alongside you in New Bark Town. She's the bubbly, cheery, and somewhat naive daughter of Professor Elm, and acted as his unofficial lab assistant prior to the beginning of the game. Entrusted with the remaining Starter Pokemon elementally weak to yours for safekeeping, she begins her traditional Pokemon journey with the intention of becoming stronger to protect her hometown and family. Crossing your paths multiple times throughout the story, she's about as likely to provide you with gifts and assistance as she is to challenge you to battles. Though she does become discouraged by repeated losses late into the Johto region, she eventually takes her place alongside you as one of its strongest Pokemon trainers. |
| Silver | A surly, mysterious, and redheaded boy. First encountered wielding the Starter Pokemon elementally strong against yours, it's quickly discovered that he actually stole it from Professor Elm's lab. Absolutely obsessed with becoming the strongest Pokemon trainer on Earth, he crosses paths with you many times during your journeys. Although he will always give you a run for your money, eventually his repeated losses to you cause him to reevaluate his priorities, becoming a kinder trainer to his Pokemon in the process. At the same time, he also develops a begrudging respect for the player, becoming friendlier to them and more willing to lend his assistance to them in some circumstances. |
Allies[]
| Name | Description |
|---|---|
| The Player's Mom | The player's mother, living together with the player at their house in New Bark Town. Her cooking is known to be delicious and can both heal your team and boost all of their Friendship stats (though this latter effect is limited to once per day). However, her true skills are in fiscal management: Allow her to save a small portion of your winnings, and she'll invest it in an account that generates considerable interest. From this fund, she'll occasionally purchase gifts for you. You can choose whether those gifts consist of items used in your Pokemon journey, decorations for your room, or both. |
| Professor Elm | The Pokemon Professor of the Johto Region, renowned for his research on Pokemon reproduction. Working from his lab in New Bark Town, he has a reputation for being more clumsy, scatterbrained, and disorganized than most in his profession, but his body of work is deeply respected and speaks to his skills as a researcher nevertheless. After the formal beginning of your Pokemon journey, he can be reached over the player's Pokegear phone at any time to provide advice on what to do next, acting as a sort of informal mission control. |
| Professor Oak | The Pokemon Professor of the Kanto Region, who often collaborates with Professor Elm and Mr. Pokemon of the Johto region in the course of his research. He developed the first modern electronic Pokedex an untold number of years ago, and has continued developing it into the Pokedex App, which he can downloaded into any Pokegear Phone and automatically transmits data back to his lab in Pallet Town. He has a reputation for being friendly but somewhat stern, but also has a sort of innate knack for seeing the potential in unproven Pokemon trainers. Some of the greatest Pokemon trainers coming out of Kanto got their start with him. You can phone him at any time to get his general assessment of your progress in filling out the Pokedex. |
| Mr. Pokemon | An eccentric collector of assorted Pokemon-related knickknacks living on Route 30, and a friend of Professors Oak and Elm. Although Professor Elm doesn't always patronize him with his presence, instead choosing to send along others to his place when busy, he does continue to humor him, thanks to the odd occasion when Mr. Pokemon really has discovered something groundbreaking. He's the one that gave the player the egg containing their Partner Pokemon, and will continue to give the player items during their journey, sometimes in exchange for something else. |
| Kurt | A craftsman living in Azalea Town, and one of the few people left with the knowledge of how to process Apricorns into specialty Poke Balls. Once the player helps him free Slowpoke Well and Azalea Town from Team Rocket, he'll gratefully craft any of his Poke Balls for the player free of charge, although the player will need to provide him with the necessary materials first. A rather staunch traditionalist, it takes a while for his more entrepreneurial granddaughter, Maizie, to convince him to sell his Poke Balls in bulk at their house. His ultimate ambition is to find the mythical Gold and Silver Apricorns, in order to craft them into an offering for Ilex Forest's guardian. |
| Kimono Girls | A family of five sisters who perform at the Ecruteak Dance Theater in traditional Johtonian attire. Their individual names are Zuki, Naoko, Miki, Kuni, and Sayo. The player meets and assists them throughout the Johto region, and they in turn perform a dance that helps summon the legendary Pokemon Ho-Oh and Lugia. They are heavily implied to be working behind the scenes to assist the player on their quest, as the player can discover that it was Zuki that handed over the Pokemon Egg containing the player's Partner Pikachu (Let's Go Pichu) or Togepi (Let's Go Togepi) to Mr. Pokemon. After either Ho-Oh or Lugia is captured, the Kimono Girls can be fought at the Ecruteak Dance Theater, where they each wield a different Eeveelution. |
| Eusine | A self-proclaimed expert on the Pokemon Suicune, living in a villa north of Cianwood City. Although knowledgeable about the lore concerning Suicune, he's failed to actually find the legendary Pokemon, until the player accidentally awakens Suicune alongside Raikou and Entei in the basement of the Burned Tower in Ecruteak City. After this, Eusine pursues his target across the Johto and Kanto regions, frequently encountering the player along the way and forming a sort of friendly pseudo-rivalry with them. It's heavily implied that his family owns the Seaside Gallop resort north of Goldenrod City, explaining where he gets the money for his travels and flashy suits. |
| Celebi | A mysterious, rare, and poorly-understood Pokemon, who seems to be tracking the player's progress throughout their adventure from afar. Celebi can be seen watching the player escort Naoko out of Ilex Forest, delivering medicine to Ampharos at Glitter Lighthouse, and calming the red Gyarados at the Lake of Rage. It is possible to capture Celebi, but only if a suitable offering is placed at the shrine of Ilex Forest's guardian, in which case the player will be spirited away to Celebi's personal sanctuary. |
Gym Leaders[]
| Name | Description |
|---|---|
| Falkner | The Flying-type gym leader of Violet City, who awards the Zephyr Badge. He's relatively new at being a gym leader, having inherited both his gym and most of his Pokemon from his father. He's eager to try and step out from under his shadow, so he can come across as a bit of a try-hard. Due to their similar circumstances, he and Janine relate to each other pretty well. |
| Bugsy | The Bug-type gym leader of Azalea Town, who awards the Hive Badge. In spite of being so young, he's considered both a talented gym leader and an expert on Bug-type Pokemon, having conducted a lot of his own independent research on them. He's heralded as a hero by many Bug-type aficionados, at least partly for convincing the general public to take the Bug-type seriously. |
| Whitney | The Normal-type leader of Goldenrod City, who awards the Plains Badge. The two things this girl loves are spirited competition and cute Pokemon, so it was only natural that she became a gym leader. Despite being having a somewhat flakey personality and being relatively new to the concept of Pokemon battling, she proves to be a prodigy at it, having wiped out many unsuspecting trainers that have challenged her unprepared. That said, she's not used to losing, so she will sometimes throw a tantrum when defeated. Loves to play softball in her spare time. |
| Morty | The Ghost-type leader of Ecruteak City, who awards the Fog Badge. He's a strong, silent type, more apt to sit back and listen and observe, rather than talk. He's an expert on Ecruteak's local mythology, and is a good friend of Eusine. His personal dream is to see the legendary Rainbow Pokemon of the Bell Tower. He may or may not also possess limited precognition abilities. |
| Chuck | The Fighting-type leader of Cianwood City, who awards the Storm Badge. He enthusiastically physically trains alongside his Pokemon every single day, even going as far to standing under a raging waterfall to build his resolve. He's a jolly fellow who enjoys the heat of battle, but losing will cause his training regimen to go into overdrive. Despite his strenuous exercise, he still packs a considerable gut, something not lost on his wife. |
| Jasmine | The Steel-type leader of Olivine City, who awards the Mineral Badge. Bucking all the stereotypes you might have of somebody specializing in Steel-type Pokemon, Jasmine is a shy but warm and kind young woman, suspending her gym-leader duties to tend to the sickly Ampharos at Glitter Lighthouse. She's also known to be able to pack away a surprising amount of food at Olivine's local diner. |
| Pryce | The Ice-type gym leader of Mahogany Town, who awards the Glacier Badge. He might look like an unassuming old man, but he has over fifty years of Pokemon battling experience under his belt, so don't underestimate his skills. In spite of being old, he's not out of touch, so a big portion of the trainers at his gym are young, extreme winter sports-types. Much like Chuck, he also meditates under a waterfall. |
| Clair | The Dragon-type gym leader of Blackthorn Village, who awards the Rising Badge. Like a lot of Dragon-type trainers, Clair is haughty and proud. She claims to be the world's best dragon master, which is mostly (though not entirely) backed up by her impressive battling career so far. Whenever she does lose, she tends not to take it very well. Fortunately, her more level-headed cousin Lance is there to curb her worst excesses. |
| Lt. Surge | The Electric-type gym leader of Vermilion City, who awards the Thunder Badge. Very likely the first Kanto gym leader the player will challenge, Lt. Surge loves nothing more than the thrill of battle. He, his Pokemon, and many of the trainers in his gym were all involved in some unspecified armed conflict years ago, with Surge having personally saved the lives of many of his men. As a result, the degree of respect that he gets from his former squadmates is very high. |
| Sabrina | The Psychic-type gym leader of Saffron City, who awards the Marsh Badge. As a rare instance of a human possessing psychic powers, she's a formidable fighter thanks to her ability to communicate directly with her Pokemon, being able to formulate strategies on the fly. She also possesses some degree of precognition, and she and Morty like to compare their predictions. Although somewhat aloof and distant, she is willing to use her abilities to help other people. |
| Erika | The Grass-type leader of Celadon City, who awards the Rainbow Badge. She's a young woman who eschews the modernity Kanto is known for, preferring to wear traditional Kantonian kimonos and practicing the art of flower arranging. She's also known for having a sleepy demeanor right up until a Pokemon battle starts, and for populating her gym exclusively with female trainers. |
| Misty | The Water-type leader of Cerulean City, who awards the Casade Badge. A spirited girl who loves swimming, she has a reputation among Kanto's gym leaders for going all out during Pokemon battles. She's recently started dating, though finding boys that aren't intimidated by her lofty position and headstrong personality is something of an issue. She and Brock are old friends going back to their childhoods. |
| Janine | The Poison-type leader of Fuchsia City, who awards the Soul Badge. Having inherited her gym from her father Koga, she puts constant pressure on herself to live up to her dad's reputation, although she does start to try to step out of his shadow once defeated by the player. She's a master of illusion, having invisible walls and a cadre of body-doubles populating her gym. She's just as likely to commiserate with Falkner given their similar circumstances as she is to vehemently argue with him whose father is better. |
| Brock | The Rock-type leader of Pewter City, who awards the Boulder Badge. Known for his serious, though reliable and kind demeanor. In his spare time, he likes to search Mt. Moon for fossils as an amateur palentologist, and hopes in the future to develop the skills needed to become a Pokemon breeder. In contrast to his serious side, he's also known for being a ladies' man. Is an old friend of Misty. |
| Blaine | The Fire-type leader of New Cinnabar Town, who awards the Volcano Badge. He's a fiery old scientist who respects intelligence and has very little patience for ignorance. After the original Cinnabar Island was destroyed in a volcanic eruption, he was instrumental in rallying some of its former residents and establishing New Cinnabar Town on the Seafoam Islands, though he is bitter that most of Cinnabar Island's former scientific institutions have relocated elsewhere. He's also a fan of Pokemon-related trivia and abrupt pop quizes. |
| Blue | The Ground-type leader of Viridian City, who awards the Earth Badge. He's the grandson of the renowned Professor Oak and an impressive Pokemon trainer in his own right, having even briefly been the Champion of the Indigo Pokemon League. His brash and snarky attitude still remains, though luckily he has also mellowed out with age. He employs a dedicated Ground-type team at his gym, but uses his older team of varied Pokemon whenever he challenges you for the Champion title at Indigo Plateau. |
The Elite Four & The Champion Challengers[]
| Name | Description |
|---|---|
| Will | A member of Indigo Plateau's Elite Four. He's a debonair young man with a penchant for fine clothing and dramatic flourishes, which may obscure his strategic mind from some trainers. Unlike earlier games, Will does not specialize in the Psychic type. Rather, he has diverse teams with an elegant aesthetic, and focuses on applying buffs to his Pokemon and terrain effects and Trick Room proporties to the battlefield. |
| Koga | A member of Indigo Plateau's Elite Four. He was the gym leader of Fuchsia City until he got his promotion. His ninja skills and somewhat stern demeanor intimidate some people, but ultimately he's a good man at heart. Unlike earlier games, Koga does not specialize in the Poison type. Rather, he has diverse teams with a scary asethetic, and focuses on applying debuffs and status effects on the player. |
| Bruno | A member of Indigo Plateau's Elite Four. He's a hulk of a man, towering over others and possessing prodigious strength. He's also known for his quiet demeanor, generally preferring to train out in the wilderness with his Pokemon rather than spending time with other humans. Unlike earlier games, Bruno does not specialize in the Fighting type. Rather, he has a diverse team with a tough aesthetic, and focuses on highly-offensive moves, including those that involve some degree of risk to his own Pokemon. |
| Karen | A member of Indigo Plateau's Elite Four. An utterly gorgeous woman, you might expect a person in her position to be haughty and stuck-up, but she is instead renowned for her kindness, encouraging the potential inside every Pokemon and every Pokemon trainer. Unlike earlier games, Karen does not specialize in the Dark type. Rather, she has a diverse team with a cute aesthetic, and focuses on team synergy to set up favorable weather conditions and buffs, utilizing moves such as U-turn and Baton Pass. |
| Lance | The Champion of Indigo Plateau, at least until you usurp his position, after which he'll become a potential Champion Challenger. Coming from an illustrious family of dragon tamers, he definitely carries an air of grandeur about him. But he also works hard to protect the people of Johto and Kanto, assisting the player in squashing the reemerging Team Rocket. Unlike earlier games, Lance does not specialize in the Dragon type. Rather, he has a diverse team with a draconic aesthetic, and focuses on maximizing coverage with a wide range of powerful moves, further bolstered by smart EV distributions. |
| Silver | One of the potential Champion Challengers the player may face if they defeat the Elite Four again. For more information, please see the Protagonists & Rivals section of the character descriptions. |
| Lyra | One of the potential Champion Challengers the player may face if they defeat the Elite Four again. For more information, please see the Protagonists & Rivals section of the character descriptions. |
| Blue | One of the potential Champion Challengers the player may face if they defeat the Elite Four again, available once the player defeats him at his gym in Viridian City. For more information, please see the Gym Leaders section of the character descriptions. |
| Red | One of the potential Champion Challengers the player may face if they defeat the Elite Four again, available once the player defeats him at Mt. Silver. Famously one of the best Pokemon trainers of all time, Red retired to Mt. Silver to train his team after he couldn't find an adequate challenge anywhere else. He'll return to civilization once again if the player manages to beat him on Mt. Silver's summit. Although he's strictly the silent type, there's just the slightest hint of desperation conveyed whenever he rechallenges you at Indigo Plateau. |
| Archer | One of the potential Champion Challengers the player may face if they defeat the Elite Four again. For more information, please see the Team Rocket section of the character descriptions. |
| Joey | One of the potential Champion Challengers the player may face if they defeat the Elite Four again. Originally just another Youngster trainer on Route 30, Joey and his rodent Pokemon prove to be much more capable than anyone ever thought. Part of his strategy against the player is to use priority moves and Speed buffs. |
| Reina | One of the potential Champion Challengers the player may face if they defeat the Elite Four again. She's the younger sister of the Kimono Girls, but pursued a career as a pop idol, rather than follow the rest of her family into traditional dance theater. Her ace is Sylveon and likes to use vocal moves and inflict the Infatuated status effect upon her foes whenever she can. |
| Lorelei | One of the potential Champion Challengers the player may face if they defeat the Elite Four again, available once player drives the Shadow Raiders out of Icefall Cave in the Sevii Island Adventures! DLC. For more information, please see the Sevii Island Adventures! section of the character descriptions. |
| Captain Jones | One of the potential Champion Challengers the player may face if they defeat the Elite Four again, available once player earns all five of the Sevii Islands' gym badges. For more information, please see the Sevii Island Adventures! section of the character descriptions. |
Team Rocket[]
| Name | Description |
|---|---|
| Proton | The first admin of the revived Team Rocket in Johto that the player encounters, leading the efforts to harvest Slowpoke tails at Slowpoke Well. He's noted for being exceptionally ambitious and cruel, hoping to prove his worth and quickly ascend up the chain of Team Rocket's command. If there's something particularly unpleasant that Team Rocket aspires to do, he'll readily volunteer to make it happen. Does not take failure well. |
| Petrel | Another admin of Team Rocket, first encountered at the Bottling Plant attempting to concoct Tonics. He's rather atypical for a member of Team Rocket, having a friendly, easy-going demeanor, and seems almost as concerned with the player having a positive impression of him relative to actually carrying out Team Rocket's criminal goals. He even freely hands out passwords and other crucial information to the player, although this is tempered by his belief that the player's actions will ultimately be futile. Perhaps the reason why Team Rocket keeps him on is due to his mastery of disguises, which are always foolproof until the moment that Petrel decides to dramatically blow his cover. |
| Ariana | One of the two heads currently leading Team Rocket. The player first encounters her directing forced-evolution experiments on Pokemon at Team Rocket's hideout in Mahogany Town. She has been a high-level admin of the group since its heyday back in Kanto three years ago. Although not needlessly vicious, she is noted as being cold and calculating, utterly determined to make Team Rocket succeed through whatever pragmatic means would make that possible. She's also been tirelessly working to contact Giovanni, the former boss of Team Rocket, in the hopes of convincing him to lead the organization once again. |
| Archer | One of the two heads currently leading Team Rocket, and its de facto boss in its current iteration. The player confronts both him and Ariana at the top of the Broadcast Tower in Goldenrod City following Team Rocket's takeover of it. Like Ariana, Archer has served Team Rocket for a long time, even being the right-hand man of Giovanni himself. Archer likes to think that he is a criminal mastermind, and is far less enthusiastic than Ariana about the prospect of his former boss taking back Team Rocket's reigns. While Archer is in many ways competent, the truth is that he's not in the same league as Giovanni, lacking his vision, charisma, and raw talent. After his downfall, he escapes and hopes to become a Pokemon Champion in order to gain power and influence. |
Sevii Island Adventures![]
| Name | Description |
|---|---|
| Julia | Unlike most characters featured in the Sevii Island Adventures! DLC, Julia appears in the main game as an extremely minor and inconsequential NPC that the player can encounter in Vermilion's harbor area. Her character is greatly expanded in the DLC, where she's established to be an engineer working in Vermilion City's shipyards. She's painstakingly constructed the Intrepid 1 submarine, a craft designed to study Pokemon living on the seabed, over the course of a few years, only to have it stolen a short while before its inaugural voyage. As one might expect, she's incredibly ticked off by this development. She's also an accomplished diver, and will teach your Partner Pokemon how to safely swim beneath the waves to help you find the Intrepid 1 somewhere in the Sevii Islands. |
| Captain Jones | The Captain of the S.S. Jetty, a small motorboat that serves as the player's main mode of transport between the various Sevii Islands. He's very friendly but possesses a devil-may-care attitude about life, prefering to mostly sunbathe on his boat while the player is out having adventures and confronting the Shadow Raiders. However, the player's actions eventually inspire him to take the welfare of the Sevii Islands more seriously, working together with the player to cripple the Shadow Raiders at their main base of operations. Here, he's shown to be a surprisingly effective Pokemon trainer. |
| The Governor | The nameless governor who was elected to head the government of the Sevii Islands from the Governor's Mansion in One City. Though overwhelmed by the rise of the Shadow Raiders and the sudden disappearance of Pokemon throughout the Sevii Islands, the Governor can be a valuable ally, having a close pulse on reported criminal activity and a deep knowledge of the islands' cultural lore. If you're ever at a loss at what to do next in the Sevii Islands, it's not a bad idea to give him a call. |
| Lostelle | A young girl living in Two Town with her Psyduck and her father, who runs the Surf Shack minigame. She commonly travels to Three Island to visit her grandmother and pick berries in the Berry Forest. Being as precocious and sweet as she is, it's no surprise that she's made friends with many Pokemon, including maligned species such as Hypno. That said, she's also a bit too curious for her own good, having a tendency to leave home without telling anybody and wandering into trouble. |
| Lorelei | A native of Four Island and a former member of the Elite Four at Indigo Plateau. Nowadays, she's focused on protecting the Pokemon residing on Four Island, particularly those in Icefall Cave. Despite her powerful presence, Pokemon still seem to be disappearing from Four Island, and Lorelei asks the player to help them figure out how this is happening. Lorelei maintains a house in Four Town. Inside, the player quickly discovers Lorelei's obsession with collecting large quantities of Pokemon plushes. |
| Torque | An admin in the Shadow Raiders, previously a minor-yet-persistent criminal group of poachers stationed in the Sevii Islands. He's not very intelligent, often having a hard time articulating his words and having little-to-no understanding of the Shadow Raider's larger objectives. That said, he's utterly loyal to Axle and the Shadow Raiders, is big and strong, and has a savant-level degree of knowledge relating to the maintenance and repair of motorized vehicles. He loves loud motorcycles, but has a (somewhat) irrational fear of Ghost-type Pokemon. |
| Chassy | Another admin in the Shadow Raiders. She's one of its youngest and most hyperactive members. She's prone to getting distracted over trivial things, speaking in a very fast, scattershot manner, and accidentally blabbing about the Shadow Raiders' plans, to the point that she grates on Axle's nerves. However, when focused she's also surprisingly capable of being devious, having successfully delayed the player long enough to escape twice. Some believe she's way more self-aware than she lets on, and her frivolous demeanor is at least partly an act. |
| Axle | The serious-minded leader of the Shadow Raiders. She's come into her role relatively recently, and having long been dissatisfied with the limited scope of her band of criminals, jumped at the chance to work covertly with with Neo Team Rocket, abducting and delivering a wide variety of Pokemon from the Sevii Islands to them, in exchange for a vast amount of resources that the Shadow Raiders could previously only dream of. As a result, the Shadow Raiders has recently blossomed from a minor annoyance to a major local threat. Although she has a temper that sometimes flares up when her immediate subordinates fail her, she's ultimately cold, calculating, and strategic, willing to concede outposts and personnel if they are not essential to her long-term goals or personal survival. |
| Gideon | An intelligent but utterly immoral scientist currently working for Neo Team Rocket. Having worked alongside Giovanni for many years, he deeply respects his boss, considering his vision for the world and his strategic capabilities to exceed even his own. Compared to almost everyone else, Gideon considers himself a super-genius whose rightful station is above the common rabble. This is not entirely mere megalomania, however, as Gideon is genuinely an accomplished inventor. He developed both Meta Mewtwo and the Pain Shards that ensure its loyalty to Giovanni, and built a working portal generator with the intent to conquer other universes. In his earlier days with the original Team Rocket, he discovered both Tonics and a broadcast frequency that would induce evolution in Pokemon. As Gideon ruefully comments, his research notes on these latter two were seized and and implemented haphazardly by "those backwater idiots in Johto" following the collapse of Team Rocket's Kanto branch. |
| Giovanni | The former head of Team Rocket, who now leads Neo Team Rocket from a hidden underwater base. Following Team Rocket's crippling defeats in the Kanto region three years ago, Giovanni left his family behind to covertly rebuild his criminal empire, getting back into contact with his head scientist Gideon a short while later and relocating to the Sevii Islands. His current plans are to recreate the Pokemon Mewtwo by sampling the genetics of numerous abducted Pokemon, using the local Shadow Raiders gang as both a workforce and a cover for his operations, before accessing Ultra Space and conquering additional worlds. Like most instances of Giovanni throughout the multiverse, this iteration is ambitious, cunning, and charismatic. What separates this Giovanni from others, however, is his disregard for his subordinates: While most Giovannis will reciprocate the adoration of their underlings to varying degrees, this one will sacrifice their lives without a second thought if it's the most effective way to achieve his goals. |
| Meta Mewtwo | An artificial lifeform of incredible destructive power created by Gideon of Neo Team Rocket. Due to Mew being the common ancestor of most Pokemon, Gideon figured that it would be possible to recreate Mewtwo by sequencing the genetics of enough Pokemon. To this end, Neo Team Rocket secretly set up shop in the Sevii Islands, known for having a wide diversity of Pokemon, and recruited the Shadow Raiders to kidnap and deliver Pokemon to their genetic labs. The resulting Meta Mewtwo is said to be even stronger than the original, having a more refined genetic code. However, the player arrives at Neo Team Rocket's base before Meta Mewtwo was finished synthesizing, prompting Giovanni to release it prematurely in spite of its unstable physical form. With a large Pain Shard embedded in its shoulder, Meta Mewtwo is in constant agony and dreams of exacting revenge on Gideon, Giovanni, and the rest of the world. |
| Lulani | The Fairy-type gym leader of One Island, who awards the Mists Badge. This old man runs the Ember Spa alongside his wife, and is an expert on rejuvenating both people and Pokemon back to health. He also has a reputation for being a prankster, as evidenced when he tricks the player into setting up a Terrain advantageous to Fairy-types prior to their battle. He's an old friend of Pryce, and the two sometimes meet up in Cherrygrove City. |
| Gethwine | The Dark-type gym leader of Three Island, who awards the Guile Badge. She's a theatrical girl aware of her creepy reputation and utterly embraces it to gain a psychological edge during battles. She operates out of the abandoned Twilight Village, and employs the local Zorua to reenact a mystery of her own making for players to solve before challenging her. In fact, she wants to become a mystery writer when she grows up. It's said that she's somehow related to Karen of the Elite Four. |
| Selphy & Sebastian | The gym leaders of Five Island, who award the Tandem Badge. They specialize in the Doubles battle format. Selphy is the heiress of Resort Gorgeous, a small but popular vacation destination on Five Island, and Sebastian is her ever-loyal butler. Selphy has a rather demanding attitude, which Sebastian tolerates but is quick to apologize for behind Selphy's back. Selphy is also an expert on the nearby Lost Cave, knowing most of its ins and outs, and using that knowledge to retrieve trespassers that get stuck inside of it. |
| Adrian | The gym leader of Seven Island, who awards the Antipode Badge. He specializes the Inverse battle format and reversed move order priorities. An eccentric, absentminded scientist who studied under Professor Burnet in Alola, his claim to fame is the discovery of particles that can reverse gravity and the properties that Pokemon display in battle. He set up his gym inside the Inverted Tower, which was renovated from an abandoned battle facility. |
| Guardian of the Sevii Islands | The gym leader of Arena Island, who awards the Journey's End Badge. They specialize in endurance battling, pitting the previous gym leaders against you again before challenging you themselves, in a series of five back-to-back battles with no chance to recover in-between. You can only challenge them in the first place by earning the other four Sevii Island gym badges beforehand. The Guardian also serves to protect the people and artifacts of the Sevii Islands from danger.
The Guardian's identity is shrouded in mystery until you actually face them in battle, when it's revealed that they are Captain Jones. Jones earned the title of Guardian by besting the other four gym leaders in a grueling, multi-day tournament. However, because the Sevii Islands are largely peaceful and sleepy in modern times, Jones quickly let his Guardian duties slide and his skill in battle atrophy. Being unable to deal with the Shadow Raiders without the player's help, he's recommitted himself to taking his role as Guardian seriously. For their part, the player is awarded an honorary Guardianship following their victory over Jones. |
Features[]
New Features[]
From Pokemon Gold, Silver & Crystal[]
From Pokemon Let's Go Pikachu & Eevee[]
- Time System - The overworld in Pokemon Let's Go Pichu & Togepi now experiences a realtime 24-hour day-night cycle, which reflects the time set on the Nintendo Switch. The game also tracks the date set on the system, and some events in-game are dependent on the day of the week.
- Compared to Pokemon HeartGold & SoulSilver, the time system is somewhat streamlined, intended for player convenience. For example, no wild Pokemon encounters are time-dependent in Let's Go Pichu & Togepi. Also, certain events have been altered: The Bug-Catching Contest is no longer held on certain days of the week, but rather once each day, and the Lapras in Union Cave may be encountered at any time, although it does regenerate the next Friday if knocked out.
- Held Items - Pokemon are able to hold various items, which give them access to passive buffs, recovery, and other benefits in battle.
- To this end, Berries are now intended for use as held items to aid Pokemon in battle. The role that Berries had in Let's Go Pikachu & Eevee in assisting in the capture of wild Pokemon has been taken by the new Bait items.
- Battle Tower - The Battle Tower from Pokemon Crystal returns, although it has several changes. First, it has been relocated to Vermilion City. Second, it now supports the Doubles Format as well as a rental Pokemon system. Third, previously-encountered characters like gym leaders or rivals can now appear in it. It even has its own heads, the new characters Tower Tycoon Theodora and her assistant Miles.
- Mystery Gift - A long-time staple of the franchise, Mystery Gift allows the player access to special items, events, or Pokemon distributed by Nintendo or The Pokemon Company during certain times or in certain locations. In Let's Go Pichu & Togepi, the Mystery Gift feature has been split into two parts, Special Gifts and Daily Gifts. Special Gifts are distributed by Nintendo or The Pokemon Company, either during certain days or in certain locations, and can include rare items, special events, or distributed Pokemon. Daily Gifts can be distributed to the player once a day, and take the form of a random item, ranging from berries to nuggets to room decorations. The more Daily Gifts the player receives, the better chance that their Daily Gifts consist of rare or valuable items. Mystery Gifts are accessible from the PokeGear menu.
From Pokemon HeartGold & SoulSilver[]
- Intergenerational Evolutions & Preevolutions - Pokemon originating from Generations 1 and 2 but with evolutions and preevolutions originating from later generations have access to them in Let's Go Pichu & Eevee. Unlike Pokemon FireRed & LeafGreen, these are not locked behind story progression
- Eusine Sidequest - The player encounters the Pokemon trainer Eusine, who is obsessed with the Pokemon Suicune. The sidequest plays largely like it did in Pokemon HeartGold & SoulSilver
Removed Features[]
From Pokemon HeartGold & SoulSilver[]
- Abilities - Abilities are not present in Let's Go Pichu & Togepi. To partially make up for this, the number and variety of Held Items available has been increased.
- However, there are a few Pokemon that still act as if they are affected by one of their abilities, even if this is never stated as such. For example, Regigigas is still afflicted by the effects of its Slow Start ability at the beginning of battles, while Wishiwashi will still transform between its Solo and School forms as dictated by the Schooling ability.
- Pokeathlon - The Pokeathlon has been replaced by Pokemon Races at the Seaside Gallop.
New Features[]
Pokemon[]
- Gift Mimikyu - A special event triggers in the Goldenrod Department store if the player either specially pre-ordered their copy of Let's Go Pichu or Togepi, or has purchased The Sevii Island Adventures DLC. The player is tasked with investigating a display of Pokemon dolls that have been giving everyone bad vibes. The player can then acquire a Mimikyu hiding among the dolls. Mimikyu does not have a Pokedex entry in the base game, but gains one in the Expanded Pokedex of The Sevii Island Adventures DLC
Other[]
- Pokemon Races - Pokemon Races are a new minigame taking place at the Seaside Gallop Resort, which replaces the Pokeathlon of Pokemon HeartGold & SoulSilver. In this minigame, you and any Ride Pokemon in your possession compete against opponents to reach the finish line in first place or achieve some other kind of goal. You Pokemon's stats influence how well your Pokemon perform. For example, the Speed stat determines a Pokemon's maximum top speed. If you come in 3rd or higher in any race, you'll be able to choose one of a selection of prizes, which get better the more victorious you are. Multiple players are also able to compete against each other (or in Footie Ball, cooperate together). Competitions at the Seaside Gallop come in four formats:
- Land Races - For land-based Ride Pokemon. The emphasis of these races is to stay on track to avoid slowing down in the grass using good turning techniques
- Sea Races - For water-based Ride Pokemon. The emphasis of these races is to use ramps and currents to find shortcuts and stay ahead of the competition
- Air Races - For flying or levitating Ride Pokemon. These races are in a slightly unconventional format, where participants race to achieve a certain point total before their opponents do. This is mostly done by collecting differently-valued gems, flying through a series of rings in quick succession, and performing stylish tricks while accomplishing your other tasks
- Footie Ball - A competition for smaller Pokemon that cannot compete in races. Participating in a team of four (of which the player can select one to four of their Pokemon to participate in), the player (controlling their Pokemon directly) attempts to win a game of soccer. The player is able to charge their strikes against the ball to make them more powerful, but this leaves them vulnerable to diving by other Pokemon, which can also be done help intercept or block the ball. Charging or diving into Pokemon briefly stuns them, with charging stunning Pokemon for a larger period of time. Passing frequently between the player's team members is also encouraged, as this will quickly increase the speed at which the ball can be striked. The first team to a predetermined score wins
- Elite Four Order - Unlike previous titles in which the Indigo Plateau is involved, the members of the Elite Four can be challenged in whatever order the player desires
- Champion Challengers - Like in Pokemon Sun & Moon and Pokemon Ultra Sun & Ultra Moon, the player will be challenged by a one of a selection of powerful trainers whenever they return to Indigo Plateau after becoming Champion and defeating the Elite Four again. If you lose against a Champion Challenger, they will acquire the title of Champion, and it will be up to you to defeat them to take it back. Potential Champion Challengers include:
- Lance - A trainer specializing in the Dragon type, and the champion prior to you. He's eager to regain the Champion's Crown
- Lyra - Professor Elm's daughter and lab assistant, and your childhood friend from New Bark Town
- Silver - Your once-embittered rival, who has grown stronger since learning how to love and care for his Pokemon
- Youngster Joey - An up-and-coming Pokemon protege. His ace is his cherished Raticate
- Eusine - An amateur Pokemon researcher, who has attempted to track down the legendary Pokemon Suicune for years
- Reina - The younger sister of the Kimono Girls of Ecruteak City. Unlike the rest of her family, she's pursued a career as a pop star. Her signature Pokemon is Sylveon
- Baoba - The former warden of the Safari Zone, a Pokemon reserve that used to exist in Fuchsia City. In his retirement, he's taken up a strong interest in Pokemon battling
- Theodora - Head of the Battle Tower in Vermillion City. She's looking to generate publicity by competing at the Indigo Plateau, expanding her influence and business empire whether she wins or loses
- Archer - Former interim head of Team Rocket, determined to win hearts and minds as his own crime boss by becoming champion of the Indigo League
- Blue Oak - Former champion and grandson of Professor Oak. He competes using a varied team, unlike the battle with him at Viridian City's gym
- Red - (once defeated at Mt. Silver) This silent-type is one of the most powerful trainers in the world. Since his defeat at the hands of the player, there's the slightest hint of desperation to his demeanor
- Lorelei - (once the Shadow Raiders are driven out of Icefall Cave in The Sevii Island Adventures DLC) A former member of the Elite Four. Working with her in Icefall Cave has reawakened her passion for Pokemon battling
- Adrian - (once defeated at the Ceremonial Grounds in The Sevii Island Adventures DLC) The Island Champion of the Sevii Islands comes to claim the title at the Indigo Plateau. He's brash and boastful, but has the skills to back his words up
Gameplay[]
Gameplay in Pokemon Let's Go Pichu & Let's Go Togepi largely resembles the precedent set in Let's Go Pikachu & Eevee - The player aims to earn the gym badges of the Johto region by acquiring wild Pokemon, who are largely visible in the overworld, and making the Pokemon in their party stronger by earning Experience Points, which are mostly earned via capturing additional wild Pokemon or by defeating opposing teams of Pokemon in trainer battles. As Pokemon gain Experience Points and increase in level, they can gain new, more effective attacks, and some can evolve into a stronger form upon reaching a certain level. By making their party of Pokemon stronger, the player character is able to take on more difficult opponents and advance through the game's world. Upon gathering all eight of Johto's badges, the player is invited to challenge the Elite Four and the reigning champion at Indigo Plateau. Defeat them all, and the player acquires the champion title and wins the game.
Partner Pichu & Partner Togepi[]
Very early into the game, the player will acquire a Pokemon Egg, which quickly hatches into either a Pichu (Let's Go Pichu) or Togepi (Let's Go Togepi). The newborn Pokemon quickly forms an attachment with the player and becomes their Partner Pokemon.
Partner Pichu and Partner Togepi are important elements of the games. Your Partner Pokemon is almost always present on your person, usually situated on the player's shoulders, even if the Partner Pokemon is not currently selected to be in the player's party of six Pokemon available for battle. In battle, Partner Pichu and Partner Togepi prove to be exceptionally adept, having boosted stats and unique movepools that focus of offensive capabilities, especially in the case of Partner Togepi. Both can also learn unique moves, both inside and outside of battle. In the field, your Partner Pokemon is capable of using Secret Techniques, maneuvers that allow you to further navigate the world by allowing you to either remove or traverse obstacles.
Although all captured Pokemon have a Friendship stat in Let's Go Pichu & Eevee, your Partner Pokemon are unique in how they can boost and utilize their Friendship stats. You are able to access a small sub-game in which you can play, pet, and feed your Partner Pokemon. All of these interactions can make your Partner Pokemon's friendship stat rise. You are also able to give Partner Pichu and Togepi unique haircuts, which boosts their happiness far more than the general grooming available to other Pokemon. Finally, you're able to dress up your Partner Pokemon with various sets of clothing found throughout the world. While changing your Partner Pokemon's clothes does not boost Friendship, it does double the Friendship increases from traversing the overworld together and leveling up, if you and your Partner Pokemon are wearing matching outfits from certain sets of clothing.
A high Friendship stat has unique benefits for your Partner Pokemon. If Friendship is moderately high, your Partner Pokemon will occasionally gift you with certain items while traveling through the overworld, and will make a noise and perform a unique animation if hidden items are nearby. If Friendship is very high, your Partner Pokemon will strive harder in battle in order to make you happy, doing things such as dodging attacks, shaking off status effects, or enduring blows that would otherwise cause them to faint. Finally, at maximum Friendship, Partner Pichu and Partner Toegpi will gain a 10% boost to all non-HP stats, as opposed to the 5% boost granted to all other Pokemon. These boosts are permanent, unless a Pokemon's Friendship stat somehow decreases all the way down from its maximum value to its minimum.
While Pichu and Togepi do normally evolve into Pikachu and Togetic via a high Friendship stat, Partner Pichu and Partner Togepi instead evolve once a certain point in the story is reached in the game. After falling into a booby trap in Team Rocket's hideout in Mahogany Town, the player is separated from their Partner Pokemon, who is quickly seized by Team Rocket. Locate and rescue your Partner Pokemon from Rocket admin Arianna, and they'll be so overwhelmed with happiness that they'll immediately evolve into Partner Pikachu or Partner Togetic. Aside from a substantial boost to their stats, Partner Pikachu and Partner Togetic operate identically to how their predecessors did. Partner Pikachu and Partner Togetic cannot further evolve into Raichu or Togekiss.
Lastly, your Partner Pokemon cannot be traded away or transferred out of Let's Go Pichu or Let's Go Togepi into Pokemon Home. This is to prevent players from softlocking themselves in the game's overworld or dungeons without access to their Partner Pokemon's Secret Techniques.
The Player & Their Partner Pokemon[]
Player Customization[]
Physical Traits[]
The following physical traits can be customized in Let's Go Pichu & Togepi:
- Sex - The player can choose to play as a boy or a girl, although the protagonist's gender is never referenced to in the story itself. Chosen at the beginning of the game. The boy character is modeled after Ethan from the original Pokemon Gold & Silver and their remakes, while the girl resembles Kris from Pokemon Crystal. Lyra's design has been reworked into a new friendly rival in Let's Go Pichu & Togepi.
- Skin Tone - Four different skin tones are available. Chosen at the beginning of the game.
- Hair Color - The player's hair color at the beginning of the game is paired with skin tone. However, once the player arrives in Goldenrod or Celadon City, the player can choose a different color to dye their hair at a cosmetics shop.
- Hair colors include: Blonde, Brown, Black, Red, Pale Blonde, Strawberry Blonde, Auburn, White, Pink, Blue, Violet, and Green
- Eye Color - The player's eye color at the beginning of the game is paired with skin tone. However, once the player arrives in Goldenrod or Celadon City, the player can choose to insert different contact lens to change their eye color at a cosmetics shop.
- Eye colors include: Blue, Green, Brown, Black, Hazel, Amber, Grey, Violet, Red, Yellow, Pink, and Turquoise.
Outfit Sets[]
Player outfits return from Let's Go Pikachu & Eevee, given to you by in sets by various NCPs at different points in the game. Most sets of clothing include a coordinated cap/haircut, top, pants, shoes, and bag, which you can mix and match to your liking. Some outfits in Let's Go Pichu & Togepi include uniquely-modeled headgear/haircuts or shoes.
The individual clothing sets are:
- Trendy Set - The default clothing set, popular among the youth.
- Eevee Set - A variation of the Trendy Set themed around Eevee. Purchasable from the Goldenrod Department Store for $5,000.
- Vaporeon Set - A variation of the Trendy Set themed around Vaporeon. Purchasable from the Goldenrod Department Store for $5,000.
- Jolteon Set - A variation of the Trendy Set themed around Jolteon. Purchasable from the Goldenrod Department Store for $5,000.
- Flareon Set - A variation of the Trendy Set themed around Flareon. Purchasable from the Goldenrod Department Store for $5,000.
- Espeon Set - A variation of the Trendy Set themed around Espeon. Purchasable from the Goldenrod Department Store for $5,000.
- Umbreon Set - A variation of the Trendy Set themed around Umbreon. Purchasable from the Goldenrod Department Store for $5,000.
- Leafeon Set - A variation of the Trendy Set themed around Leafeon. Purchasable from the Goldenrod Department Store for $5,000.
- Glaceon Set - A variation of the Trendy Set themed around Glaceon. Purchasable from the Goldenrod Department Store for $5,000.
- Sylveon Set - A variation of the Trendy Set themed around Sylveon. Purchasable from the Goldenrod Department Store for $5,000
- Kimono Set - A set of clothes based off a modern interpretation of the kimonos worn by Ecruteak City's famous Kimono Girls. Given to the player by Naoko after escorting her to the exit of Ilex Forst.
- Racing Set - A set of clothes with wild colors and crazy designs, intended to make you as noticeable as possible. Given to you by the bicycle shop owner in Goldenrod City as compensation for his bikes being out of stock.
- Farm Set - A set of clothes perfect for working hard out in the field, including a unique pair of black boots and a brimmed hat. Given to you by the patriarch of Moomoo Farms after growing ten mature Berry or Apricorn plants.
- Nurse Set - Clothing based on uniforms worn by the nurses working in Pokemon Centers. Given by the nurse working in the Olivine City Pokemon Center after healing Ampharos at Glitter Lighthouse.
- Winter Set - Very warm winter clothes, including a long undershirt, leggings, and a unique stocking cap and white boots. Given to you by a concerned NCP immediately after you exit Ice Path.
- Rocket Set - The black uniforms worn by the grunts of Team Rocket. Given to you by a Team Rocket member in Goldenrod, thinking you're a new recruit, during Team Rocket's takeover of Goldenrod's Broadcast Tower. Unlike HeartGold & SoulSilver, you actually get to keep the set after Silver rips it off of you. Wearing the entire set will cause Pokemon Center nurses to treat you with concern and PokeMart clerks to treat you with suspicion.
- Police Set - Clothing based off of police uniforms. Given by any policeman or policewoman after talking with them while wearing the Rocket Set or the Blasting Off Set.
- Champion Set - A regal-looking set, which even includes a golden crown. Given by Lance after becoming champion at Indigo Plateau.
- Sailor Set - Clothes fit for swabbing the decks and sailing the seven seas. Given by a member of the S.S. Aqua's crew after you rough up a slacking-off coworker in a Pokemon battle.
- Pikachu Set - Clothes themed around your partner Pokemon, Pikachu. Given by the Pokemon Fan Club in Vermilion City if your Partner Pikachu has a maxed-out Friendship stat. Exclusive to Let's Go Pichu.
- Togetic Set - Clothes themed around your partner Pokemon, Togetic. Given by the Pokemon Fan Club in Vermilion City if your Partner Togetic has a maxed-out Friendship stat. Exclusive to Let's Go Togepi.
- Raichu Set - Bold Clothes themed around the Pokemon Raichu. Given by Lt. Surge after defeating him at his gym in Vermilion City. He gives it to you in lieu of a signed autograph, having run out of photos to give.
- Luxury Set - A set of overpriced, ostentatious golden clothes with silver accents, all encrusted with various jewels. Includes a golden top hat that can be worn separately. Wearing the full set will cause you to sparkle. Purchasable from the Celadon Department Store for $500,000.
- Blasting Off Set - Pieces of one of Team Rocket's old uniforms, which are white, not black. Given by Jesse and James after defeating them in battle at their apartment in Celadon City. Wearing the entire set will cause Pokemon Center nurses to treat you with concern and PokeMart clerks to treat you with suspicion.
- Suicune Set - Very stylized formal wear based on the aesthetic of Suicune, including a unique ballroom mask as headgear. Given by Eusine after capturing Suicune. If you fail to do so at Route 25, Suicune can subsequently be found back at the Burned Tower. Capture it here, include it in your party, and visit Eusine's villa in Cianwood City. Eusine will then belatedly reward you with the Suicune set.
- Formal Set - A set of sombre black clothes, suitable for any serious occasion. Given by Mr. Fuji's assistant after confronting Petrel in the Pokemon Catacombs.
- Safari Set - Clothing designed to blend into the flora of wild savannahs. Given to you by Baoba at Fuchsia City's Safari Zone upon registering five Regional Variant Pokemon in the Pokedex App.
- Pop Fusion Set - A set from a popular clothing line designed by Valerie, Johto's most famous fashionista. It combines traditional Johtonian aesthetics with modern sensibilities. Includes a pair of colored sunglasses that can be selected separately. Obtained by winning against Valerie at her family cottage on Route 50.
- Yell Set - A set of clothing resembling the punk-inspired uniforms worn by members of the Spikemuth Gym in Galar. Includes wild magenta haircuts that can be selected separately, and unique face paint that is applied to the player / your Partner Pokemon if the entire set is worn at once. Given to you by Piers, the leader of the Spikemuth gym, if you manage to defeat him while he's on tour in Lavender Town.
- Retro Set - Clothing based on those worn by Ethan and Kris in the Generation II Pokemon games. Given by Professor Elm after defeating Red at Mt. Silver.
- Assistant Set - A simple set of white, clinical clothing denoting an assistant to a Pokemon professor. Given to you by Professor Elm after registering 50 unique species of Pokemon in the Pokedex.
- Vacation Set - Brightly-colored clothes fit for a leisurely day at the beach, including a unique pair of sunglasses as headgear and sandals. Given by Surfin' Joe after beating his high score in the Surfing Pikachu minigame on Two Island. Exclusive to the Sevii Island Adventures! DLC.
- Shadow Raider Set - Grungy-looking clothes resembling those worn by members of the Shadow Raiders. Includes a unique bandana that can be selected separately. Wearing the entire set will cause Pokemon Center nurses to treat you with concern and PokeMart clerks to treat you with suspicion, but only on the Sevii Islands. Obtained from a locker in the Shadow Raider Fortress. Exclusive to the Sevii Island Adventures! DLC.
- Island Guardian Set - Dignified clothing based on the traditional garments worn by the Guardians of the Sevii Islands, which comes complete with a minurature cape. Given by Captain Jones after earning the Journey's End Badge. Exclusive to the Sevii Island Adventures! DLC.
Meet Your Partner Pokemon![]
In addition to their starter Chikorita, Cyndaquil, or Totodile, the player also receives a Pokemon Egg from Mr. Pokemon near the start of the game, containing either Partner Pichu (Let's Go Pichu!) or Partner Togepi (Let's Go Togepi!). The egg hatches after the player returns to Professor Elm's Pokemon Lab from Mr. Pokemon's house.
Unlike other hatched Pokemon, Partner Pichu and Togepi start out at Level 5, instead of Level 1. They are also stronger than other Pichu and Togepi, possessing roughly the same amount of fighting prowess as the base forms of the traditional Grass-, Fire-, and Water-type starters. However, they are initially nowhere near as inherently strong as Partner Pikachu or Partner Eevee in Let's Go Pikachu & Eevee. Unlike those Pokemon, however, Pichu and Togepi do evolve. While this is normally dependent on Pichu or Togepi's Friendship stat, Partner Pichu and Partner Togepi evolve into Partner Pikachu and Partner Togetic at a critical point in the game's story instead, after rescuing them from Team Rocket's headquarters in Mahogany Town. Following this, however, Partner Pikachu and Partner Togetic cannot further evolve into Raichu or Togekiss, although their base stats are boosted in order to make up for this. Additionally, your Partner Pokemon can never be traded away or released back into the wild.
Partner Pikachu and Partner Togetic can each learn unique battle moves once they evolve.
- Partner Pikachu
- Zippy Zap - Electric-type exclusive move. It has increased priority
- Floaty Fall - Flying-type exclusive move. It has a chance of making the target flinch
- Splishy Splash - Water-type exclusive move. It has a chance of paralyzing the target
- Pika-Papow - Electric-type exclusive move. Its base power is dependent on Partner Pikachu's Friendship stat
- Partner Togetic
- Glittery Glitz - Fairy-type exclusive move. It has a chance of Confusing the target
- Jetty Jaunt - Flying-type exclusive move. It has a chance of lowering the target's Defense and Special Defense stats
- Revvy Roll - Normal-type exclusive move. It has a chance of lowering the target's Attack and Special Attack stats
- Toge-Trounce - Fairy-type exclusive move. Its base power is dependent on Partner Togetic's Friendship stat
Gameplay[]
[]
PokePhone[]
The vast majority of menus in Let's Go Pichu & Togepi are displayed via the interface of the PokePhone. Intended to be an evolution of the Pokegear from the original Pokemon Gold & Silver, the PokePhone allows you to select various apps installed onto it in order to access different things.
Phone App[]
Allows you to place and receive calls from NPCs. After speaking to certain NPCs, they will either give you their phone number or ask if they can do so. Contacts are divided into one of three categories - "Important People" (like Professor Elm and the player character's mother), "Rematches" (Pokemon Trainers that can either call or be called in order to fight again), or "Other Contacts" (mostly other Pokemon Trainers that can be talked to concerning miscellaneous matters, such as items they wish to give the player or reports of rare Pokemon spawning en mass). Each category can hold an unlimited number of contacts, and the player is free to delete contacts as they see fit (except for in the "Important People" category). If you wish to regain an NPC's phone number, talk to them again in the overworld.
When NPCs call the playable character in Let's Go Pichu & Togepi, a small text summary will appear on the bottom-right corner of the screen, conveying who the caller is and a brief summary of what they want to talk about (i.e., "Joey - Let's Fight Again!" or "Mom - Bought Something For You!"). You can then choose to take the call, decline it, or leave it to ring for a short while.
You can choose to save summaries of most calls into your phone's memory if you decide to pick them up. Call summaries are sorted into the same categories as your contacts: "Important People", "Rematches", and "Other Contacts". and you can sort the contacts in any of these categories either by the date registered into the Poke Phone or alphabetically.
Texts sent to your phone are stored for a week, after which they are automatically deleted. The exception to this is any texts sent to you by contacts categorized as Important People, which are never automatically deleted. The player can choose to delete any text message, however.
Options App[]
A set of game options that the player can toggle on and off at any time. New options have been added to make Let's Go Pichu & Togepi more appealing to veterans of the series.
- Text Speed - How fast text generates in text boxes. The options are Slow, Normal, and Fast, with Normal being the default.
- Skip Cutscenes & Dialogue - Allows the player to skip all cutscenes and dialogue by holding the A-Button on the Nintendo Switch. Is Off by default.
- Battle Effects - Whether or not certain animations such as attacks, status afflictions, or weather occur during wild and trainer battles. The options are On or Off, with On being the default.
- Battle Style - Whether or not the player is given the option to switch their active Pokemon whenever an opponent's Pokemon is knocked out and is about to send out another. The options are Switch and Set, with Switch being the default. The Switch option allows you to change your Pokemon, while Set does not. Even if the Switch option is selected, the player will not have the ability to switch their Pokemon in Double, Triple, or Multi Battles, as well as in any battle taking place in the Battle Frontier or in Online Battles.
- Friendship Battle Perks - Whether or not the player is given perks in battle from Pokemon with a high Friendship stat, such as inflicting additional critical hits or enduring attacks that would have otherwise fainted them. The options are On and Off, with On being the default. The benefits from a high Friendship stat outside of battle, such as the ability to evolve, are not affected. Friendship battle perks are automatically disabled in the Battle Frontier and multiplayer battles.
[]
Secret Techniques[]
Unlike previous Pokemon titles taking place in Johto, Let's Go Pichu & Togepi do not have HMs. Now, obstacles are overcome and other field actions are performed by utilizing Secret Techniques, special actions undertaken by Partner Pichu/Pikachu or Togepi/Togetic. In all cases, Secret Techniques will need to be learned from an NPC before your Partner Pokemon can use them.
Secret Techniques available to your Partner Pokemon include:
- Chop Down - A powerful slash that allows your Partner Pokemon to cut down small obstructing bushes. You can initiate this technique by approaching small bushes and pressing the A Button. Trees cut down in this way do not regrow. You can also cut down swaths of grass, which do not regrow or generate wild Pokemon until you leave the area. Learned from the Charcoal Maker's Farfetch'd after rescuing it from the depths of Ilex Forest.
- Charging Tackle - A concentrated tackle designed to shake larger trees to their very roots. If performed, there's a chance something could fall out of said trees, including rare Berries, Apricorns, or even wild Pokemon. You can initiate this technique by approaching trees and pressing the A Button. Learned from an NPC on Route 34, who agrees to share the technique with you if you can help him capture a shiny Caterpie up in a tree. Optional.
- Boulder Bash - Your Partner Pokemon punches a small, cracked boulder with incredible force, causing it to shatter into pieces. Aside from clearing out obstacles, sometimes rare stones, Fossils, or even wild Pokemon can be found in the resulting debris. You can initiate this technique by approaching cracked boulders and pressing the A Button. Some of these boulders will regenerate, while others, specifically those whose sole purpose is obstructing your way, will not. Learned from an NPC immediately after defeating or capturing the Sudowoodo on Route 36.
- Sea Skim - Your Partner Pokemon summons a surfboard from nowhere, allowing you to ride over the surface of bodies of water. You can initiate this technique by approaching any body of water and pressing the A Button. Learned from the proprietor of Ecruteak's Dance Theater if you manage to defeat a rowdy Team Rocket grunt causing trouble there.
- Sky Dash - Your Partner Pokemon summons an excessive number of balloons, lifting you into the air and allowing you to instantly travel to any settlement or major landmark that you've previously visited. Learned from Chuck's wife in Cianwood City after defeating him at his gym.
- Light Up - Your Partner Pokemon drives away darkness by using either electricity or magical fairy sparkles. Useful for navigating dark areas, but required to read inscriptions situated in such places. Once you learn the technique, you'll be asked if you want to perform it anytime you enter into a dark area. Learned from the Ampharos at Glitter Lighthouse in Olivine City after retrieving medicine for it and making it feel better.
- Strong Push - Gives your Partner Pokemon the ability to push large blocks of stone. When said blocks are pushed into a similarly-shaped hole, they fall in, permanently staying there and allowing the player to walk over them. You can initiate this technique by approaching stone blocks and pressing the A Button. Learned from a hiker navigating his way through Mt. Mortar.
- Calming Tides - A mystical song capable of quelling even the mightiest of whirlpools. Any whirlpools dispelled using Calming Tides will not regenerate. You can initiate this technique by approaching whirlpools and pressing the A Button. This can also be used at special carved stones to reverse the direction of the giant whirlpool inside the Whirl Islands dungeon. Learned from Lance after assisting him in driving out Team Rocket from their headquarters in Mahogany Town.
- Waterfall Rise - Superpowers the surfboard summoned by Sea Skim, so that it is now capable of quickly ascending up waterfalls. You can initiate this technique by approaching the base of waterfalls and pressing the A Button. Learned from Clair after receiving the Rising Badge from her in Dragon's Den.
- Rockface Launch - Allows your Partner Pokemon to launch the player into the air at certain studded rockfaces, allowing them to reach higher ledges. Such rockfaces can then be slid down if the player wishes to return back to lower ground. You can initiate the launch or slide by approaching a rockface and pressing the A Button. Learned from Silver on Cinnabar Island after visiting New Cinnabar Town, in order to pursue Proton into the Cinnabar Volcano.
- Deep Dive - A Secret Technique exclusive to the Sevii Island Adventures! It allows the player to dive underwater in a protective shield / bubble and explore the seafloor below. The player can only use this Secret Technique in areas of water that are particularly dark, and can only return to the surface in underwater areas where bright light can be seen shining from above. The player learns this Secret Technique from Julia after the player tracks down her stolen submarine at the Shadow Raider Fortress on Six Island.
Ride Pokemon[]
Ride Pokemon include the following:
| Land Travel - Allow the player to traverse the land at the same speed at which the playable character can run. Requires the Land Saddle. | Machamp, Haunter, Gengar, Rhydon, Rhyperior, Kangaskhan, Snorlax, Meganium, Ursaluna, Mamoswine, Camerupt, Golurk, Probopass, Bastiodon |
| Fast Land Travel - Allow the player to traverse the land at a considerably faster speed than the player character can. Requires the Land Saddle. | Persian, Alolan Persian, Arcanine, Hisuian Arcanine, Magnezone, Rapidash, Galarian Rapidash, Dodrio, Rhyhorn, Tauros, Wyrdeer, Metagross |
| High Land Travel - Allow the player to traverse the land while situated in a high position, granting access to flying wild Pokemon and Item Balloons. Requires the Land Saddle. | Onix, Steelix, Farigiraf |
| Water Travel - Allow the player to travel on and under surfaces of water. Requires the Sea Saddle to travel on water, and the Dive Saddle to travel underwater (exclusive to the Sevii Islands Adventures! DLC). | Blastoise, Tentacruel, Lapras, Lanturn, Wailord |
| Fast Water Travel - Allow the player to travel on and under surfaces of water at faster speeds than usual. Requires the Sea Saddle to travel on water, and the Dive Saddle to travel underwater (exclusive to the Sevii Islands Adventures! DLC). | Starmie, Mantine, Sharpedo |
| High Water Travel - Allow the player to traverse the water while situated in a high position, granting access to flying wild Pokemon and Item Balloons. Requires the Sea Saddle. | Gyarados, Milotic |
| Air Travel - Allow the player to fly high in the air, quickly bypassing obstacles and granting access to flying wild Pokemon, Item Balloons, and otherwise inaccessible areas. Requires the Sky Saddle (exclusive to the Sevii Island Adventures! DLC). | Charizard, Pidgeot, Aerodactyl, Dragonite, Togekiss, Yanmega, Skarmory, Lugia, Ho-Oh, Altaria |
Catching Pokemon[]
Baits[]
| Sweet Bait | Bait composed of a pulp derived from berries. It makes Pokemon easier to catch. |
| Savory Bait | Bait made from cooked rice and herbs. It makes Pokemon less likely to flee. |
| Rich Bait | Bait that resembles ultra-dense pastries. It makes Pokemon sluggish and less likely to swat Poke Balls away. |
| Exotic Bait | An uncommon bait with a taste that's difficult to describe. If caught, a Pokemon that was fed this bait is more likely to hold an item. |
Poke Balls[]
The main tools you'll use to capture Pokemon. Poke Balls come in many varieties and have varying degrees of effectiveness in catching Pokemon. More effective kinds generally have some sort of trade-off, such as being less common, more expensive, or only having optimum effectiveness when certain conditions exist.
You can find a wide variety of Poke Balls in Item Capsules throughout the world. You can also buy some types of Poke Balls at Poke Marts. A third method of acquiring Poke Balls is to have Kurt in Azalea Town craft them from Apricorns. Apricorns can be found in special trees throughout the world, and come in different colors, which are then crafted into different types of Poke Balls. Kurt can craft up to twenty Poke Balls of the same variety at one time, and will have them instantly ready to be used by the player.
| Poke Ball | The standard-grade Poke Ball. Serves as the baseline for measuring the effectiveness of other Poke Balls. |
| Great Ball | The next step up from a Poke Ball. It's 1.5 times as effective as a Poke Ball. |
| Ultra Ball | The highest-grade Pokemon that is sold in most stores. It's expensive, but twice as effective as a Poke Ball. |
| Master Ball | A ball that captures any Pokemon without fail. When throwing a Master Ball, it's also impossible to miss your target. Very, very rare. |
| Premier Ball | For every ten Poke Balls of any variety you purchase in some stores, you'll get a complimentary Premier Ball. It has the same effectiveness as a regular Poke Ball. |
| Sport Ball | Balls used at the National Park during Bug-Catching Contests. It is 1.5 times as effective on Bug-type Pokemon, but otherwise has standard effectiveness. You can also purchase them from a vendor at the National Park at a ridiculous markup. |
| Heavy Ball | Made from Black Apricorns. It is a whopping eight times as effective as a Poke Ball, but in exchange, it's much heavier and slower when thrown. |
| Lure Ball | Made from Blue Apricorns. It's four times as effective when catching Pokemon from or on the water. Otherwise, it is only half as effective as a Poke Ball. |
| Friend Ball | Made from Green Apricorns. Pokemon captured in this ball increase their Friendship stat at twice the normal rate. Is 1.5 times as effective as a Poke Ball. |
| Crush Ball | Made from Pink Apricorns. It's four times as effective when capturing a Pokemon that has an opposite gender to that of the player. Otherwise, it has standard effectiveness. |
| Level Ball | Made from Red Apricorns. It's increasingly effective the lower a wild Pokemon's level is compared to the average of the player's party. It also boosts the chance of catching higher-leveled Pokemon, though these effects are not as pronounced |
| Fast Ball | Made from White Apricorns. When thrown, it has no arc and an extremely fast speed, making it hard to miss a targeted Pokemon. The effectiveness of the Fast Ball also peaks at the beginning of the catching attempt and steady decreases as time goes on. |
| Moon Ball | Made from Violet Apricorns. It's three times as effective when catching Pokemon at night or sunset, or inside a cave. Otherwise, it is only half as effective as a Poke Ball. |
| Sun Ball | Made from Yellow Apricorns. It's three times as effective when catching Pokemon during the day or sunrise. Otherwise, it is only half as effective as a Poke Ball. |
Battling[]
Status Effects[]
Every non-volatile Status Effect can be cured by using a Full Heal or Lum Berry, or by healing afflicted Pokemon at a Pokemon Center.
| Poison | Removes 1/8 of a Pokemon's maximum HP at the end of each turn. Poison and Steel types cannot be Poisoned. Unlike Pokemon HeartGold & SoulSilver, no damage is taken from Poison when moving in the overworld | Cured with an Anidote or Pecha Berry |
| Bad Poison | A worse form of the Poison status condition. The amount of damage taken from Bad Poison increases by 1/16 of maximum HP each turn, starting out at 1/16 maximum HP. Poison and Steel types cannot be badly poisoned | Cured with an Anidote or Pecha Berry. After a battle ends, the Badly Poisoned status effect becomes the Poisoned status effect |
| Paralysis | Prevents Pokemon from executing moves in battle 25% of the time. It also decreases an afflicted Pokemon's speed by 50%. Electric types are immune to Paralysis | Cured with a Paralyze Heal or Cheri Berry |
| Sleep | Prevents a Pokemon from executing any moves for one to three turns. However, if the move Rest is used, the Pokemon will always wake up after two turns | Cured with an Awakening and Chesto Berry. When a battle ends, any sleeping Pokemon will automatically wake up. Can also be cured by using the Poke Flute, although the use of this item isn't allowed at the Battle Tower or during Online Battles |
| Burn | Removes 1/8 of a Pokemon's maximum HP at the end of each turn. Additionally, the Physical damage dealt by a burned Pokemon is halved. Fire types cannot be burned | Cured with a Burn Heal or Rawst Berry. If a Pokemon is attacked with certain Ice-type moves, it may also cure its Burn condition |
| Frostbite | Removes 1/8 of a Pokemon's maximum HP at the end of each turn. Additionally, the Special damage dealt by a frostbitten Pokemon is halved. Ice types cannot be frostbitten. Replaces the Frozen status effect from Pokemon HeartGold & SoulSilver | Cured with an Ice Heal or Aspear Berry. If a Pokemon is attacked with certain Fire-type moves, it may also cure its Frostbite condition |
| Confusion | There is a 33% chance a confused Pokemon will hurt itself instead of executing a move in battle. This status condition lasts from two to five turns. In Pokemon Let's Go Pichu & Togepi, Confusion is now a non-violatile status effect, meaning that it can no long stack on top of the above status effects or Infatuation | Cured with the new Refocuser item or a Persim Berry. When a battle ends, any confused Pokemon will automatically snap back to attention |
| Infatuation | There is a 50% chance an infatuated Pokemon will not execute a move during its turn. Caused by a Pokemon of the opposite gender using a move that can afflict Infatuation on the target. In Double Battles, infatuated Pokemon may not act even if their target is not the Pokemon that infatuated them. In Pokemon Let's Go Pichu & Togepi, Infatuation is now a non-violatile status effect, meaning that it can no long stack on top of the above status effects | Cured with the new Refocuser item or a Persim Berry. When a battle ends, any infatuated Pokemon will automatically snap back to attention. Infatuation can also end during battles if the Pokemon that caused it is switched out, faints, or is otherwise removed from the battlefield |
Held Items[]
| Oran Berry | Restores 10 HP or 10% of HP, whatever figure is higher, whenever HP falls below 50% |
| Sitrus Berry | Restores 30 HP or 25% of HP, whatever figure is higher, whenever HP falls below 50% |
| Merica Berry | Restores 25% of a Pokemon's HP whenever its HP is depleted |
| Leppa Berry | Restores up to 10 PP to a move whenever that move's PP is depleted |
| Cheri Berry | Cures Paralysis |
| Chesto Berry | Cures Sleep |
| Pecha Berry | Cures Poison or Bad Poison |
| Rawst Berry | Cures Burn |
| Aspear Berry | Cures Frostbite |
| Persim Berry | Cures Confusion or Infatuation |
| Lum Berry | Cures any non-volatile status condition |
| Suppa Berry | Halves the damage taken from any super-effective attack |
Pokemon[]
Pokedex[]
Johto and Kanto have a combined Regional Pokedex, which Professor Oak gives to the player at Mr. Pokemon's house near the beginning of the game. It records data on the Pokemon native to the Johto and Kanto regions, although it does not do this for the gift Mimikyu available in the Goldenrod Department Store. Therefore, obtaining Mimikyu is not required to complete the Regional Pokedex in Let's Go Pichu & Togepi. Before departing to the Sevii Islands for the first time (after purchasing the Sevii Island Adventures! DLC), Professor Oak upgrades the Regional Pokedex into the Expanded Pokedex, which records data on Mimikyu and the new Pokemon native to the Sevii Islands. The National Dex is not available in Let's Go Pichu & Togepi.
Regional Pokedex[]
| Pokemon Name | Typing | Evolves From/Form Change* | How to Obtain |
|---|---|---|---|
 |
Electric | N/A | Starter (Let's Go Pichu only), New Bark Town |
|
Electric | N/A | Hatch from Pikachu line |
 |
Electric | Partner Pichu, rescue from Team Rocket Hideout, Mahogany Town | Evolve Partner Pichu |
|
Electric | Pichu, level up with high Friendship stat | |
 |
Electric | Pikachu, use Thunder Stone | Evolve Pikachu |
 |
Fairy | N/A | Starter (Let's Go Togepi only), New Bark Town |
|
Fairy | N/A | Hatch from Togetic line |
 |
Fairy/Flying | Partner Togepi, rescue from Team Rocket Hideout, Mahogany Town | Evolve Partner Togepi |
|
Fairy/Flying | Togepi, level up with high Friendship stat | |
 |
Fairy/Flying | Togekiss, use Shiny Stone | Evolve Togetic |
 |
Grass | N/A | Grass, Route 32, Day |
 |
Grass | Chikorita, level 16 | Evolve Chikorita |
 |
Grass | Bayleef, level 32 | Evolve Bayleef |
 |
Fire | N/A | Dungeon, Mt. Mortar |
 |
Fire | Cyndaquil, level 14 | Evolve Cyndaquil |
 |
Fire | Quilava, level 36 | Evolve Quilava |
| Hisuian Typhlosion | Fire/Ghost | Quilava, level 36 holding Hisuian Memento | Reward for recording Pokedex data on all other Regional Variants in the base game, Safari Zone Entrance |
| Totodile | Water | N/A | Water, Route 49 |
| Croconaw | Water | Totodile, level 18 | Evolve Totodile |
| Feraligatr | Water | Croconaw, level 30 | Evolve Croconaw |
| Pidgey | Normal/Flying | N/A | |
| Pidgeotto | Normal/Flying | Pidgey, level 18 | |
| Pidgeot | Normal/Flying | Pidgeotto, level 36 | Flying, Kanto skies |
| Spearow | Normal/Flying | N/A | |
| Fearow | Normal/Flying | Spearow, level 20 | |
| Hoothoot | Normal/Flying | N/A | |
| Noctowl | Normal/Flying | Hoothoot, level 20 | |
| Rattata | Normal | N/A | |
| Alolan Rattata | Dark/Normal | N/A | Trade Rattata |
| Raticate | Normal | Rattata, level 20 | |
| Alolan Raticate | Dark/Normal | Alolan Rattata, level 20 | Evolve Alolan Rattata |
| Sentret | Normal | N/A | |
| Furret | Normal | Sentret, level 15 | |
| Caterpie | Bug | N/A | |
| Metapod | Bug | Caterpie, level 7 | |
| Butterfree | Bug/Flying | Metapod, level 10 | |
| Weedle | Bug/Poison | N/A | |
| Kakuna | Bug/Poison | Weedle, level 7 | |
| Beedrill | Bug/Poison | Kakuna, level 10 | |
| Ledyba | Bug/Flying | N/A | |
| Ledian | Bug/Flying | Ledyba, level 18 | |
| Spinarak | Bug/Poison | N/A | |
| Ariados | Bug/Poison | Spinarak, level 22 | |
| Geodude | Rock/Ground | N/A | |
| Alolan Geodude | Rock/Electric | N/A | Trade Geodude |
| Graveler | Rock/Ground | Geodude, level 25 | |
| Alolan Graveler | Rock/Electric | Alolan Geodude, level 25 | Evolve Alolan Geodude |
| Golem | Rock/Ground | Graveler, trade | Evolve Graveler |
| Alolan Golem | Rock/Electric | Alolan Graveler, trade | Evolve Alolan Graveler |
| Zubat | Poison/Flying | N/A | |
| Golbat | Poison/Flying | Zubat, level 22 | |
| Crobat | Poison/Flying | Golbat, level up with high Friendship stat | Evolve Golbat |
| Cleffa | Fairy | N/A | Hatch from Clefairy line |
| Clefairy | Fairy | Cleffa, level up with high Friendship stat | |
| Clefable | Fairy | Clefairy, use Moon Stone | Evolve Clefairy |
| Igglybuff | Normal/Fairy | N/A | Hatch from Jigglypuff line |
| Jigglypuff | Normal/Fairy | Igglybuff, level up with high Friendship stat | |
| Wigglytuff | Normal/Fairy | Jigglypuff, use Moon Stone | Evolve Jigglypuff |
| Sandshrew | Ground | N/A | |
| Alolan Sandshrew | Ice/Steel | N/A | Trade Sandshrew |
| Sandslash | Ground | Sandshrew, level 22 | |
| Alolan Sandslash | Ice/Steel | Alolan Sandshrew, use Ice Stone | Evolve Alolan Sandshrew |
| Ekans | Poison | N/A | |
| Arbok | Poison | Ekans, level 22 | |
| Dunsparce | Normal | N/A | |
| Dudunsparce | Normal | Dunsparce, level up knowing Hyper Drill | |
| Mareep | Electric | N/A | |
| Flaaffy | Electric | Mareep, level 15 | |
| Ampharos | Electric | Flaaffy, level 30 | |
| Wooper | Water/Ground | N/A | |
| Paldean Wooper | Poison/Ground | N/A | |
| Quagsire | Water/Ground | Wooper, level 20 | |
| Clodsire | Poison/Ground | Paldean Wooper, level 20 | |
| Gastly | Ghost/Poison | N/A | |
| Haunter | Ghost/Poison | Gastly, level 25 | |
| Gengar | Ghost/Poison | Haunter, trade | |
| Unown | Psychic | N/A | Dungeon, Ruins of Alph |
| Onix | Rock/Ground | N/A | |
| Steelix | Steel/Ground | Onix, trade holding Metal Coat | Evolve Onix |
| Bellsprout | Grass/Poison | N/A | |
| Weepinbell | Grass/Poison | Bellsprout, level 21 | |
| Victreebel | Grass/Poison | Weepinbell, Leaf Stone | Evolve Weepinbell |
| Hoppip | Grass/Flying | N/A | |
| Skiploom | Grass/Flying | Hoppip, level 18 | |
| Jumpluff | Grass/Flying | Skiploom, level 27 | Flying, Kanto skies |
| Paras | Bug/Grass | N/A | |
| Parasect | Bug/Grass | Paras, level 24 | |
| Poliwag | Water | N/A | |
| Poliwhirl | Water | Poliwag, level 25 | |
| Poliwrath | Water/Fighting | Poliwhirl, use Water Stone | Evolve Poliwhirl |
| Politoed | Water | Poliwhirl, trade holding King's Rock | Evolve Poliwhirl |
| Magikarp | Water | N/A | |
| Gyarados | Water/Flying | Magikarp, level 20 | |
| Goldeen | Water | N/A | |
| Seaking | Water | Goldeen, level 33 | |
| Slowpoke | Water/Psychic | N/A | |
| Galarian Slowpoke | Psychic | N/A | Trade Slowpoke |
| Slowbro | Water/Psychic | Slowpoke, level 37 | |
| Galarian Slowbro | Poison/Psychic | Galarian Slowpoke, use Galarica Cuff | Evolve Galarian Slowpoke |
| Slowking | Water/Psychic | Slowpoke, trade holding King's Rock | Evolve Slowpoke |
| Galarian Slowking | Poison/Psychic | Galarian Slowpoke, use Galarica Wreath | Evolve Galarian Slowpoke |
| Oddish | Grass/Poison | N/A | |
| Gloom | Grass/Poison | Oddish, level 21 | |
| Vileplume | Grass/Poison | Gloom, use Leaf Stone | Evolve Gloom |
| Bellossom | Grass | Gloom, use Sun Stone | Evolve Gloom |
| Drowzee | Psychic | N/A | |
| Hypno | Psychic | Drowzee, level 26 | |
| Abra | Psychic | N/A | |
| Kadabra | Psychic | Abra, level 16 | |
| Alakazam | Psychic | Kadabra, trade | Evolve Kadabra |
| Ditto | Normal | N/A | |
| Pineco | Bug | N/A | |
| Forretress | Bug/Steel | Pineco, level 31 | |
| Nidoran♀ | Poison | N/A | |
| Nidorina | Poison | Nidoran♀, level 16 | |
| Nidoqueen | Poison/Ground | Nidorina, use Moon Stone | Evolve Nidorina |
| Nidoran♂ | Poison | N/A | |
| Nidorino | Poison | Nidoran♂, level 16 | |
| Nidoking | Poison/Ground | Nidorino, use Moon Stone | Evolve Nidorino |
| Yanma | Bug/Flying | N/A | |
| Yanmega | Bug/Flying | Yanma, level up knowing Ancient Power | Evolve Yanma |
| Sunkern | Grass | N/A | |
| Sunflora | Grass | Sunkern, use Sun Stone | Evolve Sunkern |
| Exeggcute | Grass/Psychic | N/A | |
| Exeggutor | Grass/Psychic | Exeggcute, use Leaf Stone | Evolve Exeggcute |
| Alolan Exeggutor | Grass/Dragon | Exeggcute, use Leaf Stone holding Alolan Memory | |
| Bonsly | Rock | N/A | Hatch from Sudowoodo line holding Rock Incense |
| Sudowoodo | Rock | Bonsly, level up knowing Mimic | |
| Wynaut | Psychic | N/A | Hatch from Wobbuffet line holding Lax Incense |
| Wobbuffet | Psychic | Wynaut, level 15 | |
| Venonat | Bug/Poison | N/A | |
| Venomoth | Bug/Poison | Venonat, level 31 | |
| Scyther | Bug/Flying | N/A | |
| Scizor | Bug/Steel | Scyther, trade holding Metal Coat | Evolve Scyther |
| Kleavor | Bug/Rock | Scyther, trade holding Black Augurite | Evolve Scyther |
| Pinsir | Bug | N/A | |
| Heracross | Bug/Fighting | N/A | |
| Koffing | Poison | N/A | |
| Weezing | Poison | Koffing, level 35 | |
| Grimer | Poison | N/A | |
| Alolan Grimer | Poison/Dark | N/A | Trade Grimer |
| Muk | Poison | Grimer, level 38 | |
| Alolan Muk | Poison/Dark | Alolan Grimer, level 38 | Evolve Alolan Grimer |
| Magnemite | Electric/Steel | N/A | |
| Magneton | Electric/Steel | Magnemite, level 30 | |
| Magnezone | Electric/Steel | Magneton, level up at Old Power Plant Magneton, use Thunder Stone |
Evolve Magneton |
| Voltorb | Electric | N/A | |
| Hisuian Voltorb | Electric/Grass | N/A | Trade Voltorb |
| Electrode | Electric | Voltorb, level 30 | |
| Hisuian Electrode | Electric/Grass | Hisuian Voltorb, use Leaf Stone | Evolve Hisuian Voltorb |
| Aipom | Normal | N/A | |
| Ambipom | Normal | Aipom, level up knowing Double Hit | Evolve Aipom |
| Snubbull | Fairy | N/A | |
| Granbull | Fairy | Snubbull, level 23 | |
| Vulpix | Fire | N/A | |
| Alolan Vulpix | Ice | N/A | Trade Vulpix |
| Ninetales | Fire | Vulpix, use Fire Stone | Evolve Vulpix |
| Alolan Ninetales | Ice/Fairy | Alolan Vulpix, use Ice Stone | Evolve Alolan Vulpix |
| Growlithe | Fire | N/A | |
| Hisuian Growlithe | Fire/Rock | N/A | Trade Growlithe |
| Arcanine | Fire | Growlithe, Fire Stone | Evolve Growlithe |
| Hisuian Arcanine | Fire/Rock | Hisuian Growlithe, Fire Stone | Evolve Hisuian Growlithe |
| Stantler | Normal | N/A | |
| Wyrdeer | Normal/Psychic | Stantler, use Psyshield Bash 20 times | Evolve Stantler |
| Azurill | Normal/Fairy | N/A | Hatch from Marill line holding Sea Incense |
| Marill | Water/Fairy | Azurill, level up with high Friendship stat | |
| Azumarill | Water/Fairy | Marill, level 18 | |
| Diglett | Ground | N/A | |
| Alolan Diglett | Ground/Steel | N/A | Trade Diglett |
| Dugtrio | Ground | Diglett, level 26 | |
| Alolan Dugtrio | Ground/Steel | Alolan Diglett, level 26 | Evolve Alolan Diglett |
| Mankey | Fighting | N/A | |
| Primeape | Fighting | Mankey, level 28 | |
| Annihilape | Fighting | Primeape, use Rage Fist 20 times | |
| Meowth | Normal | N/A | |
| Alolan Meowth | Dark | N/A | Trade Meowth |
| Persian | Normal | Meowth, level 28 | |
| Alolan Persian | Dark | Alolan Meowth, level 28 | Evolve Alolan Meowth |
| Psyduck | Water | N/A | |
| Golduck | Water | Psyduck, level 33 | |
| Machop | Fighting | N/A | |
| Machoke | Fighting | Machop, level 28 | |
| Machamp | Fighting | Machoke, trade | Evolve Machoke |
| Tyrogue | Fighting | N/A | |
| Hitmonlee | Fighting | Tyrogue, level 20 if Attack stat > Defense stat | Evolve Tyrogue |
| Hitmonchan | Fighting | Tyrogue, level 20 if Attack stat < Defense stat | Evolve Tyrogue |
| Hitmontop | Fighting | Tyrogue, level 20 if Attack stat = Defense stat | Evolve Tyrogue |
| Girafarig | Normal/Psychic | N/A | |
| Farigiraf | Normal/Psychic | Girafarig, level up knowing Twin Beam | |
| Tauros | Normal | N/A | |
| Paldean Tauros Combat Breed |
Fighting | N/A | Trade Tauros |
| Paldean Tauros Blaze Breed |
Fighting/Fire | N/A | Trade Tauros |
| Paldean Tauros Aqua Breed |
Fighting/Water | N/A | Trade Tauros |
| Miltank | Normal | N/A | |
| Magby | Fire | N/A | Hatch from Magmar line |
| Magmar | Fire | Magby, level 30 | |
| Magmortar | Fire | Magmar, trade holding Magmarizer | Evolve Magmar |
| Smoochum | Ice/Psychic | N/A | Hatch from Jynx line |
| Jynx | Ice/Psychic | Smoochum, level 30 | |
| Elekid | Electric | N/A | Hatch from Electabuzz line |
| Electabuzz | Electric | Elekid, level 30 | |
| Electivire | Electric | Electabuzz, trade holding Electirizer | Evolve Electabuzz |
| Mime Jr. | Psychic/Fairy | N/A | Hatch from Mr. Mime line holding Odd Incense |
| Mr. Mime | Psychic/Fairy | Mime Jr., level up knowing Mimic | Prize, Game Corner, Goldenrod City |
| Smeargle | Normal | N/A | |
| Farfetch'd | Normal/Flying | N/A | |
| Natu | Psychic/Flying | N/A | |
| Xatu | Psychic/Flying | Natu, level 25 | |
| Qwilfish | Water/Poison | N/A | |
| Tentacool | Water/Poison | N/A | |
| Tentacruel | Water/Poison | Tentacool, level 30 | |
| Krabby | Water | N/A | |
| Kingler | Water | Krabby, level 28 | |
| Shuckle | Bug/Rock | N/A | |
| Staryu | Water | N/A | |
| Starmie | Water/Psychic | Staryu, use Water Stone | Evolve Staryu |
| Shellder | Water | N/A | |
| Cloyster | Water/Ice | Shellder, use Water Stone | Evolve Cloyster |
| Corsola | Water/Rock | N/A | |
| Remoraid | Water | N/A | |
| Octillery | Water | Remoraid, level 25 | |
| Chinchou | Water/Electric | N/A | |
| Lanturn | Water/Electric | Chinchou, level 27 | |
| Seel | Water | N/A | |
| Dewgong | Water/Ice | Seel, level 34 | |
| Lickitung | Normal | N/A | |
| Lickilicky | Normal | Lickitung, level up knowing Rollout | Evolve Lickitung |
| Tangela | Grass | N/A | |
| Tangrowth | Grass | Tangela, level up knowing Ancient Power | Evolve Tangela |
| Eevee | Normal | N/A | |
| Partner Eevee | Normal | N/A | Given by Blue Oak after the player defends / regains their Championship title after receiving 16 badges |
| Vaporeon | Water | Eevee, use Water Stone | Evolve Eevee |
| Jolteon | Electric | Eevee, use Thunder Stone | Evolve Eevee |
| Flareon | Fire | Eevee, use Fire Stone | Evolve Eevee |
| Espeon | Psychic | Eevee, level up with high Friendship stat during day | Evolve Eevee |
| Umbreon | Dark | Eevee, level up with high Friendship stat during night | Evolve Eevee |
| Leafeon | Grass | Eevee, level up at Viridian Forest Eevee, use Leaf Stone |
Evolve Eevee |
| Glaceon | Ice | Eevee, level up at Seafoam Grotto Eevee, use Ice Stone |
Evolve Eevee |
| Sylveon | Fairy | Eevee, level up with high Friendship stat knowing 1 Fairy-type move | Evolve Eevee |
| Horsea | Water | N/A | |
| Seadra | Water | Horsea, level 32 | |
| Kingdra | Water/Dragon | Seadra, trade holding Dragon Scale | Evolve Seadra |
| Gligar | Ground/Flying | N/A | |
| Gliscor | Ground/Flying | Gligar, level up holding Razor Fang during night | Evolve Gligar |
| Delibird | Ice/Flying | N/A | |
| Swinub | Ice/Ground | N/A | |
| Piloswine | Ice/Ground | Swinub, level 33 | |
| Mamoswine | Ice/Ground | Piloswine, level up knowing Ancient Power | Evolve Piloswine |
| Teddiursa | Normal | N/A | |
| Ursaring | Normal | Teddiursa, level 30 | |
| Ursaluna | Normal/Ground | Ursaring, level up holding Peat Block at Night | Evolve Ursaring |
| Phanpy | Ground | N/A | |
| Donphan | Ground | Phanpy, level 25 | |
| Mantyke | Water/Flying | N/A | Hatch from Mantine line holding Wave Incense |
| Mantine | Water/Flying | Mantyke, level up with Remoraid in party | |
| Skarmory | Steel/Flying | N/A | |
| Doduo | Normal/Flying | N/A | |
| Dodrio | Normal/Flying | Doduo, level 31 | |
| Ponyta | Fire | N/A | |
| Galarian Ponyta | Psychic | N/A | Trade Ponyta |
| Rapidash | Fire | Ponyta, level 40 | |
| Galarian Rapidash | Psychic/Fairy | Galarian Ponyta, level 40 | Evolve Galarian Ponyta |
| Cubone | Ground | N/A | |
| Marowak | Ground | Cubone, level 28 | |
| Kangaskhan | Normal | N/A | |
| Rhyhorn | Ground/Rock | N/A | |
| Rhydon | Ground/Rock | Rhyhorn, level 42 | |
| Rhyperior | Ground/Rock | Rhydon, trade holding Protector | Evolve Rhydon |
| Murkrow | Dark/Flying | N/A | |
| Honchkrow | Dark/Flying | Murkrow, use Dusk Stone | Evolve Murkrow |
| Houndour | Dark/Fire | N/A | |
| Houndoom | Dark/Fire | Houndour, level 24 | |
| Slugma | Fire | N/A | |
| Magcargo | Fire/Rock | Slugma, level 38 | |
| Sneasel | Dark/Ice | N/A | |
| Weavile | Dark/Ice | Sneasel, level up holding Razor Claw during night | Evolve Sneasel |
| Misdreavus | Ghost | N/A | |
| Mismagius | Ghost | Misdreavus, use Dusk Stone | Evolve Misdreavus |
| Porygon | Normal | N/A | Reward, Goldenrod Broadcast Tower |
| Porygon2 | Normal | Porygon, trade holding Upgrade | Evolve Porygon |
| Porygon-Z | Normal | Porygon2, trade holding Dubious Disk | Evolve Porygon2 |
| Happiny | Normal | N/A | Hatch from Chansey line holding Luck incense |
| Chansey | Normal | Happiny, level up holding Oval Stone during day | |
| Blissey | Normal | Chansey, level up with high Friendship stat | Evolve Chansey |
| Lapras | Water/Ice | N/A | |
| Omanyte | Rock/Water | N/A | Revive Helix Fossil |
| Omastar | Rock/Water | Omanyte, level 40 | Evolve Omanyte |
| Kabuto | Rock/Water | N/A | Revive Dome Fossil |
| Kabutops | Rock/Water | Kabuto, level 40 | Evolve Kabuto |
| Aerodactyl | Rock/Flying | N/A | Revive Old Amber |
| Munchlax | Normal | N/A | Hatch from Snorlax line holding Full Incense |
| Snorlax | Normal | Munchlax, level up with high Friendship stat | |
| Bulbasaur | Grass/Poison | N/A | |
| Ivysaur | Grass/Poison | Bulbasaur, level 16 | |
| Venusaur | Grass/Poison | Ivysaur, level 32 | |
| Chamander | Fire | N/A | |
| Chameleon | Fire | Charmander, level 16 | |
| Charizard | Fire/Flying | Charmeleon, level 36 | |
| Squirtle | Water | N/A | |
| Wartortle | Water | Squirtle, level 16 | |
| Blastoise | Water | Wartortle, level 36 | |
| Articuno | Ice/Flying | N/A | Special Encounter, Seafoam Caverns |
| Zapdos | Electric/Flying | N/A | Special Encounter, Old Power Plant |
| Moltres | Fire/Flying | N/A | Special Encounter, Cinnabar Volcano |
| Raikou | Electric | N/A | Roaming Johto |
| Entei | Fire | N/A | Roaming Johto |
| Suicune | Water | N/A | Special Encounter, Route 25 Special Encounter, Burned Tower (if defeated on Route 25) |
| Meltan | Steel | N/A | Import from Pokemon Go |
| Melmetal | Steel | Meltan, use 400 Meltan Candies in Pokemon Go | Evolve Meltan in Pokemon Go |
| Sumitti | Dragon/Fairy | N/A | Import from Pokemon Go |
| Shododrago | Dragon/Fairy | Sumitti, use 400 Sumitti Candies in Pokemon Go | Evolve Sumitti in Pokemon Go |
| Dratini | Dragon | N/A | Water, Dragon's Den |
| Dragonair | Dragon | Dratini, level 30 | Evolve Dratini |
| Dragonite | Dragon/Flying | Dragonair, level 55 | Evolve Dragonair |
| Larvitar | Rock/Ground | N/A | |
| Pupitar | Rock/Ground | Larvitar, level 30 | Evolve Larvitar |
| Tyranitar | Rock/Dark | Pupitar, level 55 | Evolve Pupitar |
| Lugia | Psychic/Flying | N/A | Special Encounter, Whirl Islands |
| Ho-Oh | Fire/Flying | N/A | Special Encounter, Bell Tower |
| Mewtwo | Psychic | N/A | Special Encounter, Unknown Dungeon |
| Mew | Psychic | N/A | Reward, Faraway Island |
| Celebi | Psychic/Grass | N/A | Special Encounter, Temporal Grove |
| Victini | Fire/Psychic | N/A | Special Encounter, Mt. Silver |
Expanded Pokedex[]
| Pokemon Name | Typing | Evolves From/Form Change* | How to Obtain |
|---|---|---|---|
 |
Psychic/Flying | Special Encounter, Seafoam Grotto (after catching Articuno and defending / earning Championship title with 16 badges) | |
 |
Fighting/Flying | Special Encounter, Old Power Plant (after catching Zapdos and defending / earning Championship title with 16 badges) | |
 |
Dark/Flying | Special Encounter, Cinnabar Volcano (after catching Moltres and defending / earning Championship title with 16 badges) | |
| Abyssal Lugia | Psychic/Dark | Hold Dark Essence* | |
| Radiant Ho-Oh | Fire/Fairy | Hold Light Essence* | |
| Armored Mewtwo | Psychic/Steel | Hold Limiter Armor* | |
 |
Normal | ||
 |
Normal | ||
 |
Water/Flying | ||
 |
Water/Flying | ||
 |
Bug | ||
 |
Bug | ||
 |
Bug | ||
 Plant Cloak |
Bug/Grass | ||
 Sandy Cloak |
Bug/Ground | ||
 Trash Cloak |
Bug/Steel | ||
 |
Bug/Flying | ||
 |
Grass | ||
 |
Grass/Fighting | ||
 |
Water/Grass | ||
 |
Water/Grass | ||
 |
Water/Grass | ||
| Ralts | Psychic/Fairy | ||
| Kirlia | Psychic/Fairy | ||
| Gardevoir | Psychic/Fairy | ||
| Gallade | Psychic/Fighting | ||
| Stunky | Poison/Dark | ||
| Skuntank | Poison/Dark | ||
| Cherubi | Grass | ||
| Cherrim | Grass | ||
| Cutiefly | Bug/Fairy | ||
| Ribombee | Bug/Fairy | ||
| Chatot | Normal/Flying | ||
| Skitty | Normal | ||
| Delcatty | Normal | ||
| Wishiwashi | Water | ||
| Roggenrolla | Rock | ||
| Boldore | Rock | ||
| Gigalith | Rock | ||
| Pancham | Fighting | ||
| Pangoro | Fighting/Dark | ||
| Shinx | Electric | ||
| Luxio | Electric | ||
| Luxray | Electric | ||
| Cacnea | Grass/Dark | ||
| Cacturne | Grass/Dark | ||
| Numel | Fire/Ground | ||
| Camerupt | Fire/Ground | ||
| Wimpod | Bug/Water | ||
| Golisopod | Bug/Water | ||
| Sizzlipede | Fire/Bug | ||
| Centiskorch | Fire/Bug | ||
| Grubbin | Bug | ||
| Charjabug | Bug/Electric | ||
| Vikavolt | Bug/Electric | ||
| Axew | Dragon | ||
| Fraxure | Dragon | ||
| Haxorus | Dragon | ||
| Phantump | Ghost/Grass | ||
| Trevenant | Ghost/Grass | ||
| Drifloon | Ghost/Flying | ||
| Drifblim | Ghost/Flying | ||
| Minior | Rock/Flying | ||
| Fomantis | Grass | ||
| Lurantis | Grass | ||
| Wailmer | Water | ||
| Wailord | Water | ||
| Carvanha | Water/Dark | ||
| Sharpedo | Water/Dark | ||
| Snover | Grass/Ice | ||
| Abomasnow | Grass/Ice | ||
| Snorunt | Ice | ||
| Glalie | Ice | ||
| Froslass | Ice/Ghost | ||
| Nosepass | Rock | ||
| Probopass | Rock/Steel | ||
| Toxel | Electric/Poison | ||
| Toxtricity | Electric/Poison | ||
| Sableye | Dark/Ghost | ||
| Golett | Ground/Ghost | ||
| Golurk | Ground/Ghost | ||
| Shellos | Water | ||
| Gastrodon | Water/Ground | ||
| Clamperl | Water | ||
| Huntail | Water | ||
| Gorebyss | Water | ||
| Mareanie | Poison/Water | ||
| Toxapex | Poison/Water | ||
| Inkay | Dark/Psychic | ||
| Malamar | Dark/Psychic | ||
| Frillish | Water/Ghost | ||
| Jellicent | Water/Ghost | ||
| Trapinch | Ground | ||
| Vibrava | Ground/Dragon | ||
| Flygon | Ground/Dragon | ||
| Aron | Steel/Rock | ||
| Lairon | Steel/Rock | ||
| Aggron | Steel/Rock | ||
| Zorua | Dark | ||
| Hisuian Zorua | Normal/Ghost | ||
| Zoroark | Dark | ||
| Hisuian Zoroark | Normal/Ghost | ||
| Riolu | Fighting | ||
| Lucario | Fighting | ||
| Absol | Dark | ||
| Turtonator | Fire/Dragon | ||
| Mimikyu | Ghost/Fairy | Special Encounter, Goldenrod Department Store (Pre-Order / DLC only) | |
| Scatterbug | Bug | ||
| Spewpa | Bug | ||
| Vivillon | Bug/Flying | ||
| Swablu | Normal/Flying | ||
| Altaria | Dragon/Flying | ||
| Feebas | Water | ||
| Milotic | Water | ||
| Litwick | Ghost/Fire | ||
| Lampent | Ghost/Fire | ||
| Chandelure | Ghost/Fire | ||
| Solrock | Rock/Psychic | ||
| Lunatone | Rock/Psychic | ||
| Lileep | Rock/Grass | ||
| Cradily | Rock/Grass | ||
| Anorith | Rock/Bug | ||
| Armaldo | Rock/Bug | ||
| Cranidos | Rock | ||
| Rampardos | Rock | ||
| Shieldon | Rock/Steel | ||
| Bastiodon | Rock/Steel | ||
| Beldum | Steel/Psychic | ||
| Metang | Steel/Psychic | ||
| Metagross | Steel/Psychic | ||
| Castform | Normal | ||
| Castform Sunny Form |
Fire | ||
| Castform Rainy Form |
Water | ||
| Castform Snowy Form |
Ice | ||
| Regirock | Rock | ||
| Regice | Ice | ||
| Registeel | Steel | ||
| Regieleki | Electric | ||
| Regidrago | Dragon | ||
| Regigigas | Normal | ||
| Darkrai | Dark | ||
| Phione | Water | ||
| Deoxys | Psychic |
World[]
Locations[]
There are many, many places to visit in the world of Pokemon Let's Go Pichu and Pokemon Let's Go Togepi, split across two entire regions (as well as an additional region if The Adventure Continues DLC is purchased). Below is a complete record of all the towns, routes, and landmarks you can travel to throughout your journey, as well as the Pokemon contained within.
The key below denotes the following things in the location guides:
- LGP - Pokemon that exclusively appear in Let's Go Pichu
- LGT - Pokemon that exclusively appear in Let's Go Togepi
- REGEN - Special encounters that regenerate after the Championship title at the Indigo Plateau is either earned for the first time or is successfully defended
- DLC - Pokemon that appear in Johto or Kanto only after the purchase of The Adventure Continues! DLC
Johto Region[]
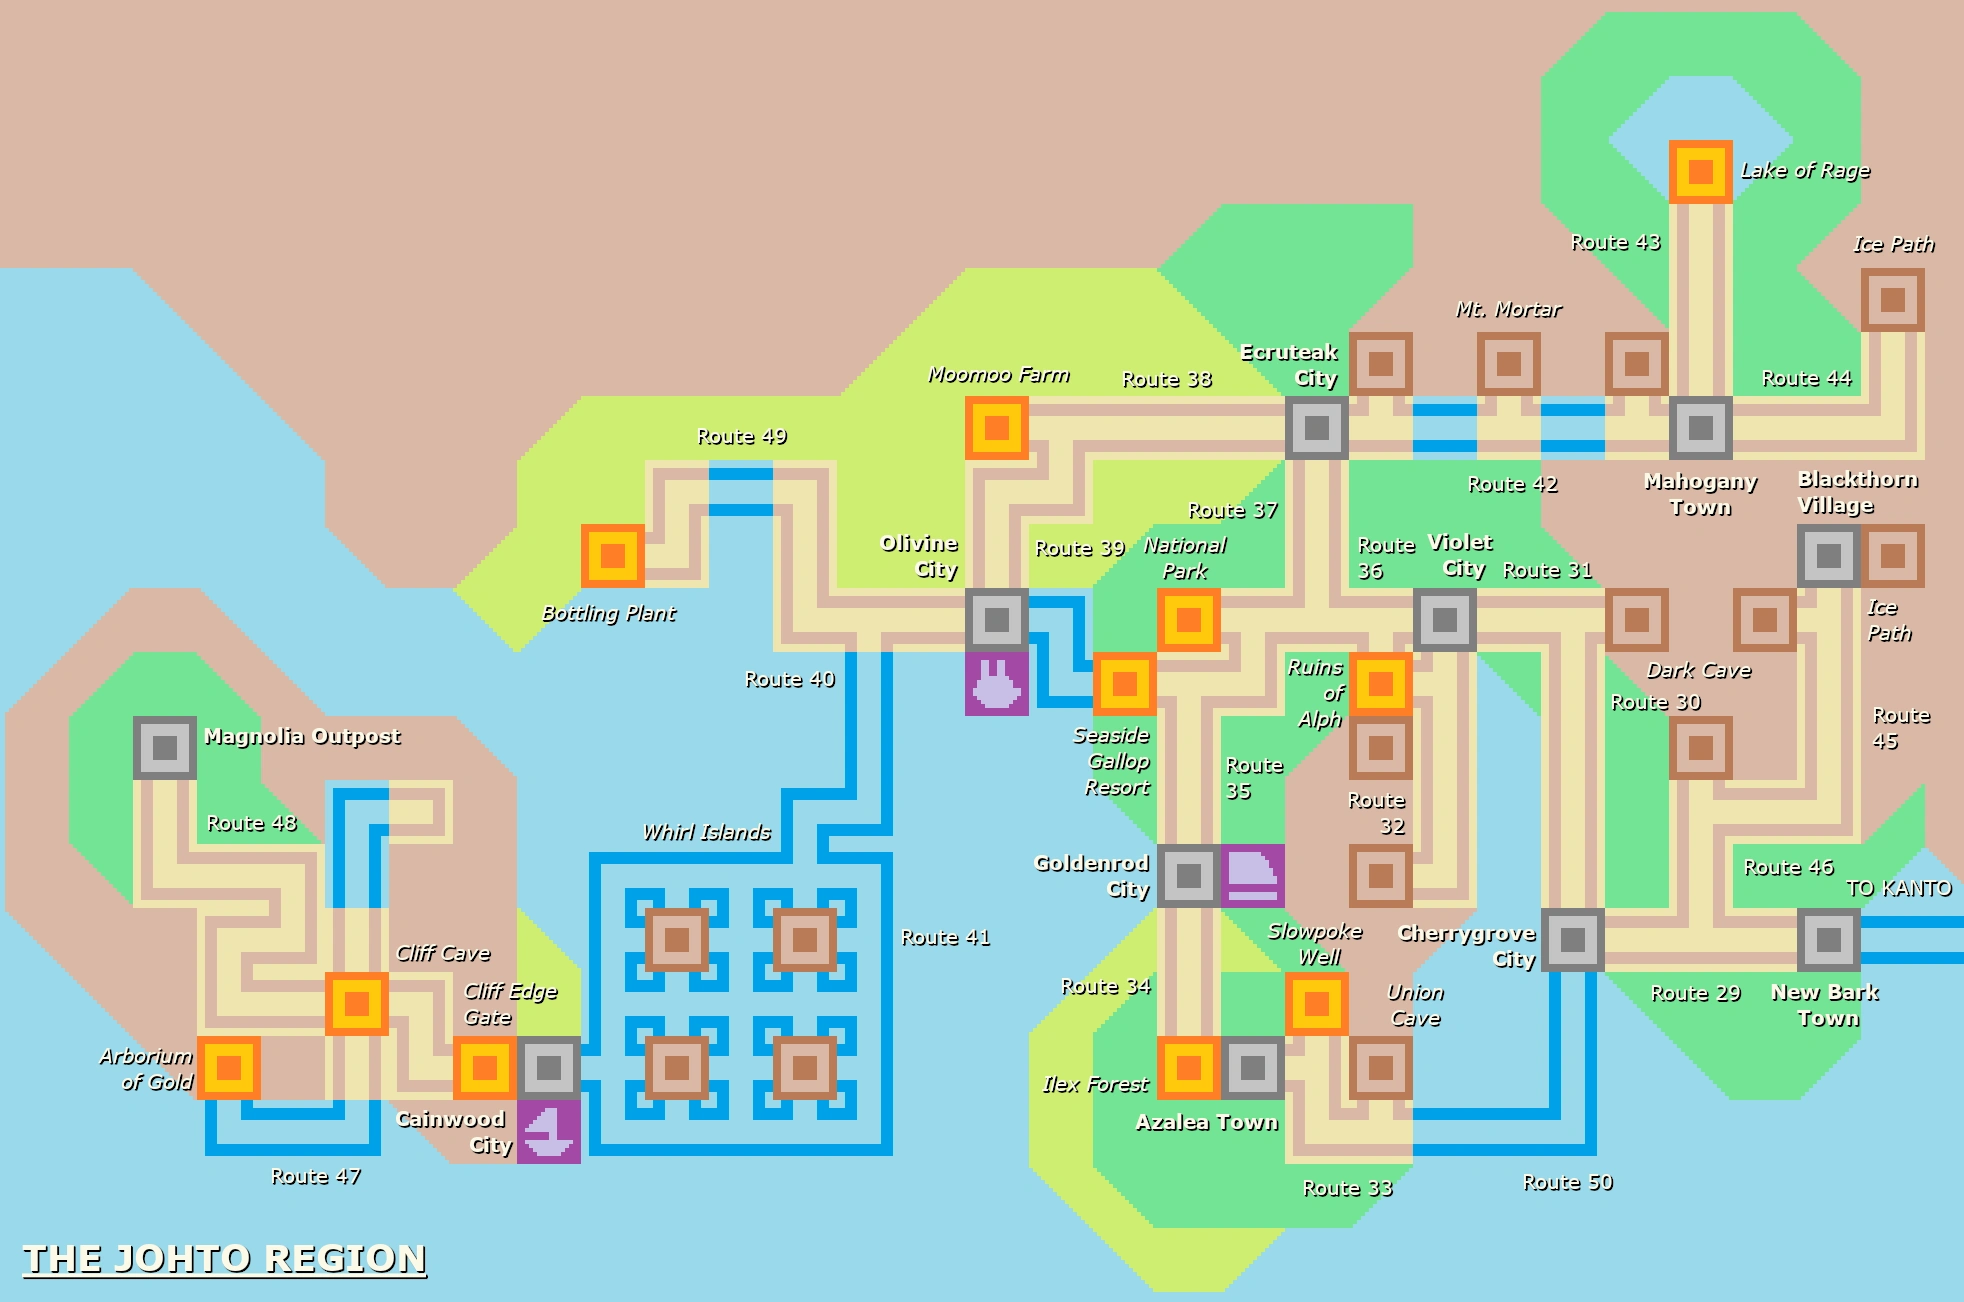
| Area Name | Description | Pokemon |
|---|---|---|
| New Bark Town | A small town located in the relative wilds of Johto's eastern edge. About the only claim to fame the town has prior to you and Lyra's journey is it being the location of Professor Elm's Pokemon lab, which specializes in the study of Pokemon evolution and reproduction. |
|
| Route 29 | A small forested route between New Bark Town and Cherrygrove City. A northern exit leads to a small portion of Route 46. |
|
| Route 46 | The base of a winding mountain road ultimately leading from Blackthorn Village. Only a small portion can be accessed at the beginning of the game, but later on an entrance to Dark Cave can be found on this route. |
|
| Cherrygrove City | A small-ish coastal city, not yet big enough to have its own Pokemon gym. That said, it's a welcome point of rest for novice Pokemon trainers before heading north. Best known for access to the beautiful Route 50 bay, and a kindly old man that gives general advice and the Map App to new Pokemon trainers. |
|
| Route 30 | A long route spilling northwards from Cherrygrove City, and the first to contain follow Pokemon Trainers itching for a fight. A major detour leads to Mr. Pokemon's house, an eccentric collector of all things strange and Pokemon-related, and a good friend of Professor Elm's. |
|
| Route 31 | A short jaunt west off Route 30 to Violet City. The first accessible entrance to Dark Cave is situated here. |
|
| Dark Cave | This cave system isn't huge, but it's trouble to navigate, with ledges, rocky debris, and most apparently of all, darkness getting in the way. You can see a very short distance around you, but without a Pokemon to illuminate your surroundings, you'll essentially be stumbling blind. Has exits to Routes 31, 45, and 46. |
|
| Violet City | The first city in the game large enough to justify the presence of a Pokemon Gym. Despite its big size, it has a traditional Johtonian flavor to it, reflected in the local architecture and Sprout Tower, a historical landmark. Other sights to see include Johto's trainer school, which offers more insight into basic Pokemon mechanics and a few optional battles. Violet City's gym leader is Falkner, the Flying-type specialist, who awards the Zephyr Badge. |
|
| Sprout Tower | The first of many traditional-style pagoda towers you'll encounter on your way through Johto. Its center beam is said to have been built around an abnormally-tall Bellsprout, hence why it's always shaking back and forth. Inside, monks meditate and attempt to divine the deeper connections between Pokemon and mankind, but Silver has rudely disrupted their peaceful solitude. You'll need to beat a lesson into him before Falkner will return to Violet City's Pokemon gym. |
|
| Route 36 | The central crossroads of Johto, connecting Violet, Goldenrod, and Ecruteak Cities. However, traffic and trade has ground to a halt and a national crisis has erupted, due to a stubborn Sudowoodo blocking the one goddamned tile connecting everything. Spritz it with a Squirt Bottle from the Goldenrod City Flower Shop as punishment for its obstructive ways, and it'll be peeved enough to attack you. |
|
| Route 32 | A long route weaving through the forst in its northern half to the coast in the south. It's so long and packed with trainers that it was deemed necessary to construct a Pokemon Center near the entrance to Union Cave, one of the very few not situated inside of a settlement. A fisherman living on the southern end of this route will give you the Fishing Rod for humoring him with a visit, allowing you to catch aquatic Pokemon close to the water's edge. |
|
| Ruins of Alph | An archaeological dig of ancient ruins straddled between Routes 32 and 36. The scientists working here believe there's a mysterious presence that permeates the entire place but can't prove it, until you solve a tile puzzle and unleash the Unown, Pokemon modeled after the characters of Latin-derived alphabets. As you gain access to more puzzles with the right Secret Techniques, solving them grants access to more varieties of Unown in the ruin's central halls. What happens if you catch them all? |
|
| Faraway Island | A isolated tropical island at unknown coordinates. The Unown can teleport you here after you record all 28 of their forms. The only other being on the island is Mew. Mew usually flees at the very sight of you, but if Mewtwo is your accompanying Pokemon and it has a maximized Friendship stat, Mew will very gladly join you in a spare Poke Ball. |
|
| Union Cave | A damp old cave that connects Route 32 to Route 33. Initially, only the first floor is available, but the right Secret Techniques allow you to delve deeper and discover all of its oddities, including exits to otherwise inaccessible portions of the Ruins of Alph, and a lonely stray Lapras that somehow winded up in the caves' lowest pool of water. |
|
| Route 33 | Stretches the limits of what can be defined as a route, due to its extremely short length. Basically just serves to spit you out into Azalea Town from Union Cave. Slowpoke Well is also accessible from here. One new addition is a set of stairs taking you down to the ocean's coastline, allowing access to Rotue 50. It always rains here once the local Slowpoke are freed from the clutches of Team Rocket. |
|
| Route 50 | A new route created for Let's Go Pichu & Togepi. This water route is essentially a shortcut between Cherrygrove City and Route 33, allowing you to quickly bypass Violet City and Union Cave. This route isn't accessible until you earn the Calming Tides secret technique, allowing you to dispell the Whirlpools on either of its ends. Along this route are stretches of shoreline, one of which contains the family cabin for Valerie, the Johtonian fashionista who's vacationing from her gym leader duties in Kalos. Defeat her in battle and she'll give you the Pop Fusion clothing set. |
|
| Slowpoke Well | An old well inhabited by Slowpoke. Team Rocket has recently seized their home and is chopping off the Slowpokes' tails to sell as pricey delicacies. Put a stop to Team Rocket's dastardly ways and the Slowpoke are free to once again roam Slowpoke Well and Azalea Town with impunity. |
|
| Azalea Town | A small pastoral community nestled in the forests of southern Johto. The town is most famous for its population of Slowpoke, who are pretty much free to meander wherever they please. But be sure to also patronize Kurt, who can transform Apricorns into specialized Poke Balls right before your eyes. Azalea Town's gym leader is Bugsy, the Bug-type specialist, who awards the Hive Badge. |
|
| Ilex Forest | This deep dark woods is so thick, sunlight has a difficult time permeating its canopy, giving the place a slightly creepy atmosphere. Some entrepreneuring Azalea Towners make their living chopping down trees to make into charcoal, but their Farfetch'd has wandered away. Chase it back to them and they'll teach Partner Pichu or Partner Togepi the Chop Down special technique. A bit further lies a small wooden shrine dedicated to the forest's guardian. |
|
| Temporal Grove | Locate the Golden and Silver Apricorns in remote reaches of Johto and Kanto, respectively, bring them to Kurt in Azalea Town, and place the resulting Precious Offering in the wooden shrine in Ilex Forest. You'll be whisked away to Celebi's personal realm, a timeless garden. Switch between the past and the future by toggling sundials. In the past, ancient walls are restored to their former glory but hedges are nothing but sproutlings. In the future, the walls erode to dust while the hedges grow to their full size. Manipulate time to reach the end of this maze, where Celebi waits expectantly. |
|
| Route 34 | Step out of the woods into this urbanized seaside route. Lyra's grandparents own the region's Pokemon Nursery here, which you're going to want to get acquainted with if you want to fill out the entries for the various Baby Pokemon. The Daycare Couple will even gift you with a Pokemon Egg, contain one of two rare Pokemon. A trio of sisters will force you to battle them one after another in the hidden alcove on this route, accessible by traversing its waters to the south. |
|
| Goldenrod City | Johto's biggest city, with a ton of things to do. Visit its world-famous and iconic Broadcast Tower, from which television and radio programs are produced and sent out. Or, you can shop 'til you drop at its multitiered department store. Also present is the GO Transfer Center, allowing you to transfer certain Pokemon directly from Pokemon GO to Let's Go Pichu & Togepi. When you want to go home, Goldenrod's sleek bullet train can whisk you away at super speeds to Saffron City in Kanto, though it's currently undergoing maintenance. Of course, Goldenrod also has a seedier underbelly, with a thriving casino and an underground network of tunnels, some of which are occupied by small and/or shady businesses. Goldenrod City's gym leader is Whitney, the Normal-type specialist, who awards the Plain Badge. |
|
| Route 35 | A little route connecting Goldenrod City to the National Park / Seaside Gallop complex. If you want to avoid that, a short detour can bypass you to Route 36. |
|
| National Park | An expansive park conveniently located in the smack dab center of Johto. The Park contains many nooks and cranies, thanks in part to the park's fencing being disrepaired in a few places, which usually have some items littered about. Drop at least $500 in the center fountain to boost your chances of Critical Hits by 10% for the rest of the day. Once each day, a Bug-Catching Contest is held. Choose one Pokemon, and you're given 30 Park Balls and 20 minutes to catch the biggest bug Pokemon you can. Winners get their pick of one of several evolutionary stones. Finally, there's a Snorlax lounging around deep inside the forest surrounding the park. You still can't awaken it until you get the Poke Flute all the way in Kanto, but unlike the Snorlax in Kanto, this one regenerates if you fail to catch it each time you earn / defend the Champion title at Indigo Plateau. |
|
| Seaside Gallop Resort | This luxury hotel exists due west of Route 35 and the National Park, replacing the Pokeathlon Dome from Pokemon HeartGold & SoulSilver. Also hosted by the hotel are the Seaside Gallop Derbies, a series of land-, water-, and air-based races that you can enter your Pokemon into. Also available is Footie Ball, a spin on soccer that Pokemon too small for the races can enter into. This area also contains trainers to battle and a direct connection to nearby Olivine City, though accessing it requires you dispell a whirlpool first. |
|
| Route 37 | Deal with that Sudowoodo unpleasantness, and emerge out the other side onto Route 37. There's not much to say about this rather short route, but it does contain a double battle and a small grove of Apricorn bushes. |
|
| Ecruteak City | If Goldenrod is Johto's economic seat of power, then Ecruteak is its cultural jewel. The city preserves Johto's traditional architecture aesthetics, with even the city's Pokemon Center and PokeMart getting in on the act. Among the historical landmarks to visit are the Ecruteak Dance Theater and the Burned Tower. The nearby Bell Tower is off-limits to tourists, being one of the most sacred sites in all of Johto and blocked off by monks 24-7. Ecruteak City's gym leader is Morty, the Ghost-type specialist, who awards the Fog Badge. |
|
| Burned Tower | This smoldering wreck was once a much more dignified tower, comparable to the Sprout or Bell Towers. According to old tales, the fire that consumed the tower also drove off the legendary creature roosting there and killed three other Pokemon, who were then miraculously resurrected. Nowadays, it's a lawsuit waiting to happen, with tons of splinters and the floor giving way in many places. Eusine is here, thinking that the Pokemon Suicune might be present, as well as Silver, who just seems to be being his usual dickish self. |
|
| Bell Tower | Acquire the Rainbow Feather (either from driving Team Rocket from the Broadcast Tower in Let's Go Pichu, or from the Feather Collector in Pewter City after stopping Ariana at the Cinnabar Volcano in Let's Go Togepi), and the rabid monks guarding the way to Bell Tower will finally let you pass. Inside, you'll need to find a way to the top, navigating ledge puzzles on many of the floors. On top of the tower's roof, you'll find the legendary Pokemon Ho-Oh, waiting for a worthy challenger. |
|
| Route 38 | Route 42 has been blocked off by a rockslide from Mt. Mortar, so you'll be forced to take this pastoral route out of Ecruteak instead. Picturesque picket fences line golden fields of wheat, which you and other inconsiderate trainers have barged into, trespassing laws be damned. |
|
| Route 39 | The heart of Johto's... heartland, where it's impossible to tune into a radio station that isn't either country or fiery dogmatism. Moomoo Farm lies to the west, while Olivine City is due south. |
|
| Moomoo Farm | This time, Moomoo Farm is its own distinct area. Why? Well, after helping the farm's sick Miltank recover by feeding it five of any Berry, the grateful owners will open up a field to you, allowing you to plant up to 30 Berry or Apricorn bushes in one convenient location. |
|
| Olivine City | A bustling port city popular with vacationers and other sea-faring travelers. The city's harbor is the only one in Johto with the capability to host large ocean liners, such as the S.S. Aqua. Guiding ships safely to port is the city's iconic lighthouse, though it seems to have been knocked offline as of late... Olivine City's gym leader is Jasmine, the Steel-type specialist, who awards the Mineral Badge. |
|
| Route 40 | A stretch of beach running west from Olivine City and a large expanse of ocean beyond that. Something's causing the sea's waters to be polluted and viscous, resulting in many people and Pokemon in the area getting sick. It's not safe to travel over the water until you find and eliminate the source of the problem. |
|
| Route 49 | A new route created for Let's Go Pichu & Togepi, taking place on a cascade of waterfalls overlooking Route 40 and the ocean. The source of the mysterious water pollutants afflicting the ocean is thought to originate upstream from the rivers that feed it. A broken bridge on this route is the first instance in the game where the Sea Skim secret technique is required to progress. If you don't have it, Kuni of the Kimono Girls will explain that you can find it at the Dance Theater in Ecruteak City and will offer to take you there. |
|
| Bottling Plant | Team Rocket has seized this bottling plant, originally built to collect and bottle Fresh Water from the local waterfalls, and have used it to produce Tonics on a mass scale, liquid concoctions that temporarily boost a Pokemon's stats, in hopes of both selling them and using them to make their own Pokemon unstoppable. Unfortunately, Tonics require a myriad of chemicals to make, the waste products of which Team Rocket is dumping into the adjacent river. Your job is to turn a series of valves that will flush the Bottling Plant's central chamber with water, each of which will gradually purify the water and raise the water level, allowing you to utilitze floating platforms to reach additional areas of the dungeon. At the top of the Bottling Plant is Proton, head of the operations here. Beat him and Team Rocket will scamper away once again, allowing the Bottling Plant's actual owners to completely fix the water pollution problem. |
|
| Route 41 | With the pollution from the Bottling Plant claned up, you can proceed upon your oceanic voyages. Until the player can find a way to bypass whirlpools and access the Whirl Islands, this route has the distinction of being the only one in Johto completely occupied by water. Watch it, because wild Pokemon are known to suddenly jump from beneath the water's surface. |
|
| Whirl Islands | A series of four islands in the middle of Route 41 and the extensive cave system beneath them. They cannot be entered until your partner Pokemon knows the Calming Tides secret techniques. The Whirl Islands' most distinctive feature is a gigantic whirlpool in the middle of the dungeon that dictates where you can and cannot go. Using Calming Tides on certain blue crystal spires will allow you to change the whirlpool's spin, letting you access new areas. At the bottom of the caves lies a tremendous waterfall, from which you can summon and challenge the legendary Pokemon Lugia if you have Silver Feather in your possession. |
|
| Cianwood City | A city clinging to a small, dry outcropping of land next to the sea. Because it's geographically separated from the rest of Johto, it has a different cultural flavor to it compared to the rest of the region, reflected mostly in its architecture and its unique form of rituatized mock fighting. In the past, this was a fairly sleeping burg, but recent activity to the west has brought with it a fair amount of newcomers. Cianwood City's gym leader is Chuck, the Fighting-type specialist, who awards the Storm Badge. |
|
| Cliff Edge Gate | This large cavern essentially serves as way to access the cliffs of Route 47 from the lower Cianwood City. Until you defeat Chuck at his Pokemon gym, the cave is blocked from being accessed due to unusually high tides. |
|
| Route 47 | A newly-constructed route, which formally connects Cianwood City with the new community of Magnolia Outpost, providing the latter with a steady supply of provisions. It's still fairly rugged, utilizing natural cliff ledges and rickety wooden bridges to weave in and out of the rocky tiered coast. Using Cliff Cave, you can either travel down to the ocean's surface or ascend even higher up the cliffs. |
|
| Cliff Cave | A narrow vertical shaft used to connect the three levels of Route 47. |
|
| Sandstone Chamber | A short detour along the coast of Route 47, requiring that you first dispel a whirlpool before accessing. Inside this dark cave are ancient inscriptions on the far wall. While initially too dark to read, you'll have the Light Up secret technique by this point, allowing you to see the inscription clearly. The inscription is one of ninety-nine randomly-generated riddles. Solve said riddle (which usually involves the use of a Secret Technique or a specific party composition), and the inner chamber will open, allowing you to find and challenge the legendary Regirock. |
|
| Route 48 | This route is a quick step up, left, and then up again to Magnolia Outpost. Surfing along the river here via heading up a waterfall on Route 47 leads to a minor cache of items. The road here is heavily forested, indicative of the natural landscape of Johto prior to its settlement by humans. |
|
| Magnolia Outpost | A new town created for Let's Go Pichu & Togepi. The newest settlement in Johto, it was recently set up to serve Warden Baoba as he endeavors to create his newest nature reserve, Prehistoric Park. Cianwood City's pharmacist is also here, making sure the workers and their Pokemon stay healthy. You'll need to speak with him to get the medicine needed to cure the sick Ampharos all the way back in Olivine City. You can also revive fossils here, and either to add the resulting Pokemon to your team or stock Prehistoric Park. You even get a free Helix or Dome Fossil for your troubles coming here! |
|
| Prehistoric Park | The newest nature preserve / tourist trap from Warden Baoba, the owner-operator of the Safari Zone in Kanto. This park is intended to create a stable population of the recently-rediscovered and previously-extinct fossil Pokemon. When you revive a fossil at Magnolia Outpost's Fossil Revitalization Lab, you can either immediately add it to your team or choose to donate it to Prehistoic Park. Once you donate a mating pair of a particular fossil evolutionary line, wild instances of that line will start to populate Prehistoric Park the next day. |
|
| Route 42 | After finally curing the Ampharos at Glitter Lighthouse of its sickness and beating Jasmine in a gym battle, the rockside east of Ecruteak City is cleared and you are free to step into Route 42. A large but fairly straightforward route, you can either choose to step and surf to Mahogany Town, or briefly go through Mt. Mortar to get to the other side of the route. |
|
| Mt. Mortar | The largest cave system in Johto. If you're merely passing through, you can enter and exit Mt. Mortar in under a minute. If you're actually going to explore its interior, however, then have fun traversing the other 95%, which requires a variety of Secret Techniques, including Boulder Bash, Sea Skim, Strong Push, Waterfall Rise, and Grapple Climb. It also helps to have a knack for mental imaging, because much of the dungeon is a befuddling mess of one-way ledges. Your reward for tolerating all of this, however, is the chance to spar with Kiyo the Karate King, former head of the Fighting Dojo in Saffron City, out here in the boonies to do some training. Beat him and you'll receive a free Tyrogue. |
|
| Mahogany Town | An isolated settlement nestled inside the mountains of northern Johto. Accustomed to their largely uneventful lives, the town's inhabitants are completely caught off guard when Team Rocket invades and takes control of Mahogany's main store. Nobody is quite certain what Team Rocket is planning to do, although since they've appeared, there has been disturbing news of Pokemon going on violent rampages up north... Mahogany Town's gym leader is Pryce, the Ice-type specialist, who awards the Glacier Badge. |
|
| Team Rocket HQ | Now Team Rocket has really done it, stealing your Partner Pichu / Togepi while distracted at the Lake of Rage. You and Lance storm back to Mahogany Town and uncover this expansive underground complex, located in an old ninja hideout beneath a secret staircase in Mahogany's souvenir store. Traps abound here, including statues that summon pairs of Rocket grunts to fight you, as well as hidden panels that drop Pokemon upon you, all of which can be quick to Self-Destruct. Luckily, you can toggle these off by finding the right computer terminals. You'll need a password to get into generator room to shut down Team Rocket's ambitions, which is helpfully provided by Admin Ariana's talking Murkrow. Finally, you'll need to confront Ariana herself before reuniting with your Partner Pokemon and disabling the Electrodes powering Team Rocket's transmission equipment. |
|
| Route 43 | A stretch of forest extending northwards into the wilds leading from Mahogany Town to the Lake of Rage. Team Rocket, the jerks that they are, are tolling travelers who want to stay on the route's beaten path, although they skedaddle after Mahogany Town is liberated and their tollbooth is actually pretty easy to avoid to begin with, so long as you don't mind stepping into the tall grass and battling a few trainers. |
|
| Lake of Rage | Named after the Gyarados populating the lake that can make quite a ruckus, the Lake of Rage is ironically a very tranquil spot most of the time, being a popular destination for those wanting to do some fishing and get away from it all. Unfortunately, this has not been the case recently, as something is driving all the Magikarp in the lake to spontaneously evolve into Gyarados and subsequently go berserk. In particular, an oddly-large and red-colored Gyarados is even causing the weather to get borked up and rain constantly, flooding the lake's lower shores. Beat or capture this weirdly mutated Gyarados, and the rains will subside, at least temporarily bringing back some sense of peace. |
|
| Route 44 | An isolated and quiet mountain road. In Let's Go Pichu & Togepi, this route has been significantly expanded, the new portion being a snowy trek upwards towards the entrace of the Ice Path. Different Pokemon appear on this segment of the route. |
|
| Ice Path | A cave system, high up in the mountains and stubbornly cold. Icy surfaces will slide you in whatever direction you were moving, and you won't be able to stop until you hit an obstacle. A traveler and their frozen, wounded Seaking lie near the middle of the dungeon. Provide the supplies needed to return said Seaking to health, and the traveler will graciously teach Partner Pikachu / Togekiss the Waterfall Rise secret technique. You can't actually use it in the field until you defeat Clair in Blackthorn Village, but the thought is nice. Ice Pokemon are positively lousy though here, so investing in some Ice Heals probably wouldn't hurt. |
|
| Blackthorn Village | This truly remote settlement will only ever be visited by a handful of very dedicated Pokemon trainers. This includes a handful of rare Dragon Tamers, who come here mostly to visit the nearby Dragon's Den, and to be in the presence of Clair, the cousin of Lance and an extremely powerful Dragon-type trainer in her own right. Perhaps because of this, Clair is extremely haughty and prideful in her own abilities. Blackthorn Village's gym leader is Clair, the Dragon-type specialist, who awards the Rising Badge. |
|
| Dragon's Den | This small cave is of extreme cultural and ecological importance to the Blackthorn Villageians, due to being one of the few places in Johto where Dragon-type Pokemon naturally spawn, namely members of the Dratini evolutionary line. Near the back of the cavern is a small shrine. Inside is a trio of elders who will gift you with a Dratini knowing the move Extreme Speed if you can answer all their questions correctly. Hint: The more compassionate / all-inclusive the answer, the better. Clair also retreats here to have a meltdown after you manage to defeat her. Said elders will shame her into giving you your well-earned Rising Badge. |
|
| Route 45 | The final route of Johto is a tumble down a steep decline with many one-way ledges, necessitating that you come here multiple times to mop everything up. Flying back up to Blackthorn a few times is probably the best way to achieve this. The route also has an entrance into Dark Cave, allowing the player to also access Route 30 from here. |
|
Kanto Region[]
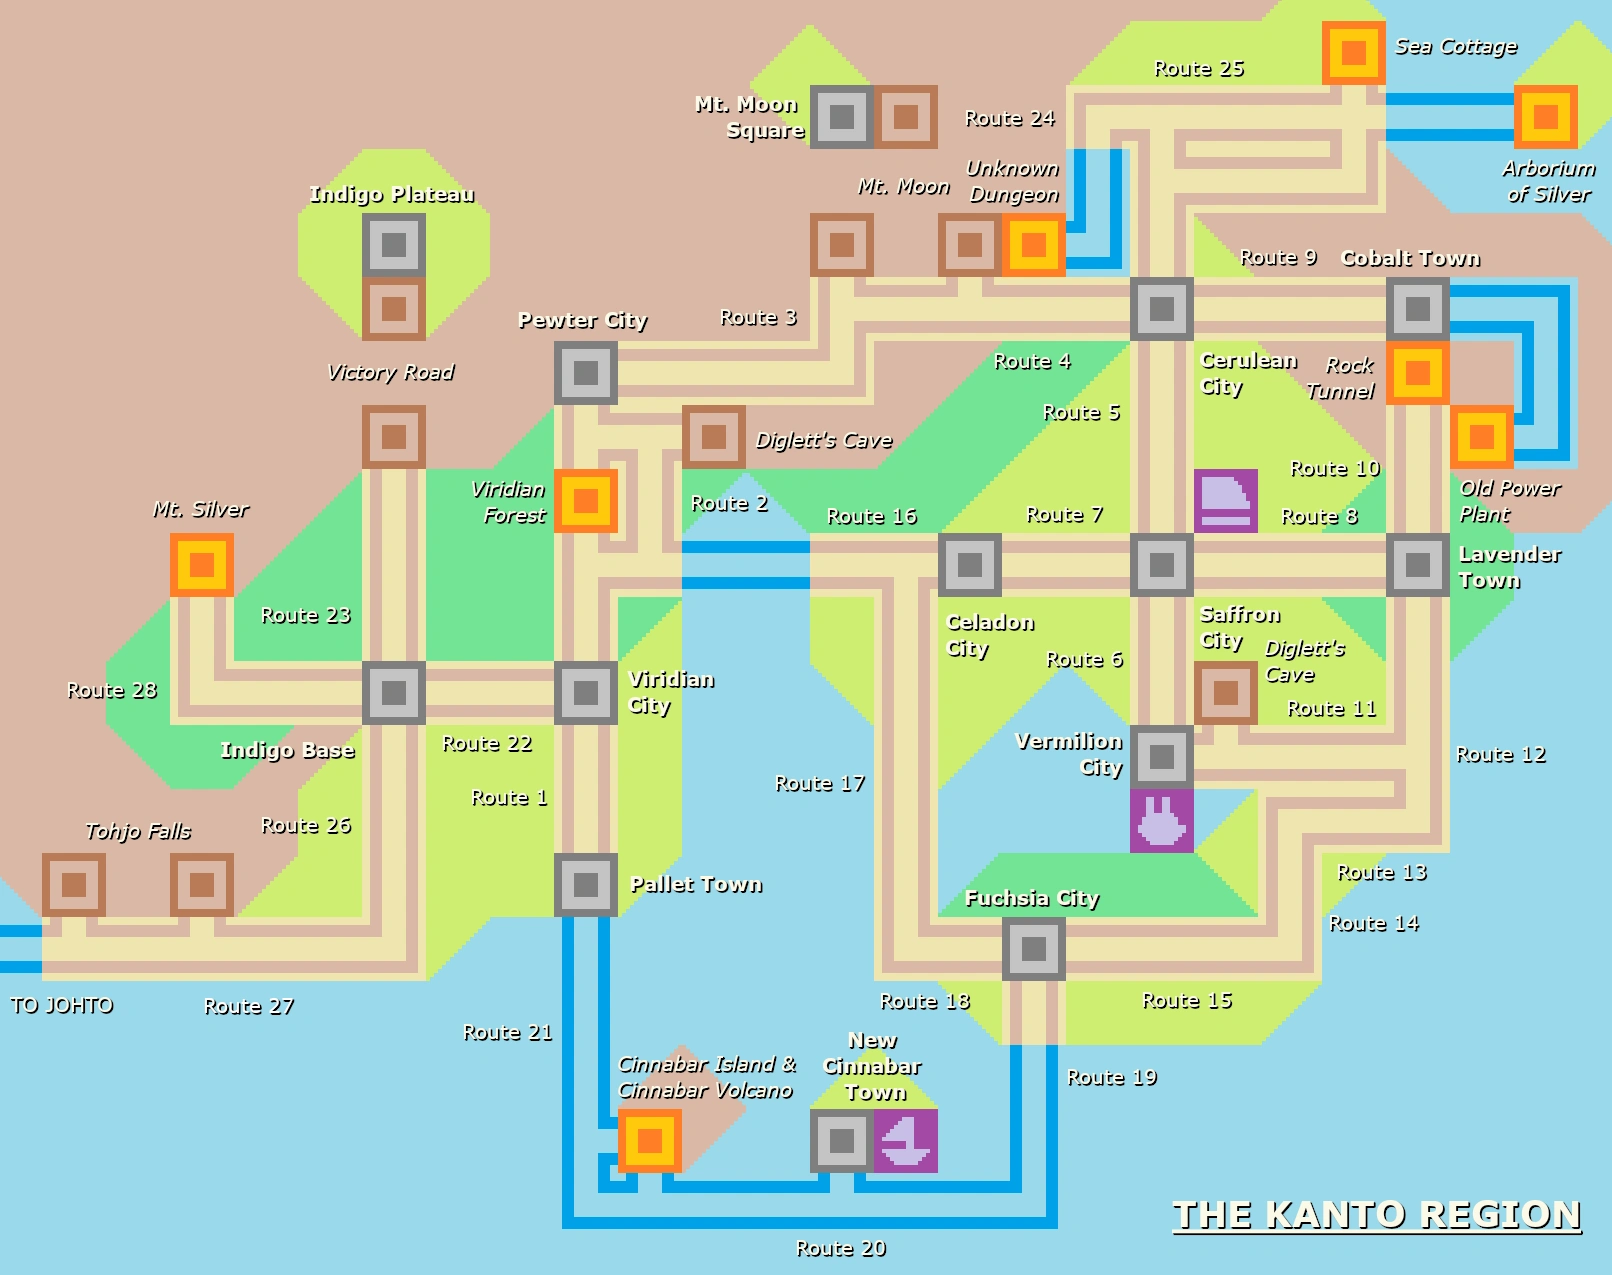
| Area Name | Description | Pokemon |
|---|---|---|
| Route 27 | Geographers, legal experts, and marauding armies have hotly debated for years whether or not this stretch of coast should be considered a part of Johto or Kanto. At least for now, the answer is Kanto. If you just want to snag a Ponyta or something, you can actually come here as early as your Partner Pokemon learns the Sea Skim secret technique, but you won't be able to bypass Tohjo Falls and access the rest of the route until it can also use Waterfall Rise. Once you can, you'll be confronted by hordes of powerful trainers and wild Pokemon as the (first) endgame commences. |
|
| Tohjo Falls | This is the symbolic (but not actual) landmark that separates Johto from Kanto. A pair of waterfalls spill out on both halves of this cavern, so you're gonna need the Waterfall Rise secret technique if you wanna get to the other side. The topmost waterfall conceals a hidden chamber, containing some supply crates, a sleeping bag, an old oil lamp, and a radio. Everything here is covered with a considerable layer of dust. |
|
| Route 26 | A route that ascends from the coast to the mountains as you rise to the challenges along your journey and make your way towards Indigo Base. It's almost like it's a metaphor or something. The Pokemon and trainers here continue to be bloodthirsty and relentless, but a kindly woman will let you rest in her home about midway through. |
|
| Indigo Base | Replaces the Pokemon League Reception Gate from the original Pokemon Gold & Silver. Reimagined as an actual town settled within the fortifications of an old castle, Indigo Base contains all of the amenities of most settlements in the Pokemon world, including its own Pokemon Center and store. The Ultimate Move Tutor lives here as well, who can teach powerful moves to the final evolutions of any in the two sets of starter Pokemon available in Let's Go Pichu & Togepi. When you're rested up and ready to move on, continue out the northern gate into Route 23. You can exit the eastern gate into Route 22, but won't get very far due to road construction, which only wraps up once you reach Viridian City. The western gate is completely closed off and is only ever opened for truly exceptional Pokemon trainers, even among the Champions. Come back here once you have defended your title against an even stronger Elite Four and a Champion Challenger. |
|
| Route 28 | Also known as Champion's Field, this area west of Indigo Base is restricted to only truly accomplished champions, those who, at the very least, have earned all sixteen gym badges of the Johto and Kanto regions and then faced off against the (pen)ultimate teams of the Elite Four and Championship Challengers. While being granted access here is an incredible honor in and of itself, there isn't actually much to do here except earn massive amounts of Experience Points by going up against some of the strongest wild Pokemon in the base game. No, what's really interesting is what lies on the other side... |
|
| Mt. Silver | This is it, your ultimate destination. The tallest peak in either Johto or Kanto, this mountain has incredible cultural significance for the people of both regions. Only the most accomplished Pokemon trainers will ever been allowed to step foot in here. Filled with hordes of vicious and powerful wild Pokemon, it's said that those who can brave the challenges within and make it to the mountain's submit will go down in history as among the most powerful Pokemon trainers on the planet. But... it seems that Red, the player characters from the original Pokemon Red & Blue, is also here... Having accomplished nearly everything that a Pokemon trainer can possibly accomplish and out of achievements to strive towards, Red is positively bored and weary of it all. So he waits, and waits, and waits here, hoping that someday, someone else will emerge from over the edge of the mountaintop, and that he can finally, finally challenge another person even approaching his vast level of skill and talent, a battle in which his inevitable victory is not a foregone conclusion... Beat him and return to the submit afterwards, and you'll find that a symbol of your victory is waiting patiently to be picked up. |
|
| Route 23 | Almost utterly nonexistant in previous interpretations of Gold & Silver, Route 23 has been massively expanded in Let's Go Pichu & Togepi. Gone are any badge checkpoints, and replacing them are more patches of grass from which wild Pokemon spawn as well as Pokemon trainers itching for a fight, functioning much more like a traditional route. The aesthetic has changed as well: Route 23 is now set in an ethereal forest littered with ancient ruins and patches of flowers, with a river running through its entire length, which you can either cross via stone bridges or navigate up using the Sea Skim secret technique, culminating in a mighty waterfall near the entrance to Victory Road. Lyra wishes you off here. Even though she doubts she's champion material, she still challenges you to one last Pokemon battle, for old time's sake. |
|
| Victory Road | The final obstacle before you get to prove your worth at Indigo Plateau. While not overly-large, Victory Road can still be difficult to get a grasp of, mostly due to the many ladders between floors and rope bridges that contain navigable passages beneath them. New to Let's Go Pichu & Togepi are little outdoor areas that serve either as another way to ascend or descend between floors or simply hold some optional items. Silver ambushes you near the exit, but once you defeat him again, he finally gets through that thick dumb skull of his that abusing your Pokemon is not the ideal way to raise them. |
|
| Wrought Chamber | After you collect the eight badges of Kanto, returning to Victory Road any time afterwards will trigger an earthquake, revealing a previously-hidden chamber. Solve the riddle inside and an additional door will open, allowing you to confront Registeel. |
|
| Indigo Plateau | The lofty heights that every good Pokemon trainer wishes to attain one day. Now the only thing left to do is to take on the Elite Four and then usurp the Champion. Stock up on supplies, heal your party, and head into the Elite Four's antechambers. From here, you can choose which order to confront the each member of the Elite Four. Unlike gym leaders, Elite Four members in Let's Go Pichu & Eevee are less restricted by type than they are by certain aesthetics and battle tactics:
Plow through the Elite Four, and the way to the Champion's Chambers will open up. Here, you'll either fight the reigning champ or fend off a coup attempt from one of several possible Champion Challengers. The first time you arrive at Indigo Plateau, your final opponent will be Lance, who wields draconic Pokemon who utilize debuffs and hard-hitting attacks. Defeat him and the champion title will now be yours. If, for whatever reason, you think you're not ready for the challenge ahead, speak to the man with the Abra in the main lobby. He can send you back instantly either to Indigo Base or New Bark Town. |
|
| Vermilion City |
| |
| Route 6 |
| |
| Saffron City |
| |
| Route 7 |
| |
| Celadon City |
| |
| Route 5 |
| |
| Cerulean City |
| |
| Route 4 |
| |
| Route 24 |
| |
| Unknown Dungeon |
| |
| Route 25 |
| |
| Frozen Chamber |
| |
| Route 9 |
| |
| Cobalt Town |
| |
| Old Power Plant |
| |
| Great Cobalt Mine |
| |
| Route 10 |
| |
| Lavender Town |
| |
| Pokemon Catacombs |
| |
| Route 8 |
| |
| Route 12 |
| |
| Route 13 |
| |
| Trick Manor |
| |
| Route 14 |
| |
| Route 15 |
| |
| Route 16 |
| |
| Route 17 |
| |
| Route 18 |
| |
| Fuchsia City |
| |
| Safari Zone |
| |
| Route 11 |
| |
| Diglett's Cave |
| |
| Route 2 |
| |
| Pewter City |
| |
| Route 3 |
| |
| Mt. Moon |
| |
| Mt. Moon Square |
| |
| Viridian Forest |
| |
| Viridian City |
| |
| Route 22 |
| |
| Route 1 |
| |
| Pallet Town |
| |
| Route 21 |
| |
| Cinnabar Island |
| |
| Cinnabar Volcano |
| |
| Route 20 |
| |
| New Cinnabar Town |
| |
| Seafoam Islands |
| |
| Route 19 |
|
Sevii Islands[]
All areas and Pokemon listed below are only available in The Adventure Continues! DLC.
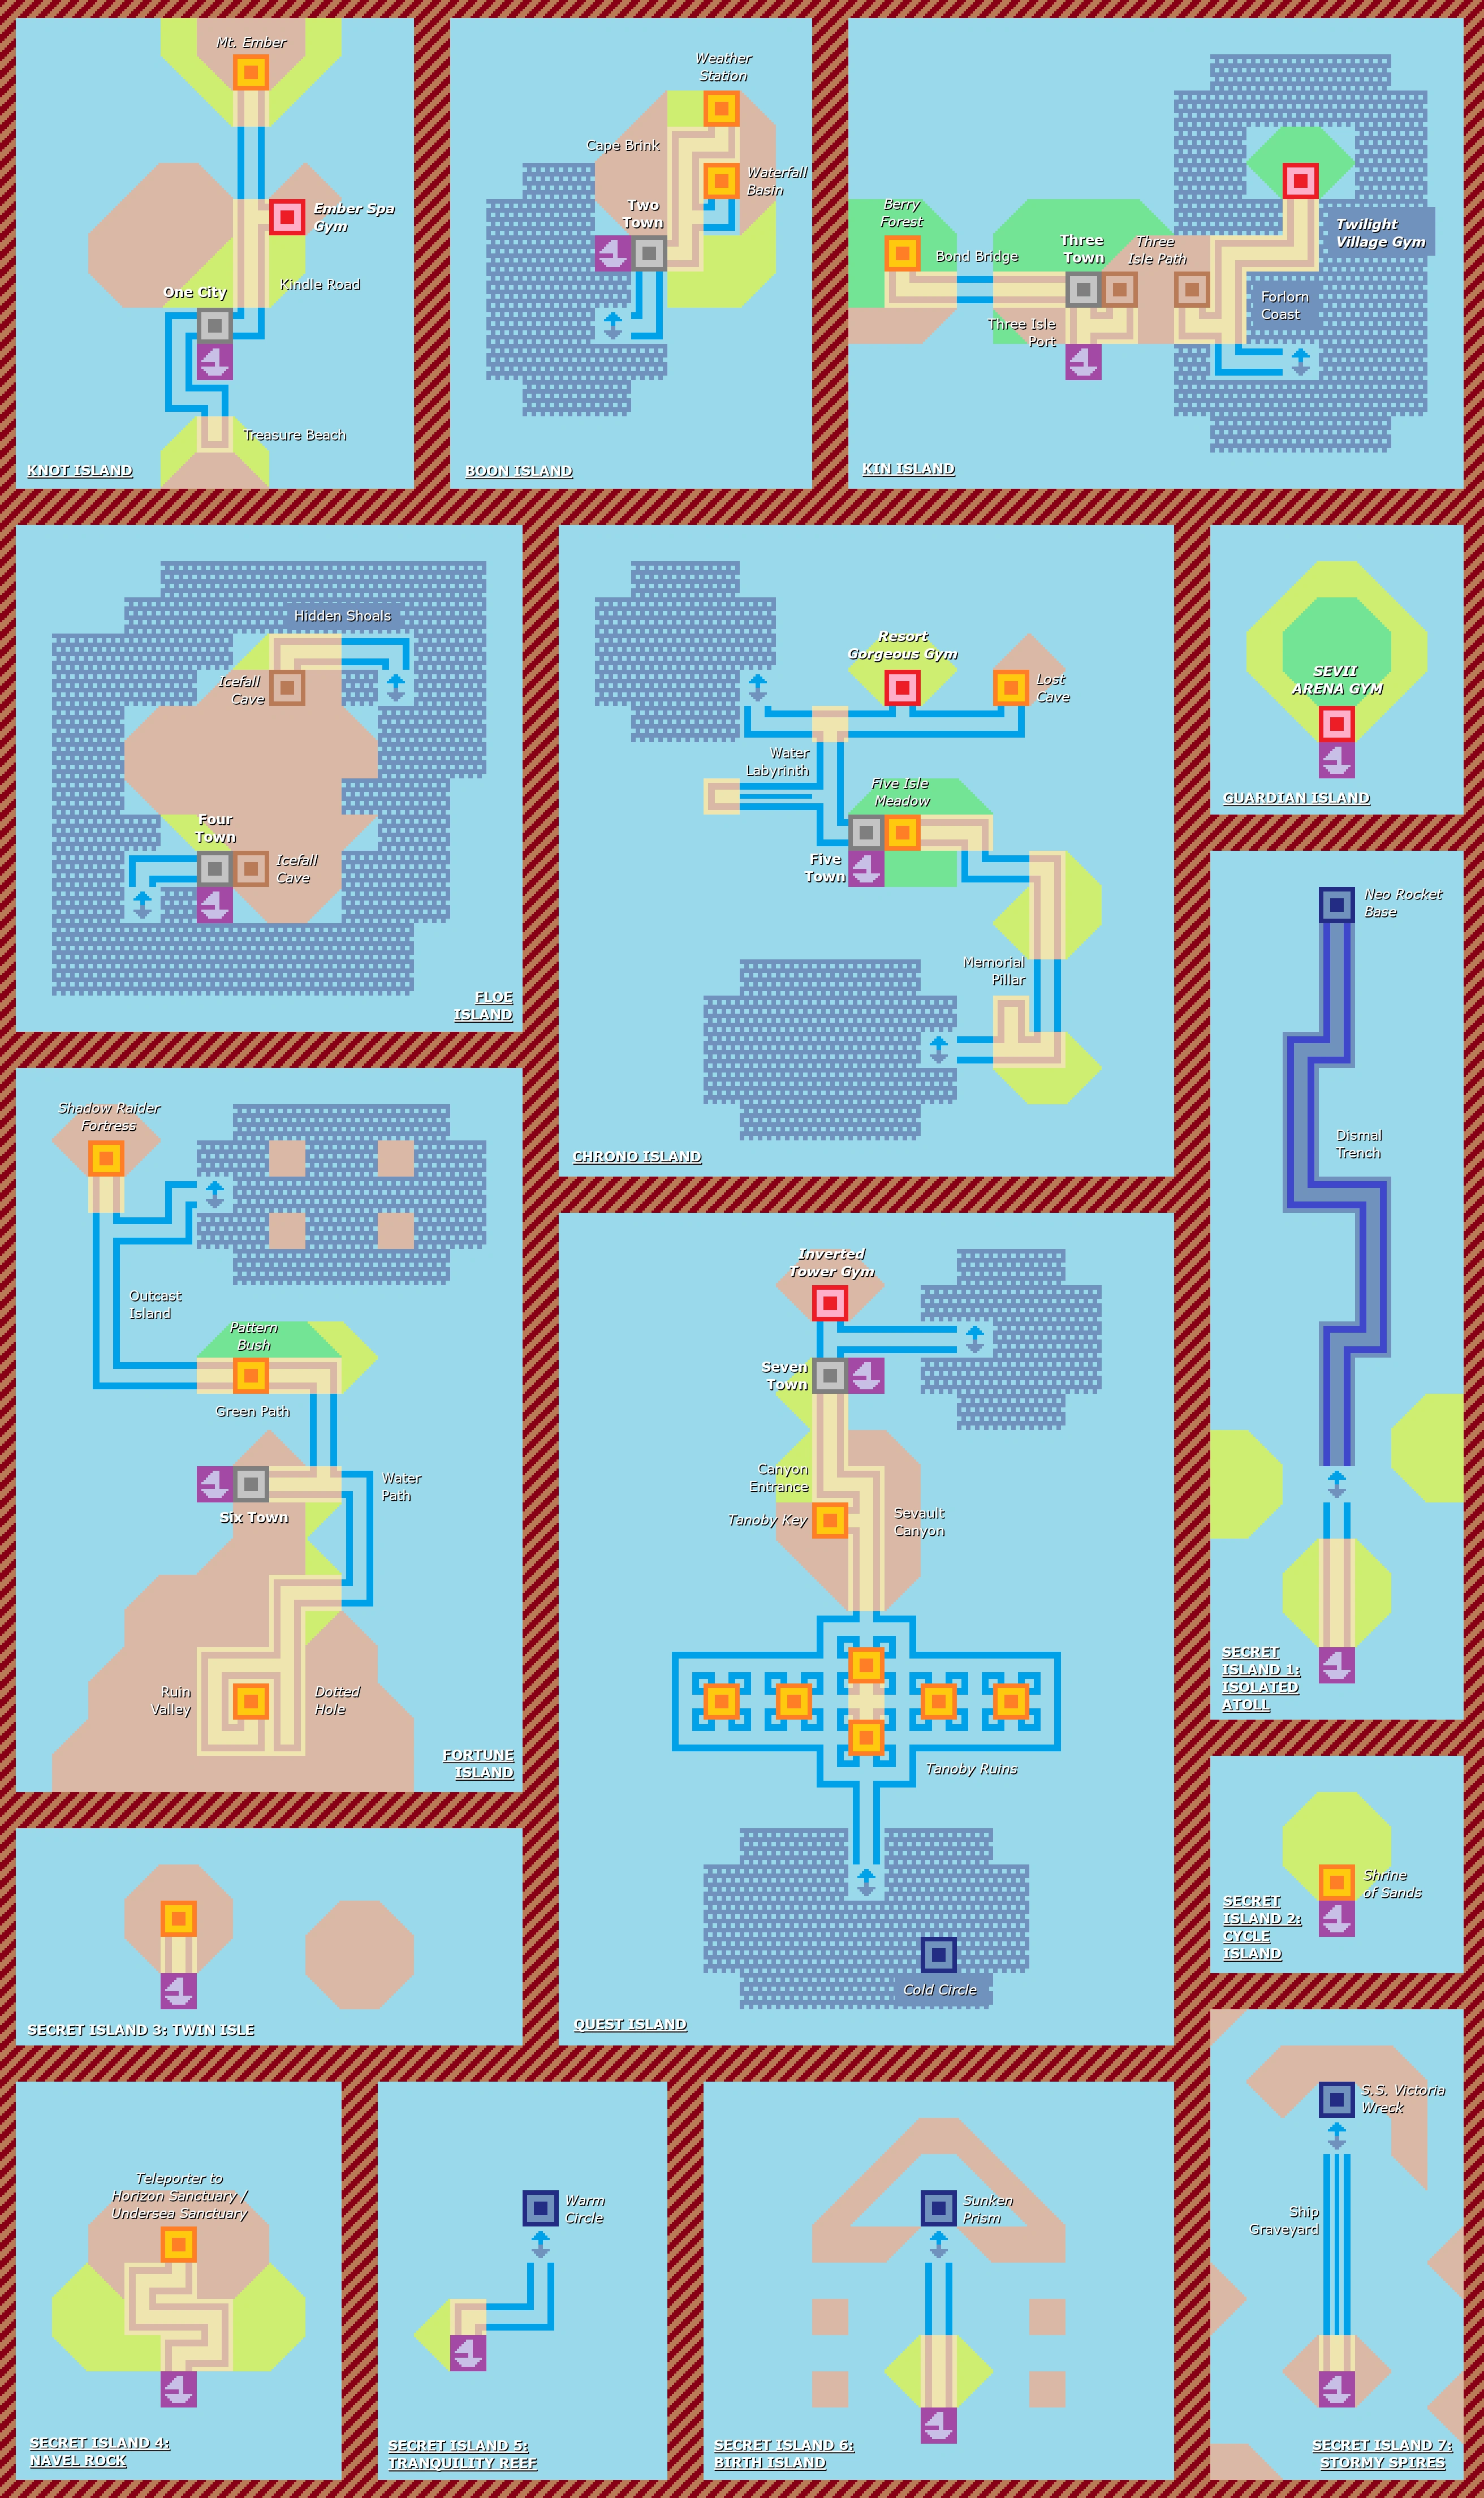
| Area Name | Description | Pokemon |
|---|---|---|
| One City (One Island) |
| |
| Treasure Beach (One Island) |
| |
| Kindle Road (One Island) |
| |
| Ember Spa (One Island) |
Ember Spa's island guardian is Lulani, the Fairy-type specialist, who awards the Mists Badge. |
|
| Mt. Ember (One Island) |
| |
| Two Town (Two Island) |
| |
| Foreign Exchange (Two Island) |
| |
| Cape Brink (Two Island) |
| |
| Three Town (Three Island) |
| |
| Bond Bridge (Three Island) |
| |
| Berry Forest (Three Island) |
| |
| Three Island Tunnel (Three Island) |
| |
| Lonely Coast (Three Island) |
| |
| Twilight Village (Three Island) |
Twilight Village's island guardian is Gethwine, the Dark-type specialist, who awards the Guile Badge. |
|
( Island) |
|
Important Trainers[]
Gym Leaders[]
Johto Circuit[]
- Falkner, the Flying-type gym leader of Violet City
- Awards the Zephyr Badge and TM51 (Roost) upon initial defeat
- Awards the Flyinium Z-Crystal upon defeat during the Super Gym Challenge
- Bugsy, the Bug-type gym leader of Azalea Town
- Awards the Hive Badge and TM89 (U-Turn) upon initial defeat
- Awards the Buginium Z-Crystal upon defeat during the Super Gym Challenge
- Whitney, the Normal-type gym leader of Goldenrod City
- Awards the Plain Badge and TM45 (Attract) upon initial defeat
- Awards the Normalium Z-Crystal upon defeat during the Super Gym Challenge
- Morty, the Ghost-type gym leader of Ecruteak City
- Awards the Fog Badge and TM30 (Shadow Ball) upon initial defeat
- Awards the Ghostium Z-Crystal upon defeat during the Super Gym Challenge
- Chuck, the Fighting-type gym leader of Cianwood City
- Awards the Storm Badge and TM01 (Focus Punch) upon initial defeat
- Awards the Fightinium Z-Crytal upon defeat during the Super Gym Challenge
- Jasmine, the Steel-type gym leader of Olivine City
- Awards the Mineral Badge and TM23 (Iron Tail) upon initial defeat
- Awards the Steelium Z-Crystal upon defeat during the Super Gym Challenge
- Pryce, the Ice-type gym leader of Mahogany Town
- Awards the Glacier Badge and TM07 (Hail) upon initial defeat
- Awards the Icium Z-Crystal upon defeat during the Super Gym Challenge
- Clair, the Dragon-type gym leader of Blackthorn Village
- Awards the Rising Badge and TM59 (Dragon Pulse) upon initial defeat
- Awards the Dragonium Z-Crystal upon defeat during the Super Gym Challenge
Kanto Circuit[]
- Lt. Surge, the Electric-type gym leader of Vermilion City
- Awards the Thunder Badge and TM34 (Shock Wave) upon initial defeat
- Awards the Electrium Z-Crystal upon defeat during the Super Gym Challenge
- Sabrina, the Psychic-type gym leader of Saffron City
- Awards the Marsh Badge and TM48 (Calm Mind) upon initial defeat
- Awards the Psychium Z-Crystal upon defeat during the Super Gym Challenge
- Erika, the Grass-type gym leader of Celadon City
- Awards the Rainbow Badge and TM19 (Giga Drain) upon initial defeat
- Awards the Grassium Z-Crystal upon defeat during the Super Gym Challenge
- Misty, the Water-type gym leader of Cerulean City
- Awards the Cascade Badge and TM03 (Water Pulse) upon initial defeat
- Awards the Waterium Z-Crystal upon defeat during the Super Gym Challenge
- Janine, the Poison-type gym leader of Fuchsia City
- Awards the Soul Badge and TM84 (Poison Jab) upon initial defeat
- Awards the Poisonium Z-Crystal upon defeat during the Super Gym Challenge
- Brock, the Rock-type gym leader of Pewter City
- Awards the Boulder Badge and TM80 (Rock Slide) upon initial defeat
- AWards the Rockium Z-Crystal upon defeat during the Super Gym Challenge
- Blaine, the Fire-type gym leader of New Cinnabar Town
- Awards the Volcano Badge and TM50 (Overheat) upon initial defeat
- Awards the Firium Z-Crystal upon defeat during the Super Gym Challenge
- Blue, the gym leader of Viridian City. Unlike other gym leaders, he uses a type-diverse team
- Awards the Earth Badge and TM00 (Baton Pass) upon initial defeat
- Awards the Gigahyperium Z-Crystal upon defeat during the Super Gym Challenge
The Elite Four[]
The four powerful trainers that must be defeated at Indigo Plateau before you have have a shot at the Champion title itself. Unlike previous titles, they do not have teams based around certain types, but rather certain general themes and/or battle strategies, ensuring that their teams have more balanced typing that before. You can challenge them in any order you wish. The Elite Four will alter their teams and boost their Pokemons' levels after collecting 16 badges, and again after completing the Super Gym Challenge, increasing in difficulty each time. Additionally, the player is given a limited number of healing items when challenging the Elite Four after the Super Gym Challenge, and cannot use any others.
- Will, who uses elegant-looking Pokemon and employs Trick Room, terrains, and other strategies that fundamentally alter the basic parameters of the battlefield
- Koga, who uses scary-looking Pokemon and employs status effects and debuffs to gradually wear down your party
- Bruno, who uses tough-looking Pokemon and employs buffs for his own Pokemon and high-powered but risky moves that can quickly end the battle in his favor if you are unlucky
- Karen, who uses cute-looking Pokemon. She's unique in that she fights you in the Doubles Battle format, employing summoned weather effects and other strategies that utilize teamwork and synergy among her Pokemon
Changes[]
World[]
- No Gym Prerequisites - Unlike Let's Go Pikachu & Eevee, none of the gyms require any prerequisites to enter, although some still require that you still fulfill certain story obligations before being accessible.
Battling[]
- Updated Battle Mechanics - The following battle mechanics have been implemented into the games: The Physical/Special split, the Double Battle format, held items, abilities, Mega Evolution, and Z-Moves.
- Toggleable Catching Mechanics - You can change the Catching Style to either Go or Original in the Options Menu.
- 'Go Catching Sytle - Resembles how wild encounters in Pokemon Let's Go Pikachu & Eevee operated. Aim Pokeballs at the Pokemon on the screen
DLC: Sevii Island Adventures![]
Pokemon Let's Go Pichu & Togepi have DLC available in the form of the Sevii Island Adventures! expansion. Costing $19.99, the DLC includes the following:
- A Gift Mimikyu - Players who have specially pre-ordered Let's Go Pichu or Togepi will have access to a special event Mimikyu at the Goldenrod Department Store. Players who didn't pre-order their copies of the game can still access the event with the purchase of the Sevii Island Adventures! DLC.
- Assess to a New Adventure in the Sevii Islands - Returning from Pokemon FireRed & LeafGreen, the Sevii Islands are a chain of islands off the coast of Johto and Kanto, beckoning adventures to come and explore their untamed landscapes. This time, there's new areas to explore, including additional routes and islands. This combines with the content in Let's Go Pichu & Togepi to create one of the biggest Pokemon adventure ever!
- Even More Gyms - The Sevii Islands possess their own local Sevii Pokemon League, consisting of five gyms. The League will test your mettle against the Fairy and Dark types, require you synergize in Double Battles, rewrite the rules with reversed type properties and move priorities, and test your ability to manage your team's health and resources in a rapid and grueling series of successive battles.
- Even More Pokemon - The Sevii Islands are home to over 90 Pokemon from the regions appearing now appearing there, including the Hoenn starters Treecko, Torchic, and Mudkip, and legendary Pokemon such as Heatran, Regigigas, Darkrai, and Creselia. Additionally, new trades become available, including the Hisuian forms of Voltorb, Qwilfish, and Sneasel, as well as new items and move tutors that allow Scyther, Stantler, and Ursaring to achieve new evolutions.
- A New Story - In The Adventure Continues, you'll encounter members of the Shadow Raiders, a criminal group that has suddenly popped up in the Sevii Islands. They seem dead-set on abducting as many Pokemon as possible, but what are their ultimate goals? Uncover their sinister conspiracy as you spar with them throughout your journey in the Sevii Islands.
- Build Your Own Island & Gym - Create a new town on an uninhabited island and fill it with people, scenery, homes and shops. Set up a new gym with unique trainers, puzzles, and decorations. You can even design your very own gym badge from scratch. You can then invite friends to tour your island and challenge your gym. The more people you invite, and the more they interact with your island, the more options become available for your island and gym!
- The Super Gym Challenge - So, you've beaten all the gym leaders in Kanto and Johto and conquered the Elite Four. What more is there to do? Take on the Super Gym Challenge! In the Super Gym Challenge, you'll rechallenge all 20 gym leaders, each with new, formidable teams and access to Mega Evolution! The prize for emerging triumphant is the acquisition of the Z-Crystals, allowing you to unleash overwhelmingly powerful Z-Moves. Complete the Super Gym Challenge, and the Elite Four and Championship Challengers will further refine their teams as well, making for some of the most difficult Pokemon battles yet.
- Ultra Tournament - Unlocked after completing the Sevii Islands League, the Ultra Tournament is a new battle facility housing the ultimate Pokemon challenge. In a bracket-style tournament, battle against 31 randomized opponents consisting of rivals, gym leaders, Elite Four Members, and other powerful trainers as they all fight to emerge as the ultimate victor. Each battle occurs in quick succession, so your opportunities for rest and healing are strictly limited. Also available is the Ultra Co-op Tournament, allowing you to take on the Ultra Tournament with a partner battling aside you. This partner can either be an online friend or one of the 31 participants in the regular Ultra Tournament. Your choices for battling partners are limited at first, but your options grow as the rank of your Champion's Crown increases, eventually allowing you to fight alongside the most distinguished trainers in the game. Your prize for emerging victorious in the Ultra Tournament and Ultra Co-op Tournament are access to rare items such as new Demeanor Modifiers (allowing you to establish a Demeanor for a Pokemon, which will override its innate Nature when it comes to influencing a Pokemon's stat growth) and Shiny Balls (Poke Balls allowing you to convert wild Pokemon into their Shiny coloration, if you can manage to capture them).