This page is under construction. Please excuse its informal appearance while it is being worked on. We hope to complete it as soon as possible!
Kingdombound 2
Developer(s)
Lazy Studios
Publisher(s)
Lazy Studios
Platform(s)
Nintendo Switch XBOX One Xbox Series X Playstation 4 Playstation 5 PC
Genre(s)
Action, Real-Time Strategy
Release Date(s)
April 24th, 2020
Age Rating(s)
ESRB: T PEGI: 16 CERO: C
Kingdombound 2 is an upcoming action real-time strategy game created by Lazy Studios. The game is a sequel to the original Kingdombound. The game will be released at an unknown at time on the Nintendo Switch, XBOX One, XBOX Series X, Playstation 4, Playstation 5 and PC. The game is rated T by the ESRB for Violence, Blood and Gore and Mild Language.
After the death of The Lich, the Ancient Valley was freed of his potential takeover. Though many celebrated, some had learned that remnants of the Lich's power had spread all across the world. The rulers of Arcandia and Elytius, King Maroon and Princess Maya sought to obtain these remnants themselves, hoping to end their family's long-standing feud. However, new of this power spread wide, including to two continents that had, until now, not made contact with the Ancient Valley. From the Ancient Highlands, Lord Auburn and Celadia, and from the Ancient Orient, Emperor Sumire and Princess Mikado, seek to find these remnants as well. Forced into an alliance in order to combat these new threats, the three factions set out to defeat the others, grabbing as much power as possible and sending their best warriors into another all-out war.
Gameplay[]
Kingdombound 2 retains the gameplay of the original Kingdombound, though with a few changes. The game is mixes elements from MOBAs, hero shooters and real-time strategy games. The player takes control of one of 21 playable classes, each corresponding to one of 3 factions. From there, the players that to use their abilities and teammates to complete various objectives. Unlike the original game, Kingdombound 2 features 3D models for all of the characters, rather than 2D art.
Basic Gameplay[]
Players can Move their character around with the Left-Stick. They can use the Right-Stick to Face a certain direction, in order to direct your attacks in a certain direction, or press the B button to Jump, going across gaps or reaching higher areas.
With the ZR button, players can perform their Basic Attack. You can also press the ZL button to Aim, moving the camera in the direction you're facing and changing your Basic Attack into something more suited towards long range. Each player also has 3 Abilities, assigned to the L, R and X buttons. The attacks and abilities the player has access to change depending on which character you're playing as. Press A to Interact with various objects, like picking up Bombs, commanding Troops and building. Classes like the Wizard or Marksman can also press the Y button to Reload or Charge Mana in order to refill their attacks.
Buildings[]
Buildings have seen somewhat of an overhaul from the last game. Now, most buildings can only be place in areas known as Building Bases. Their primary purpose is to help support the player with defending their base. To build a building, the player will need the corresponding materials. The game features 4 different types of materials:
Wood: Wood is the most common material, found by destroying Trees or going to Lumber Mills.
Stone: Stone's rarity is between Wood and Iron, found by destroying Rocks and Ore Deposit or going to Mines.
Iron: Iron is fairly rare, only found in Ore Deposits or going to Mines.
Crystals: A special material, it appears in your Storage Bin after your team kills 10 enemies, or 20 troops. It can also be very rarely in Ore Deposits.
Though the player can hold up to 10 materials, players gain a speed debuff when they attempt to hold more than 4 materials (if the player is playing as a Pirate this material limit raises to 8 materials). Lumber Mills and Mines will run out of materials if used too much, and require time to recharge.
Materials are placed in your team's Storage Bin, which is located at your base alongside any outpost you have. Once the materials are placed in a Storage Bin, all other players can use them. From there, players can interact with a Building Base, and build whatever building they want, so long as they have the corresponding materials. Buildings are split into three types, Towers, which are automated and do whatever is needed automatically, Workshops, which give you access to new items and weapons to use, like Bombs, Cannons, Catapults and Barricades, and Spawners, which generate troops.
Buildings have limited health, which can be reduced when they take damage from enemy attacks. If a building is destroyed, you have to build a new one, as they cannot be restored. With the exception of the Cannon and Catapult, all buildings are static, and cannot be moved after being built. Spawners are the only buildings that lose health overtime, eventually being destroyed on their own after enough time has passed.
Towers[]
Building
Description
Materials
Arrow Tower
A tower equipped with a ballista, firing rapid arrows at enemies. Low damage, but a high fire rate. Great against groups of weaker enemies.
Unlocked by default.
10x Wood
1x Stone
Cannon Tower
A tower equipped with a cannon, firing cannonballs at enemies. Higher damage, but a lower fire rate. Great against tankier foes.
Unlocked at Level 2
10x Stone
Mortar
A tower equipped with a mortar, it fires bombs into the air which then drop down on enemies. Slow, but powerful.
Unlocked at Level 15
15x Stone
Blade Tower
A tower equipped with large blades to chop nearby enemies. High damage, but short-range.
Unlocked at Level 6
10x Iron
Frost Tower
A tower that creates ice and snow around it. Deals little damage, but slows everyone in its radius down. Vulnerable to fire.
Unlocked at Level 8
20x Wood
1x Crystal
Dragon Tower
A tower that houses a dragon. The dragon sprays fire to anyone nearby, setting them ablaze. Vulnerable to ice.
Unlocked at Level 16
20x Stone
1x Crystal
Bolt Tower
A tower equipped with a large crystal. Unleashes bolts of electricity that pierce through targets and cause high damage. Can hold up to 3 charges, using one each time it attacks, and recharging them overtime. Without any charges, they are left vulnerable.
Unlocked at Level 20
10x Iron
1x Crystal
Heal Tower
A tower that heals nearby allies. Cannot deal damage.
Unlocked at Level 12
2x Crystals
Workshops[]
Building
Description
Materials
Barracks
A workshop that can be used to construct defenses for your base.
Unlocked by default.
2x Crystals
Blacksmith
A workshop that can be used to construct siege weapons, like bombs, cannons and catapults.
Unlocked by default.
3x Crystals
Defenses[]
Building
Description
Materials
Wooden Barricade
A barricade created out of wood, designed to act as a wall against enemy attacks. Damages enemies that touch it, but has the lowest health. Vulnerable to fire.
Unlocked by default.
5x Wood
Stone Barricade
A barricade created out of stone, designed to act as a wall against enemy attacks. Has medium health.
Unlocked at Level 3
5x Stone
Iron Barricade
A barricade created out of iron, designed to act as a wall against enemy attacks. Has high health but is vulnerable to electricity.
Unlocked at Level 11
5x Iron
Magic Barricade
A barricade created out of crystals, designed to act as a wall against enemy attacks. Has medium health, but also reflects projectiles.
Unlocked at Level 19
1x Crystal
Spike Trap
Wooden spikes that deal damage to anyone that step on them. Takes damage when enemies step on it, and will eventually get destroyed once it deals enough damage. Can be easily destroyed if it comes into contact with fire.
Unlocked at Level 4
5x Stone
Monster Lure
A wooden decoy in the shape of a Hero, the Monster Lure attracts enemy troops, getting them distracted and causing them to attack it. Only classes are able to destroy them.
Unlocked at Level 14
5x Stone
Trapdoor
A trapdoor placed on the ground. Once placed, this trapdoor cannot be seen by enemies, at least until they get near, in which they activate. Though a trapdoor will temporarily stun anyone that activates them, you can place bombs, troops or yourself it to ambush your foes. Once it is used up, it gets destroyed.
Unlocked at Level 9
5x Wood
1x Iron
Siege Weapons[]
Building
Description
Materials
Bomb
A basic explosive, after being activated it blows up anyone in its radius, dealing heavy damage. They explode once thrown and after a certain amount of time passes. Can be used in conjunction with Cannons and Catapults.
Unlocked by default.
5x Stone
Fire Bomb
A bomb that coats the area around it in fire, setting anyone in its radius ablaze. They explode once thrown and after a certain amount of time passes. Can be used in conjunction with Cannons and Catapults.
Unlocked at Level 5
5x Stone
Poison Bomb
A bomb that coats the area in a poisonous gas, damaging anyone within the radius. The cloud lingers for some time, inflicting blind onto anyone hit. They explode once thrown and after a certain amount of time passes. Can be used in conjunction with Cannons and Catapults.
Unlocked at Level 13
10x Wood
1x Stone
Electric Bomb
A bomb that strikes anyone in the radius, damaging and stunning anything in the radius for a short time. They explode once thrown and after a certain amount of time passes. Can be used in conjunction with Cannons and Catapults.
Unlocked at Level 18
10x Stone
1x Iron
Jump Pad
A spring that can be used to launch yourself into the air, reaching higher areas or getting over enemy defenses. Though worse than the Catapult (as they are immobile, don't allow you to launch bombs, and launch you less far) it's cheaper, allowing you to build them more often.
Unlocked at Level 10
10x Wood
5x Stone
Cannon
Launch whatever is placed in it a far distance. Use them to fire bombs, troops or other players as a means of transportation, or as a means of attack.
Unlocked at Level 7
10x Wood
20x Stone
Catapult
Catapults lob whatever is placed into them up into the air. Though the distance you travel isn’t as far as the Cannon’s, the Catapult allows you to launch over enemy walls and barricades, making it a great way of launching a surprise attack.
Unlocked at Level 17
20x Wood
10x Iron
Collectibles[]
As the player plays the game, they will get access to various collectibles.
Gold: Gold acts as the game's main currency, collected from competing in matches. They can be used in the Trading Post, allowing you to purchase weapon upgrades, outfits, troops and buildings.
Experience: Experience is a progress indicator that increases as the player competes in matches. Once a player earns enough Experience, they will Level Up, unlocking various things like new shops and items in the Meetup Area. Players start in Level 1, but can level up until they reach Level 99.
Class Experience: Class Experience is similar to normal Experience, but increases by competing in matches with certain classes. Each class has their own experience meter, levelling up once they've earned enough, unlocking weapon upgrades in the Meetup Area, and allowing that class to equip more powerful troops and outfits. Classes start at Level 1, but can level up until they reach Level 20.
Ranking: When players participate and finish in a Ranked Match, their Ranking will be affected. Once a player earns a high enough ranking they will Rank Up. Similar to Experience, it serves as a progress indicator, it increases the chance that rare items will appear in the shops. Your rank will go up if you win a Ranked Match, but go down if you lose. Your ranking determines what Rank you are in. Every player starts in Beginner's Rank. Raising you rank enough allows you to increase your rank. Rank up three times and you move onto a higher league, from Bronze, to Silver, to Gold and finally to Diamond.
Faction Tokens: Faction Tokens are a second currency, obtained by competing in Faction Wars. They can be traded with Sylasura, allowing you to purchase exclusive cosmetics, or boosts in gold or experience.
Controls[]
Left C-Stick: Move
Right C-Stick: Face
ZL: Aim
ZR: Attack
L: Ability 1
R: Ability 2
X: Ability 3
Y: Reload / Charge Mana
B: Jump
A: Interact (Grab, Build, Command Troops, Revive)
Direction Buttons: Taunts/Voice Commands
Controls are shown as if the player is using a Nintendo Switch. Controls may change depending on which controller they are using.
Trading Center[]
Located on a remote island between all three continents, the Trading Center serves as the game's hub area, replacing the Meetup Area from the last game. Used primarily as a pirating island, it has since been converted as the main area for warriors to join the war. The Trading Center itself features a wide-variety of things to do.
Bulletin Board
The Bulletin Board is the player's destination for joining online matches. When selecting the Bulletin Board, the player is given the option to join a random server, or select servers with preferences like certain modes and/or maps.
Ranked Board
Unlocked upon reaching Level 15, the Ranked Board allows players to join ranked matches. They feature several difference from normal matches, such as limited mode choices, and a smaller team size of 6.
Faction Board
Unlocked upon reaching Level 6, the Faction Board allows the player to participate in Faction Wars. Join a faction and fight for it in a battle for territory. After a few days have passed, the team with the most territory wins. Compete in battles to earn Faction Tokens, and trade them in for prizes!
Adventure Guild
A building attracting hopeful adventurers, the Adventure Guild allows players to access the game's Adventure Mode. The player can play the game solo, locally or online.
Bazaar
Unlocked when the player reaches Level 4, the Bazaar allows the player to use the gold they collect to purchase outfits and accessories to change their classes' stats. Chosen outfits are random, but the higher the player's ranking, the higher the chance rare items will appear.
Ssscalp Sssatisssfiersss
Unlocked when the player reaches Level 4, Ssscalp Sssatisssfiersss (yes the extra s's are needed) allows the player to use the gold they collect to purchase hats to change their classes' stats. Chosen outfits are random, but the higher the player's ranking, the higher the chance rare items will appear.
Weapons Shopppe
Unlocked when a class reaches Level 2, the Weapons Shopppe allows the player to use the gold they collect to purchase new abilities for their classes. The more a class levels up, the more abilities will be unlocked.
Toro & Friends Building Company
Unlocked when the player reaches Level 2, Toro & Friends Building Company allows the player to use the gold they collect to purchase buildings and workshop items. The more the player levels up, the more items will be unlocked.
Boutique Infernal
Unlocked when the player reaches Level 3, the Boutique Infernal allows the player to purchase troops to use in battles. The more the player levels up, the more troops will be unlocked.
Game Modes[]
Kingdombound 2 features a variety of game modes for the player to play. In online, up to 24 players can join a match, with 12 on each team (though certain modes may limit player numbers). The game modes are split between different mode types:
Standard Modes: These are modes that can be played on at any time in the Bulletin Board. They are the only modes available in the Ranked Board.
Rotation Modes: These modes rotate every few hours, with four being available at a time.
Co-op Modes: These modes focus on co-op, with the player fighting against CPU enemies.
Standard Modes[]
Castle Defense
In Castle Defense, one team must defend their treasure from being controlled by the enemy team. The defending team has outposts that, if taken control of, will open the gate into the castle. If the treasure is captured, the attacking team wins. If times runs out, the defending team wins.
Strategies
Be prepared for whatever the defending team is going to do. Make sure to use area-of-effect weapons against troops, and siege weapons against their defenses.
If you have enough firepower, you can destroy the enemy's gate. This is a great option if you don't have enough time or the enemy is low on defenses.
You can use catapults to launch yourself over enemy walls.
If the attackers takes control of your outposts, the defenders can take them back. It's recommended to do so since the door will open if all of the outposts are controlled by the enemy.
Make sure your castle is well fortified if the enemy breaks in. Use barricades, towers, and plenty of troops to take care of the enemies.
Castle War
In Castle War, both teams must defend their castle and treasure from eachother. Take control of the outposts to open the enemy gates to the castle. Capture the enemy's treasure to win, but don't let the other team capture yours.
Strategies
Strategies used in Castle Defense will also apply to Castle War.
Be sure that not too many of your team attack the castle all at once. Someone needs to stay behind in case the enemies attempt a sneak attack while you're gone.
Castle Control
In Castle Control, two teams must fight to take control of the castle. Once one team has control, they will start to gain points. However, the other team can capture the castle by taking control of it, making the other team unable to gain points. Once a team reaches 100 points, they win.
Strategies
Make sure your team has a good balance of offense and defense. You'll need somebody to defend the castle once you're done capturing it.
Make sure you grab some materials as well. You'll need barricades and other defenses once you have control of the castle.
Though gates and barriers don't need to be destroyed, cannons and catapults can still help kill your enemies and defend the castle.
If at least one enemy is inside the castle, points will not be gained. Kill them quickly to continue getting points.
Outpost Control
In Outpost Control, two teams must fight to take control of three outposts. The more outposts a team has, the more points they will produce. Once a team reaches 200 points, they win.
Strategies
Strategies used in Castle Control will also apply to Outpost Control.
Always be aware of the state that your outposts are in. If an outpost isn't being defended, that means the enemy can obtain it and get more territory to build stuff and attempt to gain control of the other outposts.
Capture the Flag
In Capture the Flag, each team must capture the enemy flag, steal it, and take it back to their base to earn points, all while defending your own flag from being stolen. If you are killed while holding the flag, a team member can pick it up, but if is left for 1 minute, it will go away. Once time runs out, the team with the most points wins.
Strategies
Faster classes like Berzerkers and Rogues can be helpful in grabbing the flag.
If a teammate dies while they are holding the flag, you can grab the flag and bring it with you.
Barricades, bombs and tower are helpful in defending your flag.
If an enemy has stolen your flag, kill them and grab your flag back to put it back into place.
Killing an enemy by pushing them off a cliff or other one-hit-kill areas will cause the flag to go back to your base, without even needing to grab it.
Escort
In Escort, one team must escort their wagon to the end of the map while another team must prevent them from doing so. If the wagon reaches a checkpoint, the time increases. If the wagon makes it to the end, the attacking team wins, but if time runs out, the defending team wins.
Strategies
Defensive classes are useful for protecting the wagon from being stopped, as if one enemy is near the wagon it will stop.
Though troops can't help push the wagon, they can help with distracting the enemies or defending the wagon.
If no enemies are pushing the wagon for some time, the wagon will go backwards.
You can't place barricades on the wagon trail, so don't even try.
Placing trapdoors with bombs near the near the path is a great way of creating a dangerous trap.
Troops can help distract your enemies, and drive them away from the wagon.
Battering Ram
In Battering Ram, each team must compete to take control of a battering ram and bring it to the enemy's base to win. Along the way the battering ram will reach a checkpoint, and a wall that must be destroyed in order to advance. If the battering ram makes it to the enemy base, you win. If time runs out, the team that covered the most distance wins. Getting to the end results in an automatic victory.
Strategies
Strategies used in Escort also apply to Battering Ram.
If you manage to take control of the Battering Ram while it is at a checkpoint, the checkpoint will restore some of its health.
If the battering ram is left alone it will begin returning back to the center of the map.
Rotation Modes[]
Deathmatch
In Deathmatch, players compete to earn 20 points. You get one point for killing an enemy. Once a player gets 20 points, they win. Players cannot build in this mode, but can summon troops with Monster Crystals scattered around the map. Players count is limited to 12 in this mode.
Strategies
Try not to get killed. You don't want to be giving the enemy free points.
Team Deathmatch
In Team Deathmatch, both teams must compete to get 50 points before the other team does. You get one point for killing an enemy. Once a team gets 50 points, they win. Players cannot build in this mode, but can summon troops with Monster Crystals scattered around the map.
Strategies
Reviving an ally will cause your enemies to lose a point so reviving is recommended (especially as a Priest since they revive faster than other enemies).
Battle Royale
In Battle Royale, each player must fight to be the last to survive. In this mode, if you are killed, you are eliminated. Once every other player is dead, you win. Players cannot build in this mode, but can summon troops with Monster Crystals scattered around the map. Players count is limited to 12 in this mode.
Strategies
Strategies used in Deathmatch will also apply to Battle Royale, however, with higher stakes since you don't respawn after you are killed.
If a match goes on for too long, a magic field will begin closing in around the players, damaging anyone inside its influence. This is to force people together get them to fight.
Team Battle Royale
In Team Battle Royale, players fight to be the last to survive. In this mode, if you are killed, you are eliminated. Once one person is left . Players cannot build in this mode, but can summon troops with Monster Crystals scattered around the map.
Strategies
Strategies used in Team Deathmatch will also apply to Battle Royale, however, with higher stakes since you don't respawn after you are killed. Reviving is crucial in this mode.
Like in Solo Battle Royale, if a match goes on for too long, a magic field will begin closing in around the players, damaging anyone inside its influence.
Duel
In Duel, teams of four compete in an best-out-of-seven game of elimination. Defeat all the enemies to earn a point, and the first team to four points wins. Players cannot build in this mode, but can summon troops with Monster Crystals scattered around the map. Players count is limited to 8 in this mode.
Strategies
Strategies used in Battle Royale will also apply to Duel. Reviving is crucial in this mode.
Have a good team composition. It's recommended to always have a healer to keep each other alive.
Like in Battle Royale, if a match goes on for too long, a magic field will begin closing in around the players, damaging anyone inside its influence.
Harbinger
In Harbinger, players must fight to earn as many souls as possible. You earn souls by defeating enemies, but lose them if you are killed yourself. Once you obtain souls, you must take them to an Altar and deposit them to add to your score. Once a team gets 60 points, they win. Players cannot build in this mode, but can summon troops with Monster Crystals scattered around the map.
Strategies
Strategies used in Deathmatch will also apply to Harbinger.
Staying in groups is recommended as you will need protection and numbers to ward off enemies.
If one of your allies is killed, you can grab any souls they've collected to prevent them from going into enemy hands,
Bringing in a large amount of souls to an Altar can grant you a bonus, but puts a target on your back.
Siegeball
In Siegeball, each team must grab a ball that randomly spawns on the map and throw it into the enemy goal to earn points. If you are killed while holding the ball, someone else can grab it. Once time runs out, the team with the most points wins.
Strategies
Strategies used in Capture the Flag will also apply to Siegeball. Grabbing the ball from a dead enemy will put in your hands, giving you the chance to throw it into the enemy's goal.
You can't attack while holding the ball, as attack will have you throw the ball. Always be weary of that.
If you have the ball and are about to die, you can pass it to an ally so the enemy can't grab it from you.
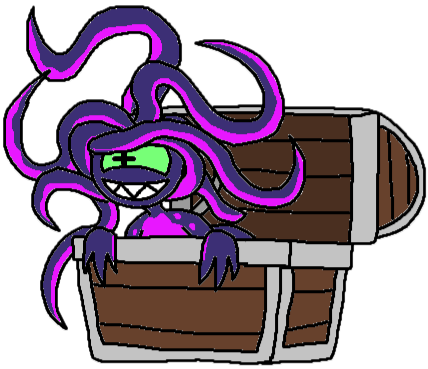
Treasure Plunder
In Treasure Plunder, each team must grab as much gold as possible and bring it to their base to earn points, while defending them from the enemy. Gold is scattered around the map, and if you are killed you will drop any gold you were holding. Once time runs out, the team with the most gold wins.
Strategies
Strategies used in Capture the Flag will also apply to Treasure Plunder.
You can carry up to 20 gold.
You can steal gold from enemy base by going near it. The longer you stay in the enemy base, the more gold you'll steal. Just be careful, as if enemies get into the capture area, you will stop stealing gold from them.
Look out for Treasure Chests! Grab these and bring them to your base and you'll earn 10 points! However, it's presence is always made known on the map, so it's a race to see which team will get it first!
Titan Takedown
In Titan Takedown, players must work together and attempt to fight against a randomly chosen Titan. The Titan is a larger version of the player's chosen class with increased power and health. If all the players are defeated, the Titan wins. If the Titan is defeated, the players win. Players cannot build in this mode, but can summon troops with Monster Crystals scattered around the map. Players count is limited to 12 in this mode.
Strategies
Strategies used in Battle Royale also apply to Titan Takedown.
While the Titan is powerful, avoiding large groups is a priority as they can easily chip away at the Titan's health.
The enemies are given a 30 second free period before the Titan appears. This gives whoever is chosen as the Titan the chance to scout the enemy and come up with a strategy.
Co-op Modes[]
Monster War
In Monster War the player is tasked with defending their base from 10 waves of monsters, seeking to destroy it. As players play they'll earn gold which they can use for stat upgrades or to build buildings. This mode is available in Easy, Medium and Hard difficulties, with the enemy count increasing the higher your difficulty is. Players count is limited to 6 in this mode.
Strategies
Team balance is important! A good balanced team can cover each other's weaknesses.
Players are given 30 seconds between each wave. Use this to your advantage and rebuild your defenses.
Players respawn slowly in this mode. Keep each other alive if you don't want to be overwhelmed.
On Waves 5 and 10, a powerful boss enemy will always appear, so be prepared to take it out.
Adventure Mode[]
Adventure Mode serves as Kingdombound 2's main singleplayer mode. After learning of rumors that a warlock named Ellania had plans to resurrect the Lich and take over the world, the three kingdoms made a temporary alliance to defeat this threat. Of course, they don't know what to do, and that's where you come in! You (alongside up to three other players) are tasked with adventuring through various lands, defeating Ellania's guardians, and stopping her plans of world domination.
Main article: Kingdombound 2 / Adventure Mode
Characters[]
Classes[]
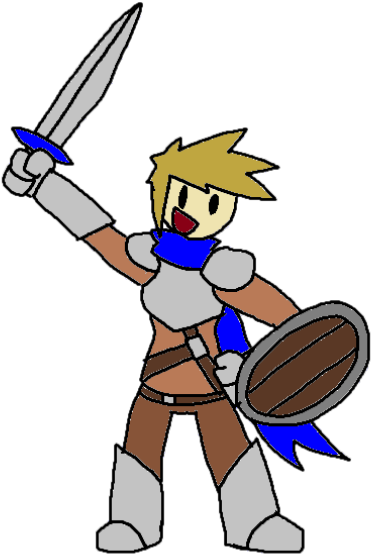
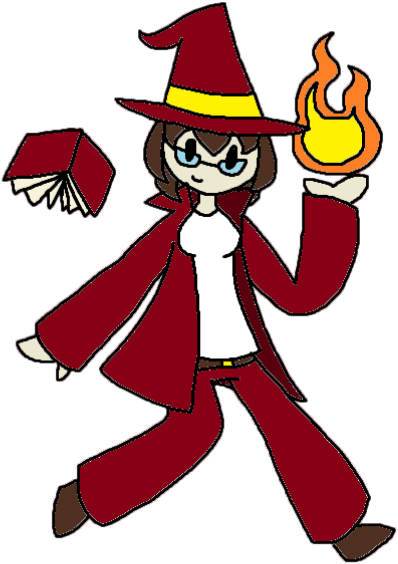
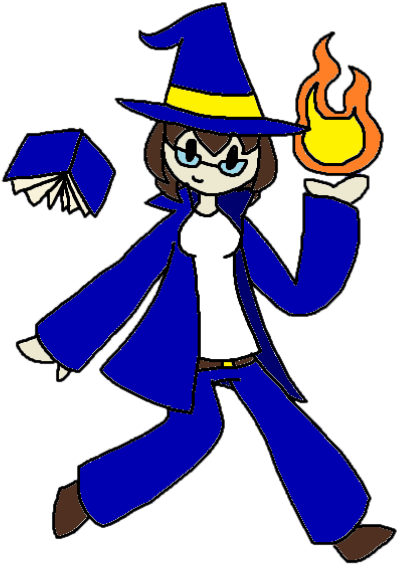
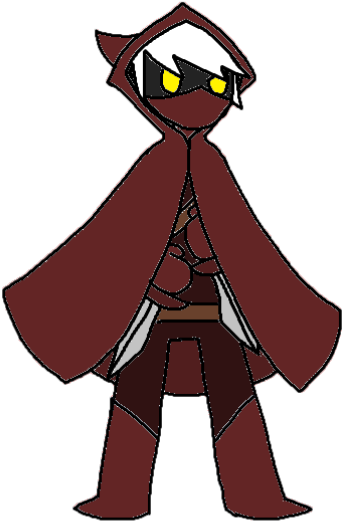
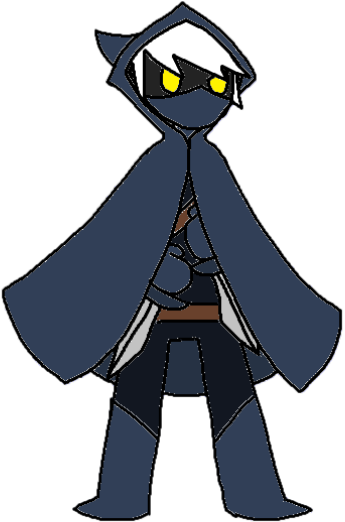
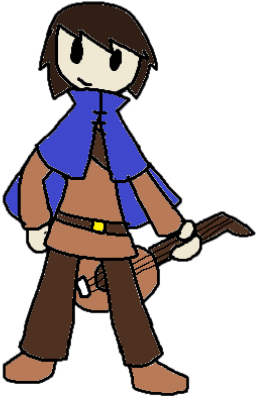
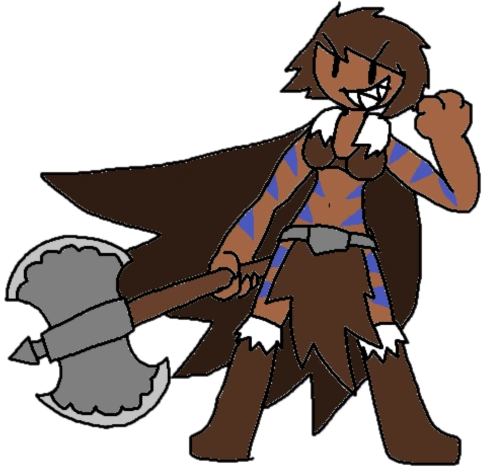
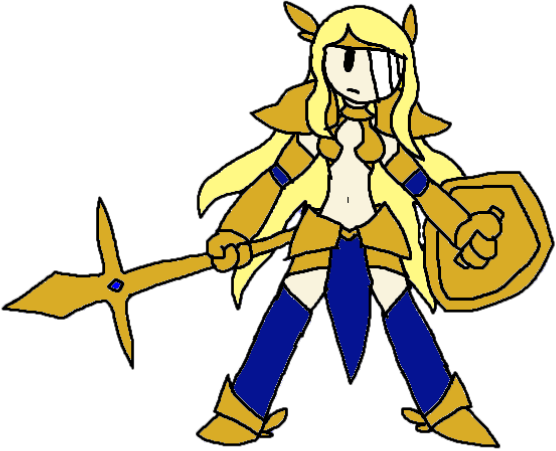
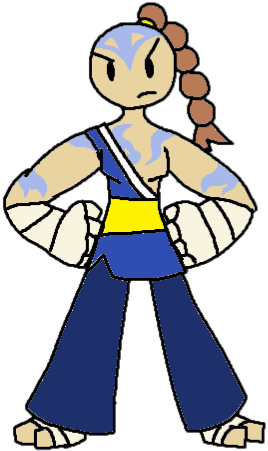
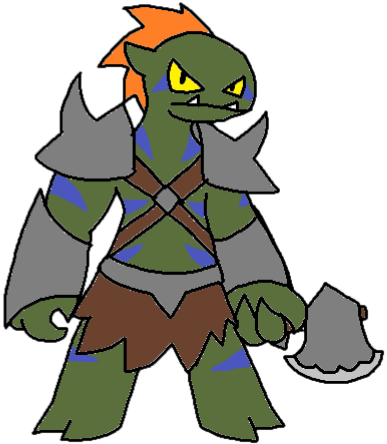
Kingdombound 2 features 21 playable characters, 9 more characters than the original Kingdombound's 12. Each class has different weapons, stats and abilities, each making them unique from each other. lasses are put into one of three types: Offense, Defense and Support, and are assigned to one of three factions: Glory, War and Honor. The color of a character's clothing changes depending on which team they are on.
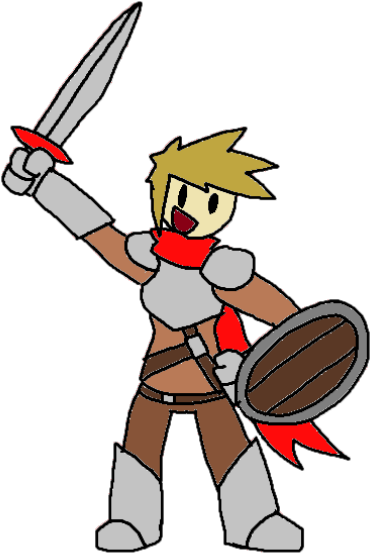
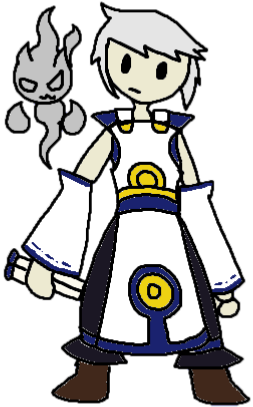
The latest in a line of legendary warriors, the Hero serves as the game's balanced offensive fighter. Wielding a sword and shield, he possesses a good balance of speed, damage and defense, and his skills allow him to take down most foes without having trouble in areas, making him great for beginners. However, while him broad range of abilities is useful, he doesn't excel in any particular area.
Type
Health
Speed
Offense
250
Medium
Attacks
Basic Attack
Sword Slash
The Hero performs a quick slashing attack. It has a good area of effect in front of them, allowing it to be used to take down groups of enemies if they are clumped together.
N/A
Aiming Attack
Sword Stab
The Hero performs a quick thrust forward with their sword. It's just as quick as the sword slash, but trades the area of effect in front of them for a thin, but longer-ranged attack.
N/A
Ability 1
Shield Bash
The Hero charges forward and smashes enemies in their way with a damaging shield bash. The attack will push back the target along with nearby enemies.
10 seconds
Shield Burst
The Hero performs a shield bash, creating a shockwave in from of him that reflects projectiles and knocks away nearby enemies.
Unlocked at Class Level 4.
10 seconds
Shield Blast
The Hero launches a shield-shaped projectile that absorbs projectiles and damages anyone in its way. Great against more projectile-focused classes.
Unlocked at Class Level 10.
15 seconds
Ability 2
Blade Beam
The Hero launches a wave of energy forward. A good projectile that can go through multiple enemies before disappearing.
15 seconds
Energy Lance
The Hero fires a spear of energy forward. Travels a farther distance and deals more damage, though its harder to hit enemies due to its smaller size.
Unlocked at Class Level 2.
15 seconds
Power Slash
The Hero creates a spinning blade of energy that deals multiple hits to anyone in the radius. Deals more damage at the cost of range.
Unlocked at Class Level 6.
15 seconds
Ability 3
Spin Attack
The Hero spins around like a tornado, dealing damage to anyone around him. The player can move while spinning, albeit slowly, and pressing the attack button while the performing the attack allows the Warrior to perform a quick dash in that direction. Using this too much however will cause the Warrior to become dizzy for a short time.
25 seconds
Quick Spin
The Hero spins quickly, damaging anyone around him. This version deals less damage, but lasts longer and allows for increased speed and control while spinning.
Unlocked at Class Level 8.
25 seconds
Tornado Spin
The Hero spins wildly, damaging anyone around him. This version has a larger size and is capable of dealing more damage, but lasts a shorter time.
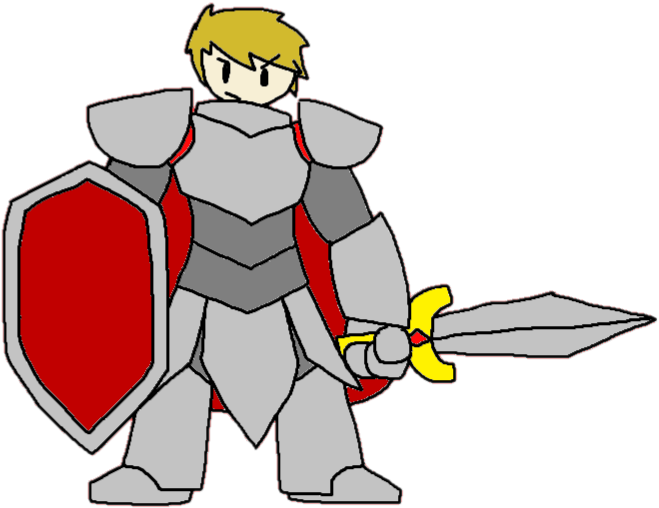
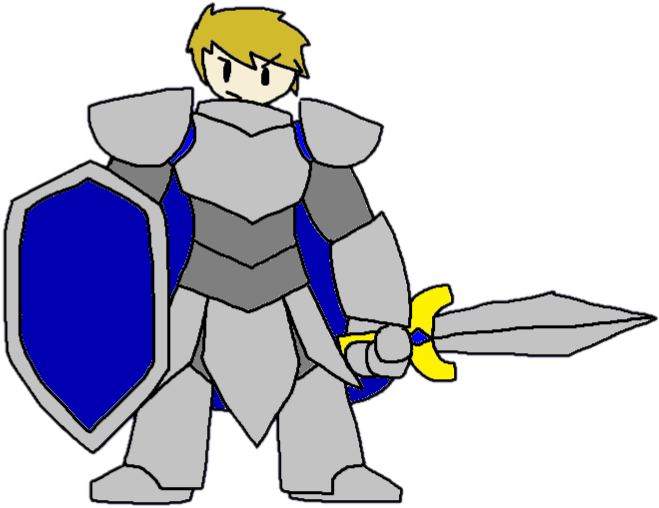
Heavily armored knights who fight to protect the innocent, the Paladin is the best class at defending your team. Armed with a sword and shield, his high health and Holy Shield ability allows him to absorb tons of damage, providing protecting for him and his allies, while breaking through defenses with his high damage. However, he has slow speed, and is vulnerable against more agile classes.
Type
Health
Speed
Defense
400
Slow
Attacks
Passive
Armored
The Paladin is resistant to knockback, being launched at lower distances.
N/A
Basic Attack
Sword Slash
The Paladin performs a slashing attack. Causes good damage and has a good area of effect in front of them, but is considerably slow.
N/A
Aiming Attack
Knight's Shield
The Paladin creates a shield in front of them, blocking all oncoming attacks at the cost of making the Paladin unable to attack. Can be used to defend allies behind you. Unlike other abilities, it has its own health bar that depletes if it takes damage, but recharges when not in use. The Paladin's movement speed is reduced while the shield is up.
N/A (Posesses 500 health)
Ability 1
Thunder Slash
The Paladin launches an electric blast from their sword that creates an explosion, stunning all enemies and buildings in its radius for a short time.
15 seconds
Wind Blade
The Paladin launches an blade of wind from their sword, slashing through enemies in its way and sending aerial enemies to the ground. More suited as a direct attack, but it loses the ability to stun enemies.
Unlocked at Class Level 9.
15 seconds
Ability 2
Armored Tackle
The Paladin charges forward, shield-first, damaging any enemy in their way and reducing any damage they take while they perform the charge.
20 seconds
Shoulder Bash
The Paladin rushes forward a short distance while performing a powerful shoulder bash, damaging and knocking away anyone nearby. Suited as a close-ranged attack.
Unlocked at Class Level 3.
20 seconds
Ability 3
Rally
The Paladin rallies nearby allies, increasing their speed and damage for a short time. Useful for quickly getting to objectives or assisting in and against pushes.
30 seconds
Bolster
The Paladin rallies nearby allies, granting them armor and a temporary immunity to status effects. Better suited towards protecting allies rather than starting an offense.
Unlocked at Class Level 6.
30 seconds
Battle Heal
The Paladin creates an aura around it, healing nearby allies for a short time.
Intelligent magic-users who have mastered the art of fire magic, the Wizard uses her magical spells to unleash burning havoc upon the enemy. Great at crowd-control, their fire attacks cover a large area, and while they don't do much damage, light enemies on fire, dealing damage to them overtime. They are bogged down by a rather slow movement speed.
Type
Health
Speed
Offense
200
Slow
Attacks
Passive
Mana
The Wizard has 200 mana, which she uses to fuel her attacks. If she runs out, she can't use them until it recharges. The mana recharges overtime when not attacking, but can be charged to speed it up at the cost of leaving yourself vulnerable.
N/A
Burn Immunity
The Wizard cannot be lit on fire.
N/A
Basic Attack
Flamethrower
The Wizard fires a stream of fire from their hands. Damages enemies near them and lights them on fire. Using it slowly drains your mana.
N/A
Aiming Attack
Fireball
The Wizard launches a small fireball from their hands. Lights enemies that touch it on fire. If launched at an enemy already on fire, it deals extra damage. Launching a fireball uses 20 mana.
N/A
Ability 1
Explosion
The Wizard launches a small fireball forward. The fireball will slowly fly forward, dealing little damage to anyone in its way. Press the ability button again to detonate the fireball, dealing powerful damage to anyone in its radius. Uses 50 mana.
15 seconds
Firebolt
The Wizard launches a fast-moving blast of fire that flies forward at high speed. Deals less damage than Explosion, though works better as a standard attack, and its big projectile size makes it useful for damaging groups. Uses 50 mana.
Unlocked at Class Level 2.
20 seconds
Will o' Wisp
The Wizard launches a swirling fireball that chases after enemies. It moves very slowly and doesn't have much of an explosion size, but if it hits, it packs a punch. Uses 50 mana.
Unlocked at Class Level 6.
20 seconds
Ability 2
Firestorm
The Wizard creates a trail of flames in front of her. This trail will damage and knock back enemies and light them on fire, and will stay on the map for some time. Useful for separate enemies or preventing them from escaping. Uses 100 mana.
25 seconds
Wildfire
The Wizard creates a blast that explodes into an area of flames. Anyone within the area with take damage and light on fire. Covers a wider area, though loses the knockback and lasts slightly shorter. Uses 100 mana.
Unlocked at Class Level 8.
30 seconds
Ability 3
Meteor
The Wizard charges up before launching herself in the desired direction, or diving downward if used mid-air. Causes good damage against burning enemies, but can also be used as a way of escape. Uses 50 mana.
20 seconds
Flamecoat
The Wizard coats herself in flames and charges at enemies. Deals less damage than Meteor but allows for movement and control, making it great at harassing groups or tearing through weak troops. Uses 100 mana.
Unlocked at Class Level 4.
30 seconds
Flamenado
The Wizard creates a flaming tornado around herself. It has abysmal speed and doesn't last for very long, but has the added effect of pulling in nearby enemies and damaging them. Just be ready to fight back once the tornado is over. Uses 100 mana.
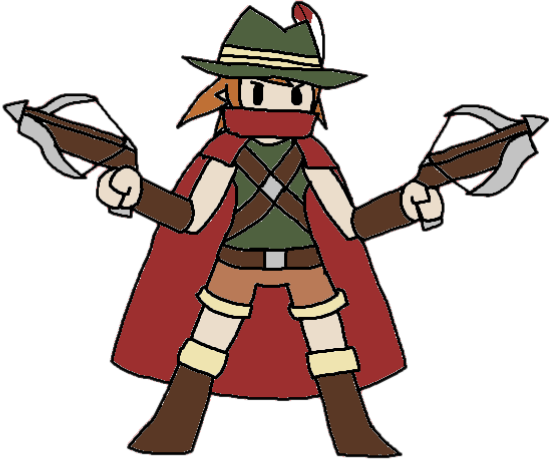
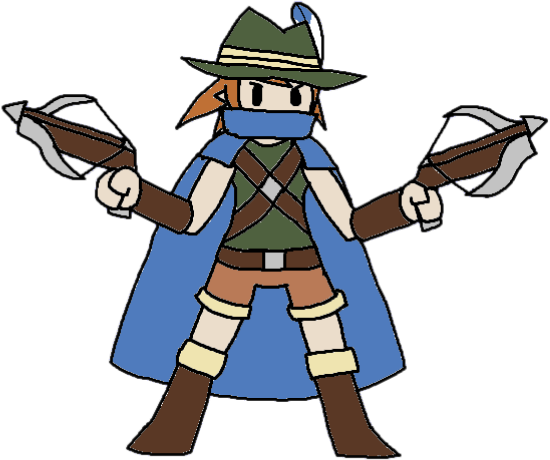
Skilled and stylish warriors who enjoy hunting monsters for sport, the Marksman excels as an offensive ranger. Wielding dual crossbows, they barrage the enemy with an onslaught of arrows, while keeping a safe distance with their good speed and abilities. They struggle at close-range however, as they have low health and their attacks don't cover a wide area.
Type
Health
Speed
Defense
150
Fast
Attacks
Passive
Ammo
The Marksman holds up to 6 arrows at a time, which they use in their attacks. If they runs out of ammo they can't attack. The arrows automatically reload upon running out, but can be manually reloaded at any time.
N/A
Basic Attack
Rapid Shot
The Marksman fires rapid shots from their crossbows. Its fast attack rate makes it a great attack, though because each shot uses an arrow it drains your ammo pretty quickly.
N/A
Aiming Attack
Precision Shot
The Marksman fires a single fast-firing arrow. Better suited towards long range.
N/A
Ability 1
Bomb Arrow
The Marksman equips two bomb arrows before firing them at enemies. Causes high damage if landed, though the Marksman themselves are slowed for a bit while pulling out the arrows. Uses two arrows.
25 seconds
Flame Arrow
The Marksman fires off several arrows that create small explosions on impact and lighting enemies on fire. While you are slowed for longer while firing, and the arrows deal less damage overall, its large area makes it great for taking out groups. Uses six arrows.
Unlocked at Class Level 3.
25 seconds
Electro Arrow
The Marksman fires off two electric arrows before firing them at enemies. While dealing less damage and not causing an explosion, these arrows pierce through enemies and can be used more often compared to other special arrows. Uses two arrows.
Unlocked at Class Level 12.
20 seconds
Ability 2
Jumping Fire
The Marksman leaps high into the air, firing arrows below them to damage enemies. A great way to disorient your enemies or get over obstacles. Uses 6 arrows.
30 seconds
Leaping Fire
The Marksman leaps high into the air, firing arrows below them to damage enemies. Unlike Jumping Fire, this covers more distance, at the cost of dealing less damage.
Unlocked at Class Level 6.
30 seconds
Bombing Fire
The Marksman leaps into the air and fires bomb arrows around them. Unlike Jumping Fire your speed is slowed dramatically, making it useless in an escape, but it can be used to dodge attacks and unleash powerful damage on anyone nearby. Only uses 4 arrows.
Unlocked at Class Level 9.
20 seconds
Ability 3
Dodge Roll
The Marksman performs a roll, dodging incoming damage while reloading her crossbows. Great as a way to dodge a potential attack, or to unload more arrows into the enemy.
Cold and silent assassins for hire, the Assassin is a tricky class who excels in ambushing the enemy. He can be a bit difficult to use due to his low health, but his ability to quickly take out isolated targets and get behind enemy lines can be integral to victory. With Smoke Bombs and his Cloak ability, he can get in and out of situations very quickly.
Type
Health
Speed
Offense
125
Fast
Attacks
Basic Attack
Dagger Slash
The Assassin quickly slashes enemies with their dagger. Deals light damage, but is extremely fast.
N/A
Aiming Attack
Throwing Knives
The Assassin tosses three throwing knives forward. They deal very little damage, but can be hard to see. Great for harassing enemies from afar.
N/A
Ability 1
Smoke Bomb
The Assassin tosses a gas bomb that gases nearby enemies, limiting their vision for a short time.
20 seconds
Remote Bomb
The Assassin tosses a gas bomb that gases nearby enemies, limiting their vision for a short time. This bomb doesn't explode impact, instead blowing up by pressing the ability button. While it is slower to explode, it's great for setting up traps.
Unlocked at Class Level 2.
25 seconds
Stun Bomb
The Assassin tosses a flashbang that stuns nearby enemies, leaving them vulnerable to damage. It has short range, but its effect is more potent at dealing with targets quickly.
Unlocked at Class Level 10.
25 seconds
Ability 2
Assassinate
The Assassin strikes a pose before they begin slashing everybody around him, causing powerful damage. You can move while performing the attack, though your speed is greatly reduced.
25 seconds
Quick Assassinate
The Assassin strikes a pose before they begin slashing everybody around him, causing powerful damage. Its range is greatly reduced, but it comes out quicker and your movement speed is kept the same, making it great for escaping enemies.
Unlocked at Class Level 4.
25 seconds
Soul Assassinate
The Assassin strikes a pose before they begin slashing everybody around him, causing powerful damage. It deals less damage and has a slower start-up time, but damaging anyone while you are performing the attack will restore your health.
Unlocked at Class Level 12.
25 seconds
Ability 3
Cloak
The Assassin becomes invisible from enemy sight for a short time. Great for sneaking into or away from enemy territory. Attacking or using any abilities will cause the Assassin to immediately reappear. Lasts for 8 seconds.
15 seconds
Ghost Step
The Assassin quickly becomes invisible, gaining a quick speed boost. This ability is better suited towards a more offensive playstyle or making a quicker escape, at the cost of less cloak time. Lasts for 4 seconds.
Unlocked at Class Level 6.
15 seconds
Mirage Phase
The Assassin quickly teleports in the direction they are moving. Though it has a short range and you lose the ability to go invisible, the ability is great for quickly getting in and out of a situation, while dodging attacks.
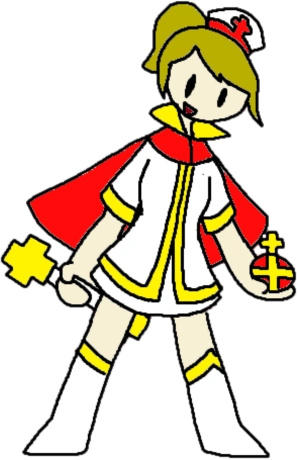
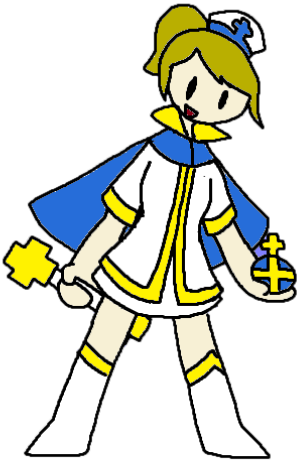
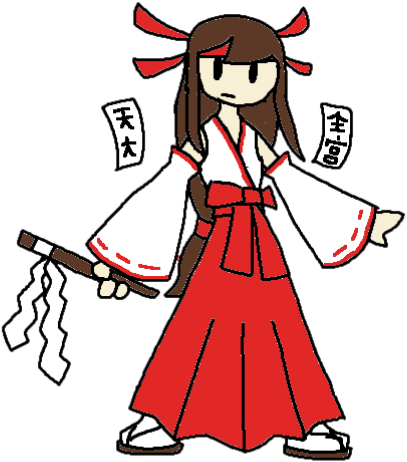
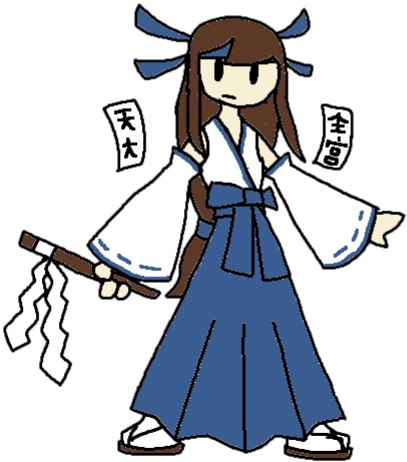
A woman of holy belief who wishes to heal the sick and injured, the Priestessess is all about healing allies and keeping them in the fight. She lacks combat abilities, but can efficiently heal allies and provide constant support for them on the battlefield, which makes her integral in many strategies.
Type
Health
Speed
Support
175
Medium
Attacks
Passive
Quick Revive
The Priestess can revive dead allies twice as quickly as all other classes.
N/A
Regenerate
The Priestess slowly regenerates lost health (3 a second)
N/A
Basic Attack
Stave
The Priestess bashes the enemy with her stave. It has short range and doesn't deal much damage, though it has a chance to do knockback.
N/A
Aiming Attack
Holy Light
The Priestess launches a blast of light at distant foes. The range is useful when under attack, though the attack itself doesn't deal much damage.
N/A
Ability 1
Heal Beam
The Priestess launches a beam of light that latches onto allies, constantly healing them and granting them armor.
N/A
Quick Heal Beam
The Priestess launches a beam of light that latches onto allies, constantly healing them. This beam heals enemies faster, but is unable to grant them armor.
Unlocked at Class Level 6.
15 seconds
Power Beam
The Priestess launches a beam of light that latches onto allies, constantly healing them. This beam heals enemies slower, but grants anyone you are healing a damage boost.
Unlocked at Class Level 9.
N/A
Ability 2
Heal Bomb
The Priestess tosses a bomb that explodes into bright light, healing allies touching it and knocking away enemies in the initial blast.
15 seconds
Heal Orb
The Priestess launches an orb of healing energy that causes high damage to enemies, while healing an ally and granting them armor if they touch it.
Unlocked at Class Level 3.
15 seconds
Ability 3
Blast Jump
The Priestess throws a heal bomb under her feet, launching her into the air and knocking back nearby enemies. Useful for making an escape or quickly getting to an injured ally.
15 seconds
Heal Wave
The Priestess creates a blast around her, which heals nearby allies while knocking away enemies.
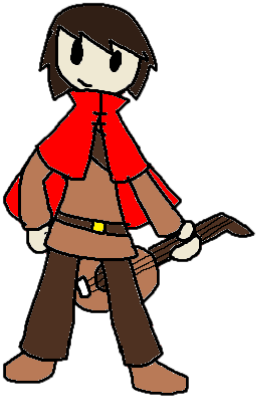
A wandering musician who seeks to bring positivity wherever they go, the Bard is a great supporter who provides buffs to all his allies. Armed with a guitar, he uses the power of song to boost his allies' morale. In combat, however, they struggle due to their little damage and low health.
Type
Health
Speed
Support
125
Fast
Attacks
Passive
Song Effects
While a song is currently equipped, the Bard gains certain effects. With Heal Song, you slowly restore health, and with Speed Song you gain a speed boost.
N/A
Basic Attack
Song Burst
The Bard creates a sound wave around him, healing / boosting nearby allies and damaging nearby enemies.
N/A
Aiming Attack
Song Blast
The Bard create a sound blast in front of him, healing / boosting allies hit by it and damaging nearby enemies. Covers less area, but can hit more distant allies.
N/A
Ability 1
Speed Song
The Bard swaps between a healing song and a speed-boosting song.
5 seconds
Damage Song
The Bard swaps between a healing song and a damage-boosting song. While Damage Song is equipped, your attacks gain a damage boost.
Unlocked at Class Level 3.
5 seconds
Defense Song
The Bard swaps between a healing song and an armor-granting song. While Defense Song is equipped, you slowly recharge armor points.
Unlocked at Class Level 9.
5 seconds
Ability 2
Refresh
The Bard plays a unique song that removes status effects and reduces the ability cooldown of nearby allies by 5 seconds.
15 seconds
Ability 3
Powersong
The Bard increases the speed of their current song for a short time, doubling their effectiveness. Using the song to attack enemies with cause knockback.
15 seconds
Loudsong
The Bard increases the volume of their current song for a short time, increasing its area of effect.
Unlocked at Class Level 6.
15 seconds.
Earworm
The Bard plays a special song that gets stuck in people's ears. Whoever is nearby will have the Bard's current song effect linger for 8 seconds, even when they aren't near him. Changes effect depending on the song. Enemies nearby will begin taking damage overtime.
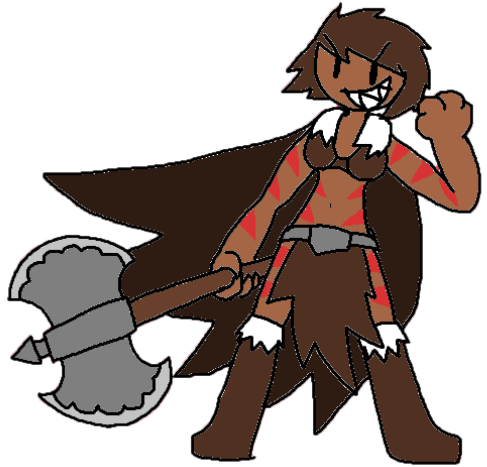
A member of a vicious clan of warriors, the Berzerker yearns for constant battle and bloodshed. Running headfirst into the fight with her massive battle-axe, she destroys everything in her path with her high damage and fast movement speed. However, she has low health, so players are incentivized to keep moving while playing as her.
Type
Health
Speed
Offense
150
High
Attacks
Basic Attack
Axe Swing
The Berzerker swing their axe in front of her. Covers a good area in front of her and causes good damage, but the attack itself is pretty slow.
N/A
Aiming Attack
Axe Slam
The Berzerker lunges forward and slams her axe into the ground. Deals high damage but requires some precision.
N/A
Ability 1
Battlecry
The Berzerker lets out an intimidating roar. Anyone around her will have their speed reduced for a short time.
20 seconds
Roar
The Berzerker lets out an intimidating roar. Anyone around her will take damage and be knocked backwards.
Unlocked at Class Level 3.
15 seconds
Ability 2
Jumping Crush
The Berzerker leaps into the air before coming back down and performing a mighty axe swing to anyone below her. It also creates a shockwave to damage nearby enemies as well. The Berzerker can move a short distance during the jump, allowing them to go over traps and obstacles.
15 seconds
Multi-Crush
The Berzerker leaps into the air before performing multiple axe swings, each sending her downward before launching her back into the air. While these swings do less damage, the multiple jumps allow for increased mobility, and allowing the attack to be used on multiple enemies.
Unlocked at Class Level 6.
15 seconds
Ability 3
Berserk Rage
The Berzerker flies into a blind rage, increasing their speed and damage for a short time. Lasts for 5 seconds.
30 seconds
Power Rage
The Berzerker flies into a blind rage, increasing their speed and damage for a short time. Lasts for 3 seconds, but its effects are even more powerful, potentially allowing you to cause more damage.
Unlocked at Class Level 9.
30 seconds
Controlled Rage
The Berzerker flies into a blind rage, increasing their speed and damage for a short time. Lasts for 8 seconds, but its effects are less potent.
Holy warriors who seek out and fight those who have performed terrible deeds, the Valkyrie is a mobile team defender. She has a good balance of stats, good speed, ranged damage with her spear and can provide quick cover for allies with shields. However, her shields are weaker than Paladin's, making her less suited for defending entire teams.
Type
Health
Speed
Defense
275
Medium
Attacks
Basic Attack
Spear Stab
The Valkyrie stabs her spear straight forward. Covers some good distance, making it useful for spacing out enemies, though it can be a bit slow on the damage side.
N/A
Aiming Attack
Holy Shield
The Valkyrie puts up a shield in front of her, blocking attacks. Unlike other abilities, it has its own health bar that depletes if it takes damage, but recharges when not in use. While shielding, you still have the same movement speed, allowing you to quickly move towards your enemies while shielding.
N/A
(Possesses 300 health)
Ability 1
Javelin Throw
The Valkyrie tosses her spear forward as a projectile. The spear pierces through multiple enemies and cannot be reflected. After being thrown, it returns to the Valkyrie.
20 seconds
Javelin Spin
The Valkyrie tosses her spear forward as a spinning projectile. The spear deals high damage, covers a wide area in front of her, and destroys projectiles, though it lacks range.
Unlocked at Class Level 2.
20 seconds
Ability 2
Spear Rush
The Valkyrie charges forward in a straight line. If she runs into an enemy, they will become pinned, and take massive damage upon reaching a wall. Pressing the attack button while charging to stop and perform a spear swing, damaging nearby enemies and launching pinned foes.
15 seconds
Angelic Impact
The Valkyrie charges forward at high speed. You have more control than with Spear Rush, however, you cannot pin enemies. Instead charging into enemies creates an explosion which knocks back anyone in the radius.
Unlocked at Class Level 6.
15 seconds
Absorption Armor
The Valkyrie rushes forward a short distance, charging into enemies with her shield. Hitting an enemy knocks them away, but if she is hit by an attack or projectile while performing this attack, the damage will increase and she will gain a temporary speed and damage boost.
Unlocked at Class Level 8.
15 seconds
Ability 2 (Flying)
Spear Slam
The Valkyrie flies downward and slams her spear into the ground, damaging anyone near her. This puts her out of flight, but can be used to quickly take out enemies or get back to the ground.
N/A
Ability 3
Wings of Justice
Wings appear behind the Valkyrie as she leaps into the air and begins flying. For 8 seconds, the Valkyrie can attack enemies from the air while becoming immune to melee damage. However, she cannot put up her shield, and if she is hit by a projectile or anyone who is jumping, she will fall to the ground.
30 seconds
Wings of Swiftness
Wings appear behind the Valkyrie as she leaps into the air and begins flying. For 4 seconds, the Valkyrie can attack enemies from the air while becoming immune to melee damage. Unless Wings of Justice however, you movement speed is greatly increased. You can't put up your shield and white flying if you are hit by an attack you will fall to the ground.
Unlocked at Class Level 4.
30 seconds
Wings of Guarding
Wings appear behind the Valkyrie as she leaps into the air and begins flying. For 12 seconds, the Valkyrie can attack enemies from the air while becoming immune to melee damage. Your movement speed is slowed while flying, but you can withstand more damage before being knocked to the ground.
A woman born with the power to control icy magic, the Sorceress provides damaging support by covering the battlefield in a thick layer of snow and ice. She uses her magic to slow down her enemies, leaving them vulnerable to her and her allies' attacks. However, on her own, she can't deal much damage, and her slow movement speed can leave her vulnerable.
Type
Health
Speed
Offense
200
Slow
Attacks
Passive
Mana
The Sorceress has 200 mana, which she uses to fuel her attacks. If she runs out, she can't use them until it recharges. The mana recharges overtime when not attacking, but can be charged to speed it up at the cost of leaving yourself vulnerable.
N/A
Frost Immunity
The Sorceress is not affected by ice's slowing effects.
N/A
Basic Attack
Icicle
The Sorceress launches sharp icicles at her enemies. They deal more damage if the enemy is frozen, and will slowly apply freeze to them as well. Each icicle uses 10 mana.
N/A
Aiming Attack
Snowball
The Sorceress builds up snow, creating a large snowball before launching it at enemies. A damaging projectile that freezes enemies. The longer you hold the button, the more damage it will do, but the more mana will be used, 50 mana when fully charged.
N/A
Ability 1
Blizzard
The Sorceress stops as she begins to control a large circle. Upon pressing the attack button, she will summon icicles to rain down in that area, damaging enemies and freezing them. Uses 100 mana.
25 seconds
Controlled Blizzard
The Sorceress stops as she begins to control a large circle. Upon pressing the attack button, she will summon icicles to rain down in that area, damaging enemies and freezing them. It deals even more damage, but suffers from short range. Uses 100 mana.
Unlocked at Level 6.
25 seconds
Snowfall
The Sorceress stops as she begins to control a large circle. Upon pressing the attack button, she will summon snow to rain down in that area, damaging enemies and freezing them. It deals much less damage, and is only able to slow enemies, but it lasts much longer than a normal Blizzard. Uses 100 mana.
Unlocked at Level 9.
25 seconds
Ability 2
Ice Wall
The Sorceress summons a shield of ice in front of her to block attacks. Press the ability button again and the Sorceress will launch the wall of ice at enemies to damage and push them away. Uses 100 mana.
20 seconds
Ice Ring
The Sorceress summons a shield of ice around her to block attacks. The shield covers more area, but the shield itself has less health. Press the ability button again and the Sorceress will destroy the ring, creating an explosion that damages enemies and pushes them away. Uses 100 mana.
Unlocked at Level 12.
20 seconds
Ability 3
Ice Clone
The Sorceress teleports in the held direction, as an icy statue of her appears in her place. The statue will attract nearby troops, causing them to prioritize attacking it. After some time, the statue explodes, damaging and freezing any nearby enemies. Uses 50 mana.
20 seconds
Ice Lure
The Sorceress teleports in the held direction, as an icy statue of her appears in her place. The statue lasts for longer, and creates an icy field around it that damages and slows nearby enemies. This makes it more useful against troops, but not only does it have short range, it can be destroyed by enemy attacks. Uses 50 mana.
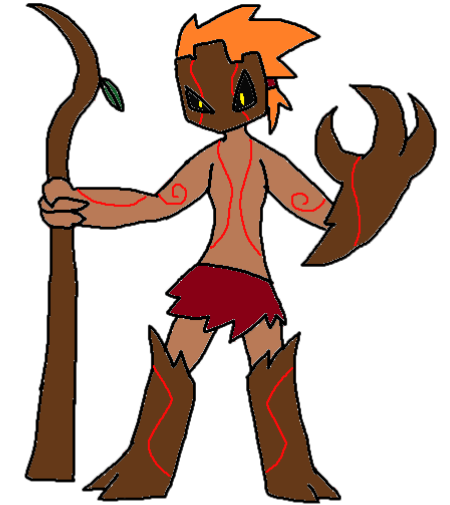
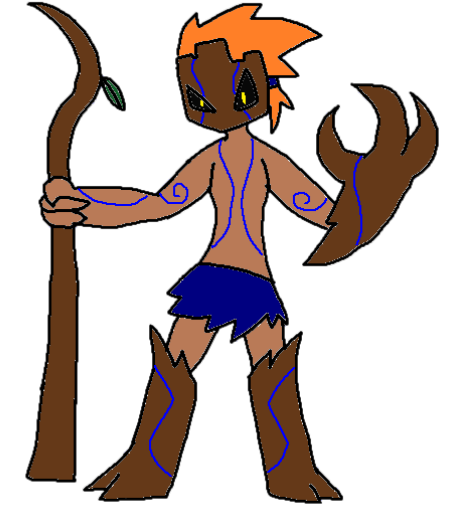
A mysterious and silent protector of nature, the Druid is a unique class who focuses on harassing teams and preventing them from advancing. With their staffs they drain their enemy's health and apply a variety of debuffs and obstacles in order to make it hard for them to make it to wherever they need to be. He's great for area denial and setting up coordinated attacks.
Type
Health
Speed
Defense
200
Medium
Attacks
Basic Attack
Energy Sap
The Druid creates a field around them that drains the health of nearby enemies and transfers it to you.
N/A
Aiming Attack
Energy Snare
The Druid creates energy tendrils that latch to enemies and drains their health, transferring it to you.
N/A
Ability 1
Nature's Curse
The Druid creates a green blast around them that makes players unable to use their abilities for a short time and blocks healing. Stuns buildings and troops in the radius as well.
15 seconds (after detonation)
Ability 2
Earthwall
The Druid creates a wall of vines a distance in front of them. Acts like a normal wall and can be destroyed if it takes enough damage, though it disappears after enough time has passed. Can be used to block off certain areas to enemies or prevent them from escaping.
15 seconds
Ability 3
Tendril Trap
The Druid plants a root into the ground that can be remotely detonated. Anyone near the plant when it detonates will not only take damage but have a reduction in their speed. It can be destroyed through fire attacks.
A girl who grew up living in the wild, the Shaman is a vicious fighter who benefits when around troops. Alongside her wolf companion, she rushes into battle with high speed, buffing nearby troops and overpowering the enemy through numbers. On her own, she isn't great, due to her low health and lack of ranged options.
Type
Health
Speed
Offense
150
Fast
Attacks
Basic Attack
Claw Slash
The Shaman slashes enemies with her claws. Very fast, but it doesn't deal much damage.
N/A
Aiming Attack
Cross Slash
The Shaman lunges forward and slashes enemies. More range and a bit more damage though a bit slow.
N/A
Ability 1
Wolf's Call
The Shaman summons a Wolf to attack enemies. The Wolf is a very fast troop with 100 health, that will attack nearby enemies by lunging at them and biting them. Press the ability button again to have the Wolf go away. While not fighting, the Wolf will regenerate its health back.
60 seconds (after wolf dies)
Hawk's Call
The Shaman summons a Hawk to attack enemies. The Hawk is a flying troop with 50 health, that will attack by hovering nearby enemies with its talons, and can also pick up bombs and drop them on enemies. While not fighting, the Wolf will regenerate its health back.
Unlocked at Class Level 3.
80 seconds (after hawk dies)
Bear's Call
The Shaman summons a Bear to attack enemies. The Bear is a slow troop with 250 health, that will attack with powerful slashes and bites. Press the ability button to have the Bear go away. While not fighting, the Bear will regenerate its health back.
Unlocked at Class Level 12.
80 seconds (after bear dies)
Ability 2
Howl
The Shaman howls, increasing the speed and damage of all nearby troops for a short time.
25 seconds
Healing Cry
The Shaman cries out, creating a healing aura that restores the health of all nearby troops.
Unlocked at Class Level 6.
30 seconds
Ability 3
Pounce
The Shaman flies forwards and jumps on top of an enemy. If she lands the attack, she begins clawing into the enemy, dealing damage until the enemy eventually dies. The enemy is left unable to attack, but attacks from other players will knock you off.
20 seconds
Rend Flesh
The Shaman flies forwards and jumps on top of an enemy. If she lands the attack, she begins clawing into the enemy, dealing damage until the enemy eventually dies. It deals less damage than Pounce, but has the added effect of healing the Shaman while she is attacking. The enemy is left unable to attack, but attacks from other players will knock you off.
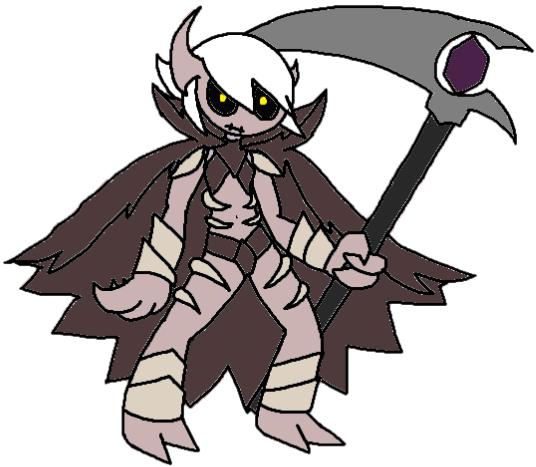
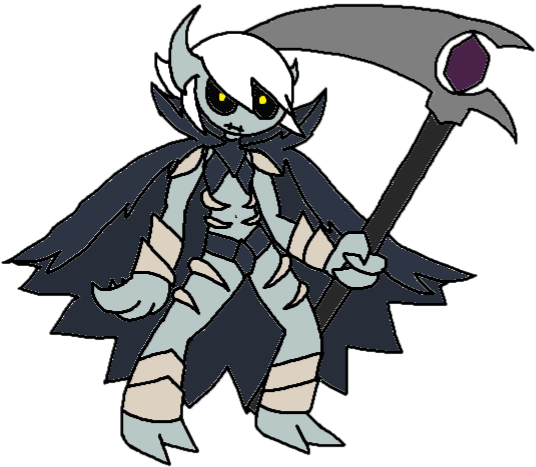
A wizard who sold her soul to demons in exchange for powerful magic abilities, the Warlock is a great class for guarding objectives and supporting allies. Wielding a scythe, she has the unique ability to raise the undead, and collect blood from fallen players as a damaging projectile or as a way to enhance your minion's powers.
Type
Health
Speed
Support
200
Slow
Attacks
Gimmick
Blood
The Warlock can store up to 150 blood from dead players, and can be used in conjunction with Blood Bullet to damage enemies and enhance and heal and upgrade your minions. You gain 50 blood per player.
N/A
Basic Attack
Scythe Slash
The Warlock slashes nearby enemies with their scythes. The attack is a bit slow, but causes great damage and covers a wide area.
N/A
Aiming Attack
Blood Bullet
The Warlock launches a shot of searing blood forward. Firing them at a minion allows you to heal them and enhance their powers. Every Blood Bullet you fire uses 25 blood.
N/A
Ability 1
Skeleton Sentry
The Warlock summons a skeleton that stands in place, launching blasts of energy at nearby enemies. Enhancing it allows you to increase its damage and range. It can be enhanced twice, each upgrade needing 50 blood. Only one skeleton can be out at a time, and trying to place down a second one will move the first one to that location.
30 seconds
Mini Skeleton Sentry
The Warlock summons a mini skeleton that stands in place, launching blasts of energy at nearby enemies. Enhancing it allows you to increase its damage and range. It can be enhanced once, each upgrade needing 50 blood. Mini Skeletons are weaker than normal Skeletons, but they are smaller and the player can have up to two up at a time.
Unlocked at Class Level 2.
15 seconds
Mummy Missile
The Warlock summons a mummy that stands in place, launching blasts of energy at enemies. Enhancing it allows you to increase its damage and range. It can be enhanced twice, each upgrade needing 50 blood. Unlike Skeletons, Mummies' projectiles explode on impact, and have a longer range at the cost of a slower firing speed. Only one mummy can be out at a time, and trying to place down a second one will move the first one to that location.
Unlocked at Class Level 6.
30 seconds
Ability 2
Soul Totem
The Warlock summons a totem that heals nearby allies. Summoning one requires 50 blood, and it cannot be enhanced. Only one totem can be out at a time, and try to place down a second one will remove the first one.
30 seconds
Bone Totem
The Warlock summons a totem that increases the damage of nearby allies. Summoning one requires 50 blood, and it cannot be enhanced. Only one totem can be out at a time, and try to place down a second one will remove the first one.
Unlocked at Class Level 4.
30 seconds
Eldritch Totem
The Warlock summons a totem that increases creates a barrier, shielding any ally within it. Summoning one requires 100 blood, and it cannot be enhanced. Only one totem can be out at a time, and try to place down a second one will remove the first one.
Unlocked at Class Level 19.
30 seconds
Ability 3
Dark Vortex
The Warlock launches a dark void that pulls in nearby enemies. Allows you to pull enemies into you and your allies' attacks, making it useful for harvesting blood. Summoning a vortex requires 100 blood.
25 seconds
Dark Call
The Warlock summons a dark mist, which temporarily increases the power of their summons for a short time. Sentries will now deal more damage and fire faster, while totems will give out their effects at a faster rate. Using this requires 100 blood.
Unlocked at Class Level 8.
30 seconds
Dark Summoning
The Warlock summons a raises the dead, summoning two skeletons with swords to attack enemies. These act as troops, with a basic amount of health, good close-ranged damage and speed. Using this requires 100 blood.
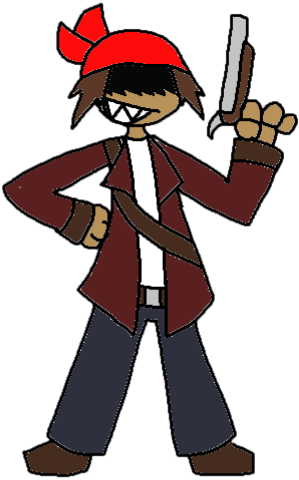
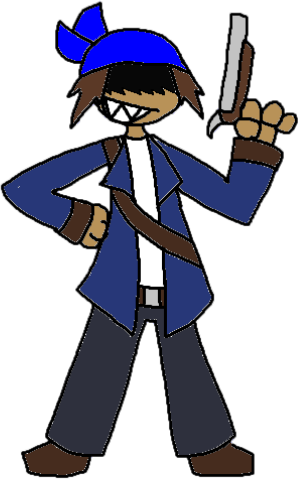
A sea-travelling outlaw in search of riches, the Pirate work best in combination with buildings. His Tinker ability combined with his enhanced material gathering makes him great for those trying to fortify their bases. In combat, he wields a gun to attack from range, though they lack in overall damage and their attacks are quite slow.
Type
Health
Speed
Support
175
Medium
Attacks
Gimmick
Building Expert
The Pirate can carry up to eight materials without slowing down. Buildings built by him will also be constructed faster.
N/A
Ammo
The Pirate has 9 shots, and if the Pirate runs out of shots, is unable to use his attacks. The shots automatically reload upon running out, but can be manually reloaded at any time.
N/A
Basic Attack
Shotgun Blast
The Pirate fires three bullets in a spread shot. This weapon is best used up close or against groups. Uses 3 shots.
N/A
Aiming Attack
Pistol Shot
The Pirate shoots a bullet forward. Deals less damage than the Shotgun Blast, but has more accuracy, and a slightly faster fire rate. Uses 3 shots.
N/A
Ability 1
Tinker
The Pirate tinkers with a nearby building, increasing its health and damage. It can also be used to destroy enemy buildings or to stun enemies if you are in a pinch.
15 seconds
Repair
The Pirate tinkers with a nearby buildings, restoring its health. It can also be used to cause high damage to enemy buildings or to stun enemies if you are in a pinch.
Unlocked at Class Level 3.
10 seconds
Ability 2
Pull Anchor
The Pirate tosses an anchor that latches onto structures and enemies, pulling the Pirate toward them. Great for bringing you to an important area, or for getting enemies in line of a Shotgun Blast.
10 seconds
Drag Anchor
The Pirate tosses an anchor that latches onto structures and enemies, pulling them towards the Pirate if they're an enemy, or causing high damage to them if they're a building. Though you lose maneuverability, it add less risk as you can bring yourself to an enemy without risking taking damage.
Unlocked at Class Level 9.
10 seconds
Ability 3
Powder Keg
The Pirate pulls out a barrel of gunpowder that acts as a bomb. Unlike other bombs, it only explodes when hit, or if it is launched out of a Cannon or Catapult.
30 seconds
Concussive Keg
The Pirate pulls out a barrel of gunpowder that acts as a bomb. It doesn't deal much damage, but has the added effect of knocking away nearby enemies. It only explodes when hit, or if it is launched out of a Cannon or Catapult.
Unlocked at Class Level 6.
30 seconds
Oil Keg
The Pirate pulls out a barrel of oil that acts as a bomb. The oil lingers on the ground and doesn't deal damage, but anyone that touches it will be covered in it, gaining a speed debuff. If an enemy is hit by any attack, they will light on fire. It only explodes when hit, or if it is launched out of a Cannon or Catapult.
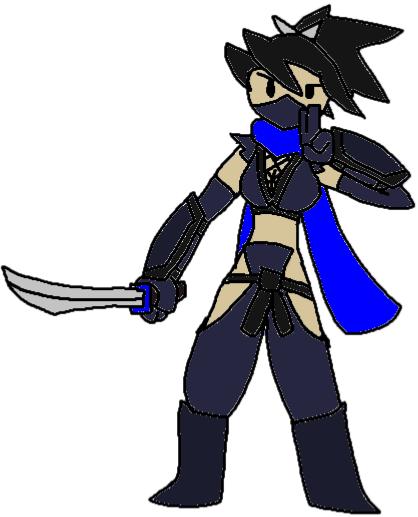
An honorable warrior who practices the art of bushido, the Samurai is a swift fighter who fights with discipline and technique. Armed with a katana, he utilized a variety of debuffs to break through enemy defenses, and defeat the enemy in a few single strikes. However, missing these attacks can leave him vulnerable, as using these attacks risks putting yourself in enemy lines.
Type
Health
Speed
Offense
200
Medium
Attacks
Basic Attack
Katana Flurry
The Samurai quickly slashes enemies in front of him. A quick burst of damage, though it has short range.
N/A
Aiming Attack
Katana Slash
The Samurai performs a wide slash with his katana. High damage though a bit slow.
N/A
Ability 1
Armor Breaker
The Samurai performs a rising slash. This slash deals high damage to shields, and removes whatever armor a player had. Also sends aerial enemies to the ground.
15 seconds
Blood Edge
The Samurai performs powerful downward slash. This slash drains enemies health and gives it to you.
Unlocked at Class Level 6.
15 seconds
Ability 2
Helm Splitter
The Samurai leaps upward, swinging enemies in the head with his katana. Anyone hit will be slowed for a short time.
15 seconds
Indecisive Slice
The Samurai freezes for a moment, before charging perform and performing a really powerful slash. It can hit through multiple enemies, though you are left vulnerable after using it.
Unlocked at Class Level 12.
20 seconds
Ability 3
Dragon Slash
The Samurai charges up before launching a blade of fire at the enemy. It explodes on impact and lights its area of impact on fire, damaging enemies and lighting anyone in it ablaze.
20 seconds
Raijin Lightning
The Samurai charges up before firing a beam of electricity in front of him. Stuns anyone in its way, but doesn't do much damage.
Unlocked at Class Level 3.
20 seconds
Fujin Tornado
The Samurai charges up before launching a small tornado, that travels a short distance forward. The tornado pulls in nearby enemies and causes damage to them.
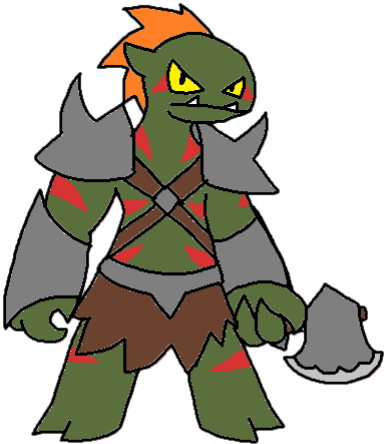
A brutal warrior who fights with the strength of ancient demons, the Oni Warrior is a offensive tank. Using his high health, he rushes in and scatters enemies to the wind with powerful knockback, isolating them and leaving them vulnerable to his powerful hits. However, he has slow movement, and struggles against faster classes.
Type
Health
Speed
Offense
350
Slow
Attacks
Basic Attack
Club Swing
The Oni Warrior swings his massive club in front of him. A bit slow but has a chance to deal knockback.
N/A
Aiming Attack
Club Slam
The Oni Warrior lunges forwards swings his club downward in front of him. Deals high damage though slow.
N/A
Ability 1
Earthquake
The Oni Warrior slams his club into the ground, creating an earthquake. This earthquake briefly stun and knocks away anyone hit by it.
20 seconds
Jumping Earthquake
The Oni Warrior flies forward and slams his club into the ground, creating an earthquake. It allows you to cover some distance, but the earthquake has a smaller radius.
Unlocked at Class Level 4.
20 seconds
Staggering Swing
The Oni Warrior spins around, damaging nearby nearby and launching them away. You have some control of where you go, but after the attack you will be left vulnerable for a brief moment. It also loses the ability to stun enemies, only knocking away.
Unlocked at Class Level 6.
20 seconds
Ability 2
Throw-ni
The Oni Warrior rushes forward and grabs an enemy. Then he can pick them up and throw them to deal damage. Throw them into a group of enemies to damage multiple foes, or toss them into hazards and chasms to take them out very easily.
20 seconds
Distant Throw-ni
The Oni Warrior rushes forward and grabs an enemy. Then he can pick them up and throw them to deal damage. It covers a longer distance, at the cost of not doing as much damage.
Unlocked at Class Level 2.
20 seconds
Oni Suplex
The Oni Warrior rushes forward and grabs an enemy. Then, he jumps into the air and slams the enemy into the ground. It allows for better movement and a bit more damage, though moving into hazards isn't recommended, as you can possibly hurt yourself.
Unlocked at Class Level 10.
20 seconds
Ability 3
Demon Fury
The Oni Warrior roars, gaining 100 points of armor and making him immune to status effects and knockback for a short time. The armor will go down after a certain time.
30 seconds
Demon Armor
The Oni Warrior roars, reflecting oncoming projectiles and causing damage to anyone near him.
A tricky master of illusions who hides in the shadows, the Ninja is a class who's all about speed. Weaving around the enemy, she uses quick strikes and deception to disorient her foe before slashing the enemy into thin pieces with her ninjato. However, her low health leaves her vulnerable if she is cornered, or under status effects.
Type
Health
Speed
Offense
125
Fast
Attacks
Passive
Double Jump
The Ninja can jump a second time while in mid-air, allowing her to access higher areas than most classes, go across longer gaps, or redirect her movement mid-air in case something bad happens or you want disorient your enemy.
N/A
Basic Attack
Ninjato Slash
The Ninja slashes enemies with her ninjato. A fast attack with good damage as well.
N/A
Aiming Attack
Shuriken
The Ninja tosses a shuriken at the enemy, dealing good damage at a quick speed. Hold the button to increase the number of shurikens thrown to three, giving it a spread effect.
N/A
Ability 1
Slash Dash
The Ninja flies forward, slashing enemies in her way. While dashing the Ninja is invincible to all attacks.
10 seconds
Ability 2
Clone Jutsu
The Ninja summons an identical clone that rushes forward. Upon hitting something or taking damage, it explodes, damaging nearby enemies. Great at leading the enemy away or disorienting them.
20 seconds
Ability 3
Kunai Teleport
The Ninja tosses a kunai, which sticks to the ground. Press the ability button again and the Ninja will teleport to the kunai, dealing damage to anyone near it or her when she teleports. Can be used to escape or disorient foes. The kunai will stay up for 10 seconds.
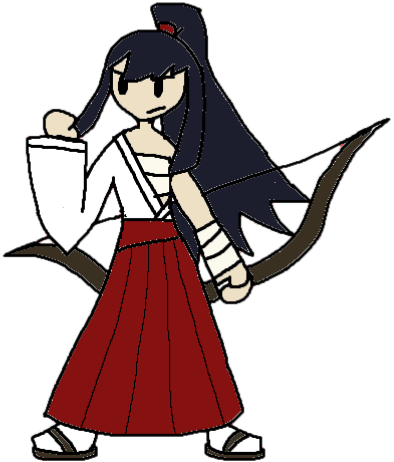
A legendary archer who is said to never miss a shot, the Sniper excels in her namesake, long-ranged sniping. Possessing the longest range of any character, they use their bow to fire at enemies to attack foes from any distance, making her great for area denial. However, they lack close-ranged options, leaving them vulnerable when in that position.
Type
Health
Speed
Defense
125
Medium
Attacks
Passive
Headshot
If a fully charged arrow hits the enemy in the head, it will deal double damage.
N/A
Basic Attack
Quick Shot
The Sniper quickly fires an arrow in a small arc, eventually landing on the ground. She can charge the shot to increase the damage of the arrow.
N/A
Aiming Attack
Snipe Shot
The Sniper fires a more damaging arrow. She can charge the shot to increase the damage of the arrow. When fully charged, the Hunter greatly slows their movement, but the arrow can fly for very long distances.
N/A
Ability 1
Sniper's Mark
The Sniper marks an enemy they are looking at. A marked enemy will cause all the arrows fired from the Sniper to have a slight homing effect, making it easier to hit them. However, after some time or if that enemy moves far away from the Sniper, the mark goes away.
20 seconds
Tracker's Mark
The Sniper marks an enemy they are looking at. A marked enemy will cause all the arrows fired from the Sniper to have a slight homing effect, making it easier to hit them. If a Marked enemy is killed, you restore some health and gain an increase in firing speed, but if you lose them, the cooldown increases by 10 seconds.
Unlocked at Class Level 6.
20 seconds
Danger Mark
The Sniper marks an enemy they are looking at. A marked enemy will cause all the arrows fired from the Sniper to have a slight homing effect, making it easier to hit them. The enemy also becomes dispelled, draining their mana and ammo, and removing their passives for a time. However, the time the mark lasts is reduce, and the mark goes away from a closer distance
Unlocked at Class Level 9.
20 seconds
Ability 2
Blossom Trap
The Sniper creates a pink flower-shaped trap. The trap is invisible to enemies until they step on it, causing them to get slowed down. Only one trap can be active at a time, and attempting to place a second one will cause the previous one to disappear.
15 seconds
Lotus Trap
The Sniper creates a green flower-shaped trap. The trap is invisible to enemies until they step on it, creating an explosion that knocks enemies away. Only one trap can be active at a time, and attempting to place a second one will cause the previous one to disappear.
Unlocked at Class Level 3.
15 seconds
Rose Trap
The Sniper creates a red flower-shaped trap. The trap is invisible to enemies until they step on it, firing off arrows around it. Only one trap can be active at a time, and attempting to place a second one will cause the previous one to disappear.
Unlocked at Class Level 12.
15 seconds
Ability 3
Phoenix Shot
The Sniper charges themselves with pink energy, slowing her movement. From there, she can either fire out a spread shot when using Quick Shot, or fire a rain of arrows down on the enemy when using Snipe Shot.
A martial artist who wishes to become more powerful through mind and spirit, the calm and collected Monk is a tricky class that requires patience and proper resource management to play. Wielding only his fists, he attacks enemies with a flurry of damaging punches, while avoiding hits with his speed and Deflect. Once enough time has passed, they can transform into the Dragon, a close-ranged class that can cause powerful damage, but their presence can make them a big target.
Type (Monk)
Health
Speed
Defense
125
Fast
Type (Dragon)
Health
Speed
Defense
350
Slow
Attacks (Monk)
Basic Attack
Punch Flurry
The Monk performs a five-hit punching combo. Rapid damage but short-ranged. Suspends you in the air after jumping.
N/A
Aiming Attack
Uppercut
The Ninja performs an uppercut, launching enemies into the air and hitting flying enemies. Great for comboing enemies.
N/A
Ability 1
Spin Kick
The Monk flies forward and performs multiple spin kicks.
10 seconds
Jump Kick
The Monk flies forward and performs a flying kick. Causes high damage, but if you don't hit anyone, the Monk will crash into a wall and take damage.
Unlocked at Class Level 2.
10 seconds
Dive Kick
The Monk jumps into the air performs a spinning dive kick. Can be used to get over obstacles.
Unlocked at Class Level 6.
10 seconds
Ability 2
Deflect
The Monk channels chi in front of him. If he is hit by an attack he performs a palm thrust, damaging enemies and reflecting projectiles
20 seconds
Ability 3
Dragon's Might
The Monk charges up before transforming into the Dragon, knocking away all nearby enemies. Restores the Monk's health.
120 seconds
Dragon's Rage
The Monk charges up before transforming into the Dragon, knocking away all nearby enemies. Restores the Monk's health. Unlike Dragon's Might, the Dragon's stats are altered, giving them a increase in health, damage and speed. However, the Dragon only lasts 8 seconds.
Unlocked at Class Level 10.
120 seconds
Attacks (Dragon)
Basic Attack
Dragon Claw
The Dragon slashes nearby enemies. A more powerful but slower version of Punch Flurry.
N/A
Aiming Attack
Dragon Punch
The Dragon lunges forward and punches enemies. Long-ranged and deals a good burst of damage.
N/A
Ability 1
Dragon Upper
The Dragon rushes forward, performing an uppercut that launches enemies away. Also useful for getting up to a high area.
10 seconds
Dragon Wing
The Dragon flies into the air, being able to move for a short time, before crashing down to the ground, creating an explosion.
Unlocked at Class Level 4.
20 seconds
Ability 2
Dragon Shot
The Dragon charges up before launching a large ball of fire at the enemy. The ball explodes on impact, causing high damage to anyone in its radius. While charging, you are slowed.
20 seconds
Dragon Spin
The Dragon creates a ring of flames around them, before launching them away. The flames knock away enemies, but do less that Dragon Shot.
Unlocked at Class Level 8.
15 seconds
Ability 3
Dragon Burst
The Dragon charges up before creating a fiery explosion around them, causing powerful damage to anyone nearby. If used, it reverts the Dragon back into the Monk.
A magic-user who specializes in the supernatural, the Onmyoji fights alongside the Shikigami, a mysterious spirit capable of controlling thunder. One of the most unique classes, aiming will cause you to take control of the Shikigami, granting you an entirely different moveset. Separating the two allows you to take control of two characters as once. They're great for holding down multiple areas, but they are difficult to use effectively without good management of both.
Type (Onmyoji)
Health
Speed
Support
125
Medium
Type (Shikigami)
Health
Speed
Support
50
Fast
Attacks (Onmyoji)
Gimmick
Mana
The Onmyoji has 200 mana, which he uses to fuel his attacks. If he runs out, he can't use them until it recharges. The mana recharges overtime when not attacking, but can be charged to speed it up at the cost of leaving yourself vulnerable.
N/A
Stun Immunity
The Onmyoji cannot be stunned.
N/A
Attack
Electro Spark
The Onmyoji fires an arc of electricity from his scroll. It has great range and a good attack speed, though has lacking damage. The electricity will arc to enemies if they are near the target. Each shot uses 10 mana.
N/A
Ability 1
Shikigami Shot
The Onmyoji launches the Shikigami as an electric projectile, damaging enemies. From there, the Shikigami and Onmyoji will be seperated. Press the ability button again at the Shikigami will return to the Onmyoji. Doesn't not work if the Shikigami is dead.
5 seconds
Ability 2
Healing Wind
The Onmyoji creates a wind that grants nearby allies armor, increasing their max health. Uses 50 mana.
20 seconds
Ability 3
Spirit Barrier
The Onmyoji creates a purple barrier of energy. It floats in place, blocking enemies and reflecting projectiles. Uses 50 mana.
20 seconds
Attacks (Shikigami)
Gimmick
Mana
The Shikigami has 150 mana, which he uses to fuel his attacks. If he runs out, he can't use them until it recharges. The mana recharges overtime when not attacking. The mana recharges overtime when not attacking, but can be charged to speed it up at the cost of leaving yourself vulnerable.
N/A
Shikigami Control
Pressing the aim button allows you take control of the Shikigami instead of the Onmyoji. By using Shikigami Shot or Mysterious Mist, you can separate the two and effectively control two characters at once. However, the Shikigami cannot capture points or flags, can't build or command troops, and cannot move a certain distance away from the Onmyoji. If he is killed, he will respawn after 40 seconds. The Shikigami will return to the Onmyoji's side if either of them make contact with each other, they use Shikigami Shot or Mysterious Mist while separated, or if the Shikigami respawns.
N/A
Hover
The Shikigami hovers low to the ground, becoming immune to grounded traps and being unable to fall down chasms.
N/A
Stun Immunity
The Shikigami cannot be stunned.
N/A
Attack
Thunder Spark
The Shikigami fires an arc of electricity. Unlike the Onmyoji's, it's much quicker, but suffers from less range. The electricity will arc to enemies if they are near the target. Each shot uses 10 mana.
N/A
Ability 1
Mysterious Mist
The Shikigami covers the Onmyoji in a cloudy mist, teleporting him a short distance away. From there, the Shikigami and Onmyoji will be seperated. Press the ability button again at the Shikigami will bring the Onmyoji to him.
5 seconds
Ability 2
Thunderbolt
The Shikigami calls down thunderbolts from the sky. The player can choose where the thunderbolt will appear from a moveable reticle. High damage, but a warning circle appears when the attack lands. Uses 100 mana.
25 seconds
Ability 3
Thunder Burst
The Shikigami surges with electricity, increasing in speed before exploding, either upon touch or being hit, causing high damage and stunning nearby enemies. This kills the Shikigami, leaving you vulnerable for a time, but is useful for causing a high large burst of damage.
An oracle responsible for taking care of shrines, the Shrine Maiden is a mix between a healer and an offensive fighter. Armed with talismans, they grant her ranged attacks, and can be attached to allies and enemies in order to heal or debuff them. However, due to her low health and speed, you'll need to be careful and not get close to enemies.
Type
Health
Speed
Support
150
Slow
Attacks
Basic Attack
Talisman Strike
The Shrine Maiden swings her gohei as her talismans fly forward to strike enemies. Medium-ranged attack with okay damage.
N/A
Aiming Attack
Talisman Shot
The Shrine Maiden charges up before launching a talisman coated in spirit energy. When fully charged, the talisman has more range and a slight homing effect.
N/A
Ability 1
Holy Talisman
The Shrine Maiden attaches a talisman to an ally, healing them and making them immune to status effects. Goes away if the ally goes too far away. You can only have one talisman out at a time.
15 seconds
Talisman of Strength
The Shrine Maiden attaches a talisman to an ally, increasing their damage and speed. Goes away if the ally goes too far away. You can only have one talisman out at a time.
Unlocked at Class Level 2.
15 seconds
Ability 2
Talisman of Weakness
The Shrine Maiden attaches a talisman to an enemy, increasing the damage they take. Goes away if the enemy goes too far away. You can only have one talisman out at a time.
15 seconds
Cursed Talisman
The Shrine Maiden attaches a talisman to an enemy, removing their abilities and blocking healing. Goes away if the enemy goes too far away. You can only have one talisman out at a time.
Unlocked at Class Level 6.
15 seconds
Dispelling Talisman
The Shrine Maiden attaches a talisman to an enemy, draining mana and ammo and removing passive abilities. Goes away if the enemy goes too far away. You can only have one talisman out at a time.
Unlocked at Class Level 8.
15 seconds
Ability 3
Talisman Orb
The Shrine Maiden transforms into an orb of invincible energy, allowing her to protect herself from all damage. This allows her to get to an area without being attacked, or escape a sticky situation.
30 seconds
Orb of Haste
The Shrine Maiden transforms into an orb of invincible energy, allowing her to protect herself from all damage. It is much faster, and has the added ability to charge into enemies, though it lasts much less time than the normal Orb.
Unlocked at Class Level 4.
30 seconds
Orb of Protection
The Shrine Maiden transforms into an orb of invincible energy, allowing her to protect herself from all damage. She is slowed, but creates a barrier around her that protects allies within it from damage.
Unlocked at Class Level 10.
30 seconds
Troops[]
Troops are non-playable characters that can be summoned from Spawners. When a troop is spawned, they will wait around their spawn building. From there, players can use the interact button to have them follow you. When an enemy is near, they will attack them. There are 20 troops available in the game, each with their own abilities. Unlike the original Kingdombound, the player must equip troops. Troops are split between Basic Troops (which are generally cheaper and can be used by all classes) Glory Troops, War Troops and Honor Troops (who cannot be used by another outside of class in their factions and are generally more expensive). Troops can be focused on Melee, Range and Support. Each faction also has a Power Troop, a very powerful troop that each team can only have one of alive at a time. A team can only have 30 active troops at a time. A Spawner takes damage overtime and will eventually be destroyed after enough time passes.
In modes where the player can build Spawners, they can instead summon Troops through the use of Monster Crystals. These power-ups are scattered across the map, and can be used to summon a troop of your choice. You can only summon a troop a certain amount of times during a match.
Common gelationous creatures with a large appetite, Slimes are the cheapest of the troops to create. They have the lowest health and don't do much damage, though their speed is quite helpful. Their largest strength is their production time, which is quite fast, allowing them to be produced in large amounts.
They can be unlocked by buying them from Blizza at Level 2.
Type
Health
Speed
Melee
50
Fast
Cost (Spawner)
Uses (Crystal)
1
3 (spawns 4)
Attacks
Attack
Chomp
The Slime bites the enemy as an attack. Has very short range and deals mediocre damage.
Forest-dwelling hunters that tend to aggress against humans, Orcs are well-rounded close-ranged troops. With well balanced stats, they are more resilient than the Slime, though not as slow as the Golem.
They can be unlocked by buying them from Blizza at Level 3.
Type
Health
Speed
Melee
125
Medium
Cost (Spawner)
Uses (Crystal)
3
3 (spawns 2)
Attacks
Attack
Axe Swing
The Orc swings their axe in front of them. Covers a good area in front of them.
Constructs of rock and clay given life through magic, Golems are a tanky troop. Boasting high health and the ability to create a shield, Golems are a great way of providing support in defending areas. However, they are quite slow.
They can be unlocked by buying them from Blizza at Level 5.
Type
Health
Speed
Melee
250
Slow
Cost (Spawner)
Uses (Crystal)
5
3
Attacks
Passive
Hard Body
The Golem is immune to knockback.
Attack
Rock Hand
The Golem swipes forward, dealing good damage to nearby enemies. Has a chance of knockback.
Special
Crystal Barrier
The Golem projects a small shield in front of it to block attacks for a short time. Protects players behind it as well.
Small and mischevious cousins of Orcs, Goblins are the cheapest of the ranged troops. Like the Slime, they have low health and damage, great speed, and the ability to be created at high speeds.
They can be unlocked by buying them from Blizza at Level 4.
Type
Health
Speed
Range
100
Medium
Cost (Spawner)
Uses (Crystal)
2
4 (spawns 2)
Attacks
Attack
Arrow Shot
The Goblin fires an arrow into the air to land onto an enemy.
Elusive bug-like creatures that store heat in their body as a defense mechanism, Bomb Fairies are one of the most destructive of the troops. They have the ability to create damaging explosions, similar to a bomb. Unlike bombs, they are weaker, but can created a bit faster than them.
They can be unlocked by buying them from Blizza at Level 9.
Type
Health
Speed
Range
25
Fast
Cost (Spawner)
Uses (Crystal)
4
3 (spawns 3)
Attacks
Attack
Explosion
The Bomb Fairy uses its stored heat to create an explosion around it, damaging nearby enemies. Kills them after use.
Elusive plant-like creatures whose nectar has healing properties, Mandrakes are a very useful support troop. They can passively heal nearby allies, making them useful for offensive attacks. However, they have low defenses and can't defend themselves.
They can be unlocked by buying them from Blizza at Level 6.
Type
Health
Speed
Support
100
Medium
Cost (Spawner)
Uses (Crystal)
5
2
Attacks
Passive
Healing Aura
The Mandrake slowly restores the health of nearby allies.
Attack
Leaf Whip
The Mandrake's arms extend and they use them to slap enemies with their leaves like whips. Has a chance of knockback.
Intelligent cat-like creatures, Nekons are not the best classes for combat, due to their low damage and health. However, their cuteness creates a morale boosting effect around them, increasing nearby allies' damage and speed.
They can be unlocked by buying them from Blizza at Level 14.
Type
Health
Speed
Support
100
Medium
Cost (Spawner)
Uses (Crystal)
5
2
Attacks
Passive
Morale Boost
The Nekon boosts the power and speed of nearby allies.
Attack
Claw Slash
The Nekon slashes nearby enemies with their claws. Deals very little damage. Has a chance of knockback.
Low-ranking demons who enjoy causing mischief and generally being annoying, Imps may not be the best at attacking enemies, but they provide useful abilities. They have the ability to grab objects, and can be used to bring materials to your base, throw bombs, or grab enemies and drop them. However, they do very little damage on their own.
They can be unlocked by buying them from Blizza at Level 8.
Type
Health
Speed
Support
75
Fast
Cost (Spawner)
Uses (Crystal)
3
3 (spawns 2)
Attacks
Passive
Carry
The Imp can grab materials, bringing them to your base. They can also grab bombs and drop them on enemies to blow them up.
Hover
The Imp hovers low to the ground, becoming immune to grounded traps and being unable to fall down chasms.
Attack
Claw Slash
The Imp slashes enemies with their claws. Only performed against buildings.
Special
Demon Claw
The Imp flies toward an enemy and grabs them, dragging them into the air before dropping them. Enemy attacks that hit him will knock the enemy to the ground.
Bird-like humanoids that live high in mountains, Harpies are a unique and evasive melee troop. Their largest strength is their ability to fly, allowing them to avoid melee attacks and attack enemies in high areas with their spears. However, they are vulnerable to projectiles and fire.
They can be unlocked by buying them from Blizza at Level 7.
Type
Health
Speed
Melee
75
Medium
Cost (Spawner)
Uses (Crystal)
4
3 (spawns 2)
Attacks
Passive
Flight
The Harpy flies above grounded foes and obstacles, and is immune to melee attacks from the ground. Can however be hit by projectiles and enemies who are jumping.
Attack
Spear
The Harpy stabs enemies below her with their spear. Can hit aerial foes along with grounded ones.
Baby dragons, while not as powerful as their adult counterparts, Draglings are still formidable aerial foes. With the ability to spew fireballs from their mouth, they may not deal the most damage, but these fireballs grant the Dragling the longest range out of any troop in the game. However, their health is very low, leaving them vulnerable to projectile-focused classes and troops.
They can be unlocked by buying them from Blizza at Level 15.
Type
Health
Speed
Range
50
Medium
Cost (Spawner)
Uses (Crystal)
5
3 (spawns 2)
Attacks
Passive
Flight
The Dragling flies above grounded foes and obstacles, and is immune to melee attacks from the ground. Can however be hit by projectiles and enemies who are jumping.
Attack
Fire Puff
The Dragling shoots a fireball from its mouth. Great range and okay damage.
A race of fish-like humanoids that live in grand underwater kingdoms, Mermaids are a great damage supporter. With their tridents they have great melee range, and with their ability to summon electricity they can stun enemies for a time, leaving them vulnerable to damage. However, they are quite slow.
They can be unlocked by buying them from Blizza at Level 10.
Type
Health
Speed
Range
125
Slow
Cost (Spawner)
Uses (Crystal)
6
2
Attacks
Passive
Stun Immunity
The Mermaid cannot by stunned.
Attack
Trident Stab
The Mermaid stabs nearby enemies with their trident.
Special
Storm Spark
The Mermaid raises her trident into the air and unleashes a blast of electricity that stuns enemies for a time.
Fat and hulking orcs who use their incredible size to overpower his enemies, the Ogre is a slow and cumbersome troop that can cause tons of damage. Easily the largest and tankiest troop, he's all about absorbing damage and dishing it back with his powerful attacks. However, their attacks are easily telegraphed, so smarter players can easily dodge them. They are a Power troop, meaning only one can be out at a time.
They can be unlocked by buying them from Blizza at Level 19.
Type
Health
Speed
Melee
400
Slow
Cost (Spawner)
Uses (Crystal)
8
1
Attacks
Attack
Club Slam
The Ogre raises his club into the air before slamming it downward. High damage in front of him.
Special
Club Spin
The Ogre winds up before spinning his club around him to damage enemies. He is left vulnerable for a moment after spinning.
Vicious creatures with the upper-half of a woman and the lower-half of a large spider, Arachne a hybrid of melee and ranged attacks. They have the ability to fire a web to pull in enemies, leaving them vulnerable to the Arachne's attacks. However, she has low health, and can't handle groups.
They can be unlocked by buying them from Blizza at Level 16.
Type
Health
Speed
Range
125
Medium
Cost (Spawner)
Uses (Crystal)
6
2 (spawns 2)
Attacks
Attack
Pincers
The Arachne slashes enemies with her pincers. Good damage but a bit slow.
Special
Web Shot
The Arachne fires a web at an enemy, pulling them towards her. If the enemy hits the webbed foe, they will break them out.
Humanoid mushrooms known for their poisonous nature, Myconids are a ranged troops focused on area denial. Armed with mushroom bombs, they create toxic cloud of spores to close off areas, damaging and blinding anyone in these clouds. However, their overall damage is low and they are vulnerable at close-range.
They can be unlocked by buying them from Blizza at Level 12.
Type
Health
Speed
Range
100
Medium
Cost (Spawner)
Uses (Crystal)
5
3
Attacks
Passive
Toxic Burst
When the Myconid is killed, it creates a toxic cloud to damage nearby enemies.
Attack
Stick Stab
The Myconid stabs the enemy with its stick. Deals okay damage but generally only used as a last resort.
Attack
Mushroom Bomb
The Myconid pulls out one of the mushrooms on its back and tosses it at enemies, creating a cloud of poison that damages and blinds anyone in the radius.
Horse-people who serve as forest guardians, Centaurs are a powerful offensive troop. Though not as tanky as the Golem, they can withstand some damage, attacking with their spears, and have the unique ability to Charge, allowing them to easily get close to the enemy and destroy powerful targets and structures. However, they have a slow production speed, and they become dazed after using their charge, leaving them vulnerable.
They can be unlocked by buying them from Blizza at Level 18.
Type
Health
Speed
Melee
200
Medium
Cost (Spawner)
Uses (Crystal)
6
2
Attacks
Attack
Glaive Slash
The Centaur swings their glaive in front of them, damaging enemies in a pretty large area in front of them. Doesn't deal as much damage compared to other troops.
Special
Charge
The Centaur winds up before speeding forward, ramming into the first enemy in her way and knocking them backwards. Stuns them for a second upon impact.
Beautiful vampires that seduce men with their beauty, Succubi are range troops that provide tons of extra damage. Alongside launches blasts of energy, they can summon Fire Bats to attack enemies, acting similar to Slimes, granting increasing the size of your army. However, they are bogged down by a slow speed. They are a Power troop, meaning only one can be out at a time.
They can be unlocked by buying them from Blizza at Level 21.
Type
Health
Speed
Range
175
Slow
Cost (Spawner)
Uses (Crystal)
8
1
Attacks
Passive
Hover
The Succubus hovers low to the ground, becoming immune to grounded traps and being unable to fall down chasms.
Attack
Love Shot
The Succubus fires a pink blast of love energy from her hands. The blast pierces through multiple enemies, making her great at taking out groups.
Special
Fire Bats
The Succubus summons three Fire Bats, small melee-focused troops, that follow her and attack enemies when they get close.
Turtle-like creatures that live near water and attack travelers, Kappa are an annoying troop to deal with. They have okay health and speed but their most useful ability allows them to dive, becoming invisible to enemies for a short time, before popping out to attack. Great for ambushing enemies.
They can be unlocked by buying them from Blizza at Level 11.
Type
Health
Speed
Melee
100
Fast
Cost (Spawner)
Uses (Crystal)
5
2 (spawns 2)
Attacks
Attack
Webbed Claw
The Kappa slashes enemies with their claws. A basic melee attack
Special
Dive
The Kappa dives into a puddle of water, becoming invisible to enemies for a few seconds.
A snake-like race that live in deserts, Nagas can easily create tons of fiery havoc across the map. With the ability to launch fireballs, these fireballs explode and can light entire groups on fire. A great troop only hindered by their slow production speed.
They can be unlocked by buying them from Blizza at Level 17.
Type
Health
Speed
Range
125
Slow
Cost (Spawner)
Uses (Crystal)
6
2
Attacks
Passive
Burn Immunity
The Naga cannot be lit on fire.
Attack
Naga Claw
The Naga slashes nearby enemies with her claws. Only used if enemies get too close.
Special
Flame Hand
The Naga forms a fireball into her hands and tosses it forward. Explodes on impact and lights anyone in the radius on fire.
A vengeful spirit that manifests as a floating icicle, Frost Spirits cover the area around them in a freezing blizzard. This blizzard slows down nearby enemies, leaving them vulnerable to your allies' attacks. However, on their own, they can't deal much damage.
They can be unlocked by buying them from Blizza at Level 13.
Type
Health
Speed
Support
75
Medium
Cost (Spawner)
Uses (Crystal)
5
2
Attacks
Passive
Blizzard
The Frost Spirit creates a freezing blizzard around it, which slows down enemies.
Frost Immunity
The Frost Spirit is not affected by ice's slowing effects.
Attack
Ice Blade
The Frost Spirit spins, using its icicle like a blade to slash enemies.
Fox spirits that have reached god-like wisdom and power through age, Ninetails are powerful support class. They have control over luck, they boost nearby allies and protect them with their fans, while debuffing enemies at the same time. However, they are very slow and can't deal much damage. They are a Power troop, meaning only one can be out at a time.
They can be unlocked by buying them from Blizza at Level 20.
Type
Health
Speed
Support
225
Slow
Cost (Spawner)
Uses (Crystal)
8
1
Attacks
Passive
Fortune Field
The Ninetails creates an aura around it, speeding up ability cooldowns, draining enemy's ammo and mana, and causing any enemy in the radius to temporarily lose their passive abilities.
Attack
Spirit Fan
The Ninetails infuses its fan with spiritual magic and tosses it forward. After flying a distance, the fan opens and floats in place. In this state, it acts like a small wall, damaging and pushing away anyone that touches it and reflecting projectiles.
Non-Playable Characters[]
Rulers[]
King Maroon
The ruler of the Arcandia, King Maroon is one of the leaders of the Glory Faction. He wants the best for his people, generally wishing not to use violence to handle disputes. He reluctantly joins with Princess Maya in order to get the Lich's Remains, seeking to keep them out of the hands of evil (especially Maya's).
Princess Maya
The ruler of Elytius, Princess Maya is one of the leaders of the Glory Faction. Behind her initially cute and innocent demeanor, is a ruthless tyrant who seeks incredible power. She allies with King Maroon to get the Lich's Remains, though seeks to use them for herself and eventaully betray him.
King Auburn
The leader of a vicious clan of warriors, King Auburn is one of the leaders of the War Faction. Always yearning for battle, he and Celadia had been in a constant battle, as he want to take over the entirety of the Ancient Highlands. He seeks to obtain the Lich's remains and use them to defeat Celadia.
Celadia
A powerful druid worshipped as a guardian of nature, Celadia is one of the leaders of the War Faction. She see's Auburn's clan as horrible people, and seeks to eradicate them and bring the Ancient Highlands back to nature. She believes obtaining the Lich's remains will help her reach that goal.
Emperor Sumire
A legendary shogun who fought in countless battles, Emperor Sumire is one of the leaders of the Honor Faction. He believes that constant war is the only way his country can be seen as strong, so wishes to fight for the Lich's remains in order for an excuse to fight other kingdoms.
Princess Mikado
The princess of an unknown kingdom in the Ancient Orient, Princess Mikado is one of the leaders of the Honor Faction. Despite allying with a war-obsessed general, she's rather gentle and hates the idea of having to go to war. Though she wishes to protect her people, she believes that fighting for the Lich's remains will just lead to the innocent being killed.
Shopkeepers[]
Milo & Ecto
Milo is a travelling Nekon merchant, always on the move and selling whatever cool clothes he finds on his adventures. He can be found in the Bazaar, selling various and sells various stat-affecting outfits and accessories for the player to wear. Despite his cute and welcoming demeanor, he is secretly a scummy con artist and insults the player under his breath for not buying anything. He's always accompanied by his pet Slime, Ecto, who acts as his mascot and rides on his backpack.
Ssssteve
Ssssteve (yes the four ss are needed) is a Naga hat salesman, setting his store, Ssscalp Sssatisssfiersss, in the Trading Center in order show these warriors how to show some class on the battlefield by selling various stat-affecting hats for the player to wear. A jerk and a narcissist, he thinks highly of himself and doesn't like it when you come to his store just to window shop.
Frey
Raised by dwarves at a young age, Frey is a blacksmith who runs the Weapon Shopppe in the Trading Center. Fascinated by weapons, she'll gladly upgrade them, granting players access to new alternate abilities. She enjoys going on long tangents about the capabilities of the weapons she crafts.
Rana, Toro & Honey
A trio of builders, Rana, Toro and Honey run Toro & Friends Building Company in the Trading Center, selling blueprints to buildings the player can use in battle. Toro is their leader, an aggressive minotaur who just loves destroying things for the sake of rebuilding them. Rana is a frog girl who hates her job, constantly complaining about Toro's antics and being really cynical. Honey is the bee girl, and in contrast to Rana, is hard-working and idolizes Toro, and wishes to be as strong as he is one day.
Blizza
A penguin harpy from the coldest reaches of the Ancient Highlands, Blizza runs a monster summoning shop called the Boutique Infernal in the Trading Center, selling troops for the player to use in battle. She is absolutely fascinated by monsters, and enjoys talking about their lore and ancient legends of them in action.
Sylasura
A mysterious mimic, Sylasura runs a small business in an alleyway. She'll take those rare Faction Tokens you obtain from Faction Wars and exchange them for awesome rewards like boosts in obtaining gold or epxerience, or even rare items. Not much is really known about her, but her obsessive attitude and reluctance to leave her chest gives her a shady feel.
Other[]
Ellania
The main villain of Adventure Mode, Ellania was once just your ordinary Warlock, who served as one of the Lich's most powerful servants. With his death, Ellania sought to bring him back, and use him to take over the world. Despite seeming like a serious person and showing magical power, her wish to resurrect the Lich has become an insane obsession, and she wishes to eventually become the Lich's bride.
Detrevni
A mysterious jester-like figure, Detrevni servas as Ellania's right-hand man. Their origins are shrouded in mystery, but they show a deep loyalty to Elliana, supplying her with the army of monsters, and wielding a variety of dark magics. They'll often appear to introduce a major boss and taunt the player.
Guards
A group of armored soldiers hired by the kingdoms, the Guards are responsible for managing the Trading Center. Several can be found across the Trading Center, running various services, teaching inexperienced players and generally making sure nothing bad happens.
Maps[]
War Maps[]
War Maps are normally the largest maps in the game. Team's spawn areas and castles are on opposite sides of each other, with two to three outposts in between. These maps appear in these modes:
Castle Defense
Castle War
Maps
Description
Barrier Cliffs
Barrier Cliffs takes place in a rocky mountain range between the Ancient Valley and the Ancient Highlands. The map is fairly long, with various narrow sections alongside the side of the mountain, caverns to hide in and chasms that player can fall out of. The map features two outposts, which are along the path from one castle to the other.
Dragon Shrine
?
Frozen Peaks
?
Greenford
Greenford is a small meadow town located between Arcandia and Elytius. The first part of the map consists of a small and tightly-spaced town, while the middle is much more open with large fields, and the end features the castle, which is a simple straight hallway into the treasure room. There are three outposts, one located in a small square in the town, and two on opposite sides in the field area.
Pharaoh's Pyramid
?
Pirate's Landing
Pirate's Landing takes place on a deserted island. The castles are on each side of the island (on this map they are pirate ships), with them being connected by the beaches on both sides of the island's perimeter. Players can also go through the jungle in the middle, which is where the two outposts can be found.
Control Maps[]
Control Maps are similar to War Maps, but are smaller and a bit more condensed. Team's spawn areas are on opposite sides of each other, with the Castle or Outposts located in the middle. These maps appear in these modes:
Castle Control
Outpost Control
Maps
Description
Battler's Summit
?
Crestcoast
?
Evergreen Falls
?
Kraken Isle
?
Mirage Oasis
?
Scholar's Archives
?
Escort Maps[]
Escort Maps are normally the longest maps, consisting of one trail for the wagon/battering ram to follow. In Escort, the defending team's spawn is always some distance between the attacking team's spawn, and as the wagon crosses a checkpoint, the spawns move further through the map. In Battering Ram, the maps are slightly smaller. These maps appear in these modes:
Escort
Battering Ram
Maps
Description
Crystalline Mines
?
Dragon's Domain
?
Ellania's Tower
?
Firework Festival
?
Forbidden Forest
?
Temple of the Ancients
?
Flag Maps[]
Flag Maps are similar to Control Maps, but are smaller and a bit more condensed. Team's spawn areas are on opposite sides of each other, and the flags (goals in Siegeball) are normally in some distance away from the spawn area. These maps appear in these modes:
Capture the Flag
Siegeball
Treasure Plunder
Maps
Description
Castle Town
?
Dueling Dojos
?
Fae Forest
?
Goblin Swamp
?
Harpy's Nest
?
Treasure Cove
?
Battle Maps[]
Battle Maps are normally the smallest of the maps, designed primarily for combat rather than a set objective. Spawn areas are on opposite sides of eachother. These maps appear in these modes:
Deathmatch (Solo & Team)
Battle Royale (Solo & Team)
Duel
Harbinger
Titan Takedown
Maps
Description
Ancient Citadel
?
Berzerker Bowl
?
Cursed Necropolis
?
Dwarven Workshop
?
Grand Colosseum
?
The Galleon
?
Clothes & Perks[]
TBA
Trivia[]
General[]
Alongside KillGames 2, it is one of the few original games created by Lazy Studios to get a sequel.
The largest inspiration for Kingdombound 2 is For Honor, with creators basically taking the idea of that game and putting it into the Kingdombound world.
All of the characters in this game are free to use! As long as you keep them in character, I'd be glad to see these characters in any of the crossovers or umbrella games you want to have them in.
Characters[]
Similar to the original, every character in the game is canonically a human, with the only exception being the Marksman who's an elf.
Many of the characters were based off of designs from other video games.
The Marksman's design is inspired by Etrian Odyssey.
The Shaman, Imp, Succubus and Ninetails' designs were inspired by the Disgaea series.
The Oni Warrior was primarily inspired by the Shugoki from For Honor.
The Onmyoji's design is inspired by the class of the same name from Fire Emblem: Fates.
Several characters went through large design changes during the game's development.
Originally, the Shaman was known as the Beastman, and they were designed as a masked chained prisoner who could transform into a werewolf. The creators felt it didn't fit the game's cartoony atmosphere, so it was eventually changed to what it was today.
The Warlock originally had an outfit similar to its original appearance, but was change in order to give her more of a "warlock-like" feel. This included the addition of bony armor.
The Marksman went through a massive design change, primarily done as the creator's grew to hate the old Marksman design. The Marksman was originally meant to be male, but during the redesign it was decided to make their gender ambiguous.
The Dragling and Succubus were troops in early versions of Kingdombound, but were scrapped in favor of the Nekon and Naga respectively. They were brought back as the creators needed ideas for new troops.
The Succubus however does appear as a mini-boss in the original Kingdombound, with a different design.
The Frost Spirit is based on and originally named the "Yuki-onna", though the name was changed during development as the final design strayed a bit too far from a traditional design of the yokai.
The Ninetails was originally called the "Kitsune", though it was changed to differentiate it from the same troop from the original Kingdombound. In-universe, it's implied that Kitsune become Ninetails upon reaching a certain age.
Like in the original, all of the rulers are named after shades of the color they are wearing.
The only exception to this is Emperor Sumire, with sumire meaning "violet" in Japanese.
Ellania, Detrevni and the new shopkeepers' names were created by users on the Fantendo Discord.
Honey was originally designed as an antgirl rather than a beegirl, and was originally named "Crawlie". She was changed because the creators wanted to find a way to incorporate a beegirl after it was scrapped as a troop.
Scrapped Content[]
Gender variants for each of the game's classes was scrapped because, as the creators developed the game, it became increasingly hard to create cosmetics for each character, alongside the introduction of classes like the Valkyrie and Shrine Maiden which would not fit as male characters.
The Hunter was considered to be included in the game as a playable character (part of the Glory Faction), but during development they were split into two classes, one being the Marksman and the other being the Sniper.
Attacks similar to the Ultimates in Overwatch were at once considered to be added to the game, but were scrapped as the creators felt they messed with the game's balance too much, especially due to the large amount of players normally present in a match.