Final Fantasy XVI is an upcoming JRPG for the PlayStation 4, Xbox One, Nintendo Switch & PC. It is the 16th Mainline Final Fantasy Game, like most games in the series it is unrelated to the previous entries in terms of plot although does share some overlapping character names and creatures. Like Final Fantasy XV before it the game is Open-World and features Real-Time Combat.
On the planet of Luludanitu a utopia formed, though history on this planet had been filled with conflict in the past through the co-operation of its peoples and the use of magic to advance civilization to untold heights the planet become a utopia where life had become eternally peaceful thanks to magical devices that were able to sustain all worldly needs of the people of the planet. The gilded cities of the planet reaching forth into the heavens where great mighty towers known as the Fingers of the Gods were constructed to pay homage to the divine beings who protected the people.
Millions of years passed on the planet and the people lived peacefully, learning of their ancient history and creating divine inventions that harnessed the magic the gods had gifted the mortals of the planet to help in their lives and pay worship to the divines. However in the Ninth Great Divine Era, an un-foretold decay began to permeate the planet of Luludanitu. Despite their divine origin, the gods were dying, having existed for so long in a static state, their incorporeal forms were fading from existence with this came The Decay the current era of the planet and possibly its last, the era is defined by the decline of magic, its heralded power which had for so long protected and guided the people of the planet slowly fading away, though many still practice magic daily their powers are diminishing.
The leaders of the planet now finding themselves under an unforseen level of pressure have taken many different approaches to dealing with the crisis however from the starving people to the ravaged towns and cities, the ruins of once great monuments to the gods that no salvation will bring the people back to that utopia now a fading memory for them. Among those seeking to dampen the damage done from the decay, a vicious group of the Divine Order of the Gods, known as the Inquisitors had taken over as the dominant power of the world religion, they preach of conserving the magic that remains believing that it is the people's overuse of magic that has lead to the decay, holding steadfast to their beliefs in the god's immortality the Inqiuistors began a divine crusade purging those not sanctioned by them to use magic, many fled their homes in the panic and the populations of the planet became dispersed and separate, lacking communication and order many small bands formed.
One such band of refugees was a group called the Sirrushes who fled into a region known as the Graves of Takestroy a large series of flat steppes that harbour large bushlands where the refugees settled. Safe from the Inquisitors the Sirrushes started society back at the beginning, though still capable of using magic and teaching it to their children, the Sirrushes minimized their usage of magic to the absolute essentials to avoid detection from the Inquisitors, learning from old texts their elders had brought the budding civilization learned of old ways to survive without magic long forgotten by the placated of the utopia.
Among the Sirrush lived a pair of siblings, Kenmaur and Kammi whose peaceful albeit hard-working lives would have seen them live without ever knowing about the lands beyond the Graves of Takestroy if not for the warring horde that was approaching their home.
Main Plot[]
The game begins with a short cinematic recapping what was covered in the Backstory Synopsis, this can be skipped if the player wishes to and will automatically play on the menu screen if the player doesn't enter any sub-menus. After the scene ends the player will see Kenmaur working in the field with his father, Burnwik. The two discuss the future of the farm, Kenmaur commenting on how they should look into finding ways to improve the soil, mentioning that last year's harvest wasn't as good as the year before's, Burnwik agrees and mentions that he'll put in a word to Ghalhefri about conducting another soil analysis. In the distance Kammi can be seen running towards the field along with a number of other kids.
The player gains control of Kenmaur from this point and Burnwik asks the player to go let Kammi into the field, the player heads over to the gate at the end of the field and opens it for Kammi and the children, Kammi thanks Kenmaur explaining that she'd found something rather odd out in one of the caves she and the others were exploring, Kenmaur and Kammi head back to Burnwik as Kammi explains showing Kenmaur a strange device that appears similar to a compass although lacks moving parts. As the duo along with the children reach Burnwik, Kammi shows her father the strange compass, Burnwik examines the device closely and comments that he's never seen anything like it before and mentions to Kammi that she might want to get it checked with Mortimer in case he knows. Kenmaur expresses his disagreement with the idea however noting that Mortimer had given them bogus information in the past about ancient artifacts, Burnwik counters Kenmaur's argument by noting that no one in the village would have knowledge of such a device anyhow so Mortimer is Kammi's best shot at figuring out what it is and tells Kenmaur that he should have a little more faith in Mortimer. Kenmaur reluctantly accepts Burnwik's advice but declares that he's going with Kammi just in case Mortimer tries to swindle her.
Kammi immediately protests the idea though stating that Kenmaur will just get into another argument with Mortimer, Burnwik however disagrees with Kammi and states that Kenmaur won't get into an argument otherwise he'll face Burnwik's wrath when he gets back. The children with Kammi giggle as Kenmaur sheepishly looks away, the duo head off out of the field, bidding farewell to the children who head back to their homes. Kammi asks Kenmaur if he remembers where Mortimer's shop is, the player can choose to say yes although selecting no will give the player a tutorial on using the map.
The duo head through the settlement, along the way the player can interact with several of the settlers who're out of their houses at that time. As the duo get towards the well in the middle of the settlement, they meet up with Bididi and Dobobo who're examining the well. Kenmaur approaches the duo and asks them what they're doing, Dobobo mentions that they thought they heard noises coming from the bottom of the well earlier today and were trying to listen again and suggests Kenmaur listen, the player can choose whether Kenmaur decides to take the twins up on their offer, if the player accepts then they'll be introduced to the Hearing System in the game which teaches the player to be able to identify creature sounds from a distance. Once Kenmaur has dealt with the twins they head off waving goodbye to Kenmaur and Kammi.
The duo eventually reach Mortimer's shop, a strange looking building with a somewhat wonky design and a big, broken grandfather clock out the front with its pendulum missing. Entering the shop, Kenmaur comments on the overwhelming aroma from the incense that Mortimer is burning, Kammi disagrees stating that it smells quite pleasant. Mortimer enters from one of the back rooms greeting the pair stating that he had to use some incense because he'd just been delivered some Huskmox Fur which was stinking up the shop, Kenmaur wonders if it could really smell worse than the incense however Kammi hushes him. Kammi pulls out the compass device and shows it to Mortimer asking if he knows what it is, Mortimer looks over it closely, inspecting the front and pricking the dial of the device and then looking on the underside, examining a small indentation in the middle of the back, then reading over some small glyphs located on the rim of the device. Mortimer clears his throat and places the device onto the desk between him and Kammi, he informs her that the device is likely one from the Eighth Era, stating that he remembers seeing one when he went to Zeb'r years ago and is surprised to see that one would just be lying about near the Sirrush Settlement. Kammi comments that she found it in a cave that had quite a few old artifacts lying about but none of them seemed particularly of interest.
Mortimer ponders on the thought and asks Kammi if she'd be willing to show him where the cave is as he'd like to inspect the other artifacts, Kenmaur pipes up stating that she shouldn't since Mortimer might just try to take all the artifacts for himself. Mortimer facetiously overreacts proclaiming that he would never do something so cruel to Kammi. Kammi tells Kenmaur to drop it and accepts Mortimer's proposal stating that they should leave at night as to not have to deal with the guards, Mortimer agrees and states he'll meet them near the settlement gates when the moon is high. Kammi picks up her Compass Artifact and her and Kenmaur head out of the shop, Kenmaur comments that he's not sure she should just trust Mortimer's word on this, Kammi however tells Kenmaur not to worry as she has a plan and tells Kenmaur to head back home since their mother will probably want some help with preparing dinner tonight.
From here the player is able to choose whether to play as Kammi or Kenmaur, Kammi's side of the story has her going to see Bididi and Dobobo and asking them to tag along with her, Kenmaur and Mortimer to the cave to make sure Mortimer doesn't try anything suspicious, Bididi accepts on the condition that she proves that she has what it takes to deal with Mortimer herself and challenges her to a battle. In Kenmaur's side of the story he heads back home to find his mother, Halamai wrestling with a Rutswine, a hulking great pig creature with root-like tusks. In both scenarios the player is introduced to the combat of the game with having to either best Bididi or defeating the Rutswine. After the events, Kammi arrives home and Kenmaur and Halamai have prepared dinner, the family has dinner together, Burnwik mentioning that he'd had a visit from Yullig earlier who wanted to know if Kammi was interested in performing at the Sirrush Festival Dance this year, Kammi attempts to avoid the question by commenting on the Rutswine, however Halamai joins in the conversation and Kammi reluctantly accepts the offer although is evidently not enthusiastic about it.
After dinner, Kenmaur and Kammi head up to their rooms, Kenmaur asks Kammi if she's got everything planned out and Kammi tells him not to worry, the player can freely explore the house and interact with Halamai and Burnwik as well as the family's pet dog, Biggsy. Time will pass during this or the player can simply relax in their character's bedroom until the time arrives. Once the moon is high in the sky and Kenmaur and Kammi's parents have headed off to bed, Kenmaur and Kammi sneak out of the house, shushing Biggsy by giving him a bone from the Rutswine to chew on. Heading out of the house, the two head through the settlement and eventually meet up with Mortimer, Bididi and Dobobo, the group ready to head out, although Mortimer asks if they'll be alright if they run into any monsters as he's not much of a fighter, Bididi proudly proclaims that they'll be fine as long as he's present. The group sneaks through a false panel in the wall and out onto the roadside, sneaking through the forest thicket.
The group eventually reach the cave that Kammi mentioned having marked it on the map for the player, entering the cavern and navigating past a number of creatures that inhabit the cave the group comes across the artifact treasury. The group sees numerous items lying about in a large crater, Mortimer begins searching through the artifacts commenting on almost every single one he picks up, wondering how they all got here, Kenmaur notes that its strange they're laying about like this seems more like a dumping ground than some old ruins. Just then the group hear voices, and quickly hide, torches can be seen emanating from the mouth of the cavern as several bandits enter the cavern lead by a large, burly individual with a distinctive reticle in the place of his eye, the Bandit Leader, Sid. Sid tells the bandits to begin collecting up the treasure as he's going to have one of the merchants they captured sell it off for them. The bandits begin loading up the artifacts as Sid approaches the centre of the pile, rummaging through it, looking for something, Sid eventually reaches the bottom of the pile and then asks in an unsettling calm voice to the other bandits where the Windpiece is, the bandits quickly check their sacks and one of them speaks up stating that they don't know, Sid very quickly has his expression turn from calm to enraged as he asks the bandits if they've seen the Windpiece again, the bandits apologize to Sid and state that they'll find it as soon as possible, and exit the cave in a rush, Sid slowly walks out of the cave muttering to himself in anger.
The group quickly bail out of the cave and run to a brush thicket, Kenmaur exclaiming that Sid's probably referring to Kammi's Compass Artifact, Kammi however staunchly defends herself stating that she found it and he wasn't protecting it so it's rightfully hers. Kenmaur demands that Kammi return it before he finds out it was her, however she protests that they could take on Sid's bandits if they got the other settlers onto their side. Mortimer however protests the idea mentioning that if Sid's bandits got into a major fight with their settlement it might expose the settlement to unwanted attention and agrees with Kenmaur that Kammi should return the artifact. Kammi pauses and looks at the artifact before reluctantly agreeing and quickly runs back into the cave dropping the Windpiece in the centre of the pile. The group head back to the settlement, hoping no bandits saw them along the way.
As they get back they see three bandits at the gates, talking to the guards, Mortimer tells the others to stay hidden and he'll try to deal with the situation. Mortimer goes over to the bandits and guards, the latter immediately questioning Mortimer as to why he's outside the settlement so late, Mortimer explains that he'd been doing a bit of midnight foraging and asks the bandits what they're at the gates for stating that their agreement with Sid meant that he'd leave their settlement alone. The bandits explain the situation to Mortimer, who laughs wondering if Sid's getting a bit old and losing his sight, the bandits quickly warn Mortimer to watch his words as they'll cut him down where he stands, Mortimer then cowers behind the guards telling the bandits that they wouldn't dare start an unnecessary conflict with the Sirrush. The bandits however disregard Mortimer's warning and draw their weapons, the guards draw theirs in retaliation and Kammi whispers that they need to help the guards, Dobobo unsure suggests that it might be better if they hide, Kenmaur however disagrees stating that with enough numbers they might be able to convince the bandits to leave without killing them.
Kenmaur, Kammi, Bididi and Dobobo approach the bandits and warn them to back off, the bandits however refuse to back down and a battle ensues. The group fend off the bandits weakening them but not killing them, the bandits begin to retreat warning the Sirrush settlers that they'll find out if they were hiding their treasure. The guards thanks the quartet mentioning that Mortimer ran off back to his shop in the scuffle, they tell the group they should probably head back home before their parents find out to which they agree and quickly head home, Bididi and Dobobo saying goodbye to Kammi and Kenmaur as they head off.
At the start of the next day the player is free to play as Kenmaur or Kammi and travel around the settlement, there are a multitude of tasks that can be complete or the player can go explore out into the wilderness beyond the settlement. During this time the player can familiarize themselves with various other systems in the game such as Bartering, Magical Combat, AT Systems and much more, after three in-game days the player will be informed they need to meet up with Mortimer near the settlement gate, when the player does so, Mortimer will explain that he'd been out scouting that day (his shop is closed on the third day) to see if he could find what was going on with Sid's bandits and he fears they might be planning to raid the settlement. Just as Mortimer finishes up his scouting detail the group is approached by Yullig the spiritual leader of the Sirrush, she questions Mortimer as to what he was talking to Kenmaur and Kammi about to which Mortimer vaguely informs her of his scouting detail, purposefully leaving out details that he'd told Kenmaur and Kammi just before. Yullig thanks Mortimer for his efforts and informs him that they'll need to prepare the settlement for a possible attack, Yullig informs Kenmaur that he should inform Burnwik and see if he can spare some weapons to help in the fight. Yullig and Mortimer head off and Kammi confronts Kenmaur questioning him as to why he'd listen to Yullig, Kenmaur states that Yullig is just looking out for the settlement's safety however Kammi argues back believing that Yullig is just trying to get their father killed because he holds sway among the people. As the pair walk back to their home, they continue bickering, after Kenmaur informs Burnwik about the situation the player is able to make a few decisions, the player has limited time so they won't be able to help with all of them however the player can aide in improving the wall defences, assist in scaring off some Bandit Scouts, talk to the townsfolk to convince the more reluctant ones to help fight to protect the settlement and also collect healing herbs from the surrounding brush for Moch-Noch or Teres to help them creating healing potions.
At the dawn of the next day, Kenmaur is awoken by Kammi who informs him that the townsfolk have already rallied near the settlements entrance. The duo head out and see Yullig giving a speech to the settlers, Yullig bellows with a commanding voice that Sirrush will protect them from the ferocity of the bandits as long as the people have faith in Sirrush. A cheer reigns in from the crowd as several of the guards march out to protect the exterior of the settlement, Yullig approaches Kenmaur and Kammi informing them that she'll need them to perform some scouting stating again that Sirrush would protect them, while Kammi looks doubtful at Yullig's claims, Kenmaur proclaims that he'll help to protect the settlement, Yullig thanks Kenmaur and informs the duo that Bididi and Dobobo have already headed out towards some dense brush a bit far off from the settlement and they'll need to keep an eye out for potential bandit patrols.
Kenmaur and Kammi head out, carefully navigating about dealing with the monsters along the road before meeting up with Bididi and Dobobo near a tree surrounded by bushes that stretch out somewhat from the small woods nearby, Kammi asks the duo if they've seen any bandits yet to which Dobobo informs them that the road has been clear so far, Kammi tells Kenmaur that she's going to move to a different location to get a better view, Bididi states that he'll go with her and the two quickly move across to a nearby thicket with a lone pair of trees atop a small hill. The player has the choice of playing as Kenmaur or Kammi for this section and the player must deal with the bandit patrols that come along the path, the player is taught to use ambush tactics and stealth for this section before initiating a battle, after dealing with four bandit patrols the group see Sid himself riding up the road along with a large number of bandits, Bididi quickly runs off towards the settlement evading being seen thanks to his small stature, the remaining three watch carefully as Sid passes by, briefly stopping to investigate movement in the brush only for a Midinik, a small six-legged deer-like creature to hop out from the brush near Kammi that one of the bandits promptly shoots, Sid continues heading towards the settlement telling a few of the bandits to deal with the Midinik. After Sid's group leaves, the trio attack the Bandits and defeat them, Dobobo quickly runs over to the Midinik and gives it some healing potion stating that Teres gave him some just in case their scouting went poorly and states that Midinik should live another day.
Kenmaur exclaims that they need to head back to the Settlement to help protect it to which the other two agree and the group quickly head back. Upon arriving however they find the settlement up in flames, the walls having been burned to the ground and numerous bandits rummaging through the wrecked buildings, several guards can be found dead or severely wounded along the road up to the entrance with Moch-Noch and Teres tending to the gravely injured guards' wounds. Moch-Noch tells the trio that the guards dealt with the bulk of the bandits but Sid and his elites broke through, Kenmaur quickly rushes ahead and Dobobo tells Kammi to go help inside the settlement as well as he'll help Moch-Noch and Teres with the wounded. The player controls Kammi through this section, along the way the player can help a few guards still fighting bandits, helping the guards will allow the player to gain a temporary party member in Huett, as the player enters the settlement proper they find numerous buildings wrecked blocking much of the pathway, the player maneuvers through the wreckage dealing with the bandits along the way, eventually meeting up with Kenmaur who is seen fighting a Bandit Beserker, Kammi helps Kenmaur out in the battle and after dealing with the Beserker the two head towards their home, within they find Burnwik exhausted fighting against one of Sid's most powerful bandit lieutenants, Revbalon, Kenmaur and Kammi quickly attack to protect their father, during the fight eventually thanks to the combined effort of the three Revbalon is defeated.
However before Burnwik can finish the job, Revbalon uses a powerful Acid Magic to strike at Burnwik, the injury causes Burnwik to recoil in severe pain as Kenmaur and Kammi rush over to help their father, Revbalon makes a retreat as Moch-Noch and several guards (varies depending on how many the player helped earlier) appear from another entrance to the building, Moch-Noch looks over Burnwik's wounds and states that he believes he'll be able to save Burnwik but he has to get Burnwik out of the settlement immediately, a few guards pick up Burnwik and head off with Moch-Noch. Among the remaining guards is the leader of the settlement, Langley, he informs the siblings that they'll need to help as Yullig and the other spiritual elders were trapped within the Sirrush Temple. The group quickly head towards the temple, several of the guards being dispatched to deal with bandits and people trapped in buildings. Along the way the siblings meet up with Bididi who's found fighting remarkably well against two bandits, after Langley rushes in and cuts down the two bandits Bididi thanks Langley and tells them that he saw the Bandit Leader, Sid near the entrance to the Sirrush Temple.
As the group enter the building they split up with Kenmaur, Kammi and Bididi heading into the lower levels of the temple, after navigating the small maze of corridors and burning rubble they come to the ritual room in the temple where they see Sid confronting Yullig, Sid informs Yullig that she'd broken the pact they'd agreed to, Yullig argues back that the pact was never broken although Sid ignores her arguments noticing the trio enter the room, Sid orders several bandits to attack them, the trio quickly deal with the bandits however in the time Sid grabs Yullig and drives the Ion Saber he was carrying through Yullig's chest killing her instantly. As Yullig's body falls down, Sid removes his saber from her body and points it towards Kenmaur stating that he'll make sure the blade leaves Kenmaur for dead this time, making a slicing motion in the air in the same direction as Kenmaur's scar. The trio get into a battle with Sid who uses a combination of magic and powerful sword blows to fight, each attack dealing potentially devastating damage, however the trio prevail breaking the Ion Saber in the process, Sid realizing the dire situation roars to the sky above and slams his fist into the ground, just as he punches the ground a bolt of lightning strikes the temple, incredibly destroying many of the floors revealing the sky above to the ritual room the trio and Sid were in. the massive storm clouds that form around the temple create fierce winds as Sid summons Odin whom rides down from the clouds above on his horse appearing in front of Sid, Odin holds out a hand to Sid who grabs Odin's hand disappearing in a flash of lightning before the group can do anything.
After Sid's disappearance the clouds rain down heavily on the settlement, dowsing the flames but causing the ground to turn into a sludge-like mud washing away much of the remaining structures. As the trio head back up to the top of the temple, Langley asks them what happened to which Kammi pauses before informing Langley of Yullig's death. Langley appears to go into a complete shutdown, unable to respond he slowly walks down into the temple towards the ritual room before standing before Yullig's corpse, he kneels down and weeps as he mourns her passing.
Gameplay[]
Unlike Final Fantasy XV, Final Fantasy XVI allows the player to customize their gameplay options, the game has three major gameplay modes; Modewheel, Forward Menu & Classic.
Modewheel is the most similar to Final Fantasy XV as it has the player select their actions from the four primary action buttons, however unlike Final Fantasy XV when a button is selected by holding it a select wheel will appear with the applicable options available, rotating which option the player wants with the analog stick (or arrow keys on PC) will shift between the option selected, once an option is selected the action that was chosen will initiate. In addition by simply tapping the button the player is able to repeat the previous action assigned to that button. The four action buttons are; Offense, Defence, Magic & Items. Offense is all non-magical attacks that the player character possesses, Defence is the player's block and parry preparation options as well as dodging. Magic is all the player's magic attacks which can be quickly scrolled through between each sub-group of magic attacks by double tapping the analog stick, lastly items covers items in the player's inventory and allows the player to use healing items and other such items.
The second gameplay option is Forward Menu, this is a new mode that allows the player to pre-select actions through the menus, when the AT bar fills the character will automatically perform the action, as long as the player is in range of the target, all non-Offense actions can be performed through this Forward Menu. Offense actions are instead mapped ot the action buttons and can be performed either by the single attack or through combo attacks by chaining correct button inputs together.
The last option is Classic, this is similar to older Real-Time RPGs where the player is able to select their action from the menu when their AT bar is selected, the player will be shown the range of effect of that action to let them know if their target is in range as well as the "Hit %" of that target which can range from 5-100% as long as they're in range. Like Forward Menu, Offense actions are excluded from this and are instead performed through the action buttons.
While in and out of combat the player is also able to swap between the playable characters, character swapping is instantaneous and time will stop while the player is selecting which character to swap to.
Offense Attacks[]
As noted in the previous section, Offense Attacks are considered separate from Defence, Magic & Items and do not consume AT when used. Offense Attacks are relatively low damage in comparison to Magic Attacks although can be performed immediately and can be chained through combinations to deal more damage. Depending on the player's weapon and their skill with the appropriate classes they will be able to use different combo attacks, certain weapons gain no bonus combo attacks from classes however and some classes like the Mage-orientated and Healer-orientated ones have no bonus combo attacks for Offense Attacks at all.
Class Progression[]
Uniquely new to Final Fantasy XVI is its class progression system, similar to Final Fantasy X the game features a decentralized class tree, however all playable characters share the same class tree in Final Fantasy XVI, this is because as the tree branches it falls into four major classes and then later sixteen minor classes (four for each major class). The player is free to mix and match abilities from each class as they level up, unlocking more skills as they progress through the game. The character's class is simply dictated by what they've invested the most skills towards, players can also be noted as being "Dual Class" which simply means they're nearly equally distributing skills between two or more classes.
It should be noted that the Class Tree as a whole is extremely long and characters will only be able to either fully specialize into a single class or go generalist for all four of the base classes and never specialize into the more advanced classes.
Class does play an important role in the AI of the allies in the game as since the player is not able to directly control them the player will need to specify their attack style and also select what skills they want that character to be more invested towards. Class is also important as there are numerous overworld interactions the player can only see by being of a certain class, most interactions only require skill in the four basic classes meaning even a generalist character can interact with them although there are a small few which the player will need to be one of the advanced classes for.
The player's ability to swap between characters is also important for this overworld interaction as characters unlock skills that have overworld usage that allows the player to perform actions out of combat that have various functions.
When the player reaches max level they will be able to visit a specific location in the game to reset their character if they so desire, resetting a character creates an Orb of Memories, these are special items worth a lot of Gil and can also be used in combat with the orb being able to summon powerful entities. It is through this resetting that the player is able to complete the game 100% as they will be able to interact with all possible overworld instances.
Classes
Base Class
Description
Onion
N/A
The starting class for all playable characters, Onion is a very basic generalist class with no specialities, all of the Skills that can be unlocked in this class act as foundations for the later classes.
Basic Classes
Warrior
Onion
Orientated towards direct Melee Combat, Warriors use skills that are orientated around Offense and Defence although have a few Magic Spells as well, their attacks generally favour slow but punishing damage that can be dealt against both a single target or multiple enemies. The Warrior is usually the one that will directly attack an enemy.
Thief
Onion
Thief is a Basic Class that utilizes non-direct combat attacks, they're the most skilled with ranged weapons and can also use special skills that allow them to disadvantage their enemies without magic or direct attacks. Thieves gain access to a number of Magic Spells that are orientated around maximizing their base stats in battle.
Mage
Onion
The predominant spell casters on the offensive side of combat, Mages are capable of using a wide variety of spells, more so than any of the other basic classes, their spells can vary in effect and element although most do either damage or create debuffs on opponents. Mages do also gain a number of skills that help them and their allies in battle.
Healer
Onion
The most support orientated of the four basic classes, Healers have relatively few direct attacks and magical attacks however gain access to the largest and most useful variety of Support Spells, they're useful for healing the rest of the team as well as buffing them while also being able to set up defensive barriers and traps depending on the skill.
Advanced Classes
Blood Knight
Warrior
Blood Knights are an Advanced Class that is focused towards parry attacks, they are able to utilize these types of attacks the most effectively and can generally work well with lighter armour as they don't need to block as much. Their special Skills focus around HP Transfer, taking health from targets and transferring it to the user or the party in general, this also extends to several Spells they learn and items.
Centimane
Warrior
This Advanced Class focuses around the character being able to generate multiple limbs, using said limbs with weapons to attack. Centimane's magic spells all revolve around maintaining multiple arms and also increasing the character's stats to benefit direct attacks. Many of the combos in Centimane favour multiple strikes. Uniquely by using Centimane with its respective skills the player can equip more than two weapons to the character.
Phantom
Warrior
Phantoms are an extremely evasive Advanced Class, most of their skills revolve around the Dodge mechanic and can allow the player to completely evade direct damage if they're skilled enough. Phantoms also have a lot of direct attacks and magic that foucs on teleportation, and dealing rapid attacks in quick succession, the main trade off for this class is that they are completely incapable of learning new Healing or Buffing Magic leaving them vulnerable without support.
Golem
Warrior
The Golem Class is a defensive orientated class, it focuses around stationary attacks and defending, there are a number of spells Golems can acquire through their Skill Tree that improve their attacking and defence output and even allow damage directed at allies to be redirected to them. Golems can deal the most damage in a single hit through their skills although require a considerable amount of time relative to other classes to perform said attacks.
Bushido
Thief
Focused around an honour code, Bushido are somewhat of a blend between Warrior and Thief although are firmly part of the latter, they use skills that focus around direct combat and are capable of analyzing enemies to identify critical weak points as well as utilize attacks that deal critical damage. Many of their spells focus around maximizing the probability of one-shotting an enemy.
Therianthrope
Thief
Therianthropes are an Advanced Class that focuses around utilizing innately beastial abilities, many of the skills for this class utilize magic buffs that can be applied to the character to boost their abilities and allow for more skilled combat in different environments. The most powerful skills of the Therianthrope directly allow for the character to utilize the abilities of the four primary creatures the class revolves around; Timberwolf, Salamander, Kraken & Geruda.
Forest Spirit
Thief
Those in tune with nature itself that are able to use the world around them to their whim, Forest Spirits learn the most magic of the four advanced Thief Classes and can utilize nature itself to fight on their side, they also have a number of abilities that allow them to take control of animals and monsters. Their other skills center around trapping targets and ensuring a guaranteed hit either by them or by another party member.
Pact Dealer
Thief
Pact Dealers are a strange class that utilizes Gil as a primary part of its mechanic. Pact Dealers are able to call on different mercenaries and also have a number of spells that can increase the amount of Gil found as well as other skills that maximize the usage of the currency. Pact Dealers learn a number of direct combat abilities that allow them to steal items from their enemies and place negative effect items
Necromancer
Mage
Steeped in the dark forces of magic, Necromancers can summon the undead and use dark and dangerous spells. Necromancers are the most magic orientated class in the game along with their Healer counterpart, Summoners. They're able to resurrect dead enemies to fight for them and can also use rituals to bring undead forces to fight alongside them, they have no physical attacks learnt through their skill tree however meaning direct combat with them is a bad idea.
Mimicform
Mage
A rather strange advanced class that capitalizes on using the skills of the enemy to bolster the character. Mimicform's skills revolve around abilities to mimic opponents, stealing their positive effects and even abilities, later skills even allow the character to hold onto the skills of an enemy across battles utilizing them whenever they want. Mimicform has relatively few Physical Attacks however and completely lacks Support Abilities making it somewhat fragile in combat.
Alchemist
Mage
Brewing Potions and using them in combat, Alchemists are a rather distinct class as they don't have many skills in Offense, Defence or any form of magic. Their skills instead stem into improving their potions which are useful both as offensive weapons and also in providing healing, buffing and recovery for allies, they're generally a support class as a result although are quite capable of fighting as long as their damaging potions are plentiful.
Charm Writer
Mage
Utilizing the various charms and spell tages, Charm Writers are capable of controlling the battle through indirect means, setting up traps and safety zones they utilize the power of the written word to imbue power into special tags they can apply to their allies or enemies to help or hinder. Charm Writers are rather generalist learning a combination of Offensive and Defensive abilties from both the physical and magical side of things, their main attributes focus around writing Charms and curses which they can apply to allies, enemies or their surroundings for a variety of effects.
Conductor
Healer
Conductors specialize in controlling the flow of battle through their musical abilities, they're able to create songs that can envigorate the party or debuff their enemies and also utilize songs that can impact the surroundings of the environment as well. They learn a number of physical attacks as well which often tie into their focus around using music to control the battle.
Survivalist
Healer
The Survivalist Class are masters of the the wild, outside of combat they're capable of finding use in items in the environment that other classes can't and in combat are able to provide rapid healing abilities depending on the terrain, they can also provide party buffs through different terrains and are able to use the environment around them in combat in place of magic which they have the least skills focused around of the Healer Advanced Classes.
Summoner
Healer
In tune with the divines, Summoners are capable of expending huge amounts of magic to summon powerful beings from the higher realms, Summoners are one of the most magic orientated classes in the game, their spells revolve around summoning powerful entities or imbuing their allies with the power of the gods to boost their abilities.
Photo Guard
Healer
Photo Guards are an Advanced Class that is in tune with the world of the spirits, they're able to see those who've passed on and whose spirits inhabit the lands, using this foresight of the dead they can call upon ghostly spirits to aid them in battle, providing protection for the character and their allies while also setting up sentries who'll automatically attack any target that comes into range of the spirit. Photo Guards have a considerable amount of skills focused around Defence in both Physical and Magical means although can also learn a number of Magical Attacks.
Status Effects[]
Like with previous Final Fantasy Games, Final Fantasy XVI features a variety of Status Effects that the player's characters and the enemies can inflict on each other, the effects of each status vary and some cancel each other out. As the player progresses through the game they'll find that they need to contend with a larger array of Status Effects that can affect their characters and also enemies that are resistant or even immune to Status Effects.
Status Effect
Description
Slow
The target is slowed, reducing their movement speed and their AT Bar Charge Speed, can be countered by Haste and is overriden by Paralysis.
Haste
The target is sped up, increasing their movement speed and their AT Bar Charge Speed, higher levels of Haste even allow for multiple attacks per turn, can be countered by Slow and is negated by Paralysis.
Paralysis
Completely stops the target's movement although their AT Bar still charges just more slowly, often caused by Electricity.
Burn
Inflicts damage over time on the target and prevents them from using Ice Magic although boosts the damage of Fire Magic, may interrupt attack animations for Offense Attacks. Burn cannot occur while Freeze is active. Usually occurs as a result of Fire.
Enraged
Increases target's Attack although they will attack randomly including possibly their allies, movement is also somewhat randomized, can be countered with Terrified.
Terrified
Increases target's Movement Speed although they may be unable to attack at all, in addition they cannot receive buffs or heals from allies while the effect is active, can be countered with Enraged.
Sickness
Inflicts random damage over time on the target and can be passed onto target's allies through close proximity, also will debuff one stat at random while active.
Bleed
Inflicts damage over time although decreases over time until damage from Bleed is 0, also reduces Physical Attack and makes the target more liable to acquire other Status Effects.
Freeze
Prevents the target from moving and halts their AT Bar entirely, cannot be activated at the same time as Burn. Usually occurs as a result of Ice.
Poison
Inflicts damage over time, effect also lowers Magical Attack and Magical Defence while active, if active at the same time as sickness then can be transferred along with sickness between target's allies.
Trapped
Prevents the target from moving and can also reduce target's Physical Defence depending on the type of trap, cannot activate if Target is Enraged.
Debuffed
Is a decrease to any of the stats of the target, it is countered by Buffing the same stat.
Buffed
Is an increase to any of the stats of the target, it is countered by Debuffing the same stat.
Invisibility
Makes the target invisible increasing their Evasiveness and making them unable to be targeted by attacks, is countered indirectly by Truesight.
Blindness
Reduces the accuracy of the target and makes their movement randomized, also heavily reduces the effective range of most attacks, it is cancelled by Truesight. Usually occurs as a result of Light.
Truesight
Increases Accuracy and Evasiveness of target and allows them to target invisible targets.
Shielded
Comes in Physical and Magical varieties that protect the target from oncoming attacks of that nature, does not protect against Parries or Counter Magic.
Regen
Slowly regenerated HP or MP over time, is countered by Poison for HP Regeneration.
Scan
Increases Critical Hit Ratio and lowers Evasiveness of target, the effects are dramatically increased by Truesight and can be countered by Invisibility.
Condemn
Causes the target to die after a certain amount of time, can be countered with certain magic.
Confuse
Causes AT Bar Charge Speed to become random and movement is also randomized, attacks may also strike allies and deal damage as well.
Curse
Inflicts damage under a certain criteria based on the curse that was dealt, can be countered with certain magic.
Muffle
Prevents the target from using Magic, cannot be activated while Uproar is in effect.
Uproar
Target will randomly use Magic even if their AT Bar isn't filled, Magic used is randomized however and targets can hurt their allies as well, it is often caused by Sound.
Reverse
Inverts all debuffs and buffs on the target.
Puppet
User takes control of the target allowing them to attack their allies.
Characters[]
Like with previous Final Fantasy Games, Final Fantasy XVI features a large variety of characters to interact with as well as a party system with numerous characters the player can have. As with more recent Final Fantasy games, playable characters have clear personalities however, how they specialize in combat is entirely up to the player.
Playable Characters[]
Character
Description
Kenmaur
One of the main characters of Final Fantasy XVI and along with his sister, Kammi is one of the first two playable characters. Kenmaur is a diligent older brother who's hard working attitude had earned him the right to inherit his father's farm after he becomes old enough. Kenmaur is often quite calm and collected in conversations and interactions, generally trying to act as a defacto leader of his family as his father's gotten older in life, he is however rather childish when pressured trying to play things off as not being serious and making games out of more serious situations and trying to lighten the mood in more dire situations. Overall, Kenmaur ends up being laid-back in his personality, trying not to worry himself with the issues of the world and just focus on maintaining his father's farm and keeping his family safe from harm.
Kammi
One of the main characters of Final Fantasy XVI and along with her brother, Kenmaur is one of the first two playable characters. Kammi is a rather free-spirit who unlike her older brother isn't interested in staying on her parent's farm, rather seeking to go explore the world and find worldly treasures that may be hidden from them. Kammi often leads her brother and the other children of the Sirrushes out on expeditions beyond the boundaries of the settlement, leading to her often being scolded by her parents due to their fear of the dangers that exist beyond their homes. Kammi in spite of her adventerous demeanour is easily spooked and has encountered creatures in the wild that she would exaggerate the danger of when she returned from her expeditions causing her parents some significant stress as a result. Kammi's nature hasn't distanced her from her parents however as she still deeply cares for them and never goes out for too long on her expeditions and any treasures she comes across she gives to her parents to let them keep as her way of helping to look after them.
Dobobo
Dobobo is the other twin and although physically larger and more imposing than Bididi is actually a bit of a coward often acting as a critic to Kammi's decisions and often helps in keeping Kammi from doing anything that might put their group in danger. Dobobo is however conflicted by his cowardice through his vast interest in the natural world, often cataloguing every creature and plant they come across, hoping to one day create an encyclopedia of the natural world and so hopes to overcome his innate fears to find all the creatures and plants hidden away in the world around them.
Supporting Characters[]
Character
Description
Burnwik
The father of Kenmaur and Kammi, although rather old at the start of the game, during his youth he was revered as one of the great leaders of the Sirrush people, his dedication to the protection of their settlement had earned him the title of elder when he retired from his combat role. Burnwik has deep ties to the other people in the village and although is rather easy-going like his son, he also has a deep-rooted sterness to his personality that has helped him in raising Kammi who's adventerous nature would otherwise have gotten the better of her parents.
Halamai
The mother of Kenmaur and Kammi, Halamai appears outwardly to be a soft-spoken individual although when it comes to the Sirrush people and their protection she is considered a ferocious beast by would be bandits, Halamai's dual personality is most evident in her interactions with her family as she can be both aloof with keeping check on Kammi and also sometimes overbearing, or even at times encouraging her. Halamai is also heavily spiritual having being a priestess of the Sirrush faith when she was younger, many who seek wisdom from the gods will often visit Halamai if the temple is too busy as she is one of the most knowledgable people in the settlement.
Mortimer
A merchant who resides in the Sirrush settlement, Mortimer is a sly individual who's quick-wit has made him enemy of many and friend of many more. Mortimer often deals in general wares although periodically comes across rare artifacts, Kammi looks up to Mortimer as his travels outside the settlement fascinate her, she is also one of the few that's seen Mortimer for who he truly is, that being someone who deeply fears remaining still and must keep moving forwards, this has lead to Mortimer developing somewhat of a dark past among the people in the village as at times he has been ruthless in his actions nearly getting him executed for his actions.
Bididi
Twins who live in the village, they're slightly younger than Kenmaur and Kammi and are often ones to tag alongside Kammi on her expeditions. Bididi is the smaller of the two although is remarkably strong often doing the heavy lifting for their expedition parties and often likes to show off his strength whenever he can. Bididi is also a bit of a clutz being oblivious to his surroundings and subtlety, whenever exploring caverns Kammi often has to remind Bididi not to shout as he has periodically done so in the past resulting in monsters that dwell in the caves being alerted of their presence.
Yullig
The current spiritual head of the Sirrush people, Yullig is a very controlling woman who's presence among the council of the settlement is felt immensely, even though she isn't the outright leader of the settlement, many regard her as such due to her incredibly imposing clothing and intimidating personality. Yullig is fully aware of her status and uses it to her maximum potential to lead the Sirrush people through her seemingly divine words, though some, in particular Kenmaur and Halamai question Yullig, no one actively opposes her in fear of being regarded as a heretic.
Langley
The current leader of the Sirrush settlement, Langley is an intensely devout individual who's raw energy is unmatched by the other people of the settlement, some describe him as the "Thunder Gorilla" as he can go into an intense borderline-rage when speaking to the other Sirrush People, with this borderline ferocity in his personality he has been able to successfully ward off a number of would be threats to the settlement although some believe that Langley's leadership is leaving the Sirrush people isolated, however Yullig supports Langley and due to his intense devotion to the Sirrush faith he has become ignorant to the beliefs of other people in the settlement.
Moch-Noch
A rather peculiar individual, Moch-Noch is the Sirrush people's specialist in medicine and one of the few people in the settlement who uses magic, although he has been attempting to distance himself from his reliance on magic throughout the decades he still needs magic for a variety of his medicines. Moch-Noch is a conflicted characters due to this and often becomes hesitant to perform treatments on the Sirrush people as he doesn't want to potentially waste valuable resources, this behaviour has resulted in people regarding him unfavourably and generally avoiding him, leaving him as somewhat of a hermit who spends much of his time working on new medicines without the reliance on magic.
Teres
Originally Moch-Noch's star pupil, Teres is now his closest competitor as a provider of aid in the settlement, Teres unlike Moch-Noch isn't against using magic for medicine believing that the service of the Sirrush people always overrules any potential risks of overusing magic. Teres is considered to be one of the most well-liked people in the Sirrush settlement and also gets along well with the few traders the village has as she provides rather unique medicines that only exist within the settlement that provide aid other medicines cannot. Although Teres doesn't agree with Moch-Noch's approach to medical care, she does agree with his process of moving away from a reliance on magic and has often adopted or tried to adopt his procedures for creating magic-less medicine.
Sid
A ferocious bandit leader who has been known to terrorize the Sirrush people for generations, Sid and his bandits control a large army of Enthelopes which they use to rule over the Graves of Takestroy with an iron fist. Although they've yet to be able to perform a successful raid on the Sirrush settlement, Sid's bands of bandits have been known to attack traders and the various Sirrush people who leave the settlement from time to time.
One particular incident of note occured when Kenmaur, Kammi and the other children of the settlement were exploring in the woods near the settlement, the group was onset by Sid himself and a few of his bandits, though surrounded, both Kenmaur and Kammi confronted the bandit leader and challenged him to a duel, Sid though vicious accepted with chivalrous intentions, the duel showed the children just how ruthless Sid was however, overpowering the siblings with his powerful Ion Saber leaving a distinct gash on Kenmaur's chest that scarred him permanently, if not for Kammi stabbing Sid through his mouth with a dagger she had with her Sid would've likely killed Kenmaur on that day. Ever since then Sid has vowed to one day take the siblings on in a duel again to finish what they had started.
Revbalon
Second in command of Sid's bandits, Revbalon is an incredible fighter who often can act as Sid's moral compass at times. Regarded as one of the strongest of the bandits, Revbalon's cool demeanour has had him challenged by numerous bandits only to leave them cut down by his powerful magic. His personality although cruel is often one of mercy, never intending to kill anyone outside of a fight to the death, Revbalon prefers using methods of preventing his opponents from fighting back.
His history with Sid is a long one as the two group up together under the leadership of Sid's predecessor, Blind-Eye Rex and both were fascinated by the at the time frowned upon technology used by some members of the bandits, through Sid's sheer strength and Revbalon's intelligence however they usurped Rex in a fight for leadership and Sid thrust upon the bandits an era of technological improvement, using now machinery and tools to improve their effectiveness, while Sid adores using the machines they have in combat, Revbalon's interests fall into tinkering with the various machines they come across, trying to improve them in whatever way he can.
Locations[]
Like Final Fantasy XV before it, Final Fantasy XVI is comprised of a large open-world that can be explored, unlike its predecessor however Final Fantasy XVI is not limited to just one large open-world area and instead is comprised of five major ones, each one spans large areas that are regarded as the primary regions of the island the game takes place on, Lybboan Island. The five regions are separated by the massive mountain range called the Star of Ramus that splits the regions somewhat evenly. As the player explores throughout the game and progresses in the story they'll be able to visit areas from early in the game which contained extremely powerful monsters for the early game player character and deal with them when they're more powerful or attempt to face the challenges if the player feels they're skilled enough to overcome the level difference.
The map begins as seen above although the regions the player has yet to visit are greyed out, as the player explores and find new locations they will become highlighted on the map, the player is able to freely include or remove icons from the map based on the group they fall into, by default only Main Roads, Cities, Towns and Major Dungeons (the latter not included in the picture above) are included.
King's Aghea Marsh[]
The first of the five regions the player has access to, the location is home to the largest city on the planet, Zeb'r as well as a number of smaller settlements located throughout including the Sirrush Settlement that the player begins the game in. The region is fairly flat terrain with some mountainous areas such as the Graves of Takestroy and Heavensreach Mountain. it is populated by a large variety of creatures although most are peaceful and will only attack when provoked, it is more so the people that pose a threat during the day, at night however there are known to be bands of roaming predators that will attack wandering travellers who aren't in fortified areas.
Type
Location
Description
Cities
Zeb'r
Located in the North-most of the Region, Zed'r is the largest city on Lybboan Island, it is a gilded and illustrious city that despite the presence of the decay has maintained its mystical allure. Much of the city is supported high up in the sky on massive pillars with bubble shields that protect the citizens from the low oxygen. The city stretches out for miles nearly reaching both the West and East borders of the King's Aghea Marsh. Located within the city are dozens of shops and homes, despite the futuristic nature of much of the city the streets appear relatively small as the numerous pillars allowed for small neighbourhoods to develop. The Castle is located on its own pillar in the centre of the city and is connected to the other pillars by retractable bridges.
To get into Zeb'r one needs a Lord's Pass which can only be obtained by gaining favour with a regent in every region, as such the city is able to keep its transient population low by only permitting the most elite of individuals. Due the innovations made in the past the city primarily is automated with hundreds of robots that fly around the city performing most of the more rudimentary tasks, despite the threat of the decay the people of Zeb'r appear to be in denial of the issue and continue to use magic freely.
Zeb'r is also home to the Grand Cathedral the operational headquarters of the Inquisitors, many of the citizens have to pay patronage to the Inquisitors otherwise they run the risk of having their belongings confiscated or worse, being exiled from the city all together. Many of the citizens have never left the city so the sway the Inquisitors have on the fearful populace is massive and often outshines the High Ruler's own will.
Catroar
The second largest city in King's Aghea Marsh, Catroar is a coastal city located on the Catroar Peninsula in the very south of the region, the city's port nature makes it quite populated as many people who seek a life at sea will use Catroar as their home between seafare. The city through the decay has seen significant change as the massive magic machines no longer function forcing the people to move the massive amounts of cargo by hand as they lack any non-magical technology beyond small vehicles.
Catroar has been in general decline as a result as many manufacturers have moved out from the city to be closer to their production facilities, Catroar is mainly maintained by its massive fishing industry, the city's name comes from this fishing industry which attracted thousands of feline creatures to the peninsula which adapted over generations to the lifestyle. Many people in the city keep felines as pets from the very small Afurats to the man-sized Zabertigers. It is recommended by visitors to avoid the docks as the potent smell of fish in particular rotting fish can be nearly noxious to those who haven't grown up in the environment.
Sasam
Sasam is one of the central most cities in the region, located north of Catroar the city is known for being a popular stop for travellers thanks to its generally friendly populace and bustling industries, Sasam is a trading juggernaut in the region, the large farmlands located to the south of it haul much of their produce into the city and sell them in the city's main attraction, the Chocobo Bazaar, built by the studious Hertzman Korun the bazaar facilitates hundreds of shops selling their wares from numerous places both near and far to the thousands of people who visit the city while travelling between the major cities of King's Aghea Marsh.
The rest of Sasam revolves around facilitating the tourists and transport, the city has extremely large roads for its size and has numerous storage facilities located across the city to accommodate deliveries from the North, South and West. Sasam also has the largest Airport on Lybboan Island, the Muncuhri Airport which allows those who can still afford to travel by air a quick access to the island as well as from other regions. The tourism in Sasam is relatively cheap in comparison to the cities of Zium Dud although many facilities and places of interest are still provided. Near the Chocobo Bazaar is a popular tourist destination, Fireworks Park a large theme park that many tourists visit due to its adventurous theming and wildlife preserves.
Ovostein
Ovostein is a somewhat small city located between Anbon and Pondolt Urie in the East of King's Aghea Marsh, the city is generally missed by most due to its somewhat secluded location. Ovostein also has a reputation for being a bit of a strange location, supposedly the region is haunted by the spirits of the dead as there is a massive burial mound located to the South-West of the city. Many of the residents seem to dismiss or be offended by the rumors however so it is often a topic left unspoken of within the city.
The city was prior to the Decay rather important thanks to its access to the largest Mana Pool in the King's Aghea Marsh, which provided Liquid Esper a special ingredient necessary for Magical Fuel. Due to the decay however the Mana Pool is no longer in use as its seemingly endless supply is now noticeably more limited. The town in general has also regressed, many of the buildings have been abandoned as people left, though there is a sizeable population there is a general vibe of dread and foreboding in the atmosphere of the city as its decline into non-existence is almost certain at this point.
Reatiem
Reatiem is the oldest of what are known as Chrono Cities, a rare type of city that were built atop of the bones of ancient dragons that long ago were feared by humanity, though the dragons are long extinct, the magic they possessed continued to permeate into the ground where the dragons lay and provided incredible power. Reatiem was the first city to make proper use of this magic, tapping into its incredible source eventually the city's most powerful mages had unearthed an incredible secret about the dragon bones, they possessed a new form of magic, Temporal Magic which allowed one to bend time's flow, this greatly helped the world into bringing about the first of the Golden Eras as the incredible power of altering time allowed them to harness power far beyond what was previously capable.
Outside of its magical abilities, Reatiem is also rather ecologically driven using magic to enhance the greenery around the city and within it, giving the city a jungle-like appearance with large trees growing thorughout, including some which the more recent buildings were structured around. Of course as a result of the decay the ecology of the city has been unable to be controlled as a result many of the city's structures are slowly being absorbed by the plants they were built around and the roads are becoming unusable.
Curimut
One of the more solitary cities in King's Aghea Marsh, Curimut was one of the hardest hit by the Decay, the city heavily relies on magic for its generators and much of the city's various small industries use magic as well, as a result numerous people have moved away from Curimut causing the city to become noticeably barren, many buildings around the city are abandoned and left either inaccessible or infested with creatures that have taken up residents. Much of the city's remaining populace focuses around the only industry that remained relatively unharmed, the mining industry. Thanks to old practices which several of the mining companies in the city still practice the industry was able to stay afloat by ditching the newer technologies and going back to older methods, this did significantly impact the output however due to the relative lack of minerals from other regions of Lybboan Island the mineral exports from Curimut make the city a sizeable profit.
Many of the residents lament the change however, often commenting on wanting to leave the city but lacking the funds to. The remnants of the city have over time become altered due to the needs of the people who remain, Curimut can be best described as a bit of a shanty with parts of the old buildings being knocked out or repurposed to make travelling through the inhabited parts of the city easier.
Anbon
Located at the conjoining of the Mirumiru River and the Kalderon River, Anbon is a farming city that had benefited massively from magic, thanks to the advances in technology much of its farming process was automated allowing it to become the major production of wool on Lybboan Island. Though the decay has slowed production, the old methods that were taught prior to the introduction of the automated process were maintained and the populace has been able to survive thanks to recovering the old techniques.
In general, Anbon is one of the few cities in King's Aghea Marsh not to be in decline due to the Decay, their adaptation to old technology as well as diversifying their industry, taking in wildlife from the surrounding area and trying to domesticate it to acquire new sources of industry has kept Anbon in a remarkable state. Many of the citizens of Anbon will often complain about the work however, often envious of the people of Zeb'r due to their lifestyle however in parts thanks to their charismatic regent, Arlia Monz who spearheaded the change in production styles Anbon has suffered the least emigration of the major cities in King's Aghea Marsh.
Liamot
Liamot is a coastal city located along the southern coast of the King's Aghea Marsh, the city was built with an artificial lake to supply fresh water, a large water purifier known as the Kracken's Wall is the oldest building in the city, providing fresh water to the populace. Over time the city grew providing life to the barren area of King's Aghea Marsh around it, the water was repurposed for a variety of functions, Liamot eventually became a hybrid of agriculture and entertainment as people would flock to see the strange and unique plants that were grown as well as the fantastical water displays which could be found near the centre of the city.
Over time research was conducted to experiment on the plants that grew in the region to make as many of them edible as possible to help provide for the rapidly growing population, over time however the experiments moved away from the edibility of the plants and instead towards their aesthetics, hundreds of generations later the plants that grow around Liamot are unlike any found in the rest of the world due to the changes done to them, the strange and unique designs of each are compared to one another in yearly festivals as the numerous botanists in the city, who's vast wealth had given them significant power within the city, experiment constantly. Due to the decay the water has slowly been unable to be purified as quickly due to the magic needed to run the water purifying weakening, as a result many of the farmers who tilled the land around Liamot have left because the large population near the centre of the city favoured the entertainment from the modified plants and water displays.
Bidrus
Located near the border to Reme Karn, Bidrus is a strange city, sometimes referred to as the little sister to Zeb'r, Bidrus is a flying city that was built atop the Bidrus Crater, a crater that was created during a war Lybboan Island had with a foreign power long ago that destroyed the original city. Bidrus was once considered a great marvel due to its sheer technological brilliance, the city is unique in that its reliance on magic is relatively low, the power that helps maintain the city afloat is mostly drawn from the colossal wind turbines located all around the city as well as near the crater below. The wind generated from the mountains in the Star of Ramus help keep the city afloat, the only magic involved in maintaining the levitation is in the jet propulsion beneath the city.
There are constant concerns that one day the magic will diminish to the point where the city will lose its ability to fly and come crashing down, as such many of the scholars in the city are researching methods of countering the effects or minimizing the damage, some believing they can create a new energy source for the jets while others believe the city should be lowered down gradually to prevent it crashing at all, this split in the scientific community in the city has prevented a consensus from coming about.
Much of Bidrus' role prior to the Decay came in the form of Technological advancements, many of the magical machines that automate the world originate at least partially from the city and ever since the decay the city has been fiercly focusing on finding new technologies both to protect itself and to sell to the other cities.
Pondolt Urie
The South-East most City in King's Aghea Marsh, Pondolt Urie was an extremely old city in the region, originally build as a fort to protect from naval invasion from other powers the city gradually grew around the fort as the soldiers who lived in the fort settled down and started families. Pondolt Urie is easily noticeable thanks to its two walls that are shaped like a square for the inner wall and a hexagon for the outer wall, this divides the city into five sectors generally referred to as The Fort and each Cardinal Direction for the outer four.
Many of the citizens of Pondolt Urie hold great pride in their city's history and many relics remain from the city's old days as a fortification. Pondolt Urie also has a large museum that is dedicated to the history of warfare on Lybboan Island, the museum is considered somewhat of a rarity in the world as most texts are simply kept in archives rather than being displayed as such it's somewhat of an attraction for visitors simply due to its oddity.
Icora
Located in the South-West of the region in an area known as the Silverbrush Forest, Icora is primarily a city that acts as connection between Bidrus and Liamot, however the people of Icora hold the city in high regard as their main industry, Cider is renowned for its fierce competitiveness among the main producers into improving their recipes. The people of Icora are similar to Zeb'r, ignorant of the decaying magic, they continue to use magic regularly to continuously improve the flavour and quality of their beverages.
While some in the city have attempted to move away from the industry which has become increasingly fierce as the Decay has only encouraged the most powerful Cider producers to expend even more magic towards their product, much of the attempt to move away from the industry however has been met with disdain by the rest of the populace in the city, as a result a sector within Icora known as the Gilweed Sector has somewhat segregated those who reject the overuse of magic and many citizens in particular the officials and regent of Icora hold the people of the sector with significant prejudice.
Reme Karn[]
A highly spiritual location, Reme Karn is a very mountainous region on Lybboan Island that is where many of the major temples on the island were constrcuted, a constant fog bank that forms from the rivers that flow from the peaks of Heavensreach Mountain through the Star of Ramus' arm into the region, as a result many of the settlements in the region are built near the peaks of the mountain where the harsh weather tests the endurance of those that seek to live there or perform pilgrimiges. Numerous tales speak of the strange and mysterious monsters that lurk in the Fogs of the Reme Karn that will eat lost travellers and leave their bones as warnings for other would be travellers of the dangers of their lands. In recent years the magic that was keeping the fog away has weakened and the fog is slowly encroaching on the highlands of the region causing overcrowding in the small cities of the region.
Galula Band[]
Located in the North-West of the island, the Galula Band is an arid environment due to it being surrounded by the more verdant two regions and has no major rivers flow through it, though the region is now a hot desert as has been described to appear on other islands on the planet its rocky terrain makes it difficult to navigate as the lack of vegetation causes frequent landslides and the overmining of the residents in the region has caused the terrain to become unstable. In addition subterranean monsters that were previously kept calm with powerful calming magic no longer are able to be controlled and as such run rampant in many of the old, abandoned mining tunnels of the region. Many of the people who live in the region consider themselves rather hard-working in comparison to the rest of the residents of Lybboan Island as they chose to mine the minerals of the land instead of simply relying solely on magic, as such they've suffered the least from the Decay in terms of their livelihoods.
Zium Dud[]
A resort in comparison to the other regionsof Lybboan Island, some have referred to Zium Dud as heaven on Luludanitu, its sparkling rivers have healing properties in them thanks to magic from the priests who live in the temples in the higher areas of the region, much of the region has lush and dense forests and even a large jungle that stretches across the middle of the region called Falkalwood which is said to be one of the most plentiful locations in terms of fauna on the entire island. A large resort city exists on the coast of Zium Dud called Daremiala which is a popular destination for all who visit the region including many outsiders to the island, although due to the panic that was caused by the Decay the tourism to Daremiala has gone down significantly and crime has become a problem in the once bright city as sectors of the city have had to be shut down due to the lack of Gil flowing into the city. Many of the other settlements in the region have also suffered as the focus on maintaining Daremiala's appeal has taken funding away from the smaller cities.
Aglim Sehg[]
The large golden savannah of Aglim Sehg is known far and wide, the great beasts that wander through its lands hunting each other for food are only matched by the impressive sportsmanship of the cities of Aglim Sehg who's people are fiercly competitive with one another often seeking to constantly improve their skill at their various activities. The region is known for being rather distinct among the five regions of Lybboan Island as the one who rules over Aglim Sehg is considered equal to the High Ruler of Zeb'r, supposedly having lived for over ten thousand years, very few people even within Aglim Sehg have ever even seen a part of their ruler however his divine might is unquestioned as it has lead his people to great prosperity. In the dire times the Decay, Aglim Sehg transformed from an entertainment powerhouse into an Agricultural juggernaut, utilizing its already athletic population to maintain food output, some believe that Aglim Sehg's ruler was able to forsee the Decay and was preparing his people for the day, others however particularly other members of the councils of the other regions believe that Aglim Sehg's leader may have been responsible for initiating the Decay and as a result the tension betwene Aglim Sehg and the other regions has been quite tense ever since the end of the ninth era.
More TBA
Enemies[]
Within FF16 there are a large variety of enemies the player can encounter, enemies appear in the overworld and when encountered may become aggressive to the player on sight or may remain passive until provoked or attacked, the player can perform Stealth Attacks on enemies before initiating combat to get bonus damage. During battle enemies use Regular and Magic attacks, Regular Attacks for enemies work like the player's Offense Attacks and are not tied to any AT Bar, whereas their Magic Attacks are.
Enemy
Magical Attacks
Description
Aninfox
N/A
Small fox creatures that dwell in the forests of Lybboan Island, their long snout allows them to smell out prey and predators alike, they will fight the player's party on sight however will flee if they know they're going to lose forcing the player to chase them down if they want to finish the creature off.
Braton
Snatch - Steals Gil from the player, will be returned at the end of a battle if defeated Smoke Puff - to Targets in affected area for 5 Sec. Blood Rush - Physical Attack 1 Stage on User for 10 Sec.
A goblin-like creature that is quite common across the Lybboan Islands, they are the original inhabitants of the island before humans took over and harbour a deep-seeded hatred towards them, Bratons are numerous and live underground often being encountered in caves and old ruins, though weaker than humans their numbers can make them quite dangerous as they have similar intelligence to humans.
Garolwulf
Roar - Physical Attack to Allies by 1 Stage for 5 Sec.
Small wolves that often appear in packs, they're more of a nuisance than anything on account of their tendency to try to steal livestock, in large enough groups they can prove troublesome for travellers.
Rutswine
Dig Up - Deals Earth Damage Rampage - Induces for 5 Sec.
A large pig creature that is quite common on Lybboan Island, they're often domesticated for food although many can be found in the wild, they will not attack unless provoked although the bulls (identified by their larger tusks) will attack on sight.
Drop Beetle
N/A
These small beetles are often quite a nuisance as they will drop out of trees in forests to hurt travellers, children will sometimes collect ones that end up falling onto their backs and collecting them, they're fairly harmless aside from their main trait.
Click Beetle
Clang Click - Physical Defence for Target by 1 Stage for 5 Sec.
A related species to the Drop Beetle, they will often be seen on the trunks of trees hanging on and making clicking sounds to attract other beetles, they can release an ultrasonic soundwave to weaken potential predators.
Sunworm
Molt - to User for 5 Sec. Heat Up - Regular Attacks deal Fire Damage for 10 Sec.
Unusually large insects that constantly stare at the sun, they're deceptively fast in spite of their appearance and have an internal combustion organ that they can activate when threatened.
Amberfili
Paralyzing Powder - for 10 Sec. Sun Spot - Deals Electric Damage, may cause
An amber-coloured butterfly like creature that's roughly the size of a human, its large gilded wings are laced with a paralyzing powder that when sprayed can incapacitate their targets, they will often appear at Sunrise and Sunset in deep forests and may also appear as a result of a Sunworm's death screech.
Cystofili
Blood Flush - May induce for 10 Sec. Rotblood - Induces on Target for 10 Sec.
A rare variant of the Amberfili where their wings are blood red, they only appear on the night of a full moon and are more dangerous than their orange counterparts, their wings are noticeably more jagged in shape.
Rendipede
Ramming Rush - Deals Earth Damage, Physical Defence 1 Stage on Target for 5 Sec.
A large centipede creature that's body is covered in thick armour that is incredibly durable and cannot be attacked from above reflecting magical attacks and reducing physical attacks to an extremely low degree, the creature's underbelly however is very weak and flipping them over will reveal this weakness.
Wholemole
Burrow - Unable to be Targeted, needed to perform Burrow Strike Burrow Strike - Requires Burrow to be performed first, Deals Earth Damage
An underground dwelling mammal that is quite large, its sharp claws can be quite dangerous and it has a boosted Critical Hit Ratio too, they tend to stay underground and only attack when an opportunity presents itself.
Jackal
N/A
Dog-like creature with a lean body allowing it to maneuver at high speeds often out-speeding humans, they're quite agile and can be dangerous in packs although can be overwhelmed by strong enough power.
Noctvulper
Nightvision - on Self for 5 Sec. Shadow Meld - on Self for 5 Sec. Phantom Pounce - Deals Dark Damage
Only encountered at night, Noctvulpers are a strange hound-like creature with noticeably long legs and a hunched back giving the creature a quite unnatural shadow, they can seemingly meld into their environment thanks to their dark fur.
Glass Ghost
Shrapnel - 5% Chance to cause Glass Shield - User Physical Defence for 20 Sec. Phase - to User for 5 Sec.
Fragments of spirits that were trapped inside abandoned glassware, they're more common around urban areas although only come out at night, they can be particularly tricky to deal with if one doesn't have access to Truesight.
Spry Flower
Synthesis - User Magical Attack by 1 Stage for 10 Sec. Seed Strike - Deals Nature Damage Root Up - Deals Earth Damage
A weed that grows commonly on the side of dirt roads, they attack travellers in hopes of scaring them off before stealing their dropped goods, they will often group together in fours as to avoid ambushes.
Carnivorous Vines
Ensnaring Vines - on Target for 10 Sec. Acid Spit - Deals Nature Damage, may cause Vine Wrap - Deals Elemental Damage
Strange vines that grow in forests and jungles, they're attached to large maws that release a powerful acid that can dissolve creatures they ensnare.
Huskmox
Shed Fur - Halves Electrical Damage on User for 20 Sec. but Doubles Ice Damage on User for 5 Sec. Stench - 25% Chance to cause deals Noxious Damage Power Stomp - 50% Chance to Physical Attack 2 Stages on Target for 25 Sec.
A large bovine creature that is normally quite docile unless provoked by running at them or attacking them. They usually reside in herds and can be somewhat dangerous to attack due to their large size. They reek of something foul, no one is quite sure how their stench is so bad however treating their fur can remove the odour and is quite popular in clothing.
Bandit
Fire - 10% Chance to cause , Deals Fire Damage Snow - 10% Chance to cause , Deals Ice Damage, hits multiple Targets Spark - 10% Chance to cause , Deals Electrical Damage Sharpen - User Physical Attack by 1 Stage for 15 Sec.
Becoming increasingly more common thanks to the Decay, Bandits are men and women who have given up on the civilized life and resorted to thievery and other crimes, they're often not trained in combat and so can easily be dispatched by an adventurer although Bandits will often group together in large hordes meaning attacking their bases can prove exceedingly dangerous at times.
Spells[]
As with previous Final Fantasy Games there are a variety of spells that the player has access to, like with some previous games the spells that can be learnt are able to be done so both through Skills unlocked in the game as well as through bought Tomes. Tome Spells differ from Skill Spells as they're always weaker than their Skill Equivalents and are generally present to ensure the player has access to a wide variety of spell-based attacks and defences, Tome Spells are not reset when the player resets a character's level although Skill Spells are.
Spell
Effect
Buffing Magic
Meditate
User's Physical Defence by 1 Stage for 15 Sec.
Courage
User's Physical Attack by 1 Stage until MP runs out
Encouragement
Target's Physical Attack and Dodge Chance by 1 Stage for 5 Sec.
Patronage
User's Magical Attack by 1 Stage for 15 Sec.
Protective Melody
All Allies' Magical Attack by 1 Stage for 10 Sec.
Healing Magic
Soothe Wounds
Heals target for up to 15HP
Healing Breath
Heals target for up to 20HP
Cure
Cures the Target of one Status Ailment
Bard's Melody
Heals all Targets for up to 25HP and causes on User for 5 Sec.
Effect Magic
Mana Guard
User and nearby Allies for 5 Sec.
Beserk
on User for 10 Sec. and User's Physical Defence 2 Stages for 10 Sec.
Reflection
Reflects Physical Attacks back from the User at the Target for 2 Sec.
Report
on Target and also adds enemy to Bestiary
Non-Elemental Magic
Dummy
Creates a Dummy that distracts some enemies, doesn't work on more intelligent foes
Magi-Strike
Non-Elemental Magic Attack that hits a Single Target
Bloodletter
Non-Elemental Magic Attack that is guaranteed to cause
Fire Magic
Ember
Fire Elemental Magic Attack that hits a Single Target
Fire
Fire Elemental Magic Attack, hits targets in a close range, may cause
Firaga
Fire Elemental Magic Attack, hits targets in a V-shaped arc, may cause
Firoa
Fire Elemental Magic Attack, deals splash damage if it hits, may cause to Target's Physical Defence by 1 Stage for 10 Sec.
Wisplight
Fire Elemental Magic that creates a Will-O-Wisp that wanders around for 10 Sec. and can cause to those that come into contact
Sun Ray
Fire Elemental Magic Attack that hits all Targets, deals 10% more Damage during the Day and 10% less Damage during the Night
Ice Magic
Ice
Ice Elemental Magic Attack that hits a Single Target
Snow
Ice Elemental Magic Attack, hits targets in a large radius although with unfocused damage, may cause
Snowaga
Ice Elemental Magic Attack, hits all targets in a straight line, may cause
Snowoa
Ice Elemental Magic Attack, hits targets in close range to User dealing more damage the further they are, may cause to Target for 5 Sec.
Snowstorm
Ice Elemental Magic Attack that hits all targets, may cause or
Aurora Clear
Ice Elemental Magic, on User for 5 Sec.
Snow Armour
Ice Elemental Magic, reduces damage from Ice and Water Magic by 50% and increase damage from Fire Magic by 50% for 10 Sec.
Blizzard
Ice Elemental Magic Attack that hits all targets, may cause on User and Allies
Electrical Magic
Bolt
Electric Elemental Magic Attack that hits a Single Target
Spark
Electric Elemental Magic Attack that hits a Single Target, may cause for the User
Sparkaga
Electric Elemental Magic Attack that hits multiple targets through chaining, may cause
Sparkoa
Electric Elemental Magic Attack that attacks in a wide wave, dealing more damage closer to the user, may cause
Light Shot
Electric Elemental Magic Attack that fires in a volley in random directions from the user, may cause
Paralytic Haze
Electric Elemental Magic that causes
Lightning Rod
Electric Elemental Magic that directs all Wind and Electrical Magic towards the Target for 5 Sec.
Earth Magic
Tremor
Earth Elemental Magic Attack that hits a Single Target
Power Wave
Earth Elemental Magic Attack, hits targets in a close range, may cause
Earth Spike
Earth Elemental Magic Attack that hits a Single Target and has a high Crit. Ratio
Quake
Earth Elemental Magic that all Target's Physical Defence by 1 Stage for 8 Sec.
Boulder
Earth Elemental Magic Attack, hits all targets in a straight line, may cause on Target's Magical Defence
Bouldaga
Earth Elemental Magic Attack, hits targets in a V-shaped arc and knocks targets back
Bouldoa
Earth Elemental Magic Attack that hits a Single Target, may cause
Dark Magic
Necrotic
Dark Elemental Magic Attack that hits a Single Target, may cause , extremely rarely will cause
Monster Shadow
Dark Elemental Magic, may cause if the Target is weakened
Umbra
Dark Elemental Magic Attack, hits targets in a close range
Umbraga
Dark Elemental Magic Attack, hits targets in a close range, may cause to Target's AT Speed
Umbroa
Dark Elemental Magic Attack, hits a single target and leaves behind a trap, Trap causes if a Target steps on it
Phantasm
on User for 10 Sec.
Water Magic
Whirlpool
Water Elemental Magic Attack that hits a Single Target, may cause
Bubbles
Water Elemental Magic Attack, hits targets in a close range, may cause
Hydro
Water Elemental Magic Attack, hits targets in front and behind the User
Hydraga
Water Elemental Magic Attack that hits a Single Target, may cause to User's Movement Speed
Hydroa
Water Elemental Magic Attack, hits targets in close range to User dealing more damage the closer they are
Nature Magic
Gift Tree
Nature Elemental Magic that creates a Tree that Heals User and Allies nearby for up to 60HP total
Thorns
Nature Elemental Magic that sets up Thorns which cause when targets walk on them and may cause
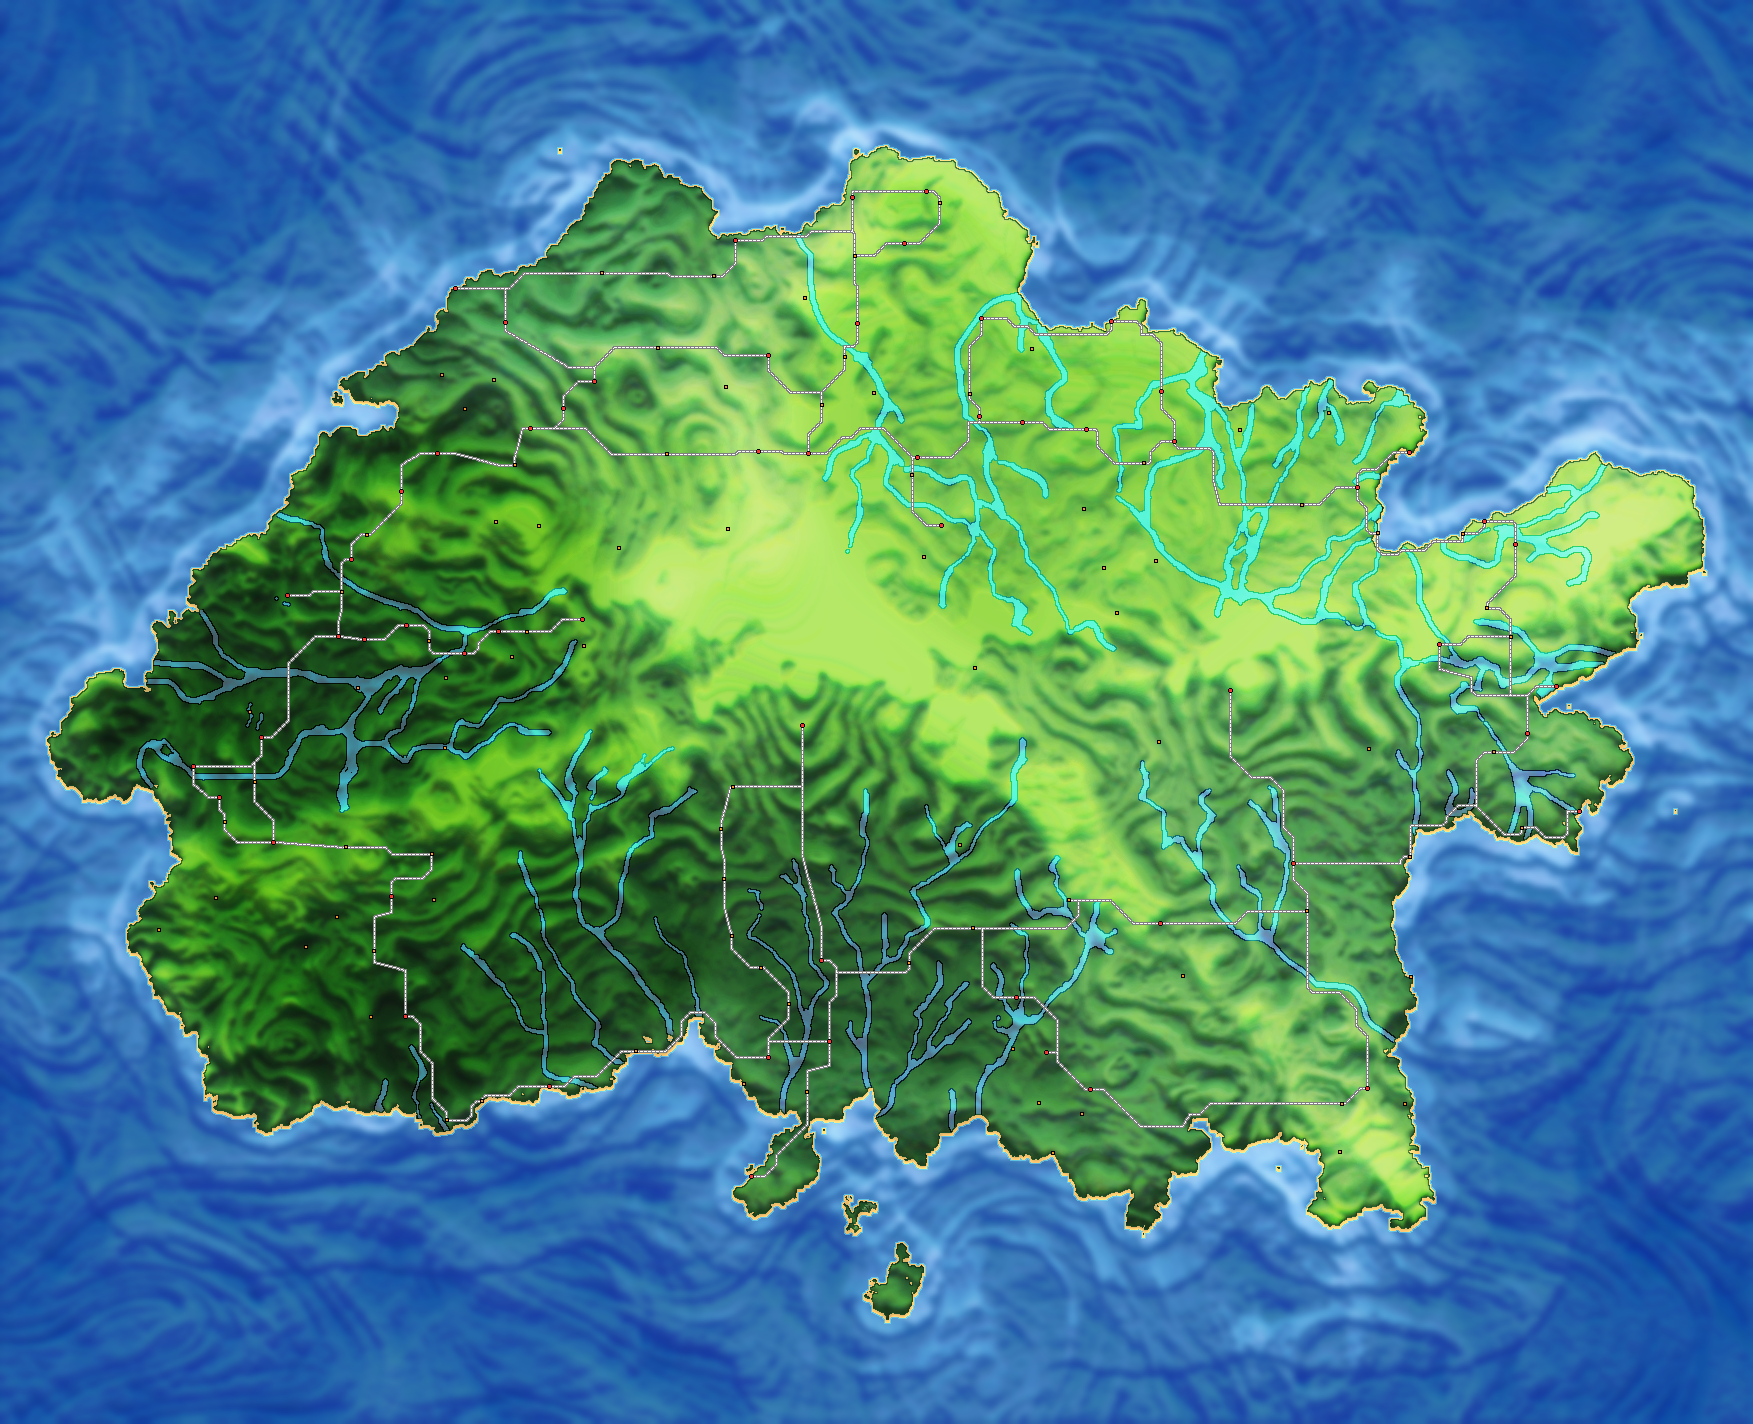


")
")