Fantendo - Game Ideas & More
Advertisement
This article shows outstanding quality! Click here for more information.


KillGamesLogo(transparent)

KillGames is an upcoming 3D arena fighting game developed and published by Lazy Studios. The game centers around various contestants attempting to win the KillGames, a massive annual tournament where people kill eachother in the most gruesome ways possible. The game will be released on May 24th, 2020 for the Nintendo Switch, Playstation 4, Xbox One and PC. 

Plot[]

KillGames takes place in the distant future of 21XX in Neo York City. Much of the world is in ruins due to constant war and everything but major cities are desertous wastelands. Neo York City was one of the few surviving cities, but as a result, life there was quite boring. That was until a mysterious man named Adam introduced people to the KillGames, a massive tournament where you can watch people kill eachother in the most brutal ways possible. The tournament becomes extremely successful, becoming extremely popular and eventually becoming a tradition in Neo York City, being held every year. With the 25th KillGames coming very quickly, Adam wished to make this KillGames a bit different from the last. With help from the champion, Soul, he challenges anyone that if they can beat him, they will have any wish they desire granted. Knowing this, hundreds of people join, with the possibility to gain endless power. The game focuses on 16 competitors, each with their own story.

Gameplay[]

KillGames is a 3D arena-style fighting game where players must reduce their enemy's health bar to defeat them. Four players can fight eachother at a time.

Gameplay Mechanics[]

In KillGames, each character has a Health Bar and a Rage Meter. Your Health Bar goes down when you take damage from enemy attacks. If the Health Bar goes down enough, you will be killed, however, you will not lose. You actually have two Health Bars, a Normal Health Bar (which I just explained), and a True Health Bar. Once you lose all your Normal Health, you will lose True Health depending on the current rating. If your True Health isn't reduced to zero, you will respawn with full Normal health. However, if you lose all of your True Health, you die.

Your Rage Meter goes up when you take or deal damage. Once you have enough Rage, it gives you a Rage Bar, which can be spent to perform super-powerful Rage Attacks by pressing the R button. You can have up to 4 Rage Bars. If you are killed, you won't lose any Rage Meter.

One of the larger game mechanics in KillGames is the Rating. Since hundreds of people are watching you fight, obviously you want to entertain them. Everytime you and your enemy(s) attack, the rating grows. Once a player is killed, the rating determines how much True Health the enemy loses, with them losing more health the higher the ratings are. After this, the rating will decrease.

Basic Controls[]

In KillGames, your player can move with the Left-Stick and attack with the face buttons. You have three types of attacks:

  • Light Attacks: Light Attacks are the fastest of your moves, but are the weakest overall. Often they will be the ones that you will use for combos.
  • Heavy Attacks: Heavy Attacks are slow, but compensate for their slowness with great damage, and special abilities like launching, anti-airs, or the ability to go through certain attacks.
  • Special Attacks: Special Attacks are moves will unique properties. Often these will include things like projectiles, or attacks that work in tandem with a character's gimmick.

Depending on the direction you are holding the control stick (either no direction, left/right, toward your enemy or away from your enemy), your character will perform a different attack.

The player can also perform a Jump to gain extra height or start an air combo, or Block to nullify attacks. However, if a player blocks for too long, or if the shield takes too much damage, it will break and become unavailable for some time. Grabs and other attacks will also go through these shields.

Finishers[]

When a character has low enough health, their health bar will begin glowing red and their character will look visibly exhausted. When this is happening, that character can be Finished. To initiate a finisher, the player will either need to perform a certain move (normally a Strong Attack, a Special Attack or a Pummel), or have the player come in contact with a hazard. During this, the victim will be brutally murdered in a gory fashion, often involving dismemberment, decapitation, evisceration, ripping out vital organs, skin or entire skeletons, etc. Trust me, they can get pretty intense. Certain finishers will put the enemy in a Helpless state. While in a Helpless state, the enemy is unable to do anything, but the player can follow up this finisher to add extra damage or combo into another finisher to increase the rating.

Controls[]

  • Left C-Stick: Move Character
  • Right C-Stick: Move Camera
  • A: Light Attack 
  • B: Heavy Attack
  • X: Special Attack
  • Y: Jump
  • L: Block
  • R: Rage Attack

Techniques[]

  • Target: Tapping the right stick allows players to target different enemies, making it easier to focus your attacks on a certain player.
  • Dodge: Tap a direction while blocking to perform a dodge, allowing you to quickly move while dodging a potential attack.
  • Parry: Activating or ending a block at the time an enemy attacks allows you to perform a Parry. This technique is useful for when the enemy is just barraging you with attacks, as the Parry will stun the enemy for a short time. However, performing this is risky, as it will leave you vulnerable.
  • Grab: Press the light and heavy attack buttons at the same time to perform a Grab. This attack goes through blocks, and allows you to either a Pumel or a Throw.
  • Pummel: Press the Light Attack button while grabbing enemies to perform a Pummel, dealing some damage.
  • Throw: Press the Heavy Attack button while grabbing enemies to perform a Throw, to throw an enemy in a certain direction, potentially into an item or a deadly hazard.
  • Target: Click on the left C-Stick to target a player. While targeting a player, all attacks will automatically be directed toward that player. In a 1v1, the enemy is always targeted, but  you can switch between players if you fighting in a free-for-all.

Note: Controls shown here are shown as if the player is using a Nintendo Switch controller.

Modes[]

Story[]

In Story Mode, the player follow the adventures of either Redge or Storm as they go through the KillGames. The mode features three stories, one focusing on Redge and Lane trying to get Yuki out of the KillGames, one focusing on Storm, Newton and Break as they search and try to stop Maligna, and the last story and ties both of them together. If you want to see more on Story Mode, click here.

Singleplayer[]

Arcade[]

Arcade Mode is similar to Story Mode, but focuses less of story. The mode tasks players with choosing a character and play a series of 9 fights, ending with a final fight against Adam. Your time can be put into online leaderboards to see how you did against other players.

Survival[]

Survival Mode tasks players with surviving as long as possible. Players fight an endless barrage of enemies and characters until they drop dead. Getting high ratings will earn you Health Sodas to continue fighting. Your time can be put into online leaderboards to see how you did against other players.

Training[]

In Training Mode, the player can practice playing the game by completing various challenges. The mode is hosted by Stun and Torque. It features three different modes:

  • Tutorial: In the Tutorial, the player can learn the basics of the game. Everything from moving, to the basics of attacking, the rating system, etc.
  • Character Spotlight: In Character Spotlight, the player can learn how to play an individual character, their strengths and weaknesses, and each of their moves.
  • Free Training: In Free Training, the player is free to practice their fighting skills without any interruptions.

Versus[]

Versus Mode is where the player can go to play offline, against players locally or against CPUs. The player is free to choose their characters, stages, and even manipulate some of the rules, including the amount of health you have, the time, hazards, items, etc.

Deathmatch[]

Deathmatch tasks players with being the last to survive. Players must build up the ratings and take advantage of hazards and finishers to cause as much damage as possible.

Battle Royale[]

Battle Royale tasks players with getting the highest rating by the time limit. Players must build up the ratings and take advantage of hazards and finishers to get the highest ratings possible. Dying will cause you to lose half of your ratings.

Massacre[]

Massacre tasks players with getting the highest rating by the time limit. Enemies will constantly spawn, and the player needs to kill as many as possible to maximize ratings. Dying will cause you to lose half of your ratings, but players can't damage each other in this mode.

King of the Hill[]

King of the Hill tasks players with getting the highest ratings by the time limit by standing in the designated area. Players gain less points the more players are in the area, so players will need to knock eachother away so they can get the highest ratings. Dying will cause you to lose half of your ratings.

Deathball[]

Deathball tasks players with getting the highest ratings by the time limit. To earn ratings, the player needs to knock the enemy into "goals". Attacks that cause knockback and throws are recommended.

Online[]

In Online, the player can fight against other players online. Each player has a ranking, that increases if the player wins and decreases if the player loses. The player can also fight against friends, though this won't affect your rankings.

Characters[]

KillGames, at launch, features 16 playable characters. Each character has their own unique backgrounds and playstyles. After the game's release, four more characters were released through DLC.

Starting Characters[]

TransparentredgeKillGames

Redge

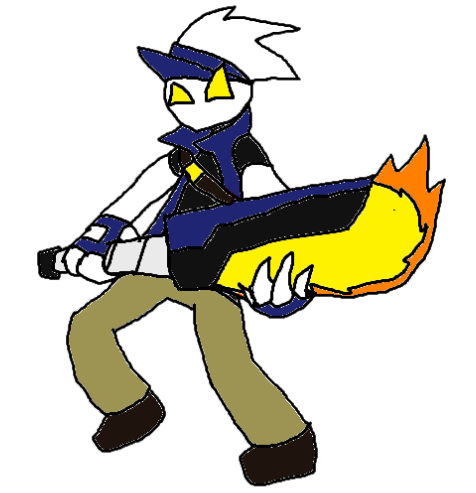
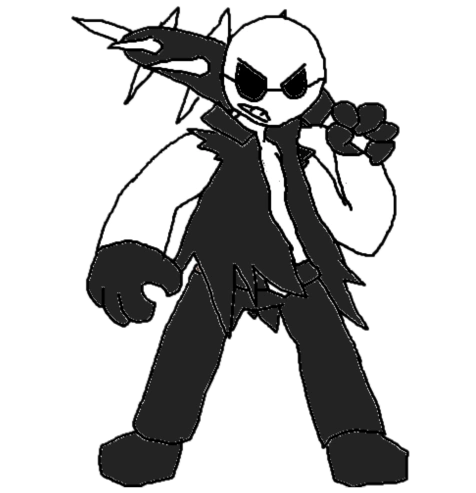
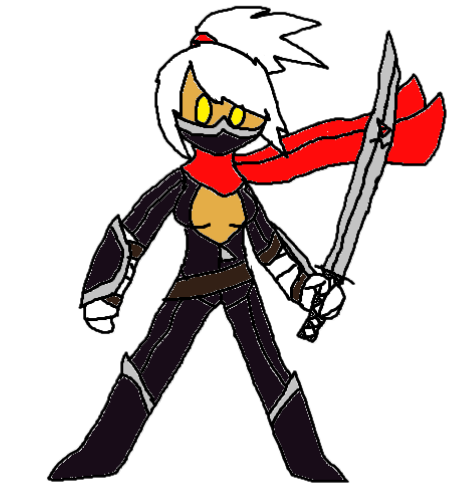
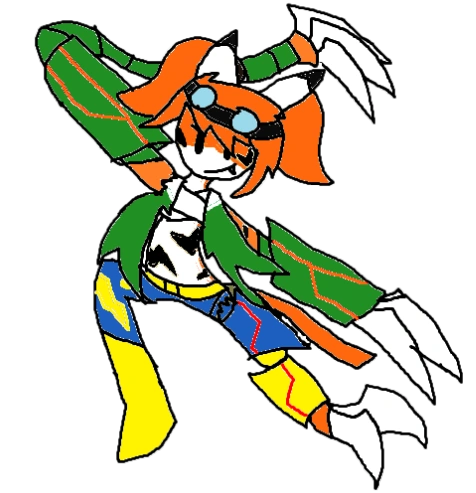
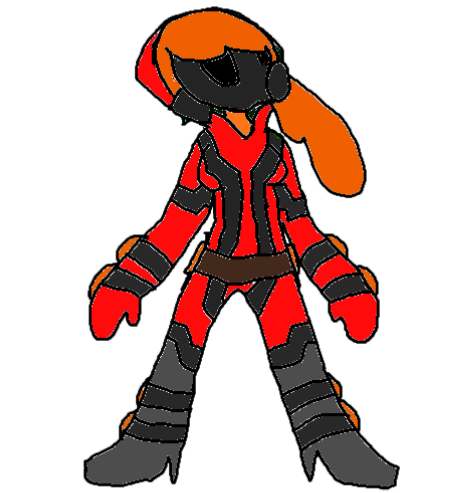
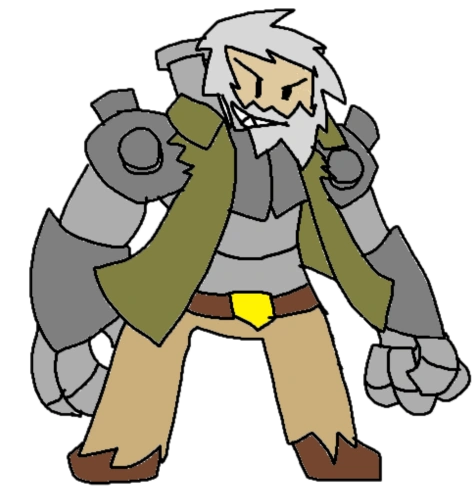
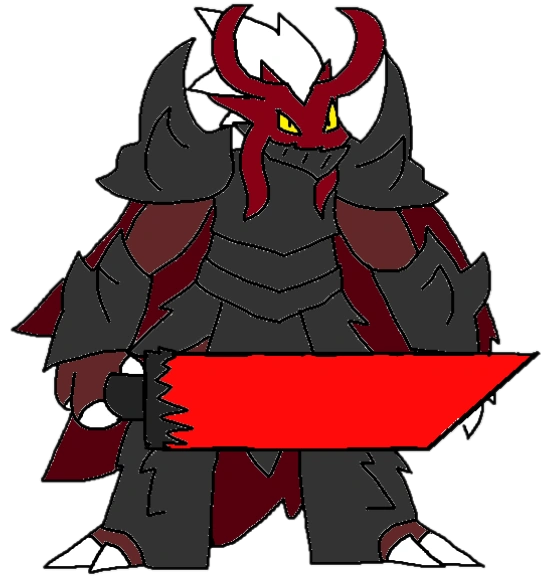
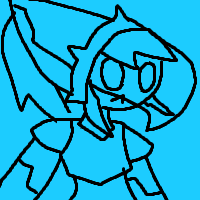
Redge is one of the game's main protagonists, alongside Storm. He is a half-demon, having a human father and a demon mother. His mother, Soul, killed his father shortly after he met her, and when Redge was born, Soul barely cared about him. This led to Redge eventually growing a grudge against her and leaving the Demon Realm to live in the Human Realm. He lived with Lane for several months, and after hearing about the KillGames, joins out of the possibility of killing his mom and finding something to do.

Redge is normally shown to be abrasive, sarcastic and overly rude. He shows little concern for the well-being of many people, with the only exceptions being his close friends like Lane. He often enjoys saying offensive remarks to his enemies.

His weapon in the Cauterizer, a chainsaw-sword that is powered by the flames of Hell.

Playstyle
All-Arounder: Redge possesses balanced damage, speed and defense. He largely focuses on close-ranged fighting along with keepaway. He's a great character for those wanting to learn the fundamentals, or play a character with no gimmicks or quirks.
Light Attacks Input Description
Jab A Redge performs a quick forward punch. 
Gut Punch AA Redge performs a gut punch.
Kick AAA Redge performs a quick kick.
Straight Punch AAAA Redge steps back before performing a powerful punch. A basic combo ender that launches foes backwards on the ground, and downwards in the air.
Hook ↔A Redge performs a spinning punch that attacks enemies in an area around him.
Shoulder Bash ↑A Redge rushes forward and performs a quick shoulder bash.
Roundhouse Kick ↓A Redge performs a roundhouse kick. Launches foes backwards on the ground, and downwards in the air.
Heavy Attacks Input Description
Chain Stab B Redge stabs forward with the Cauterizer.
Chain Slash ↔B Redge performs a wide slash with his Cauterizer.
Chain Slam ↑B Redge swings the Cauterizer downward. Acts as an anti-air and causes the enemy to bounce on the ground. 
Chain Upper ↓B Redge swings the Cauterizer upward. Launches enemies into the air.
Special Attacks Input Description
Hell Gun X Redge shoots three fireballs forward. Hold the button to charge it, transforming the fireballs into one big fireball that explodes upon contact. In the air, the shots are fired downward.
Hell Burst ↔X Redge holds the Cauterizer downward as it creates a blast of fire in front of him. This attack is a bit slow, but launches enemies backwards.
Flame Slash ↑X Redge flies forward a distance, and when he comes near an enemy, he slashes them with the Cauterizer. This attack can be cancelled into other moves.
Flame Upper ↓X Redge jumps upward while performing an uppercut with the Cauterizer. Acts as as an anti-air.
Grabs Input Description
Headbutt A Redge, with the enemy in hand, headbutts them.
Spin Throw (Side) ↔B Redge grabs the enemy by the legs before throwing them sideways.
Spin Throw (Forward) ↑B Redge grabs the enemy by the legs and spinning them around before throwing them forward.
Spin Throw (Back) ↓B Redge grabs the enemy by the legs and spinning them around before throwing them backward.
Rage Attacks Input Description
Giga Inferno RA Redge points the Cauterizer forward before firing a massive wave of hellfire in front of him.
Death Tornado RB Redge charges up before spinning rapidly and damaging enemies around him. Pulls in nearby enemies and goes through most enemy attacks.
Raging Rave RX Redge goes into his True Demon Form, charging forward, launching enemies into the air with the Cauterizer. Flying into the air, Redge unleashes a combo of flaming slashes with his weapon. The enemy, now covered in ashes, watches as the Cauterizer increases to massive size. Redge smiles at the camera, before he chops the enemy clean in half. He and his enemy's dead body fall to the ground as he strikes a cool pose and goes back to his normal form. This attack will instantly kill the enemy if it lands. Uses 3 Rage Meters..
Finishers Input Description
Torso Cutter
  • Chain Slash
  • Death Tornado
Redge slashes at the enemy's torso, slicing the enemy horizontally in half. Leaves the enemy in a helpless state.
Gut Buster
  • Chain Stab
  • Chain Upper
  • Flame Upper
Redge stabs the enemy in the enemy's torso. As the enemy struggles, he raises them into the air and activates the Cauterizer, violently eviscerating them as their burning guts and organs spread everywhere.
Burn Up
  • Hell Gun (charged)
  • Hell Burst
  • Giga Inferno
Redge lights the enemy on fire, causing them to slowly burn to death. Leaves the enemy in a helpless state.
Pindown
  • Headbutt
Redge appears behind the enemy, grabbing them by the head and putting them on their knees. He stabs the Cauterizer through the enemy's chest. As the enemy screams in pain from their organs being destroyed, Redge slashes upward, cutting the enemy vertically in half.

TransparentstormKillGames

Storm

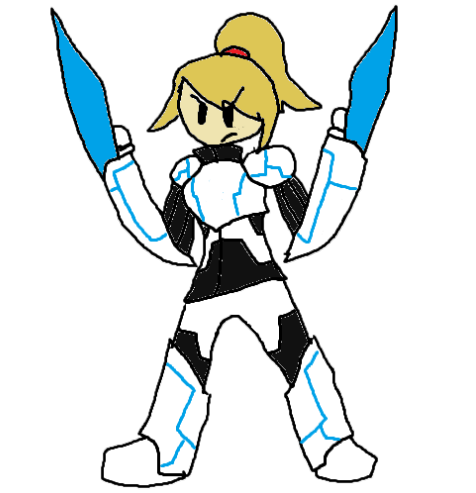
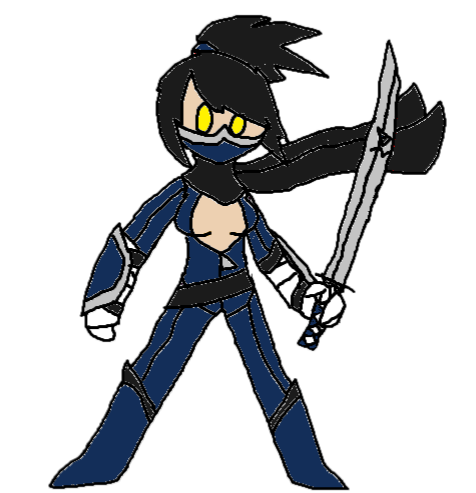
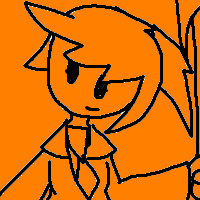
Storm is one of the game's main protagonists, alongside Redge. She is a member of the Anti-KillGames Association, a government-owned organization that wishes to end the KillGames for its large body count. She was formerly a police officer, and lost her arms while protecting a group of civilians from a gang. She reluctantly joins the KillGames to use the grand prize as a way to stop it.

Despite her short temper and aggressive nature, she tries to stay coolheaded and keeps a heroic nature at all times. She is opposed of using violence unless needed, and only wishes to protect innocent people from danger.

Her weapons are dual Plasma Cutters on her gauntlets. She can also project energy shields and blasts of energy.

Playstyle
All-Arounder: Storm, similar to Redge, possesses well-balanced stats and has an all-arounder playstyle. Her attacks are more well-suited towards rushdown, with many of her attacks hitting multiple times, Spark Cutter being useful for applying pressure and Reflect Barrier useful for punishing zoners. Her only problem is her somewhat lacking damage.
Light Attacks Input Description
Left Stab A  Storm performs a quick stab with her left Plasma Cutter.
Right Stab AA Storm performs a quick stab with her right Plasma Cutter.
Slamming Slash AAA Storm raises her Plasma Cutters into the air before slamming slash. Causes enemies to bounce on the ground.
Double Stab AAAA Storm stabs with both of her Plasma Cutters, launching foes backwards on the ground and downwards in the air.
Horizontal Slash ↔A Storm performs a horizontal slash that damages enemies in an area in front of her.
Jump Slash ↑A Storm flies before jumping and performing a downward slash.
Foot Stab ↓A Storm performs a downward thrust, stabbing the enemy in the foot.
Heavy Attacks Input Description
Plasma Stab B Storm's Plasma Cutters coarse with electricity as she thrusts them forward.
Plasma Slash ↔B Storm's Plasma Cutters coarse with electricity as she slashes both of them in front of her.
Plasma Slam ↑B Storm's Plasma Cutters coarse with electricity as she slams both blades downward. This is an anti-air, and causes the enemy to bounce on the ground.
Plasma Upper ↓B Storm's Plasma Cutters coarse with electricity as she performs an uppercut. This launches enemies into the air.
Special Attacks Input Description
Spark Cutter X Storm launches a bladed disc of energy from her blades. These have a slight homing effect. Hold the button to charge it, increase its size and allowing it to damage enemies multiple times. In the air, the shots are fired downward.
Reflect Barrier ↔X Storm creates an exploding barrier in front of her. Reflects oncoming projectiles and stuns nearby enemies.
Boost Slash ↑X Storm flies forward, slashing enemies multiple times in her way and destroying weak projectiles.  The last attack launches enemies backward.
Jet Slash ↓X Storm boosts into the air with her arm outstreched, slashing enemies in her way. A great anti-air that causes multiple hits.
Grabs Input Description
Chest Stab A Storm, with the enemy in hand, stabs the enemy in the chest.
Stabbing Throw (Side) ↔B Storm stabs the enemy before throwing them to the side.
Stabbing Throw (Forward) ↑B Storm stabs the enemy before throwing them to forward.
Stabbing Throw (Back) ↓B Storm stabs the enemy before throwing them to backwards.
Rage Attacks Input Description
Thunder Slash RA Storm's right Plasma Cutter extends to a massvie length as she performs a powerful slash. Covers a wide area.
Jet Blaze RB Storm's thrusters activate as she launches herself forward. She perform a series of slashes before performing an uppercut that launches enemies into the air, allowing you to extend a combo.
Energy Overload RX Storm overloads her Plasma Cutters, causing them to extend and her body to begin coarsing with electricity. She attacks the enemy with a barrage of slashes with her blades, slowly increasing in speed as she attacks. She then plunges her right Plasma Cutter into her enemy's neck. As the enemy struggles to breathe, she apoligizes to the enemy, before she charges the Plasma Cutter with so much electricity that they explode, leaving behind nothing but their detached head, ending the attack. This attack will instantly kill the enemy if it lands. Uses 3 Rage Meters.
Finishers Input Description
Decapitator
  • Plasma Stab
  • Plasma Slash
Storm slashes her enemy's neck, causing blood to spray out as their head falls off their neck.
Vertical Cutter
  • Plasma Slam
  • Plasma Upper
  • Jet Slash
  • Jet Blaze
Storm slashes the enemy clean in half.
Shocker
  • Spark Cutter
  • Thunder Slash
Storm electrocutes so much electricity that they burn up before exploding. Leaves the enemy in a helpless state.
Silencer
  • Chest Stab
Storm pin the enemy to the ground. She then plunges her Plasma Cutter into her enemy's mouth, splitting their head in half and causing the top-half of their head to fall off.

TransparentbreakKillGames

Break

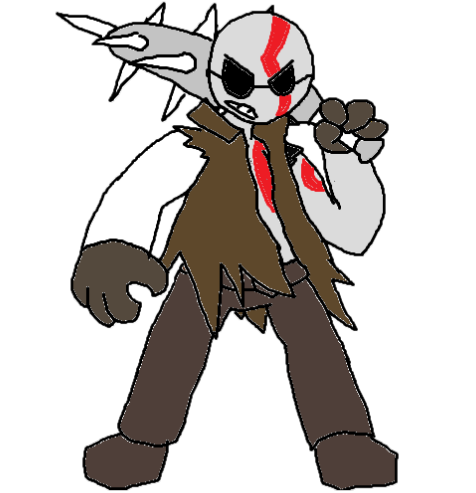
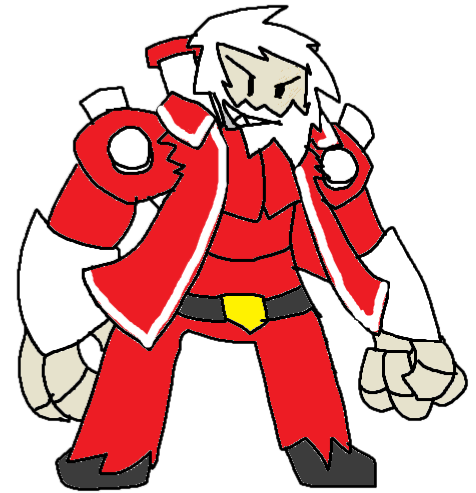
Break was once just a normal guy living in Neo York City, living a fairly standard life with his wife and daughter. At least that was until the two of them were murdered by a group of mutants. After learning of this, he made it his mission to kill every last mutant in Neo York City, and avenge his family. He uses the KillGames as a starting point, using it to kill as many mutants as he can find.

Break is shown to be serious, impulsive and very aggressive. Because of what happened to him, he gets extremely angry if he sees a mutant, no matter the person what was mutated. He almost never takes off his sunglasses.

Break's weapon is a Spiked Bat, which is just a baseball bat covered in nails and spikes.

Playstyle
Bruiser: Break is a combination between a rushdown character and a grappler, possessing good defense and damage, while somewhat lacking in speed. He relies on getting in close, reading his enemies and countering with his specials, including an attack with super armor, an anti-air grab that stuns enemies, and a short-ranged "projectile" and launches enemies into the air. Players who can play him correctly are rewarded with many of his most powerful attacks, which give high ratings and often knock enemies back into hazards.
Light Attacks Input Description
Left Punch A Break dashes forward while performing a left straight punch. 
Right Punch AA Break performs a right straight punch.
Knee Strike AAA Break knees the enemy, launching them a short distance into the air.
Haymaker AAAA Break, jumping after the enemy, winds up before performing a haymaker. Launches foes backwards on the ground and downwards in the air.
Overhead ↔A Break performs an overhead punch.
Sucker Punch ↑A Break performs a sucker punch.
Stomp ↓A Break stomps on the enemy's foot.
Heavy Attacks Input Description
Headbutt B Break performs a powerful headbutt.
Bat Swing ↔B Break swings his bat forward.
Bat Slam ↑B Break swings his bat downward. This is an anti-air, andcauses the enemy to bounce on the ground.
Bat Strike ↓B Break swings his bat upward. This launches enemies into the air. 
Special Attacks Input Description
Quake Strike X Break slams his bat onto the ground, creating a small earthquake in front of him that travels a short distance forward. If its used in the air, it launches the enemies downward and leaves the enemy vulnerable to damage.
Wind-Up ↔X Break winds up before performing a powerful swing that causes powerful damage and sends foes flying. Of course, you are left vulnerable while winding up.
Bury Bomb ↑X Break jumps upward (or rushes downward if he is in the air already) to grab an enemy. If he lands, he slams the enemy into the ground, trapping them for a short time. Since it is a grab, it goes through shields.
Shoulder Tackle ↓X Break dashes a distance forward, charging into the enemy while absorbing an oncoming hit. Hold it to determine the distance and power, while slowing the attack.
Grabs Input Description
Grabbing Punch A Break, with the enemy in hand, punches the enemy in the face.
Batter Up (Side) ↔B Break charges up before swinging his bat and launching the enemy to the side.
Batter Up (Forward) ↑B Break charges up before swinging his bat and launching the enemy forward.
Batter Up (Back) ↓B Break appears behind the enemy before swinging his bat and launching the enemy backwards.
Rage Attacks Input Description
Power Swing RA Break's eyes briefly shine before his bat grows with unknown power. He swings it forward, causing powerful damage and launching enemies backwards.
Bury Blast RB Break charges forward, absorbing an attack and grabbing an enemy in his way. If it lands, he buries the opponent into the ground and begins stomping and kicking the enemy's head, before he swings at the enemy's head and launches them backwards.
Home-Run RX Break winds up, absorbing a hit, before he swings his bat on the enemy's legs, breaking them. As the enemy is on their knees, his eye's shine, before his bat grows with unknown power. He winds up once more before he performing a powerful bat swing, that launches the enemy's head off their body, and sends it flying into the distance. This attack will instantly kill the enemy if it lands. Uses 3 Rage Meters.
Finishers Input Description
Head Swing
  • Bat Swing
  • Wind-Up
  • Power Swing
  • Bury Blast
Break hits the enemy in the head so hard it launches the enemy's head off their neck. If th head is launched into a hazard, it still gives you extra ratings. 
Jaw Breaker
  • Headbutt
  • Shoulder Tackle (charged)
Break hits the enemy so hard that their bottom jaw blows up, revealing their jawbone as it dangles from their skull. Leaves the enemy in a helpless state.
Head Crush
  • Grabbing Punch
Break slams the enemy to the ground before he repeatedly slams his bat onto the enemy's head, with the fifth hit causing the head to blow up. .

TransparentyukiKillGames

Yuki

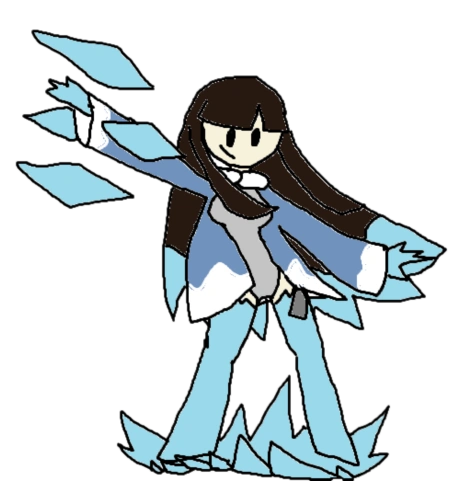
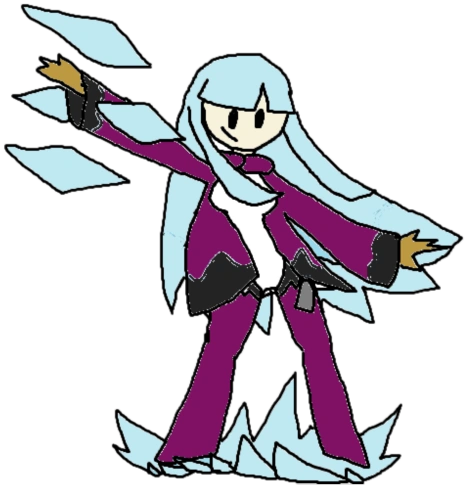
Yuki was originally created as a "next step for human evolution" by an unknown organization. Born with uncontrollable ice powers, a freak accident led her to destroying the lab she was in and kill everyone in it. Founded by Adam in the wreckage, he was impressed by the amount of death and destruction she could case, and took her in to train and become a powerful fighter. Forced into the tournament against her will, Yuki only wishes to escape with her life.

Yuki is normally shown to be shy and distant, mostly because she has had litte interaction with people who don't want to kill her. Despite being trained to kill, she absolutely hates violence, fighting only if threatened, or if she forced to. However, when she warms up to someone, she is kind and cheerful, wishing to protect those that she loves.

Yuki's weapon is her ability to create and control Ice, forming it into icicles and other weapons.

Playstyle
All-Arounder: Yuki possesses well-rounded stats, similar to Storm and Redge. However, unlike those two, Yuki is more suited towards zoning and powerful one-hit attacks. While her close-ranged game isn't the best, and her heavies are very slow to trade off for their high damage, her long-ranged attacks are quite good, and her ability to freeze opens up foes for her more powerful attacks.
Light Attacks Input Description
Icicle Stab A One of Yuki's icicles flies forward to stab enemies before looping back to Yuki.
Double Stab AA Two more icicles fly forward to stab enemies and loop back to Yuki.
Back Stab AAA Three icicles fly behind the enemy and stab them from behind before returning to Yuki.
Icicle Flurry AAAA All four of Yuki's icicles fly forward and explode. Launches foes backwards on the ground and downwards in the air.
Ice Slash ↔A One of Yuki's icicles transforms into a short sword which slashes in front of her.
Sliding Stab ↑A Yuki slides forward while two small icicles stab forward.
Ice Stab ↓A One of Yuki's icicles transforms into a short sword and stabs downward.
Heavy Attacks Input Description
Ice Spear B Yuki's icicles transform into a spear which stabs forward.
Ice Sword ↔B Yuki's icicles transform into a massive sword which slices in front of her.
Ice Axe ↑B Yuki's icicles transform into a axe which slams downward. This is an anti-air, and causes the enemy to bounce on the ground.
Ice Piercer ↓B Yuki's icicles grow in size and stab upward. This launches enemies into the air.
Special Attacks Input Description
Icicle Shot X Yuki forms an icicle and throws it forward, freezing enemies upon contact. Charge it to increase its size and allowing it to freeze the enemy for longer.
Frost Wall ↔X Yuki creates a wall of ice in front of her, blocking attacks and create a boundary between her and her enemy. It goes away after a time, but by attacking it or by pressing the Side Special command again, the wall will suddenly fall forward to damage enemies.
Snow Cloud ↑X Yuki launches a cloud of freezing ice forward, freezing enemies upon contact. It travels slowly, so it's better suited towards defense rather than offense. It's large size can hit aerial foes.
Ice Drop ↓X Yuki summons a large chunk of ice and, after some time, it drops down to crush anyone under it. Just be careful, as Yuki can be hit by the ice chunk as well.
Grabs Input Description
Icicle Poke A Yuki, with the enemy in hand, has one of her icicles stabs the enemy.
Icy Wind (Side) ↔B Yuki creates icy winds to push the enemy into the air before she launches them to the side.
Icy Wind (Forward) ↑B Yuki creates icy winds to push the enemy into the air before she launches them forwards.
Icy Wind (Back) ↓B Yuki creates icy winds to push the enemy into the air before she launches them backwards.
Rage Attacks Input Description
Blizzard RA Yuki jumps into the air before forming several icicles that fly down to rain onto enemies.
Avalanche RB Yuki manifests a giant ice hammer and slams it downward to crush enemies in her way.
Glacial Rend RX Yuki slahes the enemy with an icy sword, chopping off the enemy's legs. She unleashes a series of sword and axe slashes before she launches the enemy into the air. She then summons a giant icicle that the enemy gets impaled on. As they fall down the icicle, it slowly expands as it reaches the ground until it causes the enemy to be chopped in half. The enemy's upper half attempts to crawl toward Yuki before she apologizes, freezing the enemy, summoning an ice hammer, and looks away before smashing the enemy's head. This attack will instantly kill the enemy if it lands. Uses 3 Rage Meters.
Finishers Input Description
Frozen Destruction
  • Heavy Attack (frozen)
Yuki destroys the enemy while they are frozen, causing their frozen pieces to fly everywhere.
Head Stab
  • Ice Spear
  • Ice Piercer
  • Icicle Shot
  • Blizzard
Yuki impales the enemy in the head with an icicle, blinding them and leving them in a helpless state.
Ice Crush
  • Ice Drop
  • Avalanche
Yuki using a chunk of ice or a wall of ice to crush the enemy into pieces.
Icicle Bed
  • Icicle Poke
Yuki summons a bed of icicles behind the enemy and pushes them into it. As the enemy is impaled, she jumps into the air and stomps on the enemy, pushing them further into the icicles and killing them.

TransparentnewtonKillGames

Newton

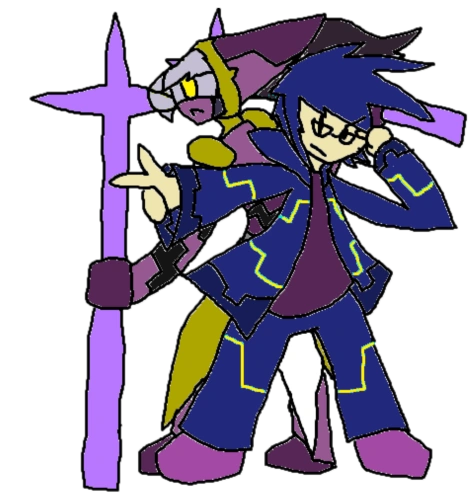
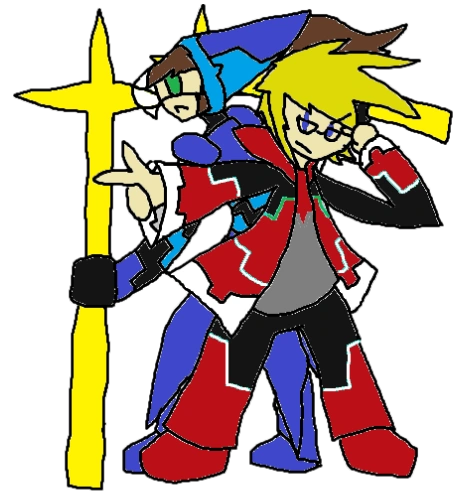
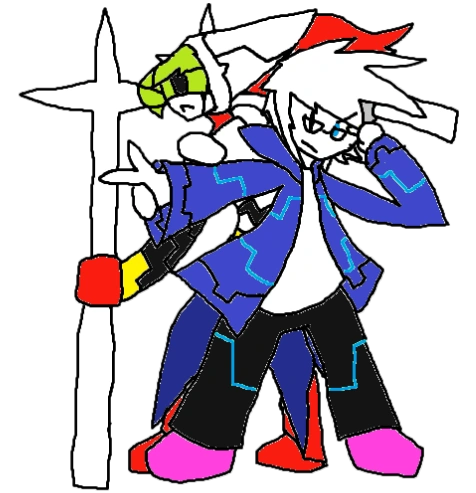
Newton is a high-ranking member of the AKA, serving as Storm's assistant. A gifted robotics scientist, Newton joined the AKA to avenge his childhood friend, a girl by the name of Ein, who joined the KillGames in the past and ended up getting killed. Like Storm, he joins the KillGames to find a way they can stop it, though he secretly wants to use the prize to bring Ein back to life.

Newton, like Storm, hates the KillGames, and wishes to stop them. He doesn't really talk that often, but he shown to be very intelligent and sophisticated.

Newton's weapon is ARMA, a combat robot designed by Newton and made in the image of Ein. She wields dual spears. which are capable of extending to extreme lengths. 

Playstyle
Puppetmaster: One of the most unique characters playstyle-wise, players control both Newton and ARMA. While Newton himself is weak, in combination with ARMA, he can control space and attack enemies with powerful combos.
Light Attacks Input Description
Left Jab A  Newton jabs enemies with his left fist.
Right Jab AA Newton jabs enemies with his right fist.
Gut Smash AAA Newton jabs enemies in the gut.
Wind-Up AAAA Newton winds up before throwing a straight punch. If ARMA is with him, she will assist with a powerful spear thrust.
Horizontal Kick ↔A Newton does a sweeping kick in front of him.
Drop Kick / Quick Stab ↑A Newton jumps forward before kicking the enemy. ARMA will also attack, quickly stabbing forward.
Overhead ↓A Newton performs an overhand strike.
Heavy Attacks Input Description
Spear Thrust B ARMA steps forward and stabs her spear forward.
Spear Flurry ↔B ARMA rapidly stabs enemies in front of her with her spears.
Spear Slam ↑B ARMA slams her spears on the ground. This is an anti-air, and causes the enemy to bounce on the ground.
Spear Upper ↓B ARMA performs an uppercut with her spears.This launches enemies into the air.
Special Attacks Input Description
ARMA Engage X ARMA flies forward, charging into any enemy in her way. Hold the button to determine how far ARMA will go. After use, ARMA will stay in place and can be used to attack enemies. Press the Neutral Special button or go to ARMA to have ARMA follow up again.
Energy Spear ↔X ARMA stabs her spear into the ground, creating an energy spike a distance in front of her. It can be somewhat hard to land, but deals very good damage. Hold the button to determine the distance.
Spark Teleport ↑X An energy sphere surrounds Newton and drag him underground, teleporting him a distance away. If ARMA is away from him, Newton will teleport to her.
Technic Crash ↓X ARMA jumps into the air and slams her spears down in front of Newton. A great anti-air move. Will immediately return ARMA to Newton when used.
Grabs Input Description
Grabbing Punch A Newton, with the enemy in hand, grabs the enemy.
Overshoulder Throw (Side) ↔B Newton grabs the enemy and throws them over his shoulder and into the ground, knocking them to the side.
Overshoulder Throw (Forward) ↑B Newton grabs the enemy and throws them over his shoulder and into the ground, knocking them forwards.
Overshoulder Throw (Back) ↓B Newton grabs the enemy and throws them over his shoulder and into the ground, knocking them backwards.
Rage Attacks Input Description
ARMA Rush RA ARMA's blue energy temporarily transforms into a deep red and, for a short time, she will rush toward the enemy at attack them.
Gunlance RB ARMA appears next to Newton as he points forward. ARMA then stabs forward, as her spear grows to massive size and causes powerful damage to anyone in its way.
Calculated Execution RX Newton stands nonchalantly. If he is hit however, the camera zooms in as he opens his eyes, summoning a sphere of energy to surround the foe. The enemy is transported into some sort of digital world, where Newton talks about how he was able to predict their movements and insults the way they fight in battle. He then walks away, instructing ARMA to finish them off. ARMA's blue energy turns red, as she charges up and plunges a spear into the trapped enemy's heart, killing them. This attack will instantly kill the enemy if it lands. Uses 3 Rage Meters.
Finishers Input Description
Impale
  • Spear Thrust
  • Spear Flurry
  • Spear Upper
  • Gunlance
ARMA impales the enemy with her spears. The enemy struggles to get out, as ARMA raises the spear into the air, and the enemy slowly falls into it.
Head Stab
  • Spear Slam
  • Technic Crash
ARMA, swinging her spear like an axe, stabs the enemy in the stab. The spear becomes stuck in the enemy's head, so ARMA decides to pull the spear out. However, it causes her to accidentally pull the head, along with part of the spinal cord, off the enemy's body.
Surprise Stab
  • Energy Spear
An enemy spear stabs through the enemy's body, disembowling them and leaving them in a helpless state.
Splitdown
  • Grabbing Punch
Newton throws the enemies into the air, as ARMA appears behind him. She stabs the enemy with both of her spears. She then uses the spears to pull the enemy apart, splitting them in half.

TransparentlaneKillGames

Lane

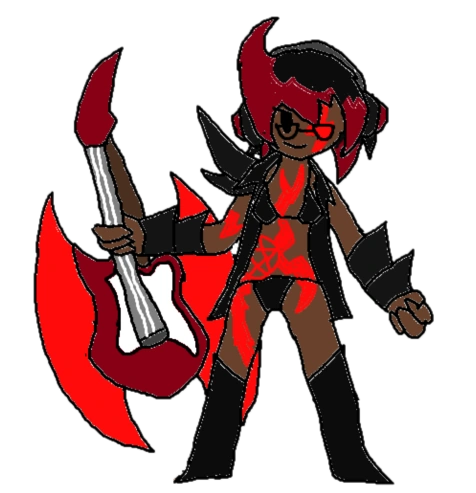
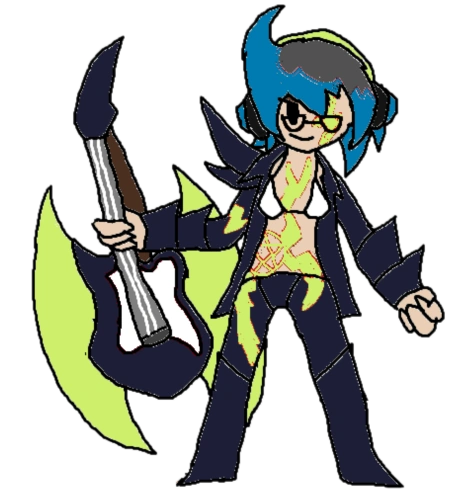
A semi-famous rockstar in Neo York City, Lane is also a powerful occultist. She enjoys studying demons and the demon world, eventually learning how to summon demons and create contracts between them. She helped Redge escape from the Demon Realm (at the cost of massive scars on her body), and created contracts with every avatar (except for Soul) to grant her powerful demonic abilities. She is unsatisfied with what humans think of demons, and wants to show the world that demons can be people just like humans can, using the KillGames as a stepping stone to her goal.

Lane, in contrast to Redge, is fun-loving and rambunctious. Her love for demons and their world can be seen by many people as an obsession, as she lets Redge stay in her apartment despite not doing anything, and believing that demons can be good people. However, she genuinelly cares about Redge as a friend, and uses her love for demons as a way of bringing good. Like Redge, she hates Soul for her wish for destruction and power.

Lane's weapon is Abaddon, her electric guitar, which she used to channel demonic-power into a battle-axe. She has the powers to summon demons, specifically Lucifer, the avatar of wrath, who she has a pretty good friendship with.

Playstyle
All-Arounder: Lane is a fighter that always seems to have a right attack for the situation. Many of her attacks are quite powerful, but they make up for it with their slow speed and sometimes need for being charged. Her playstyle is overall defensive, though can become heavy with pressure once you got the enemy under your control.
Light Attacks Input Description
Jab A Lane performs a quick forward punch. 
Gut Punch AA Lane performs a gut punch.
Flutter Kick AAA Lane jumps into the air and kicks the enemy twice.
Axe Crash AAAA Lane, in the air, slams Abaddon into the ground.
Axe Swing ↔A Lane swings her axe in front of her.
Axe Slam ↑A Lane slams her axe in front of her.
Axe Slice ↓A Lane performs an upwards slice with her axe.
Heavy Attacks Input Description
Devil's Fist B Lane calls upon Lucifer, whose hand comes out of a portal to punch enemies with a massive fist.
Devil's Blade Lane's axe glows with demonic energy as she slashes enemies in front of her with a powerful blade of energy.
Devil's Foot ↑B Lane calls upon Lucifer, whose foot come out of a portal in front of her to stomp enemies. This is an anti-air.
Devil's Upper ↓B Lane calls upon Lucifer, whose hand comes out of a portal in front of her to uppercut enemies. This launches enemies into the air.
Special Attacks Input Description
Devil's Archive X

Lane pulls out a spellbook, reciting ancient verses as up to five pentagrams appear around her. Depending on how long she charges, and the number of pentagrams that appear, the attack will change.

  • Sloth: A weak projectile that travels along the ground. Has a slight homing effect.
  • Greed: A blade-shaped projectile that flies forward. Well-rounded.
  • Gluttony: A slow-moving ball of energy. Absorbs oncoming attacks.
  • Envy: Three balls of energy that float in place before flying toward the enemy. They have a slight homing effect. They gain a damage buff if you are hit by an attack.
  • Pride: A rapid-fire volley of energy blasts. Leaves you vulnerable while firing.
Demon's Revenge ↔X Lane assumes a defensive stance. If she is hit by an attack, Lucifer appears behind the enemy, grabs them, and slams them into the ground. If there is no enemy, Lucifer will absorb any attacks for a short time.
Breaking Wheel ↑X Lane curls into a ball and charges up before launching herself forward, causing damage to anyone in her way.
Wings of Death ↓X Lane summmons two demon wings that launch her into the air. Does cause much damage, but the ascent is quite fast allowing her to follow up an air combo.
Grabs Input Description
Grabbing Punch A Lane, with the enemy in hand, punches the enemy in the face.
Demon's Throw (Side) ↔B Lucifer's hand appears out of a portal, grabbing the enemy and throwing them to the side.
Demon's Throw (Forward) ↑B Lucifer's hand appears out of a portal, grabbing the enemy and throwing them to the side.
Demon's Throw (Back) ↓B Yuki creates icy winds to push the enemy into the air before she launches them backwards.
Rage Attacks Input Description
Devil's Destruction RA Lane summons Lucifer, who jumps out of a portal to stomp on enemies in front of Lane, before firing off a massive beam of hell energy.
Devil's Contract RB Lane creates a contract with Lucifer, who boosts her power and speed for a short time, at the cost of defense.
Sacrificial Rend RX Lane starts the attack by swinging her axe at the opponent. Suddenly, a summoning circles under them, as Lane recites ancient verses. All six of the Avatar's of Hell surrounded the enemy, and begin slowly tearing them apart and dragging them into Hell. As the attack ends, her mangled enemy attempts to reach out to Lane, but Lane retaliates by swinging her axe on them, slicing their head in half and leaving their body to her demonic friends. This attack will instantly kill the enemy if it lands. Uses 3 Rage Meters.
Finishers Input Description
Demonic Crush
  • Devil's Fist
  • Devil's Foot
  • Demon's Revenge
  • Devil's Destruction (first hit)
Lucifer grabs onto the enemy and looks at them, before popping off their head like they were a can of soda, and squeezes all the blood and organs out of them into his mouth. He then teleports away.
Hell Burn
  • Devil's Archive (All except Sloth)
  • Devil's Destruction (laser)
The enemy begins burning up due to exposure to hell energy. As they burn away, they are left in a helpless state.
Axe Rampage
  • Light Attack (Devil's Contract)
  • Breaking Wheel (Devil's Contract)
Lane in a demonic rage slashes across the enemy multiple times. She pierces the enemy, who is now just a head and torso, and looks at them, before tossing them into the air and chopping them in half.
Execution
  • Grabbing Punch
Lane punches the enemy to the ground. Lucifer's hand pins them, as Lane brings Abaddon into the enemy's neck, decapitating them. She grabs the head and inspects it before throwing it into Lucifer's hand, who promptly crushes it.

TransparentdiabloKillgames

Diablo

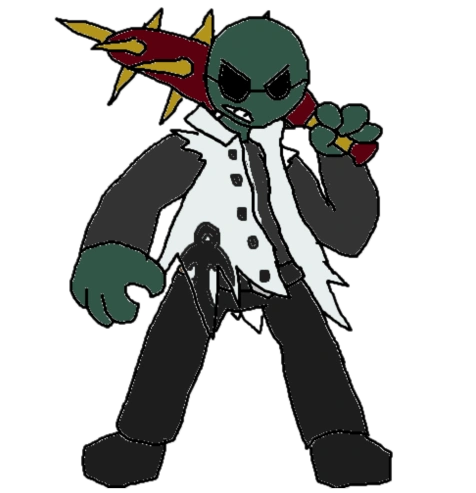
Once a famous pro wrestler, Diablo fell into obscurity when the KillGames were introduced, and caused his profession to become obsolete. Since then, he has tried to find fame through other means, eventually causing him to start taking illegal mutagens. Believing himself to be the most powerful man in the world, he joins the KillGames to bring himself back into the spotlight.

Diablo acts like a heel wrestler, often boasting about his strength, showing contempt to his opponents, and generally acting like a massive asshole. He enjoys fighting and isn't phased upon killing someone, seeing the KillGames as just a performance to him.

Diablo uses Mutagens, which rapidly increase his muscle mass and grant him superhuman strengh.

Playstyle
Grappler: Diablo is a slow-moving but incredibly powerful grappler, possessing great power and defense but very lacking speed. He has trouble getting in, but when he does, he is capable of doing some of the most powerful attacks and throws.
Light Attacks Input Description
Left Swipe A Diablo swipes at enemies with his left hand.
Right Swipe AA Diablo swipes at enemies with his right hand.
Slam AAA Diablo slams both of his hands onto the ground.
Super Slam AAAA Diablo jumps into the air and slams down on the ground so hard that it creates a shockwave. Launches foes backwards on the ground and downwards in the air.
Arm Flail ↔A Diablo performs a wild sweeping attack.
Headbutt ↑A Diablo performs a powerful headbutt.
Mutant Kick ↓A Diablo performs a kick.
Heavy Attacks Input Description
Gigante Strike B Diablo, coarsing with mutant energy, performs a powerful straight punch.
Gigante Slap ↔B Diablo, coarsing with mutant energy, performs a powerful sweeping punch.
Gigante Slam ↑B Diablo, coarsing with mutant energy, performs a powerful slam. This is an anti-air, and leaves targets vulnerable.
Gigante Upper ↓B Diablo, coarsing with mutant energy, performs a powerful uppercut. This launches enemies into the air.
Special Attacks Input Description
Diablo Drop X Diablo grabs a nearby enemy, jumps into the air, and slams them into the ground. Since it is a grab, it goes through shields. A very powerful attack that leaves you vulnerable if you miss.
Demon's Lariat ↔X Diablo quickly spins like a tornado, damaging nearby enemies multiple times. Reflects projectiles, though you are vulnerable to aerial attacks when performing this move.
Gigante Destroyer ↑X Diablo reaches upward, grabbing an enemy in the air. If he does, he unleashes a flurry of punches before punching the enemy away.
Power Crush ↓X Diablo jumps high into the air, damaging enemies in his way with a powerful headbutt. He then raises his fists before slamming them downward as he lands, causing powerful damage until him. A good anti-air
Grabs Input Description
Grabbing Punch A Diablo, with the enemy in hand, punches the enemy in the face.
Slamdown ↔B Diablo grabs the enemy by the leg and repeatedly slams them on the ground, before throwing them to the side.
Jump Drop ↑B Diablo throws the enemy forward, before jumping after them, grabbing them and slamming them to the ground. A great anti-air.
Suplex ↓B Diablo performs a suplex, launching the enemy backwards.
Rage Attacks Input Description
Super Diablo Drop RA Diablo flies forward, grabbing a nearby enemy. Jumping high into the sky, he then comes crashing down with the enemy in hand, burning up as they fall back to Earth. Diablo then slams the enemy into the ground, ending the attack and causing powerful damage.
Gigante Tornado RB Diablo grabs an aerial foe. Diablo begins spinning, creating a tornado and causing the enemy to rise in the air, before stopping and unleashing a powerful punch, sending the enemy flying.
Ultimate Diablo Drop RX Diablo's eye glisten as he grabs a nearby enemies. He rushes forward, launching the enemy backwards into a wrestling ring. Diablo unleashes a series of powerful attacks as the enemy is repeadedly bouncing off of the ropes. He then jumps into the air, grabbing the enemy and pins them to the ground. Stun and Torque count to three, as Diablo slowly crushes the enemy with his hand, breaking their bones. Once the commentators say three, he squishes the enemy so hard their body explodes under all the weight. This attack will instantly kill the enemy if it lands. Uses 3 Rage Meters.
Finishers Input Description
Organ Crusher
  • Gigante Punch
  • Gigante Upper
  • Gigante Destroyer
  • Gigante Tornado
Diablo punches so hard that his fist goes straight through his enemy. He uses the opportunity to grab onto his enemy's organs (their heart, lungs, intestines, etc.), pull them out of their body, and crush them in his hand.
Demon's Drop
  • Jump Drop
  • Suplex
Diablo, slamming the enemy into the ground, causes the enemy to break their neck.
Super Demon's Drop
  • Diablo Drop
  • Super Diablo Drop
Diablo, slamming the enemy into the ground so hard, causes the enemy to explode into pieces.
Rip Apart
  • Grabbing Punch
Diablo grabs the enemy by the arms and uses his immense strength to pull them in half.

TransparentmiseryKillGames

Misery

Misery is a ninja assassin who wanders the world, searching for people to fight. She wields Ashura, a legendary katana that houses the soul of a high-ranking demon. When Misery first grasped the sword, Ashura placed a curse on her, forcing her to feed him blood if she wishes to stay alive. Somehow finding herself in Neo York City, Misery joins the KillGames to find a way to get rid of her sword.

Misery is shown to be cold, collected and serious. Despite the situation she is in, she possesses a code of honor, and chooses to only fight people that have done bad things or will give her a good fight. 

Misery wields Ashura, and can tap into his power during certain attacks. She also uses shurikens in her Neutral Special.

Playstyle
Rushdown: With great speed and damage and low defense, Misery relies on getting in and causing as much damage as possible. Shuriken and Shadow Strike allow her to apply pressure, while Counter is useful for keeping yourself close to the enemy when they try to punish you.
Light Attacks Input Description
Left Strike A Misery strikes enemies with her left hand.
Right Strike AA Misery strikes enemies with her right hand.
Kick AAA Misery performs a quick kick.
Quick Slash AAAA Misery quickly pulls out Ashura and slashes forward. Launches foes backwards on the ground and downwards in the air.
Roundhouse Kick ↔A Misery performs a quick roundhouse kick.
Hand Chop ↑A Misery performs a quick hand chop.
Axe Kick ↓A Misery performs a two-hit axe kick.
Heavy Attacks Input Description
Demon's Stab B Misery performs a stabbing attack, coated in demonic energy.
Demon's Cut ↔B Misery performs a powerful sword slash, coated in demonic energy.
Demon's Reaping ↑B Misery performs a downward slash, coated in demonic energy. This is an anti-air, and leaves targets vulnerable.
Demon's Chop ↓B Misery performs an upward slash, coated in demonic energy. This launches enemies into the air.
Special Attacks Input Description
Rush Slash X Misery quickly charges up before flying forward, briefly turning invisible, and slashing the foe. Lines appear in the direction she will be attacking. Hold back before performing the attack, and Misery will fly upwards rather than straight (downwards if performed in the air)
Shadow Strike ↔X Misery summons a shadowy clone of herself that slides forward and slashes anyone in its way.
Shuriken ↑X Misery tosses a shuriken forward. Deals little damage, though is useful for applying pressure to a foe.
Rising Slash ↓X Misery jumps in the air, performing a rising uppercut with her sword. Quicker than other uppercuts, though doesn't cause as much damage as them.
Grabs Input Description
Demon's Bite A As Misery is grabbing the enemy, Ashura hovers nearby and bites at the enemy's face.
Teleport Strike (Side) ↔B Misery kicks the enemy into the air, before suddenly disappearing and reappearing in the enemy's path, and slashing them to the side.
Teleport Strike (Forward) ↑B Misery kicks the enemy into the air, before suddenly disappearing and reappearing in the enemy's path, and slashing them forwards.
Teleport Strike (Back) ↓B Misery kicks the enemy into the air, before suddenly disappearing and reappearing in the enemy's path, and kicking them backwards.
Rage Attacks Input Description
Demon's Cleaver RA Ashura glows bright red as Misery jumps into the air, unleashing three massive slashes that create shockwaves to damage distant foes.
Shadow Barrage RB Misery charges forward and slashes the foe, knocking them backwards and into the air. Shadow Clones suddenly appear, attacking them and knocking them higher into the air. Once the enemy is high enough, Misery appears above them, and plunges her sword into them as both of them fall to the ground.
Darkness Onslaught RX Ashura takes control of Misery as her eyes begin glowing red. She slashes forward, launching enemies into the air. She quickly jumps toward them, as the background becomes white and her and her victims appear as sillouhetes. She there unleashes a barrage of slashes, with each blood stain resembling a paint stroke. After some time, her sword begins glowing red and she does a final slash that cuts the enemy into pieces. She falls to the ground, regaining consiousness and getting up. This attack will instantly kill the enemy if it lands. Uses 3 Rage Meters.
Finishers Input Description
Torso Cut
  • Demon's Cut
  • Rush Slash
Misery slashes at the enemy's torso, slicing the enemy in half. Leaves the enemy in a helpless state. 
Vertical Cut
  • Demon's Reaping
  • Demon's Chop
  • Demon's Cleaver
Misery slashes the enemy clean in half.
Super Demon's Drop
  • Demon's Stab
  • Rising Slash
  • Shadow Barrage
Misery stabs Ashura into the enemy's chest and pulls out their heart. She tosses the heart into the air and Ashura bites it, absorbing its blood and crushing it, as the enemy falls and dies.
Neck Snap
  • Demon's Bite
Misery jumps top of the enemy, put their head between her legs. She then snaps their neck, with so much force that their head spins backwards.

TransparentcoltKillGames

Colt

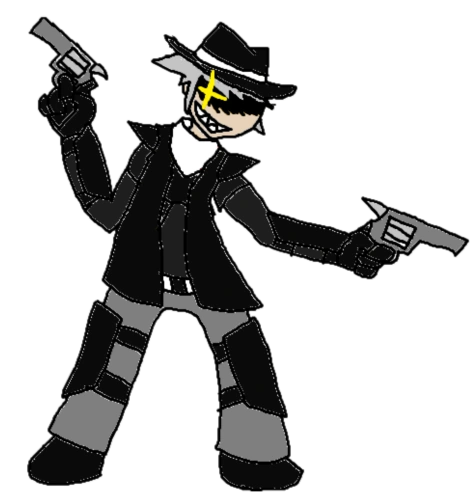
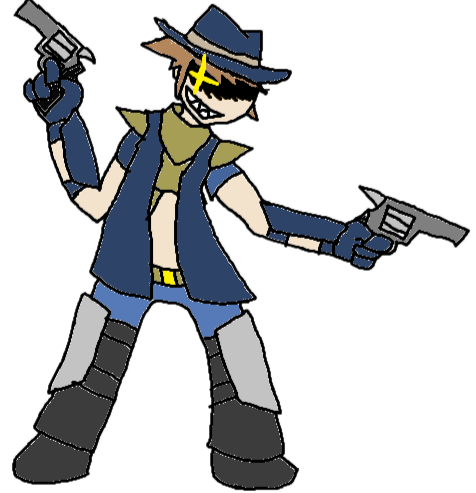
Colt is a man with one goal, to become the richest guy in the world. He initially served as a bounty hunter, using his marksmanship and varied weaponry to kill people and earn money. Not satisied with the amount of money he got from doing the job, he joins the KillGames to use the prize to win as much money as hey can.

Colt is best described as sly and scummy. He's to kind of fighter who, rather than fighting with any sense of honor and dignity, would rather run away and fight his opponents from afar. He only joins the KillGames to boost his ego and make himself rich. He is shown to flirt with many of the female characters (mostly Misery in the story).

Colt wields various Guns, including dual revolvers, a pump-action shotgun, a tommy gun, flashbangs and miniguns.

Playstyle
Zoner: Colt plays a zoner playstyle. Possessing great range in several of his moves, Colt can stay back and fire at enemies from afar.
Light Attacks Input Description
Left Revolver Bash A Colt hits enemies with his left revolver.
Right Revolver Bash AA Colt hits enemies with his right revolver.
Double Revolver Bash AAA Colt hits enemies with both of his revolvers.
Precise Shot AAAA Colt fires a two shots forward that create an explosion. Launches foes backwards on the ground and downwards in the air.
Shotgun Bash ↔A Colt smashes enemies with his shotgun.
Revolver Uppercut ↑A Colt performs a quick uppercut while attacking enemies with his revolvers.
Foot Stomp ↓A Colt stomps on his enemy's foot.
Heavy Attacks Input Description
Fire Flurry B Colt fires a flurry of shots from his revolvers.
Fire Spread ↔B Colt fires a flurry of shots in a spread.
Air Fire ↑B Colt fires a flurry of shots upward. A great anti-air.
Dust Gunner ↓B Colt fires a flurry of shots downward, creating an explosion in front of him that launches enemies into the air.
Special Attacks Input Description
Tommy Gun X Colt pulls out a Tommy gun and fires a burst of bullets at his enemies. They don't do much damage and can't cause the enemy to flinch unless used in close-range, so they're best used to rack up damage.
Volley Roll ↔X Colt dodges out of the way of an attack while automatically firing three shots from his revolvers. 
Buckshot Blast ↑X Colt pulls out a pump-action shotgun and fires a shot in front of him. This attack causes knockback, but is only very useful at close range.
Flashbang ↓X Colt tosses a flashbang grenade a short distance forward, which stuns enemies. Hold the button to increase the range.
Grabs Input Description
Grabbing Revolver Bash A Colt, with the enemy in hand, bashes the enemy with his revolver.
Buckshot Surprise (Side) ↔B Colt appears besides the enemy and fires a shotgun blast that knocks them backwards.
Buckshot Surprise (Forward) ↑B Colt pulls out his shotgun and fires a blast that knocks them backwards.
Buckshot Surprise (Back) ↓B Colt appears behind the enemy and fires a shotgun blast that knocks them backwards.
Rage Attacks Input Description
Bulletstorm RA Colt pulls out a minigun from out of nowhere before firing a torrent of bullets at the enemy.
Flash Party RB Colt pulls out several flashbangs and tossed them into the air, causing them to rain on top of the enemy.
Deadshot RX Colt pulls out a minigun and stabs the enemy with it, starting the attack with a barrage of bullets going through their body. He fires so much that the enemy ends up flying into the air. Time seems to slow as Colt, eyes shining, pulls out his revolver, firing a shot into the air. This shot proceeds to bounce off of the tray minigun bullets, until it finally pierces the enemy's head, killing them. This attack will instantly kill the enemy if it lands. Uses 3 Rage Meters.
Finishers Input Description
Headshot
  • Fire Flurry
  • Fire Spread
  • Air Fire
Colt fires a shot directly into the enemy's head, putting them in a helpless state.
Blood Fountain
  • Tommy Gun
  • Buckshot Blast
  • Buckshot Surprise
  • Bulletstorm
Colt fires a barrage of bullets at the enemy, so much in fact that the bullets fill the enemy with holes and leaves them in a helpless state. 
Russian Roulette
  • Heavy Attack (stunned)
Colt, walking toward the stunned enemy, plunges his revolver into the enemy's mouth. He spins the chamber before firing, blowing the enemy's brains up. After performing the attack, Colt reveals that the gun was fully loaded.
Don't Look Kids
  • Headbutt
Colt appears behind the enemy before plunges his guns into the enemy's anus. He raises the enemy into the air before firing off shots into the enemy, as they bleed out and eventually explode into a shower of blood.

TransparentshineKillGames

Shine

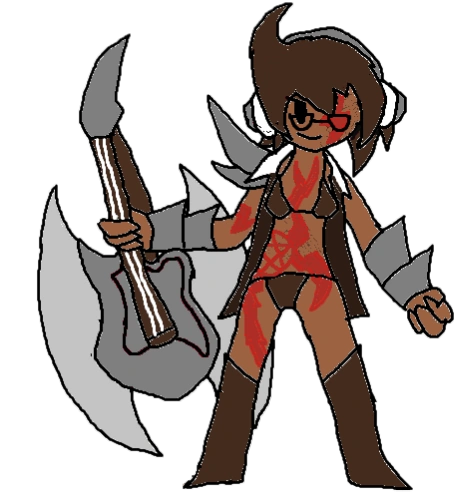
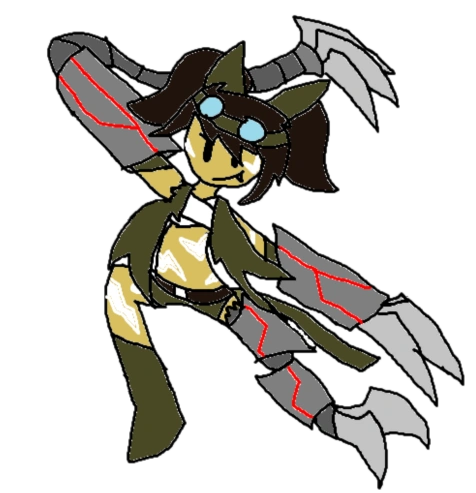
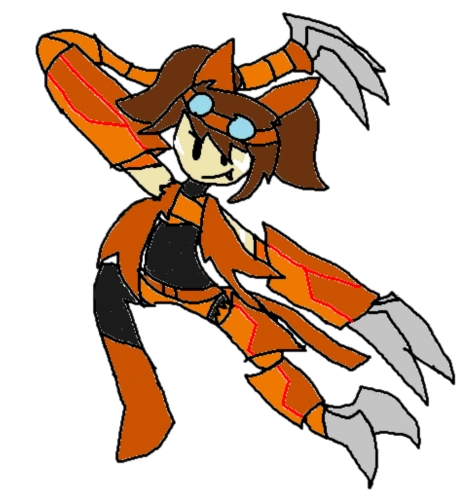
Shine is the leader of the Wastelanders, a group of gang members that live in the long-abandoned wastelands. Shine is absolutely obsessed with mechanical parts, often outfitting herself with them, and having the ultimate goal of becoming the most powerful cyborg in the world. Finding herself in the KillGames, she joins to find powerful robots and cyborgs which she can steal from.

Shine has a split personality. She is normally shown to be childish and bubbly, having a wonderment towards robots and cyborgs. But when things don't go her way, she becomes a cunning and obsessive murderer. She often uses her high position as leader to get whatever she wants, even if it means abusing her subjects.

Shine's weapon are the Soul Scratchers, two massive gauntlets equipped with launchable blades, which are similar to claws.

Playstyle
Mix-Up: Shine is a technical fighter with a reliance on placing down "links". Her claws not only provide her great range, but can also be used to grab onto these links to pull herself to areas or launch herself at foes. She is a tricky and evasive fighter that excels in mobility, at the cost of having low health.
Light Attacks Input Description
Left Kitty Slash A Shine slashes nearby enemies with her left Soul Scratcher.
Right Kitty Slash AA Shine slashes nearby enemies with her right Soul Scratcher.
Cat Flurry AAA Shine wildly slashes enemies in front of her.
Cat Punch AAAA Shine suddenly launches her claws forward. Launches foes backwards on the ground and downwards in the air.
Claw Slash ↔A Shine performs a quick horizontal slash.
Claw Uppercut ↑A Shine performs a quick uppercut.
Foot Slash ↓A Shine kicks and slashes enemies with her robotic leg.
Heavy Attacks Input Description
Rocket Fist B Shine charges up before launching both her claws forward to slash enemies.
Spin Cutter ↔B Shine charges up before spinning and slashing enemies around her with her claws.
Claw Hammer ↑B Shine winds up before extending her claws and slamming them on the ground. A great anti-air that causes a groundbounce.
Upward Rocket Fist ↓B Shine charges up before launching both her claws upward. Launches enemies into the air.
Special Attacks Input Description
Link Launch X Shine launches forward a link that hovers in the air. The link can be used by Shine to launch herself or create a quick escape.
Link Grab ↔X Shine launches one of her claws forward. If she comes into contact with a link or an enemy, she flies toward them, charging into the enemy or stick to a grabbed link. Hold a direction to angle the shot.
Drill Claw ↑X Shine grabs onto a nearby link and uses it to slingshot herself forward, spinning at high speeds to charge into foes, dealing multiple hits. Hold a direction to angle the attack.
Jump Claw ↓X Shine fires her claws upward. If she comes into contact with a link, she will grab onto it before launching herself into the air to gain extra height. If she grabs onto an enemy, she flies toward them and drags them into the ground.
Grabs Input Description
Grabbing Slash A Shine, with the enemy in hand, stabs the enemy with her claws.
Spinning Throw (Side) ↔B Shine spins with her extended claws grabbing onto the enemy, dragging them across the ground, before throwing them to the side.
Spinning Throw (Forward) ↑B Shine spins with her extended claws grabbing onto the enemy, dragging them across the ground, before throwing them forward.
Spinning Throw (Back) ↓B Shine spins with her extended claws grabbing onto the enemy, dragging them across the ground, before throwing them backwards.
Rage Attacks Input Description
Vicious Slicer RA Shine rushes forward as she slashes in front of her, her claws extended and flailing in front of her, causing rapid damage to anyone in her way.
Ultra Claw RB Shine launches her claws at high speed, so fast they pierce through the enemy and drag them to Shine. The claws will also absorb almost all oncoming attacks.
Total Beatdown RX Shine knocks the enemy out with a bash of her gauntlet. Suddenly, the enemy wakes up, surrounded by Wastelanders. Shine calls for them to attack, as the group surround the foe, tearing them limb from limb and beating them to a bloody pulp. The enemy is left limbless and bloody, as the Wastelanders move away, letting Shine make the final kill. She taunts her enemy, before launching them into the air, and extending her claws to grab themand rip them in half, raining down blood on her and her followers. This attack will instantly kill the enemy if it lands. Uses 3 Rage Meters.
Finishers Input Description
Bisector
  • Rocket Fist
  • Spin Cutter
Shine, slashing enemies with her claws, slicing the enemy into several pieces, leaving them in a helpless state.
Drill Cutter
  • Link Grab
  • Drill Claw

Shine, flying into the enemy, gets stuck in the enemy's stomach. Stuck in the enemy, she stands up, raising the enemy into the air, before splitting them in half.

Claw Slamdown
  • Claw Hammer
  • Jump Claw
Shine grabs the enemy, and slams them repeadetly onto the ground, before jumping into the air and slamming the enemy into the ground, crushing their head.
Chain Hug
  • Grabbing Slash
Shine, with the enemy in her grasp, fires her claws, causing the chains to wrap around the enemy and entangle them. The chains slowly close into the enemy, until they eventually squeeze them so hard that it crushes their bones and causes them to spin out their organs.

TransparentsharkmanKillGames

Sharkman

Sharkman is a member of the Wastelanders and one of Shine's most loyal bodyguards. He believes himself to be an acutal shark, despite the shoddy design of his costume, and is one of the Wastelander's most skilled killers. He wishes to protect his leader Shine at all costs, and joins the tournament to protect her and kill everyone who even tries to lay a finger on her.

Sharkman is incapable of speaking, only able to speak in growls and roars. He is a vicious and cannibalistic killer, with an undying ferocity much like a shark hunting its prey. His only driving force are his loyalty towards Shine, and he often sleeps when he doesn't have things to do.

Sharkman's weapon is the Turbine Hammer, a motorized spinning weapon made of scrap metal attached to the end of the stick.

Playstyle
Bruiser: Posessing a mix of speed and tankiness, Sharkman is all about getting up close and not letting the enemy escape. He has slow attacking speed, but his attacks often haven super armor and can deal large amounts of damage if you play your cards correctly.
Light Attacks Input Description
Left Slash A Sharkman slashes enemies with his left claws.
Right Slash AA Sharkman slashes enemies with his right claws.
Bite AAA Sharkman lunges forward and bites enemies.
Headbutt AAAA Sharkman lunges forward, charging into enemies. Launches foes backwards on the ground and downwards in the air.
Tail Slap ↔A Sharkman performs a sweeping tail slash.
Hammer Stab ↑A Sharkman stabs his Turbine Hammer forward.
Tail Slam ↓A Sharkman slams his tail into the ground.
Heavy Attacks Input Description
Turbine Strike B Sharkman swings his Turbine Hammer in front of him.
Turbine Spin ↔B Sharkman spins around, hitting any enemy in his way.
Turbine Slam ↑B Sharkman slams his Turbine Hammer into the ground. A great anti-air that causes a groundbounce.
Turbine Sweep ↓B Sharkman swings his Turbine Hammer upward. Launches enemies into the air.
Special Attacks Input Description
Shard Strike X Sharkman strikes the ground, creating six sharp rock shards that float in the air in front of him. Sharkman can then hit them to launch them at enemies, or leave them as a damaging trap. The attack can't be used some time after use.
Carnage Chomp ↔X Sharkman lunges forward, biting anyone in his way. Acting as a command grab, Sharkman grabs the enemy with her jaws and begins furiously mauling them.
Rampage ↑X Sharkman thrashes around, creating shockwaves damaging enemies in a nearby area.
Shark Hunt ↓X Sharkman digs underground, speeding toward the enemy. Upon reaching an enemy, he performs an uppercut, though the move can be cancelled at any point.
Grabs Input Description
Bite A Sharkman, with the enemy in hand, bites the enemy.
Hammer Throw (Side) ↔B Sharkman impales his enemy with his Turbine Hammer before throwing them to the side.
Hammer Throw (Forward) ↑B Sharkman impales his enemy with his Turbine Hammer before throwing them forward.
Hammer Throw (Back) ↓B Sharkman impales his enemy with his Turbine Hammer before throwing them backwards.
Rage Attacks Input Description
Rock Wrecker RA Sharkman smashes the ground and summons a massive rock spike, launching it forward at enemies.
Vicious Mauling RB Sharkman charges forward, grabbing onto any enemy in his way. If the attack lands, Sharkman performs a combo of biting and slashing attacks, mauling the enemy and restoring some of his health.
Megalodon's Wrath RX Sharkman smacks the enemy with his Turbine Hammer. Sharkman grabs onto the daze's enemy, digs his claws into the enemy's chest, and rips a hole through their chest. We go to the enemy's perspective, who falls to the ground. Sharkman pounces on top of them, and begins slowly ripping out and eating the enemy's organs. The enemy slowly looks up at them, as blood covers their face and they slowly die. This attack will instantly kill the enemy if it lands. Uses 3 Rage Meters.
Finishers Input Description
Turbine Spin
  • Turbine Strike
  • Turbine Spin
  • Turbine Sweep
Sharkman's enemy is impaled into his Turbine Hammer. Sharkman activates the hammer, eviscerating the enemy and causing their organs to spray everywhere.
Rock Impale
  • Shard Strike
  • Rock Wrecker

A rock impales onto the enemy's body, leaving them in a helpless state.

Half-Crush
  • Carnage Chomp
  • Vicious Mauling
Sharkman mauls the enemy enough to rip them in half. As their upper body attempts to crawl away, Sharkman walks to them and crushes their head.
Cannibalism
  • Bite
Sharkman grabs the enemy by the arms and bites down on the enemy's head and upper torso. The force of his bite eventually manages to tear off the enemy's upper body, ripping off the arms in the proceeds. The enemy screams as he chomps down on them, and eats them.

TransparentzmeiKillGames

Zmei

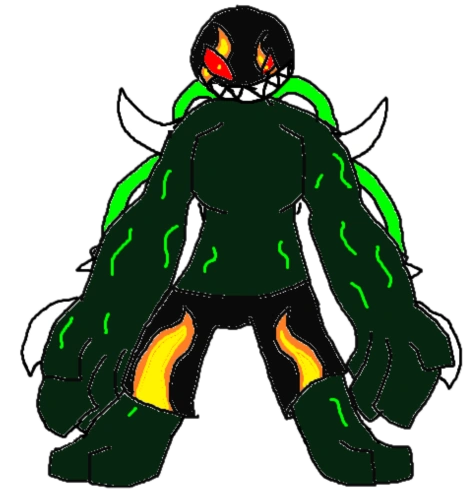
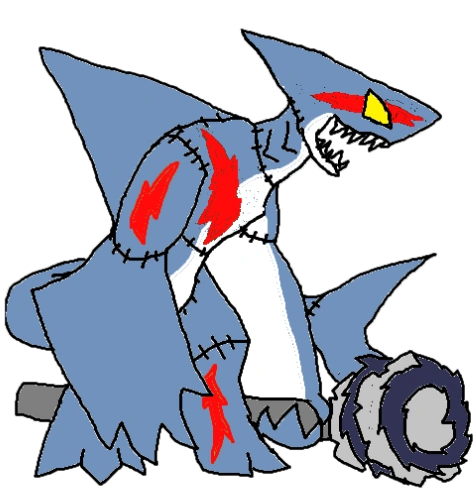
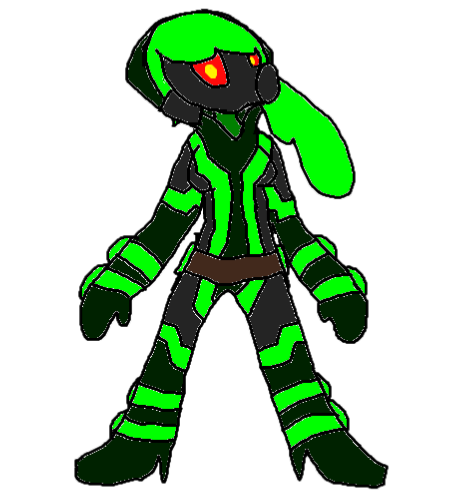
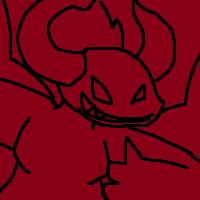
With the threat of demons and mutants taking over the world, the United States needed some kind of way to contain them. Thus was the origins of the Zmei, high-powered combat robots designed to supress these new species, and prevent them to overrunning humanity. To test out their capabilities, a single unit was sent to the KillGames as a way to test out its capabilities. 

Being a robot, Zmei feels no emotions and no free will, as his programming forces him to do what he is ordered to do. His only order is to win the KillGames, and he is willing to do anything to reach that objective, even if it means killing thousands of people.

Alongside missiles and lasers, Zmei is equipped with the Buster Breakers, where his claws form together into drills and can spin at high speed to cause incredible damage.

Playstyle
Zoner: Zmei possesses very slow movement and attack speeds, but his versatile projectiles makes him great for zoning, or just causing massive damage. Often players will need to have good prediction skills to get their attacks to land, to but its easily made up for if you can get them right.
Light Attacks Input Description
Left Claw Bash A Zmei smacks enemies with his left claw.
Right Claw Bash AA Zmei smacks enemies with his right claw.
Double Claw Bash AAA Zmei smacks enemies with both claws.
Double Claw Slam AAAA Zmei slams both of his claws in front of him.
Tail Sweep ↔A Zmei's lower half quickly spins, damaging enemies around him with his tail.
Stomp ↑A Zmei stomps the ground in front of him.
Horn Strike ↓A Zmei swings his head downard, damaging enemies with his horns.
Heavy Attacks Input Description
Drill Buster B Zmei's claws form into drills as he thrusts both forwards.
Drill Tornado ↔B Zmei's claws form into drills as he spins rapidly, damaging enemies around him.
Drill Breaker ↑B Zmei's claws form into drills as he brings them downward, drilling into the ground. This is an anti-air, and leaves targets vulnerable.
Drill Upper ↓B Zmei's claws form into drills as he jumps upward, performing a rising uppercut. This is a launcher.
Special Attacks Input Description
Beam Cannon X Zmei charges up before firing a laser beam from his mouth. The longer it is charged, the more damage and distance it covers, and the more damage it deals.
Armor Buster ↔X Zmei fires a slow-moving mini Buster Breaker in front of him. If landed, it will deal damage even if the enemy is guarding.
Rocket Tackle ↑X Zmei charges up before charging in the desired direction. The longer it is charged, the more damage and distance he covers.
Missile Launch ↓X Zmei's shoulder open and he unleashes a missile at the enemy. It flies at an upward angle, but if the enemy is in the air, it gains a slight homing effect, even if the enemy reaches the ground.
Grabs Input Description
Claw Strike A Zmei, with the enemy in hand, strikes the enemy with his claws.
Spiral Throw (Side) ↔B Zmei raises the enemy into the air, spinning his upper half at high speeds, before throwing the enemy to the side.
Spiral Throw(Forward) ↑B Zmei raises the enemy into the air, spinning his upper half at high speeds, before throwing the enemy forward.
Spiral Throw(Back) ↓B Zmei raises the enemy into the air, spinning his upper half at high speeds, before throwing the enemy backwards.
Rage Attacks Input Description
Dragoon Buster RA Zmei goes into a cannon-like form and fires a massive beam on energy in front of him.
Missile Barrage RB Zmei's shoulders open as he unleashes a volley of homing missiles.
Spiral Hydra RX Zmei flies forward and punches the enemy into the air. He unleashes a volley of homing missiles onto the airborne foe, which eventually leave the enemy mangled and covered in ashes. Zmei then charges, his Buster Breakers extending and coarsing with electricity, before flying toward the enemy and unleashing a devestating punch, so powerful that the enemy is turned into a cloud of blood. This attack will instantly kill the enemy if it lands. Uses 3 Rage Meters.
Finishers Input Description
Drill Stab
  • Drill Buster
  • Drill Upper
Zmei stabs the enemy with his drill. Raising them into the air, he spins the drills, causing the enemy's organs and body parts to be thrown all around Zmei
Short Drill Stab
  • Dril Breaker
  • Armor Buster
Zmei stabs the enemy with his drill. He spins the drills, causing the enemy's organs and body parts to be thrown in front of Zmei.
Skeleton Rip
  • Drill Tornado
Zmei's drills tear through the enemy's body. The skeleton is somehow intact, and so Zmei uses the opportunity to pull the skeleton out of the tear.
Burn Up
  • Beam Cannon
  • Missile Launch
  • Dragoon Buster
  • Missile Barrage
The heat from the laser/missile lights the enemy on fire, causing them to slowly burn to death. Leaves the enemy in a helpless state.
Claw Crush
  • Claw Strike
Zmei grabs the enemy and throws them into the air. As they fall back towards the ground, Zmei opens his Buster Breakers, and clamps down on them to crush the enemy between them. Zmei then opens his claws as their head and legs fall out, and he shakes the crush remains off his claws.

Unlockable Characters[]

TransparentreapazoidKillGames

Reapazoid

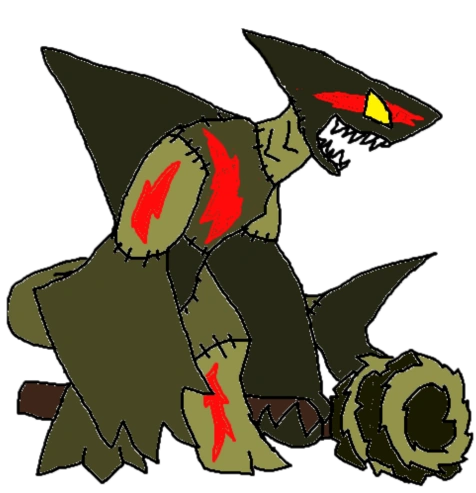
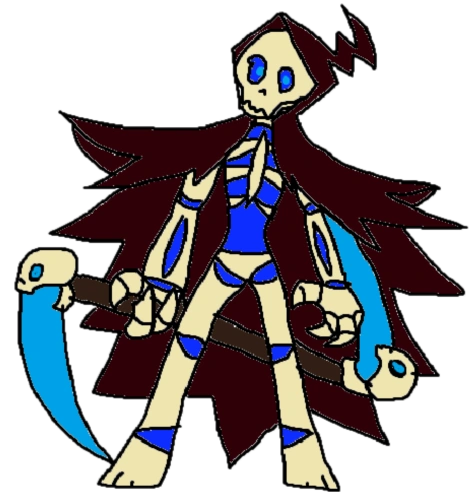
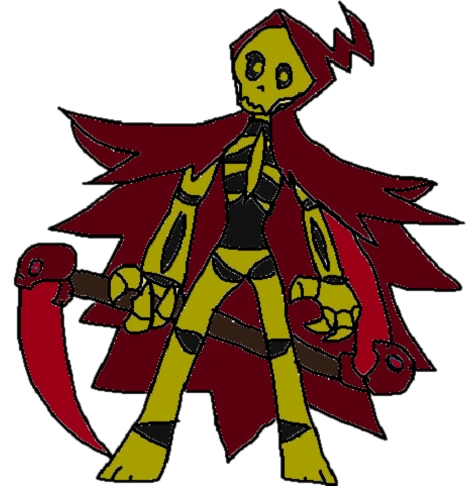
Reapazoid is a notorious mass murderer in Neo York City. Little is known about him, as he wears a Grim Reaper-esque outfit that hides his indentity. He often hunts during the night, slaughtering as many people as he can. However, with even the slightest possibility of being caught, Reapazoid seeked to find a way to never end his killing spree. He secretly joins the KillGames, wishing the use the prize to grant him the freedom to kill whoever he pleased.

Reapazoid is a psychopath who enjoys causing as much death and carnage as possible. However, he isn't a mindless murderer. Reapazoid is actually extremely cunning and smart, and enjoys toying with his enemy's psyche to disorient them and create the perfect opening.

Reapazoid's main weapon is the Harbinger, a dual-sided laser scythe. He also has the ability to manipulate portals, allowing him to suddenly teleport and fire chain-linked sickles out of them.

Playstyle
Tricky: Playing a tricky bait-and-punish playstyle. With good speed and lacking defense, many of his attacks are slow and require proper positioning, requiring the player to know character matchups. However, mastering his playstyle and being as unpredictable as possible will allow him to easily destroy health bars and net you high ratings.
Light Attacks Input Description
Left Slash A Reapazoid slashes enemies with his left scythe.
Right Slash AA Reapazoid slashes enemies with his right scythe.
Scythe Flurry AAA Reapazoid spins his scythe in front of him to slash enemies multiple times.
Scythe Slam AAAA Reapazoid slams his scythe downward. Launches foes backwards on the ground and downwards in the air.
Claw Slash ↔A Reapazoid performs a quick slash with his claws.
Upper Reap ↑A Reapazoid performs an upward swing with the Harbinger.
Downward Reap ↓A Reapazoid performs a downward slash.
Heavy Attacks Input Description
Soul Slash B Reapazoid charges up, as Harbinger glows bright blue, before performing a powerful slashing attack.
Soul Cutter ↔B Reapazoid charges up before performing a horizontal slash. Knocks enemies backwards.
Soul Slam ↑B Reapazoid charges up before slamming Harbinger downward. A great anti-air that causes a groundbounce.
Soul Upper ↓B Reapazoid charges up before slashing upward. Launches enemies in the air.
Special Attacks Input Description
Seeking Sickle X Reapazoid tosses a dark sickle that flies forward. If it hits enemies, it decreases their speed for a short time.
Spinning Edge ↔X Reapazoid spins his scythe in front of him. Hold the button to increase damage and distance. Has super armor.
Vengeance Claw ↑X Reapazoid summons two portals a distance in front of him. Sickles come of these portals, grabbing enemies between them and leaving them vulnerable to damage. Reapazoid can then combo into a powerful attack to maximize damage. Goes through grabs.
Vanish Cloak ↓X Reapazoid briefly turns invisible, dodging incoming attacks. He can then move a short distance before attacking a foe if they are nearby. Perfect for punishing attacks with a lot of end lag.
Grabs Input Description
Judgement Claw A Reapazoid, with the enemy in hand, claws at their face.
Scythe Throw

(Side)

↔B Reapazoid stabs the enemy with his scythe, before spinning and throwing them sideways.
Spinning Throw (Forward) ↑B Reapazoid stabs the enemy with his scythe, before spinning and throwing them forward.
Spinning Throw (Back) ↓B Reapazoid stabs the enemy with his scythe, before spinning and throwing them backwards.
Rage Attacks Input Description
Vorpal Edge RA Reapazoid's scythe grows to massive size and coarses with blue energy before he throws it forward, as it spins at high speeds.
Death Spectre RB Darkened clouds surround Reapazoid, greatly increasing his speed and making him very hard to it for a short time.
You Are Nothing RX Reapazoid flies forward and grabs the enemy. The enemy wakes up in a dark hallway, as Reapazoid talks to them about how much their life up to this point has been meaningless. He then exclaims, "You are nothing." before three sickles pierce through the enemy's body. As they struggle to escape, they are dragged into the darkness, where Reapazoid murders them. This attack will instantly kill the enemy if it lands. Uses 3 Rage Meters.
Finishers Input Description
Hook Ender
  • Soul Slash
  • Soul Upper
Reapazoid plunges Harbinger right into the enemy's throat. As they struggle to breath, Reapazoid slashes their head open and cuts it in half. 
Visceral Blender
  • Spinning Edge
  • Vorpal Edge

Reapazoid chops the enemy in half. He tosses the enemy's upper body into the air before spinning the Harbinger below them and eviscerating them.

Drawn & Quartered
  • Vengeance Claw
Four sickles grab onto the enemies, before they slowly pulls the enemy's limbs apart, ripping them off and leaving his enemy in a helpless state. 
Body Vanish
  • Vanish Cloak
Reapazoid mysteriously vanishes. The enemy is confused, before Reapazoid's arm appears from their mouth. Reapazoid slowly crawls out their body, eventually ripping their body in half.
Rip Through
  • Judgement Claw
Reapazoid grabs onto the enemy before plunging the Harbinger through the enemy. He then violently pulls out the enemy's skeleton through their body, killing them.

TransparentmalignaKillGames

Maligna

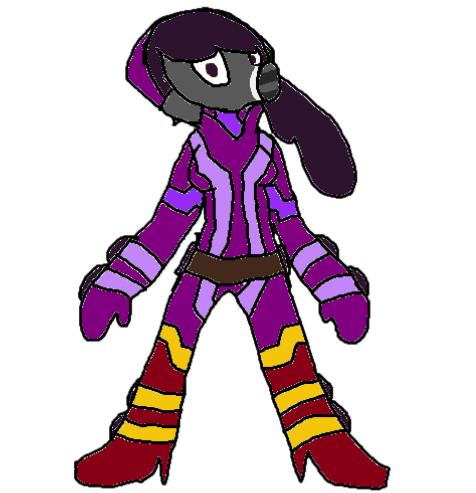
Maligna is a scientist and the largest producer of mutagens in Neo York City. With thousands of people wishing to join the KillGames, Maligna is obsessed with creating the most powerful mutagen she can create. This obsession slowly made her slowly go insane, and the exposure to her mutagens caused her to go into a permanent state of mutation. Now, believing she found the "perfect mutagen" she has been searching for, she joins the KillGames to find people to test out her creation on.

Maligna only wishes for two things, to create the perfect mutagen, and to see how much death and destruction it can cause. She see all human life as her test subjects, and is willing to sacrifice lives if it means getting closer to completing her goals.

Maligna's weapon are Mutagens. Along with the syringes she uses for close-ranged attacks, canisters of mutagen gases are attached to her arms and legs, which can be used to amplify her attacks or provide long-ranged damage.

Playstyle
Glass Cannon: An insanely powerful force in the battlefield, Maligna is capable of dealing tons of short and long-ranged damage with her Mutagens. However, using her attacks will cause her take damage due to the exposure. She can be very risky due to how fragile she is, but she can become incredibly powerful if you can manage your rescources.
Light Attacks Input Description
Left Punch A Maligna performs a left punch.
Right Punch AA Maligna performs a right punch.
Spin Kick AAA Maligna performs two spinning kicks.
Toxic Ender AAAA Maligna performs a straight punch, creating a powerful explosion. Launches foes backwards on the ground and downwards in the air.
Toxic Swing ↔A Maligna swings at the enemy, creating a small explosion if it lands.
Slide Kick ↑A Maligna performs a slide, kicking enemies in her way.
Toxic Knee ↓A Maligna performs a jumping knee attack, creating an explosion.
Heavy Attacks Input Description
Toxic Punch B Maligna charges up before performing a straight punch, creating a massive explosion.
Toxic Wave ↔B Maligna charges up before punching downwards, creating a wave of energy in front of her.
Toxic Slam ↑B Maligna charges up before jumping up and slamming downwards. This is an anti-air, and leaves targets vulnerable.
Toxic Launch ↓B Maligna charges up before performing an uppercut, creating a massive explosion. Launches enemies into the air.
Special Attacks Input Description
Toxic Explosion X Maligna charges up before creating an explosion in front of her. Charge it up to condense the explosion, transforming it into a longer-ranged attack.
Syringe Strike ↔X Maligna lunges forward in an attempt to grab an enemy. If she grabs someone, she injects them, slowing down the enemy's movement speed for a short time.
Toxic Rush ↑X Maligna creates two explosions behind her, blasting her forward to deal powerful damage to anyone in front of her.
Toxic Rise ↓X Maligna creates two explosions under her, launching her into the air, while damaging anyone around her and in her way. If used in the air, it becomes a downward dive.
Grabs Input Description
Grabbing Punch A Maligna, with the enemy in hand, punches the enemy in the face, creating a powerful explosion.
Mutant Throw (Side) ↔B Maligna extends her claws before grabbing and throwing the enemy to the side.
Mutant Throw (Forward) ↑B Maligna extends her claws before grabbing and throwing the enemy forward.
Mutant Throw (Back) ↓B Maligna extends her claws before grabbing and throwing the enemy backwards.
Rage Attacks Input Description
Toxic Blast RA Maligna pulls out four mutagens and crushes them, creating a massive blast in front of her.
Meltdown Mode RB Maligna enters Meltdown Form, greatly increases her damage, speed and defense, at the cost of slowly losing health overtime.
Ultimate Creation RX Maligna goes into Meltdown Form, and grabs the enemy. She pulls out several syringes, injecting them all into the enemy at the same time. The resulting mutagens cause the enemy to violently mutate into a giant blob of flesh. Maligna walks up to the enemy and pokes them, which causes the enemy to explode, killing them. As their blood and organs rain down from the sky, Maligna looks upwards and laughs maniacally. This attack will instantly kill the enemy. Uses 3 Rage Meters.
Finishers Input Description
Explosive End
  • Toxic Punch
  • Toxic Slam
  • Toxic Launch
  • Toxic Rise
Maligna punches the enemy, creating an explosion so powerful it vaporizes the enemy, leaving behind their skeleton and whatever bits of flesh didn't burn up from the blast.
Toxic Burnup
  • Toxic Explosion
  • Toxic Blast

Maligna releases a large amount of mutagens, so much in fact that the enemy begins slowly disentigrating, causing their skin and flesh to melt. This leaves them in a vulnerable.

Mutant Tear
  • Heavy Attack (Meltdown)
  • Toxic Rush (Meltdown)
Maligna grabs the enemy and forcibly opens their mouth. She opens it so much that she splits her enemy's body in half.
Bodily Disintegration
  • Grabbing Punch
Maligna grabs the enemy and pulls out a mutagen canister. She shoves it into the enemy's mouth. As the enemy struggles to breath, they swallow the mutagen. They begin throwing up, initially vomit, then blood, then organs, they finally, their entire skeleton. Their leftover skin and body then melts away.

TransparentsoulKillGames

Soul

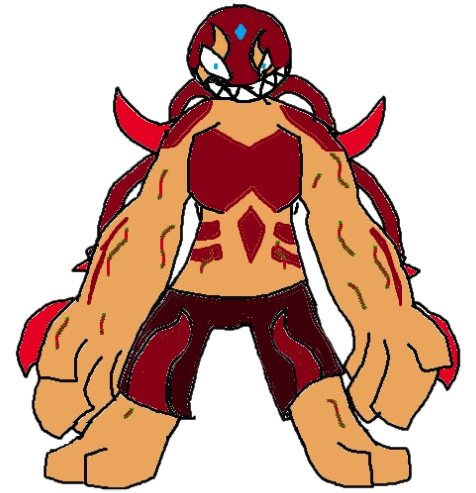
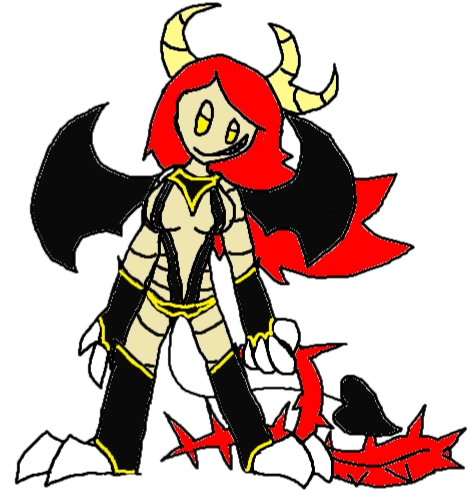
Soul is a powerful demon lord and the avatar of lust. While most of her demon brethen prefer to live in the Demon Realm and torture the souls that wander in, Soul prefers to venture into the Human Realm, driven only by sex and human blood. Stumbling upon the KillGames, she has competed every years and has stayed its ultimate champion. With the 25th KillGames coming in, she hopes to keep her position, and watch as everyone below her is destroyed by her power. Secretly however, she is plotting to take over the world.

Soul, being a succubus, is shown to be seductive, and even a little playful, but is also extremely bloodthirsty and sadistic. She enjoys the sound of her opponent's screams as she viciously mutilates them.

Soul's weapon is the Bloodletter, a whip constructed out of the blood of thousands of men. It can extend and go through objects.

Playstyle
Rushdown: Possessing great speed and damage at the cost of defense, Soul plays a vicious rushdown game. Her wings allow her to fly in the air for a short time, allowing her to stall in the air and create dangerous mix-ups. She likes to keep her enemies close to her, and not letting them go.
Light Attacks Input Description
Left Slash A Soul slashes enemies with her left claw.
Right Slash AA Soul slashes enemies with her right claw.
Whip Spin AAA Soul jumps a short distance into the air and somersaults, whipping enemies in front and above her.
Whip Smash AAAA Soul comes out of the somersault and slams Bloodletter onto the ground. Launches foes backwards on the ground and downwards in the air.
Cross Slash ↔A Soul slashes enemies in a X-shape with her claws.
Claw Slam ↑A Soul lunges forward while performing a downward slash with her claws.
Talon Rip ↓A Soul flies forward while performing a kick, and slashing enemies with her talons.
Heavy Attacks Input Description
Blood Slash B Soul lashes Bloodletter forward, as it glows bright red.
Blood Lash ↔B Soul swings Bloodletter in a horizontal manner, as it glows bright red.
Bloody Slam ↑B Soul slams Bloodletter downward, as it grows bright red. This is an anti-air, and leaves targets vulnerable.
Bloody Upper ↓B Bloodletter flies a distance forward before flying upward and spinning and damaging enemies. Launches enemies into the air.
Special Attacks Input Description
Rosebush X Soul's lashes forward as a piece of Bloodletter flies forward, and plants itself into the ground. Anyone who touches it will be stunned for a short time. Charge it to increase the number of Rosebushes, from 1 and up to 3. 
Thorn Grab ↔X Soul launches Bloodletter a distance foward. If she hits an enemy, Bloodletter ties up the enemy's legs and hangs them in the air, leaving them vulnerable.
Lilith Talon ↑X Soul jumps back before performing a flying kick, damaging enemies in her way. If used in the air, she performs a dive kick.
Blood Claw ↓X Bloodletter binds to Soul's hand, forming a gauntlet. Soul jumps into the air, slashing enemies in her way, before flying downward and slamming the gauntlet downward, creating a shockwave.
Grabs Input Description
Vicious Claw A Soul, with the enemy in hand, stabs the enemy's face.
Whip Throw (Side) ↔B Bloodletter wraps around the enemy before Soul slams them onto the ground and throws them to the side.
Whip Throw (Forward) ↑B Bloodletter wraps around the enemy before Soul slams them onto the ground and throws them forward.
Whip Throw (Back) ↓B Bloodletter wraps around the enemy before Soul slams them onto the ground and throws them backwards.
Rage Attacks Input Description
Thousand Lashes RA Bloodletter extends to massive lengths and Soul flails it wildly, damaging enemies in a large area in front of her.
Bloodbringer RB Soul snarls as she flies forward. If she comes in contact with the enemy, she pins the enemy to the ground and volently slashes them, absorbing the blood to heal herself. Satisfied, Bloodletter forms a gauntlet around Soul's arms before she performs a powerful slashing attack.
Eternal Punishment RX Bloodletter flies forward, grabbing any enemy in its way. A portal appears under the enemy and Bloodletter drops them into the portal, teleporting them to the Demon Realm. In the shadows, Soul violently eviscerates them, leaving massive gashes and cuts in their body, as they blood out and scream in agony. Soul flies down to the enemy, looking down on the enemy, before grabbing the enemy. She looks at them, before biting down on their head. This attack will instantly kill the enemy. Uses 3 Rage Meters.
Finishers Input Description
Skintaker
  • Blood Slash
  • Blood Lash
  • Bloody Slam
Bloodletter digs into the enemy's skin, and Soul uses the opportunity to rip off the enemy's skin, leaving them in a helpless state.
Pounce Claw
  • Lilith Talon

Soul kicks the enemy so hard that her leg goes right through her enemy's head. Her talons grab onto the enemy's brain and she crushes it.

Claw Crush
  • Blood Claw
  • Bloodbringer
Soul, using her Blood Gauntlet to grab the enemy's head, slowly squeezes it before popping it like a grape, causing blood to fly everywhere and the enemy's eyes to pop out.
Maneater
  • Vicious Claw
Soul pounces on top of the them. She smiles before she begins violently ripping into their body and eating their flesh. Heals herself if performed.

TransparentadamKillGames

Adam

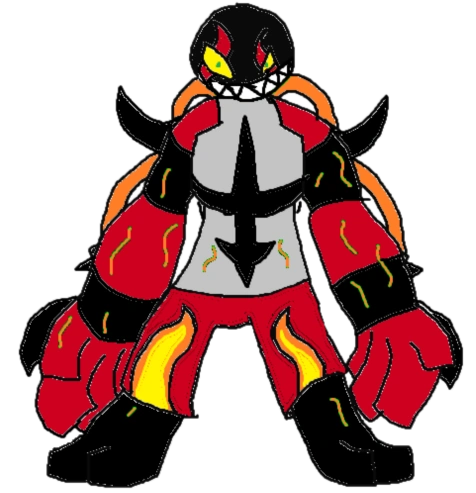
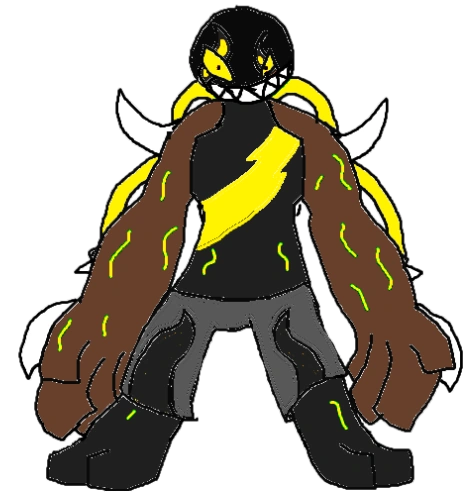
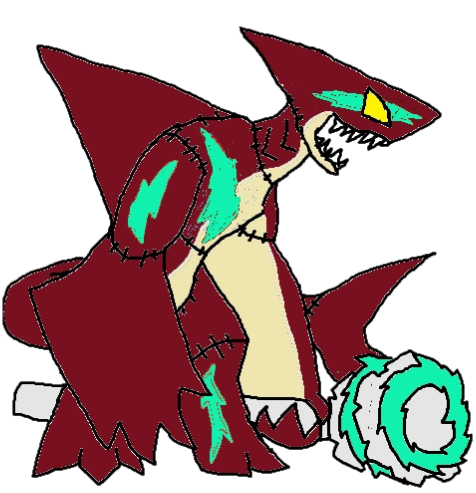
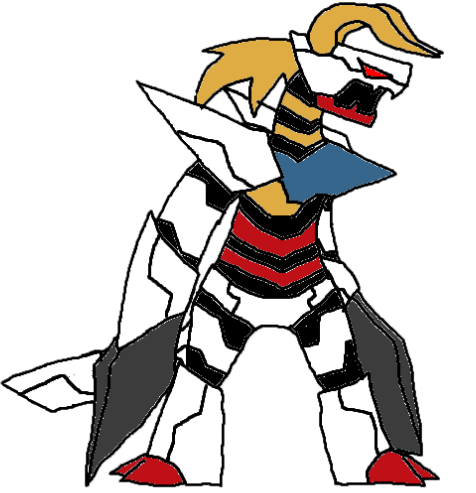
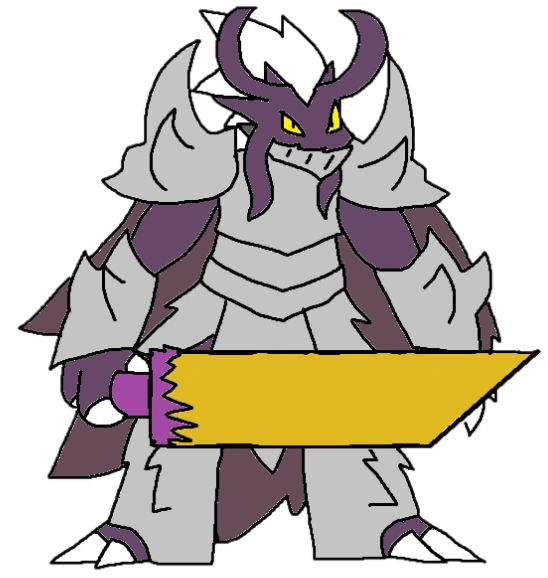
Adam is the current owner of the KillGames and initially serves as the game's final boss. He was a former war general, who went insane after he killed hundreds of soldiers in a powerful electric blast. He found himself in Neo York City and set up the KillGames, in order to find people who were willing to kill just like he did many years ago. 

Adam is normally gruff and takes pleasure in a good fight. Because of his troubled past, he sees himself as an outcast from society, which is why he tries to find people who can cause as much death as could.

Adam's weapon is the Mjolnir Ultima, a device in his mechanized body that allows him to summon and manipulate electricity to supercharge his attacks.

Playstyle
Bruiser: Adam, being a boss character, is considerably tough. His powerful attacks and great health make him deadly at close range. His Armored Rush allows him to close distances between foes and punish zoners. However, his attacks often have large amounts of end lag, which players will need to be weary of if they don't want to be combo'ed.
Light Attacks Input Description
Left Punch A Adam performs a left punch.
Right Punch AA Adam performs a right punch,
Uppercut AAA Adam performs an uppercut.
Straight Punch AAAA Adam steps back before performing a powerful punch. Launches foes backwards on the ground and downwards in the air.
Wild Swipe ↔A Adam performs a quick swipe.
Strike Kick ↑A Adam performs a straight kick.
Shock Slam ↓A Adam punches straight downward, creating a small shockwave.
Heavy Attacks Input Description
Thunder Punch B Adam charges up before letting out an electric straight punch forward.
Thunder Strike ↔B Adam charges up before performing a powerful electric hook.
Thunder Slam ↑B Adam charges up before swinging both of his hands downward. This is an anti-air, and leaves targets vulnerable.
Thunder Upper ↓B Adam charges up before performing a powerful uppercut. Launches enemies into the air.
Special Attacks Input Description
Spark Buster X Adam punches the ground, releasing an electric shockwave that travels along the ground, stunning enemies in its way. Hold the button to decrease its range, but increase its power.
Hammer Ender ↔X Adam charges up before unleashing a powerful electric punch. Causes knockback and has super armor, but has a lot of end lag.
Armored Tackle ↑X Adam charges forward, crashing into anyone in his way and reflecting oncoming projectiles.
Rising Thunder ↓X Adam performs a powerful rising electric uppercut.
Grabs Input Description
Grabbing Punch A Adam, with the enemy in hand, punches the enemy in the face.
Thunder Rocket (Side) ↔B Adam, with the enemy in hand, charges electricity into them before launching them to the side.
Thunder Rocket (Forward) ↑B Adam, with the enemy in hand, charges electricity into them before launching them forward.
Thunder Rocket (Back) ↓B Adam, with the enemy in hand, charges electricity into them before launching them to the backward.
Rage Attacks Input Description
Shock Bomber RA Adam summons bolts of thunder from the sky that travels in a straight line in front of him, hitting anyone in their way.
Volt Strike RB Adam creates a big ball of electric energy before he rushes forward and absorbs the ball of energy and performing an incredbily powerful punch.
Voltage Apocalypse RX Adam generates large amounts of electricity before launching it at the foe. Upon the enemy getting hit, their screams trigger Adam's memories of his past, causing his briefly go insane. He rises into the air, and as the enemy looks up to see Adam summons a massive ball of electricity. He smiles as he throws it at the enemy, creating a powerful explosion that melts away every last trace of the enemy. Adam then falls to the ground and goes back to normal. This attack will instantly kill the enemy. Uses 3 Rage Meters.
Finishers Input Description
Straight Shot
  • Thunder Punch
  • Thunder Upper
  • Rising Thunder
Adam punches a hole straight through his enemy. His enemy is stuck there for a bit, but Adam shakes his enemy off as they die.
Vaporize
  • Hammer Ender
  • Volt Strike

Adam punches the enemy so hard they fly into pieces.

Shocker
  • Shock Buster
  • Shock Bomber
Adam electrocutes so much electricity that they burn up before exploding. Leaves the enemy in a helpless state.
Robotic Rip
  • Grabbing Punch
Adam plunges both of his hands into the enemy and, as they trip to escape, he rips the enemy clean in half.

Downloadable Characters[]

TransparentfinalviceKillGames

Vice

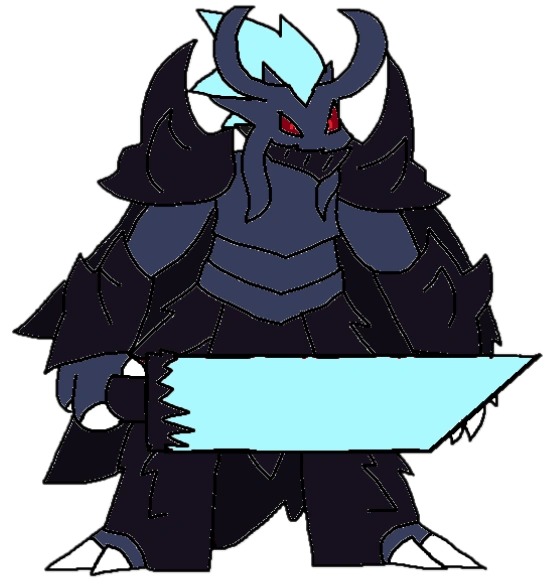
Vice is a powerful demonic knight who serves the Avatars of Hell. Not alot is really known about his past, though he was originally human. After getting into a car crash and dying, he made a deal with the Avatars to serve him in exchange for the chance of being able to see his family again. For years, he served them. When the 25th KillGames came, the Avatars decided that if he won, he could leave hell. Eagerly wishing to see his family again, he joined.

Vice is incapable of speaking, but is shown to be quite serious and dead set on accomplishing his goals.

Vice wields the Fate Edge, a massive blade constructed out of demonic energy.

Playstyle
Bruiser: On his own, Vice is powerful, but very slow. However, his most powerful ability is his ability to sumon demon crystals. He can use these to increase his speed and damage. His moveset centers around these crystals, allowing him to cause massive damage when he uses them correctly.
Light Attacks Input Description
Left Slash A Vice slashes enemies with his left claw.
Right Slash AA Vice slashes enemies with his right claw.
Horn Stab AAA Vice steps forward, attacking enemies with his horns.
Head Charge AAAA Vice charges forward, ramming into any enemy in his way. Launches foes backwards on the ground and downwards in the air.
Wild Swipe ↔A Vice swipes forward, attacking enemies with his wrist guards.
Quick Stab ↑A Vice stabs enemies with the Fate Edge.
Stomp ↓A Vice stomps on the ground in front of him, creating a small shockwave.
Heavy Attacks Input Description
Fate Stab B Vice charges up before stabbing forward.
Fate Slash ↔B Vice charges up before slashing in front of him.
Fate Slam ↑B Vice charges up before slamming the Fate Edge into the ground. This is an anti-air, and leaves targets vulnerable.
Fate Upper ↓B Vice charges up before performing an uppercut. Launches enemies into the air.
Special Attacks Input Description
Demon Crystal X Vice raises a crystal out of the ground. This crystal emits a field around it, boosting the power of Vice's attacks, along with his speed. He can have two demon crystals up at a time, but they can be destroyed by enemy attacks.
Demon Blade ↔X Vice launches a blade of energy forward. If used while near a crystal, it gains a cross-shape, becomes faster, and deals more damage.
Breakneck Blade ↑X Vice charges forward, slashing any enemy in his way. If he goes through a demon crystal's field while performing his attack, he deals more damage and covers more distance.
Crystal Launch ↓X Vice points forward, and any nearby crystal will rise out of the ground and launch itself at the enemy. These cause heavy damage if they land.
Grabs Input Description
Bite A Vice, with the enemy in hand, bite the enemy's face.
Crystal Crash (Side) ↔B Vice throws the enemy into the air, before a giant crystal thrusts out of the ground to launch the enemy to the side.
Crystal Crash(Forward) ↑B Vice throws the enemy into the air, before a giant crystal thrusts out of the ground to launch the enemy forward.
Crystal Crash (Back) ↓B Vice throws the enemy into the air, before a giant crystal thrusts out of the ground to launch the enemy backwards.
Rage Attacks Input Description
Hell-Breaking Edge RA Vice charges up before slamming the ground, creating a massive wave of Hell energy that travels along the ground. Increases in size and damage if he is around a Hell crystal.
Hell Totem RB Vice summons a massive crystal that greatly boosts Vice's speed and power. This crystal only lasts for a limited time. If Vice chooses to launch the crystal, it fires a beam of energy at the enemy that stuns them for a time.
Crystallic Prison RX Vice charges forward, slashing into any enemy in his way. Suddenly large crystals begin jutting out of the ground, Vice command them to attack the enemy. They repeatedly stab the foe, and eventually, large ones suddenly appear and crush the enemy's body (causing them to spit blood and part of their intestines). Vice jumps on top of the crystals, looking at the enemy's exposed head. He then raises the Fate Edge into the air, as crystals form around it, and form a crystallize lance. He then jumps into the air, as he plunges it into the enemy's head, killing them.  This attack will instantly kill the enemy. Uses 3 Rage Meters.
Finishers Input Description
Bisector
  • Fate Slash
  • Breakneck Blade
Vice chops the enemy in half. Demon energy seeps into their body as their upper torso burns up.
Half-Cutter
  • Fate Slam
  • Fate Upper
Vice chops the enemy vertically in half.
Hell Burn
  • Demon Blade
  • Hell-Breaking Blade
  • Crystal Launch (Totem)

The enemy begins burning up due to exposure to hell energy. As they burn away, they are left in a helpless state.

Crystal Stab
  • Crystal Launch (Crystal)
The enemy gets stabbed by a bunch of crystals. They are imbedded into the enemy's body, leaving them in a vulnerable state.
Crystal Eye
  • Bite
Vice grabs the enemy by the head, summoning a crystal in front of him. He puts the enemy's head on the spike, causing their eye to get impaled. As the enemy screams in pain, he stomps on their body, effectively pulling the head and spine off.

Transparentizuna(new)KillGames

Izuna

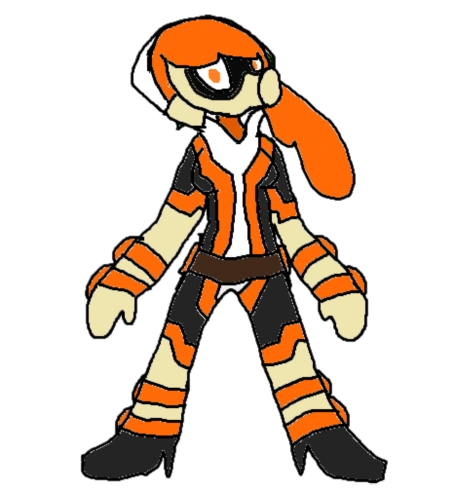
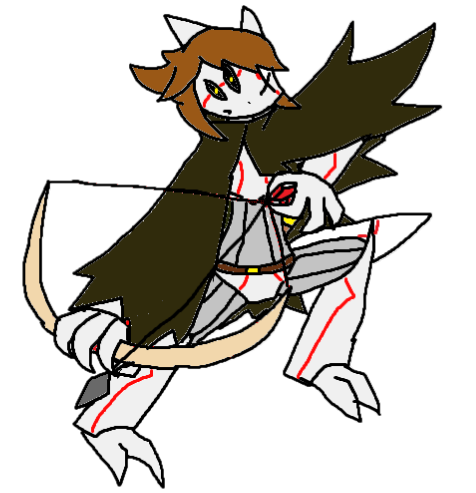
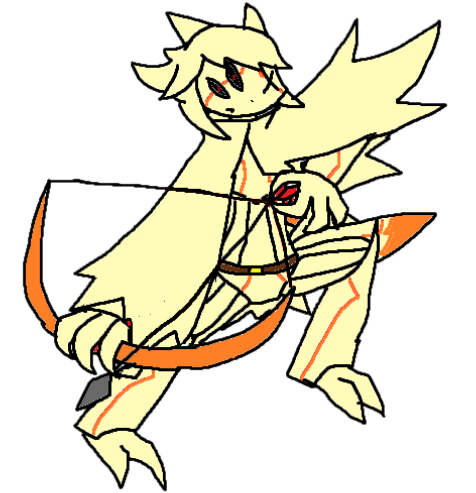
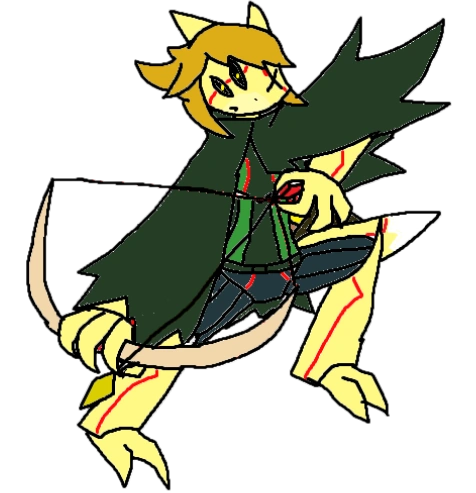
Izuna is a rogue member of the Wastelanders. Once one of its most skilled hunters, she hated the idea of introducing cyborg technology to the Wastelands as she believed it would make killing too easy. So her leader, Shine, tortured her and converted her into a robot. After escaping, she seeks to kill her former leader, and bring the Wastelands back to its former glory.

Izuna is cold and brooding. She is ashamed of her robot body and she rarely takes advantage of its abilities. She enjoys killing people, though believes that weapons like guns and plasma weapons are, "only used by weaklings", and hates them because it makes it easier to kill people.

Izuna wields the Amaterasu, a pretty simple bow and arrow. She's armed with a variety of arrows with differing effects when fired.

Playstyle
Zoner: An elusive fighter with many tricks up her sleeves, Izuna is all about keeping space and barraging enemies with your various trick arrows, each with some unique effects. Keep your opponents guessing.
Light Attacks Input Description
Left Slash A Izuna slashes with her left claw.
Right Slash AA Izuna slashes with her right claw.
Arrow Stab AAA Izuna slash enemies with an explosive arrow.
Explosive Stab AAAA Izuna quickly stabs athe arrow into an enemy, creating an explosion. Launches foes backwards on the ground and downwards in the air.
Arrow Slash ↔A Izuna slashes enemeis with a bladed arrow.
Sweep Kick ↑A Izuna performs a sweeping kick.
Tail Blade ↓A Izuna turns around, slashing enemies with her tail.
Heavy Attacks Input Description
Explosive Arrow B Izuna charges up before firing a powerful explosive arrow. The arrow doesn't go very far.
Napalm Arrow ↔B Izuna fires an arrow downward that erupts into a wave of fire around her.
Weighted Arrow ↑B Izuna fires an arrow into the air attached to a spike weight, dropping to the ground and damaging enemies in its way. This is an anti-air, and leaves targets vulnerable.
Tornado Arrow ↓B Izuna performs an uppercut with a wind arrow, creating a tornado. Launches enemies into the air.
Special Attacks Input Description
Cycle Shot X

Izuna, charges up, cycling through arrows with various effects, before firing one depending on when you release the button.

  • Fire Arrow: Izuna fires a flaming arrow that causes continous damage to anyone hit.
  • Ice Arrow: Izuna fires an ice arrow that freezes enemies.
  • Stun Arrow: Izuna fires an electric arrow that creates a stunning area around its impact point.
  • Toxic Arrow: Izuna fires a poison-tipped arrow, slowing down its targets for a short time.
  • Bomb Arrow: Izuna fires an arrow that explodes on impact.
Scatter Shot ↔X

Izuna fires an arrow that shotguns into five directions. Hold the button to reduce the spread, eventually transforming the arrow into one, super-fast arrow.

Arrow Cloak ↑X Izuna quickly enters a counter state. If she is hit, her cloak opens, as she launches six wind-controlled arrows at the enemy.
Illusion Strike ↓X Izuna quickly disappears before reappearing in the air, a distance from her starting point. Hold a direction to determine where she will appear.
Grabs Input Description
Grabbing Slash A Izuna, with the enemy in hand, claws at the enemy's face.
Explosive Sendoff (Side) ↔B Izuna stabs the enemy with an explosive arrow, kicking them as they explode, launching them to the side.
Explosive Sendoff (Forward) ↑B Izuna stabs the enemy with an explosive arrow, kicking them as they explode, launching them forward.
Explosive Sendoff (Back) ↓B Izuna stabs the enemy with an explosive arrow, kicking them as they explode, launching them backwards.
Rage Attacks Input Description
Arrow Flurry RA Izuna fires a rapid volley of arrows at her foes.
Arrow Rain RB Izuna fires several arrows into the air, which rain down on enemies in an area around them.
Final Shot RX Izuna fires an explosive arrow at the enemy to start the attack. She fires at the enemy with fire, stun and bomb arrows, greatly injuring them and covering them in arrows. Izuna then stares at the enemy, before pulling out one normal arrow. She fires it forward. We then see the enemy, as the arrow flies straight into enemy's head, killing them. This attack will instantly kill the enemy. Uses 3 Rage Meters.
Finishers Input Description
Burn Up
  • Cycle Shot (Fire Arrow/Bomb Arrow)
  • Explosive Arrow
  • Napalm Arrow
Izuna lights the enemy on fire, causing them to slowly burn to death. Leaves the enemy in a helpless state.
Frozen Destruction
  • Heavy Attack (frozen)

Izuna destroys the enemy while they are frozen, causing their frozen pieces to fly everywhere.

Shocker
  • Cycle Shot (Stun Arrow)
Izuna electrocutes so much electricity into the enemy that they burn up before exploding. Leaves the enemy in a helpless state.

Headshot

  • Scatter-Shot
  • Arrow Cloak
  • Arrow Flurry
  • Arrow Rain
Izuna fires a shot directly into the enemy's head, putting them in a helpless state.
Vision
  • Grabbing Slash
Izuna pulls out two arrows and stabs them into the enemy's eyes. The enemy falls to the ground, to which Izuna walks over to the blinded enemy, and stomps on their head.

TransparentmrslagKillGames

Mr. Slag

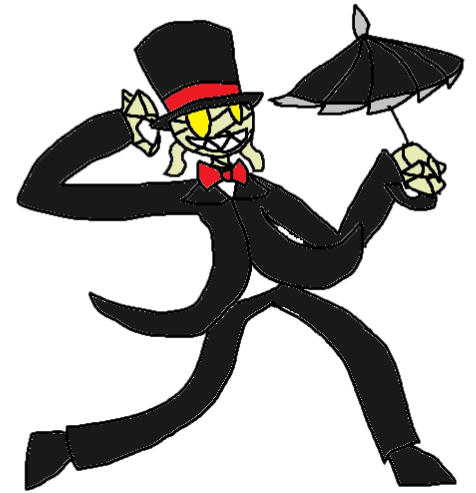
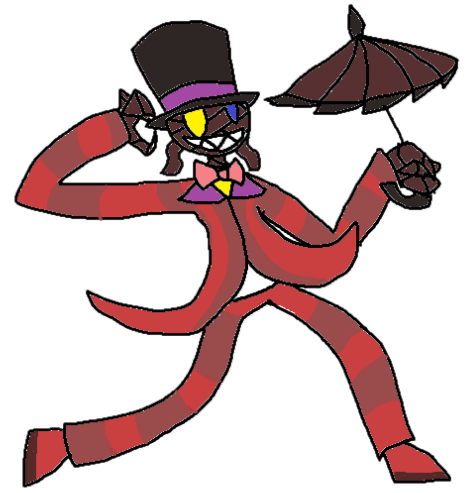
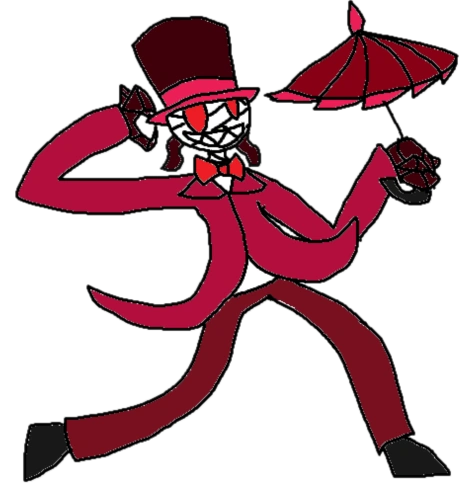
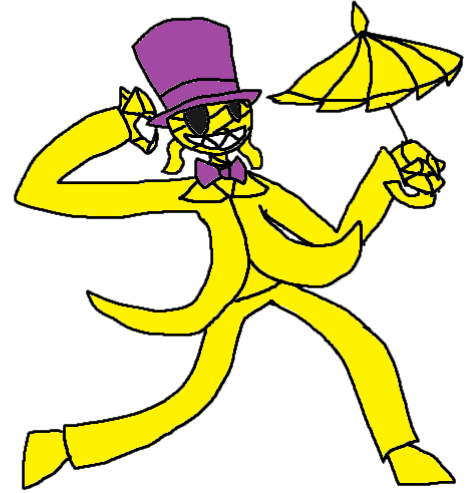
Very little information is known about the mysterious Mr. Slag. From what we know, he is a so-called "dimension-travelling trophy hunter". He enjoys traveling across different worlds and assassinating important figures for sport. Now ending up in the Human world, he seeks to find powerful targets he can kill.

Even at a first glance, Mr. Slag is an unusual person. He acts like a stereotypical British gentleman, speaking in a British accent and being friendly and quite chivalrous. He often acts in the most bizarre ways possible, but uses this as a way to catch his enemies off guard, and is actually a cold-blooded killer.

Mr. Slag's weapon is the Rainmaker, an umbrella lined with blades along the tips, and a single one at the top. He uses it similar to a rapier.

Playstyle
Tricky: One of the most unpredictable characters in the game, Mr. Slag keeps his enemies guessing with his wacky attack patterns and randomness in his moves, mostly as a result of his ?. However, his upredictably may backfire on him.
Light Attacks Input Description
Quick Stab A Mr. Slag thrusts Rainmaker forward.
Thrust Stab AA Mr. Slag enters a fencing stance and thrusts Rainmaker forward.
Stab Flurry AAA Mr. Slag rapidly thrusts Rainmaker forward.
Final Thrust AAAA Mr. Slag winds up before performing a powerful stabbing attack. Launches foes backwards on the ground and downwards in the air.
Brella Knuckle ↔A Mr. Slag swipes forward, slashing enemies with Rainmaker.
Batting Time ↑A Mr. Slag swings Rainmaker like a bat. Launches items forward.
Spinning Kick ↓A Mr. Slag twirls Rainmaker under him while rapidly kicking anyone in front of him.
Heavy Attacks Input Description
Power Thrust B Mr. Slag charges up before perform a powerful stabbing attack.
Umbrella Cutter ↔B Mr. Slag spins around, slashing enemies with the Rainmaker's blades.
Umbrella Hammer ↑B Mr. Slag slams Rainmaker downward like a hammer. This is an anti-air, and leaves targets vulnerable.
Rainshield ↓B Mr. Slag does a short jumps at an angle, stabbing enemies in his way with Rainmaker. Launches enemies into the air.
Special Attacks Input Description
Portal Peril X

Mr. Slag summons a portal, launching a random item. Hold the button to charge it, having Mr. Slag rummage through the portal, increasing the chance of a rarer item. These items despawn after some time.

  • Level 1
    • Shoe: A basic projectile that flies in an arc.
    • Cake: Heals the player who eats it.
    • Bowling Ball: A powerful projectile that struggles due to its heavyness.
    • Rock: A very weak projectile, but can cover a wide distance.
    • Flying Slag Jr.: A small chibi version of Mr. Slag. Will float in the air with its Rainmaker, damaging enemies that touch him. Upon reaching the ground, he goes away.
    • Tea: Add a chunk of energy to the Rage Meter.
  • Level 2
    • Hammer: A more powerful version of the shoe.
    • Bomb: A bomb that explodes after a delay. It's heavy, similar to the Bowling Ball. It can damage Mr. Slag if he is too close to the explosion.
    • Vial: Poisons the player who drinks it. 
    • Penguin: A penguin that slides forward, freezing anything in its way.
    • Gunning Slag Jr.: A Slag Jr. wielding a pop gun. It will fire a few shots before going away.
    • TV: A TV that jumps into the air before coming doing to damage anything under it.
  • Level 3
    • Missile: A missile that flies forward, creating a powerful explosion. A Slag Jr. is seen riding atop it, waving their top hat.
    • Oil Can: Creates puddle of oil. If it comes into contact with fire, it creates an extremely powerful explosion.
    • Road Roller: A goddamn steam roller. A Slag Jr. is seen atop the steam roller, doing poses. He rapidly punches the steam roller before creating an explosion.
    • Black Hole: Pulls in any player or projectile that comes in near it.
    • Slime: A Slime fom Kingdombound. Sticks to an enemy's face and reduces their stats.
    • Sparkle Juice: Turns all of the enemy's blood pink and sparkly for the rest of the match. The rarest item, but has no effect gameplay-wise.
Long Strike ↔X Mr. Slag charges up before thrusting Rainmaker forward, which elongates to damage distant enemies. Charging it fully allows it to deal extra damage to shielding enemies.
Portal Step ↑X Mr. Slag drops down into a portal, before suddenly reappearing near the enemy to attack. Hold a direction to determine the direction you will appear, from the left, from the right, above them, or below them.
Spinning Splitter ↓X Mr. Slag begins spinning rapidly, twirling Rainmaker above him. Mr. Slag has some control while performing this attack, and can even go into the air while doing this move (though this limits the amount of time it lasts)
Grabs Input Description
Grab Stab A Mr. Slag, with the enemy in hand, stabs them in the face.
Portal Throw (Side) ↔B Mr. Slag tosses the enemy into a portal, which spits them out to the side.
Portal Throw (Forward) ↑B Mr. Slag tosses the enemy into a portal, which spits them out in front of him.
Portal Throw (Back) ↓B Mr. Slag tosses the enemy into a portal, which spits them out behind him.
Rage Attacks Input Description
Spamming Strike RA Mr. Slag points forward, as a portal spits out six random items at a high velocity. 
The Portal Game RB Mr. Slag grabs the enemy, forcing them into a game. Two portals appear, and the player has to choose which portal they go in, with Mr. Slag going through the other portal. One portal heals the player, while the other is filled with sawblades.
Spaghettification RX Mr. Slag hold Rainmaker like a golf club, swinging it in front of him and launching anyone backwards. He summons a portal behind them, sending enemies into a bottomless pit. As the enemies fall, they are suddenly caught between another portal. As the enemy goes half-way through the portal, another portal converges with the first one, creating a makeshift black hole. The enemy is unable to handle the portal's gravitational forces, which ends up, quite painfully, getting shredded to pieces. We cut back to Mr. Slag, who opens Rainmaker and summons a portal above him, the enemy's blood showering down on him like rain. This attack will instantly kill the enemy. Uses 3 Rage Meters.
Finishers Input Description
Brain Buster
  • Power Thrust
  • Long Strike
Mr. Slag stabs the enemy in the eye. He slowly pulls Rainmaker out, alongside their brain in the process, pulling out their eye socket.
Shredder
  • Umbrella Cutter
  • Spinning Splitter
Mr. Slag uses Rainmaker to slash the enemy into thin pieces.
Big Blast
  • Portal Peril (Missile)
Mr. Slag summons a missile, and the explosion from the missile causes the enemy to fly into pieces.
Oil Panic
  • Portal Peril (Oil Can)
Mr. Slag summons a can of oil, and the ignition from the oil causes the enemy to light on fire, leaving them in a vulnerable state.
WRYYY!
  • Portal Peril (Road Roller)
Mr. Slag summons a Road Roller, and crushes any enemy in its way into paste.
Bad Choice!
  • The Portal Game (lose)
Mr. Slag's opponent chooses the wrong portal. Ripped apart and mangled by the buzzsaws, they stand for a few seconds, sawing something about their wrong choice, before falling over and dying. This can also happen to Mr. Slag if he chooses the wrong choice.
Portal Drop
  • Pummel
Mr. Slag drops the enemy into a portal. Mr. Slag waits some time as the enemy falls through an abyss, before summoning another portal. The enemy comes out of it, and immediately explodes upon impace.

Transparenttrip&wireKillGames

Trip & Wire

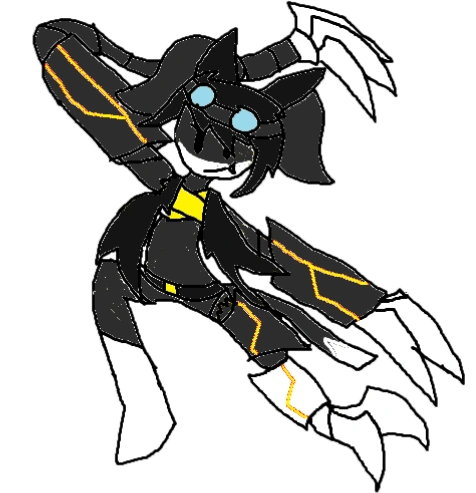
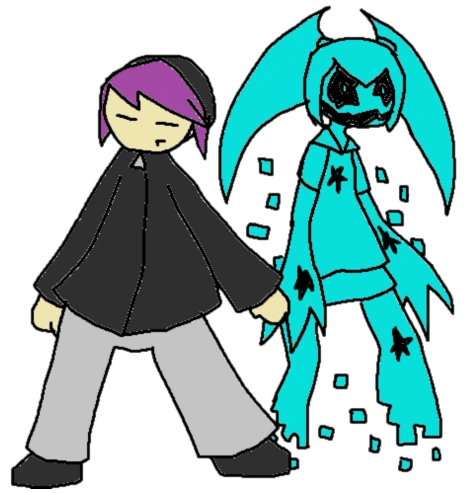
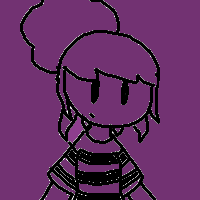
Before entering the KillGames, Trip was just your run-of-the-mill shut-in living in Neo York City. The only interactions he's had is with Wire, his virtual girlfriend. In reality however, Wire is actually an amalgamation of the vengeful souls of past KillGames contestants. Becoming so filled will malice and hate, Wire manages to break out of the virtual world, and uses Trip as a host to seek revenge against the tournament that killed them.

Trip is shown to be a loner who hates interaction with anyone that isn't Wire. He seems to thing that he and Wire are inseperable, and is willing to do anything for her. Wire on the other hand is a sadistic and manipulative psychopath bent on nothing but vengeance. Despite being Trip's girlfriend, she secretly sees him as a tool to get what she wants.

Wire is primarily the fighter in this duo, controlling Trip's body and leaving him unconscious. Wire can manipulate her body into various weapons, and can absorb data from her enemies to gain attacks similar to theirs.
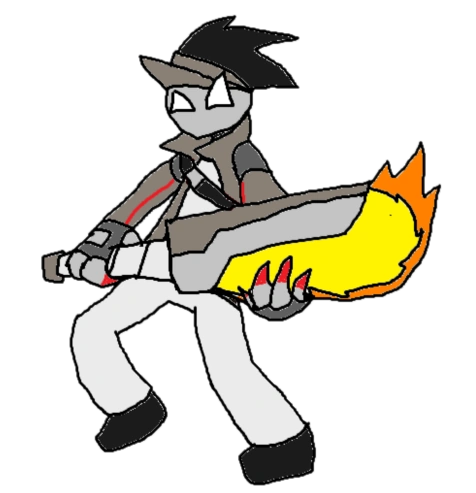
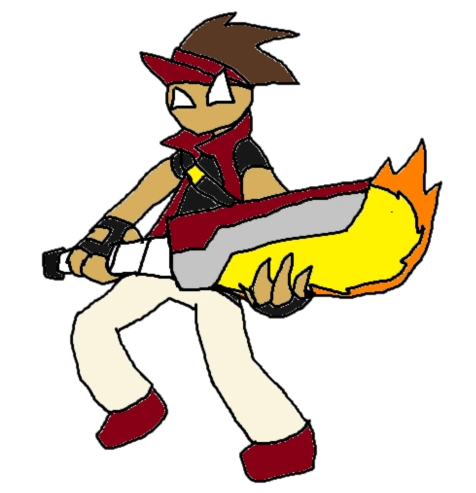
Playstyle
Tricky: While Trip & Wire are well-balanced at first, Wire's ability to absorb her enemies' data allows her to change up their moveset. This makes them a tricky fighter to deal with, as they can swap between two or more playstyles, depending on the number of players.
Light Attacks Input Description
Left Slash A Wire slashes enemies with her left claw.
Right Slash AA Wire slashes enemies with her right claw.
Headbutt AAA Wire headbutts enemies with Trip's body.
Battering Ram AAAA Wire quickly thrusts Trip's body forward before returning it to her. Launches foes backwards on the ground and downwards in the air.
Body Flail ↔A Wire flails Trip's body, swining it in front of her.
Axe Kick ↑A Wire dashes forward and delivers a swift axe kick.
Body Flop ↓A Wire kicks Trip's body, slamming it into the ground, before picking him back up.
Heavy Attacks Input Description
Bladed Reap B Wire creates two scythe hands and slashes them in front of her.
Scissors Edge ↔B Wire creates two scythe hands and brings them together like scissors.
Rolling Slam ↑B Wire creates two scythe hands, jumping into the air before slamming her scythes down. This is an anti-air, and leaves targets vulnerable.
Slicing Upper ↓B Wire creates two scythe hands, slashing her scythes upward. Launches enemies into the air.
Special Attacks Input Description
Collect Data X

Wire opens her mouth as a beam of light and scanner come out. If anyone is touching this light, Wire will absorb her enemy's powers, changing her appearence and stats to resemble them, alongside replacing her Heavy Attacks and Neutral Special with theirs.

Protective Pounce ↔X Wire lunges forward, grabbing onto any enemy in her way. While performing the pounce, she gains super armor, but disappears for a few seconds if she misses. If the attack lands, she grabs the foe, dragging them into the air, and slashing their face before slamming them into the ground.
Stalk Dash ↑X Wire seperates from Trip, and attacks the enemy with a spinning scythe attack. Hold the button to determine how far Wire will go when performing the attack.
Scythe Drop ↓X Wire jumps into the air before slamming back to the ground, creating a shockwave. The angle of your descent can be determined slightly by holding a direction.
Grabs Input Description
Grabbing Slash A Trip, with the enemy in hand, grants Wire the opportunity to slash the enemy at the head.
Double Strike (Side) ↔B Trip throws the enemy into the air, and Wire appears next to the airborne foe and launches the enemy to the side.
Double Strike (Forward) ↑B Trip throws the enemy into the air, and Wire appears next to the airborne foe and launches the enemy forward.
Double Strike (Back) ↓B Trip throws the enemy into the air, and Wire appears next to the airborne foe and launches the enemy backwards.
Rage Attacks Input Description
Embracing Edge RA Wire flies forward, spinning around and slashing nearby enemies with her scythe hands.
Extract Powers RB Wire uses extracts her collected data, allowing her to use her absorbed enemy's Light Super.
My World RX Wire quickly rushes forward, grabbing an enemy. If the attack lands, the enemy falls into a portal that suddenly appears them. Transported into a dark world of code, we go to a first-person perspective of the foe, looking around. After some time, Wire suddenly pops out and screams at the foe, and grabs them. The screen suddenly becomes static and distorted screaming can be heard. This attack will instantly kill the enemy. Uses 3 Rage Meters.
Finishers Input Description
Copycat
  • ?
If Wire has absorbed some data, any finishers the enemy normally has with their Neutral Special or Heavy Attacks can be performed by Trip & Wire.
Bisection
  • Scissors Edge
  • Stalk Slash
  • Embracing Edge
Wire slashes the enemy in half. Code cubes can be seen around them as their upper half floats in the air for a short time, putting the enemy in a helpless state.
Vertical Cutter
  • Bladed Reap
  • Rolling Slam
  • Slicing Upper
  • Scythe Drop
Wire slashes the enemy in half, code cubes floating around the enemy as they are split in half.
Eviscerate
  • Protective Pounce
Wire, with the enemy in hand, slashes the enemy in the face. She grabs the enemy's head and begins slowly tearing out the enemy's head flesh, skull, and eventually their brain. Their body eventually falls off.
Tug o' War
  • Grabbing Slash
Trip grabs the enemy's leg and Wire grabs the other. Wire then forcefully pulls the enemy apart, with them screaming in pain as they are split vertically in half.

Costumes[]

Each character has 4 alternate costumes, that are selectable before the start of a match.

TransparentredgeKillGames Transparentredge(alt2)KillGames Transparentredge(alt3)KillGames Transparentredge(alt4)KillGames
Burning Freezing Silver Solar
TransparentstormKillGames Transparentstorm(alt2)KillGames Transparentstorm(alt3)KillGames Transparentstorm(alt4)KillGames
Electric Superheated Bounty Hunter Heroic
TransparentbreakKillGames Transparentbreak(alt2)KillGames Transparentbreak(alt3)KillGames Transparentbreak(alt4)KillGames
Blunt Monochrome Vengeful Mysterious
TransparentyukiKillGames Transparentyuki(alt2)KillGames Transparentyuki(alt3)KillGames Transparentyuki(alt4)KillGames
Cute Chill Tomboyish Alluring
TransparentnewtonKillGames Transparentnewton(alt2)KillGames Transparentnewton(alt3)KillGames Transparentnewton(alt4)KillGames
Technical Pissed Mechanical Sansational
TransparentlaneKillGames Transparentlane(alt2)KillGames Transparentlane(alt3)KillGames Transparentlane(alt4)KillGames
Doom Thrash Industrial Grunge
TransparentdiabloKillgames Transparentdiablo(alt2)Killgames Transparentdiablo(alt3)Killgames Transparentdiablo(alt4)Killgames
Demonio Infierno Tornado Punezato
TransparentmiseryKillGames Transparentmisery(alt2)Killgames Transparentmisery(alt3)Killgames Transparentmisery(alt4)Killgames
Silent Royal Sexy Mechanical
TransparentcoltKillGames Transparentcolt(alt2)KillGames Transparentcolt(alt3)KillGames Transparentcolt(alt4)KillGames
Keen-Eye Emperor Yeah, See? Devilish
TransparentshineKillGames Transparentshine(alt2)KillGames Transparentshine(alt3)KillGames Transparentshine(alt4)KillGames
Cutthroat ​​​​​​Poppy TigerStar Lookin' Cool
TransparentsharkmanKillGames Transparentsharkman(alt2)KillGames Transparentsharkman(alt3)KillGames Transparentsharkman(alt4)KillGames
Man-Eater Pelagic Freshwater Draconic
TransparentzmeiKillGames Transparentzmei(alt2)KillGames Transparentzmei(alt3)KillGames Transparentzmei(alt4)KillGames
New Age ​​​​​​Angelic Nightmaric Futuristic
TransparentreapazoidKillGames Transparentreapazoid(alt2)KillGames Transparentreapazoid(alt3)KillGames Transparentreapazoid(alt4)KillGames
Death Famine War Pestilence
TransparentmalignaKillGames Transparentmaligna(alt2)KillGames Transparentmaligna(alt3)KillGames Transparentmaligna(alt4)KillGames
Corrosive Poisonous Inky Maniacal
TransparentsoulKillGames Transparentsoul(alt2)KillGames Transparentsoul(alt3)KillGames Transparentsoul(alt4)KillGames
Bloodthirsty Menacing Scanty Psychotic
TransparentadamKillGames Transparentadam(alt2)KillGames Transparentadam(alt3)KillGames Transparentadam(alt4)KillGames
Electrifying Jolly Calamitous Wealthy
TransparentfinalviceKillGames Transparentfinalvice(alt2)KillGames Transparentfinalvice(alt3)KillGames Transparentfinalvice(alt4)KillGames
Wrath Envy Pride Greed
Transparentizuna(new)KillGames Transparentizuna(alt2)KillGames Transparentizuna(alt3)KillGames Transparentizuna(alt4)KillGames
Traditional Mystic Relaxed Spectral
TransparentmrslagKillGames Transparentmrslag(alt2)KillGames Transparentmrslag(alt3)KillGames Transparentmrslag(alt4)KillGames
Classical Hullaballo Demonizing Childish
Transparenttrip&wireKillGames Transparenttrip&wire(alt2)KillGames Transparenttrip&wire(alt3)KillGames Transparenttrip&wire(alt4)KillGames
Lonely Peaceful Cold Calm

Non-Playable Characters[]

These are characters that often appear in cutscenes or gameplay, but are not controlled by the player.

StunportraitKillGames Stun

One of the KillGame's charismatic hosts, commentating over the tournament. He's a blue neon robot of mostly unknown origin. He is the more enthusiastic of the two commentators, cheering and yelling when blood and guts fly through the air. 

TorqueportraitKillGames Torque One of the KillGame's charismatic hosts, commentating over the tournament. He's a green and brown dinosaur-like creature of unknown origin. Unlike Stun, he's cynical, extremely sarcastic, and somewhat perverted. He often likes to comment on deaths in gross detail.
ArmaportraitKillGames ARMA A combat robot designed by Newton in Ein's image. Her autonomous nature makes her inable to feel feelings, but she is loyal to Newton and will protect him and his allies at all costs. She fights alongside Newton.
LuciferportraitKillGames Lucifer

The avatar of Wrath, Lucifer is the defacto ruler of Hell, often summoned by Lane to attack enemies. He also grants Lane her demonic powers. He often acts imtimidating and extremely sadistic towards most people, but with Lane and Redge, he's actually pretty chill.

AshuraportaitKillGames Ashura A demon of unknown status, trapped within Misery's katana. Ashura is shown to be bloodthirsty and loud. He is shown to be very sadistic, but relies on Misery if he wants to get what he wants. He and Misery often get into arguments.
BeatriceportraitKillGames Beatrice Break's wife, she was killed by a group of rabid mutants, and is why Break hunts and kills mutants. Not much is seen of her, but she is shown to be a cheerful and caring person. She is only seen in flashback cutscenes.
SylviaportraitKillGames Sylvia Break's daughter, she was killed by a group of rabid mutants, and is why Break hunts and kills mutants. Not much is seen of her, but she is shown to have a lot of love for her father. She is only seen in flashback cutscenes.
EinportraitKillGames Ein Newton's best friend, she joined the KillGames in the past to raise money for her family, but ended up getting killed. She was an optimistic and cheerful person who cared deeply for Newton, inspiring him to join the AKA after her death. She is only seen in flashback cutscenes.

Enemies[]

These are the various enemies that appear during KillGame's Story Mode and in Massacre Mode.

Weak Enemies[]

Anarchist

Ruthless gang members from Neo York City, they join the KillGames to kill people without going to jail. They are often found in cities, wielding pipes, bats and simple blades.

Soldier Mechanized combat robots, they are sent by the US government for testing in potential wars. They are one of the few enemies that wield ranged weapons, attacking enemies with pistols and an energy blade if enemies come too close.
Marauder Insane cyborg enemies that live in the Wastelands around Neo York City, they join the KillGames in service of their leader. Often found in deserts, and dress up as cats & dogs, their cyborg limbs often them increased speed and strength, often utilizing their blades.
Mutant People who use mutagens to enhance their strength, Mutants are an agile enemy, able to run very quickly and climb walls. They are armed with long, sickle-like claws. However, they are considerably fragile compared to other enemies.
Imp Low-ranking demons, Imps are mischevious but sadistic demonic creatures. With the ability to fly, they range out the player, attacking with their flaming whips.

Tough Enemies[]

Bomber These injured Anarchists only wish to go out in a last blast, and will run towards any enemy that they happen to see, and immediately blow up in their vicinity to cause massive damage. Bombers, however, can also be used to their advantage, with the player being able to launch them into enemies if they are killed.
Molotov Female Anarchists, these enemies primarily wield molotov cocktails. They keep their distance and toss these at the player, exploding upon contact and wiping entire areas in flames. In close-combat however, they're easy to kill.
Chopper An Anarchist wielding a chainsaw, they are among one of the more dangerous enemies you will face. They will chase you and attempt to attack enemies with their chainsaw. They are vulnerable to ranged attacks.
Rocketeer A Soldier wielding a missile launcher, they keep their distance and launch homing missiles at the player, exploding upon contact. In close-combat, they're easy to kill.
Roller Wastelanders with spikes pierced through their heads, their lower-halves have been replaced with wheels. Their main attack is attempting to ram full force into you. They take some time to rev up however, and they are vulnerable once they hit a wall.
Spiderslicer Wastelanders resembling spiders, their limbs have been replaced with robotic limbs, each equipped with a sharp blade at the end. They have the ability to turn invisible and sneak attack on unsuspecting foes.
Spitter Mutants that have taken too much mutagens, causing their bodies to literally melt. They spit out acidic blasts that leave behind puddles, damaging anyone who steps in them.
Succubus Lusty female demons who serve Soul, Succubi are a deadly enemy to come cross. They have the ability to teleport, summon Imps, and attack with explosive fireballs. However, they actively avoid combat, and if they are in close-range of you, they can't do much to defend themselves.

Threatening Enemies[]

Executioner These hulking men with bags on their heads are big and powerful, but considerably slow. However, get up close and they will almost immediately attempt to smash you with their rebar hammers. It's best to take them down from a distance.
Juggernaut Mechanical enemies built by the AKA, Juggernauts wield gatling guns as their weapons. They are extremely slow, almost never moving, but can cause powerful damage from any range with their miniguns. Get up close, and they can't really do much but a gun smack that can knock you away.
Bearzerker Powerful Wastelanders with the strength and ferocity of bears, the Bearzerker's main attack is a charging move, with them charging forward at incredible speed. Their fronts are covered in armor but their backs are vulnerable, which is normally where you will want to attack them.
Giga Mutant Massive mutants that use heavy doses of mutagens, Giga Mutants are towering beasts. Armed with powerful grapples, they are daedly if they can get close to you, which can be hard since they are so fast. It's best keep moving when combatting them.
Archdemon HIgh-ranking demon lords, Archdemons are powerful enemies. Mostly flying above the player, they cast powerful fire magic, which can cover entire areas of an arena. It's best to deal with them as quickly as you possible can.

Stages[]

KillGames features 16 stages at launch. Each stage is associated with one of the game's playable characters, and feature a unique layout and hazards (hazards featured on the stage can be seen in the Hazards section).

Neo York City Streets

Neo York City is well-known for two things: the KillGames, and its insanely high crime rate! This section of Neo York City is well-known as a place where many gangs hang out and hold gang wars with eachother.  The stage is fairly simple, consisting of a mostly flat arena with a few buildings scattered about.

  • This is the home stage of Redge.
Grand Neo Bridge

Grand Neo Bridge is a massive bridge that connects Neo York City with the rest of the Wastelands. Obviously we don't want anyone escaping during the KillGames, which is why part of the bridge is blocked off with cars and all that other junk. The stage is pretty simple, being one of the longer stages in the game, and featuring little to no elevation (with the exception of the cars scattered around the stage).

  • This is the home stage of Storm.
Central Station

Neo York City's famous train station, the area is converted into an arena every year for the KillGames. All trips are cancelled, except for the trips to hell people will be going to when the trains that pass through the station run them over. Because of the amount of death, this area is popular among KillGames fans.

  • This is the home stage of Break.
Frozen Foundry

A mysterious factory on the outskirts of Neo York City, the area was used by Yuki as a training ground for honing her ice powers. Much of the factory is coated in large ice, though apparently a few machines are still operating, and can be activated by breaking the ice encasing them.

  • This is the home stage of Yuki.
Underground Laboratory

A secret underground research facility, the Underground Laboratory features a wide variety of awesome futuristic-themed deathtraps. 

  • This is the home stage of Newton
Metal Graveyard

A massive dump where broken machines and robots are turned into scrap metal. The stage is fairly open, climbing atop hills of metal. A giant toppled crane can be jumped on top of to gain a high advantage. Watch out for the sides, as standing in it will pull you close to the grinders, killing you if you touch them.

  • This is the home stage of Lane.
The Cage

An arena used by KillGames fans when the KillGames are over, the Cage is an underground arena surrounded by spikes. It's one of the simpler arenas with no elevations, just a large octagon-shape area for you to fight in.

  • This is the home stage of Diablo.
Ancient Dojo

Though initially peaceful with its Japanese-styled architecture and relaxing waterfalls, the Ancient Dojo is just as dangerous as other arenas. The arena consists of a small square-shaped arena in the middle, alongside a balcony area surrounding it. Players can be knocked off of the balcony to instantly kill them.

  • This is the home stage of MIsery.
Casinoland

The biggest entertainment destination in Neo York City, Casinoland is what you get when you mix Las Vegas and a Six Flags into a colorful and chaotic mess. The stage is quite open, located at night in the courtyard of a massive casino, and and is surrounded by neon lights. Watch out for the Slot of Misfortune, which will randomly open up to judge the fate of anyone through into it!

  • This is the home stage of Colt.
Wasteland Slums

Disconnected from the rest of Neo York, the Wasteland Slums is a desertous settlement that serves as the home of the Wastelanders. Small buildings litter the arena. The middle of the arena is pretty big, though a crusher will keep everybody on their tows. Fences are lined with spikes and sawblades will occasionally come out of hallways to slice up unsuspecting enemies.

  • This is the home stage of Shine.
Wreckage Ocean

An abandoned dock in the outskirts of Neo York City, many abandoned ships litter this stage Wreckage Ocean features somewhat uneven ground, with players able to stand and fight on these abandoned and rusting objects. Don't fall into the water, as it is infested with Death Sharks, just waiting to feast upon your dead body.

  • This is the home stage of Sharkman
Neon Tower

The tallest standing building in Neo York City, the Neon Tower provides tons of great views of the skylines. The stage takes place on the observation deck, and is quite flat. Much of the stage is surrounded by glass, which can be broken if a player is launched into them with enough force. Anyone launched out the stage will be swiftly killed by the KillDrones surrounding the stage,

  • This is the home stage of Zmei
Abandoned Prison

A mysterious castle in the outskirts of Neo York City, it's origins is unknown, though many speculate it is either haunted, or created to attract tourists. The arena has two floors, connected by a spiral staircase in the middle. The torture instruments are still somehow working, and can be used to your advantage to kill people.

  • This is the home stage of Reapazoid.
Toxic Sewer System

Located deep benath Neo York City, the Toxic Sewer System has been long abandoned. The stage is quite long, with the stage split vertically in half because of the toxic river. This river is filled with so much trash and mutagens that entering it will cause you to disintergrate.

  • This is the home stage of Maligna.
Altered Hellscape

A crystal forest located in the bowels of Hell, it serves as Soul home. The massive crystals can block attacks, or be used as ways to kill people, but can be destroyed if they take enough damage. If you use a crystal to kill someone, the higher the crystal is, the more your rating will increase.

  • This is the home stage of Soul.
KillGames Stadium

The KillGames Stadium is the biggest location for KillGames fans around the world (or at least what's left of it)! This massive stadium trades all the bullshit of the other fighting areas for a simple rectangular arena, surrounded by a wide bottomless pit. Sure, it ain't that cool, but hey, it's a fair fighting ground.

  • This is the home stage of Adam.

Items[]

During a match, items will drop into the stage via drones. These can be used to support yourself or damage and debuff enemies. Using these to kill off an enemy will provide a bonus in ratings.

Assist Signal

A teleportation device, upon being thrown, it releases an assortment of enemies to attack your enemies. They cannot be controlled and can be taken out quite easily, though they can be quite useful is distracting the enemy and creating pressure. The enemies you summon depends on the character you are playing as.

  • Anarchists: Redge, Break, Yuki, Misery, Colt, Reapazoid, Adam, Mr. Slag, Trip & Wire
  • Soldiers: Storm, Newton, Zmei
  • Wastelanders: Shine, Sharkman, Izuna
  • Mutants: Diablo, Maligna
  • Demons: Lane, Soul, Vice
Fire Bomb A orange bomb that releases a flaming explosion when thrown, causing damage to anyone in its radius. If enemy is at low health, the explosion will light the enemy on fire, leaving them in a helpless state.
Health Soda A lemon-lime soda that contains an unhealthy amount of sugar (and by unhealthy we mean several tons), this drink will restore up to 25% of your health if finished. Just be careful, as you are vulnerable to damage while you are drinking. You can also throw the drink as an exploding weapon.
Ice Bomb A blue bomb that releases an icy explosion when thrown, freezing anyone in the radius. If the enemy is at low health while they are frozen, hit them with a Heavy Attack or a powerful Special attack to cause them to shatter.
Power Shield A energy barrier, it temporarily reduces the damage from all oncoming attacks, and grants a small layer of super armor against weak attacks.
Rage Soda An orange soda that contains special ingredients (and by special ingredients we mean copious amounts of drugs), this drink will grant one Rage meter when finished. Just be careful, as you are vulnerable to damage while you are drinking. You can also throw the drink as an exploding weapon.
Shock Trap A device that sticks to surfaces, anyone that steps on it will be violently electrocuted, stunning them for a short time. If the enemy is at low health, the device will cause the enemy to burn up and explode.

Hazards[]

The KillGames features a wide variety of hazards for the player to use. Utilizing a hazard to kill someone can give you a boost in ratings.

Bamboo Spikes

Think you're safe if you are thrown out of the dojo balcony? I think not! Because these bamboo spikes litter the bottom of the dojo, and anyone who is thrown out will get violently impaled!

  • Found in: Ancient Dojo
Burning Drum

An oil drum that is currently on fire. When an enemy is at low health, place them or launch them into them to scorch them alive! Watch as they struggle to escape as they slowly burn to death!

  • Found in: Neo York City Streets, Grand Neo Bridge
Death Sharks

These great white sharks have been mutated with the most powerful mutagens there is, and now they're hungry for any bit of human flesh they can get. Get an enemy into the water and they will take care of the rest!

  • Found in: Wreckage Ocean
Dragon Statue

Pretty normal-looking dragon statue at first, throw your enemies into its jaws and it will activate, chomping down on them!

  • Found in: Ancient Dojo
Dumpster

You gotta throw that human trash away at some point, and these dumpsters are the perfect place to do it! Throw or place an enemy into it, and the blades on the lid will easily chop the enemy in half.

  • Found in: Neo York City Streets, Central Station
Crusher

These massive crushers will occasionally raise up before coming back down to crush anyone in their path, leaving them behind as a red stain on the ground. 

  • Found in: Frozen Foundry, Metal Graveyard
Crystals

These sharp and pointy hell crystals will impale anybody who happens to land onto them. Higher ratings for anyone who gets the large crystals!

  • Found in: Altered Hellscape
Fan

A massive fan that shreds anything placed into it! Throw an enemy into them and watch as they get eviscerated by the fan's giant blades.

  • Found in: Underground Laboratory, Casinoland
Grinder

A grinder that will crush anything placed into it. Throw the enemy into it and watch as their bones slowly break as they are crushed into a red paste!

  • Found in: Metal Graveyard, Abandoned Prison
Guillotine

These massive blades will occasionally fall from the cieling to chop anyone in their way. Watch for bloodstains on the floor, as they will indicate where a guillotine (though that will be pretty hard once people start dying).

  • Found in: Abandoned Prison
KillDrones

Did you launch an opponent off of a cliff or a high place? Thinking there's the chance that they may survive that fall and attempt to kill you again? Well don't worry, the KillDrones are here to help! These flying robots patrol out of bounds areas around the KillGames, and when anybody is launched into these areas (marked with red lines), a KillDrone will fly into their path and eviscerate them with their jet engines until they are a fine red mist!

  • Found in: Abandoned Prison, Neon Tower, KillGames Stadium
Laser Fence

A fence constructed out of thin beams of light, these melt through anything that come into contact with them. When an enemy is at low health, place them or launch them into these fences to cut them to pieces.

  • Found in: Underground Laboratory
Neon Sign

These giant neon signs and billboards litter Casinoland. They also make for great makeshift weapons! Throw an enemy into them and watch the light display as they get violently electrocuted.

  • Found in: Casinoland
Sawblade

A massive sawblade that cuts through anything in its way, including human flesh!  Throw an enemy into them and watch as they are violently eviscerated by these spinning blades.

  • Found in: Frozen Foundry
Spiked Car

These abandoned cars have been converted into makeshift iron maidens! Their trunks are filled to the brim with spikes, and you can place or launch your enemies into them to give them a painful and heart-piercing (along with any other organs) death!

  • Found in: Neo York City Streets, Grand Neo Bridge
Spiked Fence

The simplest of hazards, these are chain-link fences with spikes and other sharp things attached to them. When an enemy is at low health, place them or launch them onto these spiked fences to make sure their as good as dead!

  • Found in: Neo York City Streets, Central Station, The Cage, Ancient Dojo, Wasteland Slums, Abandoned Prison, Toxic Sewer System
Slot of Misfortune

One of the most elaborate hazards, throw the enemy into the machine and stop the wheel to determine which way they will die. From crushing, to burning, to dismemberment, test your luck to see which one you'll get!

  • Found in: Casinoland
Toxic River

A river located in the Toxic Sewer System, this river is filled to the brim with trash and mutagens. Contact with the river will cause pretty harsh effects on the body! And by that we mean that jumping into the river will mutate you so much that it will cause your body to literally explode.

  • Found in: Toxic Sewer System
Train

A mode of transportation by day, in the KillGames, they are used as battering rams of pure death. Watch out for when the tracks are glowing, because a train will come in and absolutely obliterate anything standing it their path!

  • Found in: Central Station

Trivia[]

  • Many games has inspired KillGames.
    • The overall idea of this game (along with the logo) is inspired by MadWorld and Anarchy Reigns.
    • The gameplay is inspired by games like KILL la KILL - IF and Jump Force.
    • The rating system is similar to Bravery from Final Fantasy Dissidia, though is inspired by the point system from MadWorld.
  • This is CrakaboLazy's second new series after the Constructinator series.

Development[]

  • KillGames went through many, many revisions throughout its life. CrakaboLazy always wanted to create some sort of original fighting game, though was trying to find some kind of identity for it. Upon relearning about MadWorld, CrakaboLazy got his inspiration, a fast-paced bloody and gory fighting game.

Costumes[]

  • Several of the characters alternate costumes are based off of various characters from video games, anime, or other Fantendo characters.
    • Redge's Silver costume is based off of Silver Zin from COLD❄BLOOD.
    • Redge's Solar costume is based off of Sol Badguy from Guilty Gear.
    • Storm's Bounty Hunter costume is based off of Samus from the Metroid series.
    • Storm's Heroic costume is based off of Fera from Heroforce.
    • Break's Monochrome costume is based off of the black-and-white astethic of MadWorld.
    • Break's Vengeful costume is based off of Kratos from God of War.
    • Break's Mysterious costume is based off of Denos.
    • Yuki's Chill costume is based off of Kula Diamond from the King of Fighters.
    • Yuki's Tomboyish costume is based off of Cirno from the Touhou Project.
    • Yuki's Alluring costume is based off of Lilith from Darkstalkers.
    • Newton's Pissed costume is based off of Jotaro Kujo from JoJo's Bizarre Adventure. ARMA is colored after Star Platinum.
    • Newton's Mechanical costume is based off of Zero from Mega Man X. ARMA is colored after X.
    • Newton's Sansational costume is based off of Sans from Undertale. ARMA is colored after Papyrus.
    • Lane's Thrash costume is based off of Akira Otoishi from JoJo's Bizarre Adventure.
    • Lane's Industrial costume is based off of Elek-Trode from Heirs to the Wrath.
    • Lane's Grudge costume is based off of the Berzerker from Kingdombound.
      • Lane's costumes are all named after genres of heavy metal.
    • Diablo's Infierno costume is based off of Incineroar from the Pokemon franchise.
    • Diablo's Tornado costume is based off of Rayne from Whirlwind.
    • Diablo's Punezato costume is based off of Rookenj from Kotomo.
    • Misery's Royal costume is based off of Kitana from Mortal Kombat.
    • Misery's Sexy coustume is based off of Mai Shiranui from Fatal Fury and the King of Fighters.
    • Misery's Mechanical costume is based off of Genji from Overwatch.
    • Colt's Emperor costume is based off of Hol Horse from JoJo's Bizarre Adventure.
    • Colt's Yeah, See? costume is based off of stereotypical mobsters.
    • Colt's Devilish costume is based off of the Gunner from Disgaea.
    • Shine's Poppy costume and Sharkman's Pelagic costume are based on the two characters' older designs.
    • Shine's TigerStar costume is based off Tigzon the TigerStar from Tigzon.
    • Shine's Lookin' Cool costume is based off of Morgana from Persona 5.
    • Sharkman's Freshwater costume is based off of Sidon from The Legend of Zelda: Breath of the Wild.
    • Sharkman's Draconic costume is based off of Garchomp from Pokemon.
    • Zmei's Angelic costume is based off of the Evangelion Unti-01, from Neon Genesis Evangelion
    • Zmei's Nightmaric costume is based off of Xsomnis from Draco Duel.
    • Zmei's Futuristic costume is based off of the RX-78-2 Gundam from Mobile Suit Gundam.
    • Reapazoid's Famine costume is based off of Grim from The Grim Adventures of Billy & Mandy.
    • Reapazoid's War costume is based off of Skeletor from He-Man.
    • Reapazoid's Pestilence costume is based off of Plague Knight from Shovel Knight.
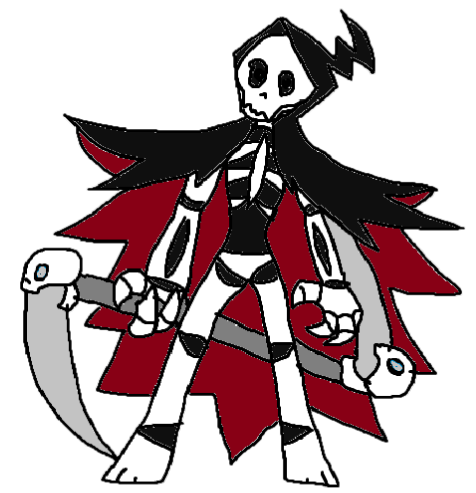
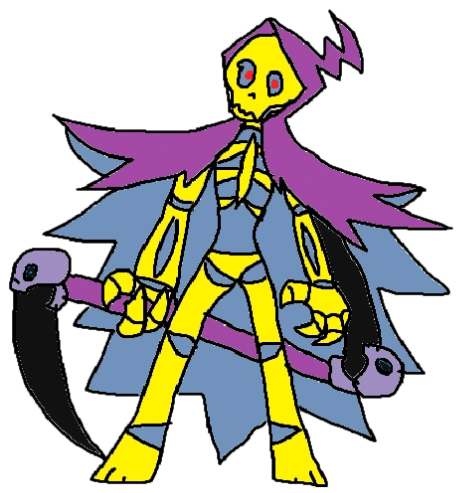
      • Reapazoid's costumes are all named after the Four Horsemen of the Apcolypse.
    • Maligna's Poisonous costume is based off of Sarin from Boundless.
    • Maligna's Inky costume is based off of the Inklings from Splatoon.
    • Maligna's Burning costume is based off of the Pyro from Team Fortress 2.
    • Soul's Menacing costume is based off of DIO from JoJo's Bizzare Adventure.
    • Soul's Scanty costume is based off of Scanty from Panty & Stocking with Garderbelt.
    • Soul's Psychotic costume is based off of Jedah from Darkstalkers.
    • Adam's Jolly costume is based off of Santa Claus.
    • Adam's Calamitous costume is based off of Ganondorf from the Legend of Zelda.
    • Adam's wealthy costume is based off of Drago Napoleon.
    • Vice's Envy costume is based off of the Marauder from Doom Eternal.
    • Vice's Pride costume is based off of Meta-Ridley from Metroid.
    • Vice's Greed costume is based off of Oni from Street Fighter.
    • Izuna's Mystic costume is based off of Ninetails from Pokemon.
    • Izuna's Relaxed costume is based off of Isabell from Animal Crossing.
    • Izuna's Spectral costume is based off of Thrusterhound from Creatures of The Spectroverse.
    • Mr. Slag's Hullaballo costume is based off of Jasper Jabberwocky.
    • Mr. Slag's Demonizing costume is based off of Alastor from Hazbin Hotel.
    • Mr. Slag's Childish costume is based off of Fredbear from Five Nights at Freddy's.
    • Trip's Peaceful costume is based off of Yoshikage Kira from JoJo's Bizarre Adventure. Wire is colored like Killer Queen, Kira's stand.
    • Trip's Cold costume is based off of Madotsuki from Yume Nikki. Wire is colored like Monoko from the same game.
    • Trip's Calm costume is based off of Rosalina from the Mario series. Wire is colored like a Luma.
Advertisement