Fantendo - Game Ideas & More
Advertisement
Click on a character to skip to that character. Characters highlighted have their movesets finished.
Dry Bowser JoeTERender DrMario SSBUltimate DaisyCharged PiranhaPlant SSBUltimate 8BitMarioCharged Geno Nibroc-Rock
Wart Nibroc-Rock DrLuigi SSBUltimate KoopaTroopaCar Dark Star Power Star Guardians Meowser Official
Rawk Hawk HDLankyKongEdit2 KingKrool SSBUltimate Colonel Pluck Sluggy the Unshaven Gotchawrench
Ganondorf SSBUltimate PhantomZeldaCharged DekuBabaH DarkSamus SSBUltimate Ridley SSBUltimate MotherBrainPoker'sCut
Dark Meta Knight KSA Marx SSBU KSA Macho Dedede KSA Daroach Heavy Lobster Wolf SSBUltimate
LeonCharged Starlink Pigma Jigglypuff SSBUltimate Pichu SSBUltimate Mewtwo SSBUltimate Incineroar SSBUltimate
795Pheromosa 648Meloetta 052Alolan Meowth 212Scizor 887Dragapult Ness SSBUltimate
Giegue concept render by primantis-d4evk99 Porky Charged CaptainFalcon SSBUltimate BloodFalconSSBC IceClimbers SSBUltimate Lucina SSBUltimate
Roy SSBUltimate Chrom SSBUltimate 0.3.Black Knight posing DarkPit SSBUltimate Beady Long Legs Ankha NL
Celeste ACaF Hoy Quarlow Mechanica BarbaraTheBat JamWithTheBand FlipnoteFrog SSBUltimate MrGameandWatch SSBUltimate
ROB JPN SSBUltimate DuckHuntCharged Alice the balloon kid by evilwaluigi-d55vngf Snake SSBUltimate Richter SSBUltimate Alucard Art
Blaze Nibroc-Rock Mighty & Ray Charged Rouge the Bat Nibroc-Rock Bayonetta SSBUltimate Joker SSBUltimate SMTC - Demi-Fiend (Big)
MegaManEnker Ken SSBUltimate MS. PAC-MAN Kazuya SSBUltimate Sephiroth SSBUltimate SlimeMSM
OverkillingMachineDQH2 PattyDQ AgnèsMillennium Bub and Bob Master chief Rabbid Yoshi
RabbidCrankyMRKBDKA CookingMamaAnarchy ShantaeSmile Kebako Charged HatKid BowKid
LilacRender Carol Tea (FP2) Fp2 milla The Beheaded Sans SSBUltimate Cuphead SSBUltimate
ChomperCharged Dart Monkey Engineer Monkey Twilight Sparkle-1515785876 Rainbow Dash-1515787024 Pinkie Pie-2
Applejack-1 Rarity-0 Fluttershy-0 LarryBoy Render by Nintega-Dario Somari Charged


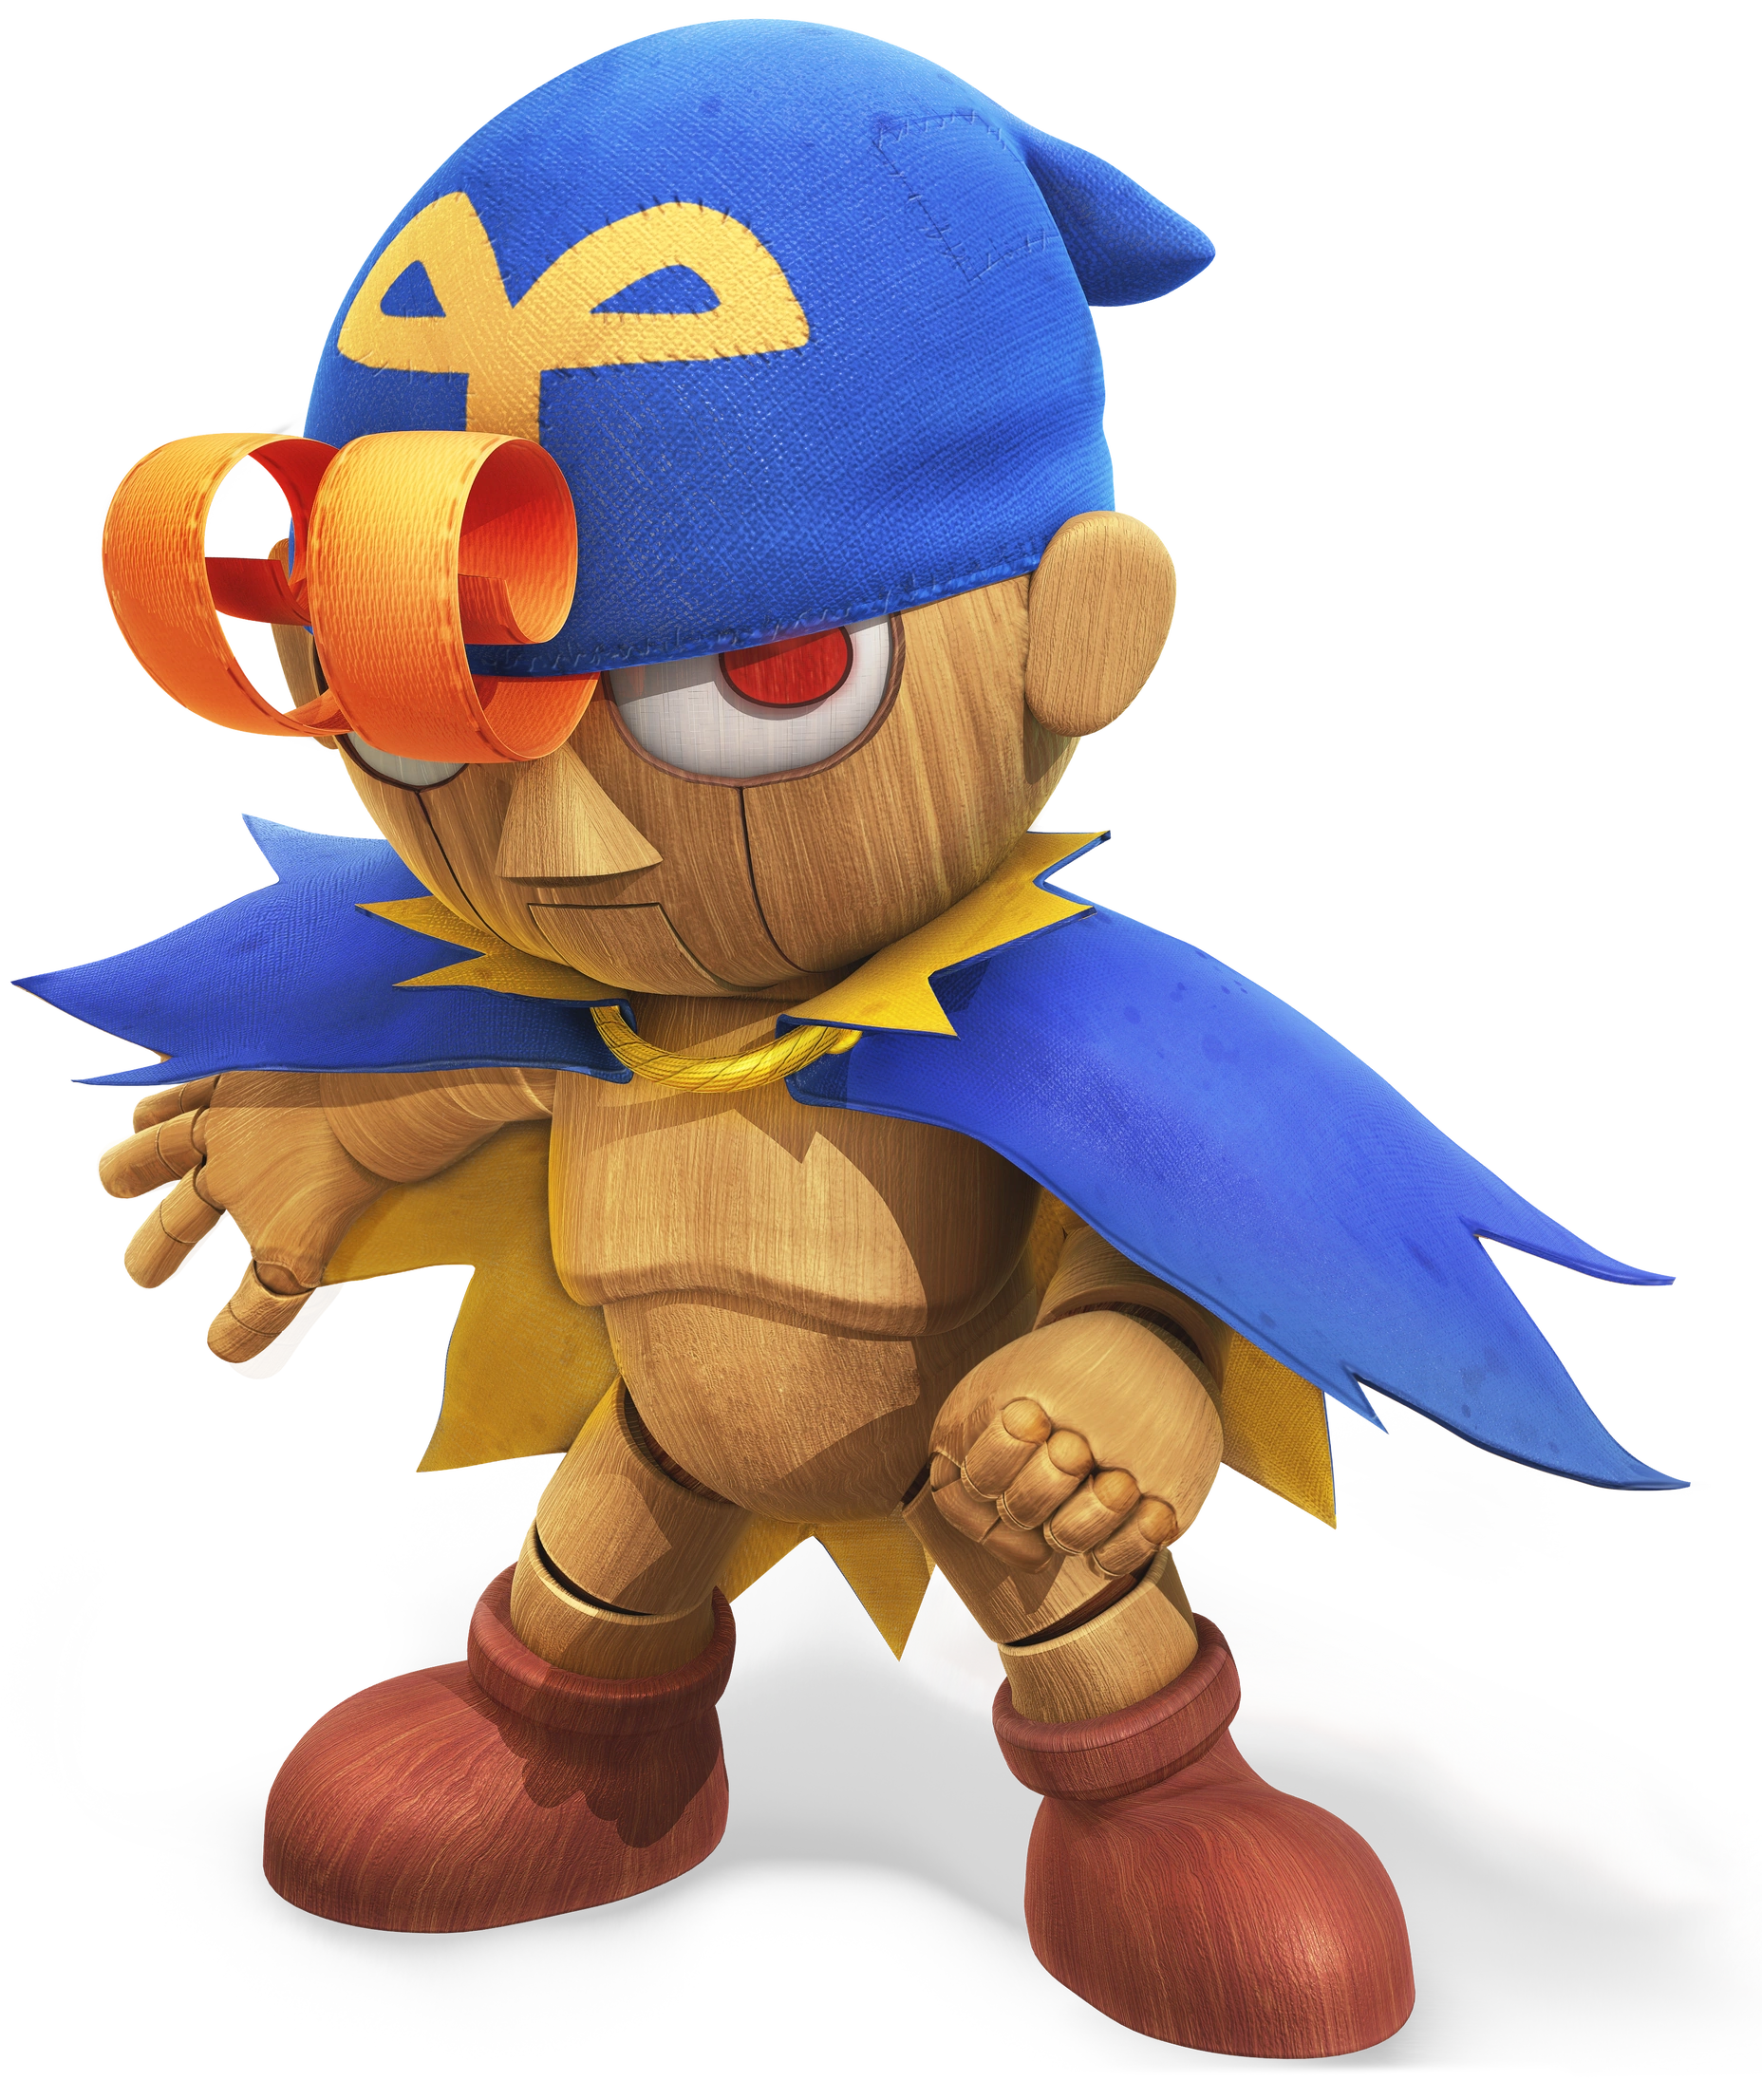
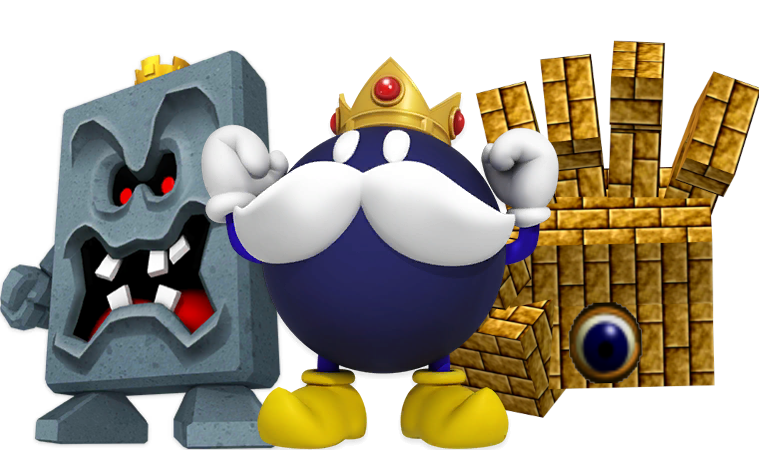
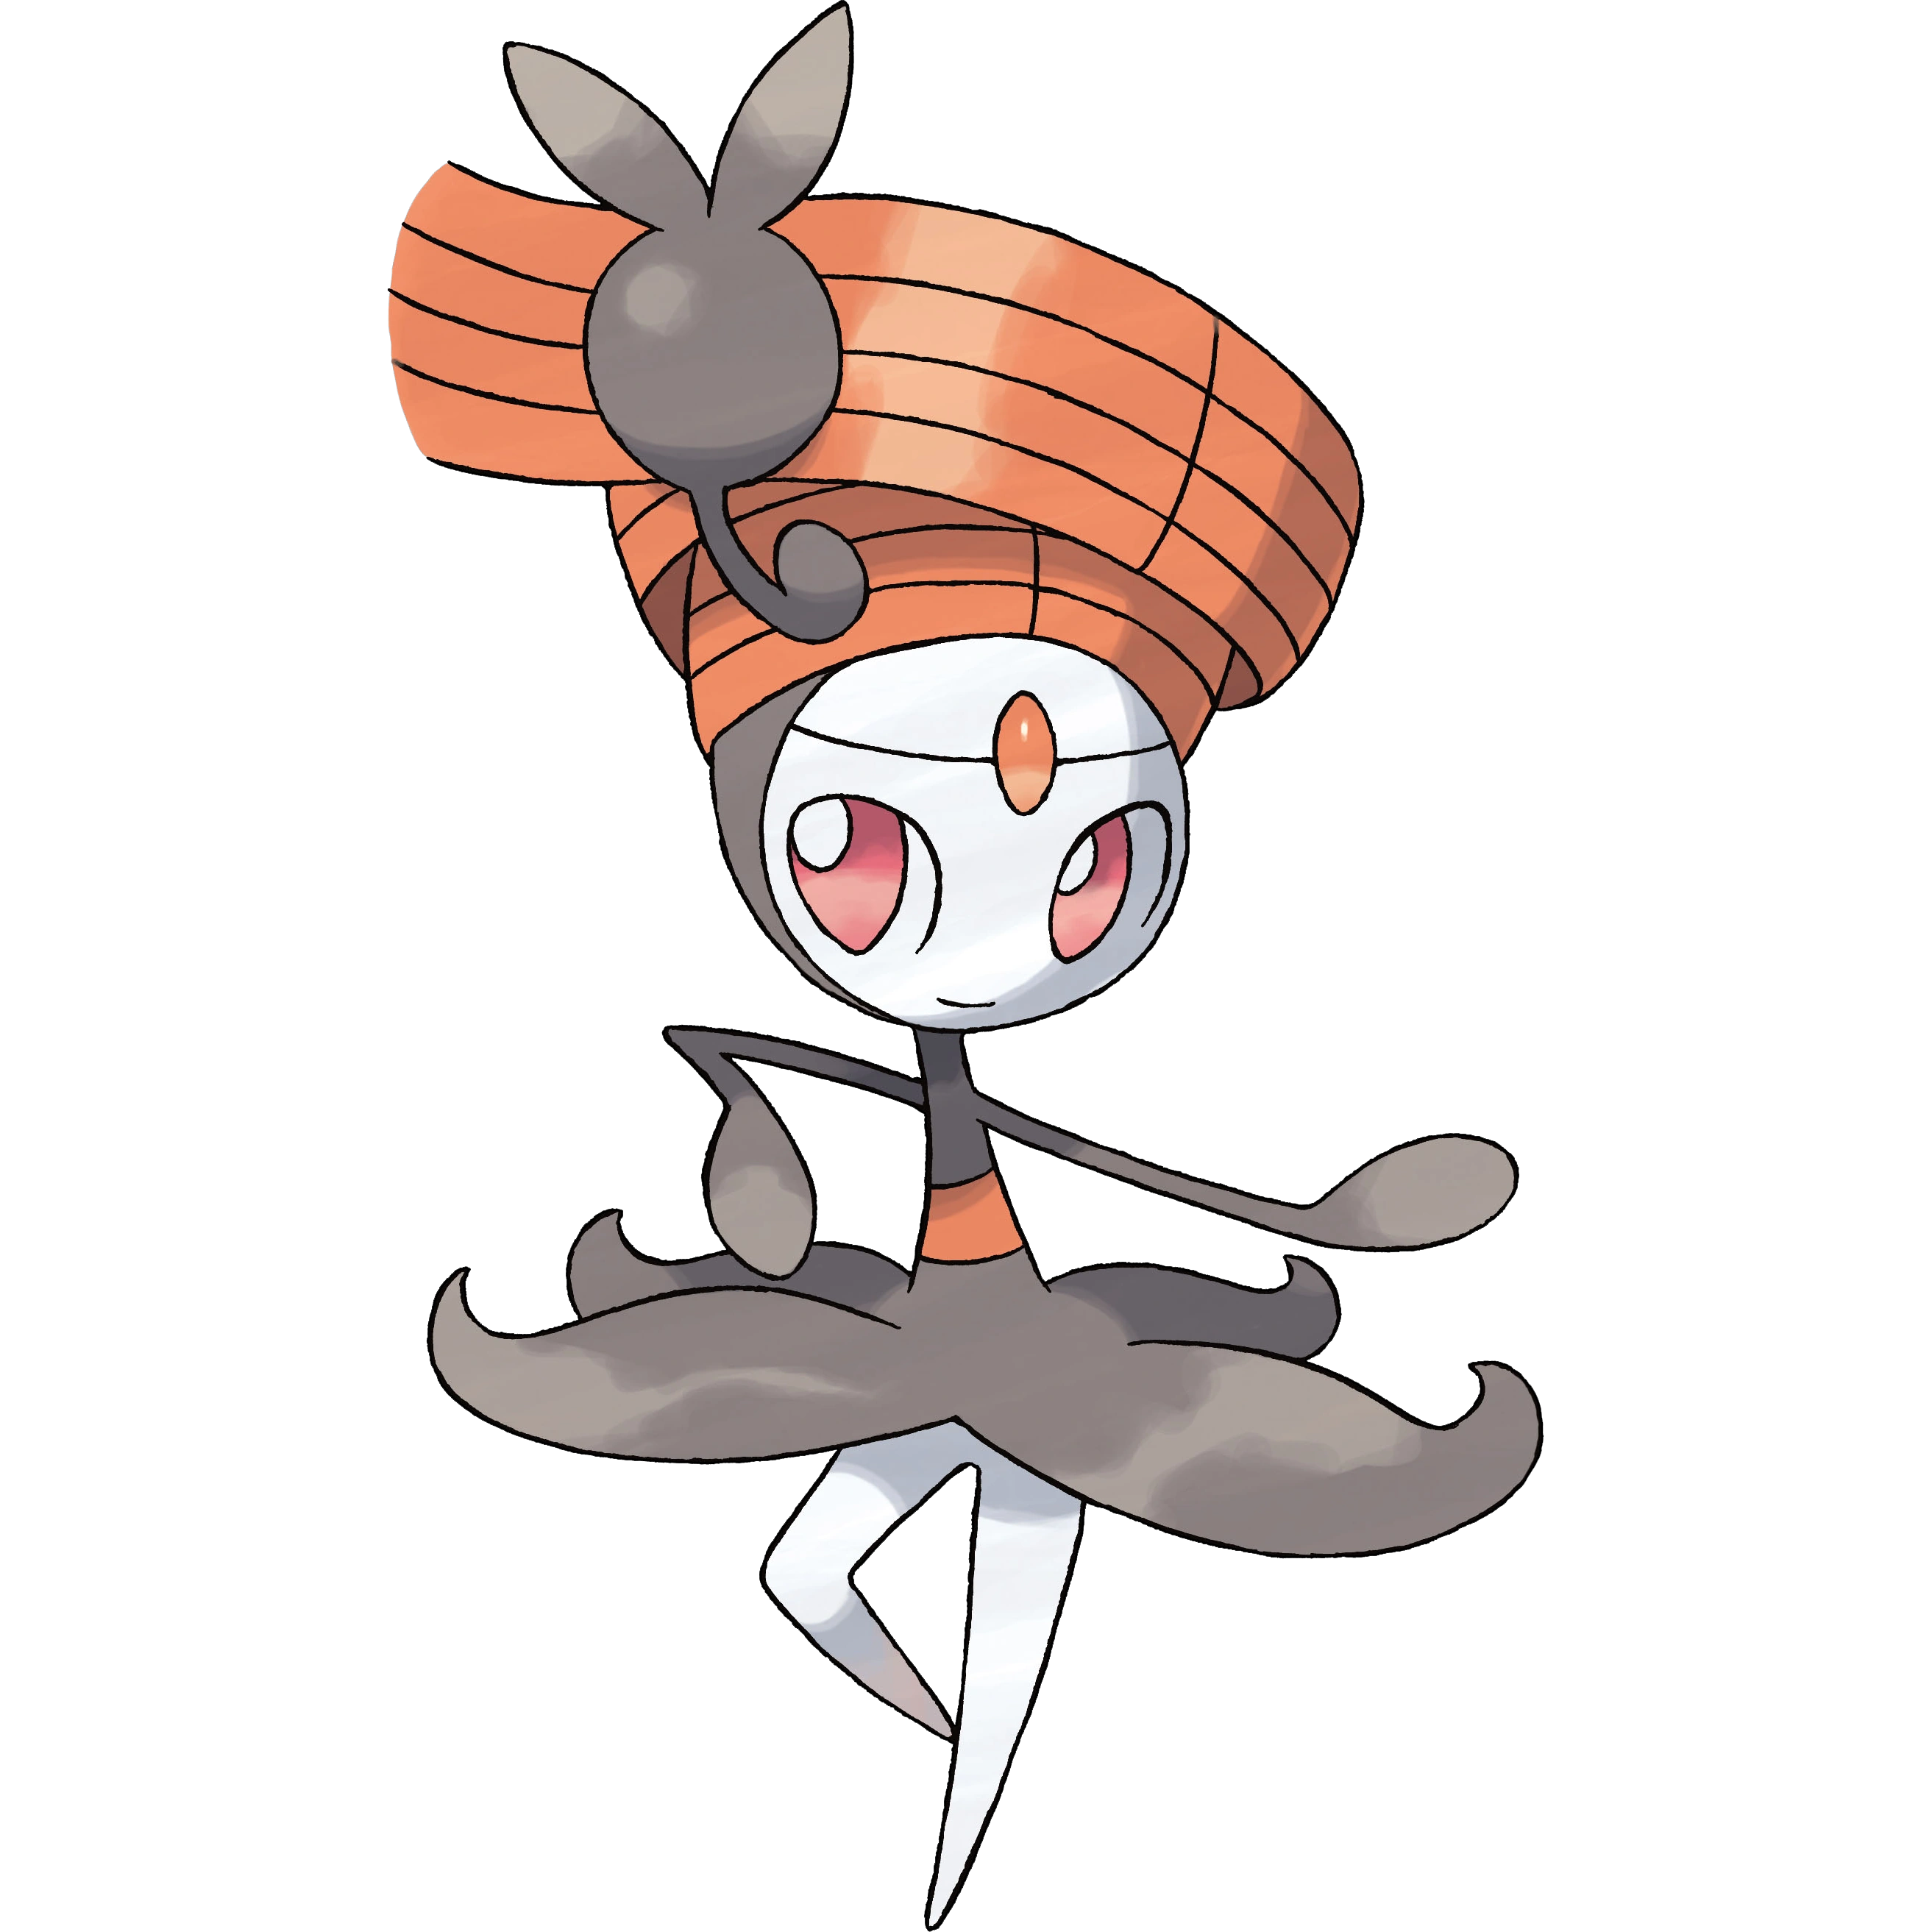
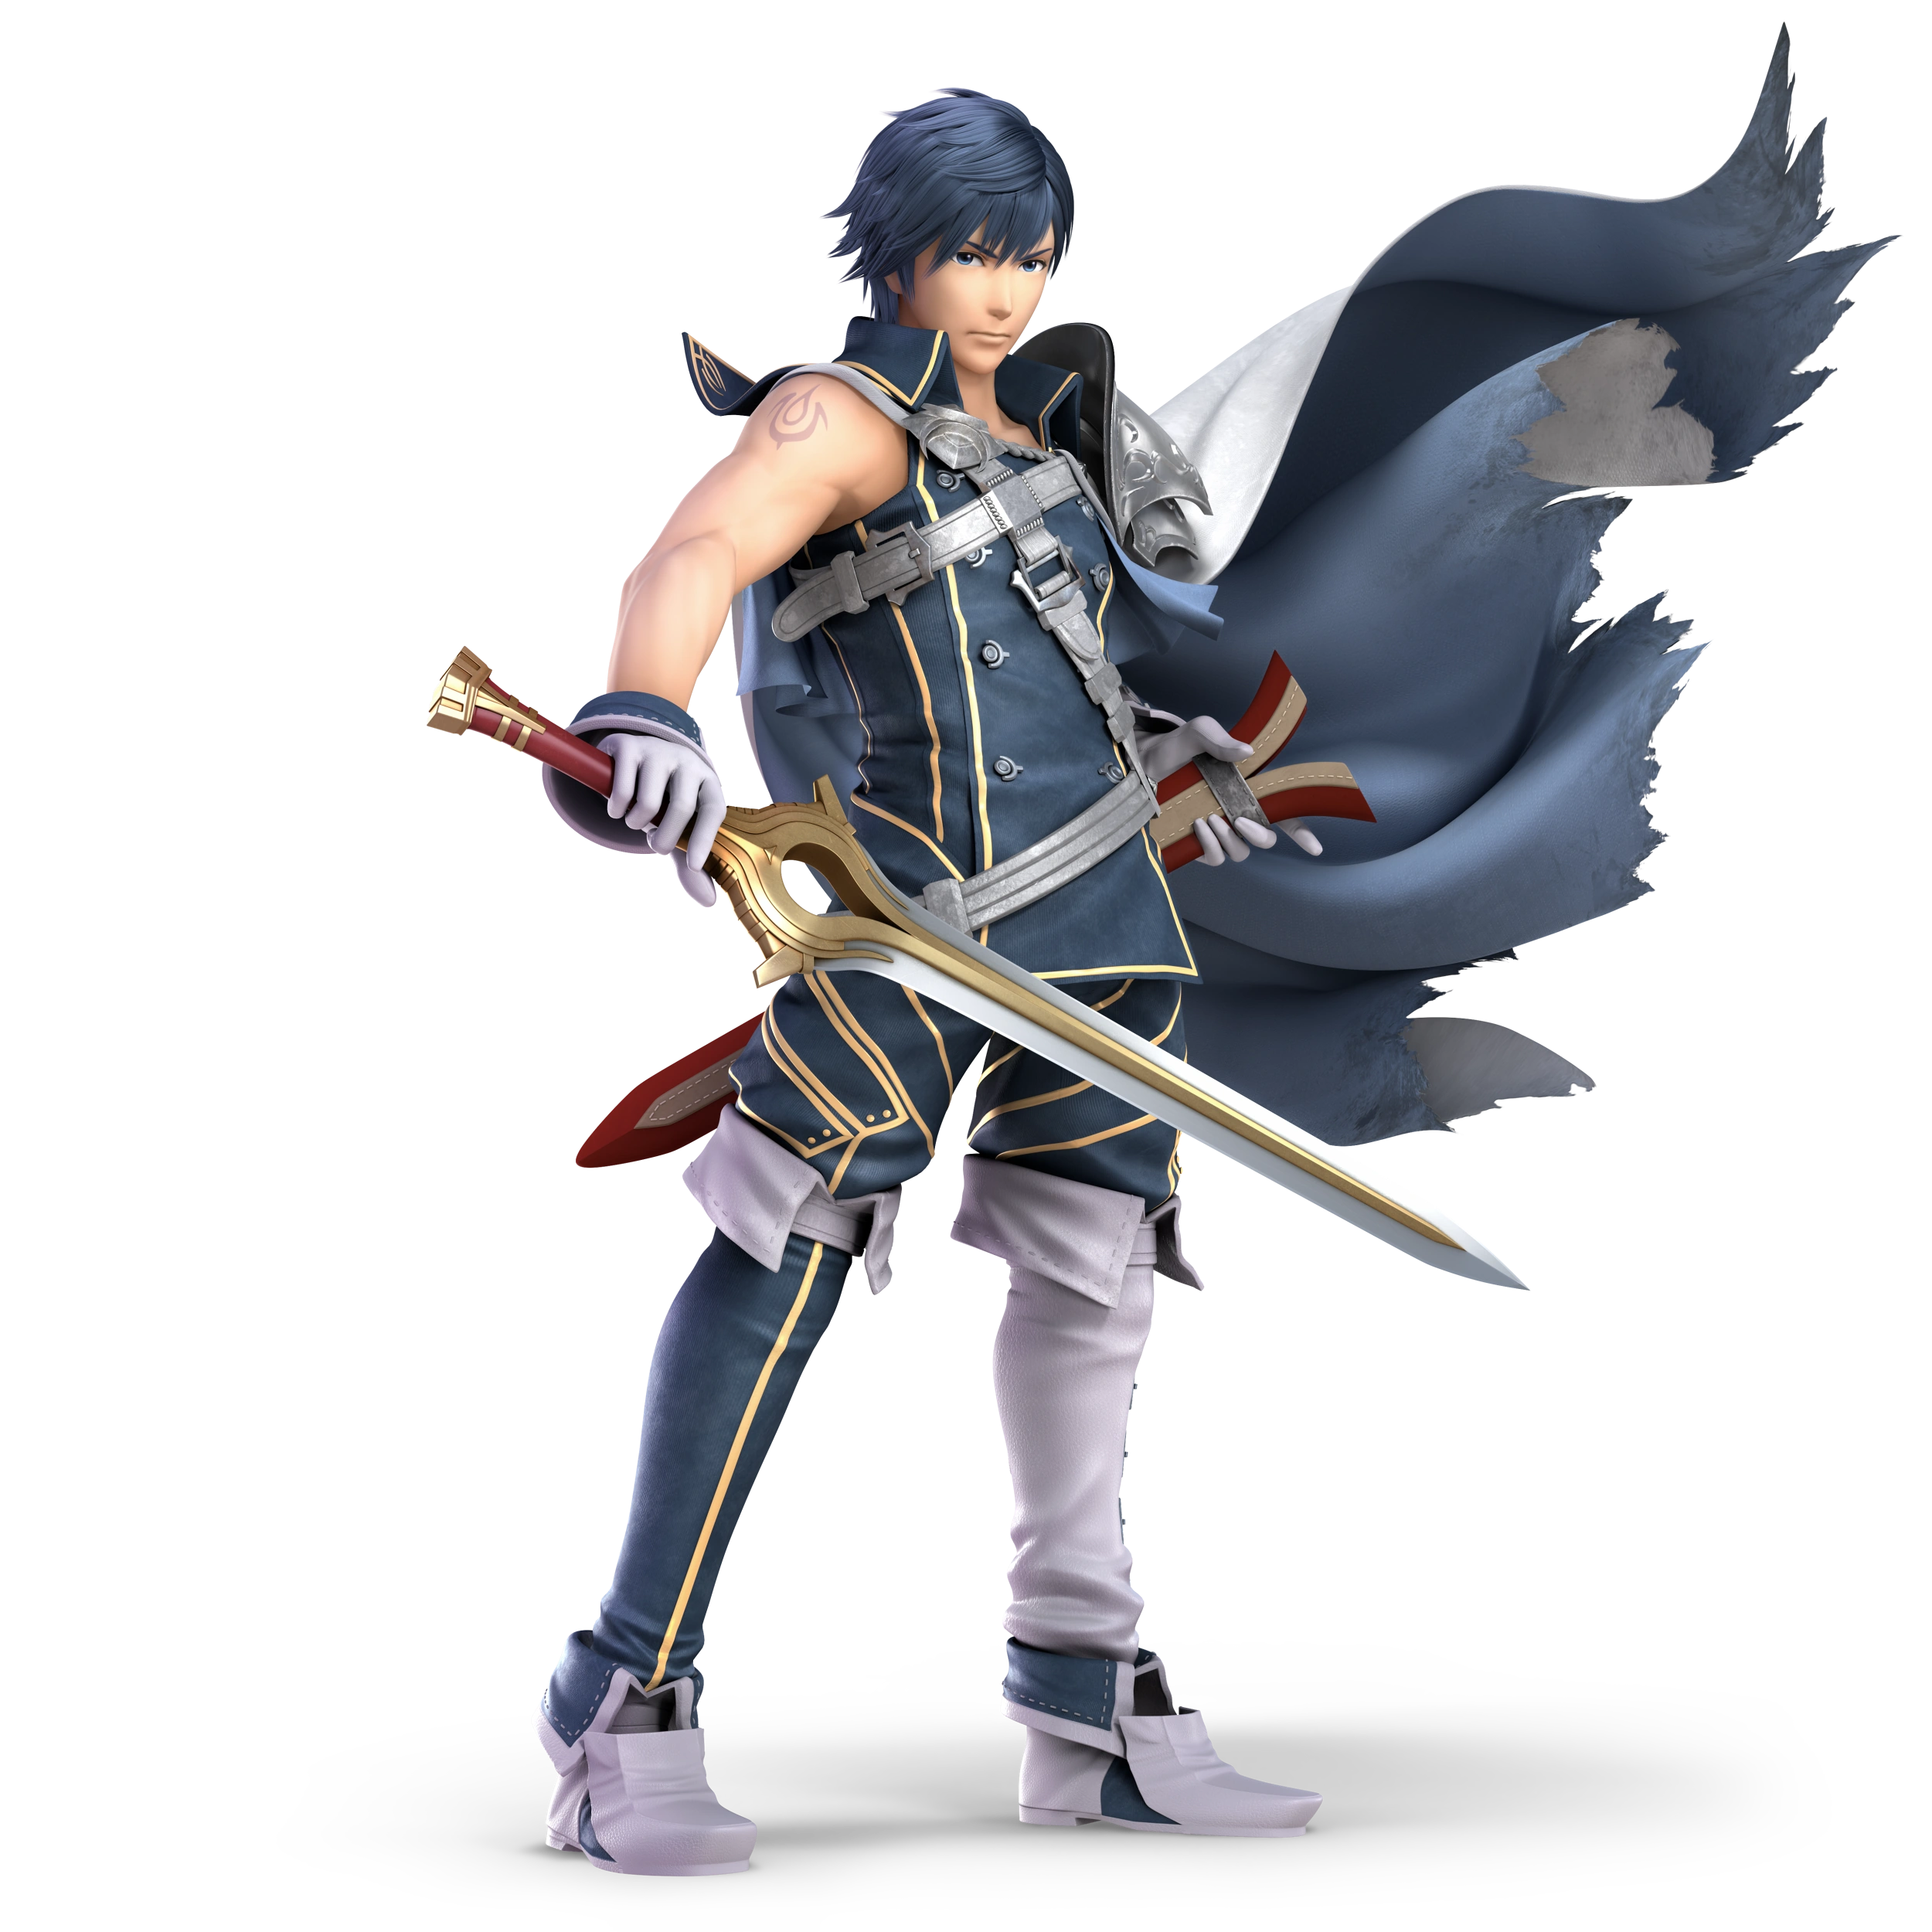
Dry Bowser (ε)
New Super Mario Bros. (2006)
Dry Bowser JoeTERender
Dry Bowser (ほねクッパ, Bone Koopa) is the skeletal form of Bowser. He first appears in New Super Mario Bros. after Mario drops Bowser into lava, causing his skin to melt off. Later in the game, Bowser is rematched as Dry Bowser. In addition to possessing his normal counterpart's strength, Dry Bowser also has the defenses of a Dry Bones, such as immunity to fireballs and the ability to resurrect after being crumbled. Since his debut, he has made playable appearances in several spin-off games, most notably the Mario Kart series, where he appears as a separate entity from Bowser.

Dry Bowser is an Echo Fighter of Bowser. In terms of moveset, with a few exceptions, it is almost identical to Bowser's. However, because he is nothing but bones, Dry Bowser is lighter than Bowser, lacks his Tough Guy attribute, and lacks the invincibility some of his attacks have. While this means he can be launched more easily, he also possesses superior mobility and frame data, allowing him to combo opponents more reliably than his normal counterpart.
SSB Mario Series Dry Bowser Stock Icon SSBCharged Icon
Dry Bowser's Moveset

  • Neutral Attack: Dry Bowser throws a two-punch combo.
  • Forward Tilt: Dry Bowser throws a punch.
  • Forward Smash: Dry Bowser throws a dropkick.
  • Up Tilt: Dry Bowser swipes his claws in an overarching motion.
  • Up Smash: Dry Bowser gets on all fours and leaps upward to damage opponents with the spikes on his shell.
  • Down Tilt: Dry Bowser punches near the ground twice.
  • Down Smash: Dry Bowser punches near the ground in front of himself and the behind himself.
  • Dash Attack: Dry Bowser throws a flying kick.
  • Counter: Dry Bowser grabs the opponent and slams them into the ground.

  • Neutral Aerial: Dry Bowser crawls into his shell and spins around, damaging opponents multiple times before launching them.
  • Forward Aerial: Dry Bowser swipes his claws downward.
  • Forward Crash: Dry Bowser swipes his claws forward.
  • Back Aerial: Dry Bowser thrusts his shell backward.
  • Back Crash: Dry Bowser throws a dropkick.
  • Up Aerial: Dry Bowser throws an upward headbutt.
  • Up Crash: Dry Bowser throws an upward headbutt.
  • Down Aerial: Dry Bowser crawls into his shell and spins downward, damaging opponents multiple times before launching them.
  • Down Crash: Dry Bowser crawls into his shell and falls downward to the ground. The attack buries grounded opponents and meteor smashes aerial opponents he lands on.

  • Grab: Dry Bowser reaches out to grab the opponent.
  • Pummel: Dry Bowser bites the opponent.
  • Forward Throw: Dry Bowser puts the opponent on his head and rears his head back, shoving them with his horns.
  • Back Throw: Dry Bowser turns around and throws the opponent backward.
  • Up Throw: Dry Bowser throws the opponent upward and enters his shell, spinning to damage the opponent with his spikes.
  • Down Throw: Dry Bowser pins the opponent on the ground and falls onto them, landing with his stomach.

  • Neutral Special - Dangerous Breath: Dry Bowser expels flames from his mouth. If the special button is tapped, Bowser will spit a fireball that travels a short distance and explodes on impact, damaging opponents. If the special button is held, he will shoot a stream of flames that damage opponents multiple times. Both the stream and fireballs can be angled with directional inputs. Use of either variation will make the attack weaker, though it will recharge when not in use. Unlike Bowser's Fire Breath, Dry Bowser's Dangerous Breath can have multiple effects on opponents on top of damaging them, indicated by the colors of the fire he spews; blue flames will freeze opponents, green flames will make them dizzy, purple flames will put a flower on their head, white flames will put a mushroom on their head, and yellow flames will shrink opponents. To compensate, the move deals less damage, and the held variant won't make opponents flinch.
    • Custom 1 - Fire Breath: Dry Bowser expels red flames. They act exactly like Bowser's, dealing more damage but without additional ailments.
    • Custom 2 - Shifting Breath: The held variant covers less range, but it takes longer to weaken. Additionally, while using the held variant, the move will change colors, as well as changing their effects.
    • Custom 3 - Dangerous Roar: Dry Bowser expels much more flames when using either variant that deal more damage, but weaken the move quicker and have less exaggerated effects.
  • Side Special - Royal Rampage: Dry Bowser ignites himself on fire and rushes forward, cooling off after a short distance. If he hits an opponent while on fire, he will grab them and throw them upwards, then jump towards them and perform a piledriver. Opponents near him will also take damage from the flames.
    • Custom 1 - Koopa Klaw: Instead of performing a piledriver, Dry Bowser can bite opponents once he grabs them. He can then throw them forward or backward.
    • Custom 2 - Rampage Slam: Instead of performing a piledriver, Dry Bowser performs a belly-to-belly suplex. The player that has the most damage controls what direction Dry Bowser flies in via directional inputs.
    • Custom 3 - Ballistic Rampage: Dry Bowser travels less distance while dashing, but the piledriver deals more damage and knockback. It also ends in an explosion that can damage other opponents in the blast radius.
  • Up Special - Spiraling Stronghold: Dry Bowser enters his shell and begins spinning around, damaging opponents multiple times before launching them. While spinning, he can move left and right. If used in midair, Dry Bowser rises upward, and can rise higher if the special button is tapped repeatedly, before he falls into a helpless state.
    • Custom 1 - Sliding Stronghold: Dry Bowser doesn't deal as much damage, but he moves around quicker. In midair, he sacrifices vertical distance for more horizontal distance.
    • Custom 2 - Burning Stronghold: Dry Bowser doesn't travel as fast, but he leaves a trail of flames behind himself, which gradually damage opponents that stand in them. In midair, Dry Bowser deals more damage in exchange for lack of horizontal movement.
    • Custom 3 - Whirlwind Stronghold: Dry Bowser cannot travel as far, but while spinning, he creates a whirlwind that has vacuumboxes that pull opponents into the attack.
  • Down Special - Bowser Bomb: Dry Bowser leaps into the air, damaging opponents with his horns before falling downward, damaging opponents he lands on. At the peak of his jump, the attack can be cancelled into any other action. If the move is used in midair, he will simply fall downward.
    • Custom 1 - Turbulent Bomb: Dry Bowser deals less damage, but he creates windboxes when he lands, pushing nearby opponents back.
    • Custom 2 - Quake Bomb: Dry Bowser creates a stage-wide tremor when he lands that causes all grounded opponents to slip. He also buries opponents he lands on.
    • Custom 3 - Meteor Bomb: Dry Bowser falls slower, but he meteor smashes opponents he lands on.
  • Final Smash - Dry Bowser Punch: Dry Bowser increases in size and teleports behind the stage. He then throws a punch, which can be aimed with directional inputs. Opponents over 100% will suffer a Screen KO. After this, he returns to the stage and reverts to his normal state.
  • Charged State - Molten Bowser: Dry Bowser becomes molten in flames. In this state, his attacks deal more damage, with many of his attacks being enhanced with fire. He can also run faster and jump higher.

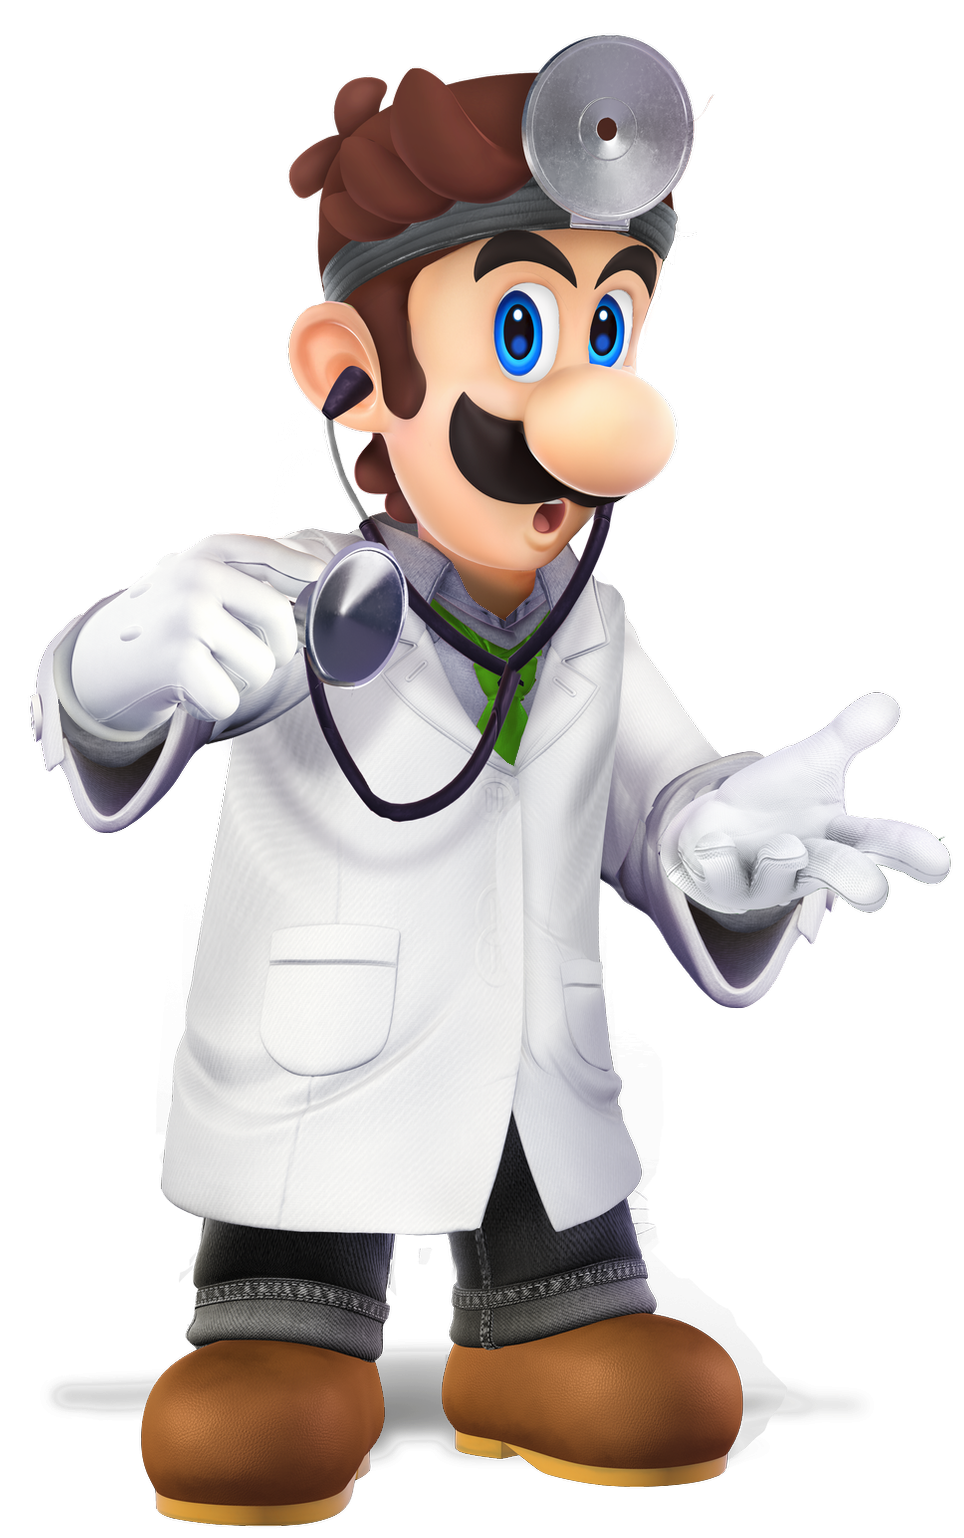
  • Dr. Mario
    Dr. Mario (1990)
    DrMario SSBUltimate
    Dr. Mario (ドクターマリオ, Doctor Mario) is the doctor persona of Mario that he appears in the Dr. Mario puzzle series. In those games, he works alongside Dr. Luigi and Nurse Peach at the Mushroom Kingdom Hospital, working to destroy Viruses using colorful pills called Megavitamins. To do this, Megavitamins of the same color must be lined up with the corresponding Virus color, which will eliminate them. Once all Viruses are eliminated, the level is complete.

    In previous Super Smash Bros. titles, Dr. Mario was considered a slower, stronger clone of Mario. However, since the former has gained a new moveset, Dr. Mario is moreso used to retain Mario's previous moveset. As in previous games, Dr. Mario has a lot of attack power, allowing him to deliver KOs quite easily. However, he has gained quite a noticeable boost in mobility, allowing him to combo opponents better. His frame data is also arguably as fast as Mario's in previous games, which helps him rack up damage before following with a KO move.

    Although many of Dr. Mario's basic attacks are similar to Mario's, the two also have completely different moves. Many of them focus on delivering heavy damage and knockback, though he has a few moves available for combos. As mentioned, his moveset is directly derived from Mario's previous moveset.
    SSB Mario Series DrMarioHeadSSBU SSBM Icon
    Dr. Mario's Moveset

    • Neutral Attack: Dr. Mario throws a one-two punch combo before following up with a kick.
    • Forward Tilt: Dr. Mario throws a roundhouse kick.
    • Forward Smash: Dr. Mario thrusts his palm forward as a burst of electricity emits from it. At full charge, the move can deal paralysis on opponents, leaving them vulnerable for attack.
    • Up Tilt: Dr. Mario throws an uppercut.
    • Up Smash: Dr. Mario throws a headbutt.
    • Down Tilt: Dr. Mario throws a legsweep.
    • Down Smash: Dr. Mario performs the Sweep Kick.
    • Dash Attack: Dr. Mario performs the Slide Kick.
    • Counter: Dr. Mario throws an electrically-charged uppercut.

  • Neutral Aerial: Dr. Mario throws a sex kick. Unlike other sex kicks, the attack grows stronger throughout the duration rather than weaker.
  • Forward Aerial: Dr. Mario rears back his fist and throws an overhead.
  • Forward Crash: Dr. Mario throws a dropkick.
  • Back Aerial: Dr. Mario throws a roundhouse kick.
  • Back Crash: Dr. Mario throws a dropkick.
  • Up Aerial: Dr. Mario throws a bicycle kick.
  • Up Crash: Dr. Mario throws a spinning uppercut, damaging opponents multiple times before launching them.
  • Down Aerial: Dr. Mario performs a spinning drill kick, damaging opponents multiple times before launching them. If the attack button is held, he can continue spinning.
  • Down Crash: Dr. Mario stomps downward. The attack can meteor smash opponents.

  • Grab: Dr. Mario reaches out to grab the opponent.
  • Pummel: Dr. Mario headbutts the opponent.
  • Forward Throw: Dr. Mario spins around once and throws the opponent forward.
  • Back Throw: Dr. Mario holds the opponent by the legs and spins around three times before throwing them backward. While spinning, Dr. Mario can move left and right, and the spinning can also damage nearby opponents if the victim collides with them.
  • Up Throw: Dr. Mario heaves the opponent directly overhead with both hands.
  • Down Throw: Dr. Mario performs a body slam with the opponent.

  • Neutral Special - Megavitamin: Dr. Mario throws a Megavitamin forward, which bounces along the ground in an arc, dealing light damage to opponents that it hits. The Megavitamin comes in a random pair of red, blue, and yellow colors, which deal varying effects if they hit opponents; red can burn opponents, blue can freeze opponents, and yellow can deal electric damage.
    • Custom 1 - Chill Pill: Only blue Megavitamins will be thrown, having a greater chance of freezing opponents.
    • Custom 2 - Mega-Vitamin: Megavitamins are much larger, but slower. They damage opponents multiple times before launching them.
    • Custom 3 - Megavitamin PM: Megavitamins deal less damage and don't even make opponents flinch, though they have a chance of putting them to sleep, leaving them vulnerable for attack.
  • Side Special - Super Sheet: Dr. Mario takes out a large sheet of paper and waves it in front of himself. The attack can reflect projectiles and reverse the opponent's direction.
    • Custom 1 - Breezy Sheet: The sheet deals less damage, but creates a windbox that pushes opponents in front of himself backward.
    • Custom 2 - Shocking Sheet: The sheet cannot reflect projectiles or turn opponents around, but it deals much more damage and knockback.
    • Custom 3 - Sheet Spin: Dr. Mario spins with the sheet three times. This makes it easier to reflect projectiles, as well as allowing him to reflect ones coming from behind, though it cannot flip opponents.
  • Up Special - Super Jump Punch: Dr. Mario performs a jumping uppercut, damaging opponents he hits on the way up and falling into a helpless state afterwards. The attack deals much more damage and knockback at the start of the move, and by using directional inputs, the jump can be angled.
    • Custom 1 - Ol' One-Two: Dr. Mario travels less distance. The attack only damages opponents at the start and end of the uppercut; the first combos into the second, which causes an explosion that deals heavy damage and knockback.
    • Custom 2 - Super Jump: Dr. Mario travel higher, but cannot damage opponents.
    • Custom 3 - Jump Punch: Instead of dealing heavy damage at the start of the move, Dr. Mario instead damages opponents multiple times before launching them at the peak of his jump. Deals more damage but less knockback.
  • Down Special - Dr. Tornado: Dr. Mario rapidly spins around, trapping opponents and damaging them with a series of discus clotheslines and spinning backfists before assuming a spread-eagle position to launch them. While spinning, Dr. Mario can move left and right, and repeatedly tapping the special button allows him to rise upward.
    • Custom 1 - Clothesline Tornado: Instead of damaging opponents multiple times, Dr. Mario damages opponents once while spinning, dealing heavy damage and kncokback. Has decreased mobility.
    • Custom 2 - Rising Tornado: Deals less damage, but grants Dr. Mario more mobility while spinning. He also rises higher if the special button is repeatedly tapped.
    • Custom 3 - Dr. Cyclone: Dr. Mario cannot rise while spinning, but the move creates vacuumboxes that draw nearby opponents into the attack.
  • Final Smash - Dr. Finale: Dr. Mario rears back and fires two massive Megavitamins forward, which spiral around each other. They damage opponents they hit and carry them across the stage, which can potentially KO them.
  • Charged State - Dr. Mario, PhD: Dr. Mario eats a Megavitamin and begins glowing gold. In this state, he has increases stats in running, jumping, aerial mobility, and attack power. He also has three midair jumps and uses stronger variants of Megavitamins, which are larger and deal more damage.

  • Daisy
    Super Mario Land (1989)
    DaisyCharged
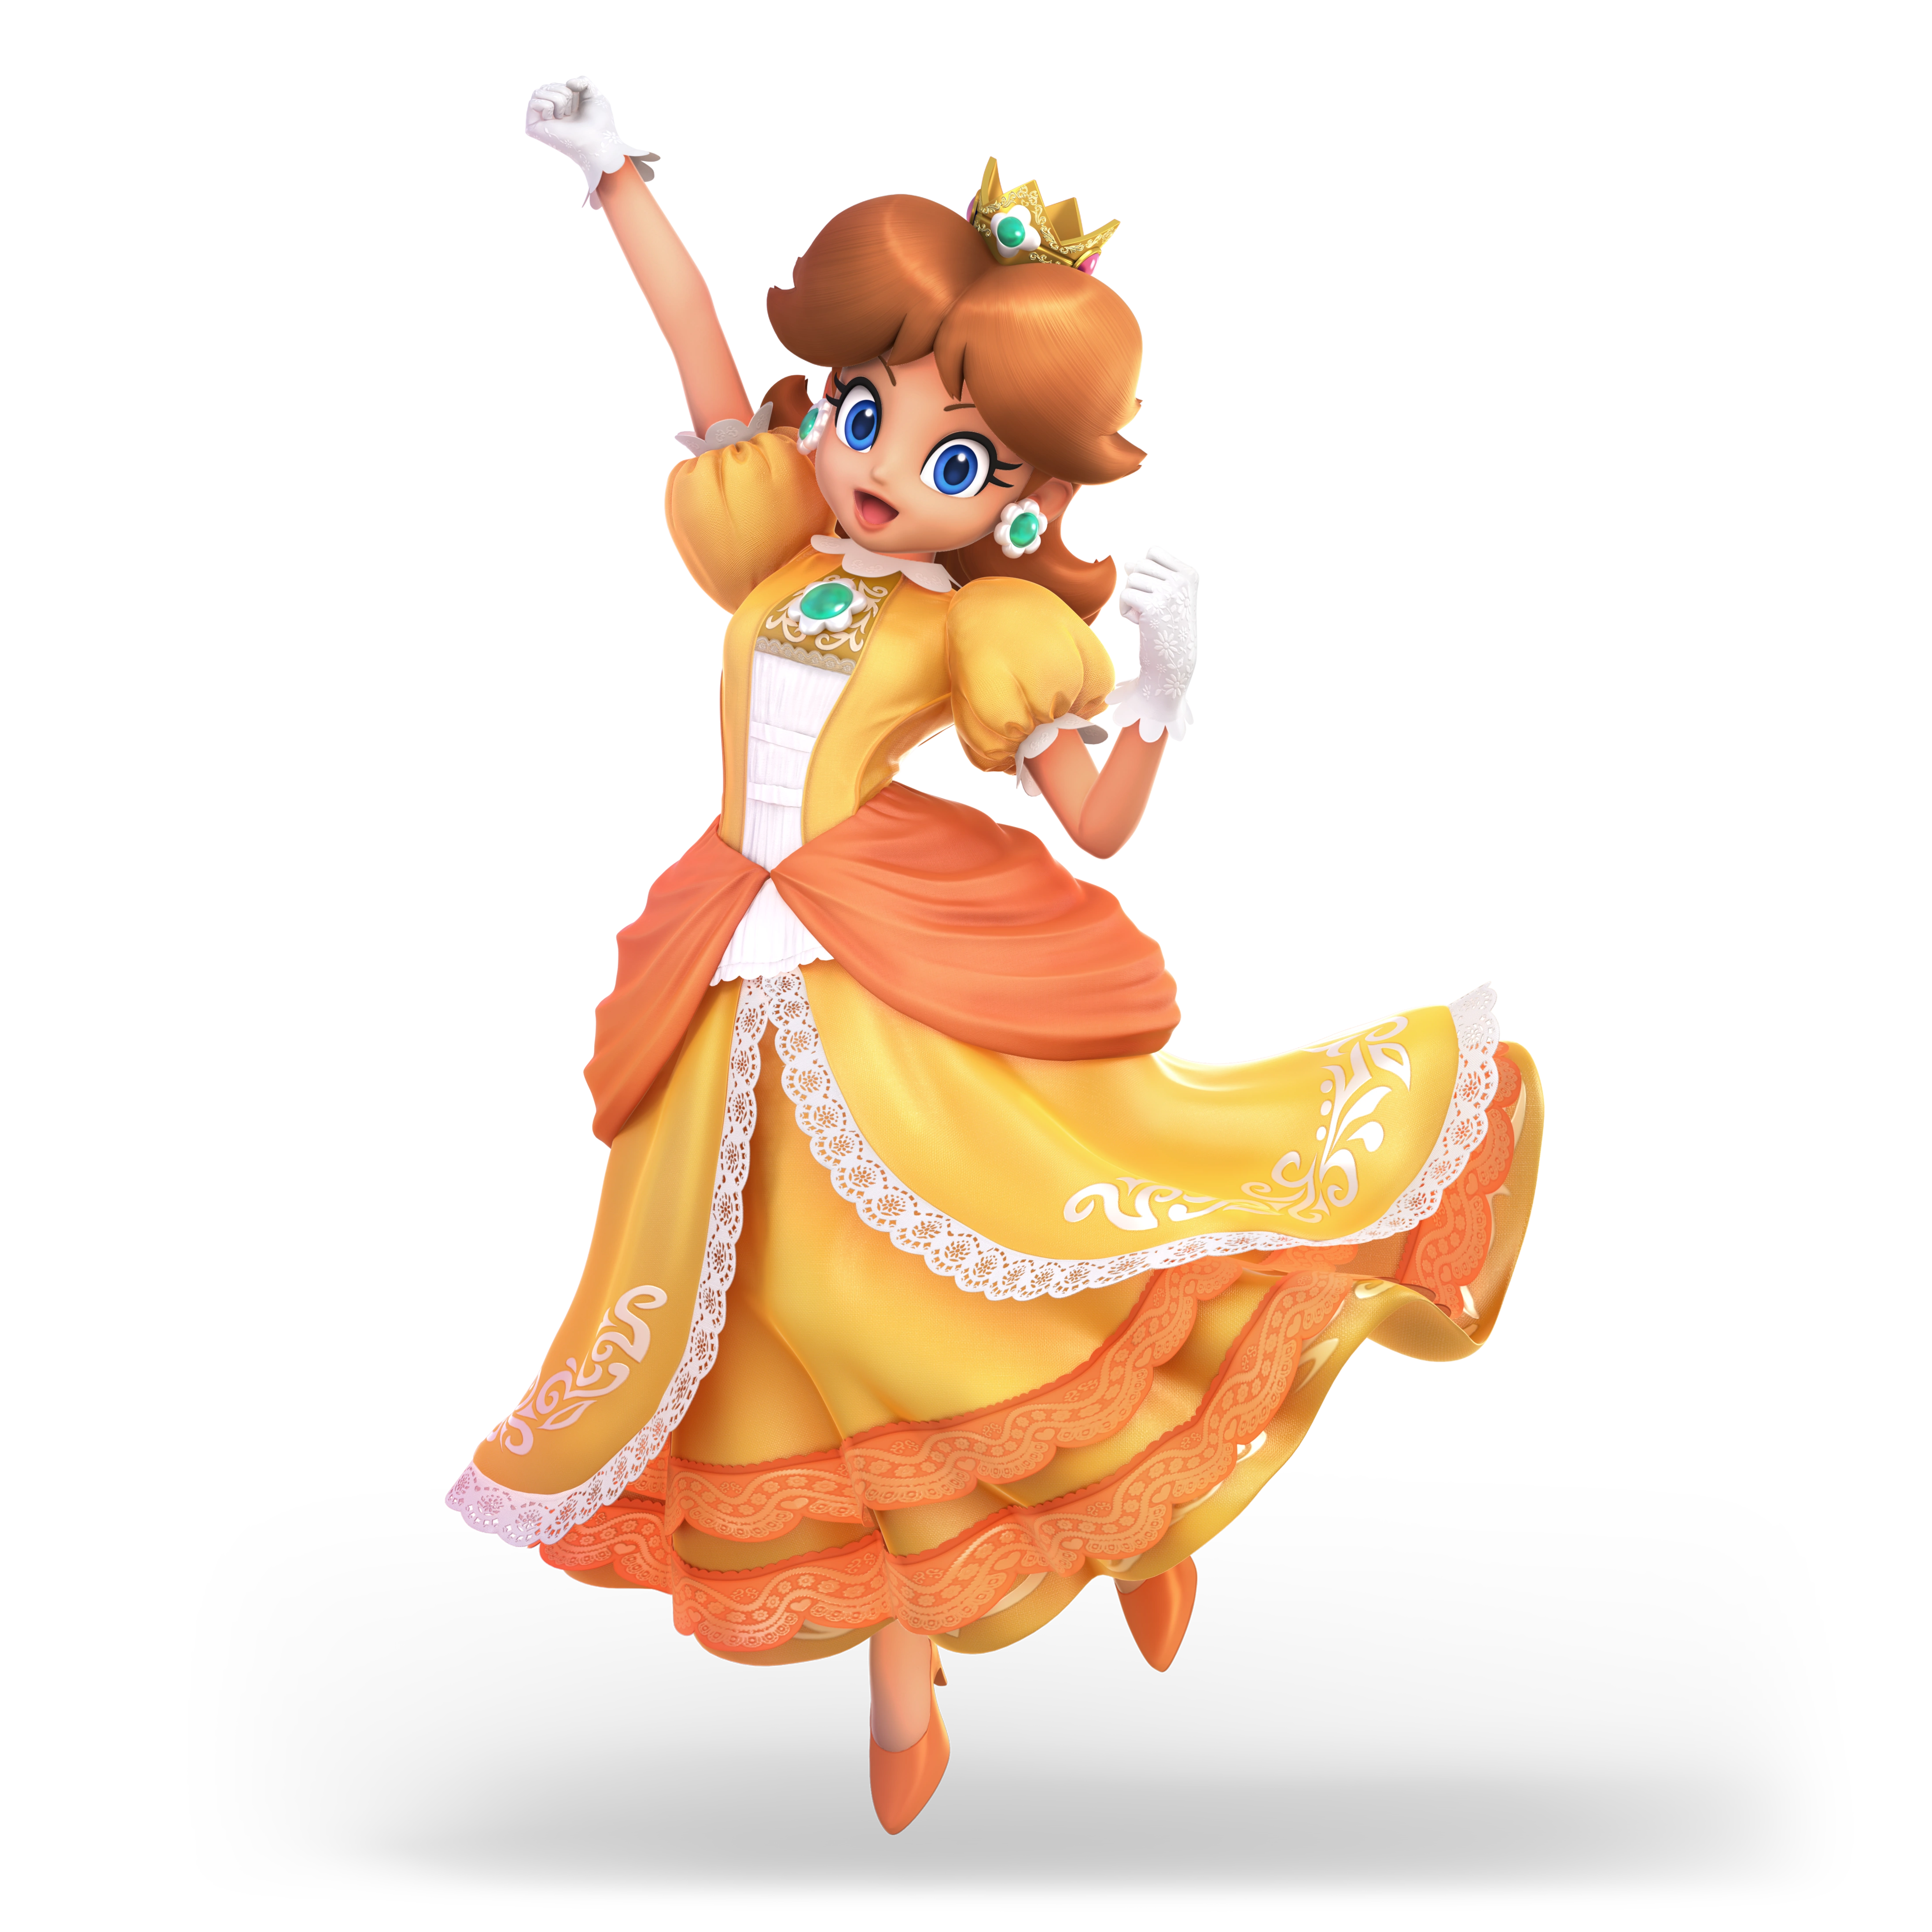
    Daisy (デイジー, Daisy) is a recurring character in the Mario series. She debuted in Super Mario Land, acting as the damsel-in-distress, and has since appeared in several Mario spin-offs. She is a tomboy, and despite being polar opposites with Peach personality-wise, they two are great friends. She is also the love interest for Luigi, much like how Peach is the love interest for Mario.

    Daisy, like Peach, can float in the air for a short time, allowing her to chain aerial attacks together. She has moderate speed while on the ground, though has low jump height. Her attacks, like Peach, deliver a lot of damage and knockback, allowing her to KO opponents easily. However, because of her light weight, opponents can launch her just as easily.

    Because Peach has a new moveset based on Super Princess Peach, Daisy mostly serves as a means of retaining Peach's old moveset. This, as such, no longer makes her an Echo Fighter like Ultimate. Her moveset mostly utilizes punches, slaps, and kicks, though she also has an assortment of projectiles at her disposal.
    SSB Mario Series Daisy Charged Stock Icon SSBUltimate Icon
    Daisy's Moveset

    • Neutral Attack: Daisy slaps twice, following with a side kick.
    • Forward Tilt: Daisy throws a 180-degree kick from low to high.
    • Forward Smash: Daisy pulls out a hockey stick, a baseball bat, or a frying pan depending on the angle the control stick is held in and swings it forward.
    • Up Tilt: Daisy extends her arm upward, making a flower burst out of it.
    • Up Smash: Daisy throws a jumping uppercut.
    • Down Tilt: Daisy throws a shin kick. The move can make opponents trip.
    • Down Smash: Daisy spins around while crouching, utilizing the edge of her dress as a blade, damaging opponents multiple times before launching them.
    • Dash Attack: Daisy throws a sliding kick.
    • Counter: Daisy summons a Gao, who breaths fire to damage the opponent multiple times.

  • Neutral Aerial: Daisy spins around with her arms outstretched.
  • Forward Aerial: Daisy takes off her crown and swings it forward.
  • Forward Crash: Daisy takes out a tennis racket and swings it forward.
  • Back Aerial: Daisy strikes behind her with her rear.
  • Back Crash: Daisy takes out a tennis racket, turns around, and swings it backward.
  • Up Aerial: Daisy throws a bicycle kick.
  • Up Crash: Daisy waves her arm above herself, creating a rainbow that damages opponents multiple times before launching them.
  • Down Aerial: Daisy kicks downward five times. The last kick can meteor smash opponents.
  • Down Crash: Daisy throws a stall-then-fall axe kick. The move can meteor smash opponents.

  • Grab: Daisy summons a Gao who reaches out to grab an opponent.
  • Pummel: The Gao chews on the opponent.
  • Forward Throw: The Gao flings the opponent forward.
  • Back Throw: The Gao swings the opponent backward.
  • Up Throw: The Gao swings the opponent upward.
  • Down Throw: The Gao pins the opponent on the ground and breathes fire on them.

  • Neutral Special - Superball: Daisy throws a metal ball downward or upward depending on directional inputs. It will bounce along surfaces and the edges of the screen, damaging opponents they hit. They will disappear after a short time. Up to three balls can be at play at once.
    • Custom 1 - Superbomb: The ball is active for less time, but it explodes when it hits an opponent, damaging them multiple times before launching them.
    • Custom 2 - Megaball: The ball is much larger and deals more damage, but travels slower.
    • Custom 3 - Dual Superball: Daisy throws two balls at once, one upward and one downward. Only two can be active at a time and they deal less damage, but they travel faster.
  • Side Special - Flower Bomber: Daisy flies forward with her rear, causing a flowery explosion on contact with an opponent and damaging them. If she hits an opponent, she gains a burst of upward momentum.
    • Custom 1 - Mushroom Bomber: Daisy deals less damage, but hitting opponents will cause a mushroom to grow on their heads.
    • Custom 2 - Flying Bomber: Daisy launches herself at an upward angle rather than forward. Has more noticeable endlag.
    • Custom 3 - Explosive Bomber: Daisy causes a fiery explosion on impact with an opponent. Deals more damage and knockback, but Daisy travels less distance.
  • Up Special - Parasol Jump: Daisy pulls out a parasol and leaps into the air, damaging opponents multiple times before launching them. At the peak of her jump, she opens it up, allowing her to float downward. While open, the parasol will damage opponents that touch it. Holding the control stick down will have Daisy fall into a helpless state, while holding up will have her open the parasol again and continue floating.
    • Custom 1 - Parasol Leap: Daisy jumps higher and deals more damage, but does not open the parasol to float downward.
    • Custom 2 - Light Parasol: Daisy doesn't jump initially, but instead opens the parasol immediately. She will float upward, damaging opponents she hits. She will fall into a helpless state after awhile or if the control stick is held down.
    • Custom 3 - Armored Parasol Jump: Daisy has super armor while floating, but doesn't jump as high and won't damage opponents.
  • Down Special - Vegetable: Daisy pulls a Vegetable from the ground, and can use it as an item. The Vegetables have different faces, with the angrier ones dealing more damage and knockback. Daisy also has a 10% chance of uprooting a Mr. Saturn or a Bob-omb instead.
    • Custom 1 - Light Veggie: Daisy can uproot Vegetables much quicker. They travel farther when thrown, but deal less damage.
    • Custom 2 - Heavy Veggie: Daisy takes longer to uproot Vegetables, but they are larger and deal more damage.
    • Custom 3 - Rotten Veggie: Daisy uproots brown, withered Vegetables. They deal less damage, but can cause a flower or mushroom to grow on opponents' heads.
  • Final Smash - Marathon: Daisy pulls out a baseball bat and swings it. If she hits an opponent, they are locked in a cinematic where whey fly through a tennis court and Daisy hits them with a tennis racket. They are then sent onto a golf course where she hits them with a golf club. Finally, they are sent flying through a baseball field where Daisy hits them with a baseball bat, sending them back to the stage and launching them.
  • Charged State - Flower Power: Daisy empowers herself with flowers. In this state, she is much faster and can float longer. Her attacks also deal more damage and knockback, with many of them enhanced with flowers.

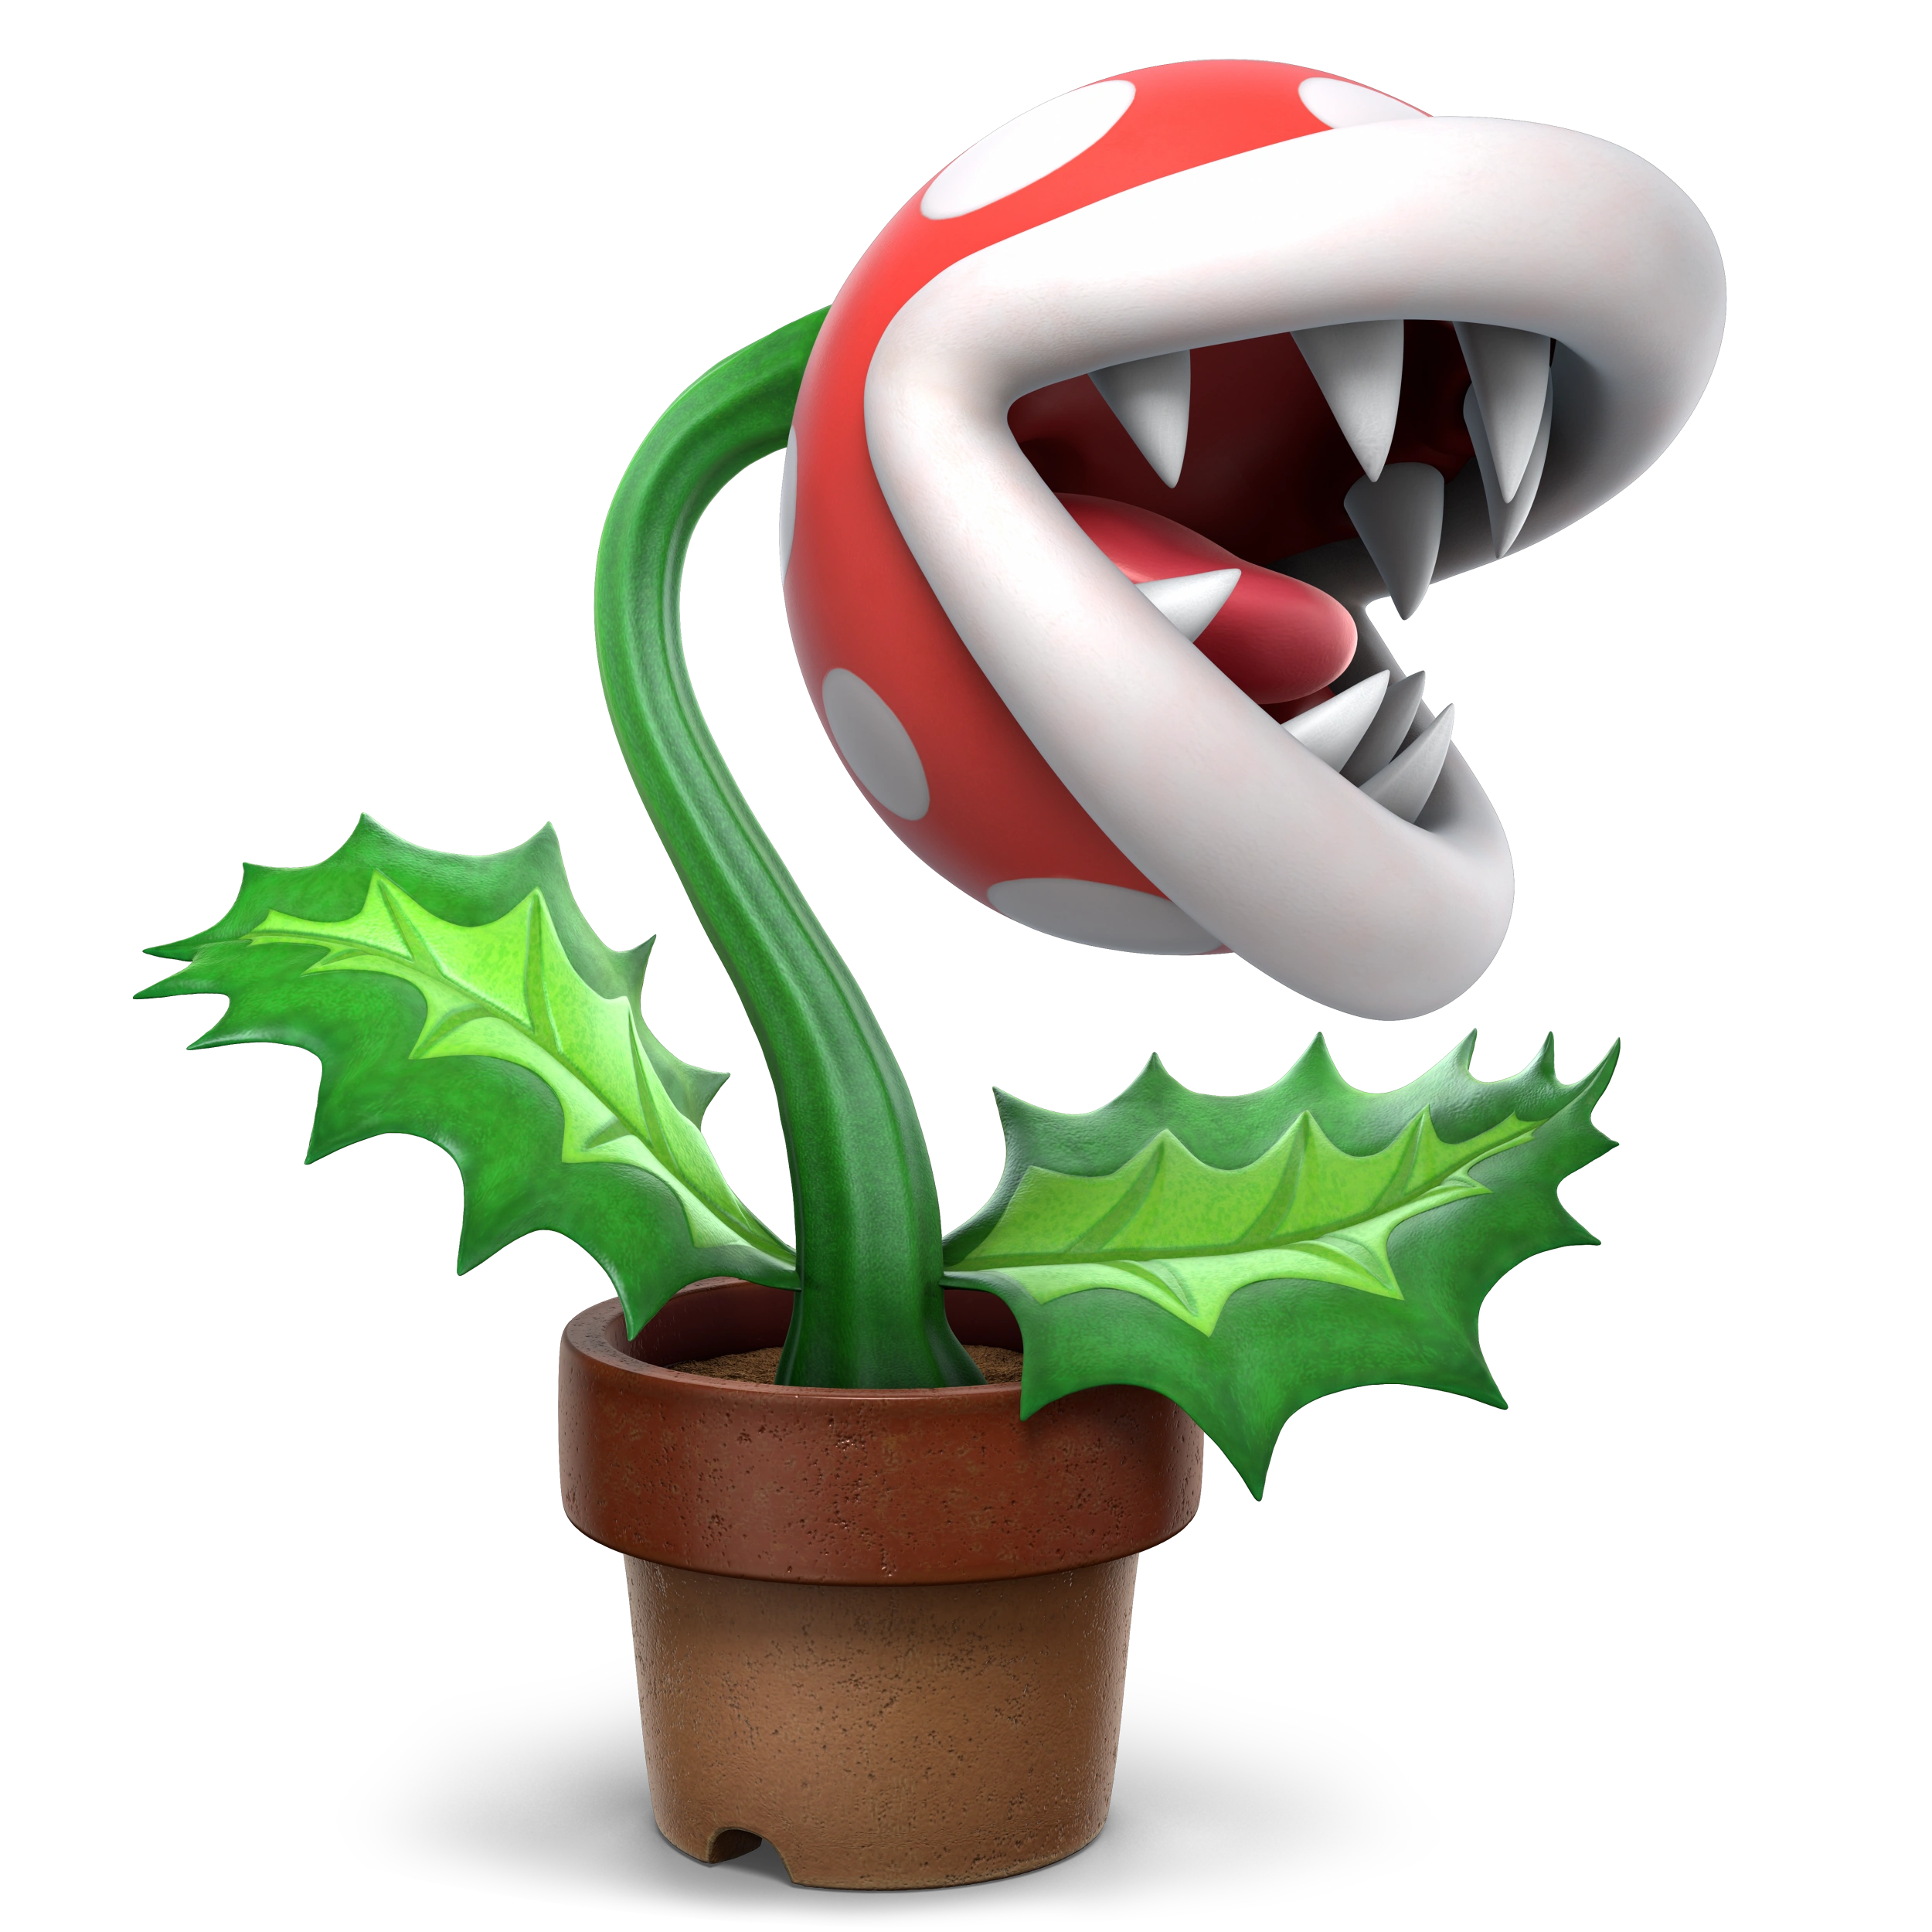
  • Piranha Plant
    Super Mario Bros. (1985)
    Piranha Plants (パックンフラワー, Packun Flower) are common enemies that appear throughout the Mario series. In their most basic form, Piranha Plants hide in Warp Pipes, and rise out of them to try and bite Mario. They also come in various other varieties, such as Fire Piranha Plants that spit fireballs, Stalking Piranha Plants that walk around and extend their stalks to bite Mario more easily, and Putrid Piranhas that spit poisonous gas.

    Piranha Plant is one of the slowest fighters in the game, sporting very slow ground mobility and below-average aerial mobility. Its attacks are a mixed bag, having utility in various areas. For example, its smash and crash attacks are good KO moves, its tilts are good for starting combos, and its back aerial and Ptooie being good moves for edgeguarding. Despite its lackluster mobility, Piranha Plant has a great and flexible recovery, giving it great survivability that is complemented by its above-average weight.

    Piranha Plant resides in a pot for the entire battle, and sprouts feet like a Stalking Piranha Plant to move around. Aside from bites and attacks utilizing the pot, Piranha Plant's moveset draws from its various subspecies, including some obscure ones.
    SSB Mario Series PiranhaPlantHeadSSBU SSBUltimate Icon
    Piranha Plant's Moveset

    • Neutral Attack: Piranha Plant bites twice, following with a headbutt. If the attack button is pressed repeatedly, it instead follows with a flurry of bites, damaging opponents multiple times before launching them with a stronger bite.
    • Forward Tilt: Piranha Plant lunges forward and bites.
    • Forward Smash: Piranha Plant transforms into a Spiky Piranha Plant and throws a headbutt.
    • Up Tilt: Piranha Plant bites upward.
    • Up Smash: Piranha Plant lunges upward and bites. Its stalk will extend longer depending on how long the move is charged, similar to a Stalking Piranha Plant.
    • Down Tilt: Piranha Plant swipes with its leaf.
    • Down Smash: Piranha Plant stomps on the ground with its pot, causing spiked vines to rise from the ground.
    • Dash Attack: Piranha Plant lunges forward with its pot.
    • Counter: Piranha Plant transforms into a Prickly Piranha Plant and slams its head into the ground. The move can bury and meteor smash opponents.

  • Neutral Aerial: Piranha Plant spins while extending its leaves, damaging opponents multiple times before launching them.
  • Forward Aerial: Piranha Plant swings its pot upward.
  • Forward Crash: Piranha Plant throws a headbutt.
  • Back Aerial: Piranha Plant spits a fireball backward.
  • Back Crash: Piranha Plant spits a burst of flames backward.
  • Up Aerial: Piranha Plant throws an upward headbutt.
  • Up Crash: Piranha Plant transforms into a Piranha Creeper and extends its stalk upward, biting.
  • Down Aerial: Piranha Plant throws a stomp with its pot. The move can meteor smash opponents.
  • Down Crash: Piranha Plant transforms into a Bungee Piranha and extends its stalk downward, biting.

  • Grab: Piranha Plant reaches out with its leaf to grab opponents.
  • Pummel: Piranha Plant bites the opponent.
  • Forward Throw: Piranha Plant headbutts the opponent.
  • Back Throw: Piranha Plant reels back with the opponent in tow and flings them backward.
  • Up Throw: Piranha Plant heaves the opponent upward before biting them.
  • Down Throw: Piranha Plant pins the opponent on the ground and bites them twice.

  • Neutral Special - Ptooie: Piranha Plant spits a spiked ball upward and blows on it to keep it afloat. While blowing, it will periodically move up and down, damaging opponents it hits. Directional inputs can be used to launch the spiked ball left or right, with its arc changing how high it is; the lower the ball is, the farther it will travel.
    • Custom 1 - River Piranha: The spiked ball is smaller and deals less damage, but it will fly farther.
    • Custom 2 - Nipper Spore: Instead of a spiked ball, Piranha Plant spits a Nipper Spore. It will fall slowly to the ground and transform into a Nipper Plant upon landing, which will hop around the stage and bite opponents nearby. The Nipper Plant will be defeated if it takes enough damage, and the Nipper Spore will disappear after any damage to it is dealt. Up to two Nipper Plants can be at play.
    • Custom 3 - Fire Piranha Plant: Instead of a spiked ball, Piranha Plant spits a fireball aimed at the nearest opponent. Directional inputs can be used to aim it however.
  • Side Special - Poison Breath: Piranha Plant transforms into a Putrid Piranha, and charges up poisonous breath. Pressing the special button again will have it release a cloud of poisonous breath in front of itself, with it remaining longer depending on how long the move is charged. Opponents in the cloud will take gradual damage, and at full charge, they will grow a flower on their heads.
    • Custom 1 - Frost Breath: Piranha Plant transforms into a Frost Piranha instead of a Putrid Piranha, and spits icy breath. It deals less damage and doesn't stay around as long, but at full charge it will freeze opponents.
    • Custom 2 - Plorp Breath: Piranha Plant transforms into a Piranha Plorp instead of a Putrid Piranha. The breath will cause opponents to grow a mushroom on their heads at full charge instead of a flower.
    • Custom 3 - Inky Piranha Plant: Piranha Plant transforms into an Inky Piranha Plant instead of a Putrid Piranha, and spits out ink. Instead of spitting a cloud that deals gradual damage, the ink glob deals damage and knockback, dealing more and travelling farther the longer it is charged. It also creates a puddle of ink on the ground, causing opponents that step in it to slip.
  • Up Special - Piranhacopter: Piranha Plant spins its leaves to propel itself upward, damaging opponents multiple times before launching them and falling into a helpless state afterwards. While rising, directional inputs can be used to change its direction.
    • Custom 1 - Jumping Piranha Plant: Piranha Plant transforms into a Jumping Piranha Plant and leaps upward, biting. The move deals more damage, but covers less distance.
    • Custom 2 - Piranha Planet: Piranha Plant transforms into a Piranha Planet and rises upward, damaging opponents it hits. It is slower and deals less damage, but it will travel farther and can be more easily controlled.
    • Custom 3 - Hootie the Blue Fish: Piranha Plant transforms into a Hootie the Blue Fish, and moves upward while biting. It travels less distance but it is more easily controllable.
  • Down Special - Long-Stem Strike: Piranha Plant hides in its pot before rising out of it and biting, while extending its stalk like a Stalking Piranha Plant. The longer the move is charged, the longer its stalk will extend. While charging, the pot can be tilted with directional inputs to change its direction.
    • Custom 1 - Piranha Pest: Piranha Plant extends a large tongue like a Piranha Pest instead of its stalk. It grabs opponents and draws them into its mouth, where it can chew on them to replenish health before spitting them forward or backward.
    • Custom 2 - Piranha Creeper: Piranha Plant transforms into a Piranha Creeper and extends its stalk while biting. The move cannot be charged, and it extends slowly, but it can be controlled with directional inputs. Its stalk will also damage opponents that touch it.
    • Custom 3 - Elasto-Piranha: Piranha Plant transforms into an Elasto-Piranha before extending its stalk. It can only lunge upward, but while charging, directional inputs can be used to move left and right.
  • Final Smash - Polluted Piranha: Piranha Plant summons a Polluted Piranha, which forms in the background. It will spit globs of goop everywhere, dealing heavy damage to opponents hit by it. The goop also covers the ground for a few seconds after it disappears, both slowing down opponents and gradually damaging them.
  • Charged State - Big Piranha Plant: Piranha Plant grows significantly larger, as well as growing spikes on its stem. Several roots also break from the pot, acting as legs. In this state, its attacks cover much more range and deal more damage. It is also heavier and can move faster.

  • 8-Bit Mario
    Super Mario Odyssey (2017)
    8BitMarioCharged
    8-Bit Mario (8ビットマリオ, 8 Bit Mario) is a form of Mario based on his sprite in Super Mario Bros. He can achieve this form in Super Mario Odyssey by purchasing the 8-Bit Cap, giving him a static, blocky shape. While in this form, Mario's limbs do not animate, but he still has the same abilities. The sprite of Mario the costume is based on is also quite iconic, albeit it is recolored to match his modern color scheme.

    8-Bit Mario is a middle-lightweight character, and can be knocked away relatively easily compared to the rest of the cast. In terms of mobility, he is rather fast, and has a unique momentum mechanic similar to Mario's running in Super Mario Bors., as he moves forward he will continue to pick up speed, which also translates to his air speed. If he keeps constantly moving, 8-Bit Mario can keep increasing his momentum, allowing him to become one of the fastest characters in the game. This also complements his quick frame data, and significantly helps his combo game.

    Much like Super Mario Odyssey, 8-Bit Mario's limbs do not animate, so instead most of his attacks consist of body slams, spins, and flips to damage the opponent. Other parts of his moveset, namely his special moves, take reference from Super Mario Maker.
    SSB Mario Series 8-Bit Mario Stock Icon SSBCharged Icon
    8-Bit Mario's Moveset

    • Neutral Attack: 8-Bit Mario leans forward to attack opponents with his fist, before backflipping to kick the opponent.
    • Forward Tilt: 8-Bit Mario performs a somersault to kick the opponent before rolling back into place. Charging the attack can increase how far he slides.
    • Forward Smash: 8-Bit Mario plants himself face-first on the ground and slides forward.
    • Up Tilt: 8-Bit Mario turns upside-down to throw a scorpion kick.
    • Up Smash: 8-Bit Mario jumps upward.
    • Down Tilt: 8-Bit Mario plants himself face first on the ground.
    • Down Smash: 8-Bit Mario jumps upward and lands headfirst into the ground. The move can bury opponents.
    • Dash Attack: 8-Bit Mario throws a battering ram.
    • Counter: 8-Bit Mario backflips to kick upward.

  • Neutral Aerial: 8-Bit Mario performs several somersaults.
  • Forward Aerial: 8-Bit Mario leans back to kick forward.
  • Forward Crash: 8-Bit Mario throws a downward headbutt. The move can meteor smash opponents.
  • Back Aerial: 8-Bit Mario thrusts his head backward.
  • Back Crash: 8-Bit Mario frontflips to punch backward.
  • Up Aerial: 8-Bit Mario throws a bicycle kick.
  • Up Crash: 8-Bit Mario backlfips to kick upward.
  • Down Aerial: 8-Bit Mario frontflips to punch downward. The move can meteor smash opponents.
  • Down Crash: 8-Bit Mario performs a stall-then-fall stomp. The move can bury and meteor smash opponents.

  • Grab: The hand from Super Mario Maker uses the stylus to hold the opponent in place.
  • Pummel: The hand from Super Mario Maker shakes the opponent.
  • Forward Throw: The hand from Super Mario Maker flings the opponent forward.
  • Back Throw: The hand from Super Mario Maker flings the opponent forward.
  • Up Throw: The hand from Super Mario Maker flings the opponent upward.
  • Down Throw: The hand from Super Mario Maker flings the opponent downward. If the move is used at the edge, the move can meteor smash.

  • Neutral Special - POW Block: The hand from Super Mario Maker places a POW Block above 8-Bit Mario, who jumps upward to hit it. This will cause a stage-wide tremor that causes all grounded opponents to be damaged. The POW Block can then be hit or attacked up up three times before it disappears. Opponents can use the POW Block for themselves however. Only one POW Block can be at play at a time.
    • Custom 1 - Slip POW Block: Instead of damaging opponents, the POW Block causes all grounded opponents to trip.
    • Custom 2 - POW Block Wave: Hitting the POW Block creates a shockwave around itself, damaging all opponents in the radius instead of only hitting grounded opponents.
    • Custom 3 - POW Block Tremor: The POW Block can only be hit once and the move has a lot of endlag, but it deals a lot more damage and knockback.
  • Side Special - Koopa Shell: The hand from Super Mario Maker places a Koopa Shell in front of 8-Bit Mario, which he kicks forward. If the special button is tapped at the right time, the hand will add a Super Mushroom to it, causing it to grow bigger and deal more damage. It can be jumped on and used by opponents, but they cannot pick it up like an item.
    • Custom 1 - Slow Shell: The timing for the big variant is less strict, but the shell travels slower.
    • Custom 2 - Shell Strike: The timing for the big variant is more strict, but the shell deals more damage.
    • Custom 3 - Pushy Shell: Instead of damaging the opponents, the shell will push them backward.
  • Up Special - Platform: The hand from Super Mario Maker places a column of blocks below 8-Bit Mario, which descend all the way to the ground or the lower blast zone. 8-Bit Mario can jump from this platform to recover, though he cannot use the move again until he lands on a different platform. Over time, the platform will start descending. It can be broken by 8-Bit Mario or his opponents with attacks, though doing so will cause it to topple over, dealing varying damage depending on the size of the column. Using the move again after landing allows 8-Bit Mario to create another platform, but the previous one will disappear.
    • Custom 1 - Wide Platform: A much wider column of blocks is created. It sinks faster, but allows 8-Bit Mario to better utilize his momentum mechanic to recovery easier.
    • Custom 2 - Sturdy Platform: The column cannot be knocked down by attacks. It will not sink, and disappears after a short time.
    • Custom 3 - Floating Platform: A single platform is created instead of a column of blocks. It will rise upward instead of sinking downward, though it loses the other properties the column has.
  • Down Special - Lava Bubble: The hand from Super Mario Maker places a ? Block above 8-Bit Mario, which he hits. It reveals a Lava Bubble, which will drop to the lower blast zone and damage opponents it hits. After this, it will continue jumping from the lower blast zone. After three jumps it will disappear. Only one can eb at play at a time.
    • Custom 1 - Circling Boo Buddies: The ? Block reveals Circling Boo Buddies instead of a Lava Bubble. They will circle around the ? Block for a short time before disappearing, damaging opponents they hit.
    • Custom 2 - Cheep Cheep: The ? Block reveals a Cheep Cheep instead of a Lava Bubble. It will continually bounce from below the blast zone, targeting opponents. It deals less damage than the Lava Bubble.
    • Custom 3 - Chain Chomp: The ? Block reveals a Chain Chomp instead of a Lava Bubble. It will bounce acorss the ground, heavily damaging opponents it hits.
  • Final Smash - Mario Maker Madness: The hand from Super Mario Maker gives 8-Bit Mario a Koopa Clown Car and a Spiny Shell helmet. He will then begin floating in the Koopa Clown Car above the stage. Pressing the attack button has him drop Bob-ombs that explode on impact, while pressing the special button will have him shoot a Bullet Bill that is aimed at an opponent. After awhile, the Koopa Clown Car explodes, returning 8-Bit Mario to his previous state.
  • Charged State - Big Mushroom: The hand from Super Mario Maker gives 8-Bit Mario a Big Mushroom, transforming him into Big Mario. In this state, his attacks cover more range and deal more damage. He can also bury opponents by jumping on them, and he creates small shockwaves upon landing that cause nearby opponents to trip.

  • Geno
    Super Mario RPG: Legend of the Seven Stars (1996)
    Geno Nibroc-Rock
    Geno (ジーノ, Geno) is a major character in Super Mario RPG: Legend of the Seven Stars, being one of Mario's party members. He serves a higher authority, and comes to the Mushroom Kingdom as a puppet in order to fix the Star Road after it is destroyed by the Smithy Gang. As a party member, he has the highest speed out of all characters, but has low defense.

    Geno is a middleweight with pretty quick mobility and average jump height. He has a unique mechanic based on Timed Hits from Super Mario RPG: Legend of the Seven Stars where, after landing an attack, the attack button can be pressed again for it to deal more damage and knockback. In general, his normal attacks are good for combos while his Timed Hit attacks are good finishers and KO moves. However, he doesn't have a good recovery, and he can be edgeguarded easily.

    Geno's attacks are all based on his abilities in Super Mario RPG: Legend of the Seven Stars. His normal attacks take reference from his physical attacks, while his special attacks take reference from his special moves.
    SSB Mario Series GenoHeadSSBU SSBCharged Icon
    Geno's Moveset

    • Neutral Attack: Geno throws a one-two punch combo, followed by using his Star Gun to fire star-shaped projectiles forward, damaging opponents multiple times before launching them with a bigger star.
    • Forward Tilt: Geno throws a roundhouse kick.
    • Forward Smash: Geno shoots his fist forward like a rocket, whoch explodes on impact.
    • Up Tilt: Geno waves his hand upward in an overarching motion.
    • Up Smash: Geno bacflips to kick upward.
    • Down Tilt: Geno throws a legsweep.
    • Down Smash: Geno punches the ground, causing an explosion.
    • Dash Attack: Geno leans forward while throwing a forearm club.
    • Counter: Geno throws an uppercut.

  • Neutral Aerial: Geno spins around with his arms outstretched.
  • Forward Aerial: Geno throws a flying kick.
  • Forward Crash: Geno uses his Hand Cannon to fire a cannonball forward.
  • Back Aerial: Geno throws a dropkick.
  • Back Crash: Geno uses his Hand Cannon to fire a cannonball backward.
  • Up Aerial: Geno uses his Star Gun to fire star-shaped projectiles upward, damaging opponents multiple times before launching them.
  • Up Crash: Geno uses his Hand Cannon to fire a cannonball upward.
  • Down Aerial: Geno uses his Star Gun to fire star-shaped projectiles downward, damaging opponents multiple times before launching them.
  • Down Crash: Geno uses his Hand Cannon to fire a cannonball downward.

  • Grab: Geno reaches out to grab the opponent.
  • Pummel: Geno headbutts the opponent.
  • Forward Throw: Geno shoves the opponent forward and fires his fist at them like a rocket.
  • Back Throw: Geno spins around and tosses the opponent backward.
  • Up Throw: Geno heaves the opponent upward.
  • Down Throw: Geno slams the opponent into the ground.

  • Neutral Special - Geno Beam: Geno fires a beam of energy out of his hand. The move can charge by holding the special button, and can be cancelled and stored. The beam deals more damage and travels farther depending on how long it is charged.
    • Custom 1 - Draining Beam: The beam deals significantly less damage and knockback, but Geno will be healed by the damage opponents receive.
    • Custom 2 - Breaker Beam: The beam is much larger and deals more damage and knockback, but it takes longer to charge, and it cannot be cancelled or stored.
    • Custom 3 - Quick Beam: The beam doesn't need to be charged, but it covers significantly less distance.
  • Side Special - Geno Whirl: Geno throws a white energy projectile forward that explodes on impact, dealing moderate damage and knockback. Uniquely, the Timed Hit variant of the move deals significantly more damage and knockback to opponents above 100% damage.
    • Custom 1 - Lightning Whirl: The projectile travels faster, but deals less damage and knockback.
    • Custom 2 - Vortex Whirl: The projectile is larger and travels slower. It has windboxes that draw opponents into it, damaging them multiple times before launching them,.
    • Custom 3 - Aggressive Whirl: The Timed Hit variant deals more damage and knockback to opponents below 100%, but less to opponents above 100%.
  • Up Special - Geno Flash: Geno transforms into a cannon, and shoots himself in the direction the control stick is held. At the peak of his flight, he explodes into a yellow flash, dealing heay damage and knockback to opponents and falling into a helpless state afterwards.
    • Custom 1 - Geno Flash Blast: Geno travels less distance, but the explosion is larger and deals more damage.
    • Custom 2 - Cannon Geno Flash: Geno travels farther, but doesn't explode. Instead, he damages opponents he hits in his flight.
    • Custom 3 - Far Geno Flash: Gen travels farther, but the explosion is smaller and deals less damage.
  • Down Special - Geno Boost: Geno boosts his attack power for a short time, indicated by glowing red. The Timed Hit variant allows him to boost his damage and knockback resistance as well. He remains in this state for 10 seconds, and the move has a 10-second cooldown, though it will increase to 15 if the Timed Hit variant is used.
    • Custom 1 - Berserk Boost: Geno's power and defense capabilities are increased much more, but it is only active for six seconds and the cooldown period is 15 seconds regardless if the Timed Hit variant is used or not.
    • Custom 2 - Lasting Boost: Geno's power and defense capabilities aren't increased as much, but he can last 20 seconds in this state.
    • Custom 3 - Super Geno Boost: Geno can last in this form for five seconds. However, every time he hits an opponent or the opponent hits him, the timer will reset, meaning he can keep the form by stringing combos. The cooldown, however, is 15 seconds, and 20 seconds if the Timed Hit variant is used.
  • Final Smash - Geno Blast: Geno summons light energy from the sky, causing beams of energy to rain onto the stage, heavily damaging opponents they hit.
  • Charged State - The Seven Stars: Geno surrounds himself with the seven Star Pieces, which form Star Road. Geno is then empowered by them, glowing yellow. In this state, he is much faster and stronger, and his projectiles travel farther. His Timed Hits is also exaggerated, with them dealing more damage and knockback.

  • Wart
    Yume Kōjō: Doki Doki Panic (1987)
    Wart Nibroc-Rock
    Wart (マムー, Mamū) is the main antagonist of Yume Kōjō: Doki Doki Panic, which was rebranded to Super Mario Bros. 2 for western audiences. He is a large frog-like creature who invaded the world of Subcon, the land of dreams, taking over their Dream Machine and using it to cause mayhem. The inhabitants of Subcon reach out to Mario in a dream and the next day he, Luigi, Peach, and Toad find a doorway to Subcon. Wart (under his Japanese name) also appears in The Legend of Zelda: Link's Awakening.

    Wart fits the mold of a typical heavyweight character, boasting high weight and KO power, but slow mobility. To make up for his lackluster speed, however, Wart has a really good camping game thanks to his unique projectiles, which allow him to keep opponents at bay. Additionally, he has high jump height and a good recovery. Further aiding his survivability is his unique mechanic where attacks in most cases will deal 0.4x the knockback against Wart. However, when he opens his mouth, which happens in some attacks, he will instead take 1.7x the amount of knockback the attack would have done normally.

    Wart's basic attacks usually revolve around his arms, legs, mouth, or the use of his whole body. His other attacks take reference from different objects and enemies from Yume Kōjō: Doki Doki Panic / Super Mario Bros. 2, particularly his special attacks.
    SSB Mario Series Wart Stock Icon SSBCharged Icon
    Wart's Moveset

    • Neutral Attack: Wart throws two alternating claw slashes followed by a body slam.
    • Forward Tilt: Wart flips his cape.
    • Forward Smash: Wart opens his mouth and blows a bubble, popping it once the move is released. Grounded opponents damaged by the bubble will fall asleep, while aerial opponents suffer light knockback.
    • Up Tilt: Wart leaps upward and throws an upward headbutt.
    • Up Smash: Wart tosses a bomb upward, which explodes on impact or at the peak of its height. Charging the move will increase the distance it travels. Directional inputs can also be used to throw the bomb in slight arcs.
    • Down Tilt: Wart throws a crouching bite.
    • Down Smash: Wart takes a deep breath and puffs out his stomach, jumping upward and slamming into the ground. Opponents he lands on will be buried.
    • Dash Attack: Wart lunges forward and bites.
    • Counter: Wart bumps the opponent with his stomach.

  • Neutral Aerial: Wart performs a somersault.
  • Forward Aerial: Wart throws a sex kick.
  • Forward Crash: Wart throws a frontal clap.
  • Back Aerial: Wart throws a backward punch.
  • Back Crash: Wart throws a dropkick.
  • Up Aerial: Wart bites upward.
  • Up Crash: Wart opens his mouth and blows a bubble, popping it once the move is released.
  • Down Aerial: Wart bites downward.
  • Down Crash: Wart throws a bomb downward, which explodes on impact.

  • Grab: Wart reaches out to grab the opponent.
  • Pummel: Wart headbutts the opponent.
  • Forward Throw: Wart shoves the opponent forward with his stomach.
  • Back Throw: Wart spins around with the opponent in tow and throws them backward.
  • Up Throw: Wart heaves the opponent upward.
  • Down Throw: Wart slams the opponent into the ground and stomps on them.

  • Neutral Special - Bubble Swarm: Wart opens his mouth and begins charging. If the special button is pressed again or the move reaches full charge, Wart will spit up to eight bubbles which fly forward at gradually decreasing distances and arcs, damaging opponents they hit. The bubbles can also neutralize projectiles.
    • Custom 1 - Big Bubble: Wart fires a single bubble instead of multiple ones. It is much larger, travels farther, and deals more damage.
    • Custom 2 - Bubble Bombs: The bubbles don't travel as far and can't neutralize projectiles, but they will explode on impact and deal more damage.
    • Custom 3 - Yucky Bubbles: The move takes longer to charge, but the bubbles can place a mushroom on opponents' heads.
  • Side Special - Bullet Ball: Wart opens his mouth and spits a fast-travelling metal ball that flies in a straight line. The move can be charged, allowing him to spit up to five in rapid succession. They don't deal much knockback, but combined they can deal a good chunk of damage.
    • Custom 1 - Rapidfire Bullets: Instead of being a charging move, Wart can continually spit balls by tapping the special button. They can not be fired in as quick succession.
    • Custom 2 - Shotgun Bullet: Wart can only ever spit one ball, and it travels much less distance. However, it will explode on impact and deals much more damage, especially the closer the opponent is to Wart.
    • Custom 3 - Electric Bullet: Wart only fires one ball and it cannot be charged. However, it is electrically-enhanced and can inflict paralysis on opponents.
  • Up Special - Pidgit's Carpet: Wart hops on a magic carpet. In this state, he can float freely through the air for a short time before it disappears or he is hit off of it and he falls into a helpless state. While on the carpet, he can use any of his ground or special attacks, and the move can be cancelled by touching a ledge or the ground.
    • Custom 1 - Flying Carpet: The carpet can travel faster, but Wart cannot stay on it for as long.
    • Custom 2 - Magic Carpet: Wart has super armor while riding the carpet, and cannot be knocked off of it. However, he cannot travel as fast.
    • Custom 3 - Soaring Carpet: The carpet will move upward automatically. Wart also cannot attack, but he will damage any opponents he hits. This makes it function as a traditional recovery move.
  • Down Special - Lil' Sparky: Wart opens his mouth and spits out a Lil' Sparky, which acts like a Hothead and travels along floors, walls, and ceilings, damaging opponents it hits. If used in midair, the Lil' Sparky travels straight downward until it hits a surface. After awhile, it will disappear. Only one Lil' Sparky can be at play at a time.
    • Custom 1 - Icy Sparky: The Lil' Sparky is ice-enhanced. It doesn't deal as much damage, but it can freeze opponents.
    • Custom 2 - Shocking Sparky: The Lil' Sparky travels slower and isn't on-screen for as long, but it can inflict paralysis on opponents.
    • Custom 3 - Speeding Sparky: The Lil' Sparky deals less damage, but it can travel significantly faster.
  • Final Smash - Dream Machine: Wart stomps on the ground, causing the Dream Machine to rise from under him. It then begins firing out a barrage of vegetables that fly in random arcs, damaging opponents they hit. At the end of the move, three giant vegetables are also fired, which deal heavy damage and knockback. After this, the Dream Machine disappears.
  • Charged State - Bubbly Wart: Wart blows a giant bubble around himself, which pops, causing him to glow yellow and have bubbles emitting from him. In this state, Wart is much faster, his defense against attacks is greatly increased, and he can jump higher.

  • Dr. Luigi
    Dr. Luigi (2013)
    Dr. Luigi (ドクタールイージ, Doctor Luigi) is the doctor persona Luigi takes up in the Dr. Mario series. He works alongside Dr. Mario in the Mushroom Kingdom Hospital, utilizing Megavitamins to destroy Viruses. Dr. Luigi mainly uses special L-shaped capsules of Megavitamins instead of the traditional ones. These can potentially eliminate a Virus in a single move, but misplacing one can be dangerous.

    Very similar to Dr. Mario, Dr. Luigi is both strong and versatile, having access to both combo and KO moves. He is a middleweight with good ground mobility, but among the slowest aerial mobility in the game. He also has some rather risky, yet rewarding techniques in his special moves that can easily turn the tide of a game. All of these elements make Dr. Luigi a character of extremes.

    Much like how Dr. Mario was treated in Charged, Dr. Luigi retains Luigi's moveset from previous Super Smash Bros. games, with some alterations. Because of this, he mainly attacks with punches and kicks, rarely using other tools outside of his neutral special. He also has a different set of throws, as he doesn't use the Poltergust G-00.
    SSB Mario Series Drluigistock SSBCharged Icon
    Dr. Luigi's Moveset

    • Neutral Attack: Dr. Luigi throws a one-two punch combo followed by thrusting his bottom forward.
    • Forward Tilt: Dr. Luigi throws a wheel kick.
    • Forward Smash: Dr. Luigi throws a knifehand thrust.
    • Up Tilt: Dr. Luigi throws an overhand swipe.
    • Up Smash: Dr. Luigi throws an upward headbutt.
    • Down Tilt: Dr. Luigi throws a low-angle back kick. The move can trip opponents.
    • Down Smash: Dr. Luigi throws a breakdance sweep.
    • Dash Attack: Dr. Luigi throws a series of childish punches while running forward, damaging opponents multiple times before launching them.
    • Counter: Dr. Luigi throws a haymaker.

  • Neutral Aerial: Dr. Luigi throws a sex kick.
  • Forward Aerial: Dr. Luigi throws a downward knifehand strike.
  • Forward Crash: Dr. Luigi throws a downward headbutt. The move can meteor smash opponents.
  • Back Aerial: Dr. Luigi throws a dropkick.
  • Back Crash: Dr. Luigi turns around and throws a haymaker. The move can meteor smash opponents.
  • Up Aerial: Dr. Luigi throws a bicycle kick.
  • Up Crash: Dr. Luigi performs an upside down corkscrew kick, damaging opponents multiple times before launching them.
  • Down Aerial: Dr. Luigi throws a stomp. The move can meteor smash opponents.
  • Down Crash: Dr. Luigi throws a corkscrew stomp, damaging opponents multiple times before launching them.

  • Grab: Dr. Luigi reaches out to grab the opponent.
  • Pummel: Dr. Luigi headbutts the opponent.
  • Forward Throw: Dr. Luigi spins around with the opponent in tow before throwing them forward.
  • Back Throw: Dr. Luigi lifts the opponent above his head before turning around and slamming them into the ground.
  • Up Throw: Dr. Luigi heaves the opponent upward.
  • Down Throw: Dr. Luigi lays the opponent on the ground and gives them a shot. This puts them in a vulnerable position.

  • Neutral Special - Operation L: Dr. Luigi throws an L-shaped Megavitamin, which flies forward in a straight line. If it hits an opponent, projectile, or wall, it will split into two normal Megavitamins and travel diagonally upward and downward.
    • Custom 1 - Operation Z: The Megavtamin doesn't split and deals less damage, but it does have a chance of putting the opponent to sleep.
    • Custom 2 - Operation 0: The Megavitamin travels slower, but it can freeze opponents.
    • Custom 3 - Operation XL: The Megavitamin is larger. It doesn't split and travels slower, but damages opponents multiple times before launching them.
  • Side Special - Dr. Missile: Dr. Luigi crouches before shooting himself forward, throwing a battering ram. The move can be charged by holding the special button, increasing his distance, speed, and damage. There is a small chance that Dr. Luigi will fly very far and deal a lot of damage to opponents he hits, called a Misfire. If Dr. Luigi charges for too long, he will sigh and stop charging.
    • Custom 1 - Dr. Torpedo: Dr. Luigi will home in on opponents, but he can't Misfire.
    • Custom 2 - Dr. Bullet: Dr. Luigi deals less damage, but he travels much farther and faster/ He also travels through opponents, allowing him to damage more than one.
    • Custom 3 - Dr. Launcher: Dr. Luigi must charge the move fully before he flies forward, though he deals more damage and travels faster. He also has a higher chance of Misfire.
  • Up Special - Super Jump Punch: Dr. Luigi throws a jumping uppercut, damaging opponents he hits before falling into a helpless state afterwards. If he hits an opponent at the start of the move, he will deal extreme damage and knockback, as well as instantly break a shield. He will deal very little damage and no knockback if he hits an opponent at any other point during the move however.
    • Custom 1 - Rising Jump Punch: There is no sweetspot at the start of the move, but Dr. Luigi damages opponents multiple times before launching them as he rises.
    • Custom 2 - Super Jump: Dr. Luigi travels much higher and can even travel diagonally, though he cannot damage opponents at any point aside from the sweetspot, which is also weaker.
    • Custom 3 - Fiery Jump Punch: The sweetspot is easier to hit, but Dr. Luigi doesn't travel as high.
  • Down Special - Dr. Cyclone: Dr. Luigi spins around with his arms outstretched, damaging opponents multiple times before launching them. While spinning, he can move around, and repeatedly tapping the special button allows him to rise into the air.
    • Custom 1 - Mach Cyclone: Dr. Luigi travels much faster and can rise higher, but he deals less damage.
    • Custom 2 - Clothesline Cyclone: Dr. Luigi deals more damage and knockback, but he only damages them once. He also can't travel as fast.
    • Custom 3 - Shredding Cyclone: Dr. Luigi spins for longer and deals more damage as a result, but he cannot rise into the air.
  • Final Smash - Negative Zone: Dr. Luigi eats a rotten Megavitamin, which causes a large area of the stage around him to become negative, inverting the colors. Opponents in this zone will take gradual damage, be inflicted with sleep, as well as other randomized status ailments, such as growing a flower or mushroom on their head, shrinking, or slowness. Opponents also take much more damage and knockback from Dr. Luigi within the zone. After awhile, the zone will disappear.
  • Charged State - Dr. Luigi, MD: Dr. Luigi eats a Megavitamin and starts glowing green. In this state, he is much faster, can jump higher, and his attacks deal more damage. Dr. Missile also doesn't need to be charged, and will always Misfire.

  • Koopa Troopa
    Super Mario Bros. (1985)
    KoopaTroopaCar
    Koopa Troopas (ノコノコ, Nokonoko) are among the most common enemies in the Mario series, and make up the bulk of Bowser's army. They usually have shells, which Mario can stomp on and throw to defeat other enemies or break blocks. Several varieties of Koopa Troopas exist, such as Paratroopas that have wings, Beach Koopas that have no shells, and Super Koopas that fly quickly through the air with capes.

    In Super Smash Bros., Koopa Troopa will always ride in a Koopa Troopa Car from Super Mario Maker 2. This makes it a very fast heavyweight, especially compared to those in its weight class. Its survivability is further helped by its jump height, air speed, and recovery. Using the car, Koopa Troopa can damage opponents by simply running into them; while this deals low damage and knockback, it's relatively safe and can lead into combos. Also, while Koopa Troopa does have very favorable stats, they can be lowered if the car is destroyed after taking enough damage. Specifically, if Koopa Troopa takes 50% damage, the car will break, which both lowers its walk and running speed and removes its ability to damage opponents by running into them. Taking 50% more damage will destroy the car further, which lowers Koopa Troopa's running speed even more. The car will replenish itself over time as long as Koopa Troopa doesn't take damage, and even faster if it hits opponents. It will take 15 seconds for the car to be fixed after entering the first stage, and it will take 25 seconds for the second stage.

    Koopa Troopa's moveset revolved around the Koopa Troopa Car, using several different maneuvers such as donuts, drifts, and wheelies. Koopa Troopa itself also attacks with its body for a few moves, such as punches, kicks, and headbutts. Its other moves are either based on Koopa Troopa variants or items and abilities from the Mario Kart series.
    SSB Mario Series Koopa Troopa Stock Icon SSBCharged Icon
    Koopa Troopa's Moveset

    • Neutral Attack: Koopa Troopa leans out of its car to throw two alternating jabs.
    • Forward Tilt: Koopa Troopa leans out of its car to throw a dropkick.
    • Forward Smash: Koopa Troopa gives its car a Mushroom, causing it to rocket forward and damage opponents it hits.
    • Up Tilt: Koopa Troopa leaps out of its car and throws a flip kick.
    • Up Smash: Koopa Troopa performs a handstand under its car to lift it upward.
    • Down Tilt: Koopa Troopa lifts the front of its car upward before slamming it downward. The move can meteor smash opponents.
    • Down Smash: Koopa Troopa performs several donuts with the car.
    • Dash Attack: Koopa Troopa spins around while driving forward, damaging opponents multiple times before launching them.
    • Counter: Koopa Troopa spins around with the car.

  • Neutral Aerial: Koopa Troopa strikes a pose while spinning around with the car.
  • Forward Aerial: Koopa Troopa leans out of the car to throw an overhead.
  • Forward Crash: Koopa Troopa turns around and thrusts the rear end of the car forward.
  • Back Aerial: Koopa Troopa throws a dropkick.
  • Back Crash: Koopa Troopa leans backward to strike with the rear end of the car.
  • Up Aerial: Koopa Troopa throws an upward headbutt.
  • Up Crash: Koopa Troopa performs a backflip with the car.
  • Down Aerial: Koopa Troopa thrusts the car downward. The move can meteor smash opponents.
  • Down Crash: Koopa Troopa strikes a pose while spinning the car below itself, damaging opponents multiple times before launching them.

  • Grab: Koopa Troopa reaches out of the car to grab the opponent.
  • Pummel: Koopa Troopa headbutts the opponent.
  • Forward Throw: Koopa Troopa tosses the opponent forward before hitting them with the car.
  • Back Throw: Koopa Troopa tosses the opponent backward before backing up into them with the car.
  • Up Throw: Koopa Troopa heaves the opponent upward.
  • Down Throw: Koopa Troopa slams the opponent on the ground before spinning one of the car's tires on them.

  • Neutral Special - Green Shell: Koopa Troopa throws a Green Shell forward. It will damage opponents, breaking on impact. Holding the special button allows Koopa Troopa to throw up to three Green Shells in rapid succession.
    • Custom 1 - Red Shell: Koopa Troopa throws a Red Shell instead of a Green Shell. It deals less damage, but will pursue opponents, disappearing after a short time if it doesn't hit anyone. The move takes longer to charge.
    • Custom 2 - Giant Shell: Koopa Troopa throws a larger Green Shell. Only one can be thrown at a time, but it deals more damage and can damage multiple opponents without breaking.
    • Custom 3 - Black Shell: Koopa Troopa throws a Black Shell instead of a Green Shell. Only one can be thrown at a time, but it explodes on impact, dealing much more damage and knockback.
  • Side Special - Koopa Drift: Koopa Troopa begins drifting in the opposite direction, damaging opponents it runs into multiple times. Holding the special button allows it to continue drifting, and releasing it allows it to speed quickly in either direction depending on where the control stick is held, dealing further damage. It will start losing speed as it drifts, and not releasing the special button soon enough causes it to stop. The drift can be cancelled into other attacks. If used in midair, Koopa Troopa hops a bit before drifting, helping its recovery.
    • Custom 1 - Shredding Drift: Koopa Troopa drifts further and faster, dealing more damage to opponents. It doesn't gain as much speed after boosting.
    • Custom 2 - Leap Drift: Koopa Troopa leaps forward before drifting. It can't drift for as long, but it helps recovery much more.
    • Custom 3 - Automatic Drift: The move deals less damage overall, though the special button only needs to be tapped for Koopa Troopa to drift and then speed in either direction.
  • Up Special - Super Koopa: Koopa Troopa ejects out of the car and becomes a Super Koopa, using its cape to to glide. The falling car can damage opponents it lands on, and disappears when it hits the ground. The glide can be cancelled with any other attack, and it will fall into a helpless state afterwards. A new car spawns under it when it lands if the move is not cancelled.
    • Custom 1 - Exploding Car: Koopa Troopa doesn't jump as high, but the falling car explodes on impact, dealing significantly more damage and knockback.
    • Custom 2 - Glider Jump: Koopa Troopa leaps upward with the car and a glider is deployed, allowing it to glide. It can damage opponents it runs into, but it falls much faster.
    • Custom 3 - Golden Cape: The cape Koopa Troopa wears when it becomes a Super Koopa is golden, making it invincible while gliding. However, it cannot be cancelled into other attacks.
  • Down Special - Item Box: Koopa Troopa breaks an Item Box, allowing it to receive either a Fire Flower, a Boomerang Flower, or a Lightning Bolt randomly. When using a Fire Flower, the button can be tapped repeatedly for it to throw fireballs, which bounce across the ground and damage opponents they hit. When using a Boomerang Flower, it will throw a boomerang, which flies forward and returns to Koopa Troopa, which can be used three times. When using a Lightning Bolt, Koopa Troopa shoots a bolt of lighting forward, which causes whoever is hit by the bolt to shrink. There is also a small chance Koopa Troopa can get a Bob-omb, a Mr. Saturn, or a Super Mushroom from the Item Box.
    • Custom 1 - Fake Item Box: Instead of using an Item Box, Koopa Troopa deploys a Fake Item Box behind itself. It will damage opponents that touch it, and it can also be picked up and thrown like an item.
    • Custom 2 - Long-Lasting Items: The Fire Flower's fireballs and the Boomerang Flower deal less damage and the Lightning Bolt doesn't shrink opponents for as long, but the Fire Flower lasts longer, the Boomerang Flower can be used five times instead of three, and the Lightning Bolt can be used three times instead of one.
    • Custom 3 - Ordered Items: Instead of receiving the items randomly, Koopa Troopa will always get a Fire Flower, a Boomerang Flower, and a Lightning Bolt in that order. Koopa Troopa cannot get a Bob-omb, a Mr. Saturn, or a Super Mushroom.
  • Final Smash - Roving Racers: Koopa Troopa rushes forward. If it hits an opponent, they are locked in a cutscene where Koopa Troopa and the Roving Racers from Super Mario Odyssey ride through a road in Koopa Troopa Cars. They will run over the opponents, sending them back to the stage and launching them.
  • Charged State - Monster Truck: Koopa Troopa's car becomes outfitted with monster tires. In this state, it deals more damage by running into opponents, is much heavier and faster, and the car cannot be broken by opponents damaging it. A lot of attacks involving the car are also stronger.

  • Dark Star
    Mario & Luigi: Bowser's Inside Story (2009)
    Dark Star
    The Dark Star {ダークスター, Dark Star) is a sentient artifact of incredible dark power that serves as the true main antagonist of Mario & Luigi: Bowser's Inside Story. Long before the events of the game, it was discovered by archaeologists, and it started attacking the Mushroom Kingdom. It was soon sealed away by the Star Sprites, and Fawful and his minions intend to resurrect it to rule the world. By the end of the game, the Dark Star absorbs some of Bowser's power and becoming Dark Bowser, who serves as the final boss.

    Dark Star has a mechanic based on its boss battle in Mario & Luigi: Bowser's Inside Story and the battle against Metal Mario in the original Super Smash Bros. At the start of the battle, it has very high defense, taking very little knockback from attacks. Paired with its powerful attacks and great aerial mobility courtesy of its high jumps and slow falling speed, Dark Star is an extremely aggressive fighter that can tank attacks without much risk. However, once it reaches 130%, Dark Star will stop shining and its eyes will close, entering a dormant state. At this point, Dark Star's attack power drops significantly and its special moves will weaken, on top of it taking regular knockback from attacks. Because of its light weight, this can make it very easy to KO Dark Star without its knockback resistance.

    Dark Star's moveset is based on its attacks from its boss battle, and normally relies on body slams and pulses of dark energy for attacks. Some attacks also create a silhouette of Dark Bowser, who uses attacks from his boss fight.
    SSB Mario Series Dark Star Stock Icon SSBCharged Icon
    Dark Star's Moveset

    • Neutral Attack: Dark Star emits a pulse of dark energy around itself.
    • Forward Tilt: Dark Star fires a short-ranged laser from its eyes.
    • Forward Smash: Dark Star creates a silhouette of Dark Bowser, who throws a straight punch.
    • Up Tilt: Dark Star creates a lightning bolt that appears from above and strikes the ground. Opponents hit by the top of the bolt will be meteor smashed.
    • Up Smash: Dark Star creates a silhouette of Dark Bowser, who slashes his claws above himself in an overarching motion.
    • Down Tilt: Dark Star makes dark matter form on the ground around itself, damaging opponents multiple times before launching them.
    • Down Smash: Dark Star creates a silhouette of Dark Bowser, who spins around while breathing purple flames.
    • Dash Attack: Dark Star flies forward while rotating.
    • Counter: Dark Star creates a silhouette of Dark Bowser, who appears behind the opponent that attacked it and throws a dropkick.

  • Neutral Aerial: Dark Star emits multiple pulses of dark energy around itself, damaging opponents multiple times before launching them.
  • Forward Aerial: Dark Star fires a ball of energy from its eyes that travels forward.
  • Forward Crash: Dark Star creates a silhouette of Dark Bowser, who throws a downward slash with his claws.
  • Back Aerial: Dark Star turns around and fires a laser from its eyes.
  • Back Crash: Dark Star summons a silhouette of Dark Bowser, who throws a dropkick.
  • Up Aerial: Dark Star creates a void of dark energy above itself, damaging opponents multiple times before launching them.
  • Up Crash: Dark Star creates a silhouette of Dark Bowser, who throws an upward headbutt.
  • Down Aerial: Dark Star faces downward and fires a bolt of lightning from its eyes.
  • Down Crash: Dark Star creates a silhouette of Dark Bowser, who throws a stall-then-fall Ground Pound that meteor smashes opponents.

  • Grab: Dark Star telekinetically grabs the opponent with dark energy.
  • Pummel: Dark Star injects dark energy into the opponent.
  • Forward Throw: Dark Star flings the opponent forward.
  • Back Throw: Dark Star flings the opponent backward.
  • Up Throw: Dark Star flings the opponent upward.
  • Down Throw: Dark Star slams the opponent into the ground.

  • Neutral Special - Dark Satellmite: Dark Star creates a Dark Satellmite from its eyes, who will remain on the ground and fire lasers from its eyes, disappearing after a short time. While it is active, Dark Star and its opponents can attack a Dark Satellmite, causing it to turn into a ball and fly forward, exploding in a mass of dark energy on impact. Only one Dark Satellmite can be at play at a time. Unlike its other special moves, this move is completely disabled in its dormant state.
    • Custom 1 - Dark Satellmite Strike: The lasers deal less damage, but the explosion a Dark Satellmite creates after it is launched is bigger.
    • Custom 2 - Rapidfire Dark Satellmite: The Dark Satellmite cannot be attacked by Dark Star or its opponents, though it will fire more lasers.
    • Custom 3 - Beaming Dark Satellmite: Instead of firing multiple lasers, the Dark Satellmite charges up to fire a long-ranged beam of dark energy that damages opponents multiple times before launching them.
  • Side Special - Dark Laser: Dark Star fires a bolt of electricity from its eyes, which will automatically target the nearest opponent if they are in range. This inflicts paralysis, leaving them vulnerable for a follow-up. In its dormant state, the bolt doesn't inflict paralysis.
    • Custom 1 - Dark Shock: The bolt only travels forward and doesn't target opponents, but the paralysis is stronger.
    • Custom 2 - Dark Zapper: The move has more endlag, but instead of stunning opponents, the bolt deals more damage and knockback.
    • Custom 3 - Chain Dark Laser: Dark Star fires three bolts in rapid succession. This deals more damage, but doesn't stun opponents. The range for the bolt to target opponents is also larger.
  • Up Special - Dark Void: Dark Star enters a void, with three other voids appearing above. Directional inputs can be used to determine what void Dark Star comes out of, falling into a helpless state afterwards. The move does leave it vulnerable, but the fake voids can deal heavy damage and knockback to opponents. In its dormant state, only a single void will appear, which is the one it exits out of.
    • Custom 1 - Vortex Void: Only one void will appear, with it being above Dark Star. However, before it reemerges, the void creates vacuumboxes that deal heavy damage to opponents before launching them.
    • Custom 2 - Flexible Voids: More voids appear around Dark Star, broadening its recovery options. However, the fake voids will not damage opponents.
    • Custom 3 - Void Pulse: Dark Star gains less distance from entering the void, though when it reemerges it can emit a pulse of dark energy, damaging nearby opponents.
  • Down Special - Vacuum: Dark Star creates a silhouette of Dark Bowser, who starts inhaling. This creates vacuumboxes that drag opponents into him. After catching an opponent, they will be repeatedly damaged before he spits them out and launches them. They can escape Dark Bowser faster via button mashing. In Dark Star's dormant state, the vacuumboxes are weaker and the move deals less damage.
    • Custom 1 - Dark Storm: Instead of creating vacuumboxes, Dark Bowser's inhale will damage opponents multiple times before launching them.
    • Custom 2 - Dark Drainer: Opponents can escape from Dark Bowser quicker and the move deals less damage, though any damage Dark Bowser deals will replenish Dark Star's health.
    • Custom 3 - Heavy Vacuum: Dark Bowser's inhale covers much more range and the windboxes are stronger, though he deals less damage to opponents he captures.
  • Final Smash - Dark Star Finale: Dark Star flames white before transforming into a void and creating a vortex. This creates vacuumboxes that drag opponents in, and any opponents it captures will take massive damage before they are launched.
  • Charged State - Eternal Darkness: Dark Star will surround itself in purple aura. In this state, its attacks cover more range, and the attacks where Dark Bowser's silhouette are summoned are bigger and deal more damage. Its dormant state also doesn't weaken the power of its attacks, and it retains some of the knockback resistance from its normal state

  • Power Star Guardians
    Super Mario 64 (1996)
    Power Star Guardians
    The Power Star Guardians (パワースターガーディアン, Power Star Guardians) are a trio of bosses originating from Super Mario 64, consisting of King Bob-omb (ボムキング, Bomb King), Whomp King (バッタンキング, Whomp King), and Eyerok (イワンテ, Iwante). All three of them were given Power Stars by Bowser to guard, and Mario had to battle and defeat them to obtain them. They were stationed in Bob-omb Battlefield, Whomp's Fortress, and Shifting Sand Land respectively.

    Unlike similar group characters like Pokémon Trainer, the player cannot switch between the three members of the Power Star Guardians at will. Each one has 60% HP, and once they run out they will explode, where they will then be replaced by the next character, however their actual percentage will not reset nor will they lose a stock. This also applies to if they are knocked into the Blast Zone, with the next character appearing on the respawn platform. The player can choose which character they start with while on the character select screen, with the order going: King Bob-omb, Whomp King, and finally Eyerok.

    All three fighters are heavyweights, with Whomp King being the heaviest and slowest, Eyerok being the lightest and fastest, and King Bob-omb being in the middle. They all use their respective moves from Super Mario 64, with King Bob-omb utilizing explosions, Whomp King trying to crush opponents, and Eyerok using punches, slaps, and claps. It should also be noted that when playing as Eyerok, there will only be one hand as opposed to the two in the original game.
    SSB Mario Series Power Star Guardians Stock Icon SSBCharged Icon
    King Bob-omb's Moveset

    • Neutral Attack: King Bob-omb throws two alternating punches.
    • Forward Tilt: King Bob-omb throws a side kick.
    • Forward Smash: King Bob-omb thrusts a Bob-omb forward before it explodes.
    • Up Tilt: King Bob-omb throws a jumping headbutt.
    • Up Smash: King Bob-omb thrusts a Bob-omb upward before it explodes.
    • Down Tilt: King Bob-omb throws an outwards kick.
    • Down Smash: King Bob-omb thrusts two Bob-ombs forward on both sides of himself before they explode.
    • Dash Attack: King Bob-omb rolls forward, which can bury opponents.
    • Counter: King Bob-omb throws a backhand punch.

  • Neutral Aerial: King Bob-omb performs a somersault.
  • Forward Aerial: King Bob-omb throws a front kick.
  • Forward Crash: King Bob-omb thrusts a Bob-omb forward before it explodes.
  • Back Aerial: King Bob-omb throws a dropkick.
  • Back Crash: King Bob-omb King Bob-omb thrusts a Bob-omb behind him before it explodes.
  • Up Aerial: King Bob-omb throws an upwards headbutt.
  • Up Crash: King Bob-omb King Bob-omb thrusts a Bob-omb above himself before it explodes.
  • Down Aerial: King Bob-omb throws a stall-then-fall stomp, which can meteor smash opponents.
  • Down Crash: King Bob-omb King Bob-omb thrusts a Bob-omb downward before it explodes, which can meteor smash opponents.

  • Grab: King Bob-omb reaches out to grab the opponent with one hand.
  • Pummel: King Bob-omb headbutts the opponent.
  • Forward Throw: King Bob-omb kicks the opponent forward.
  • Back Throw: King Bob-omb spins the opponent over his head before throwing them backward.
  • Up Throw: King Bob-omb throws the opponent upward before headbutting them.
  • Down Throw: King Bob-omb slams the opponent into the ground.

  • Neutral Special - Bob-omb: King Bob-omb throws out a Bob-omb that will begin to chase after the nearest opponent. After making contact with an opponent or after three seconds have passed, the Bob-omb will explode, damaging anyone in the blast radius.
    • Custom 1 - Micro Bomb: King Bob-omb throws a Micro Bob-omb instead of a regular one. It runs faster, but has a smaller blast radius and doesn't deal as much damage and knockback.
    • Custom 2 - Time Bob-omb: King Bob-omb throws a Time Bob-omb instead of a regular one. It doesn't move as fast, and it won't explode if it touches an opponent. However, it does last five seconds instead of three.
    • Custom 3 - Flying Bomb: The Bob-omb is thrown farther, and explodes on impact rather than chasing opponents.
  • Side Special - Royal Grapple: King Bob-omb lunges forward in an attempt to grab the opponent. If he succeeds, he can walk left and right while carrying the opponent before chucking them forward. King Bob-omb can also use this move to pick up Bob-ombs spawned with his Neutral Special and throw them forward.
    • Custom 1 - Royal Slam: Instead of grabbing opponents, King Bob-omb throws a sliding punch, damaging opponents he hits heavily.
    • Custom 2 - Royal Throw: King Bob-omb instantly throws an opponent or Bob-omb he grabs. He deals more damage and knockback, but can't walk after grabbing them.
    • Custom 3 - Royal Bury: Instead of throwing an opponent he grabs, King Bob-omb will slam the opponent into the ground, burying them. If he grabs an opponent in midair, he will meteor smash them instead.
  • Up Special - Royal Leap: King Bob-omb jumps high into the air before slamming back down on the ground, creating a shockwave that can stun opponents.
    • Custom 1 - Royal Rise: King Bob-omb damages opponents while jumping, but falls into a helpless state at the peak of his jump rather than falling to create a shockwave.
    • Custom 2 - Royal Tremor: Instead of creating a shockwave, King Bob-omb causes the stage to shake when he lands, damaging any ground-bound opponents.
    • Custom 3 - Royal Stomp: King Bob-omb doesn't jump as high and doesn't create a shockwave upon landing, but he will meteor smash and bury opponents he lands on while falling.
  • Down Special - Cannonball: King Bob-omb summons a cannon from the ground in front of him that fires a large bouncing ball in an arc. The ball will deal heavy damage to opponents as well as meteor smashing airborne foes.
    • Custom 1 - Rolling Cannonball: The cannonball rolls across the ground rather than bouncing. Instead of launching opponents it rolls over, it will bury them.
    • Custom 2 - Cannon Volley: Instead of a large cannonball, the cannon fires three small cannonballs that fly and bounce at varying arcs. This covers more area, but they deal less damage and can't meteor smash opponents.
    • Custom 3 - Cannonbomb: The cannonball explodes on impact with an opponent, dealing massive damage and knockback to opponents in the blast radius. However, it doesn't travel as fast.
  • Final Smash - The Lord of Lightning: King Bob-omb is joined by Whomp King and Eyerok as they all charge forward. If the move connects with an opponent, they are sent to the Ruined Kingdom, where Ruined Dragon appears before firing massive bolts of electricity at them, dealing lots of damage before they are sent back to the stage.
  • Charged State - Ticking Time Bomb: King Bob-omb stomps his foot in frustration as he turns red while sporting an angry expression. In this state, the blast radius on any of his explosive moves are increased, and he also becomes faster.

  • Whomp King's Moveset

    • Neutral Attack: Whomp King throws a straight punch.
    • Forward Tilt: Whomp King throws a front kick.
    • Forward Smash: Whomp King falls forward onto his face, which can bury opponents.
    • Up Tilt: Whomp King throws a uppercut.
    • Up Smash: Whomp King throws an upwards headbutt.
    • Down Tilt: Whomp King extends his leg forward.
    • Down Smash: Whomp King stomps the ground.
    • Dash Attack: Whomp King throws himself forward and slides along the ground.
    • Counter: Whomp King throws a punch.

  • Neutral Aerial: Whomp King throws a sex kick.
  • Forward Aerial: Whomp King throws a dropkick.
  • Forward Crash: Whomp King throws a downwards headbutt. The move can meteor smash opponents.
  • Back Aerial: Whomp King throws two alternating kicks.
  • Back Crash: Whomp King leans back to hit opponents with his head.
  • Up Aerial: Whomp King throws an uppercut.
  • Up Crash: Whomp King throws an upwards headbutt.
  • Down Aerial: Whomp King throws three kicks below himself.
  • Down Crash: Whomp King performs a stall-then-fall stomp, which can meteor smash and bury opponents.

  • Grab: Whomp King reaches out to grab the opponent with both hands.
  • Pummel: Whomp King headbutts the opponent.
  • Forward Throw: Whomp King punches the opponent forward.
  • Back Throw: Whomp King spins around and throws the opponent behind him.
  • Up Throw: Whomp King uppercuts the opponent into the air.
  • Down Throw: Whomp King falls on top of the opponent, burying them.

  • Neutral Special - Thwomp: Whomp King summons a Thwomp that appears in front of him suspended in midair. If an opponent goes underneath the Thwomp, it will come crashing down and damage them. The Thwomp will stay on-screen for five seconds, and up to two can be on-stage at once.
    • Custom 1 - Mega Thwomp: The Thwomp is larger and deals more damage. However, only one can be at play at a time.
    • Custom 2 - Winged Thwomp: The Thwomp has wings, and will move slowly left to right as it is dormant. This allows it to cover more range, but it deals less damage and knockback.
    • Custom 3 - Thwimp: Whomp King summons a Thwimp instead of a Thwomp. It will bounce back and forth in arcs, damaging opponents it hits. After awhile, it will disappear.
  • Side Special - Whimp: Whomp King summons a Whimp, which will run forward and attempt to tackle anyone in its way. The Whimp can be defeated by opponents attacks, and only one can be on-screen at a time.
    • Custom 1 - Whomp: Whomp King summons a Whomp instead of a Whimp. It deals much more damage and takes more damage before it is defeated, but it is slower.
    • Custom 2 - Charging Whimp: The Whimp runs faster, but it won't try to slam on opponents, and instead just run through them, which deals less damage.
    • Custom 3 - Spiked Whimp: The Whimp has spikes on its face, allowing it to deal more damage. However, it can be defeated easier.
  • Up Special - Hoot the Owl: Hoot the Owl appears above Whomp King as he grabs onto its legs, forcing him to fly. Hoot then flies upward while carrying Whomp King before he falls into a helpless state.
    • Custom 1 - High Hoot: Hoot the Owl carries Whomp King higher, but he can be damaged, making him drop Whomp King early.
    • Custom 2 - Hoot Drop: Hoot the Owl doesn't carry Whomp King as high, but instead of falling into a helpless state, Whomp King slams onto the ground with his face when he lets go. The move can meteor smash and bury opponents.
    • Custom 3 - Hoot Leap: Rather than flying, Hoot launches him and Whomp King upward really fast. However, they can only travel straight upward.
  • Down Special - Whomp Pound: Whomp King jumps up before slamming down on the ground, creating a shockwave that can trip opponents. This move can also bury and meteor smash foes.
    • Custom 1 - Forceful Whomp Pound: Whomp King doesn't create a shockwave, but any opponents he slams on will take much more damage.
    • Custom 2 - Whomp Leap: Whomp King quickly leaps forward before slamming. It doesn't deal as much damage, but it is faster and can be used as a niche recovery option.
    • Custom 3 - Unstoppable Whomp: Whomp King has super armor while using the move. However, it has more startup lag.
  • Final Smash - The Lord of Lightning: Whomp King is joined by King Bob-omb and Eyerok as they all charge forward. If the move connects with an opponent, they are sent to the Ruined Kingdom, where Ruined Dragon appears before firing massive bolts of electricity at them, dealing lots of damage before they are sent back to the stage.
  • Charged State - Reinforced Steel: Whomp King roars as his body transforms to be made of metal instead of rock. In this state, Whomp King takes less knockback from attacks, and any moves that involve him slamming or stomping will deal more damage.

  • Eyerok's Moveset

    • 'Neutral Attack: Eyerok throws a hook punch, followed by a backhand punch, before ending with an uppercut.
    • Forward Tilt: Eyerok pokes forward.
    • Forward Smash: Eyerok summons it's second hand and throws a clap.
    • Up Tilt: Eyerok punches upward.
    • Up Smash: Eyerok summons it's second hand and throws an upwards clap.
    • Down Tilt: Eyerok flicks one of it's fingers upward.
    • Down Smash: Eyerok forms a fist and slams down on the ground.
    • Dash Attack: Eyerok throws a corkscrew "headbutt", damaging opponents multiple times before launching them.
    • Counter: Eyerok pushes the opponent away.

  • Neutral Aerial: Eyerok performs a cartwheel, damaging opponents multiple times before launching them.
  • Forward Aerial: Eyerok throws a downwards chop.
  • Forward Crash: Eyerok summons it's second hand and throws a forward clap.
  • Back Aerial: Eyerok turns around and throws a punch.
  • Back Crash: Eyerok summons it's second hand and throws a backward clap.
  • Up Aerial: Eyerok wiggles it's fingers upward, damaging opponents multiple times before launching them.
  • Up Crash: Eyerok summons it's second hand and throws an upwards clap.
  • Down Aerial: Eyerok throws a downwards corkscrew "headbutt", damaging opponents multiple times before launching them.
  • Down Crash: Eyerok summons it's second hand and throws an downwards clap, which can meteor smash opponents.

  • Grab: Eyerok summons it's second hand to grab the opponent.
  • Pummel: Eyerok slaps the opponent.
  • Forward Throw: Eyerok flicks the opponent away.
  • Back Throw: Eyerok grabs the opponent and tosses them backward.
  • Up Throw: Eyerok grabs the opponent and squeezes them before throwing them upward.
  • Down Throw: Eyerok floats above the opponent and slams down on them, burying them.

  • Neutral Special - Whirlwind: Eyerok snaps it's fingers, creating a whirlwind in front of itself that travels forward a short distance before disappearing. If an opponent is caught in the whirlwind, they will be spun around before being launched upward.
    • Custom 1 - Slicing Whirlwind: The whirlwind doesn't launch opponents as far, but those who are trapped in it will take a lot of damage.
    • Custom 2 - Small Whirlwind: The whirlwind is smaller and doesn't launch opponents as much, but it travels much faster and farther.
    • Custom 3 - Sandstorm: The whrilwind stays in place, but is much larger and can capture opponents from farther away.
  • Side Special - Shove It: Eyerok summons it's second hand as it begins to fly forward. This move deals no damage, but the hand will act as a moving wall that pushes opponents backward as it moves.
    • Custom 1 - Slam It: The second hand slams on the ground halfway through the move, burying and meteor smashing opponents hit by the attack.
    • Custom 2 - Crush It: The second hand will grab an opponent on contact with them, crush them, and throw them forward to launch them.
    • Custom 3 - Block It: The second hand stays in place instead of moving forward, and Eyerok can act independently from it. It will block opponents and attacks like a Back Shield, as well as reflect projectiles.
  • Up Special - Ascending Pyramid: Eyerok summons it's second hand as they both begin to spin around while rising into the air, damaging opponents multiple times before launching them.
    • Custom 1 - Pyramid Storm: Eyerok creates vacuumboxes as it rises into the air, pulling opponents into the move. However, it deals less damage.
    • Custom 2 - Rising Pyramid: Eyerok travels much higher, but it won't damage opponents.
    • Custom 3 - Pyramid Smash: The attack only damages opponents once rather than multiple times. Eyerok travel as high, but the move can move much more laterally.
  • Down Special - Golem Clap: Eyerok summons it's second hand and claps, creating a soundwave that will make nearby opponents dizzy. Airborne opponents only suffer light knockback.
    • Custom 1 - Golen Smash: Eyerok's second hand appears farther away laterally, and the two hands will quickly smash together, crushing any opponents in between them.
    • Custom 2 - Golen Shock: The shockwave is empowered by electricity, damaging opponents instead of making them dizzy.
    • Custom 3 - Loud Golem Clap: The shockwave is much larger, but opponents aren't dizzy for as long.
  • Final Smash - The Lord of Lightning: Eyerok is joined by King Bob-omb and Whomp King as they all charge forward. If the move connects with an opponent, they are sent to the Ruined Kingdom, where Ruined Dragon appears before firing massive bolts of electricity at them, dealing lots of damage before they are sent back to the stage.
  • Charged State - Golem's Wrath: Eyerok summons it's second hand, which floats alongside it as both of their eyes turn red. In this state, Eyerok becomes a duo character similarly to Ice Climbers, with both hands attacking simultaneously. Just like the Ice Climbers though, the second hand can be knocked away and KO'ed by opponents.

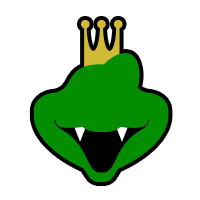
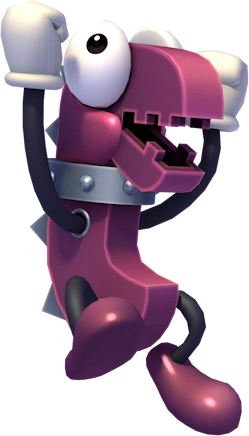
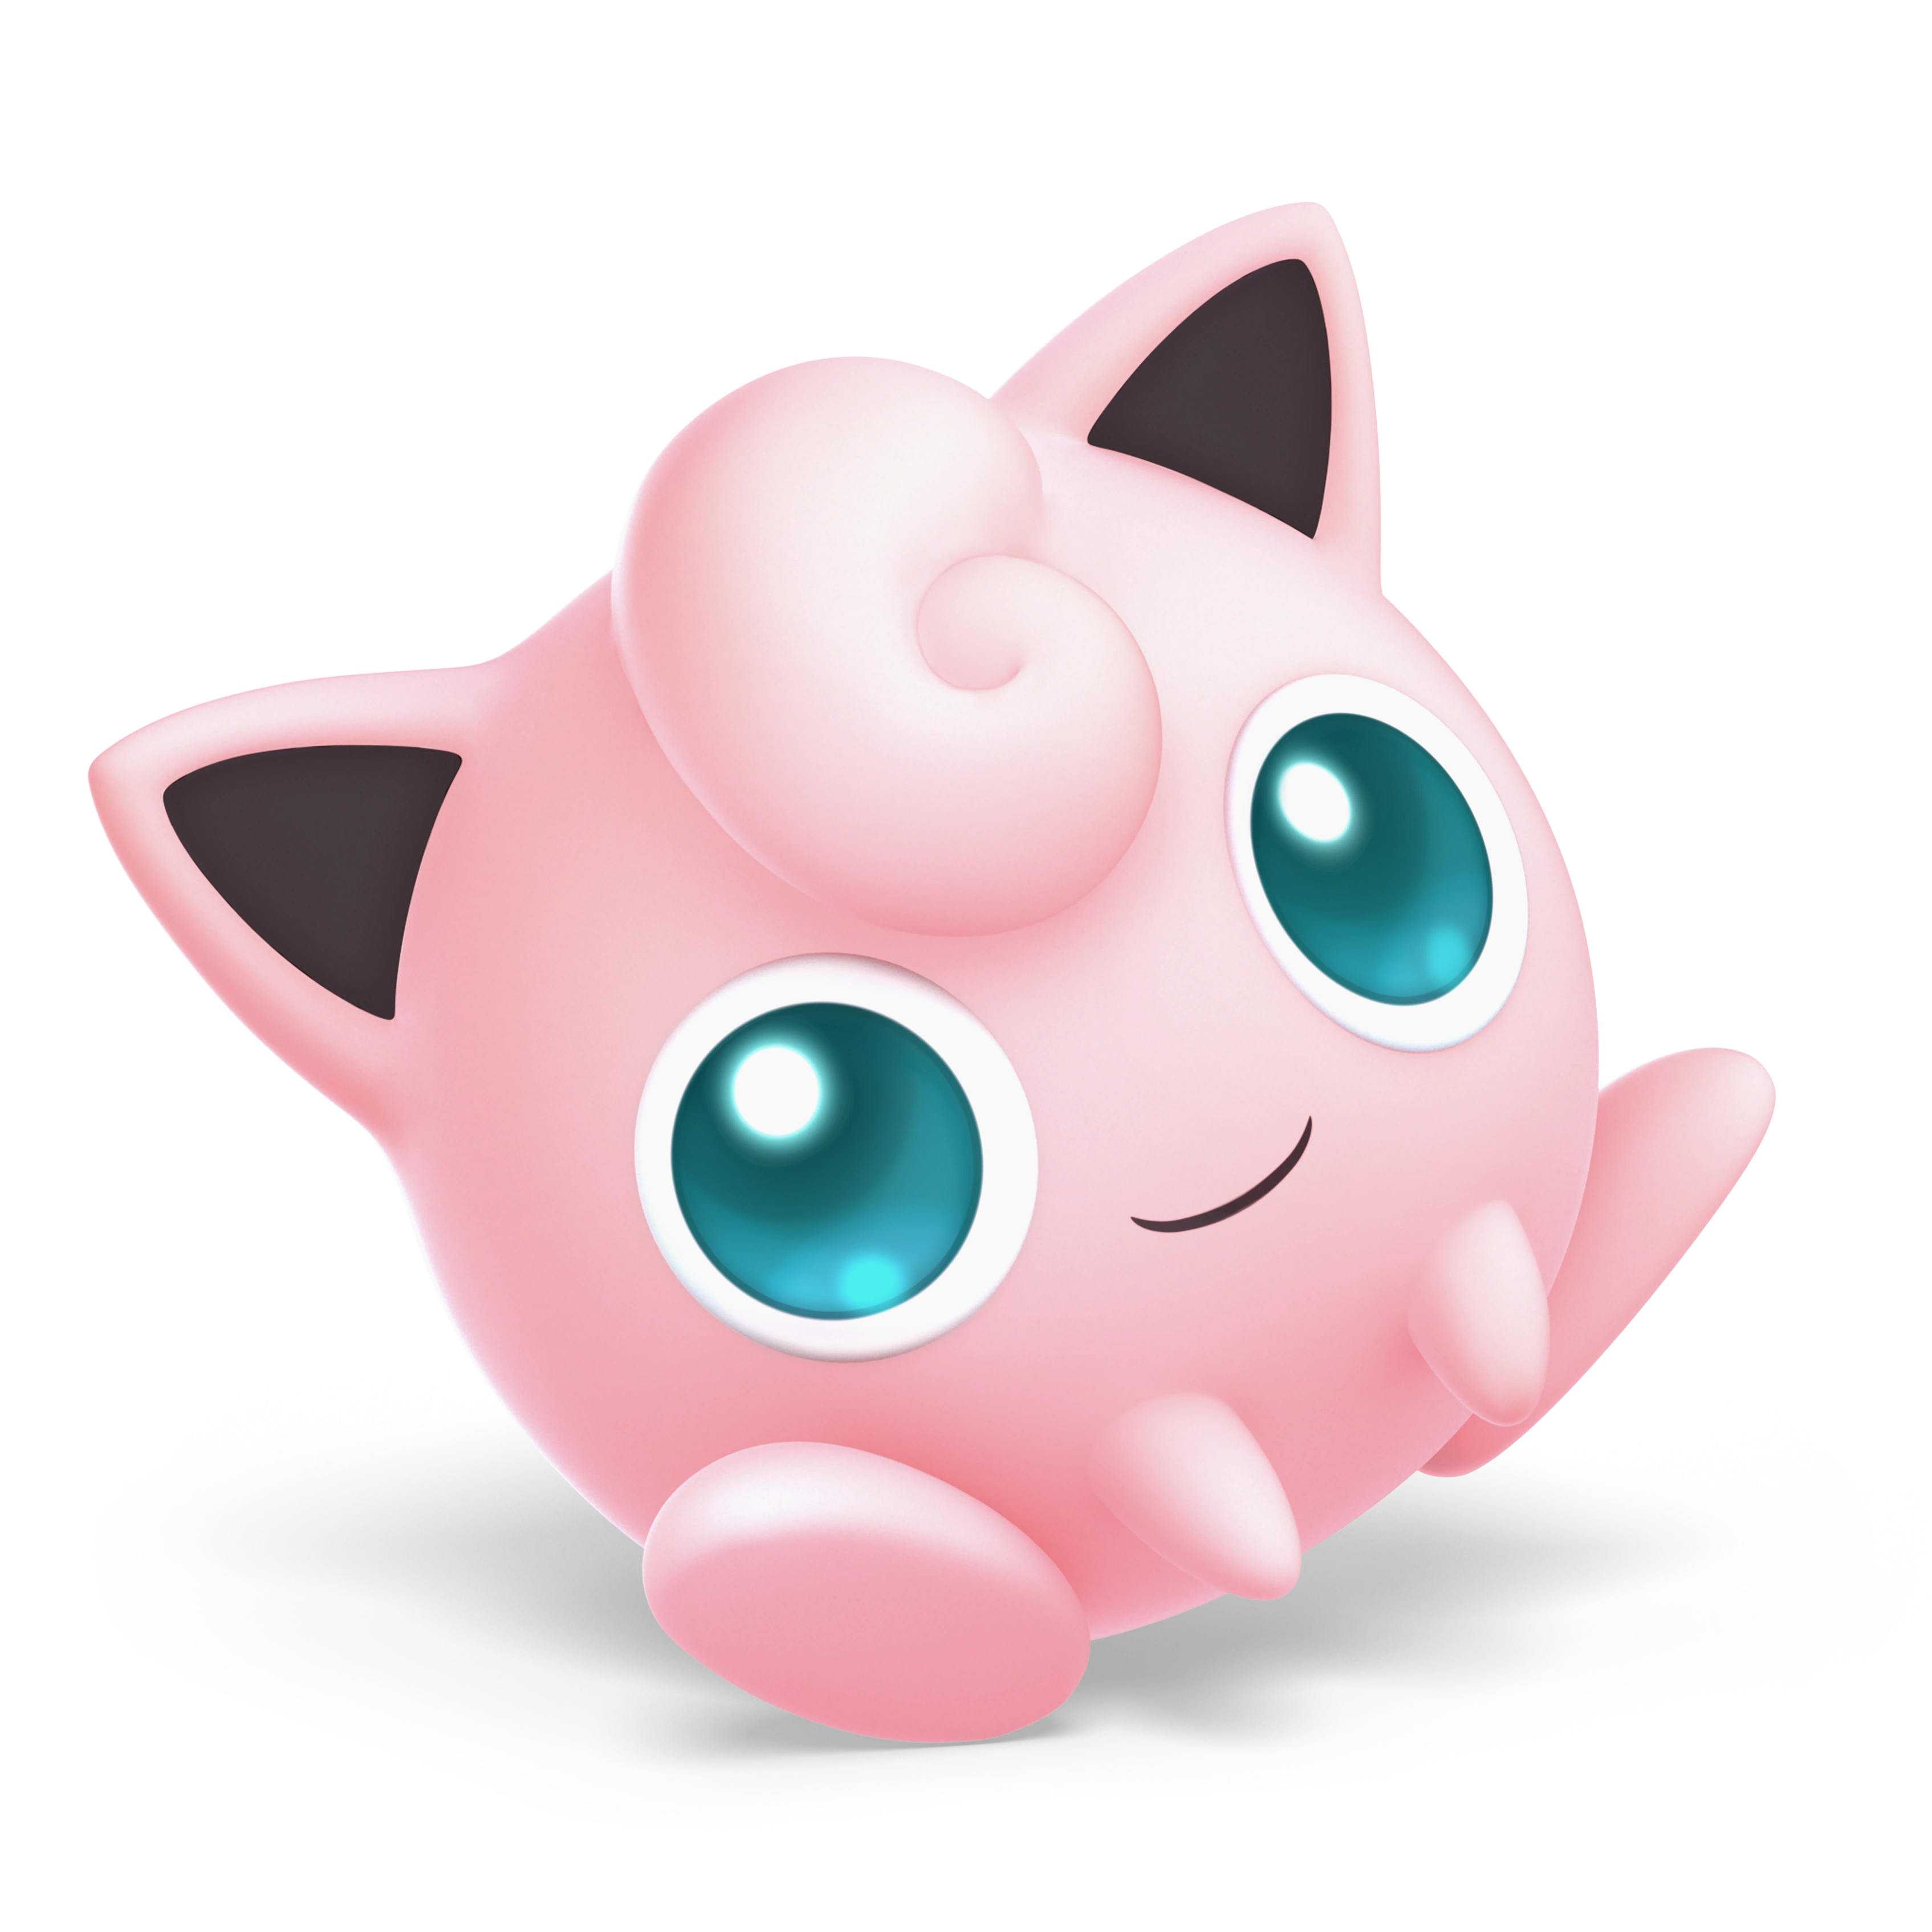
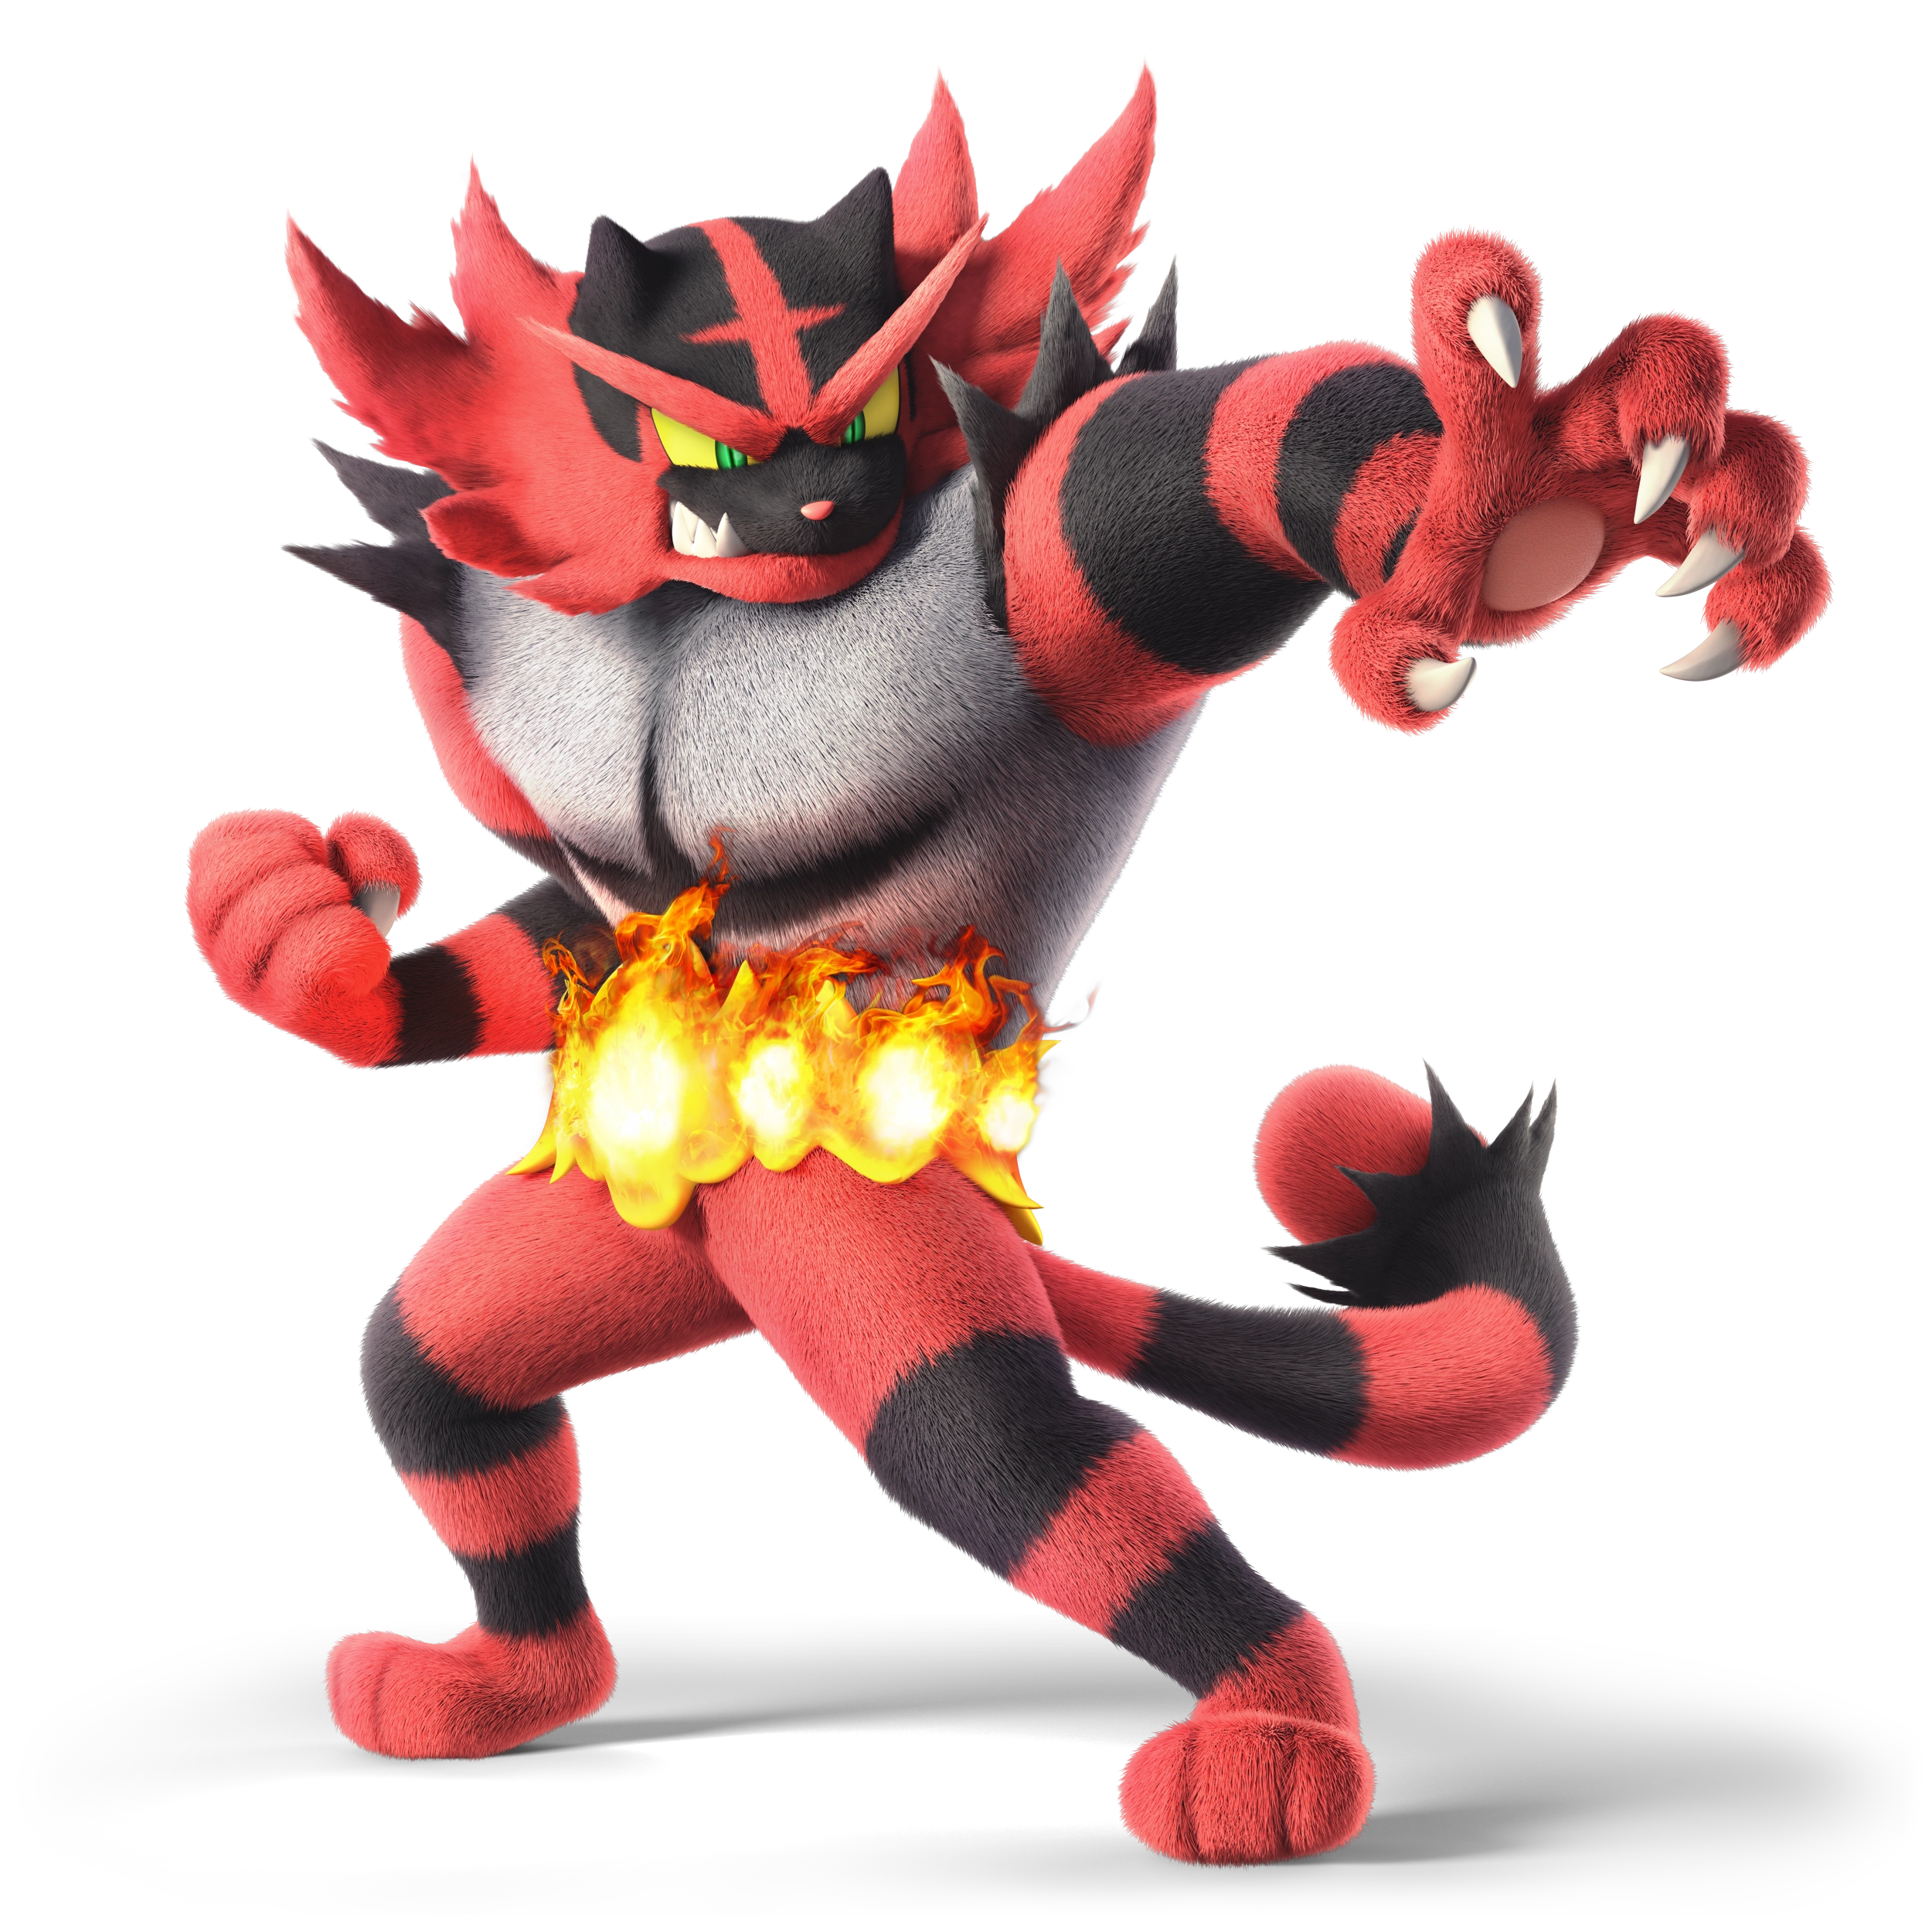
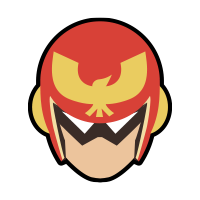
  • Meowser (ζ)
    Super Mario 3D World (2013)
    Meowser Official
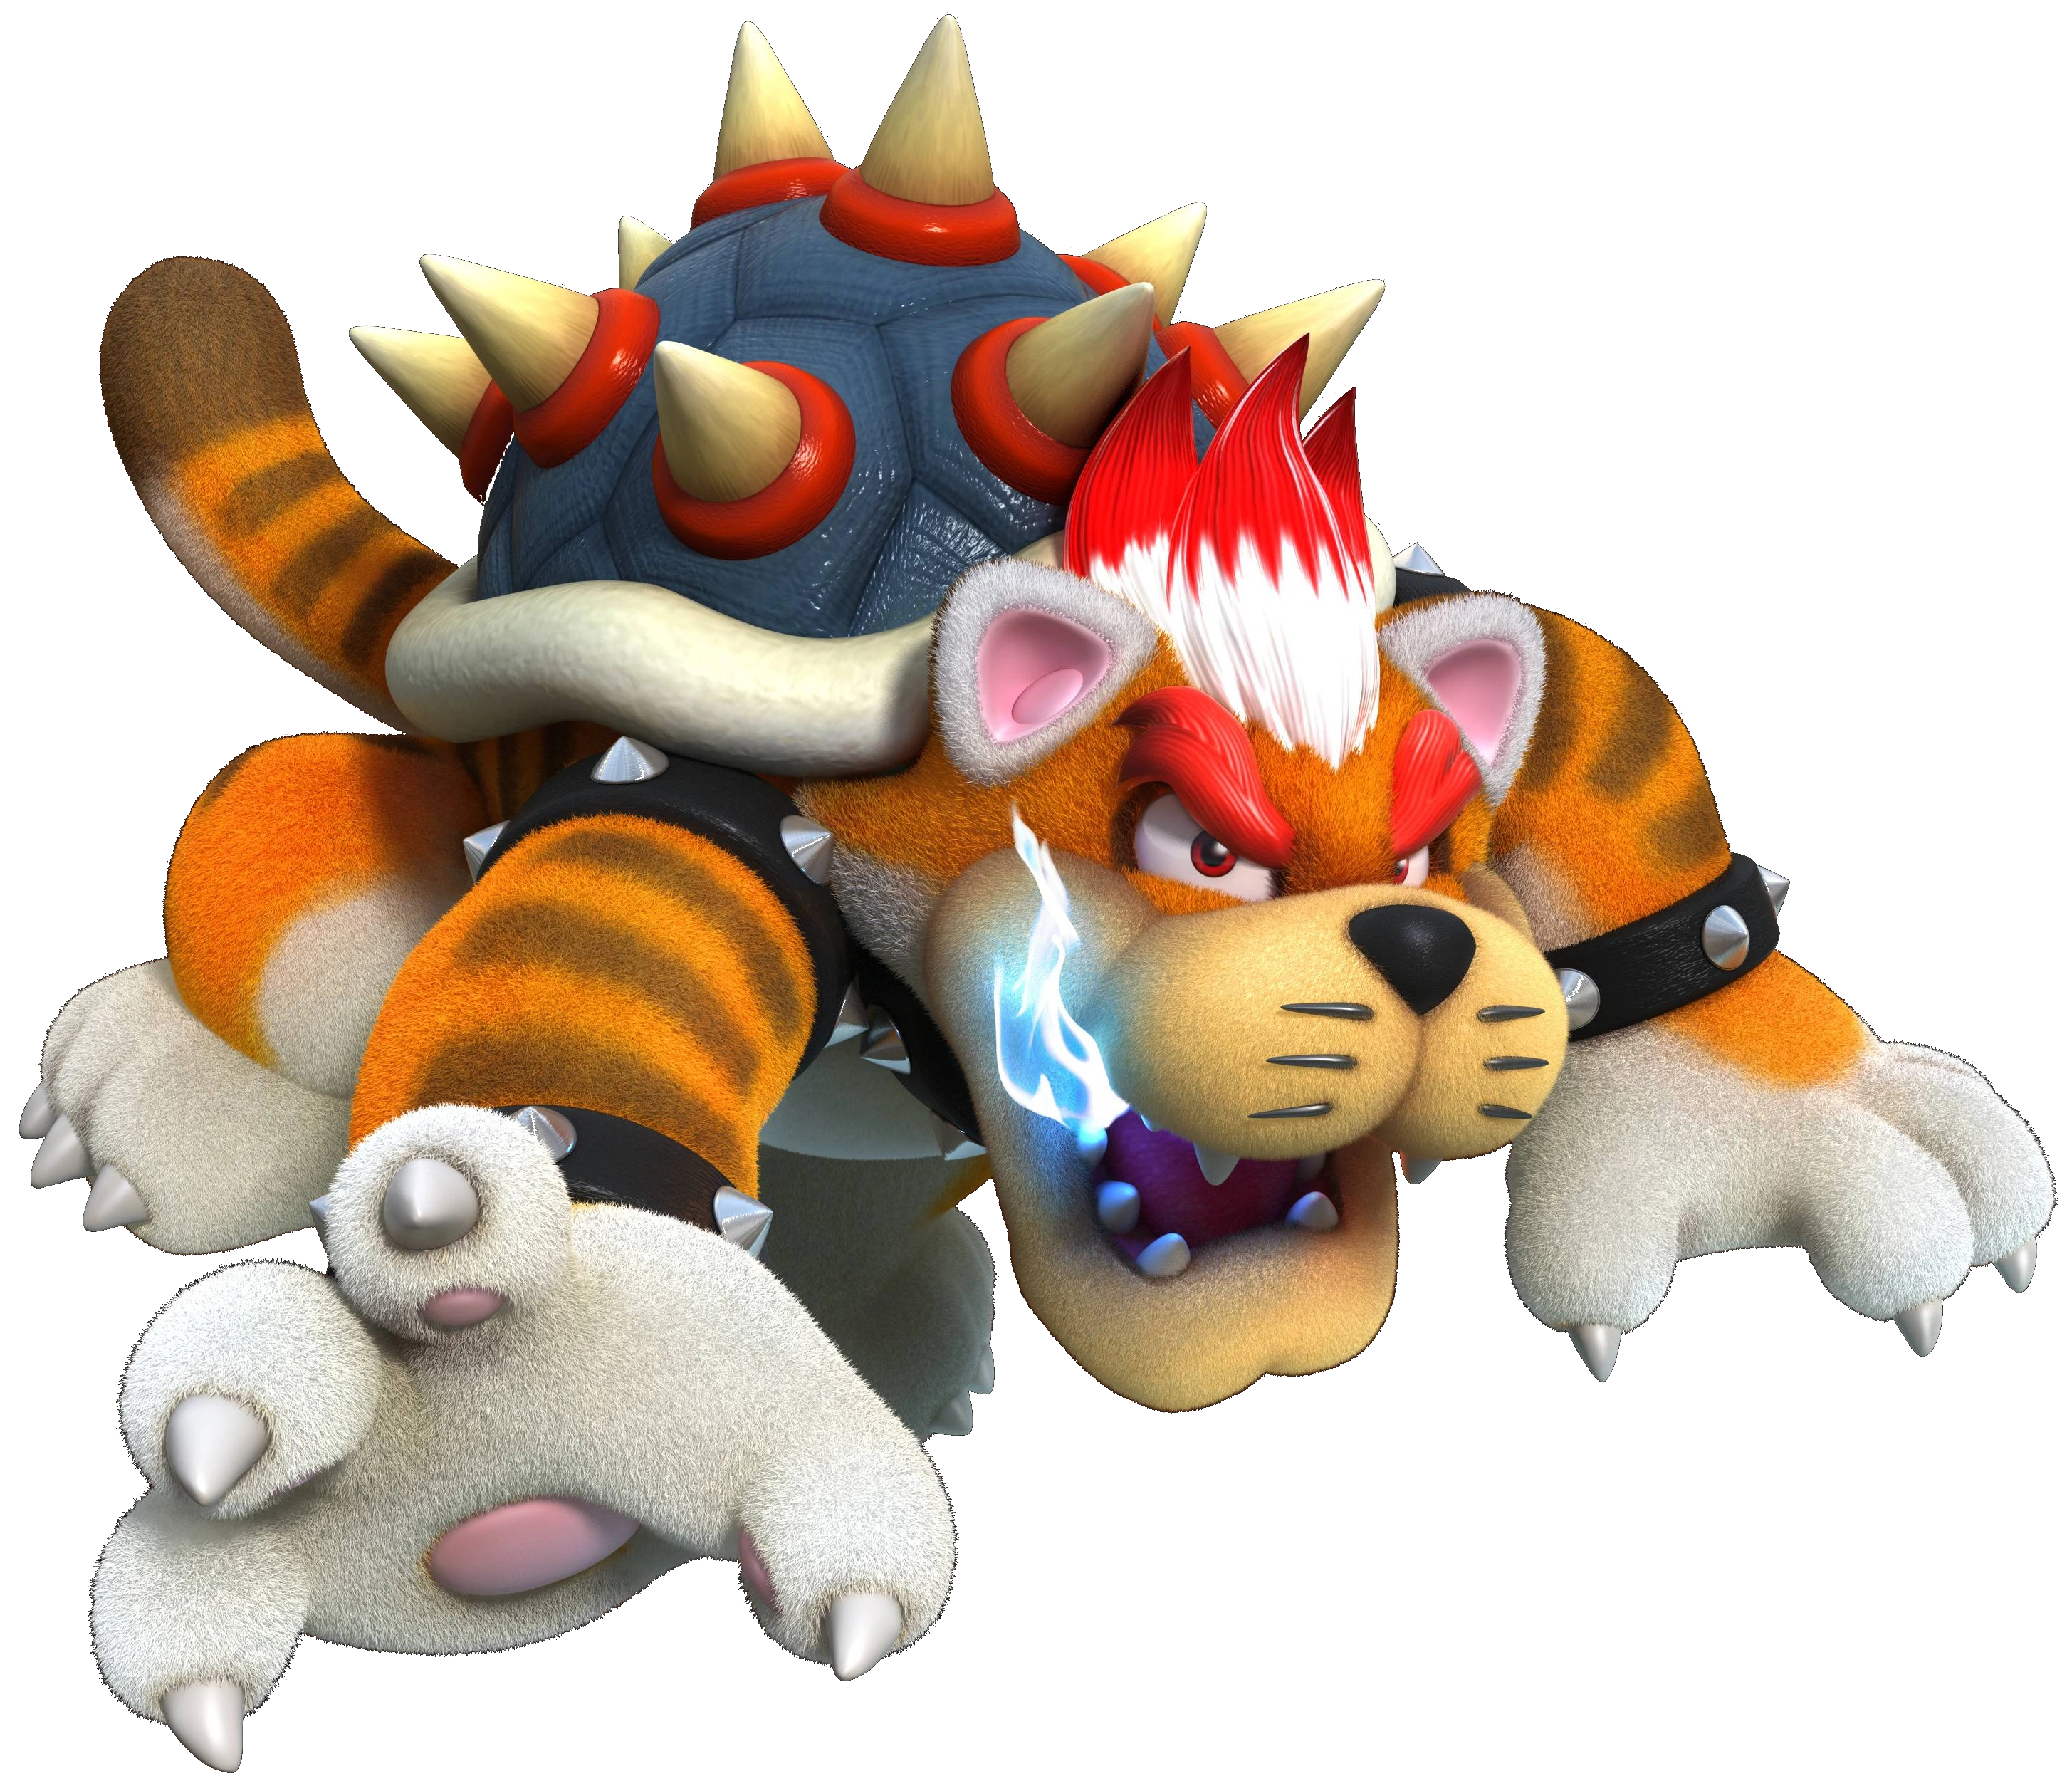
    Meowser (ネコクッパ, Cat Koopa) is the Cat form of Bowser, which he takes in the final boss of Super Mario 3D World. During the battle, Mario would have to dodge his attacks as they climbed up the Great Tower of Bowser Land, and during the second phase, he uses a Double Cherry to make copies of himself. Unlike Cat Mario, Meowser is more akin to a transformation than a suit, with him getting orange fur and cat ears replacing his horns.

    Meowser is a Fusion Fighter; obviously, many of his moves are taken from Bowser and Dry Bowser, though because of his status as a quadruped, he also takes inspiration from Poochy and Duck Hunt's regular moveset.
    SSB Mario Series Meowser Stock Icon SSBCharged Icon
    Meowser's Moveset

    • Neutral Attack: Meowser throws a claw swipe, followed by a headbutt, followed by a dropkick.
    • Forward Tilt: Meowser swings his tail forward.
    • Forward Smash: Meowser throws a dropkick.
    • Up Tilt: Meowser swipes his claws in an overarching motion.
    • Up Smash: Meowser gets on all fours and leaps upward to damage opponents with the spikes on his shell.
    • Down Tilt: Meowser swings his tail across the ground.
    • Down Smash: Meowser swipes around himself with a single claw swipe.
    • Dash Attack: Meowser throws a battering ram.
    • Counter: Meowser grabs the opponent and slams them into the ground.

  • Neutral Aerial: Meowser performs a cartwheel, damaging opponents multiple times before launching them.
  • Forward Aerial: Meowser swipes his claws downward.
  • Forward Crash: Meowser swipes his claws forward.
  • Back Aerial: Meowser thrusts his shell backward.
  • Back Crash: Meowser throws a dropkick.
  • Up Aerial: Meowser throws an upward headbutt.
  • Up Crash: Meowser throws an upward headbutt.
  • Down Aerial: Meowser crawls into his shell and spins downward, damaging opponents multiple times before launching them. The attack grants Meowser invibcibility.
  • Down Crash: Meowser crawls into his shell and falls downward to the ground. The attack buries grounded opponents and meteor smashes aerial opponents he lands on, as well as granting Meowser invincibility.

  • Grab: Meowser bites the opponent.
  • Pummel: Meowser tightens his grip on the opponent.
  • Forward Throw: Meowser flings the opponent forward.
  • Back Throw: Meowser flings the opponent backward.
  • Up Throw: Meowser flings the opponent upward.
  • Down Throw: Meowser flings the opponent downward.

  • Neutral Special - Fire Breath: Meowser expels flames from his mouth. If the special button is tapped, Meowser will spit a fireball that travels a short distance and explodes on impact, damaging opponents. If the special button is held, he will shoot a stream of flames that damage opponents multiple times. Both the stream and fireballs can be angled with directional inputs. Use of either variation will make the attack weaker, though it will recharge when not in use.
    • Custom 1 - Ice Breath: Meowser expels blue flames. They deal less damage, but can freeze opponents.
    • Custom 2 - Poison Breath: Meowser expels green flames. They become weaker quicker and take longer to recharge, but they will put a flower on opponents' heads.
    • Custom 3 - Sleepy Breath: Meowser expels white flames. They won't make opponents flinch, but they will put them to sleep. Midair opponents will instead suffer light knockback.
  • Side Special - Feline Fury: Meowser ignites himself on fire and rushes forward, cooling off after a short distance. If he hits an opponent while on fire, he will grab them and throw them upwards, then jump towards them and perform a piledriver. Opponents near him will also take damage from the flames.
    • Custom 1 - Kat Klaw: Instead of performing a piledriver, Meowser can bite opponents once he grabs them. He can then throw them forward or backward.
    • Custom 2 - Fury Slam: Instead of performing a piledriver, Meowser performs a belly-to-belly suplex. The player that has the most damage controls what direction Meowser flies in via directional inputs.
    • Custom 3 - Ballistic Fury: Meowser travels less distance while dashing, but the piledriver deals more damage and knockback. It also ends in an explosion that can damage other opponents in the blast radius.
  • Up Special - Twirling Tower: Meowser enters his shell and begins spinning around, damaging opponents multiple times before launching them. While spinning, he can move left and right. If used in midair, Meowser rises upward, and can rise higher if the special button is tapped repeatedly, before he falls into a helpless state. The attack grants Meowser invincibility.
    • Custom 1 - Sliding Tower: Meowser doesn't deal as much damage, but he moves around quicker. In midair, he sacrifices vertical distance for more horizontal distance.
    • Custom 2 - Burning Tower: Meowser doesn't travel as fast, but he leaves a trail of flames behind himself, which gradually damage opponents that stand in them. In midair, Meowser deals more damage in exchange for lack of horizontal movement.
    • Custom 3 - Whirlwind Tower: Meowser cannot travel as far, but while spinning, he creates a whirlwind that has vacuumboxes that pull opponents into the attack.
  • Down Special - Meowser Bomb: Meowser leaps into the air, damaging opponents with his horns before falling downward, damaging opponents he lands on. At the peak of his jump, the attack can be cancelled into any other action. If the move is used in midair, he will simply fall downward.
    • Custom 1 - Turbulent Bomb: Meowser deals less damage, but he creates windboxes when he lands, pushing nearby opponents back.
    • Custom 2 - Quake Bomb: Meowser creates a stage-wide tremor when he lands that causes all grounded opponents to slip. He also buries opponents he lands on.
    • Custom 3 - Meteor Bomb: Meowser falls slower, but he meteor smashes opponents he lands on.
  • Final Smash - Meowser Clones: Meowser hops off of the stage and begins performing backflips in the background as he does in Super Mario Maker 2, spitting fireballs onto the stage. While this is happening, three Meowser clones also appear, which will run around and attack the opponents with claw swipes. Meowser finishes with a massive fireball that launches opponents and causes all the clones to disappear before returning to the foreground.
  • Charged State - Feral Meowser: Meowser begins glowing bright red. In this state, his attacks have much larger range and deal more damage, with many of his attacks being enhanced with different effects. He can also run faster and jump higher.

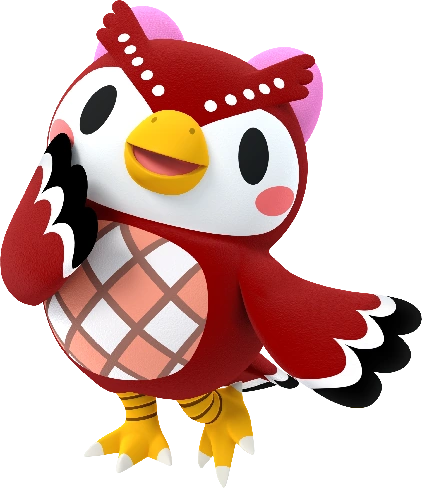
  • Rawk Hawk (ζ)
    Paper Mario: The Thousand-Year Door (2004)
    Rawk Hawk
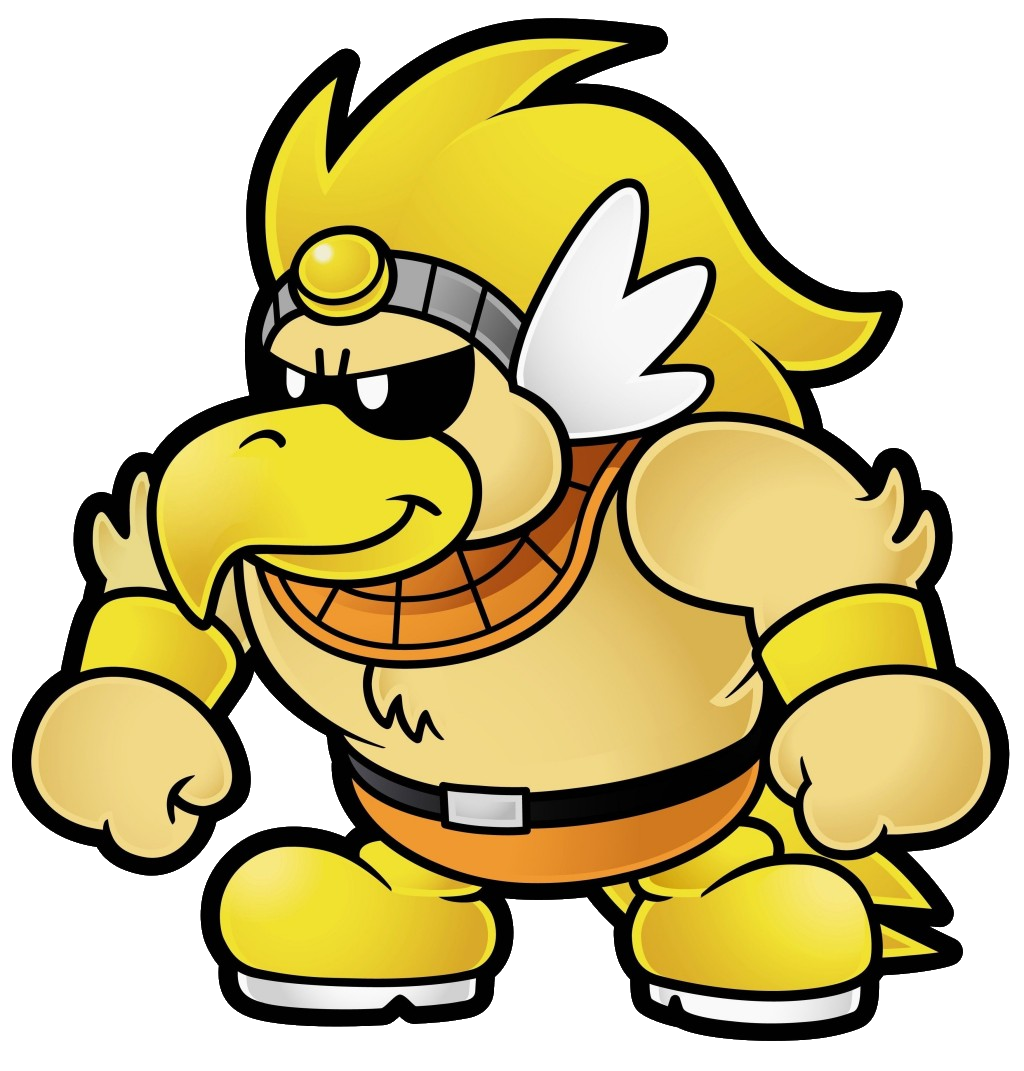
    Rawk Hawk (ゴールドホーク, Rawk Hawk), also known as the Feral Nuclear Reactor, is the reigning champion of the Glitz Pit, and a boss Mario and friends battle in Paper Mario: The Thousand-Year Door. Initially, they think the Crystal Star is on the Champ's Belt, and decide to enter the Glitz Pit as fighters and earn it. Rawk Hawk begins to get jealous when Mario starts taking his fans' attention, and starts using dirty, underhanded methods to try and get back at him.

    A Fusion Fighter, Rawk Hawk's moveset is comprised of moves from both Falco and Incineroar. This gives him a rather unique kit, containing both combo-centric multi-hitting attacks and powerful finishers. As a result, he can both combo and KO opponents effectively, and he benefits most from an aggressive playstyle. His mobility is slow and his weight is rather heavy, though he has above-average jump height.
    SSB Mario Series Rawk Hawk Stock Icon SSBCharged Icon
    Rawk Hawk's Moveset

    • Neutral Attack: Rawk Hawk throws two alternating punches followed by a clothesline spin with his arms outstretched, damaging opponents multiple times before launching them.
    • Forward Tilt: Rawk Hawk throws a knifehand thrust.
    • Forward Smash: Rawk Hawk throws an enzuigiri.
    • Up Tilt: Rawk Hawk spins around while throwing two alternating uppercuts.
    • Up Smash: Rawk Hawk throws an upward double hand axle.
    • Down Tilt: Rawk Hawk slides his tail across the ground. The move can trip opponents.
    • Down Smash: Rawk Hawk throws a jumping splash.
    • Dash Attack: Rawk Hawk throws a sliding kick with both feet.
    • Counter: Rawk Hawk throws a straight punch.

  • Neutral Aerial: Rawk Hawk performs a somersault, damaging opponents multiple times before launching them.
  • Forward Aerial: Rawk Hawk throws a corkscrew battering ram, damaging opponents multiple times before launching them.
  • Forward Crash: Rawk Hawk throws a dropkick.
  • Back Aerial: Rawk Hawk throws a back kick.
  • Back Crash: Rawk Hawk throws a backward punch.
  • Up Aerial: Rawk Hawk throws an upward headbutt.
  • Up Crash: Rawk Hawk throws a bicycle kick.
  • Down Aerial: Rawk Hawk throws a stomp. The move can meteor smash opponents.
  • Down Crash: Rawk Hawk throws a stall-then-fall stomp. The move can meteor smash opponents.

  • Grab: Rawk Hawk reaches out to grab the opponent.
  • Pummel: Rawk Hawk pecks the opponent.
  • Forward Throw: Rawk Hawk throws a giant swing, sending the opponent forward.
  • Back Throw: Rawk Hawk suplexes the opponent, launching them backward.
  • Up Throw: Rawk Hawk performs an Argentine backbreaker rack drop.
  • Down Throw: Rawk Hawk slams the opponent into the ground.

  • Neutral Special - Rawk Out: Rawk Hawk spins around with his arms outstretched, damaging opponents that hit him. While spinning, he can move back and forth. The move grants him super armor and ignores shields.
    • Custom 1 - Rawk Rise: Rawk Hawk damages opponents multiple times before launching them. If the special button is pressed repeatedly, he will rise into the air. It doesn't grant super armor.
    • Custom 2 - Fiery Rawk: Rawk Hawk doesn't gain super armor and he cannot move back and forth while spinning, but he will deal a lot more damage.
    • Custom 3 - Sliding Rawk: Rawk Hawk can move faster while spinning. The move deals less damage and doesn't ignore shields.
  • Side Special - Glitzville Whip: Rawk Hawk grabs the opponent. A set of boxing ring ropes appear behind him as he spins and throws the opponent at them. The opponent bounces off of the ropes and runs back at Rawk Hawk. If the special button is pressed again, he will perform different attacks depending on when. If pressed at the right time, Rawk Hawk will perform a lariat, dealing heavy damage and knockback. If pressed earlier, he will throw a chop, causing the opponent to trip. If pressed later, he grabs the opponent and performs a German suplex, which can set up for combos. If the special button is not pressed at all, the opponent runs into Rawk Hawk and deals 5% recoil damage.
    • Custom 1 - Reverse Glitzville Whip: The boxing ring ropes appear in front of Rawk Hawk instead of behind hit. As such, he will launch the opponent backward.
    • Custom 2 - Far Glitzville Whip: The boxing ring ropes appear farther from Rawk Hawk. This makes timing on his different attacks easier, but they all deal less damage.
    • Custom 3 - Bouncy Ropes: Rawk Hawk's attacks deal much less damage and knockback, and opponents can react out of being thrown. However, the rope rings will remain on stage for a short time or until the move is used again. These can be used to bounce high upward.
  • Up Special - Rawk Chop: Rawk Hawk leaps backward, then flies at a downward angle, damaging opponents he hits, meteor smashing them. The initial jump can be altered slightly with directional inputs, allowing him to fly at different angles
    • Custom 1 - Rawk Chop Rise: Rawk Hawk jumps straight upward before falling down. He will damage opponents as he rises up, and the initial rise has super armor, though he deals less damage.
    • Custom 2 - Angled Rawk Chop: Rawk Hawk doesn't jump as high, but he can dash anywhere via directional inputs.
    • Custom 3 - Lateral Rawk Chop: Instead of jumping up and falling at a downward angle, Rawk Hawk will jump in a diagonally upward angle and fall straight down.
  • Down Special - Appeal: Rawk Hawk strikes a pose as a spotlight shines on him. This will cause an unseen crowd to cheer for him, boosting the strength of his next attack. It is similar to Incineroar's Revenge, but isn't a counter, can't be stacked, and can be interrupted.
    • Custom 1 - Super Appeal: Rawk Hawk taunts longer, but his next attack is boosted even more.
    • Custom 2 - Food Appeal: Rawk Hawk's taunts cause the crowd to throw Food near him instead of boosting his strength, which he and his opponents can eat to recover health.
    • Custom 3 - Rawk Revenge: Rawk Hawk leans forward as the Champ's Belt shines around his waist. If he is attacked in this state, the false Crystal Star on the Champ's Belt shines a pulse and damages the opponent. The crowd cheers as Rawk Hawk's next attack is boosted.
  • Final Smash - Superstar Rawker: Rawk Hawk rushes forward to grab an opponent. If he is successful, he will take them to the Glitz Pit and throw them into the ropes as Jolene commentates. Rawk Hawk then attacks with a lariat, knocking them into the air, before jumping above them and performing a diving attack, sending them into the ground. This sends the opponent back to the stage, launching them.
  • Charged State - Feel the RAWK!: The crowd cheers wildly for Rawk Hawk as he puts on the Champ's Belt, which begins to sparkle. In this state, he can run faster and jump higher, and his attacks deal a lot more damage. Appeal is also much faster and easier to use.

  • Lanky Kong (ε)
    Donkey Kong 64 (1999)
    HDLankyKongEdit2
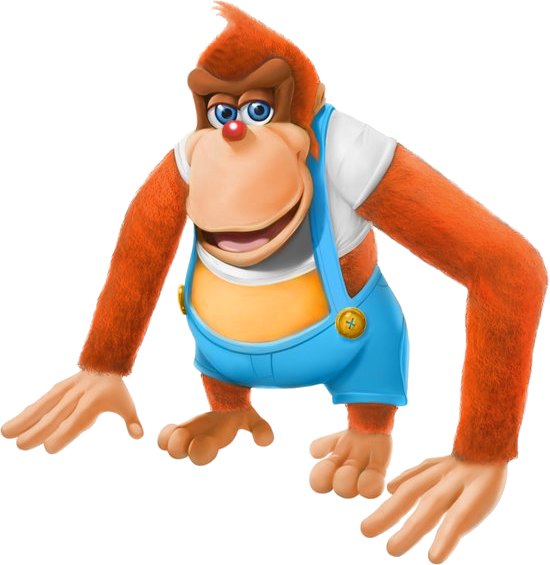
    Lanky Kong (ランキーコング, Lanky Kong) is a member of the Kong Family and one of the playable characters in Donkey Kong 64. He is an orangutan with lanky arms and a wild personality. He has the ability to stand on his hands to allow him to climb up slopes, as well as inflate himself like a balloon to reach new areas.

    As an Echo Fighter of Donkey Kong, Lanky Kong shares many of the same moves as him. He is much lighter and shorter than Donkey Kong, and can be knocked away much easier. The power of his attacks is also pretty lackluster, and he lacks Donkey Kong's Kong Karry. However, in exchange for these disadvantages, he has the unique ability to stretch his arms to allow his attacks to reach ludicrous lengths, allowing him to cover more range than most other characters. In fact, Lanky has some of the longest-ranged non-disjointed moves in the entire roster.
    SSB Donkey Kong Series Lanky Kong Stock Icon SSBCharged Icon
    Lanky Kong's Moveset

    • Neutral Attack: Lanky Kong stretches his arms to throw a hook followed by an uppercut.
    • Forward Tilt: Lanky Kong stretches his arm to swipe his hand in front of himself.
    • Forward Smash: Lanky Kong stretches his arms to clap in front of himself.
    • Up Tilt: Lanky Kong stretches his arm to swipe his hand above himself in an arcing motion.
    • Up Smash: Lanky Kong stretches his arms to clap above himself.
    • Down Tilt: Lanky Kong stretches his arm to swipe his hand across the ground. The move can trip opponents.
    • Down Smash: Lanky Kong stretches his arms to slam his fists on the ground on either side.
    • Dash Attack: Lanky Kong performs a cartwheel, damaging opponents multiple times before launching them. If used near an edge, he will roll off of it, and can cancel the attack into a jump.
    • Counter: Lanky Kong inflates himself to push the opponent away. The move can also reflect projectiles.

  • Neutral Aerial: Lanky Kong spins around and performs discus clotheslines.
  • Forward Aerial: Lanky Kong stretches his arms to throw a double-hand axle. The attack can bury grounded opponents and meteor smash aerial ones if the sweetspot connects.
  • Forward Crash: Lanky Kong extends his arm to throw a jab.
  • Back Aerial: Lanky Kong throws a back kick.
  • Back Crash: Lanky Kong stretches his arm to throw a punch backward.
  • Up Aerial: Lanky Kong throws an upward headbutt.
  • Up Crash: Lanky Kong stretches his arms to clap above himself.
  • Down Aerial: Lanky Kong stomps downward with one foot. The attack can meteor smash opponents.
  • Down Crash: Lanky Kong turns toward the screen and extends his arms to throw a double-handed axle. The attack can bury grounded opponents and meteor smash aerial ones.

  • Grab: Lanky Kong reaches out to grab the opponent.
  • Pummel: Lanky Kong slaps the opponent.
  • Forward Throw: Lanky Kong flings the opponent forward.
  • Back Throw: Lanky Kong turns around and flings the oppnonent backward.
  • Up Throw: Lanky Kong flings the opponent upward.
  • Down Throw: Lanky Kong slams the opponent into the ground.

  • Neutral Special - Lanky Punch: Lanky Kong swings his fist, winding up for a punch. Pressing the special attack again will have him extend his arm to throw a punch, with it being stronger depending on how long the move was charged. The charge can be cancelled and stored by performing any other action. At full charge, the move has super armor. The move's range also increases depending on how long it is charged.
    • Custom 1 - Storm Punch: The charging takes longer and the punch deals less damage. However, at full charge, Lanky Kong releases a massive whirlwind that has a windbox that pushes opponents back.
    • Custom 2 - Lightning Punch: The punch deals less damage, but the charging takes less time. The punch is electrically charged, and at full charge, the move can inflict paralysis on opponents.
    • Custom 3 - Sliding Punch: The punch deals significantly less damage and the fully-charged punch lacks super armor, but Lanky Kong slides across the ground as he punches.
  • Side Special - Orangutan Flip: Lanky Kong leaps forward while performing a backflip. If he hits an opponent, he will grab onto them and smack them downward, meteor smashing them and allowing him to get a boost in upward momentum, and he can use the move a second time. Otherwise, he enters a semi-helpless state afterwards. If the special button is tapped mid-jump, Lanky will throw a flying kick instead that launches opponents.
    • Custom 1 - Back Flip: Lanky Kong leaps backward rather than forward. Pressing the special button again sees him moving forward with the kick.
    • Custom 2 - Flying Flip: Lanky Kong leaps higher but travels less distance. The kick is weaker but the grab deals more damage.
    • Custom 3 - Far Flip: Lanky Kong leaps farther. However, he cannot kick and the grab does not meteor smash opponents.
  • Up Special - Spinning Kong: Lanky Kong stretches his arms and rapidly spins around, damaging opponents multiple times with a series of discus clotheslines and spinning backfists before launching them. While spinning, Lanky Kong can move forward and backward. If used in midair, he will rise upward before falling into a helpless state. Pressing the special button rapidly will allow him to extend his arms farther to cover more range, but deal less damage.
    • Custom 1 - Chopper Kong: Lanky Kong quickly rises high while spinning. He cannot damage opponents.
    • Custom 2 - Kong Cyclone: While spinning, Lanky Kong creates vacuumboxes that pull in opponents nearby into the attack. He cannot move at all if the grounded variant is used, and he gains less distance if the aerial variant is used.
    • Custom 3 - Spinning Kong Slam: Instead of damaging opponents multiple times, Lanky Kong simply launches them with heavy damage. The move has increased startup and endlag but allows him to gain more vertical height.
  • Down Special - Hand Slap: Lanky Kong slaps the ground twice, creating shockwaves that damage nearby grounded opponents. If the special button is pressed rapidly, he will continue slapping. If used in midair, Lanky Kong stretches his arms and slaps downward once; the arm continues stretching until it hits a surface or an opponent. He then pulls himself downward to deliver the second slap, which can meteor smash the opponent.
    • Custom 1 - Hot Slap: Instead of earth-shaking tremors, pillars of fire rise on either side of Lanky Kong as he slaps the ground. These pillars damage opponents, and have less horizontal range in exchange for more vertical range.
    • Custom 2 - Cold Slap: Instead of earth-shaking tremors, ice shards rise from the ground on either side of Lanky Kong as he slaps the ground. These deal less damage but will freeze opponents.
    • Custom 3 - Focused Slap: The tremors deal less damage and knockback, but inflict paralysis on opponents.
  • Final Smash - Baboon Balloon: Lanky Kong inflates his body like a balloon, and rockets around the stage, damaging opponents he hits. After awhile, he will target the leading opponent and fly into them, popping on impact and dealing heavy damage.
  • Charged State - Banana Juice: Lanky Kong drinks a jar of Banana Juice, causing him to become golden. In this state, he is faster and deals more damage. Many of his attacks also have super armor, and he can jump higher.

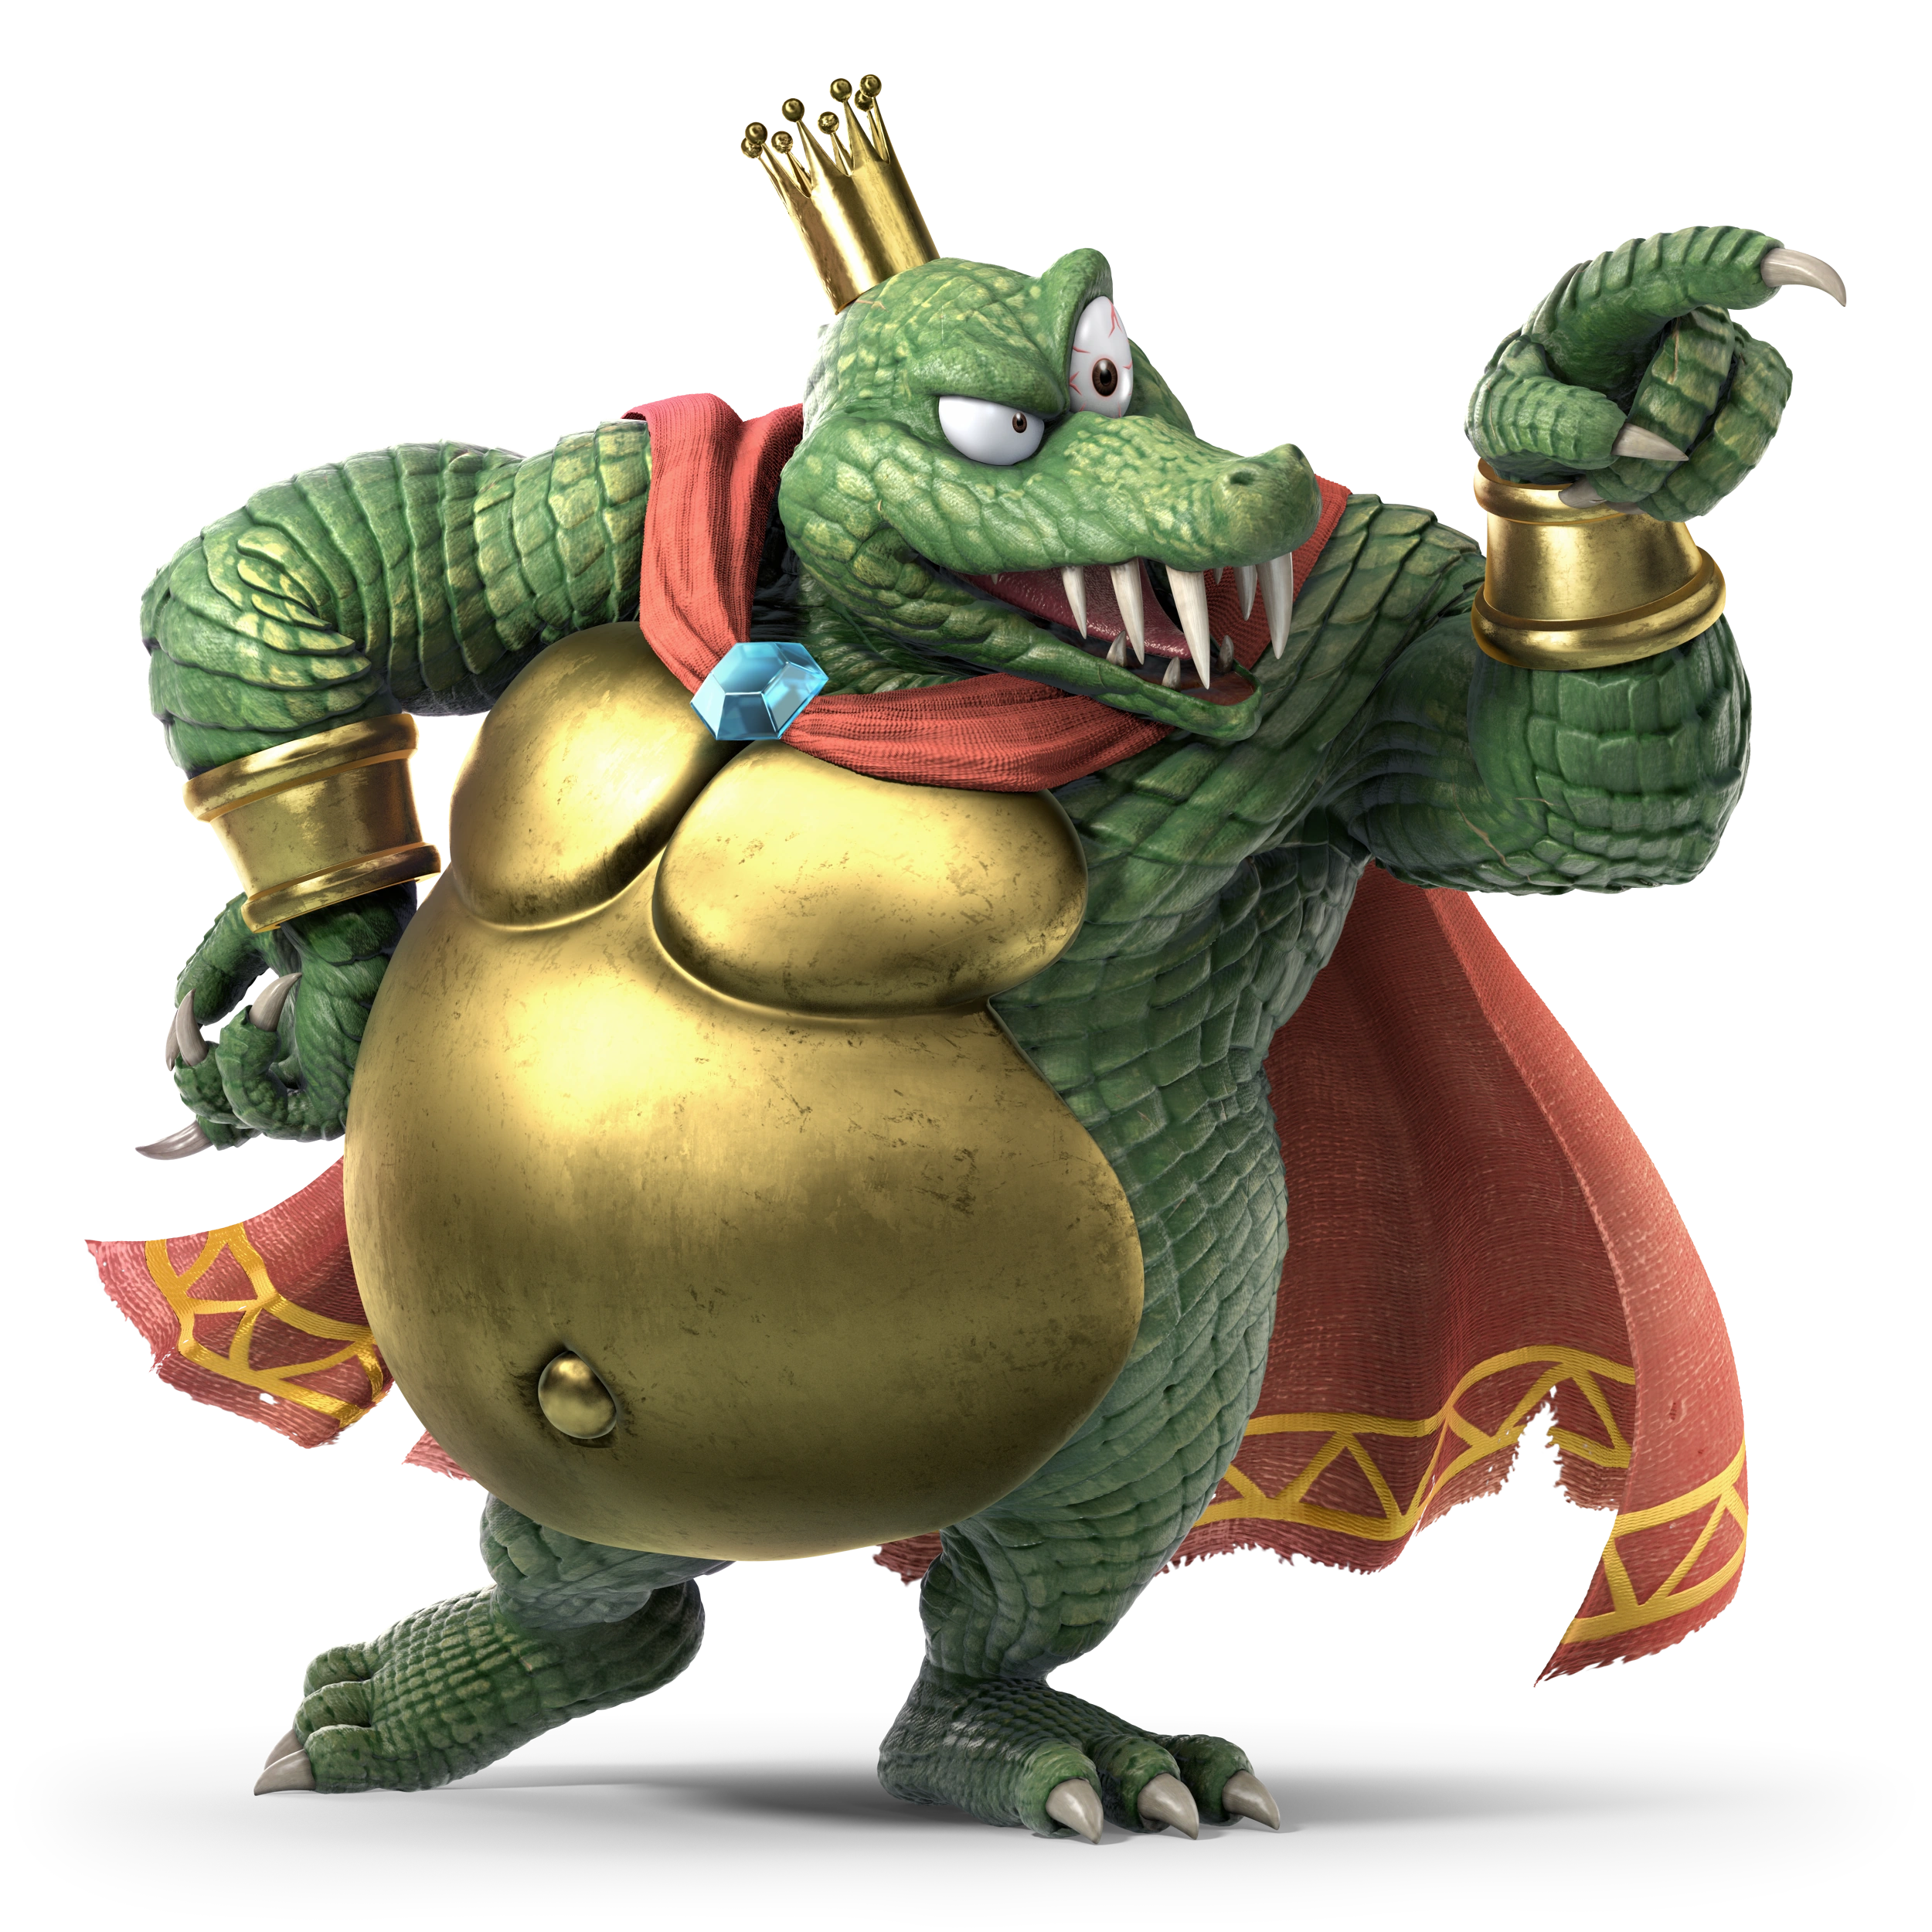
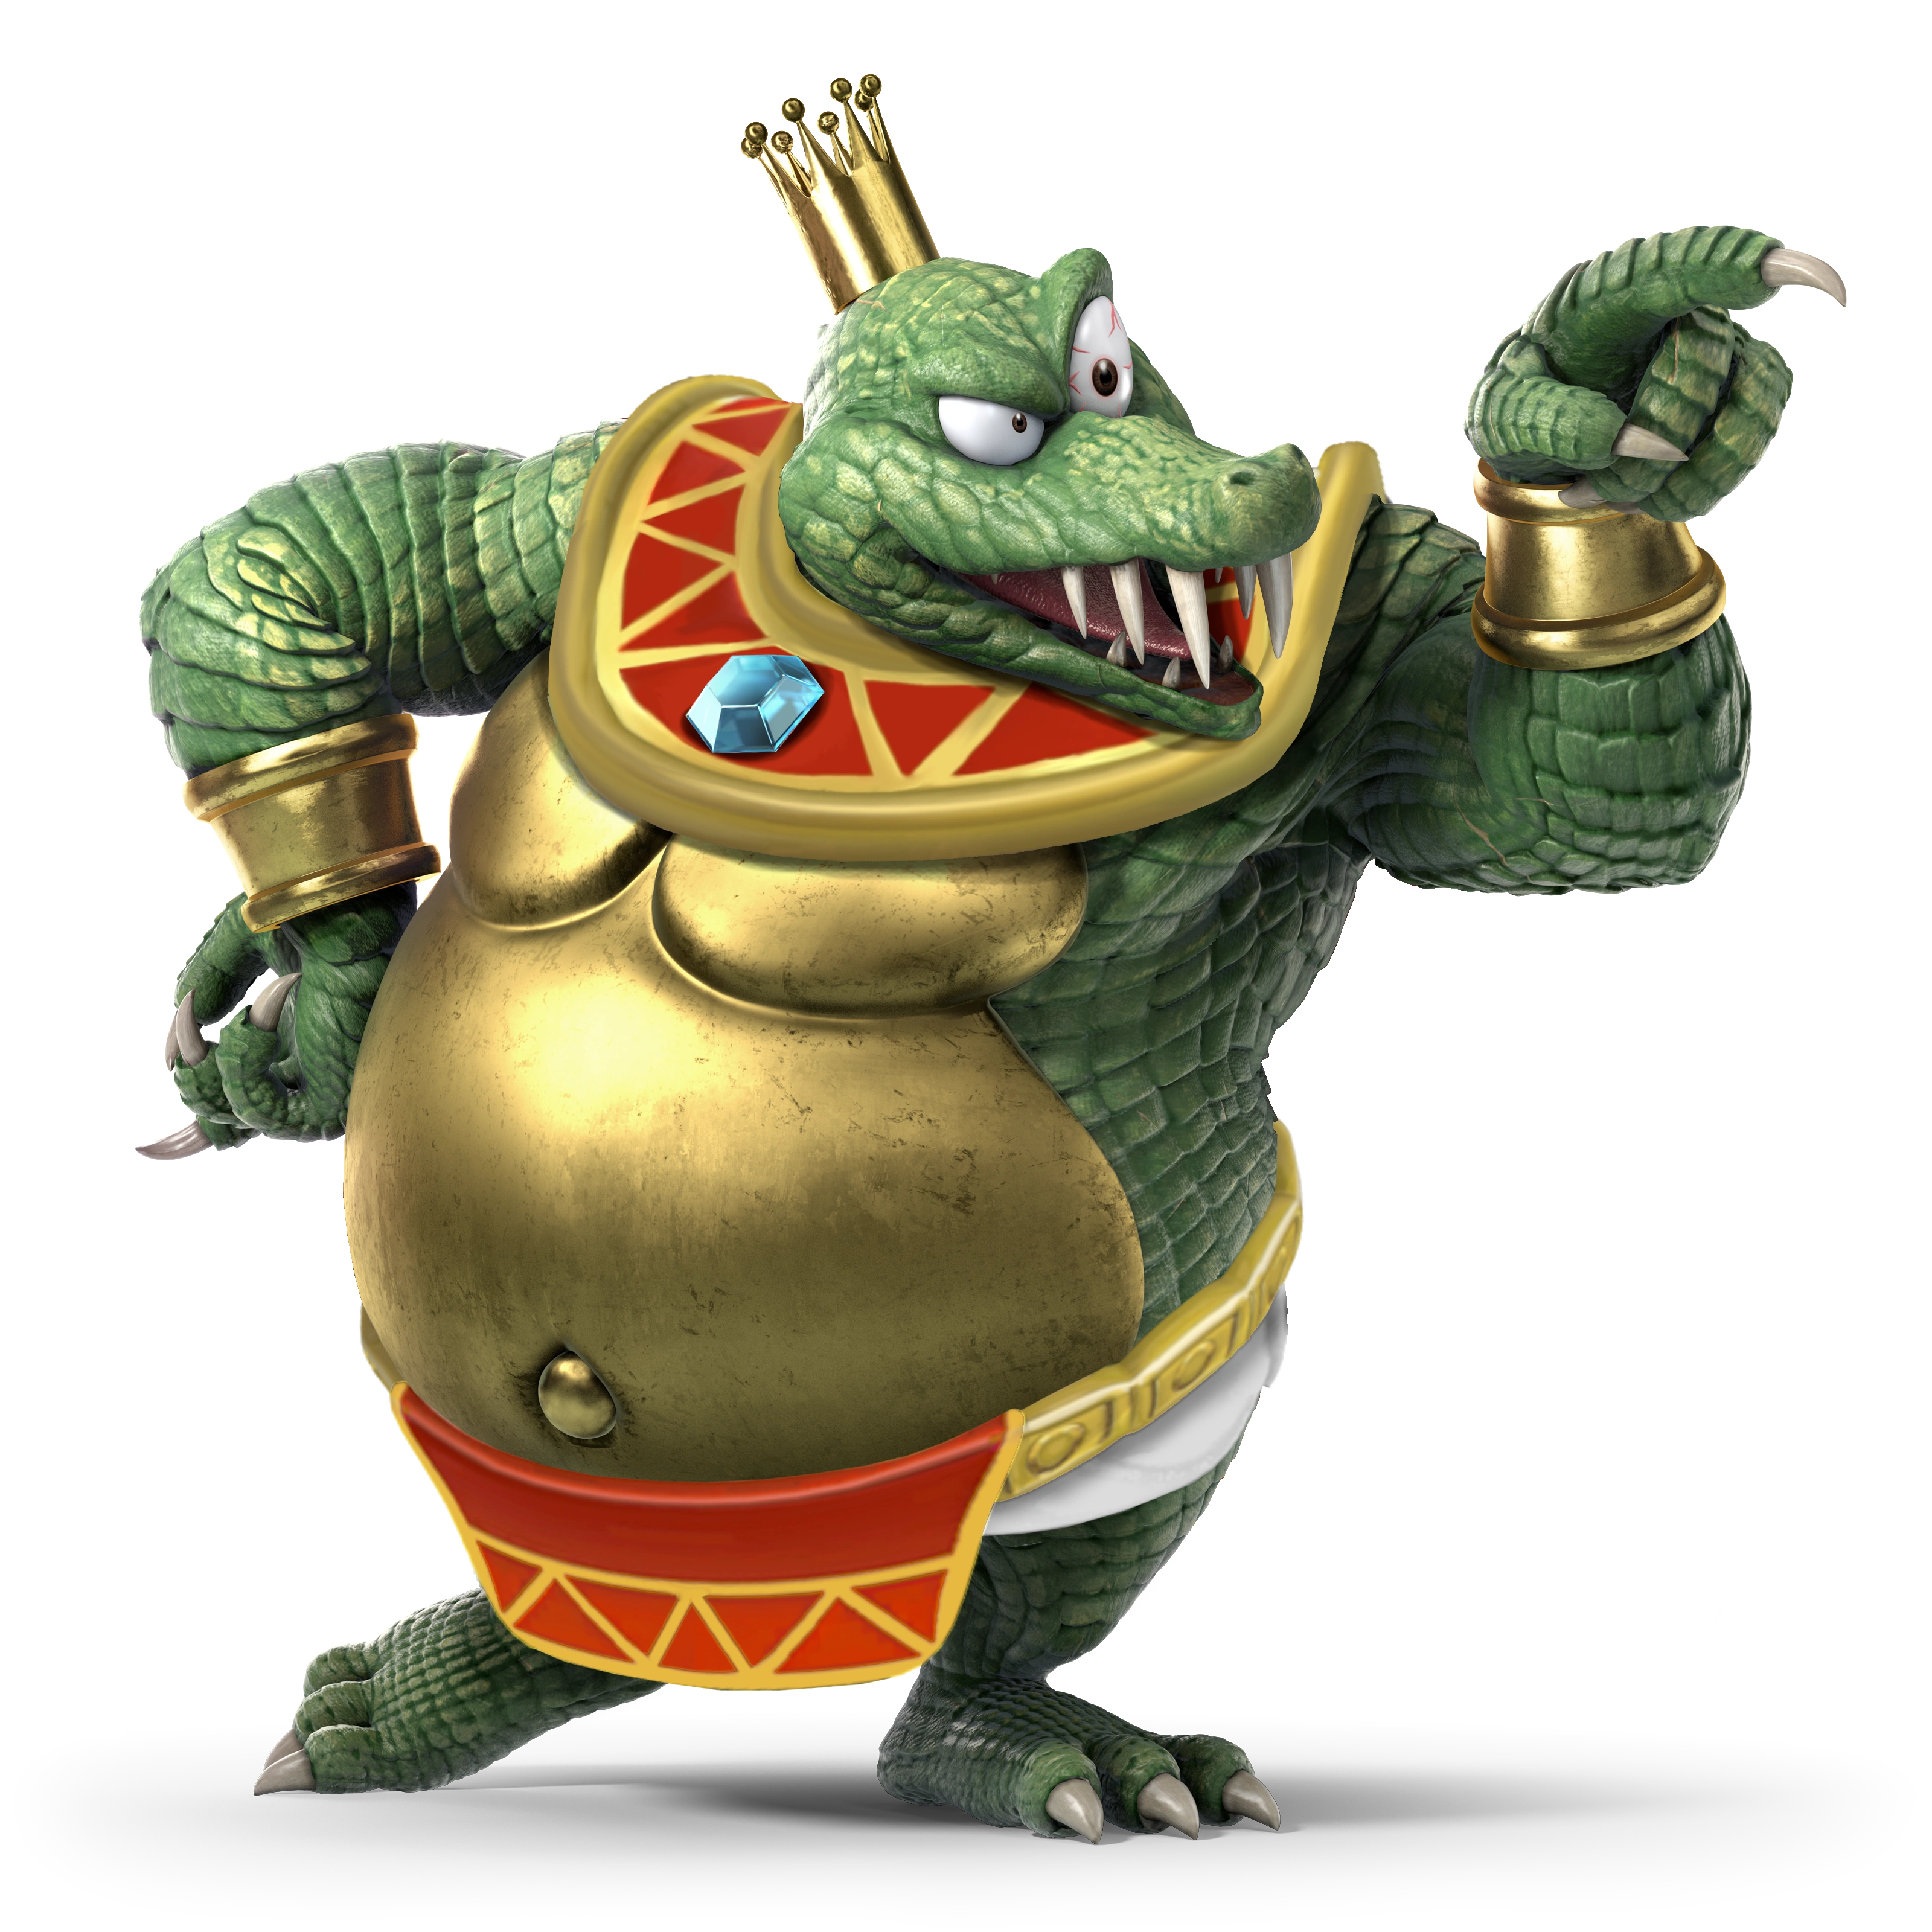
  • King K. Rool
    Donkey Kong Country (1994)
    King K. Rool (キングクルール, King K. Rool) is the main antagonist of the Donkey Kong series. The leader of a race of crocodilians called Kremlings, he is often seen trying to take Donkey Kong's Banana Hoard, and has even kidnapped members of the Kong Family. However, Donkey Kong and his friends always defeat him. Notably, he has gone under many different aliases throughout his schemes, such as Kaptain K. Rool and Baron K. Roolenstein.

    Fittingly, King K. Rool is one of the heaviest characters in the game, and as such is difficult to knock away. Aiding his survivability, many of his attacks that involve his stomach grant him special armor. This is better than super armor, as King K. Rool will only take half the damage in addition to no knockback. However, if the stomach is damaged during these attacks, it will crack. After amassing 50% damage, it will shatter, leaving K. Rool stunned for a short time. He is also quite mobile, possessing fast ground and air speed, and also has a very flexible recovery.

    Though the range on King K. Rool's attacks is short compared to other heavyweights, they still deal a lot of damage. He does, though, have access to projectiles that cover a lot of ground and are quite versatile. Many of his attacks are taken from his various appearances as a boss throughout the Donkey Kong series.
    SSB Donkey Kong Series KingKRoolHeadSSBU SSBUltimate Icon
    King K. Rool's Moveset

    • Neutral Attack: King K. Rool throws a sumo-esque palm strike followed by a claw swipe.
    • Forward Tilt: King K. Rool throws a frontal clap.
    • Forward Smash: King K. Rool puts on a boxing glove and throws a punch. The attack has super armor.
    • Up Tilt: King K. Rool throws an uppercut.
    • Up Smash: King K. Rool throws a headbutt straight upwards followed by a plank. The second part of the attack can meteor smash opponents.
    • Down Tilt: King K. Rool stomps forward. The attack can bury grounded opponents and meteor smash aerial opponents.
    • Down Smash: King K. Rool pulls out a remote and presses a button on it, causing the area around him to be covered in electricity, damaging opponents multiple times before launching them.
    • Dash Attack: King K. Rool leaps while thrusting his stomach forward. The move grants him super armor.
    • Counter: King K. Rool's stomach glows green as it puffs out. The attack can reflect projectiles.

  • Neutral Aerial: King K. Rool expands his stomach. The move grants him super armor.
  • Forward Aerial: King K. Rool throws a dropkick.
  • Forward Crash: King K. Rool puts on a boxing glove and throws a hook. The move grants him super armor.
  • Back Aerial: King K. Rool turns around and throws an overhead punch. The move can meteor smash opponents.
  • Back Crash: King K. Rool puts on a boxing glove and turns around, throwing a hook. The attack has super armor.
  • Up Aerial: King K. Rool thrusts his head upward. The attack deals more damage and has more range if he has his crown on his head.
  • Up Crash: King K. Rool throws an upward headbutt.
  • Down Aerial: King K. Rool performs a stall-then-fall attack with his stomach, falling to the ground. He bounces off opponents if he lands on one.
  • Down Crash: King K. Rool stomps downward. The move can meteor smash opponents.

  • Grab: King K. Rool reaches out to grab the opponent.
  • Pummel: King K. Rool bites the opponent.
  • Forward Throw: King K. Rool spins around before throwing the opponent forward.
  • Back Throw: King K. Rool drags the opponent across the ground before throwing them backward. The directional input can be held for him to continue dragging the opponent as he turns around and walks forward, dealing more damage.
  • Up Throw: King K. Rool leaps into the air past the upper blast zone with the opponent, landing on the ground and performing an Argentine-style backbreaker.
  • Down Throw: King K. Rool heaves the opponent overhead and slams them into the ground, burying them.

  • Neutral Special - Blunderbuss: King K. Rool puts on a pirate hat and takes out the Blunderbuss. If the special button is tapped, he will fire a cannonball that travels forward and damages opponents. If the special button is held, he will instead suck opponents into the Blunderbuss, and can then launch them at different angles depending on directional inputs. This can also be done by holding the special button after a cannonball is launched. The cannonball can be reflected back at King K. Rool with any attack that deals 4% damage or more. If either this is done or the Blusterbuss begin sucking soon enough after the cannonball is fired, it will be sucked in again and can be fired at a different angle just like the opponents.
    • Custom 1 - Blusterbuss: The Blunderbuss does not fire cannonballs, but instead fires a strong gust of wind forward that creates a windbox to push opponents back. Wind can be expelled infinitely if the special button is held, though it will only push wind forward in front of King K. Rool.
    • Custom 2 - Spiked Cannonballs: The Blunderbuss fires spiked cannonballs that deal more damage and cannot be knocked back by opponents. They also continue moving forward instead of damaging opponents. However, they move significantly slower and don't travel as far.
    • Custom 3 - Cannonball Barrage: The Blunderbuss fires three cannonballs at varying angles in rapid succession. The attack has noticeable endlag and King K. Rool cannot suck in opponents or cannonballs.
  • Side Special - Crownerang: King K. Rool takes off his crown and throws it forward, which then returns to him like a boomerang. The crown damages opponents it hits while flying forward. If it flies by King K. Rool during the return, he grabs it and puts it back on his head. If not, it continues flying backward until eventually falling to the ground. If it falls off the edge or flies past a blast zone, the crown spawns back onto the stage. In either case, opponents can pick it up and use it as an item. If King K. Rool picks it up, he simply puts it back on his head.
    • Custom 1 - Tornado Crown: The crown creates a tornado as it spins. It doesn't damage opponents, but it will catch them and bring them back to King K. Rool, allowing him to follow up with an attack.
    • Custom 2 - Circling Crown: Rather than traveling forward and backward, the crown flies in a circular motion above King K. Rool.
    • Custom 3 - Controlled Crown: Once the crown is thrown, directional inputs can be used to control it as it flies through the air. The crown can only be controlled for a short time, where it will fall to the ground afterwards. King K. Rool is left vulnerable throughout the entire duration.
  • Up Special - Propellerpack: King K. Rool puts on his helicopter pack and flies upward. While flying, he can move forward and backward, damaging opponents that touch the propeller. When he reaches the peak of his flight, the pack begins to malfunction and explode, sending King K. Rool into a helpless state and damaging all opponents in the blast radius.
    • Custom 1 - Shredding Blades: King K. Rool cannot fly as high, but the helicopter pack's blades damage the opponents multiple times, dealing more damage.
    • Custom 2 - Safe Escape: King K. Rool flies higher and faster, but can only move straight upward. Rather than the helicopter pack exploding, King K. Rool simply takes it off and falls into a helpless state.
    • Custom 3 - Aerial Pursuit: King K. Rool can be controlled with directional inputs after he puts on the helicopter pack, and can move in any direction. The helicopter pack explodes after a short time.
  • Down Special - Cannonball: King K. Rool snaps his fingers, causing a cannonball to land in front of him. It buries grounded opponents and meteor smashes aerial opponents it lands on. The cannonball can then be picked up and thrown as an item by King K. Rool or his opponents; after being thrown, it travels in an arc, damaging opponents it hits. After two throws, the cannonball disappears. Only one cannonball can be at play.
    • Custom 1 - Exploding Cannonball: The cannonball explodes on impact, dealing heavy damage and knockback to opponents in the blast radius.
    • Custom 2 - Targeting Cannonball: The cannonball falls from directly above a random opponent as opposed to in front of King K. Rool. It disappears once it hits the ground.
    • Custom 3 - Cannonball Rain: Three cannonballs fall in front of King K. Rool. These cover more range but do not bury or meteor smash opponents, nor do they deal more damage. They disappear once they hit the ground.
  • Final Smash - Blast-o-Matic: King K. Rool flies forward headfirst. If he hits an opponent, they are locked in a cinematic where they land on Donkey Kong Island. King K. Rool then appears on Krem Isle to launch the Blast-o-Matic at the island; it explodes and send the opponents back to the stage, launching them.
  • Charged State - King Krusha K. Rool: King K. Rool puts on a blue tracksuit, shoes, and boxing gloves as an announcer calls out "KING KRUSHA K. ROOL!" In this state, King K. Rool is much faster and deals more damage with his attacks. He also jumps a lot higher.

  • Colonel Pluck
    Donkey Kong Country Returns (2010)
    Colonel Pluck
    Colonel Pluck (ドクターチキン, Dr. Chicken) is the boss of the seventh world in Donkey Kong Country Returns. He was possessed by the Tiki Tak Tribe, and stationed in the factory. Here, he would use the Stompybot 3000, a giant robot he pilots, to smash stolen bananas to make a special mixture that brings life to the tikis. In order to damage him, Donkey Kong and Diddy Kong would need to get under the Stompybot 3000 when a hatch opened, and pound it to destroy the robot.

    Colonel Pluck has two vastly different playstyles that he can switch between via his down special, similar to a combination of Pokémon Trainer's ability to swap Pokémon and transformations in Melee and Brawl. He can fight in the Stompybot 3000, which makes him one of the largest and heaviest characters in the game. He has great power and launching capabilities as well as super armor on a lot of his attacks, but is slow and particularly vulnerable to combos. Colonel Pluck can also battle in a hovercraft that detaches itself from the Stompybot 3000; in this state, his weight is significantly reduced, though he is faster and has much better recovery. Mastery of the two styles is key to using Colonel Pluck correctly.

    Colonel Pluck has a different set of attacks and specials depending on which mech he is using. With the Stompybot 3000, his attacks are mostly kicks and stomps that have a lot of power and range to them. In his hovercraft, he uses more physical attacks that are faster but don't have nearly as much damage or range.
    SSB Donkey Kong Series Colonel Pluck Stock Icon SSBCharged Icon
    Colonel Pluck's Moveset (Stompybot 3000)

    • Neutral Attack: The Stompybot 3000 throws a front kick.
    • Forward Tilt: The Stompybot 3000 throws a battering ram.
    • Forward Smash: The Stompybot 3000 throws a side kick.
    • Up Tilt: The Stompybot 3000 throws an axe kick. The move can bury and meteor smash opponents.
    • Up Smash: The Stompybot 3000 throws a stretch kick.
    • Down Tilt: The Stompybot 3000 throws a stomp. The move can bury opponents.
    • Down Smash: The Stompybot 3000 leaps upward and stomps on the ground. The move can bury opponents he lands on.
    • Dash Attack: The Stompybot 3000 throws a roundhouse kick.
    • Counter: The Stompybot 3000 stomps on the opponent.

  • Neutral Aerial: The Stompybot 3000 spins around, damaging opponents multiple times before launching them.
  • Forward Aerial: The Stompybot 3000 throws a dropkick.
  • Forward Crash: The Stompybot 3000 throws an axe kick. The move can bury and meteor smash opponents.
  • Back Aerial: The Stompybot 3000 throws a back kick.
  • Back Crash: The Stompybot 30000 throws a dropkick.
  • Up Aerial: The Stompybot 3000 throws a stretch kick.
  • Up Crash: The Stompybot 3000 throws a scissor kick.
  • Down Aerial: The Stompybot 3000 performs a stall-then-fall stomp. The move can bury and meteor smash opponents.
  • Down Crash: The Stompybot 3000 throws a stomp. The move can meteor smash opponents.

  • Grab: The cockpit of the Stompybot 3000 opens as Colonel Pluck leans forward to grab the opponent.
  • Pummel: Colonel Pluck pecks the opponent in the face.
  • Forward Throw: Colonel Pluck tosses the opponent forward.
  • Back Throw: Colonel Pluck spins around and tosses the opponent backward.
  • Up Throw: Colonel Pluck heaves the opponent upward before pecking them.
  • Down Throw: Colonel Pluck slams the opponent into the ground before the Stompybot 3000 stomps on them.

  • Neutral Special - Blowtorch: A blowtorch appears out of the Stompybot 3000 and begins expelling flames. The special button can be held for it to continue to spew flames, damaging opponents multiple times. However, if the move is used for too long, it will explode, both leaving Colonel Pluck vulnerable for a short time and leaving the move unusable for a few seconds.
    • Custom 1 - Blasttorch: Instead of expelling a stream of flames that damages opponents multiple times, the blowtorch releases a single, explosive bast that deals heavy damage and knockback.
    • Custom 2 - Heavy Duty Blowtorch: The move can be used longer without the blowtorch exploding, but the flames don't travel as much distance.
    • Custom 3 - Icetorch: The blowtorch releases icy, blue flames that deal less damage, but can freeze opponents.
  • Side Special - Chicken Feet: The Stompybot 3000 runs forward while stomping, damaging opponents in its way while also having super armor. Repeatedly tapping the special button allows him to travel farther, though the move has noticeable endlag. When used in midair, the Stompybot 3000 will leap forward and start running when it lands.
    • Custom 1 - Fast Feet: Colonel Pluck travels faster, but the move deals less damage.
    • Custom 2 - Stompy Feet: Instead of knocking opponents away, the Stompybot 3000 will bury opponents it steps on. The move also grants more distance if used in midair.
    • Custom 3 - Bounding Feet: Instead of running, the Stompybot 3000 will bound forward. It is more difficult to hit opponents, but making contact with the feet deals more damage.
  • Up Special - Rocket Stomp: The Stompybot 3000 leaps into the air before falling down, burying and meteor smashing opponents it lands on. The jumping trajectory can be angled with directional inputs. Additionally, holding the special button at the peak of the jump will activate rocket thrusters under the feet, keeping it afloat. This allows Colonel Pluck to gain more horizontal distance before landing, or target an opponent more accurately. This can also be done while falling. The thrusters can be used for a combined total of three seconds.
    • Custom 1 - Heavy Stomp: The move deals more damage, but Colonel Pluck cannot use the thrusters.
    • Custom 2 - High-Fuel Jump: The Stompybot 3000 doesn't leap as high or doesn't deal as much damage, but the thrusters can be used for twice as long.
    • Custom 3 - Breaking Jump: The Stompybot 3000 cannot bury or meteor smash opponents, and simply knocks them away. It will also immediately break a shield.
  • Down Special - Mech Switch: The legs of the Stompybot 3000 come off and rocket into the air, which can damage opponents above. The cockpit opens and the base begins flying, allowing Colonel Pluck to use the hovercraft. Because of the nature of the move, it has no custom moves.
  • Final Smash - Feather Field: Colonel Pluck flies above the stage as large eggs drop from the sky. These can either hatch into BuckBots that roam around the stage and damage opponents, or explode on impact and deal heavy knockback. After awhile, three larger eggs will drop that deal heavy damage, and Colonel Pluck will return to the stage.
  • Charged State - Overdrive: The Stompybot 3000 starts glowing red as steam emits from it. In this state, it can run much faster, has access to more double jumps, and can deal more damage to opponents.

  • Colonel Pluck's Moveset (Hovercraft)

    • Neutral Attack: Colonel Pluck throws three wing slaps in rapid succession.
    • Forward Tilt: Colonel Pluck leans outward to throw a dropkick.
    • Forward Smash: The hovercraft rushes forward.
    • Up Tilt: Colonel Pluck swipes his wing in an overarching motion above himself.
    • Up Smash: The hovercraft flips upside down and flies upward, striking opponents with the underside.
    • Down Tilt: The hovercraft grinds its underside across the ground.
    • Down Smash: The hovercraft slams its underside on the ground.
    • Dash Attack: The hovercraft spins around as it flies forward, damaging opponents multiple times before launching them.
    • Counter: Colonel Pluck throws a headbutt.

  • Neutral Aerial: The hovercraft performs a somersault.
  • Forward Aerial: Colonel Pluck leans forward and throws a downward strike with his wings.
  • Forward Crash: The hovercraft boots itself forward.
  • Back Aerial: Colonel Pluck throws a backward punch.
  • Back Crash: The hovercraft boots itself backward.
  • Up Aerial: Colonel Pluck throws an upward headbutt.
  • Up Crash: The hovercraft flips upside down and boosts itself upward.
  • Down Aerial: Colonel Pluck leans forward and swings his wings downward.
  • Down Crash: The hovercraft performs a stall-then-fall, crashing into the ground.

  • Grab: Colonel Pluck leans forward to grab the opponent.
  • Pummel: Colonel Pluck pecks the opponent in the face.
  • Forward Throw: Colonel Pluck tosses the opponent forward.
  • Back Throw: Colonel Pluck spins around and tosses the opponent backward.
  • Up Throw: Colonel Pluck heaves the opponent upward before pecking them.
  • Down Throw: Colonel Pluck slams the opponent into the ground before the hovercraft lands on them.

  • Neutral Special - BuckBot: An egg pops out of the hovercraft's underside, hatching into a BuckBot when it lands. It will begin marching around the area, attacking nearby opponents with a headbutt. It can also be picked up by Colonel Pluck or his opponents as an item and throw it, where it will also use its headbutt attack. It will disappear after awhile. Up to two BuckBots can be at play at once.
    • Custom 1 - Impatient BuckBot: The BuckBot moves much faster, though its headbutt attack is weaker.
    • Custom 2 - BuckBomb: A BuckBomb hatches from the egg instead of a BuckBot. It doesn't travel as fast, though it explodes when near an opponent instead of a headbutt attack, which deals more damage and knockback.
    • Custom 3 - Big BuckBot: The BuckBot is bigger and its headbutt attack is stronger, but it moves slower and is harder to carry around.
  • Side Special - Tesla Ray: The hovercraft begins emitting electricity for a short time. If an opponent is close enough, a bolt of electricity will shoot out and shock the opponent, damaging them multiple times before launching them. If there is more than one opponent in range, the bolt will hit the nearest opponent first before travelling to the next closest one.
    • Custom 1 - Tesla Shock: Instead of shooting a bolt of electricity, the electricity surrounding the hovercraft will damage opponents touching it. It has less range but can deal more damage.
    • Custom 2 - Controlled Ray: Instead of shooting at the nearest opponent, the bolt of electricity will shoot out depending on what direction the control stick is held in. It travels slightly farther.
    • Custom 3 - Paralyzing Ray: The bolt of electricity can't travel as far and deals less damage, but will inflict paralysis on opponents instead of knocking them away.
  • Up Special - Chicken Wings: The hovercraft explodes, ejecting Colonel Pluck upward. He falls into a helpless state, though the special button can be tapped repeatedly for him to flap his wings, slowing his descent and granting him more mobility. However, he is vulnerable while flapping. Upon landing, a new hovercraft appears below him.
    • Custom 1 - Crispy Chicken Wings: Colonel Pluck is set on fire after the explosion, and will damage opponents he hits while flapping his wings. He doesn't eject as high.
    • Custom 2 - Chicken Eject: Colonel Pluck is ejected much higher than normal, though he cannot flap his wings.
    • Custom 3 - Heavy Chicken Wings: Colonel Pluck can't flap his wings as fast, though each time he does he can gain a slight boost of upward momentum. He can only flap his wings three times before falling into a helpless state.
  • Down Special - Mech Switch: The cockpit closes as legs form out of the sides of the hovercraft, forming the Stompybot 3000. It lands on the ground shortly after, which can damage nearby opponents. Because of the nature of the move, it has no custom moves.
  • Final Smash - Feather Field: Colonel Pluck flies above the stage as large eggs drop from the sky. These can either hatch into BuckBots that roam around the stage and damage opponents, or explode on impact and deal heavy knockback. After awhile, three larger eggs will drop that deal heavy damage, and Colonel Pluck will return to the stage.
  • Charged State - Overdrive: The hovercraft starts glowing red as steam emits from it. In this state, it can run much faster, has access to more double jumps, and can deal more damage to opponents.

  • Sluggy the Unshaven
    Super Mario World 2: Yoshi's Island (1995)
    Sluggy the Unshaven
    Sluggy the Unshaven (ビッグけめくじ, Big Sluggy) is a boss in Super Mario World 2: Yoshi's Island, appearing as the mid-boss of World 5. It was originally a normal Sluggy until Kamek used his magic to make him larger. He doesn't attack Yoshi, but will slowly move forward to try and push him off the edge. Yoshi must throw eggs at it to make its body push inward, and he must do this enough times to strike its heart, damaging it. After hitting it enough times, it will be defeated.

    Sluggy the Unshaven is one of the largest characters in the game, and fittingly enough, is a heavyweight. Reflecting its boss battle, Sluggy's gooey skin allows it to tank a lot of damage and knockback, with attacks that strike him dealing much less damage than they would normally. However, its skin moves inward as it's attacked, making its heart exposed. If the heart is hit, Sluggy will take significantly more damage and knockback. In terms of stats, Sluggy is rather slow, but its powerful attacks are actually quite fast compared to its fellow heavyweights. Sluggy also has three midair jumps, aiding in its recovery.

    Sluggy the Unshaven's entire moveset revolves around its gooey body, either using it to slam or smash opponents, or splashing to create puddles of goo. Its special moves are rather unique and versatile as well, some of which are inspired by other, similarly gooey bosses or enemies.
    SSB Yoshi Series Sluggy the Unshaven Stock Icon SSBCharged Icon
    Sluggy the Unshaven's Moveset

    • Neutral Attack: Sluggy throws a body slam followed by falling down on the opponent.
    • Forward Tilt: Sluggy throws a headbutt.
    • Forward Smash: Sluggy throws a battering ram.
    • Up Tilt: Sluggy bobs its head, damaging opponents with its stray hairs.
    • Up Smash: Sluggy throws a headbutt upward.
    • Down Tilt: Sluggy forms into a pile of goo, damaging opponents and causing them to slip.
    • Down Smash: Sluggy jumps and lands, creating a splash of goo before reforming.
    • Dash Attack: Sluggy slides across the ground while throwing a headbutt.
    • Counter: Sluggy headbutts the opponent.

  • Neutral Aerial: Sluggy performs a splash.
  • Forward Aerial: Sluggy throws a body slam.
  • Forward Crash: Sluggy throws a headbutt.
  • Back Aerial: Sluggy throws a dropkick.
  • Back Crash: Sluggy throws its head backward.
  • Up Aerial: Sluggy throws an upward headbutt.
  • Up Crash: Sluggy extends itself upward.
  • Down Aerial: Sluggy throws a stomp. The move can meteor smash opponents.
  • Down Crash: Sluggy performs a stall-then-fall slam, splashing into a pile of goo upon landing before reforming.

  • Grab: Sluggy leans forward to eat the opponent.
  • Pummel: The opponent is damaged inside of Sluggy.
  • Forward Throw: Sluggy spits the opponent forward.
  • Back Throw: The opponent is launched from behind Sluggy.
  • Up Throw: The opponent is launched from above Sluggy.
  • Down Throw: Sluggy spits the opponent at the ground before stomping on them.

  • Neutral Special - Little Sluggy: Sluggy spits out a normal-sized Sluggy, which will move across the stage. If an opponent is nearby, it will launch itself at them, damaging them. After awhile it will disappear, though it can be defeated if opponents attack it enough. Up to three Sluggies can be at play at once.
    • Custom 1 - Impatient Sluggy: The Sluggies are launched forward, and disappear upon landing or hitting an opponent, instead of moving around the stage.
    • Custom 2 - Mega Sluggy: Larger Sluggies are summoned. They don't deal as much damage or are as fast, but they are invincible and cannot be damaged.
    • Custom 3 - Sluggy Splash: Sluggies will splash when they hit an opponent, dealing much more damage and knockback, though the Sluggy will disappear afterwards.
  • Side Special - Jelly Roll: Sluggy forms itself into a sphere shape as it rushes forward, bowling into opponents and damaging them. If used in midair, Sluggy will bounce along the ground, burying and meteor smashing opponents it lands on. Pressing the special button again cancels the move.
    • Custom 1 - Jelly Rush: Sluggy makes a quick dash forward, even if the move is used in midair. It falls into a helpless state afterwards.
    • Custom 2 - Armored Jelly Roll: Sluggy deals less damage, but it has super armor while using the move, and can't be hit out of it.
    • Custom 3 - Bouncy Jelly Roll: Sluggy deals less damage to opponents when the move is used on the ground, but it bounces higher off the ground, and deals more damage to opponents while airborne.
  • Up Special - Sluggy Jump: Sluggy forms itself into a drop shape, leaping into the air and falling down, damaging opponents throughout the move. It causes a splash upon landing.
    • Custom 1 - Sluggy Leap: Sluggy jumps higher, but falls into a helpless state at apex height rather than crashing down.
    • Custom 2 - Sluggy Drop: Sluggy doesn't jump as high, but it will bury and meteor smash opponents it lands on.
    • Custom 3 - Sluggy Splash: Sluggy deals less damage, but the splash it creates upon landing is larger and covers a much wider radius.
  • Down Special - Needlenose Plant: Sluggy places an Egg-Plant on the ground under itself, which will spit five Needlenoses that fly in random arcs, damaging opponents they hit. Afterwards, it disappears, though it can be defeated if opponents attack it enough. Only one Egg-Plant can be at play at a time.
    • Custom 1 - Bouncy Needlenoses: The Needlenoses deal less damage, and the Egg-Plant spits four instead of five, but they will bounce across the ground a few times before disappearing, covering more range.
    • Custom 2 - Blow Hard: Sluggy places a Blow Hard instead of an Egg-Plant. It will target opponents before spitting a Needlenose aimed at them. It can spit three Needlenoses before it disappears, though it can be damaged and defeated by opponents like an Egg-Plant.
    • Custom 3 - Needlenose Mines: The Needlenoses will remain in place where they land, and slowly change colors from green, to yellow, to red before exploding, damaging opponents in the blast radius. They also explode if attacked or if an opponent touches it. The Egg-Plant spits three Needlenoses before disappearing instead of fibe.
  • Final Smash - Sluggy Rain: Several Sluggies rain from above, damaging opponents they land on. As time goes, more Sluggies start falling, and at the end, larger Sluggies fall that deal heavier damage and knockback.
  • Charged State - Hardened Sluggy: Sluggy's body becomes more opaque. In this state, its weight is increased and its attacks deal more damage. It is also harder for opponents to reach Sluggy's heart, as the body regains its shape quicker. Some attacks also bounce opponents backward if they're just out of range.

  • Gotchawrench
    Wrecking Crew (1985)
    Gotchawrench
    Gotchawrenches (スパナゴン, Supanagon) are wrench-like enemies that appear in Wrecking Crew. They have large teeth and dinosaur feet that they use to move around. They will climb around the construction site, chasing down Mario. Red variants named Gotchawrench Jr. also appear, which are slower. A Gotchawrench also appears as the third challenger in Wrecking Crew '98.

    Gotchawrench is a small, heavyweight fighter. Its mobility is rather lackluster, having slow walking and running speed. It's jump height isn't impressive either, though thanks to its up special it has a very good recovery. Gotchawrench mainly specializes in attacks that can cover a lot of range, but deal especially high damage if opponents are hit closer to it. It isn't good at combos, but it has powerful finishers and specials that can be useful in a variety of situations.

    Gotchawrench's attacks are mainly punches, with its stronger attacks being bites and headbutts. The moveset is comprised of elements, items, and obstacles originating from Wrecking Crew.
    SSB Wrecking Crew Series Gotchawrench Stock Icon SSBCharged Icon
    Gotchawrench's Moveset

    • Neutral Attack: Gotchawrench throws two alternating punches followed by a heabutt.
    • Forward Tilt: Gotchawrench throws a front kick.
    • Forward Smash: Gotchawrench leans forward and bites.
    • Up Tilt: Gotchawrench's spikes on its back extend as it bends over.
    • Up Smash: Gotchawrench spins around while throwing a headbutt, damaging opponents multiple times before launching them.
    • Down Tilt: Gotchawrench slides across the ground.
    • Down Smash: Gotchawrench spins on its back.
    • Dash Attack: Gotchawrench throws a battering ram.
    • Counter: Gotchawrench leans forward and bites.

  • Neutral Aerial: Gotchawrench spins around with its arms and legs outstretched.
  • Forward Aerial: Gotchawrench throws a flying kick.
  • Forward Crash: Gotchawrench throws a downward headbutt. The move can meteor smash opponents.
  • Back Aerial: Gotchawrench thrusts its head backward.
  • Back Crash: Gotchawrench turns around and bites.
  • Up Aerial: Gotchawrench throws a bicycle kick.
  • Up Crash: Gotchawrench throws an upward headbutt.
  • Down Aerial: Gotchawrench turns upside down and spins around, damaging opponents multiple times before launching them.
  • Down Crash: Gotchawrench throws a stall-then-fall headbutt. The move can meteor smash and bury opponents.

  • Grab: Gotchawrench grabs an opponent with its mouth.
  • Pummel: Gotchawrench bites the opponent.
  • Forward Throw: Gotchawrench spins around before tossing the opponent forward.
  • Back Throw: Gotchawrench suplexes the opponent.
  • Up Throw: Gotchawrench jumps above the upper blast zone with the opponent in tow before slamming them into the ground as it lands.
  • Down Throw: Gotchawrench pins the opponent on the ground as it bites them.

  • Neutral Special - Barrier: A brick wall appears in front of Gotchawrench. If used in midair, it will fall to the ground, damaging opponents it lands on. Neither it nor its opponents can walk through the wall, and projectiles can't travel though it. However, the wall can be damaged, and it will explode into debris when broken, damaging opponents it hits. It can be damaged by Gotchawrench or its opponents. Only one wall can be at play at a time.
    • Custom 1 - Steel Wall: The wall is made of metal instead of bricks. It can't be destroyed and only serves as a blockade.
    • Custom 2 - Tall Wall: The wall is taller. It takes more damage to destroy, but it creates more debris when broken.
    • Custom 3 - Reflector Wall: The wall is glowing green. It takes less damage it destroy, but it will reflect projectiles that touch it.
  • Side Special - Wrecking Bomb: Gotchawrench places a bomb in front of itself, as well as some walls that appear in the background. The bomb will explode, causing a chain reaction of explosions along the walls, damaging opponents caught in the blast radius. More walls can be added if the move is charged, though they can't extend off the platform.
    • Custom 1 - Time Bomb: The bomb takes a few seconds to explode instead of exploding when placed. However, the explosions are much larger and deal more damage.
    • Custom 2 - Bomb Chain: The individual explosions deal less damage, but they combo into each other, with the final explosion launching the opponents.
    • Custom 3 - Delayed Bomb: Less walls appear, though the explosions all happen at once instead of one by one.
  • Up Special - Door Escape: Gotchawrench walks through a door, walking into the background. If the stage has no background, it instead appears as a gray shilouette. It will then run in the desired direction where another door will appear and it exits out of it. It won't fall into a helpless state afterwards.
    • Custom 1 - Warp Door: Gotchawrench warps through the other door instead of running to it, making the move faster. However, the move doesn't travel as far.
    • Custom 2 - Elevator Door: The door can appear much higher, but it can't appear as far horizontally.
    • Custom 3 - Flying Doors: Gotchawrench enters a helpless state if it ends up in midair, but the doors will fly outward when it opens and closes them, damaging opponents they hit.
  • Down Special - Oil Drum: Gotchawrench pulls out an oil drum and slams it on the ground, or throws it downward if used in midair. Opponents under it will be trapped inside, but can use button mashing to escape quicker. The oil drum, with or without opponents, can be attacked to be sent rolling across the stage like a Barrel, damaging opponents it hits. Opponents can still escape the oil drum as it rolls.
    • Custom 1 - Heavy Drum: The oil drum takes longer for opponents to escape from, but it also takes more damage to be sent rolling.
    • Custom 2 - Rolling Drum: Gotchawrench rolls the oil drum across the ground, skipping the first part of the move entirely. It travels faster.
    • Custom 3 - Exploding Drum: The oil drum will explode a short time after it's deployed, damaging any opponents in the blast radius as well as any opponents caught in the oil drum if they can't escape fast enough.
  • Final Smash - Wrecking Crew: Gotchawrench walks through a door and appears in the background like its up special. Several bombs will then rain on the ground and explode on impact, damaging opponents in the blast radius. The move finishes with three larger bombs that deal even more damage and knockback. After this, Gotchawrench steps back into the foreground.
  • Charged State - Megawrench: Gotchawrench increases in size slightly. In this state, it's heavier, faster, and its attacks deal more damage. The walls with Barrier are also bigger, and the explosions with Wrecking Bomb are faster and larger as well.

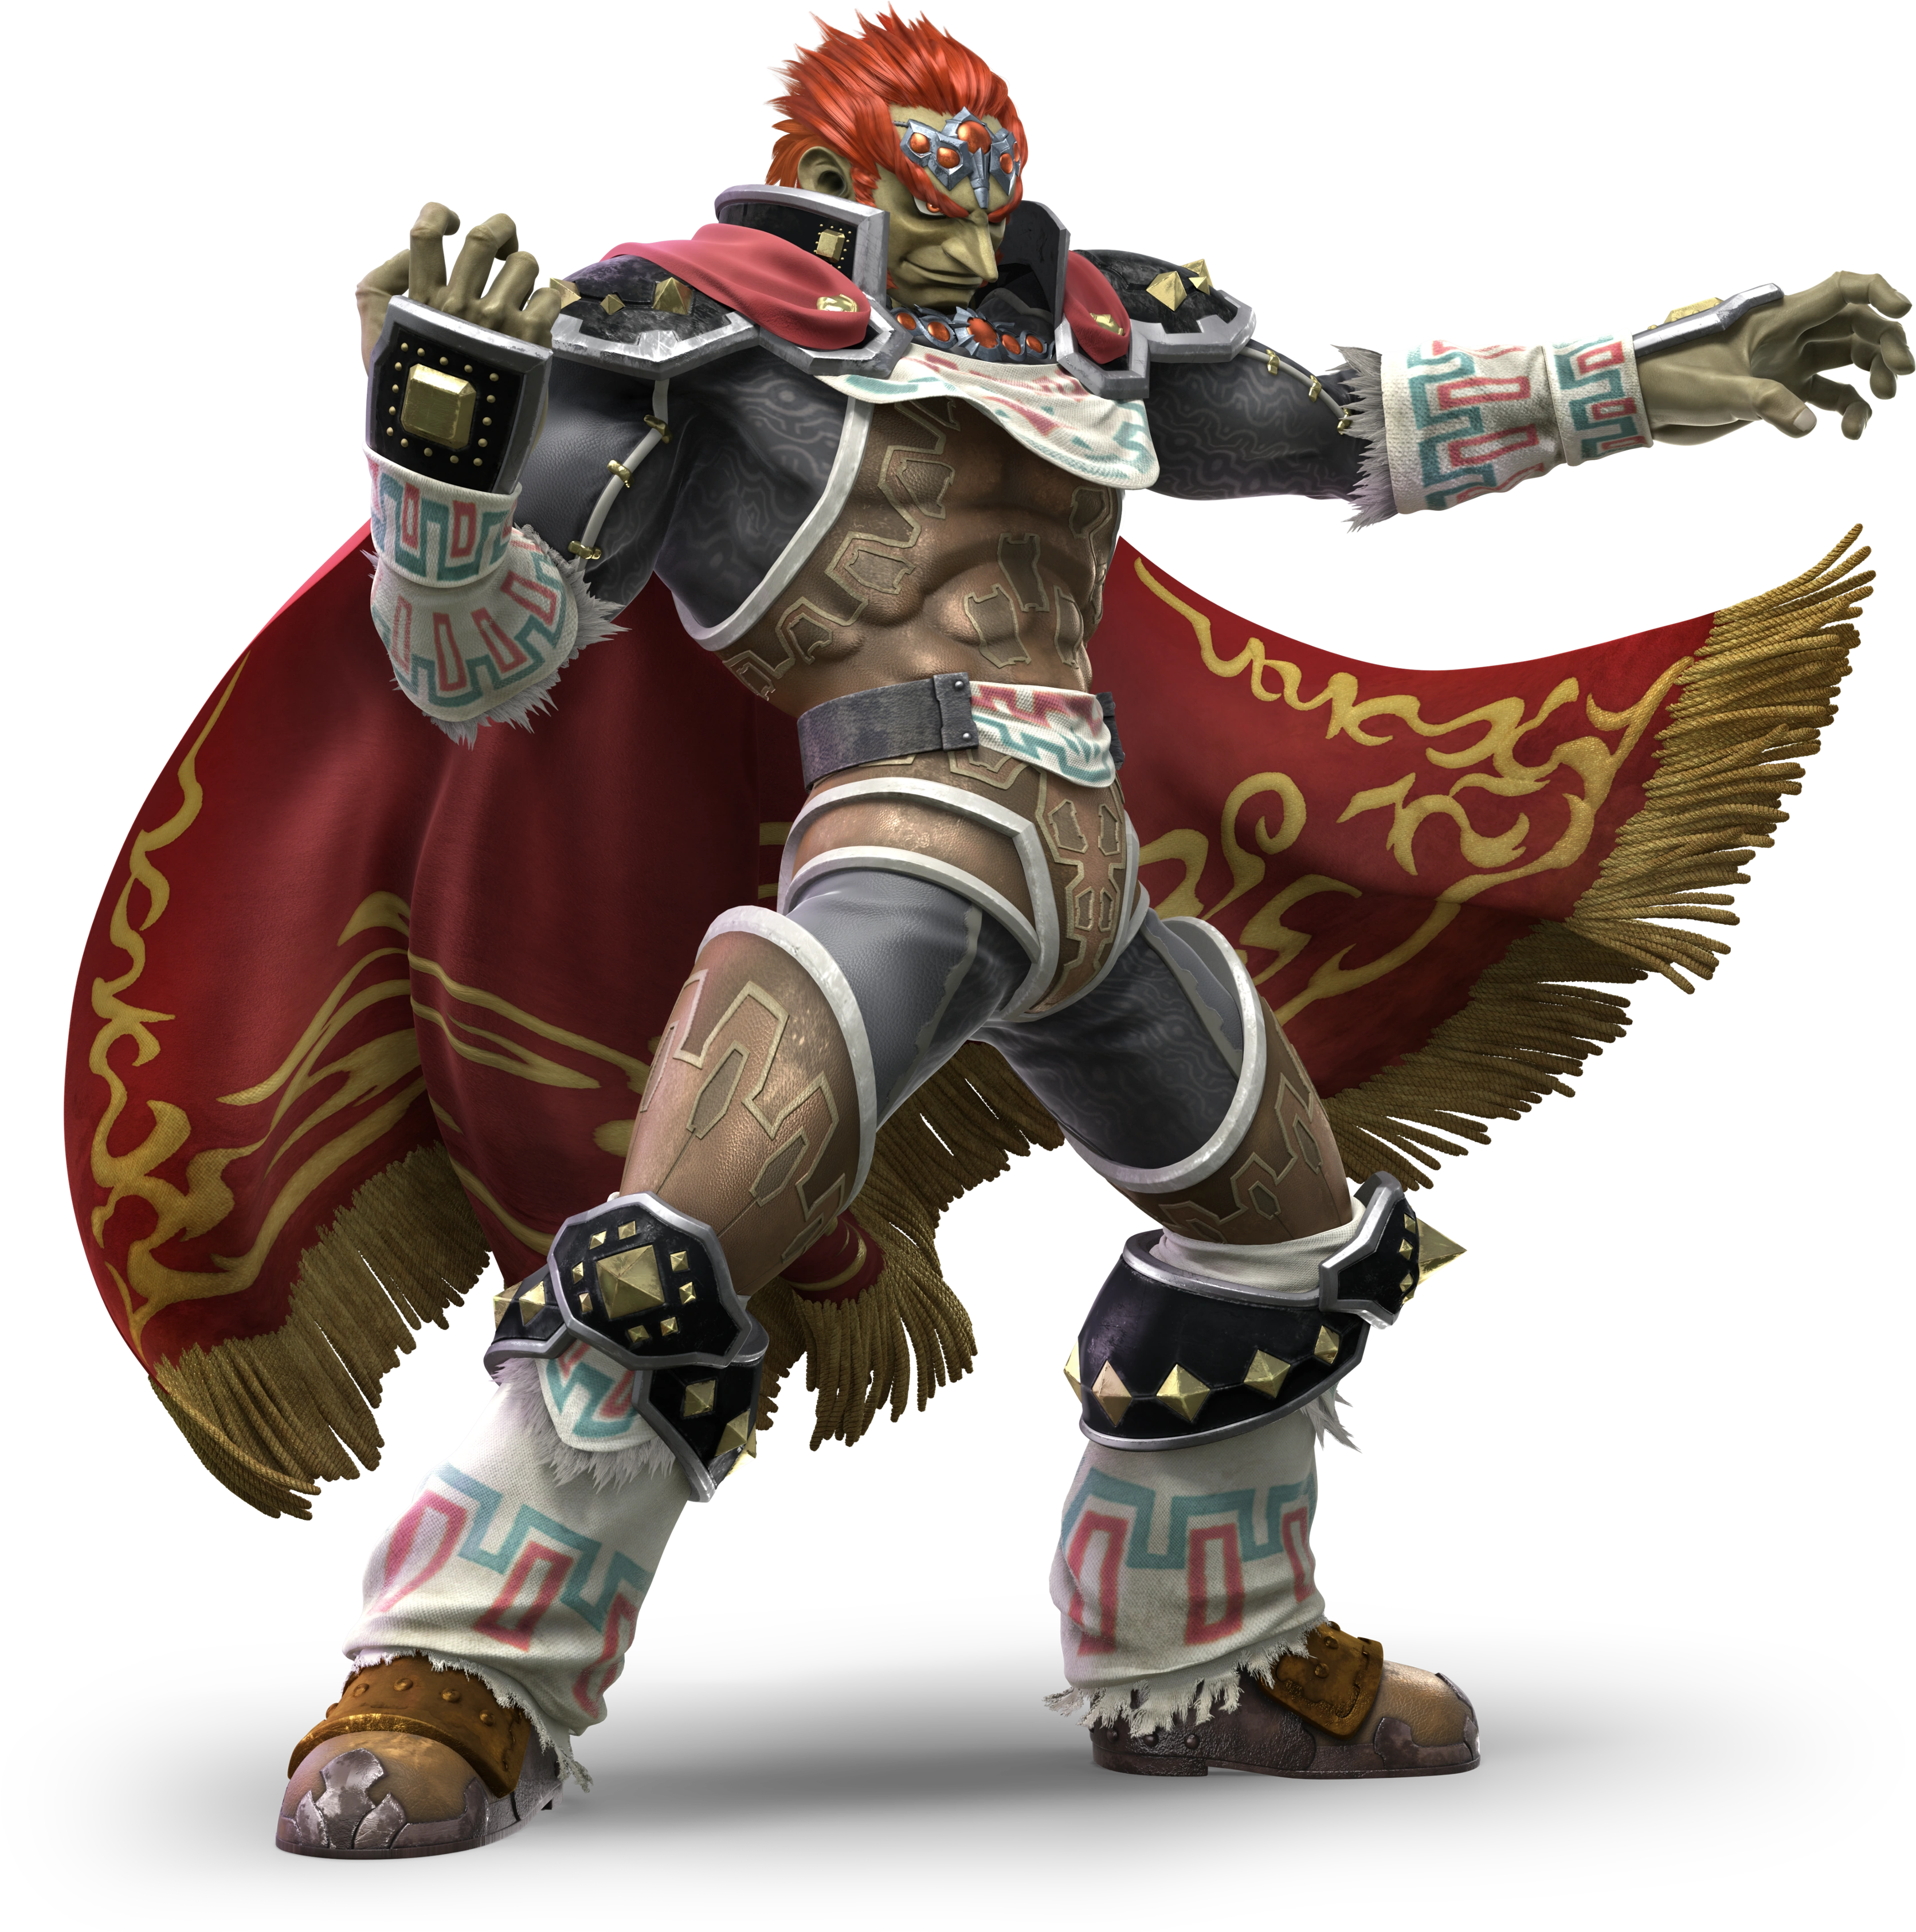
  • Ganondorf
    The Legend of Zelda: Ocarina of Time (1998)
    Ganondorf (ガノンドロフ, Ganondorf) is the main antagonist of the The Legend of Zelda series. The name "Ganondorf" is used to refer to the human form of Ganon, wielder of the Triforce of Power. He is the only male member in his tribe of Gerudo, who bear a male child every 100 years. Unlike Link or Zelda, who have multiple incarnations throughout the series, Ganondorf is a single being, be it as a Gerudo or in his more demonic Ganon form. His design in this game is based off of that in The Legend of Zelda: Ocarina of Time.

    Fitting for the wielder of the Triforce of Power, Ganondorf boasts incredible strength in his attacks, having some of the strongest moves of the entire roster. Additionally, he is one of the heaviest characters in the game, and can be hard to knock away. Despite these gifts, Ganondorf also possesses average mobility, with good ground and air speed, allowing him to rush down opponents with strong attacks. However, he has a pretty weak recovery, especially horizontally, and his moveset is also rather laggy, making it easy for him to be punished.

    As in previous games, Ganondorf is a Captain Falcon semi-clone, and shares a lot of his attacks. However, following Ultimate, many more of his moves utilize his sword, allowing him to cover more range and further differentiate himself from Captain Falcon. Uniquely, all of these sword moves can also reflect projectiles.
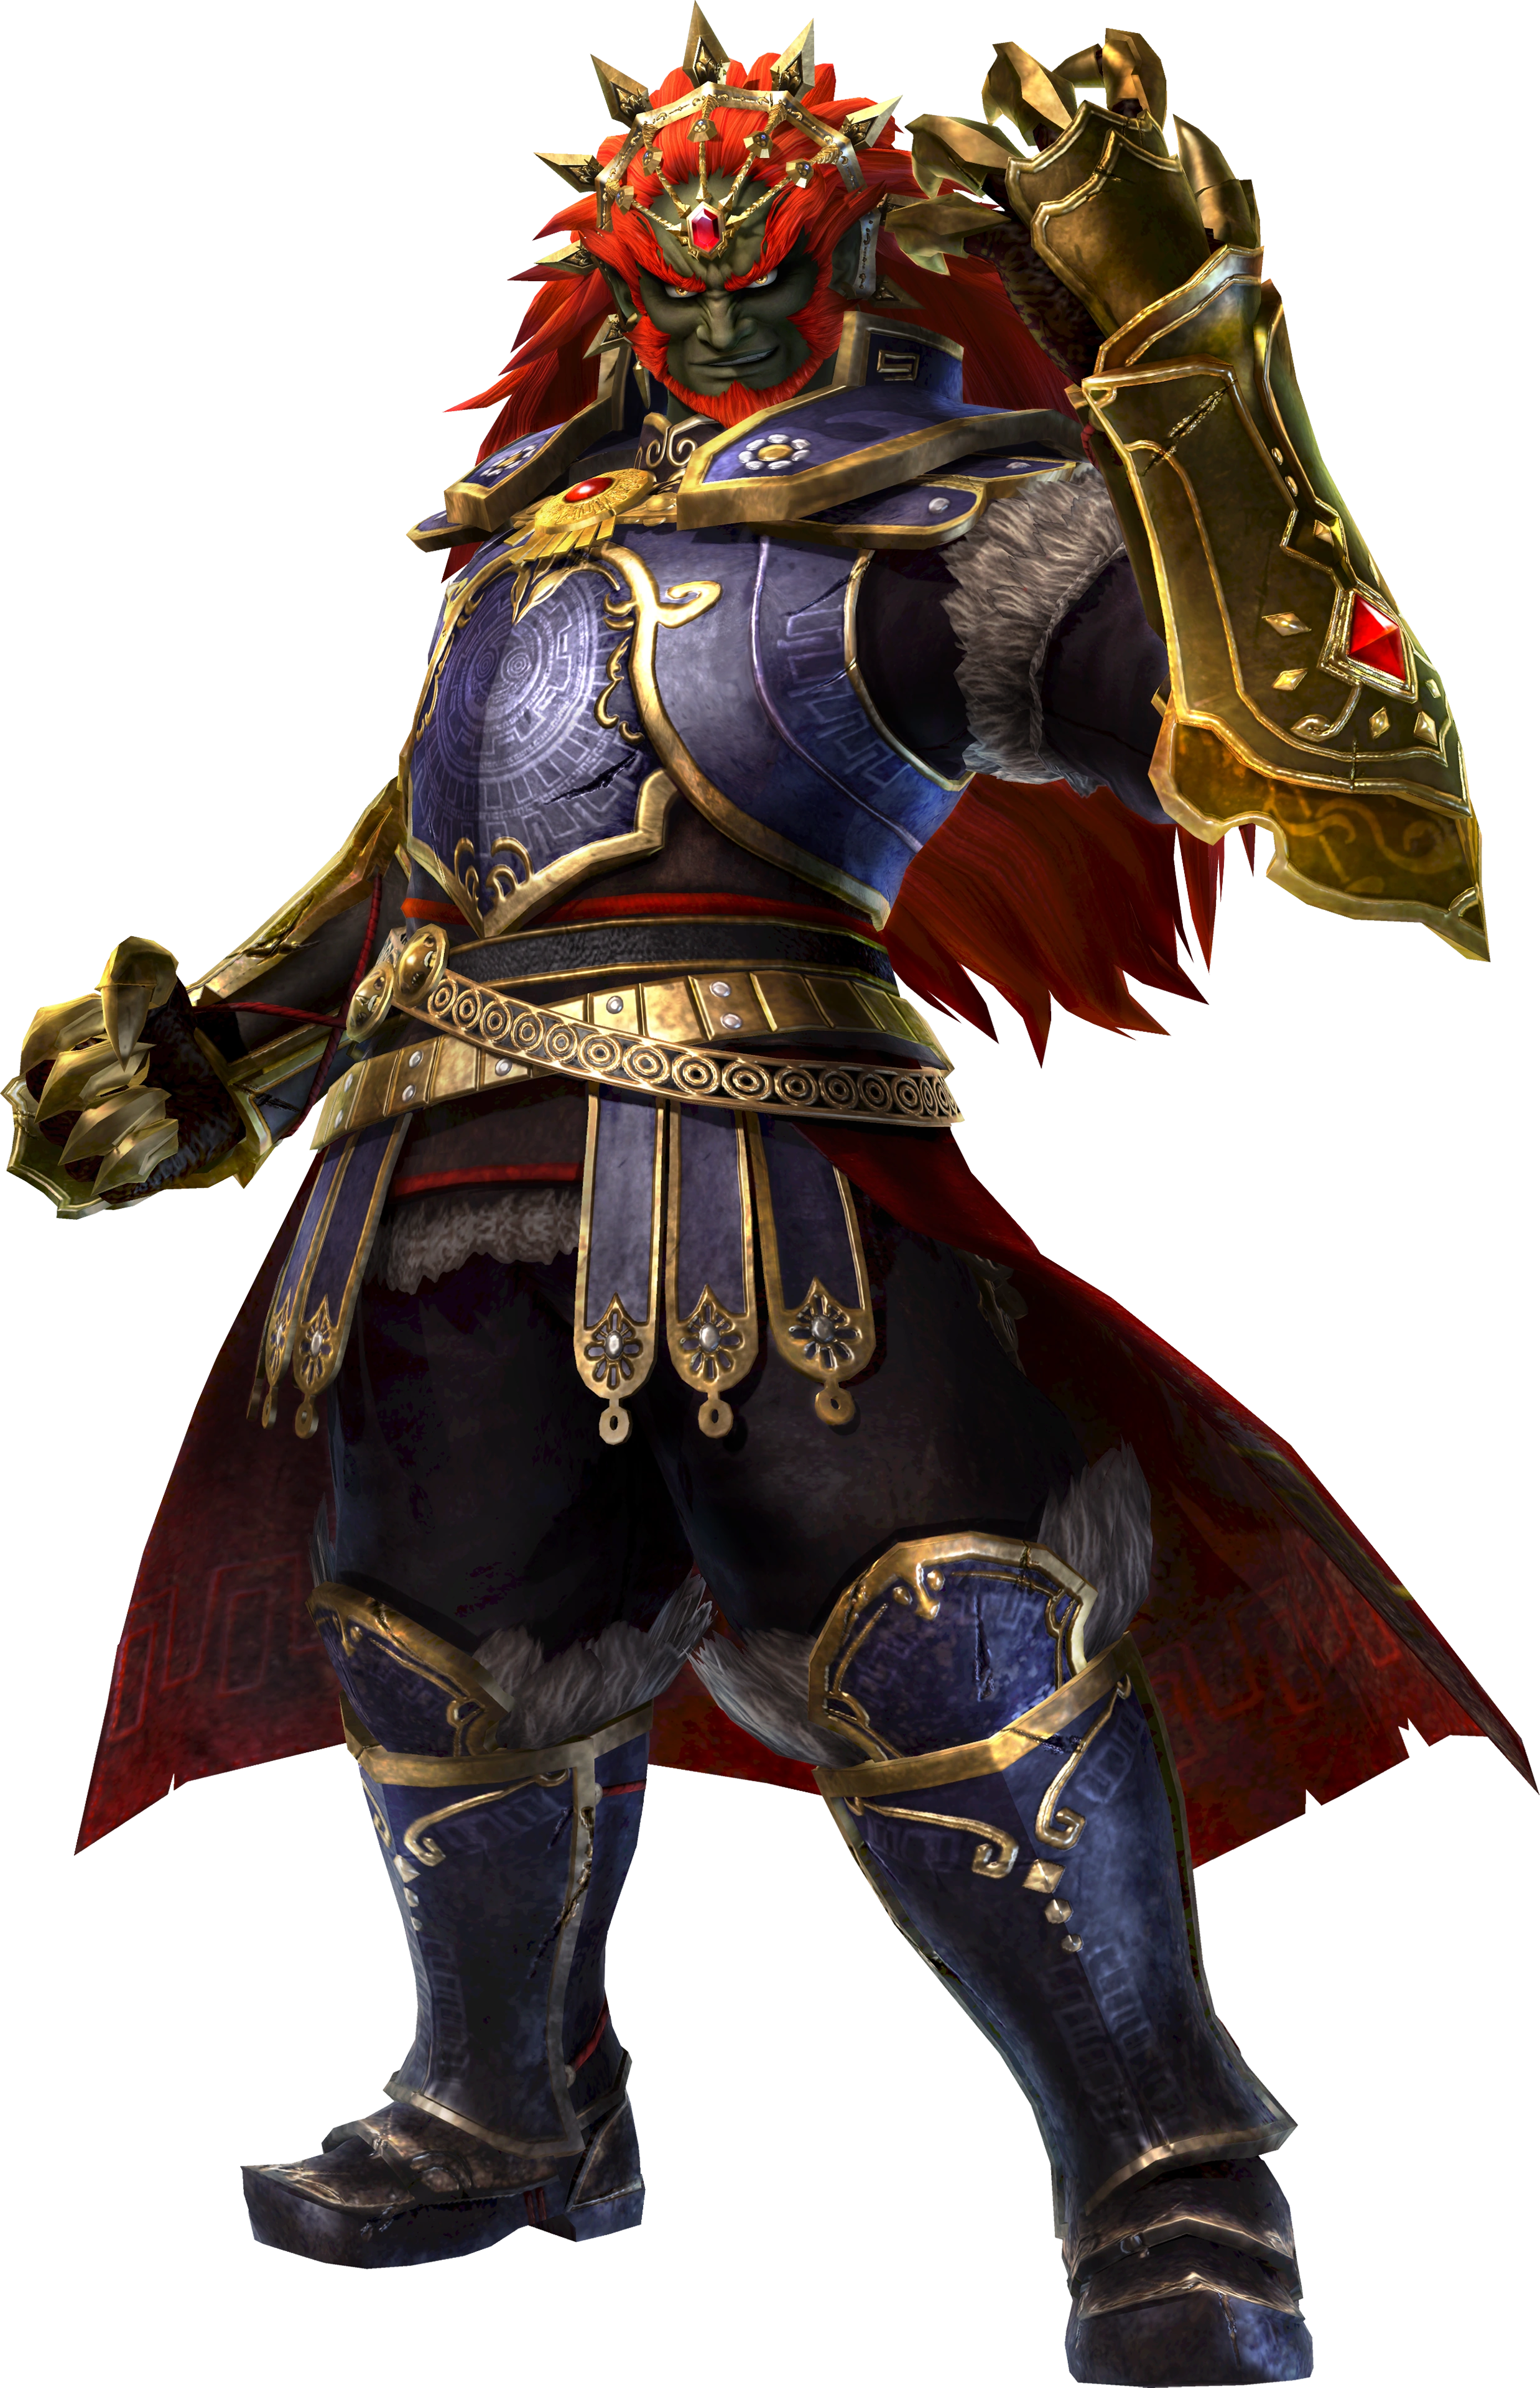
    SSB The Legend of Zelda Series GanondorfHeadSSBU SSBM Icon
    Ganondorf's Moveset

    • Neutral Attack: Ganondorf throws a darkness-enhanced punch.
    • Forward Tilt: Ganondorf throws a front kick.
    • Forward Smash: Ganondorf pulls out his sword and throws an overhead swing. The move can reflect projectiles.
    • Up Tilt: Ganondorf throws a delayed axe kick, causing an explosion when his foot hits the ground. It has a lot of startup lag, but he has super armor while using it and creates vacuumboxes in front of himself that pull opponents towards the move.
    • Up Smash: Ganondorf pulls out his sword and throws an overarching swing from front to back. The move can reflect projectiles.
    • Down Tilt: Ganondorf throws a crouching front kick.
    • Down Smash: Ganondorf pulls out his sword and thrusts the hilt forward, then thrusts the blade backward. The move can reflect projectiles.
    • Dash Attack: Ganondorf throws a shoulder tackle.
    • Counter: Ganondorf throws a darkness-enhanced stretch kick.

  • Neutral Aerial: Ganondorf throws two kicks forward.
  • Forward Aerial: Ganondorf throws a darkness-enhanced haymaker.
  • Forward Crash: Ganondorf pulls out his sword and throws an outward slash. The move can reflect projectiles.
  • Back Aerial: Ganondorf throws a backhanded punch backward.
  • Back Crash: Ganondorf pulls out his sword and throws an inward slash while turning around, followed by an outward slash. The move can reflect projectiles.
  • Up Aerial: Ganondorf throws a bicycle kick.
  • Up Crash: Ganondorf pulls out his sword and thrusts it upward. The move can reflect projectiles.
  • Down Aerial: Ganondorf stomps downward. The move can bury and meteor smash opponents.
  • Down Crash: Ganondorf pulls out his sword and performs a stall-then-fall thrust downward. Upon landing, he creates windboxes that push nearby opponents away from him. The move can reflect projectiles.

  • Grab: Ganondorf reaches out to grab the opponent.
  • Pummel: Ganondorf knee strikes the opponent.
  • Forward Throw: Ganondorf punches the opponent, sending them forward.
  • Back Throw: Ganondorf kicks the opponent backward.
  • Up Throw: Ganondorf lifts the opponent overhead and hits them with a palm strike.
  • Down Throw: Ganondorf holds the opponent overhead before slamming them into the ground.

  • Neutral Special - Warlock Punch: Ganondorf throws a darkness-enhanced punch. If the special button is held, the move will charge, allowing it to deal more damage and knockback, as well as cover more range. While charging, he can turn around if the opposite direction on the control stick is held. Additionally, vacuumboxes appear in the direction Ganondorf is facing while charging, pulling opponents in range of the attack. He has super armor during the initial startup lag, but not while charging.
    • Custom 1 - Warlock Blade: Instead of punching, Ganondorf pulls out his sword and thrusts it forward. It covers more range and takes less time to charge, but deals less damage.
    • Custom 2 - Stored Warlock Punch: The move takes longer to charge and deals less damage, but the charging can be cancelled by performing any other action, allowing the charge to be stored.
    • Custom 3 - Warlock Wave: The move has no super armor and cannot be charged, but after punching, Ganondorf sends a shotgun-style wave of dark energy forward. This deals more damage to closer opponents.
  • Side Special - Gerudo Dragon: Ganondorf dashes forward. If the move is used in midair, he enters a semi-helpless state afterwards. If he hits an opponent while dashing, he will either uppercut them upward and meteor smash them with a haymaker depending on if the move is used on the ground or in midair. If the special button is held, Ganondorf will instead hold the opponent by the throat upward and send them into the ground. If this is done in midair, he will grab the opponent and fall downwards with them until they hit a surface or blast zone. Pressing the attack button in this state will allow Ganondorf to cause an explosion and leap off of them, dealing heavy damage. Alternatively, while dashing the move can be cancelled into any other attack.
    • Custom 1 - Heavy Gerudo Dragon: Ganondorf dashes slower and cannot cancel the move, but deals more damage and has super armor.
    • Custom 2 - Wind-Up Gerudo Dragon: Ganondorf goes backward a bit before dashing forward. The move has more startup lag, but he dashes faster and farther.
    • Custom 3 - Gerudo Dragon Rush: Ganondorf dashes faster and farther, but doesn't attack opponents he runs into, and instead knocks them away as he is dashing. This deals less damage.
  • Up Special - Dark Dive: Ganondorf leaps upward before falling into a helpless state afterwards. If he hits an opponent while rising, he will grab onto them and damage them multiple times before causing an explosion, which meteor smashes them. This sends Ganondorf upward a bit, and allows him to use the move again.
    • Custom 1 - Dark Fists: Instead of grabbing opponents, Ganondorf damages them multiple times before launching them as he rises.
    • Custom 2 - Dark Vault: Ganondorf leaps twice, but will only grab opponents at the start of each leap. He knocks opponents away instead of meteor smashing them.
    • Custom 3 - Dark Leap: Ganondorf leaps much higher, gaining more vertical and horizontal distance, but will not grab opponents. He swings his fists at the end of the move, which can damage opponents nearby.
  • Down Special - Wizard's Kick: Ganondorf bursts forward with a darkness-enhanced kick. If the move is used in midair, he performs a stall-then-fall kick that travels in a diagonally-downward angle. He damages opponents he runs into, and can meteor smash them with the aerial variant, and the move can be cancelled into any other attack.
    • Custom 1 - Wizard's Dropkick: Ganondorf leaps upward before kicking in a diagonally-downwards angle. Has less startup lag but deals less damage.
    • Custom 2 - Wizard's Flurry: Ganondorf travels less distance, but damages opponents multiple times before launching them.
    • Custom 3 - Wizard's Assault: When Ganondorf runs into an opponent, he causes an explosion that damages all opponents in the blast radius before leaping backward.
  • Final Smash - Beast Ganon: Ganondorf transforms into his Ganon form. He stomps on the ground to cause tremors, stunning any opponent in front of him. He then rushes forward to heavily damage these opponents before reverting to his normal state.
  • Charged State - Triforce of Power: Ganondorf empowers himself with the Triforce of Power, and he begins glowing a red aura. In this state, many more of his attacks are darkness-enhanced, and he also deals more damage. He can also jump higher and has slower falling speed.

  • Phantom Zelda
    The Legend of Zelda: Spirit Tracks (2009)
    PhantomZeldaCharged
    Phantom Zelda (ファントムゼルダ, Phantom Zelda) is the form that Princess Zelda's spirit assumes when she enters the armor of Phantoms in The Legend of Zelda: Spirit Tracks after her body was stolen by her right-hand adviser Chancellor Cole. By possessing a Phantom, she can offer offensive and defensive backup for Link, as well as help him solve many puzzles throughout the Tower of Spirits. This version of Zelda also appears in Hyrule Warriors in the form of the Phantom Arms class of weapons used by Toon Zelda.

    Phantom Zelda is a heavyweight fighter who alternates between using the Phantom's powerful sword and abilities, and Toon Zelda's magic-based combo moves. This altogether gives her a versatile arsenal, having moves for most of every situation. However, she struggles in the mobility and recovery department, so it can be easy for opponents to overwhelm her.

    Phantom Zelda's moveset is a mixed bag. Attacks with the Phantom is slow, incorporating aspects from all types of Phantoms into it's moves, whereas Toon Zelda uses faster but weaker moves, some of which are taken from Zelda and Styla.
    SSB The Legend of Zelda Series Toon Zelda stock icon smashboards DSSB SSBCharged Icon
    Phantom Zelda's Moveset

    • Neutral Attack: Phantom Zelda throws an inward slash with her sword, followed by an outwards slash, and ending with an upwards slash.
    • Forward Tilt: Toon Zelda exits the Phantom's body and throws an magically-enhanced knifehand strike, damaging opponents multiple times before launching them.
    • Forward Smash: Phantom Zelda throws an overhead slash with her sword as it becomes enhanced with fire.
    • Up Tilt: Toon Zelda exits the Phantom's body and waves her hand above herself as magic emits from it, damaging opponents multiple times before launching them.
    • Up Smash: Phantom Zelda throws an overarching slash with her sword as it becomes enhanced in fire.
    • Down Tilt: Toon Zelda exits the Phantom's body and sweeps her hand across the ground as magic emits from it.
    • Down Smash: Phantom Zelda throws a spinning slash with her sword as it becomes enhanced in fire.
    • Dash Attack: Phantom Zelda transforms into a wrecking ball and rolls forward.
    • Counter: Phantom Zelda thrusts her sword forward.

  • Neutral Aerial: Toon Zelda exits the Phantom's body and spins with her arms outstretched as magic sparks emit from her hands, damaging opponents multiple times before launching them.
  • Forward Aerial: Toon Zelda exits the Phantom's body and throws a magic-enhanced dropkick.
  • Forward Crash: Phantom Zelda throws a downward slash with her sword.
  • Back Aerial: Toon Zelda exits the Phantom's body and throws a magic-enhanced hip thrust.
  • Back Crash: Phantom Zelda throws an inward slash with her sword behind herself, followed by an outward slash.
  • Up Aerial: Toon Zelda exits the Phantom's body and waves her hands above herself in an overarching motion as they emit magic, damaging opponents multiple times before launching them.
  • Up Crash: Phantom Zelda throws an overarching slash with her sword.
  • Down Aerial: Toon Zelda exits the Phantom's body and throws a magically-enhanced corkscrew stomp, damaging opponents multiple times before launching them.
  • Down Crash: Phantom Zelda thrusts her sword downward, which can meteor smash opponents.

  • Grab: Phantom Zelda reaches out to grab the opponent.
  • Pummel: Toon Zelda attacks the opponent with magic.
  • Forward Throw: Phantom Zelda punches the opponent, sending them forward.
  • Back Throw: Phantom Zelda kicks the opponent backward.
  • Up Throw: Toon Zelda magically spins the opponent overhead before throwing them upward.
  • Down Throw: Toon Zelda slams the opponent into the ground.

  • Neutral Special - Phantom Eye: Phantom Zelda summons a Phantom Eye, which will fly towards the nearest opponent and hover above them as a light shines down on them. While the opponent is in this light, their movement speed is decreased, allowing the slow Phantom Zelda to catch up to them and attack. The Phantom Eye can be defeated by opponents attacks, and only one can be at play at a time.
    • Custom 1 - Phantom Stun: The light will inflict paralysis on opponents instead of slowing them down.
    • Custom 2 - Phantom Drain: The light will gradually damage opponents and heal Phantom Zelda instead of slowing them down.
    • Custom 3 - Phantom Focus: The light doesn't cover as much range and it takes less damage to defeat the Phantom Eye, but opponents are slowed down more.
  • Side Special - Phantom Crescent: Phantom Zelda raises her sword as it charges with light energy before slashing it forward, which sends out a bright crescent-shaped projectile that will pass through enemies while damaging them.
    • Custom 1 - Phantom Shove: The projectile doesn't damage opponents, but instead acts as a wall that pushes opponents away.
    • Custom 2 - Phantom Slice: No projectile is created, but the sword slash is faster and deals more damage, making it a better close-quarters attack.
    • Custom 3 - Phantom Split: Two projectiles are created instead of one, which travel at diagonal angles. They deal less damage than the default move, and don't travel as far.
  • Up Special - Phantom Warp: Phantom Zelda warps in the direction the control stick is held. If she reappears in midair, she enters a helpless state afterwards. If the special button is held down, Phantom Zelda will transform into a wrecking ball once she reappears and fall downwards, burying and meteor smashing opponents she lands on, but suffering a bit of endlag as well.
    • Custom 1 - Rising Phantom: Instead of warping, Phantom Zelda leaps diagonally upward before turning into a wrecking ball. The first hit connects with the second.
    • Custom 2 - Far Phantom Warp: Phantom Zelda can warp much farther, improving her recovery. However, she cannot transform into a wrecking ball.
    • Custom 3 - Phantom Warp Attack: Phantom Zelda cannot warp as far, but she has a hitbox when she disappears and reappears, which can combo into each other.
  • Down Special - Phantom Summon: Phantom Zelda summons a smaller Phantom beside her. Holding the special button will charge the move, which can determine what attack the Phantom uses. With no charge, the Phantom's attack is weaker, but it travels farther and deals more damage as the move charges. At full charge, the Phantom stays in place before rushing forward and throwing a heavy upward slash. The Phantom can be defeated if attacked enough, and Phantom Zelda cannot use the move again for a short time if this happens.
    • Custom 1 - Swift Phantom: Phantom Zelda summons a Swift Phantom. It travels faster and farther, but deals less damage.
    • Custom 2 - Gold Phantom: Phantom Zelda summons a Gold Phantom. It doesn't travel as far, but it is invincible and cannot be defeated.
    • Custom 3 - Mega Phantom: Phantom Zelda summons a larger Phantom. It takes longer to charge, and at full charge it takes more time to rush forward, but it deals more damage, can take more damage before being defeated, and covers more range.
  • Final Smash - Focus Spirit: Toon Zelda exits the Phantom's body before creating an arrow of light and launching it forward. If it connects with an opponent, they will be frozen in place as the spirits of Zelda from A Link to The Past, Ocarina of Time, and Skyward Sword appear and empower Toon Zelda as she raises her sword before bringing it down on the opponent, creating a large explosion of light.
  • Charged State - Wrecker Phantom: Toon Zelda exits the Phantom's body and kicks it away as she summons a Wrecker Phantom before proceeding to enter it's body. In this state, Phantom Zelda gains a universal super armor, as well as many of her attacks now being able to stun opponents when hit.

  • Deku Baba (ζ)
    The Legend of Zelda: Ocarina of Time (1998)
    DekuBabaH
    Deku Babas (デクババ, Deku Baba) are recurring plant-like enemies in the The Legend of Zelda series, resembling Venus Flytraps. They will lunge out and attack Link should he come too close. If counterattacked, they will stiffen straight upwards, allowing Link to kill them. Their design is based on their appearance in The Legend of Zelda: Skyward Sword.

    Deku Baba is a Fusion Fighter that fuses attacks from its fellow plant fighters, Piranha Plant and Chomper. While its normal attacks are mostly similar to Chomper thanks to the lack of a pot, its special moves are most similar to Piranha Plant. Like the latter, it is a heavyweight fighter with deceptively good mobility and recovery, though it also has a decent grab game like Chomper.
    SSB The Legend of Zelda Series Deku Baba Stock Icon SSBCharged Icon
    Deku Baba's Moveset

    • Neutral Attack: Deku Baba bites forward twice.
    • Forward Tilt: Deku Baba throws a headbutt.
    • Forward Smash: Deku Baba lunges forward and throws a strong bite.
    • Up Tilt: Deku Baba bites upward.
    • Up Smash: Deku Baba throws an upward headbutt.
    • Down Tilt: Deku Baba buries itself in the ground and bites upward.
    • Down Smash: Deku Baba spins its head across the ground.
    • Dash Attack: Deku Baba throws a lunging bite.
    • Counter: Deku Baba throws a bite.

  • Neutral Aerial: Deku Baba performs a somersault.
  • Forward Aerial: Deku Baba performs a front flip to strike forward with its head.
  • Forward Crash: Deku Baba lunges forward and bites.
  • Back Aerial: Deku Baba throws a headbutt backward.
  • Back Crash: Deku Baba turns around and bites.
  • Up Aerial: Deku Baba throws an upward headbutt.
  • Up Crash: Deku Baba bites upward.
  • Down Aerial: Deku Baba throws a downward headbutt.
  • Down Crash: Deku Baba performs a front flip and bites downward. The move can meteor smash opponents.

  • Grab: Deku Baba lunges forward and bites on the opponent.
  • Pummel: Deku Baba chews on the opponent.
  • Forward Throw: Deku Baba spits the opponent forward.
  • Back Throw: Deku Baba spits the opponent backward.
  • Up Throw: Deku Baba spits the opponent upward.
  • Down Throw: Deku Baba spits the opponent at the ground.

  • Neutral Special - Deku Jaws: Deku Baba lunges forward and bites, consuming an opponent and holding them in its mouth. The move can be charged by holding the special button, and at full charge, it will be stored for later use. At full charge, the mouth becomes significantly larger, allowing it to swallow multiple opponents, projectiles, and items as long as they are all in range. Swallowing any items and projectiles will replenish Deku Baba's health, and it chew on opponents by tapping the special button to chew on and damage them. It can also replenish damage this way, moreso if more than one opponent is swallowed, and they can be spit in any direction with directional inputs.
    • Custom 1 - Snapping Jaws: Deku Baba bites much faster, but doesn't swallow opponents and rather simply damages them and knocks them away.
    • Custom 2 - Deku Spit: If Deku Baba only swallows a projectile, it can spit it back out like a reflector rather than eat it. The move deals less damage if used on opponents however.
    • Custom 3 - Super-Sized Jaws: Deku Baba can cover much more range with the move, though it cannot replenish health by chewing on opponents, and the move takes longer to charge fully.
  • Side Special - Poison Breath: Deku Baba begins charging poisonous breath. Pressing the special button again will have it release a cloud of poisonous breath in front of itself, with it remaining longer depending on how long the move is charged. Opponents in the cloud will take gradual damage, and at full charge, they will grow a flower on their heads.
    • Custom 1 - Frost Breath: Deku Baba spits icy breath instead of poison breath. It deals less damage and doesn't stay around as long, but at full charge it will freeze opponents.
    • Custom 2 - Fungus Breath: The breath will cause opponents to grow a mushroom on their heads at full charge instead of a flower.
    • Custom 3 - Gooey Spit: Instead of spitting a cloud that deals gradual damage, Deku Baba spits a glob of spit that deals damage and knockback, dealing more and travelling farther the longer it is charged. It also creates a puddle of ink on the ground, causing opponents that step in it to slip.
  • Up Special - Babacopter: Deku Baba spins its leaves to propel itself upward, damaging opponents multiple times before launching them and falling into a helpless state afterwards. While rising, directional inputs can be used to change its direction.
    • Custom 1 - Babaleap: Deku Baba leaps upward while biting. The move deals more damage, but covers less distance.
    • Custom 2 - Babaplane: Deku Baba travels slower and deals less damage, but it will travel farther and can be more easily controlled.
    • Custom 3 - Bababite: Dkeu Baba will only rise upward, but will also deal more damage to opponents it hits.
  • Down Special - Long-Stem Strike: Deku Baba hides in its leaves before rising out of it and biting, while extending its stalk. The longer the move is charged, the longer its stalk will extend. While charging, directional inputs can be used to change its direction.
    • Custom 1 - Deku Tongue: Deku Baba extends its tongue instead of its stalk. It grabs opponents and draws them into its mouth, where it can chew on them to replenish health before spitting them forward or backward.
    • Custom 2 - Long-Stem Slink: Deku Baba extends its stalk while biting. The move cannot be charged, and it extends slowly, but it can be controlled with directional inputs. Its stalk will also damage opponents that touch it.
    • Custom 3 - Upward Strike: Deku Baba can only lunge upward, but while charging, directional inputs can be used to move left and right.
  • Final Smash - Superbite: Deku Baba lunges forward and bites. It will continually chew on any swallowed opponents, dealing heavy damage before spitting them out. Should they be over 100%, Deku Baba will swallow them, KOing them instantly.
  • Charged State - Withered Deku Baba: Chomper morphs into a grotesque, withered form. In this state, it has some damage and knockback resistance, allowing it to survive longer. It is also faster and can deal more damage.

  • Dark Samus (ε)
    Metroid Prime 2: Echoes (2004)
    DarkSamus SSBUltimate
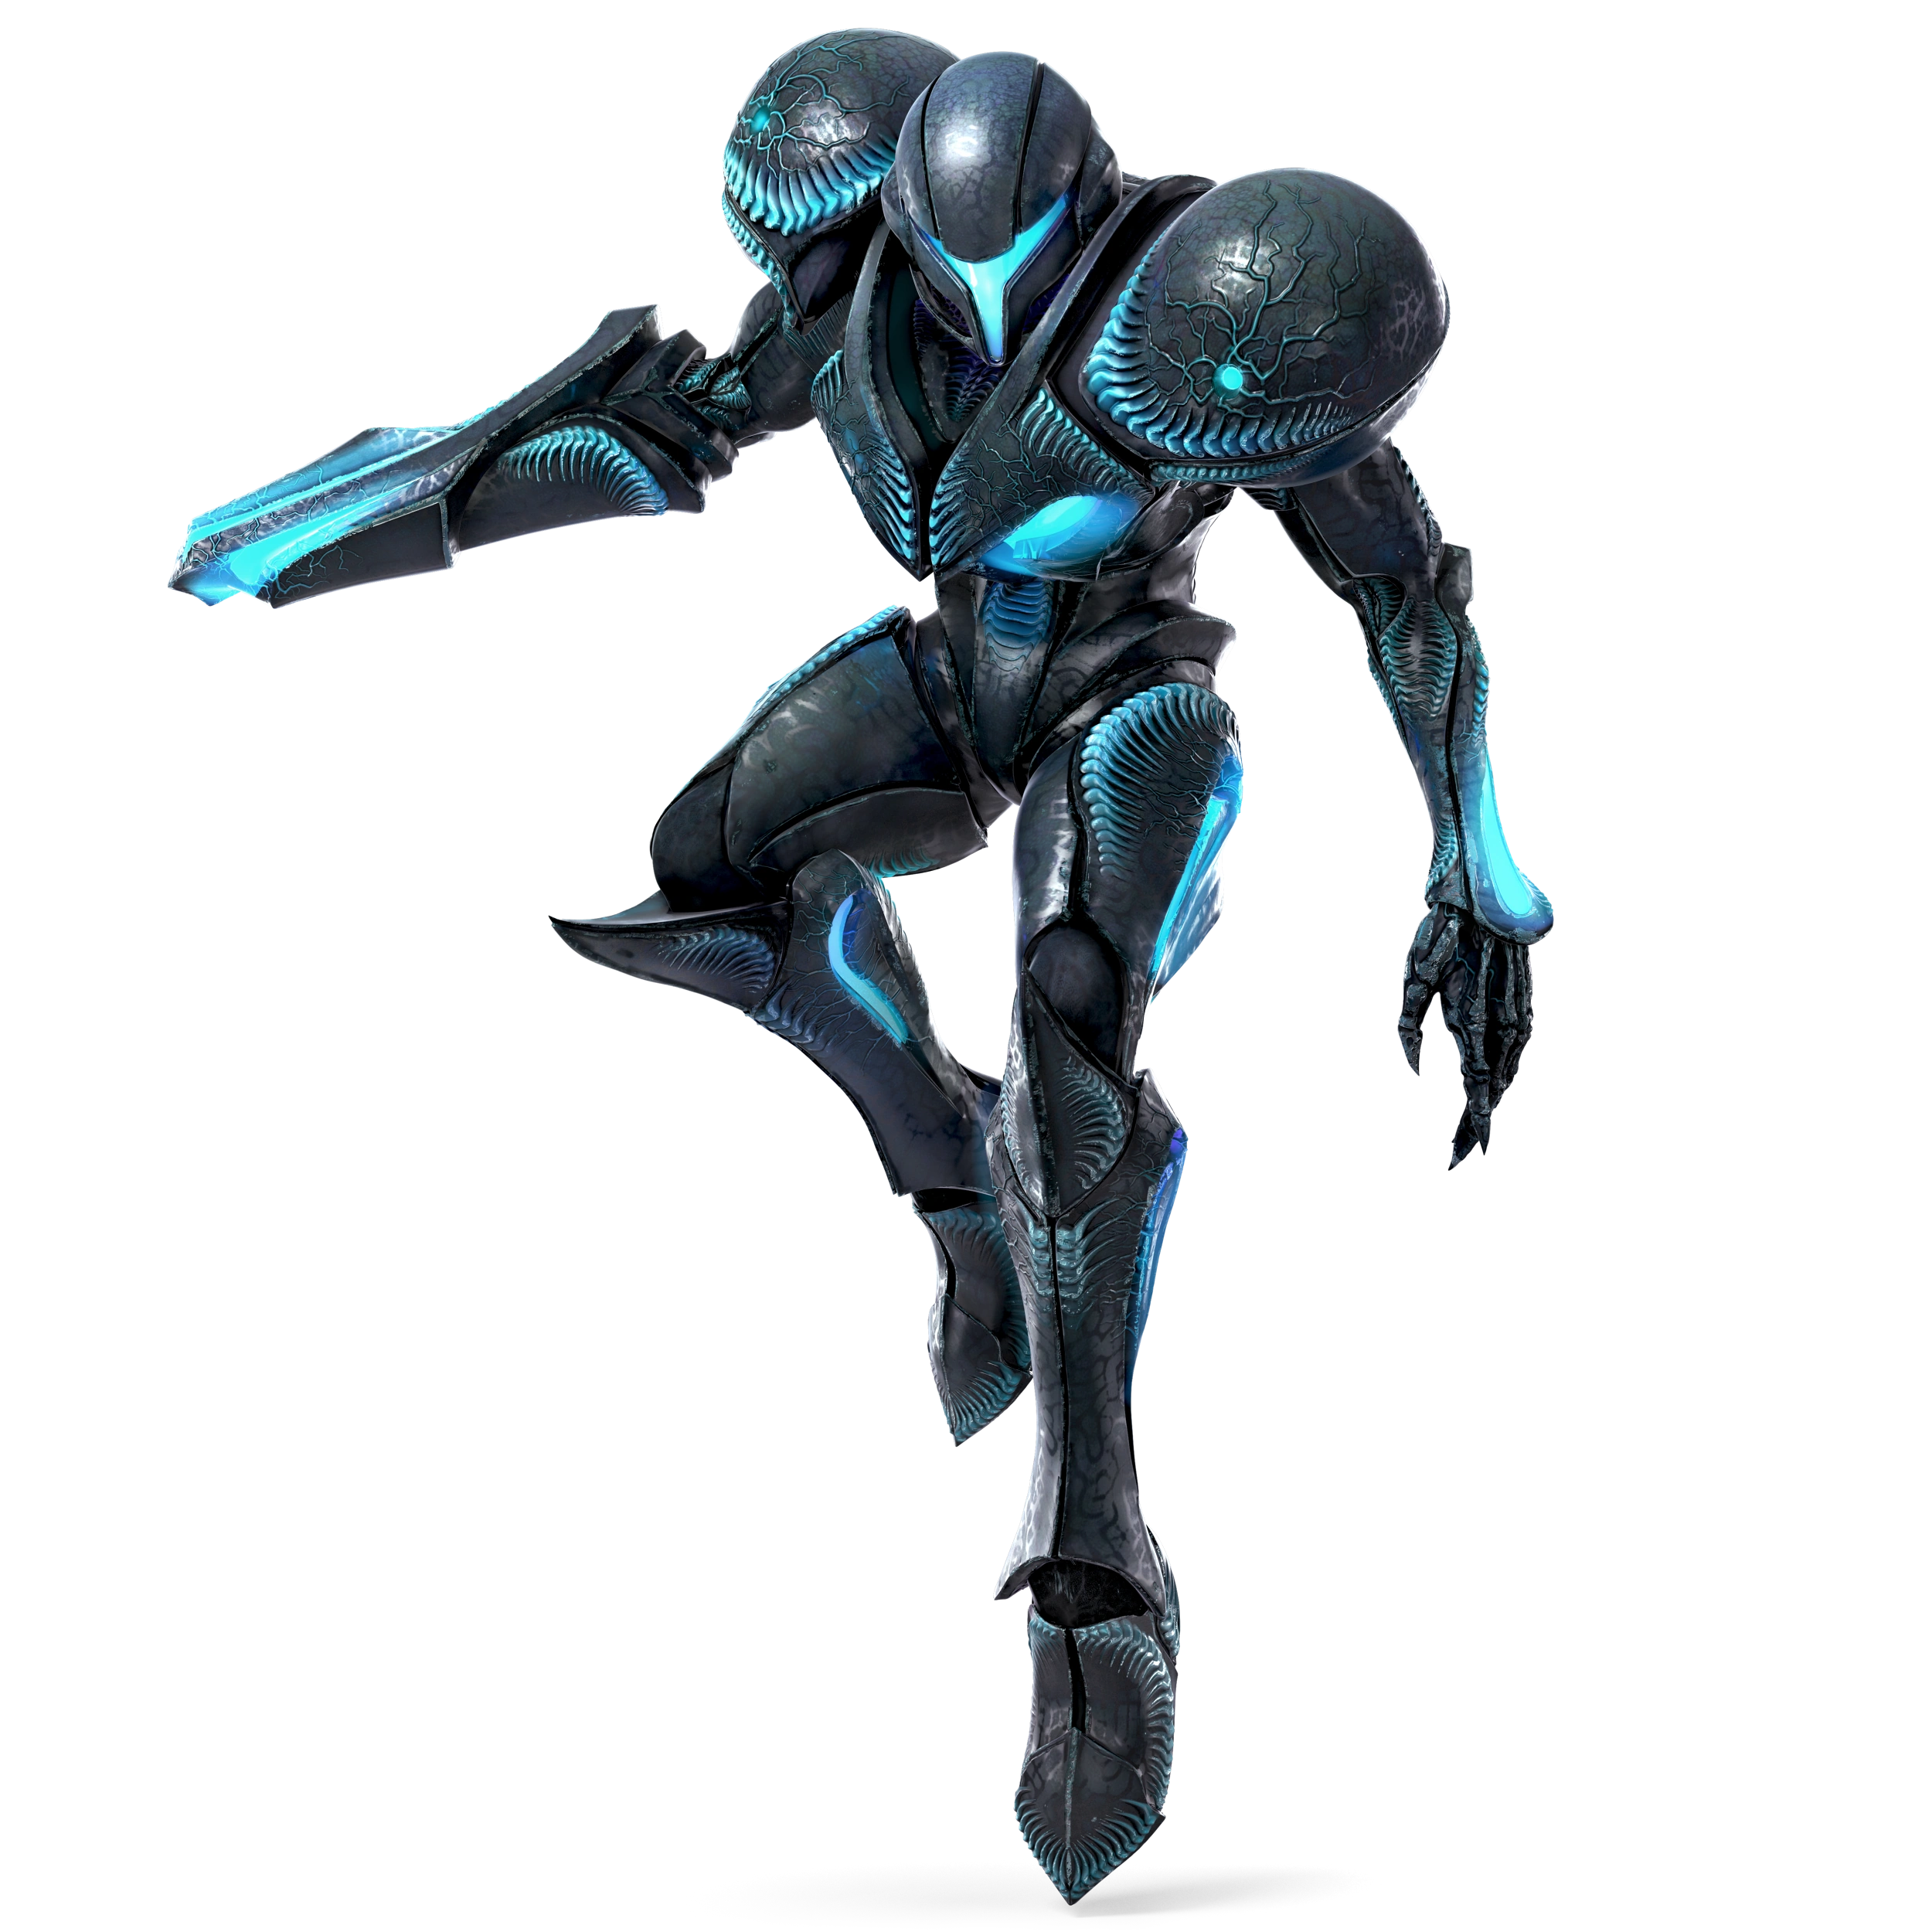
    Dark Samus (ダークサムス, Dark Samus) is a major antagonist in the Metroid series, specifically the Metroid Prime series. She was created when the Metroid Prime absorbed Samus' Phazon Suit during the final battle in Metroid Prime. Dark Samus has all of her normal counterpart's abilities, as well as Phazon-based abilities. In Metroid Prime 3: Corruption, she served as the main antagonist, where she spread Phazon across the galaxy.

    Being an Echo Fighter of Samus, Dark Samus shares many of the same moves and abilities. In general, she serves as a milder version of Samus' Hypermode Charged State, allowing her to utilize Phazon throughout the battle. While this means she cannot change from fire to ice like Samus, Phazon is unique in that it can cover the ground if it strikes opponents. When this happens, Dark Samus can walk on this Phazon to heal herself, while opponents take gradual damage from stepping in it.
    SSB Metroid Series DarkSamusHeadSSBU SSBUltimate Icon
    Dark Samus' Moveset

    • Neutral Attack: Dark Samus throws a jab followed by a forearm club with her arm cannon.
    • Forward Tilt: Dark Samus throws a roundhouse kick.
    • Forward Smash: Dark Samus thrusts her arm cannon forward to fire a small Phazon blast.
    • Up Tilt: Dark Samus throws an axe kick. The move can meteor smash opponents.
    • Up Smash: Dark Samus fires five Phazon blasts above herself in an overarching motion, damaging opponents multiple times before launching them.
    • Down Tilt: Dark Samus kneels and quickly thrusts her arm cannon downward to fire a small Phazon blast.
    • Down Smash: Dark Samus throws a legsweep.
    • Dash Attack: Dark Samus performs a shoulder tackle.
    • Counter: Dark Samus fires a small Phazon blast from her arm cannon.

  • Neutral Aerial: Dark Samus throws a spinning roundhouse kick.
  • Forward Aerial: Dark Samus fires five Phazon blasts in a downward arching motion, damaging opponents multiple times before launching them.
  • Forward Crash: Dark Samus fires a large Phazon blast forward, damaging opponents multiple times before launching them.
  • Back Aerial: Dark Samus throws a back kick.
  • Back Crash: Dark Samus throws a roundhouse kick.
  • Up Aerial: Dark Samus performs a diagonal corkscrew flying kick, damaging opponents multiple times before launching them.
  • Up Crash: Dark Samus fires a large Phazon blast above herself, damaging opponents multiple times before launching them.
  • Down Aerial: Dark Samus swings her arm cannon in a downward arching motion. The move can meteor smash opponents.
  • Down Crash: Dark Samus fires a large Phazon blast below herself, damaging opponents multiple times before launching them.

  • Grab: Dark Samus uses her Grapple Beam to grab opponents. Can be used in midair as a tether grab.
  • Pummel: Dark Samus palm strikes the opponent.
  • Forward Throw: Dark Samus twirls the opponent overhead before throwing them downward.
  • Back Throw: Dark Samus flings the opponent behind herself.
  • Up Throw: Dark Samus fires a Phazon blast from her arm cannon, launching the opponent upward.
  • Down Throw: Dark Samus pins the opponent to the ground and uses her Grapple Voltage, healing herself as she damages the opponent.

  • Neutral Special - Charge Beam: Dark Samus begins charging her arm cannon to fire a large blast of Phazon energy. The charging can be cancelled into any other action. Depending on how much the move is charged, the blast will deal more damage and kncokback, as well as be bigger and travel faster. With no charge, the move can paralyze opponents, leaving them vulnerable. At full charge, the move deals heavy damage and knockback.
    • Custom 1 - Dense Charge Beam: The blast deals more damage and knockback, but takes longer to charge. Dark Samus also has considerable endlag after firing.
    • Custom 2 - Melee Charge Beam: Instead of firing a projectile, Dark Samus fires a shotgun-style blast from her arm cannon. The move deals more damage to opponents closer to her.
    • Custom 3 - Supernova Charge Beam: The blast travels slower and it takes much longer to charge. However, as it travels the blast has vacuumboxes that pull opponents into it. It damages them multiple times before it explodes, launching them.
  • Side Special - Missile / Super Missile: Dark Samus fires a Phazon-empowered Missile or Super Missile from her arm cannon. If Dark Samus is moving while using the move, she fires a Missile, which will home in on opponents before exploding on impact. If Dark Samus is standing still while using the move, she fires a Super Missile, which flies forward at high speeds before exploding on impact. Super Missiles also deal more damage.
    • Custom 1 - Relentless Missile: Missiles last longer and home in on opponents sharper, while Super Missiles fly faster. The explosion damages opponents multiple times before launching them.
    • Custom 2 - Turbo Missile: Missiles fly in a straight line aimed at the nearest opponent, while Super Missiles take longer to accelerate after being launched, but can travel faster.
    • Custom 3 - Ice Missile: Missiles and Super Missiles deal less damage, but they can freeze opponents they hit.
  • Up Special - Screw Attack: Dark Samus leaps upward, somersaulting while discharging energy and damaging opponents multiple times before launching them. She falls into a helpless state afterwards.
    • Custom 1 - Screw Rush: Dark Samus travels more horizontal distance in exchange for less vertical distance.
    • Custom 2 - Apex Screw Attack: Dark Samus deals more damage and knockback, but travels significantly less distance.
    • Custom 3 - Gravity Screw Attack: Dark Samus deals less damage, but while somersaulting, she creates vacuumboxes around herself that draw nearby opponents into the attack. She also travels slightly higher.
  • Down Special - Morph Ball: Dark Samus rolls into her Morph Ball form. In this state, she can move around and jump freely, and using the move again has her turn back to her normal state. However, she will also revert back to normal if hit by any attack that deals knockback. While in the Morph Ball, Dark Samus gains access to three attacks. Pressing the attack button lets her use Hyper Ball, sending electricity outward and damaging opponents nearby. She can keep using it by holding the attack button, as well as use it while moving and jumping. Pressing the special button lets her use Boost Ball, charging forward and damaging opponents she rams into. Holding the special button can also increase the distance and damage it deals. Finally, Spider Ball can be used if the shield button is held, which decreases her movement but allows her to cling to walls and ceilings and move up them. This can be used in conjunction with Bombs and Boost Ball, but after a few seconds Dark Samus will fall down from walls or ceiling she is attached to.
    • Custom 1 - Bomb: Dark Samus simply deploys a Bomb after entering her Morph Ball. Unlike the Bombs used in the normal move, these will fall slowly downward and explode.
    • Custom 2 - Power Bomb: Dark Samus enters her Morph Ball and drops a Power Bomb. It takes much more time to explode than regular Bombs, but it covers much more range and deals significantly more damage.
    • Custom 3 - Morph Ball Defense: Dark Samus has armor while in the Morph Ball and can tank through weak attacks, though her attacks have decreased power.
  • Final Smash - Zero Laser: Dark Samus fires a massive laser from her arm cannon forward that can be angled up and down. The laser will damage opponents multiple times before launching them.
  • Charged State - Phazon Overload: Dark Samus begins glowing blue, enhancing herself with Phazon. In this state, all of her Phazon-based attacks become stronger, and she can move faster and jump higher.

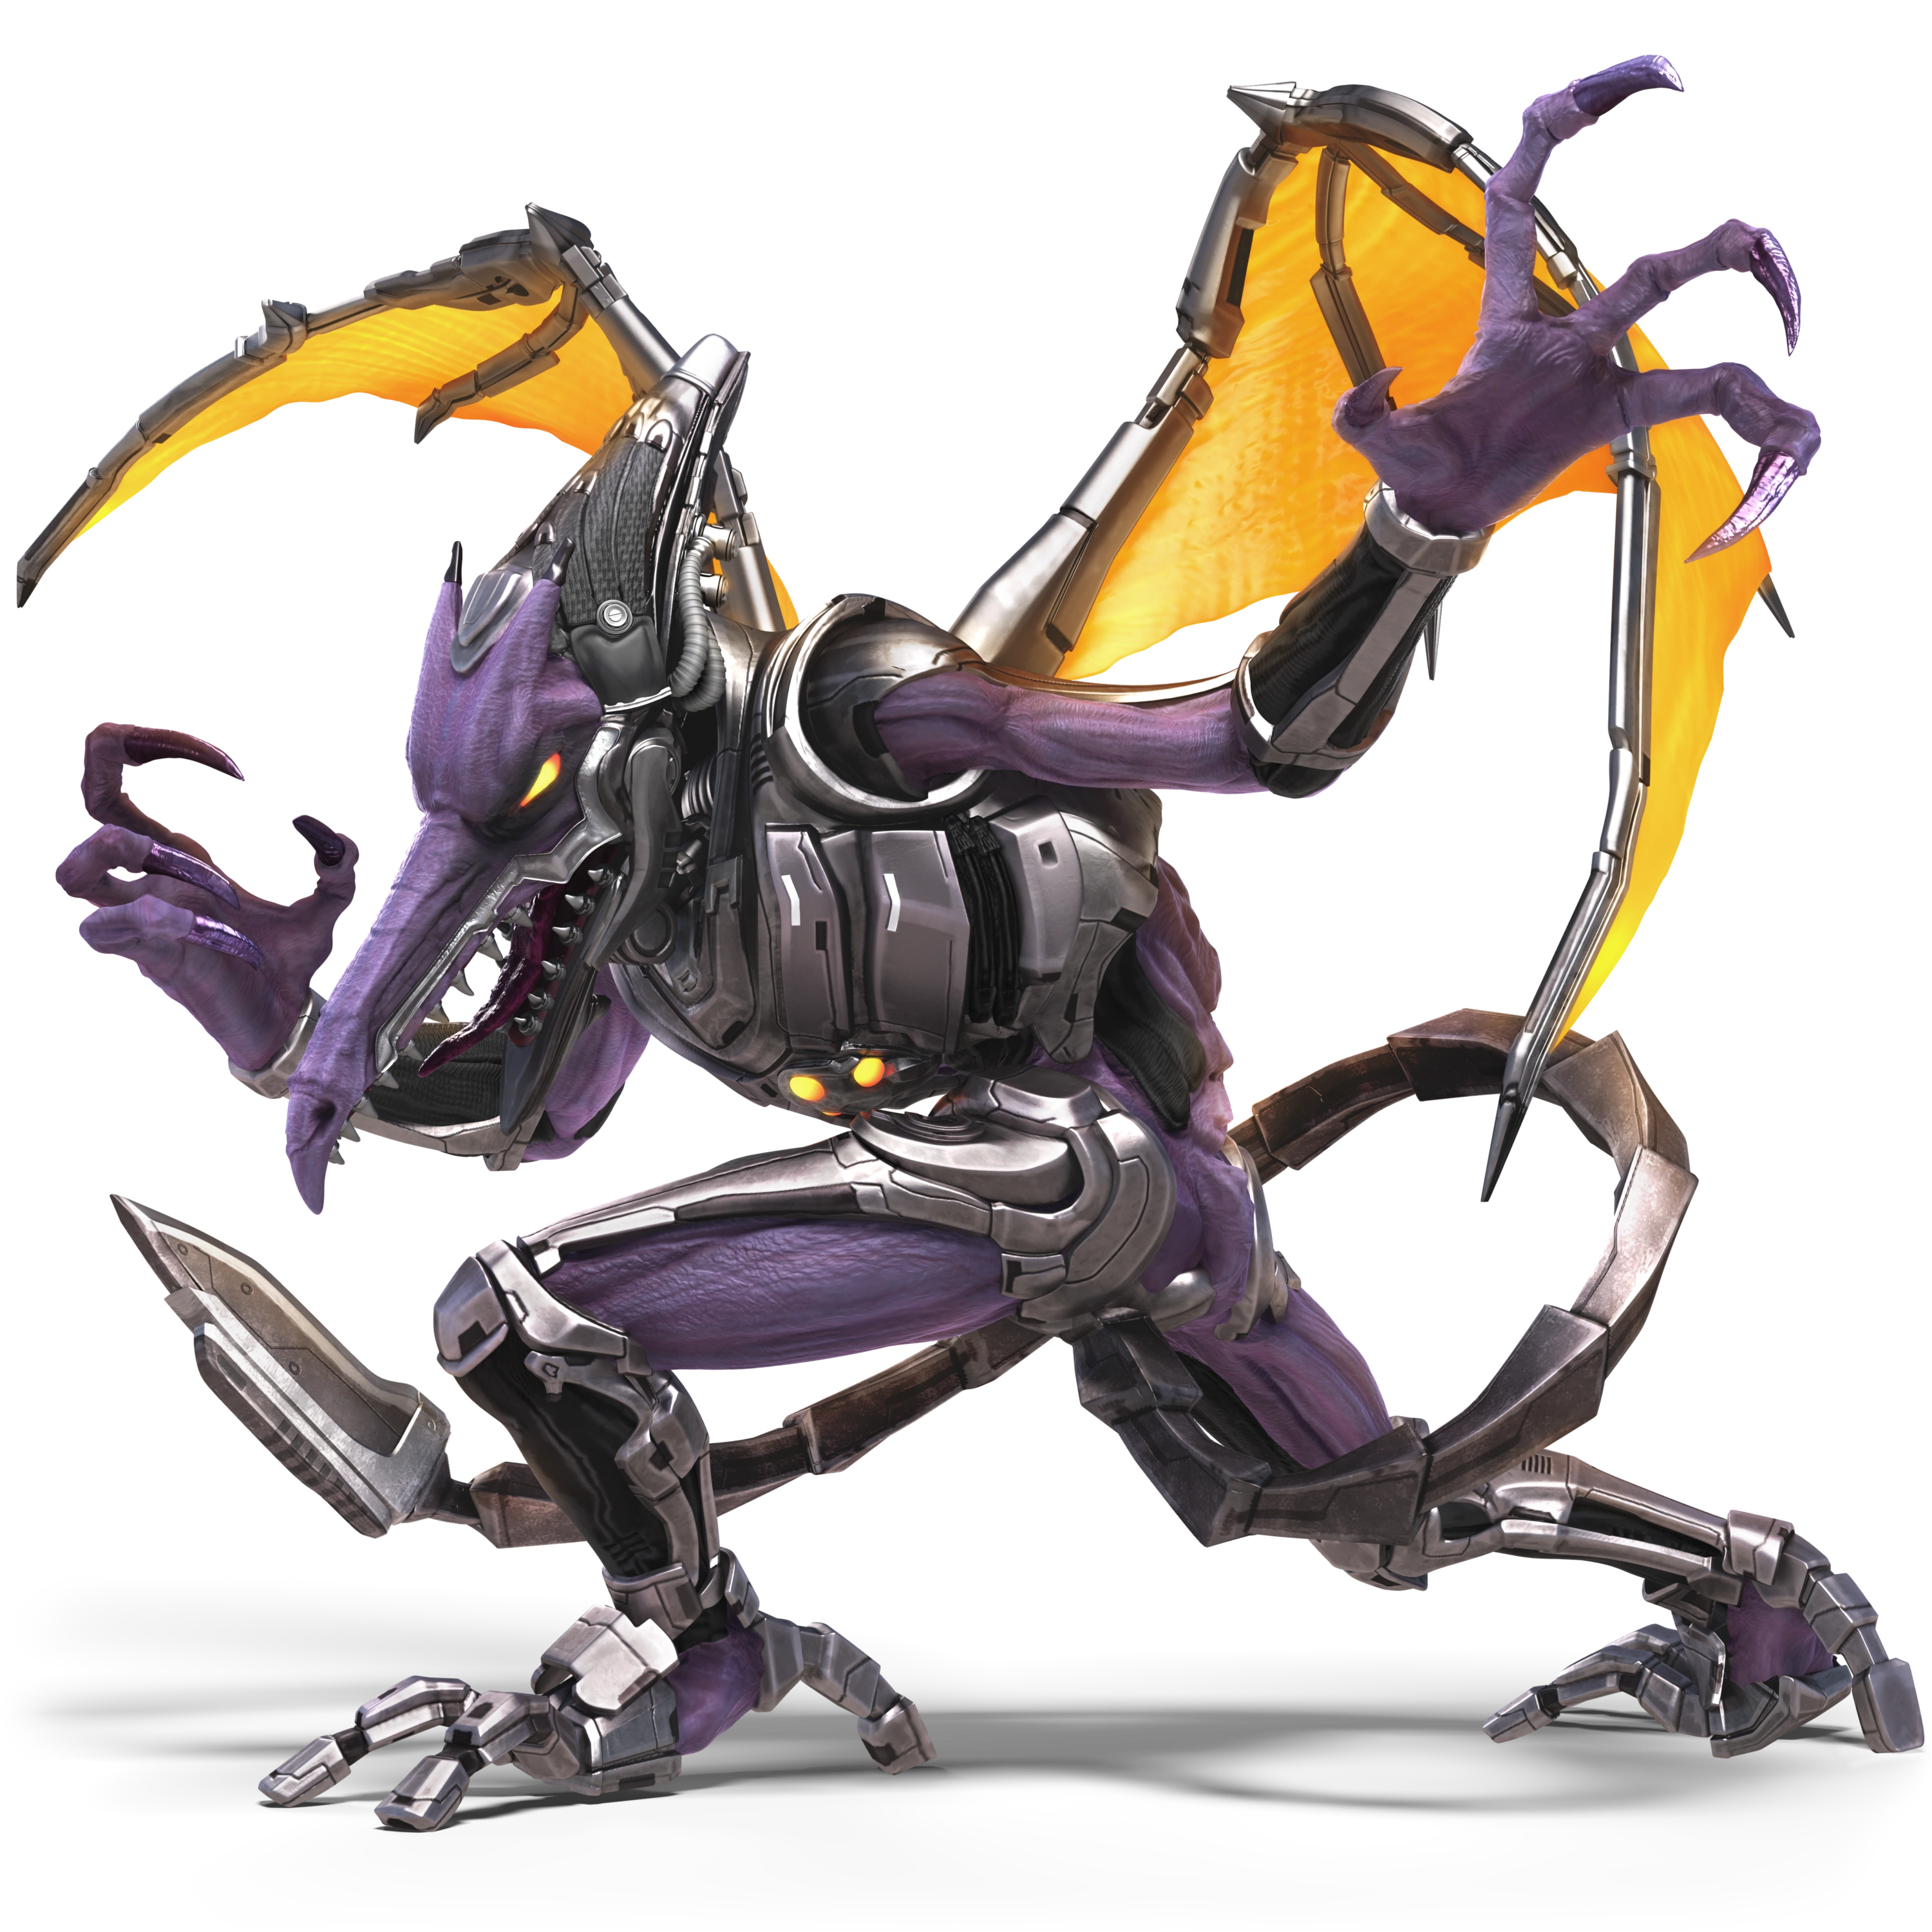
  • Ridley
    Metroid (1986)
    Ridley (リドリー, Ridley) is a massive space pterodactyl and a major antagonist in the Metroid series. He was the one responsible for the death of Samus' parents on K2-L, which would lead to a rivalry between the two. He is one of the leading commanders of the Space Pirates, and despite being seemingly killed after every encounter with Samus, he is always reincarnated somehow. Despite his big and imposing appearance, he is actually quite intelligent. His design, as in Ultimate is mainly based on his appearance in Super Metroid.

    Ridley is noticeably larger than other fighters in the roster, even compared to his fellow heavyweights. Thanks to his wings, he is capable of five midair jumps and is able to glide. Combined with his heavy weight, he can be quite difficult to launch. However, while his size grants him great range, it also makes him a big target, being susceptible to attacks and especially combos. However, he can escape combos thanks to his quick attack speed if need be.

    Ridley's moveset consists of claw slashes, wing attacks, tail slashes, and bursts of fire from his mouth. A number of his attacks take reference from several of his boss battles in the Metroid series. His attacks have a lot of range thanks to his large frame, and because his tail and wings have no hurtboxes on them, moves involving them are actually disjointed.
    SSB Metroid Series RidleyHeadSSBU SSBUltimate Icon
    Ridley's Moveset

    • Neutral Attack: Ridley throws two alternating claw swipes followed by a bite. If the attack button is pressed repeatedly, he sill stab his tail forward repeatedly, damaging opponents multiple times before launching them with a stronger stab.
    • Forward Tilt: Ridley grabs his tail and thrusts it forward.
    • Forward Smash: Ridley rears back before causing an explosion out of his mouth.
    • Up Tilt: Ridley swipes one wing above himself in an overarching motion.
    • Up Smash: Ridley performs a frontflip to kick upward.
    • Down Tilt: Ridley swipes his tail along the ground. The move can trip opponents.
    • Down Smash: Ridley leaps and slams the ground with his wings. The move creates a shockwave around Ridley that deals set knockback.
    • Dash Attack: Ridley leans forward and bites.
    • Counter: Ridley stabs his tail forward.

  • Neutral Aerial: Ridley backflips and swings his tail around himself.
  • Forward Aerial: Ridley stabs forward with his tail three times in rapid succession.
  • Forward Crash: Ridley stabs his tail forward.
  • Back Aerial: Ridley throws a roundhouse kick.
  • Back Crash: Ridley turns around and slashes with his claws.
  • Up Aerial: Rildey thrusts both of his wings upward while closed.
  • Up Crash: Ridley thrusts both of his wings upward while closed, then opens them. The second part of the attack can meteor smash opponents.
  • Down Aerial: Ridley performs a stall-then-fall stomp. The move can meteor smash opponents.
  • Down Crash: Ridley stabs his tail downward. The move can meteor smash opponents.

  • Grab: Ridley reaches out to grab the opponent.
  • Pummel: Ridley stabs the opponent with his tail.
  • Forward Throw: Ridley tosses the opponent forward.
  • Back Throw: Ridley turns around and tosses the opponent backward.
  • Up Throw: Ridley throws the opponent upward before stabbing them with his tail.
  • Down Throw: Ridley slams the opponent into the ground and stabs them with his tail several times.

  • Neutral Special - Plasma Breath: Ridley spits a fireball from his mouth, which bounces across the ground. If the special button is tapped repeatedly, Ridley can spit up to 10 fireballs in rapid succession. If seven fireballs or more are launched, Ridley will cough up smoke when he finishes, having some endlag.
    • Custom 1 - Plasma Laser: The move has more startup and endlag, but instead of firing a fireball, he fires a laser that covers a wide range, damaging opponents multiple times before launching them.
    • Custom 2 - Plasma Breath Barrage: Ridley can charge the move by holding the special button, and will spit fireballs in rapid succession depending on how long the move is charged. While charging, opponents can attack him in the mouth for the move to cancel. However, he suffers no englag, even if he spits 10 fireballs.
    • Custom 3 - Plasma Balls: Ridley cannot fie fireballs as quick. They travel a bit slower but bounce in higher arcs.
  • Side Special - Space Pirate Rush: Ridley rushes forward to grab the opponent. If successful, he slams them into the ground and flies forward while dragging them across it, dealing continuous damage before throwing them at an edge or if the special button is pressed again. However, opponents can button mash to escape Ridley's grasp. If he grabs an opponent in midair, he will fall downward to the ground or lower blast zone with them in tow, though pressing the special button again has him leap off the opponent and meteor smashing them.
    • Custom 1 - Space Pirate Drag: Ridley drags opponents slower and it is easier for them to button mash out of the move, but he deals more damage.
    • Custom 2 - Space Pirate Slam: Instead of dragging the opponent across the ground, Ridley slams them downward, burying grounded opponents and meteor smashing aerial ones.
    • Custom 3 - Space Pirate Blitz: Ridley drags opponents faster and it is more difficult for them to button mash out of the move, but Ridley has less range when grabbing and he deals less damage.
  • Up Special - Wing Blitz: Ridley folds his wings and dashes in the direction the control stick is held, damaging opponents he hits and falling into a helpless state afterwards.
    • Custom 1 - Wing Rush: Ridley can travel faster and farther, but he won't damage opponents.
    • Custom 2 - Shocking Wing Blitz: Ridley deals less damage, but the move is electrically-charged and inflicts paralysis on opponents.
    • Custom 3 - Drilling Wing Blitz: Ridley damages opponents multiple times before launching them. However, he is more limited in what directions he can move.
  • Down Special - Shish-Kebab: Ridley stabs his tail forward, piercing through any opponents he hits. He will take any opponents and swing his tail forward or backward to launch them.
    • Custom 1 - Sliding Shish-Kebab: Ridley's tail covers less range, but he slides forward as he stabs it.
    • Custom 2 - Shish-Kebab Blast: Ridley has noticeable startup lag, but after stabbing his tail, he creates an explosion that deals heavy damage and knockback.
    • Custom 3 - Skewer: Ridley stabs his tail forward. It normally deals little damage and knockback, but if an opponent is hit by the tip of the tail, they take massive damage and are left vulnerable for a follow-up. If the sweetspot does not land, he has endlag.
  • Final Smash - Plasma Scream: Ridley rushes forward. If he hits an opponent, they are locked in a cinematic where they are knocked onto Samus' gunship as it flies away. Ridley then appears and shoots a plasma beam at it, causing it to explode and sending the opponent back to the stage, launching them. After the move, Samus' gunship can be seen flying through the background, damaged.
  • Charged State - Omega Ridley: Ridley becomes swarmed with Phazon, transforming into Omega Ridley. In this state, he is much faster and a number of his attacks deal phazon-based damage. He can also jump higher.

  • Mother Brain
    Metroid (1986)
    MotherBrainPoker'sCut
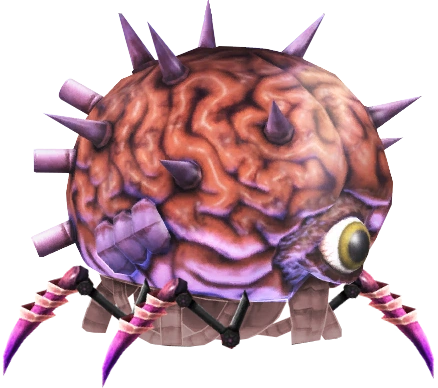
    Mother Brain (マザーブレイン, Mother Brain) is a major antagonist in the Metroid series. She was an AI created by the Chozo, but turned against them when the Space Pirates invaded Zebes, becoming their leader. On her mission to exterminate the Space Pirates, Samus needed to storm into Tourian and defeat Mother Brain.

    While Mother Brain wasn't often seen outside her capsule, she has been given mechanical legs in Charged, allowing her to move around freely. She is among the heaviest and largest characters in the game, with long-ranged attacks to match. Her moveset is overall laggy, but her stronger moves can deal impressive damage. Her biggest strength, however, is stage control, allowing her to rack up damage and overwhelm opponents from afarr before KOing them with a powerful blow.

    Mother Brain's basic moveset consists of pokes and slashes from her mechanical legs, as well as body slams that cover a lot of range. Some of her moves also make reference to the various hazards Samus needs to dodge during boss battles against Mother Brain.
    SSB Metroid Series Mother Brain Stock Icon SSBCharged Icon
    Mother Brain's Moveset

    • Neutral Attack: Mother Brain throws two alternating strikes with her mechanical legs followed by a flurry of strikes, damaging opponents multiple times before launching them with a strong thrust.
    • Forward Tilt: Mother Brain swipes one of her mechanical legs forward.
    • Forward Smash: Mother Brain shoots a blast of energy out of her eye. The move has more range depending on how long the move is charged.
    • Up Tilt: Mother Brain lifts herself upward to damage opponents with her spikes.
    • Up Smash: Mother Brain jumps upward to damage opponents with her spikes.
    • Down Tilt: Mother Brain plunges one of her mechanical legs into the ground in front of her.
    • Down Smash: Mother Brain performs a belly flop. The move can meteor smash opponents.
    • Dash Attack: Mother Brain performs a battering ram.
    • Counter: Mother Brain fires a beam from her eye.

  • Neutral Aerial: Mother Brain emits electric energy around herself, damaging opponents multiple times before launching them.
  • Forward Aerial: Mother Brain strikes forward with her mechanical leg five times, damaging opponents multiple times before launching them.
  • Forward Crash: Mother Brain thrusts herself forward.
  • Back Aerial: Mother Brain strikes with two of her mechanical legs backward.
  • Back Crash: Mother Brain thrusts herself backward.
  • Up Aerial: Mother Brain turns upside-down and strikes with her mechanical legs multiple times.
  • Up Crash: Mother Brain thrusts herself upward.
  • Down Aerial: Mother Brain strikes downward with her mechanical legs multiple times.
  • Down Crash: Mother Brain turns upside-down and performs a stall-then-fall move. The move can meteor smash opponents.

  • Grab: Mother Brain reaches out with one of her mechanical legs to grab the opponent.
  • Pummel: Mother Brain damages the opponent with electric energy.
  • Forward Throw: Mother Brain shoves the opponent forward.
  • Back Throw: Mother Brain turns around and flings the opponent backward.
  • Up Throw: Mother Brain heaves the opponent upward and damages them with her spikes.
  • Down Throw: Mother Brain pins the opponent on the ground and body slams onto them.

  • Neutral Special - Rinka: Mother Brain shoots a Rinka out of her eye, travelling in the direction of the nearest opponent and exploding on impact. Up to three Rinkas can be at play at once.
    • Custom 1 - Fiery Rinka: The move has more startup lag, but the Rinka travels faster and deals more damage.
    • Custom 2 - Flying Rinka: The Rinka travels swiftly in a straight line.
    • Custom 3 - Homing Rinka: The Rinka lightly homes in on opponents instead of just flying in their direction. However, they deal less damage.
  • Side Special - Tourian Sentry: Mother Brain deploys a sentry on the ground in front of herself. It will aim at opponents and shoot beams at them, dealing damage. They will disappear after they fire three shots, but they can be destroyed if they take 15% damage from opponents' attacks. Up to three sentries can be at play at once.
    • Custom 1 - Armored Sentry: The sentry can last much longer and cannot be destroyed by opponents' attacks, but it has a slower fire rate.
    • Custom 2 - Rapidfire Sentry: The sentry will only aim forward or upward depending on directional inputs, but it will fire 10 beams in rapid succession, damaging opponents multiple times before launching them.
    • Custom 3 - Heavy-Hitting Sentry: The sentry will only fire once before disappearing and takes much longer to fire, but its beam is much wider and deals more damage and knockback.
  • Up Special - Eject Jump: Mother Brain leaps upward, damaging opponents she hits ad falling into a helpless state afterwards. Directional inputs can be used to alter her trajectory.
    • Custom 1 - High Jump: Mother Brain can jump higher, but can only travel straight upward.
    • Custom 2 - Eject Attack: Mother Brain deals more damage, but gains less height.
    • Custom 3 - Eject Leap: Mother Brain travels in a more horizontal angle. She doesn't damage opponents she hits.
  • Down Special - Hyper Beam: Mother Brain charges up to fire a massive beam out of her eye. If the special button is held, the move will charge, increasing the beam's range and damage. Once fired, directional inputs can be used to move it up and down. At full charge, the move damages opponents multiple times before launching them.
    • Custom 1 - Shotgun Hyper Beam: The beam takes slightly less time to charge, but it cannot be angled up and down. The beam deals more damage to opponents closer to Mother Brain.
    • Custom 2 - Quick Hyper Beam: The move doesn't need to charge, but the beam covers less distance and deals less damage.
    • Custom 3 - Absorbing Hyper Beam: The move takes longer to charge, but if it hits an opponent, Mother Brain heals herself by half the damage they take.
  • Final Smash - Tourian Destruction: Mother Brain lodges herself into the ground as the stage begins shaking, flashing red. A timer appears in the top-center of the screen, counting down from five seconds. Once it reaches zero, Mother Brain creates a huge explosion around herself, damaging opponents in the blast radius multiple times before launching them.
  • Charged State - Zebesian Defense: Zebestites begin rising out of Mother Brain, causing her to glow a dark-red aura. In this state, Mother Brain has much more launch resistance and is more difficult to KO. Her mechanical legs are also longer, allowing her to move faster and cover more range.

  • Dark Meta Knight
    Kirby & the Amazing Mirror (2004)
    Dark Meta Knight KSA
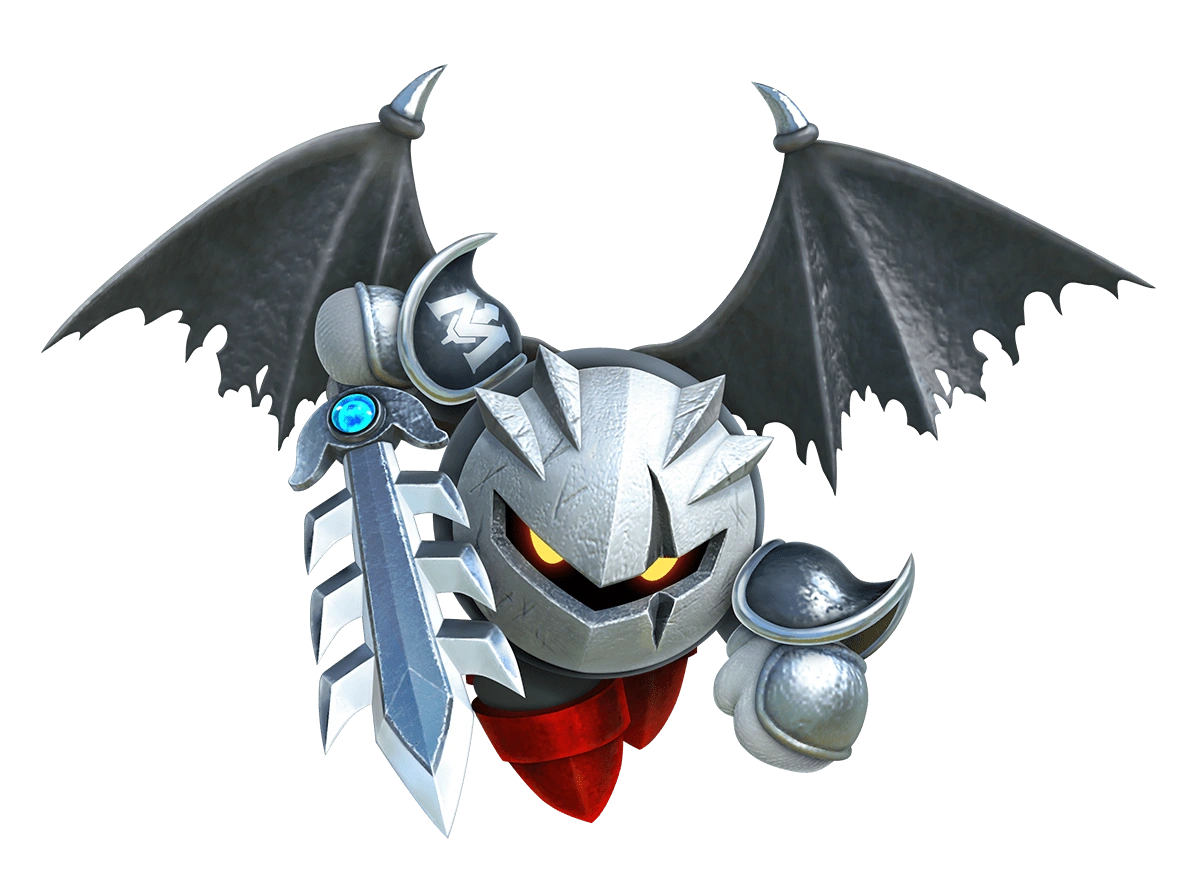
    Dark Meta Knight (ダークメタナイト , Dark Meta Knight) is the Mirror World version of Meta Knight, appearing as a recurring boss in the Kirby series, as well as a playable character in Kirby Star Allies. Despite looking identical to Meta Knight, he has a far more vicious and darker personality, lacking the knight's honor his lighter counterpart has. He has a much more aggressive fighting style, and has abilities not even normal Meta Knight can achieve.

    As a fighter, Dark Meta Knight is a fast, close-quarters fighter like Meta Knight. His version of the Galaxia offers some disjointed hitboxes, but among the most minimal in the roster. Compared with Meta Knight however, he also has access to long-ranged attacks that are also powerful, and can be used to quickly rack up damage. He also has an excellent recovery, with five midair jumps thanks to his wings.

    Dark Meta Knight's moveset is mostly derived from his attacks as a Dream Friend in Kirby Star Allies, as well as the Mirror ability in various Kirby games. This, in general, gives him a much longer-ranged moveset than Meta Knight, though he has nowhere near as favorable frame data.
    SSB Kirby Series Dark Meta Knight Stock Icon SSBCharged Icon
    Dark Meta Knight's Moveset

    • Neutral Attack: Dark Meta Knight slashes the Galaxia around himself. If the attack button is held, he can continue slashing. He finishes with an upward slash.
    • Forward Tilt: Dark Meta Knight slashes the Galaxia from overhead.
    • Forward Smash: Dark Meta Knight lunges forward while stabbing with the Galaxia, sliding across the ground.
    • Up Tilt: Dark Meta Knight stabs the Galaxia upward.
    • Up Smash: Dark Meta Knight summons two massive swords that lunge upward from mirrors that appear on the ground on either side of him.
    • Down Tilt: Dark Meta Knight stabs at the ground with the Galaxia.
    • Down Smash: Dark Meta Knight summons two massive swords that lunge outwards from mirrors that appear on either side of him.
    • Dash Attack: Dark Meta Knight throws a side kick.
    • Counter: Dark Meta Knight summons a giant sword that lunges outwards from a mirror that appears in front of him.

  • Neutral Aerial: Dark Meta Knight performs a somersault while slashing the Galaxia.
  • Forward Aerial: Dark Meta Knight slashes the Galaxia forward.
  • Forward Crash: Dark Meta Knight summons a massive sword that lunges outwards from a mirror that appears in front of him.
  • Back Aerial: Dark Meta Knight slashes the Galaxia behind himself.
  • Back Crash: Dark Meta Knight summons a massive sword that lunges outwards from a mirror that appears behind him.
  • Up Aerial: Dark Meta Knight slashes the Galaxia in an upward arching motion.
  • Up Crash: Dark Meta Knight summons a massive sword that lunges outwards from a mirror that appears above him.
  • Down Aerial: Dark Meta Knight slashes the Galaxia in a downward arching motion.
  • Down Crash: Dark Meta Knight summons a massive sword that lunges outwards from a mirror that appears below him. The move can meteor smash opponents.

  • Grab: Dark Meta Knight reaches out to grab the opponent.
  • Pummel: Dark Meta Knight stabs the opponent with the spikes on his wings.
  • Forward Throw: Dark Meta Knight flings the opponent forward.
  • Back Throw: Dark Meta Knight flings the opponent backward.
  • Up Throw: Dark Meta Knight flies above the upper blast zone with the opponent in tow, then divebombs onto the ground with them.
  • Down Throw: Dark Meta Knight throws the opponent on the ground, stomps on them several times, and violently sits on them.

  • Neutral Special - Dark Mirror: Dark Meta Knight splits into two, and the two copies travel outward at warp speed, damaging any opponents they hit. They then travel to each other and merge back into Dark Meta Knight. If directional inputs are used, the clones can travel in any direction, though they will always be opposite of each other. He also gains invincibility throughout the move.
    • Custom 1 - Backward Dash: Dark Meta Knight doesn't create a clone, but instead dashes backward before returning to his original position. He has no invincibility, but he travels farther and deals more damage.
    • Custom 2 - Distanced Dark Mirror: The clones travel much farther, but deal less damage.
    • Custom 3 - Triple Dark Mirror: Dark Meta Knight creates three clones who all dash oppositely of each other, instead of two. They travel less distance and deal less damage.
  • Side Special - Wall of Mirrors: Dark Meta Knight creates a wall of mirrors in front of himself before making them disappear shortly after. This wall will reflect projectiles and serves as a wall that prevents opponents from walking past it. If the special button is held, the wall can remain held up, though he is left vulnerable. The wall can also be destroyed if it has taken 15% damage; when this happens, it cannot be used again for 15 seconds.
    • Custom 1 - Hard Wall: The wall cannot be knocked down, but it has a weaker damage ratio with the projectiles it reflects.
    • Custom 2 - Mirror Sword: Dark Meta Knight summons a massive sword that lunges out of a mirror that appears in front of him. Using directional inputs, the sword can be aimed up or down. It deals heavy damage, but cannot reflect projectiles.
    • Custom 3 - Moving Mirror: After creating the wall, Dark Meta Knight pushes it forward, damaging opponents it hits. Another one cannot be created until the first one travels off-screen or hits a wall, causing it to shatter.
  • Up Special - Shuttle Loop: Dark Meta Knight leaps upward while slashing his sword, travels in a loop before flying upward again, and falls into a helpless state afterwards. Using directional inputs, the angle he travels in after the loop can be altered.
    • Custom 1 - Blade Coaster: Dark Meta Knight travels in a wider loop, damaging opponents multiple times before launching them. He gains less vertical distance.
    • Custom 2 - Laze Shuttle Loop: Dark Meta Knight flies slower while travelling in a loop, but rises upward quickly and deals more damage. He cannot damage opponents at any other point in the attack however.
    • Custom 3 - Shuttle Glide: Dark Meta Knight travels less vertical distance and doesn't deal damage, but he will enter a controllable glide, which can increase horizontal distance.
  • Down Special - Mirror Swords: Dark Meta Knight creates three small mirrors in front of himself. Small, red swords appear out of them and home in on opponents, damaging them. They travel slowly however, and the move cannot be used again until all the swords disappear.
    • Custom 1 - Fast Swords: The swords travel in straight lines instead of homing in on opponents, but they travel faster.
    • Custom 2 - Targeting Swords: The swords travel in straight lines, but stop in midair before boosting at high speed in the direction of the nearest opponent. They deal less damage.
    • Custom 3 - Sword Rain: The mirrors appear above Dark Meta Knight, and the swords travel in a diagonally downwards angle, hitting the ground.
  • Final Smash - Dimension Mirror: Dark Meta Knight summons the Dimension Mirror, which sucks in nearby opponents. If one is caught, he swings his Galaxia to slash the mirror, breaking it and launching the opponents.
  • Charged State - Dark Meta Knight's Revenge: Dark Meta Knight enters a mirror. The mirror begins glowing red aura before he breaks out of it, glowing red himself. In this state, he moves much faster and can jump higher. His attacks also deal slightly more damage, while moves that involve summoning swords from mirrors cover more range and are a lot stronger.

  • Marx
    Kirby Super Star (1996)
    Marx SSBU
    Marx (マルク, Mark) is a recurring character in the Kirby series. He is the main antagonist of the Milky Way Wishes subgame in Kirby Super Star, where he made the sun and moon fight and tricked Kirby to awaken Galactic Nova to stop them. After this, Marx uses its power to take over the universe, but he is stopped by Kirby. After this, he appeared as a Dream Friend in Kirby Star Allies, having seemingly changed his villainous ways. His design in Super Smash Bros. is based off of his true form, seen in his boss battle.

    Marx is a quick fighter, sporting high ground and air speed. His wings allow him six midair jumps and the ability to glide, making for a good recovery. However, he is one of the lighter characters in the game, and his large frame makes him an easy target. His attacks can cover a lot of range, making them especially good for fending off multiple opponents.

    Marx's moves are taken from his boss battle in Kirby Super Star, as well as his moveset as a Dream Friend in Kirby Star Allies. For the most part, they cover a lot of range and are quite strong, but are laggy as a result. With these attributes, Marx can be seen as a boss battle in a sense.
    SSB Kirby Series Marx Stock SSBCharged Icon
    Marx's Moveset

    • Neutral Attack: Marx slashes his wings twice before lunging forward and biting.
    • Forward Tilt: Marx throws a lunging headbutt.
    • Forward Smash: Marx swings one of his wings outward, sending small, hexagonal panels forward.
    • Up Tilt: Marx thrusts both of his wings upward.
    • Up Smash: Marx slams both of his wings against each other above himself, sending small, hexagonal panels upward.
    • Down Tilt: Marx lunges forward and bites.
    • Down Smash: Marx vanishes, then rises out of the ground with his wings spread.
    • Dash Attack: Marx performs a corkscrew headbutt, damaging opponents multiple times before launching them.
    • Counter: Marx swings one of his wings forward.

  • Neutral Aerial: Marx performs a somersault, damaging opponents multiple times before launching them.
  • Forward Aerial: Marx kicks a ball forward in an arc, which explodes on impact.
  • Forward Crash: Marx rushes forward while engulfed in blue flames.
  • Back Aerial: Marx thrusts his wings backward.
  • Back Crash: Marx rushes backward while engulfed in pink flames.
  • Up Aerial: Marx throws a bicycle kick.
  • Up Crash: Marx rushes upward with his wings outstretched.
  • Down Aerial: Marx spits a projectile downward, which explodes on impact.
  • Down Crash: Marx performs a front flip to swing his wings downward. The move can meteor smash opponents.

  • Grab: Marx chomps on the opponent.
  • Pummel: Marx chews on the opponent.
  • Forward Throw: Marx spits the opponent forward.
  • Back Throw: Marx spits the opponent backward.
  • Up Throw: Marx spits the opponent upward.
  • Down Throw: Marx spits the opponent at the ground.

  • Neutral Special - Crescent Storm: Marx encases himself within his wings before spreading them out and releasing four crescent-shaped blades that travel outward in a boomerang-like motion, damaging opponents they hit. Marx is left vulnerable until the blades return to him.
    • Custom 1 - Wide Crescent Storm: The blades travel farther out, but they deal less damage and travel slower.
    • Custom 2 - Big Crescents: Marx sends out three blades instead of four, but they are larger and deal more damage.
    • Custom 3 - Crescent Flurry: Marx sends out 11 miniature blades instead of four. They are smaller and travel faster, but deal less damage and don't travel as far.
  • Side Special - Arrows of Light: Marx launches a flurry of arrows forward, damaging opponents multiple times before launching them. If the special button is held, the move will charge, allowing him to fore more arrows.
    • Custom 1 - Mega Laser: Marx launches a massive laser instead of a flurry of arrows. The laser is larger and covers more range, and deals heavy knockback However, it takes longer to fully charge.
    • Custom 2 - Dual Fireballs: Marx launches a pair of blue and pink fireballs instead of a flurry of arrows. The move doesn't need to be charged and the fireballs travel faster, but they deal less damage.
    • Custom 3 - Ball Barrage: Marx kicks four balls instead of a flurry of arrows. The balls travel in different arcs and distances depending n how long the move is charged, and they will all explode on impact.
  • Up Special - Teleport: Marx teleports in the direction the control stick is held, falling into a semi-helpless state afterwards if he ends up in midair. The move can be used up to three times in succession, and it can be cancelled into any attack after he reappears.
    • Custom 1 - Long-Distance Teleport: Marx travels farther, but can only use the move twice.
    • Custom 2 - Wing Smash: Marx launches himself in the direction the control stick is held, damaging opponents he hits and falling into a helpless state afterwards.
    • Custom 3 - Teleport Terror: Marx can't travel as far when he teleports, but the move can be used six times instead of three.
  • Down Special - Black Hole: Marx encases himself inside his wings. In this state, he can float freely in midair with directional inputs, but is left vulnerable. After awhile, he will begin glowing purple. If the special button is pressed again, his body will split open, revealing a black hole. It will suck in all opponents in range, damaging them multiple times before launching them. The black hole will also suck in items and projectiles in range, which will heal Marx.
    • Custom 1 - Massive Black Hole: The black hole is larger and has stronger vacuumboxes, but the move takes much longer to charge.
    • Custom 2 - Mobile Black Hole: The black hole doesn't damage opponents as much and its vacuumboxes are weaker, but Marx can move faster while charging the move.
    • Custom 3 - White Hole: Instead of sucking in opponents, the black hole creates windboxes that violently push opponents backward.
  • Final Smash - Blue and Pink: Marx's body splits in two, and both halves turn into blue and pink spheres. They fly above the stage as small globs of blue and pink goop fall onto the stage, damaging opponents they hit. After this, massive blue and pink fireballs will fly through the stage, dealing heavy damage and knockback.
  • Charged State - Marx Soul: Marx transforms into his Soul form. In this state, he is much larger and his attacks are faster. They also cover more range and deal more damage and knockback.

  • Macho Dedede
    Kirby Star Allies (2018)
    KSA Macho Dedede
    Macho Dedede (盗んだデデデ, Swole Dedede) is a larger, muscular transformation King Dedede goes through in Kirby Star Allies, serving as the second boss. The battle starts as normal, with Dedede using attacks he usually uses in his battles, but once his health depletes, he grows huge muscles on his arms and chest, causing his robes and gloves to rip. He has several attacks in this form, from jumping around, to pounding his fists into the ground, to swinging on pillars.

    As one would imagine, Macho Dedede is very large and heavier, even moreso than King Dedede. He gets most of his work done with his extremely strong attacks, which have very high KO potential. However, he sacrifices Dedede's multiple midair jumps, and has very low jump height on top of that, leading to a weak recovery. While he doesn't have a weapon, his arms and fists grant him impressive range.

    Most of Macho Dedede's moves involve his fists, be them from his boss battle in Kirby Star Allies or original. Some of his normal and special attacks are also variants of Dedede's, though not enough for him to be considered an Echo or Fusion Fighter.
    SSB Kirby Series Macho Dedede Stock Icon SSBCharged Icon
    Macho Dedede's Moveset

    • Neutral Attack: Macho Dedede throws two alternating hooks followed by a double-handed axle. The third hit can bury opponents.
    • Forward Tilt: Macho Dedede throws a backhanded slap.
    • Forward Smash: Macho Dedede slams a fist into the ground. Also creates a shockwave that can cause nearby grounded opponents to trip, leaving them vulnerable.
    • Up Tilt: Macho Dedede swipes his hand above himself in an overarching motion.
    • Up Smash: Macho Dedede slaps above himself.
    • Down Tilt: Macho Dedede thrusts his stomach forward.
    • Down Smash: Macho Dedede slams both of his fists into the ground on either side of himself.
    • Dash Attack: Macho Dedede throws an uppercut.
    • Counter: Macho Dedede grabs the opponent and throws them forward. If he counters a projectile, he will simply dodge.

  • Neutral Aerial: Macho Dedede throws a splash.
  • Forward Aerial: Macho Dedede throws an overhead.
  • Forward Crash: Macho Dedede throws a bear hug.
  • Back Aerial: Macho Dedede throws a back punch.
  • Back Crash: Macho Dedede turns around and throws a double-handed axle. The move can meteor smash opponents.
  • Up Aerial: Macho Dedede throws an upward headbutt.
  • Up Crash: Macho Dedede swings his fist above himself in an overarching motion.
  • Down Aerial: Macho Dedede performs a stall-then-fall downward punch. When he lands, he creates a stage-wide shockwave that deals damage to all grounded opponents.
  • Down Crash: Macho Dedede throws a downward punch. The move can bury and meteor smash opponents.

  • Grab: Macho Dedede reaches out to grab the opponent.
  • Pummel: Macho Dedede slams the opponent into the ground.
  • Forward Throw: Macho Dedede spins the opponent on one finger like a basketball and throws them forward.
  • Back Throw: Macho Dedede rolls the opponent over his shoulders before punching them, sending them backward.
  • Up Throw: Macho Dedede throws the opponent in the air, then leaps into the air and punches them downward.
  • Down Throw: Macho Dedede rolls the opponent along the ground like a bowling ball, damaging other opponents they hit. They will roll of ledges.

  • Neutral Special - Dededestruction: Macho Dedede throws a double-handed axle and slams the ground, causing a tremor. His fists deal more damage, but the tremor grants extra range. Holding the special button allows the move to charge, increasing the strength of the fists and the range of the tremor. If used at the ledge, Macho Dedede will swing below the ledge, meteor smashing opponents he hits.
    • Custom 1 - Dedede Tremor: The fists deal less damage, but the tremor has set knockback, knocking them just above Macho Dedede. The move also has less endlag, allowing him to combo easily.
    • Custom 2 - Burying Dedede: Macho Dedede doesn't create a tremor, and his fists bury the opponent instead of launching them.
    • Custom 3 - Dedede Breaker: The move takes longer to charge, but the move deals significantly more damage and knockback.
  • Side Special - Macho Cyclone: Macho Dedede spins around with his fists outstretched while travelling forward, damaging opponents multiple times before launching them. The move has super armor, and the control stick can be held forward or backward to alter the speed Macho Dedede travels in.
    • Custom 1 - Soaring Cyclone: Macho Dedede only damages opponents once and travels a set distance forward, but he will not descend if the move is used in midair, making it much more useful for recovery.
    • Custom 2 - Macho Hurricane: Macho Dedede doesn't have super armor and travels slower, but the move has vacuumboxes that pull opponents into the attack.
    • Custom 3 - Mach Cyclone: Macho Dedede travels faster and farther, but he deals less damage.
  • Up Special - Super Dedede Jump: Macho Dedede leaps upward before crashing down. While falling, he will bury and meteor smash opponents he lands on. Upon landing, he creates four stars, two on either side, that deal further damage. The move can be cancelled by holding up on the control stick, sending him in a semi-helpless state. He has super armor throughout the entire duration of the move.
    • Custom 1 - Rising Dedede Jump: Macho Dedede damages opponents while rising upward. He falls into a helpless state at the peak of his jump.
    • Custom 2 - Tremor Dedede Jump: Macho Dedede doesn't deal as much damage, but upon landing he will create a stage-wide tremor that causes all grounded opponents to trip.
    • Custom 3 - Crushing Dedede Jump: Macho Dedede doesn't bury or meteor smash opponents he lands on, but deals much more damage.
  • Down Special - Rotten Food: Macho Dedede takes out some rotten food and throws it across the ground. It it hits an opponent, they will be damaged, and inflicted with either a flower (tomato), mushroom (sandwich), or paralysis (cake) depending on the food. After being thrown, the food can be picked up by Macho Dedede and thrown like an item.
    • Custom 1 - Stale Food: The food deals more damage, but doesn't inflict any status effects.
    • Custom 2 - Rotten Buffet: Macho Dedede throws three foods at once, each at different arcs. They deal less damgae, but are harder to dodge.
    • Custom 3 - Really Rotten Food: The food deals less damage and doesn't travel as far, but the effects they give opponents will be much stronger and last longer.
  • Final Smash - Macho of Dedede: Macho Dedede leaps into the air, then falls in the center of the stage, slamming his fists into the ground and creating a huge explosion, damaging opponents in the blast radius multiple times before launching them.
  • Charged State - King-Sized Muscles: Macho Dedede's muscles grow even bigger. In this state, while he is slower, his attacks have more range, and they are much stronger. Dededestruction also causes a stage-wide tremor when used.

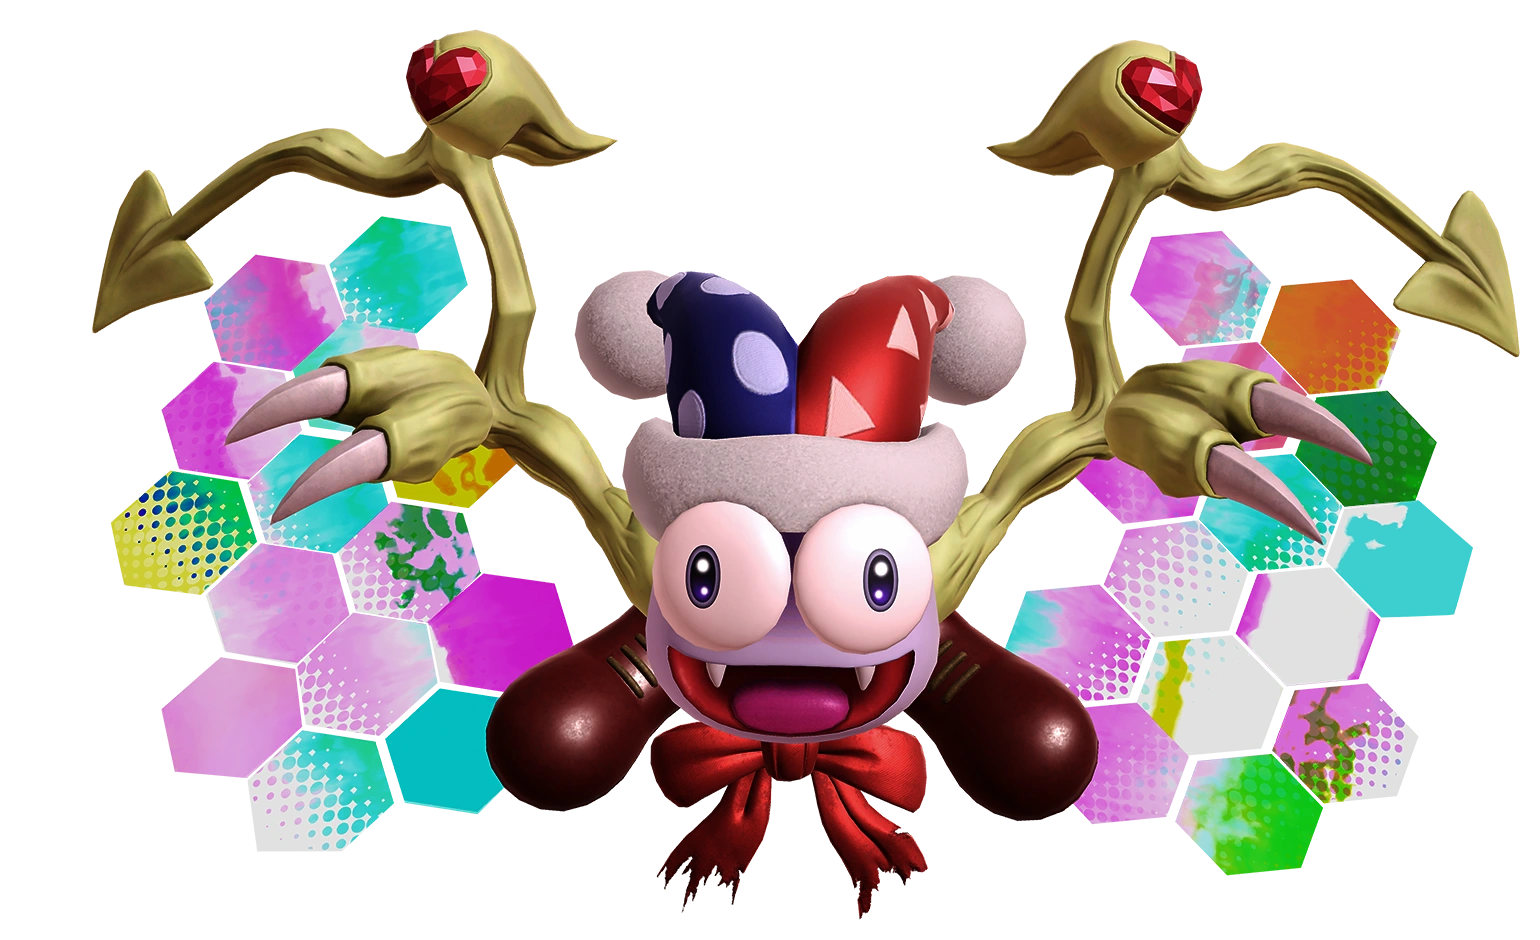
  • Daroach
    Kirby: Squeak Squad (2006)
    KSA Daroach
    Daroach (ドロッチェ, Daroach) is a recurring chaarcter in the Kirby series, debuting as the main antagonist of Kirby: Squeak Squad. he is the leader of the Squeak Squad, a gang of mouse-like thieves that steal treasure. He steals a chest thinking it contains ultimate power, but Kirby chases him, thinking it has his Strawberry Shortcake. It turns out to be Dark Nebula that hides within the chest, and it possesses Daroach. He would later become an ally of Kirby, such as in Kirby Mass Attack and Kirby Star Allies, albeit working toward his own benefit.

    daroach is a quick and nimble fighter, possessing great ground and air speed. He also has three midair jumps, and is in general a great aerial fighter. His normal moveset mostly consists of quick, non-laggy moves that are good for rushdowns and combos. Meanwhile, his specials have unique properties that can turn the tide of the fight when properly utilized.

    Daroach's moveset is directly lifted from his abilities as a Dream Friend in Kirby Star Allies, which are in turn based on his attacks in Kirby: Squeak Squad. His regular moveset revolves around claw slashes and swift kicks, while his special moves either use weapons or summon members of the Squeak Squad.
    SSB Kirby Series Daroach Stock Icon SSBCharged Icon
    Daroach's Moveset

    • Neutral Attack: Daroach throws two alternating claw slashes followed by an upwards claw slash.
    • Forward Tilt: Daroach throws an outward claw slash.
    • Forward Smash: Daroach throws a corkscrew spin with his claws, damaging opponent multiple times before launching them.
    • Up Tilt: Daroach throws a claw slash in an overarching motion above himself.
    • Up Smash: Daroach throws a dual claw slash above himself.
    • Down Tilt: Daroach throws a sliding kick.
    • Down Smash: Daroach slashes his claws at the ground in front of himself, then behind himself.
    • Dash Attack: Daroach throws a corkscrew spin with his claws, damaging the opponent multiple times. If the attack button is pressed again, he will throw a dual claw slash afterward.
    • Counter: Daroach teleports behind the opponent and throws a claw slash. If he counters a projectile, he simply dodges.

  • Neutral Aerial: Daroach spins around with his claws, damaging opponents multiple times before launching them.
  • Forward Aerial: Daroach throws a flying kick.
  • Forward Crash: Daroach throws a dual claw slash.
  • Back Aerial: Daroach throws a dropkick.
  • Back Crash: Daroach takes out his scepter and emits an icy blast behind himself. The move can freeze opponents.
  • Up Aerial: Daroach throws a bicycle kick.
  • Up Crash: Daroach throws a dual claw slash abive himself.
  • Down Aerial: Daroach slashes his claws downward. The move can meteor smash opponents.
  • Down Crash: Daroach takes out the Triple Star and swings it downward, sending three star projectiles that travel at different angles, which ricochet off of surfaces and the edges of the screen.

  • Grab: Daroach reaches out to grab the opponent.
  • Pummel: Daroach slashes his claws at the opponent.
  • Forward Throw: Daroach spins around with the opponent in tow before throwing them backward.
  • Back Throw: Daroach throws the opponent backward.
  • Up Throw: Daroach heaves the opponent upward before slashing at them with his claws.
  • Down Throw: Daroach slams the opponent on the ground and repeatedly slashes at them with his claws.

  • Neutral Special - Ice Shot: Daroach pulls out his scepter and fires a small ice shard forward. It deals little damage and doesn't travel far, but it can freeze opponents. If the special button is held, the move will charge, increasing the shard's distance. At full charge, Daroach instead fires a giant beam of ice that travels across the entire stage, damaging opponents multiple times before launching them, as well as always freezing them.
    • Custom 1 - Ice Spear: The move can be charged, but the ice shards travel further and deal more damage.
    • Custom 2 - Thunder Shot: Daroach uses his scepter to fire electric sparks instead of ice shards. They travel slower, but inflict paralysis on opponnets instead of freezing. The beam also deals more damage, but doesn't cover as much distance.
    • Custom 3 - Ice Beam: Daroach will always charge the move, which cannot be cancelled, and as such he must fully commit to it. However, the beam is bigger and deals more damage.
  • Side Special - Daroach Bomb: Daroach tosses a bomb in an arc, which explodes on impact. The arc can be altered with directional inputs. Holding the special button lets him charge the move, and when fully charged, he throws a much larger, fiery bomb. This bomb doesn't explode immediately, but creates a giant pillar of flames on detonation, damaging opponents multiple times before launching them.
    • Custom 1 - Ice Bomb: The fully-charged version of the move lets Daroach throw an icy bomb instead of a fiery one. It creates a pillar of ice instead of fire when it explodes, which is smaller but wider. Deals less damage, but it can freeze opponents.
    • Custom 2 - Smack-in-the-Box: Instead of a bomb, Daroach throws a small blue treasure chest forward. After a while, a toy version of Dark Nebula pops out of it, which bobs back and forth and deals heavy damage to opponents it hits. It remains for awhile before disappearing, and Daroach can pick it up and throw it again as an item, but it is heavy and limits his movement. Only one Smack-in-the-box can be at play at a time.
    • Custom 3 - TNT Daroach Bomb: It takes longer to charge the move, and the bomb is larger and takes longer to explode. However, instead of a fire pillar, it creates a giant explosion, heavily damaging any opponents in the blast radius.
  • Up Special - Hunter Claw: Daroach throws an uppercut with his claws, damaging opponents multiple times before falling into a helpless state at the peak of his jump.
    • Custom 1 - Rising Hunter Claw: Daroach travels higher, but he doesn't damage opponents.
    • Custom 2 - Hunter Slash: Daroach only damages opponents once and travels much faster.
    • Custom 3 - Hunter Meteor Slash: Daroach doesn't travel as high, but at the peak of his jump, he slashes his claws downward, which can meteor smash opponents.
  • Down Special - Squeak Summon: Daroach summons a member of the Squeak Squad, which changes upon use. When used for the first time, he summons Spinni, who runs around the stage and slashes any opponents nearby with his claws. When used for the second time, he summons Doc, who flies around Daroach in his UFO for a short time, which damages any opponents that touch him. When used for the third time, he summons Storo, who will perform three consecutive body slams, which heavily damage opponents, the last of which will meteor smash and bury them. If the move is used again when a member of the Squeak Squad has bee summoned, he instead summons a Squeaker, who hops around and deals little damage and knockback to opponents. Up to three Squeakers can be at play at once, and all Squeak Squad members can be defeated by opponents' attacks.
    • Custom 1 - Speedy Squeaks: Spinni, Doc, and Storo can move faster, but they deal less damage.
    • Custom 2 - Burly Squeaks: Spinnie, Doc, and Storo can take more damage before being defeated, but they are slower and deal less damage.
    • Custom 3 - Sneaky Squeaks: Spinni's claw slashes will always launch opponents toward Daroach, Doc flies his UFO in an orbit around Daroach instead of around him horizontally, and Storo doesn't move forward, but his body slasm can create shockwaves.
  • Final Smash - Squeak Squad Assemble: Daroach summons Spinni, Doc, and Storo, as well as a hoard of Squeakers, who run around the stage, doing just as they would if summoned with Squeak Summon. After awhile, they disappear.
  • Charged State - Dark Daroach: Dark Nebula possesses Daroach, causing him to take on a much darker, fiery appearance. In this state, Daroach is much faster and his attacks deal more damage. Ice Shot and Daroach Bomb also don't need to be charged, as he will immediately use their fully-charged variants. He can also summon the Squeak Squad more quickly.

  • Heavy Lobster
    Kirby Super Star (1996)
    Heavy Lobster
    Heavy Lobster (ヘビーロブスター, Heavy Lobster) is a mechanical, golden lobster that appears as a boss in Kirby Super Star. Built by Meta Knight and the Meta-Knights, it serves the masked swordsman and battles Kirby when he tries to storm the Halberd during Revenge of Meta Knight. Equipped with flamethrowers in its claws, jet thrusters on its feet, and heavy armor, it is quite strong and a force to be reckoned with.

    Heavy Lobster is one of the largest and heaviest fighters in the game, and also adopts a similar mechanic to Bowser where it has universal super armor that can tank through weaker attacks, including all rapid jabs. As in its home series, it's very slow, having pitiful walking and running speed, and it's jump height isn't very good either. However, it makes up for this by having very powerful attacks that are quite ranged. Many of its moves deal a lot of shield damage, and it has effective ways for dealing with projectiles as well, making defensive play a very unproductive option against Heavy Lobster.

    Heavy Lobster's attacks either use its claws or its legs, swinging them around heavily to deal a lot of damage. Many of its moves are also lifted from its boss battle in Kirby Super Star.
    SSB Kirby Series Heavy Lobster Stock Icon SSBCharged Icon
    Heavy Lobster's Moveset

    • Neutral Attack: Heavy Lobster throws two alternating snaps with its claws.
    • Forward Tilt: Heavy Lobster throws a straight punch.
    • Forward Smash: Heavy Lobster lunges forward and snaps both of its claws.
    • Up Tilt: Heavy Lobster waves one of its claws above itself.
    • Up Smash: Heavy Lobster snaps its claws upward.
    • Down Tilt: Heavy Lobster snaps one of its claws at the ground. The move can trip opponents.
    • Down Smash: Heavy Lobster leaps and stomps on the ground.
    • Dash Attack: Heavy Lobster boosts forward with its jet thrusters.
    • Counter: Heavy Lobster snaps with one of its claws.

  • Neutral Aerial: Heavy Lobster spins around.
  • Forward Aerial: Heavy Lobster throws a punch.
  • Forward Crash: Heavy Lobster throws a dual punch.
  • Back Aerial: Heavy Lobster throws a punch backward.
  • Back Crash: Heavy Lobster activates its jet thrusters and creates a flame behind itself. This also gives it forward momentum.
  • Up Aerial: Heavy Lobster snaps one of its claws above itself.
  • Up Crash: Heavy Lobster activates its jet thrusters and boosts upward.
  • Down Aerial: Heavy Lobster throws a stomp. The move can meteor smash opponents.
  • Down Crash: Heavy Lobster throws a stall-then-fall stomp. The move can bury opponents.

  • Grab: Heavy Lobster reaches out to grab an opponent.
  • Pummel: Heavy Lobster pinches the opponent.
  • Forward Throw: Heavy Lobster rams its head into the opponent.
  • Back Throw: Heavy Lobster spins around with the opponent in tow three times before tossing them behind itself.
  • Up Throw: Heavy Lobster holds the opponent upward before burning them with its flamethrowers.
  • Down Throw: Heavy Lobster pins the opponent on the ground and stomps on them.

  • Neutral Special - Flamethrowers: Heavy Lobster activates the flamethrowers in its claws, spewing streams of flame forward. One stream will always travel forward, but the other can be aimed with the control stick, covering more range. It damages opponents multiple times if they get caught in them. Heavy Lobster can continue spewing flames by holding the special button, though doing so for too long will cause them to overheat and eventually explode, dealing recoil damage and leaving the move unusable for a short time. This explosion, however, can deal heavy damage and knockback.
    • Custom 1 - Flameblower: The streams of flames travel much farther, and the second stream can be aimed in a wider range of angles, though the move overheats faster.
    • Custom 2 - Icethrower: Heavy Lobster spews ice from its claws instead of flames. It deals less damage, but it takes longer to overheat and can freeze opponents.
    • Custom 3 - Exhaust Flamethrower: Instead of overheating, the streams of flame will get gradually smaller and weaker as the special button is held, and will recharge when not in use.
  • Side Special - Heavy Slide: Heavy Lobster activates its jet thrusters and boosts forward. On the ground, it will grind across the ground, and bury opponents it runs over. In the air, it instead launches them, and it falls into a helpless state afterwards. It has super armor while using the move.
    • Custom 1 - Heavy Dash: Heavy Lobster travels faster and farther, but it loses the super armor.
    • Custom 2 - Heavy Grind: Heavy Lobster will damage opponents multiple times before launching them instead of burying them. It travels slightly slower.
    • Custom 3 - Fiery Heavy Slide: Heavy Lobster deals less damage, but if used on the ground, it will leave behind a trail of flames that gradually damage opponents that step in it.
  • Up Special - Jet Boost: Heavy Lobster activates its jet thrusters and propels itself upward, damaging opponents it hits. It can stop and change directions, and can move upward, forward, or backward. It doesn't enter a helpless state afterwards and can cancel the move into any attack, though eventually it will run out of fuel. The move will recharge when not in use.
    • Custom 1 - Turbulent Jet Boost: Heavy Lobster can't travel as far, but when it initially lifts from the ground, it creates windboxes that heavily push nearby opponents back.
    • Custom 2 - Rocket Boost: Heavy Lobster will only fly upward a short time before falling into a helpless state after reaching apex height, though it deals much more damage.
    • Custom 3 - Armored Jet Boost: Heavy Lobster has super armor while using the move, but it can't damage opponents.
  • Down Special - Mini Lobster: Heavy Lobster creates a smaller version of itself that quickly boosts around the area. If it touches an opponent, it will explode. Two Mini Lobsters can be at play at a time.
    • Custom 1 - Mini Chaser: The Mini Lobsters will pursue the opponent, though they deal less damage.
    • Custom 2 - Mini Jet: The Mini Lobsters will use their jet thrusters to fly forward through the air instead of moving across the ground.
    • Custom 3 - Mega Lobster: The Mini Lobsters are larger and can deal much more damage, but are slower and only one can be at play at a time.
  • Final Smash - Combo Cannon: The Combo Cannon falls on the stage where Heavy Lobster is, and begins attacking. It will fire exploding cannonballs while the claw will move around and damage opponents. It finishes with a large laser blast that damages opponents multiple times before launching them before it disappears. Heavy Lobster can move freely during all of thus.
  • Charged State - Heavy Duty Lobster: Heavy Lobster's body quickly becomes upgraded, sporting a silvery sheen and metallic armor. In this state, its universal super armor is increased, and it's a lot heavier to boot. Its attacks also deal more damage and knockback.

  • Wolf
    Star Fox 64 (1997)
    Wolf (ウルフ, Wolf), full name Wolf O'Donnell, is a recurring character in the Star Fox series, acting as a rival to Fox. He leads his own mercenary crew called Star Wolf, who pilot specialized ships called Wolfens. Though similar to Awrings, they actually have better flight and combat capabilities. Wolf and his gang are notorious criminals in the Lylat System, and often take up jobs for money. This has led him to have a huge bounty on his head.

    Like Fox and Falco, Wolf possesses supreme mobility overall, with fast ground and air speed, high falling speed, and above-average jump height. He has a good approaching game, with fast attacks that can combo into each other and special moves with high utility. However, he has a pretty poor recovery, and he can find it difficult to make it back to the stage after being launched.

    Wolf's moveset, like Falco's, has gone through some changes to further differentiate himself from Fox. His main moveset consists of claw swipes and kicks, and is generally more feral. He uses his gear differently from Fox as well.
    SSB Star Fox Series WolfHeadSSBU SSBB Icon
    Wolf's Moveset

    • Neutral Attack: Wolf throws two alternating claw swipes followed by a lunging bite.
    • Forward Tilt: Wolf leans forward before throwing an outward claw swipe with both hands.
    • Forward Smash: Wolf lunges forward while throwing a palm strike.
    • Up Tilt: Wolf throws a stretch kick.
    • Up Smash: Wolf throws a flipping scissor kick.
    • Down Tilt: Wolf throws a claw swipe across the ground. The move can trip opponents.
    • Down Smash: Wolf throws claw swipes on either side of his body.
    • Dash Attack: Wolf throws a flip kick out of a run.
    • Counter: Wolf throws a downward claw swipe.

  • Neutral Aerial: Wolf throws a sex kick.
  • Forward Aerial: Wolf throws a claw swipe forward.
  • Forward Crash: Wolf throws a roundhouse kick.
  • Back Aerial: Wolf throws a back kick.
  • Back Crash: Wolf throws a claw swipe backward.
  • Up Aerial: Wolf swipes his claws upward in an overarching motion.
  • Up Crash: Wolf throws a scissor kick.
  • Down Aerial: Wolf swipes both of his claws downward. The move can meteor smash opponents.
  • Down Crash: Wolf throws four claw swipes downward, damaging opponents multiple times before launching them.

  • Grab: Wolf reaches out to grab the opponent.
  • Pummel: Wolf bites the opponent.
  • Forward Throw: Wolf slashes the opponent with his claws, launching them forward.
  • Back Throw: Wolf turns around and slashes the opponent with his claws, launching them backward.
  • Up Throw: Wolf flings the opponent upward and leaps to slash them with his claws.
  • Down Throw: Wolf slams the opponent into the ground.

  • Neutral Special - Blaster: Wolf pulls out his Blaster and shoots a laser. The Blaster itself has a spike on it that can damage nearby opponents. The laser travels sluggishly through the air, but deals moderate damage. If the special button is tapped repeatedly, he can continually fire lasers before putting the Blaster away.
    • Custom 1 - Sharp Blaster: The lasers travel less distance and deal less damage, but the spike on the Blaster deals more knockback.
    • Custom 2 - Rapidfire Blaster: There is no spike on the Blaster that can damage opponents, but the Blaster has a faster fire rate and lasers travel faster.
    • Custom 3 - Nova Blaster: Lasers fired from the Blaster travel much slower. They damage opponents multiple times before exploding, launching them.
  • Side Special - Violent Wolf: Wolf dashes forward a short distance, falling into a helpless state afterwards if used in midair. If he hits an opponent while dashing, he will begin throwing a flurry of claw swipes before launching them with an axe kick that meteor smashes them. After this, he gains a slight burst of vertical momentum and can use the move again.
    • Custom 1 - Wolf Illusion: Wolf doesn't grab opponents during his dash, and instead simply launches them. He travels significantly farther.
    • Custom 2 - Wolf Kick: Wolf stalls for a moment before kicking forward, damaging opponents multiple times before launching them.
    • Custom 3 - Feral Wolf: Wolf finishes with an upward claw swipe instead of an axe kick. The move deals more damage and knockback, but will not meteor smash opponents.
  • Up Special - Wolf Flash: Wolf dashes in the direction the control stick is held in at warp speed, falling into a helpless state afterwards. He damages opponents he dashes through, but if he hits an opponent at the end of the dash, he throws a downward claw swipe that meteor smashes them. If this happens, he can use the move again.
    • Custom 1 - Wolf Phase: Wolf travels more distance, but will not damage opponents he dashes into.
    • Custom 2 - Wolf Rush: Wolf damages opponents multiple times before launching them as he dashes. He does not meteor smash opponents.
    • Custom 3 - Wolf Leap: Wolf will only travel straight upward, but he travels much more distance and cannot be damaged while dashing.
  • Down Special - Reflector: Wolf activates his Reflector, and can keep it active if the special button is held. The Reflector will reflect projectiles, but also deal light damage as soon as it's active. This will meteor smash opponents.
    • Custom 1 - Shine Reflector: Wolf gains some frames of invincibility by using the move, but it will not meteor smash opponents.
    • Custom 2 - Rebounder: The Reflector sends opponents upward instead of meteor smashing them.
    • Custom 3 - Absorber: The Reflector absorbs projectiles and replenish Wolf's damage instead of reflecting them. He will not damage opponents.
  • Final Smash - Team Star Wolf: Wolf summons his Wolfen, which flies across the stage in front of him. If it hits an opponent, they are locked in an animation where they are launched into an asteroid. Wolf and the rest of the Star Wolf team come cruising through space in their Wolfens, shooting at the asteroid to destroy it. This sends the opponents back to the stage, launching them.
  • Charged State - Upgrade: A box drops from above, which Wolf grabs to reveal a Wolfen Upgrade. He uses it and begins glowing red aura. In this state, his weapons cover more range and deal more damage, and his kicks have more KO power. His recovery is also a lot better, with higher jump height and Wolf Flash travelling farther distance.

  • Leon
    Star Fox 64 (1997)
    LeonCharged
    Leon (レオン, Leon), full name Leon Powalski, is a recurring antagonist Star Fox series. He is a member of the mercenary team Star Wolf, and has been a member since it was first founded. Wolf's most trusted ally and a rival to Falco, he is a cold-blooded assassin who takes up any work for money. Like the rest of his team, he pilots a Wolfen, and battles Star Fox from time to time.

    In terms of stats, Leon has quick overall mobility, including fast falling speed. In general, he has a good combo game, with quick attacks that can combo into each other. Like Wolf, he has special moves with a lot of utility, though he also has high jump height, which helps tremendously with approaching, recovery, and continuing combo strings.

    Leon's moveset is most similar to Wolf's, specifically in special moves, though his gear has different properties to them. His normal moveset consists of punches and kicks, as well as moves that take advantage of his flexible figure.
    SSB Star Fox Series Leon Stock Icon SSBCharged Icon
    Leon's Moveset

    • Neutral Attack: Leon throws a hook followed by a knifehand strike.
    • Forward Tilt: Leon throws a palm thrust.
    • Forward Smash: Leon jumps forward while throwing a kick.
    • Up Tilt: Leon throws a stretch kick.
    • Up Smash: Leon performs a backflip to kick upward.
    • Down Tilt: Leon swipes with his tail.
    • Down Smash: Leon throws a split kick.
    • Dash Attack: Leon lunges forward while throwing a knee strike.
    • Counter: Leon turns invisible, then reappears behind the opponent to kick them.

  • Neutral Aerial: Leon throws three flying kicks in rapid succession.
  • Forward Aerial: Leon swings his tail in front of himself.
  • Forward Crash: Leon throws a flying kick.
  • Back Aerial: Leon swings his tail behind himself.
  • Back Crash: Leon throws a back kick.
  • Up Aerial: Leon waves his hand above himself in an overarching motion.
  • Up Crash: Leon throws a scissor kick upward.
  • Down Aerial: Leon throws a drill kick, damaging opponents multiple times before launching them.
  • Down Crash: Leon throws a stomp downward. The move can meteor smash opponents.

  • Grab: Leon sticks out his tongue to grab opponents. This can also be used as a tether grab.
  • Pummel: Leon knee strikes the opponent.
  • Forward Throw: Leon flings the opponent forward.
  • Back Throw: Leon spins around and throws the opponent backward.
  • Up Throw: Leon heaves the opponent upward before kicking them away.
  • Down Throw: Leon pins his opponent on the ground before firing his Blaster at them.

  • Neutral Special - Blaster: Leon pulls out his Blaster and fires a laser. There is noticeable startup and endlag, but the laser deals heavy damage and knockback.
    • Custom 1 - Angled Blaster: The lasers travel less distance, but using directional inputs, they can be fired in different angles.
    • Custom 2 - Rapidfire Blaster: The lasers deal much less damage and knockback, but the move has much less startup and endlag.
    • Custom 3 - Nova Blaster: Lasers fired from the Blaster travel much slower. They damage opponents multiple times before exploding, launching them.
  • Side Special - Cold Assassin: Leon disappears before reappearing a short distance away, falling into a helpless state if he ends up in midair. If any opponents are in his path after he disappears, he will throw a series of punches and kicks while invisible, knocking them upward afterwards before reappearing. After this, the move can be used again.
    • Custom 1 - Meteor Assassin: Leon meteor smashes opponents instead of knocking them upward. The move deals less damage overall.
    • Custom 2 - Merciless Assassin: Instead of stopping to damage opponents while invisible, he damages them multiple times as he travels before launching them.
    • Custom 3 - Cruel Assassin: Leon deals more damage to opponents, but he can't travel as far.
  • Up Special - Leon Phase: Leon rushes in the direction the control stick is held in. He damages opponents he hits, but if he hits an opponent at the end of the dash, he throws a kick that deals heavy damage and knockback. After this, he can use the move again. Otherwise, he falls into a helpless state afterwards.
    • Custom 1 - Leon Flash: Leon travels less distance, but the end of the dash can meteor smash opponents if it connects.
    • Custom 2 - Leon Rush: Leon damages opponents multiple times before launching them as he dashes.
    • Custom 3 - Leon Leap: Wolf will only travel straight upward, but he travels much more distance and cannot be damaged while dashing.
  • Down Special - Reflector: Leon activates his Reflector, and can keep it active if the special button is held. The Reflector will reflect projectiles, but also deal light damage as soon as it's active. This will meteor smash opponents.
    • Custom 1 - Shine Reflector: Leon gains some frames of invincibility by using the move, but it will not meteor smash opponents.
    • Custom 2 - Rebounder: The Reflector sends opponents upward instead of meteor smashing them.
    • Custom 3 - Absorber: The Reflector absorbs projectiles and replenish Leon's damage instead of reflecting them. He will not damage opponents.
  • Final Smash - Team Star Wolf: Leon summons his Wolfen, which flies across the stage in front of him. If it hits an opponent, they are locked in an animation where they are launched into an asteroid. Leon and the rest of the Star Wolf team come cruising through space in their Wolfens, shooting at the asteroid to destroy it. This sends the opponents back to the stage, launching them.
  • Charged State - Upgrade: A box drops from above, which Leon grabs to reveal a Wolfen Upgrade. He uses it and begins glowing red aura. In this state, his weapons cover more range and deal more damage, and his kicks have more KO power. His recovery is also a lot better, with higher jump height and Leon Phase travelling farther distance.

  • Pigma
    Star Fox 64 (1997)
    Starlink Pigma
    Pigma (ピグマ, Pigma), full name Pigma Dengar, is a recurring character in the Star Fox series. He was a member of the original Star Fox team, consisting of James McCloud and Peppy Hare. However, he betrayed the team for Andross, and later joined Star Wolf. He is sadistic, greedy, and cowardly, and it was these traits and his untrustworthiness that ended up getting him booted from the team.

    Pigma has similar stats to his fellow Star Fox characters, such as quick falling speed and fast attacks. However, he differs from them greatly as he has elements of a heavyweight fighter, including high weight, overall slow mobility, and strong finishers. Despite these good traits, he has a mediocre recovery, and hardly has any tools for edgeguarding.

    Pigma's moveset is mostly comical, using is portly proportions in various ways rather than actually attacking.He does have gear, but it either backfires or is utilized differently.
    SSB Star Fox Series Pigma Stock Icon SSBCharged Icon
    Pigma's Moveset

    • Neutral Attack: Pigma throws two alternating punches.
    • Forward Tilt: Pigma throws a front kick.
    • Forward Smash: Pigma leaps forward while thrusting his belly forward.
    • Up Tilt: Pigma throws an uppercut.
    • Up Smash: Pigma raises both of his hands into the air.
    • Down Tilt: Pigma stomps on the ground. The move can bury opponents.
    • Down Smash: Pigma leaps upward and performs a belly flip.
    • Dash Attack: Pigma trips and falls over.
    • Counter: Pigma thrusts his stomach outward.

  • Neutral Aerial: Pigma extends his stomach outward.
  • Forward Aerial: Pigma throws a sex kick.
  • Forward Crash: Pigma throws a hip thrust.
  • Back Aerial: Pigma lunges his entire body backward.
  • Back Crash: Pigma turns around and throws a punch.
  • Up Aerial: Pigma throws an upward headbutt.
  • Up Crash: Pigma spins around, damaging opponents multiple times before launching them.
  • Down Aerial: Pigma throws three stomps in rapid succession.
  • Down Crash: Pigma performs a stall-then-fall belly flip.

  • Grab: Pigma reaches out to grab the opponent.
  • Pummel: Pigma headbutts the opponent.
  • Forward Throw: Pigma spins around and flings the opponent forward.
  • Back Throw: Pigma hip thrusts the opponent, launching them backward.
  • Up Throw: Pigma heaves the opponent upward.
  • Down Throw: Pigma slams the opponent into the ground.

  • Neutral Special - Blaster: Pigma pulls out his Blaster and fires a laser. By holding the special button, the move will charge, allowing it to deal more damage and knockback. However, if he charges the move for too long, it will explode and leave him vulnerable for a short time.
    • Custom 1 - Stun Blaster: The Blaster takes longer to charge, but the lasers will inflict paralysis on opponents.
    • Custom 2 - Ranged Blaster: The lasers travel farther, but deal less damage.
    • Custom 3 - Quickfire Blaster: Lasers deal less damage, but they take less time to fully charge.
  • Side Special - Fire Mine: Pigma throws a mine forward, which explodes into a pillar of flames that damages opponents multiple times before launching them. The arc the mine is thrown in can be changed with directional inputs.
    • Custom 1 - Blast Mine: The mine explodes instead of creating a pillar of fire, dealing heavy damage and knockback.
    • Custom 2 - Timed Mine: The pillar of flames lasts longer and deals more damage, but the mine explodes a few seconds after it has been thrown instead of on contact.
    • Custom 3 - Trap Mine: The mine detonates when an opponent touches it rather than on contact with the ground.
  • Up Special - Fried Pigma: Pigma ignites himself in flames, exploding shortly afterwards and flying upward, falling into a helpless state afterwards. Hos trajectory can be angled with directional inputs. The explosion deals massive damage and knockback, but Pigma is left vulnerable for the rest of the move.
    • Custom 1 - Rocketing Pigma: The explosion deals less damage and knockback, but Pigma himself damages opponents he flies into.
    • Custom 2 - Blasted Pigma: Pigma travels more distance, but he can only fly straight upward.
    • Custom 3 - Deep-Fried Pigma: The explosion is much larger and Pigma flies slightly higher, dealing more damage and knockback. However, Pigma also takes 10% recoil damage after using the move.
  • Down Special - Reflector: Pigma activates his Reflector, and can keep it active if the special button is held. The Reflector will reflect projectiles, but also deal light damage as soon as it's active.
    • Custom 1 - Shine Reflector: Pigma gains some frames of invincibility by using the move, but it reflected projectiles deal less damage.
    • Custom 2 - Thrown Reflector: Pigma throws the Reflector forward, which returns to him like a boomerang. It cannot meteor smash opponents.
    • Custom 3 - Absorber: The Reflector absorbs projectiles and replenish Pigma's damage instead of reflecting them. He will not damage opponents.
  • Final Smash - Team Star Wolf: Pigma summons his Wolfen, which flies across the stage in front of him. If it hits an opponent, they are locked in an animation where they are launched into an asteroid. Pigma and the rest of the Star Wolf team come cruising through space in their Wolfens, shooting at the asteroid to destroy it. This sends the opponents back to the stage, launching them.
  • Charged State - Upgrade: A box drops from above, which Pigma grabs to reveal a Wolfen Upgrade. He uses it and begins glowing red aura. In this state, his weapons cover more range and deal more damage, and his kicks have more KO power. His recovery is also a lot better, with higher jump height and Fried Pigma travelling farther distance.

  • Jigglypuff
    Pokémon Red and Pokémon Green (1996)
    Jigglypuff SSBUltimate
    Jigglypuff (プリン, Purin) is a Normal / Fairy dual-type Balloon Pokémon introduced in Generation I. It evolves from Igglybuff and evolves into Wigglytuff. It is known for its ability to sing, performed by inflating its body to empower its lungs. The lullabies it sings are known for putting its opponent to sleep. However, since some Pokémon are naturally resilient to its singing, its life may be in danger since it cab't breathe while singing.

    Jigglypuff has the fastest air speed in the game, which allows it to float swiftly through the air an utilize its powerful aerial moves. While it is also the lightest character in the game, this air speed and five midair jumps give it an extremely reliable recovery. Its ground attacks are also strong, being able to deal heavy damage and kncokback. However, they lack range and are hard to land due to Jigglypuff's sluggish ground speed. Uniquely however, if its shield is broken, it undergoes a shield jump so high it reaches the upper blast zone, KOing itself.

    Most of Jigglypuff's moveset relies on its round body. Though this gives it less than favorable range, its attacks are rather strong and can KO reliably. Its special moves are extremely unorthodox, but are very useful in certain situations.
    SSB Pokemon Series JigglypuffHeadSSBU SSB64 Icon
    Jigglypuff's Moveset

    • Neutral Attack: Jigglypuff throws two alternating jabs.
    • Forward Tilt: Jigglypuff throws a roundhouse kick.
    • Forward Smash: Jigglypuff throws a leaping kick forward.
    • Up Tilt: Jigglypuff throws a scorpion kick.
    • Up Smash: Jigglypuff throws an upward headbutt.
    • Down Tilt: Jigglypuff throws a shin kick.
    • Down Smash: Jigglypuff performs a split kick. The move has windboxes that can push opponents away.
    • Dash Attack: Jigglypuff performs a leaping headbutt.
    • Counter: Jigglypuff inflates, damaging the opponent.

  • Neutral Aerial: Jigglypuff throws a sex kick.
  • Forward Aerial: Jigglypuff throws a flying kick.
  • Forward Crash: Jigglypuff throws a dropkick.
  • Back Aerial: Jigglypuff throws a back kick.
  • Back Crash: Jigglypuff thrusts its head backward.
  • Up Aerial: Jigglypuff waves its hand upward in an overarching motion.
  • Up Crash: Jigglypuff performs an upside down corkscrew kick, damaging opponents multiple times before launchin them.
  • Down Aerial: Jigglypuff performs a corkscrew stomp that damages opponents multiple times before launching them.
  • Down Crash: Jigglypuff stomps downward. The move can meteor smash opponents.

  • Grab: Jigglypuff reaches out to grab the opponent.
  • Pummel: Jigglypuff slaps the opponent.
  • Forward Throw: Jigglypuff inflates itself, pushing the opponent forward.
  • Back Throw: Jigglypuff performs a suplex, sending the opponent backward.
  • Up Throw: Jigglypuff flings the opponent upward.
  • Down Throw: Jigglypuff pins the opponent on the ground and angrily rolls on their back.

  • Neutral Special - Rollout: Jigglypuff spins in place for a short time before rocketing forward at full speed, damaging opponents it hits. While rolling, directional inputs ca be used to change direction. It will also not roll off ledges unless the direction is held.
    • Custom 1 - Relentless Rollout: Jigglypuff cannot travel as far, but it damages opponents multiple times before launching them.
    • Custom 2 - Raging Rollout: Jigglypuff can't change direction while moving and the move has more startup and endlag, but it does deal more damage and knockback.
    • Custom 3 - Romping Rollout: Jigglypuff only rolls a short distance forward, but it buries opponents it rolls over. Airborne opponents will suffer light knockback.
  • Side Special - Wake-Up Slap: Jigglypuff slides forward while punching. The move deals three times as much damage and knockback to opponents that are asleep. The punch also deals heavy shield damage, almost breaking a full one.
    • Custom 1 - Sideways Slap: Jigglypuff slides farther along the ground, but the move deals less damage.
    • Custom 2 - Slap Blitz: Jigglypuff slowly slides across the ground while punching, damaging oppnents multiple times before launching them.
    • Custom 3 - Meteor Slap: Jigglypuff doesn't deal triple damage to sleeping opponents or deal significant shield damage, but it will punch downward when it hits an opponent, burying or meteor smashing them.
  • Up Special - Sing: Jigglypuff sings a lullaby. Opponents around it will fall asleep, leaving them vulnerable. If it manages to make an opponent fall asleep, it can be cancelled into any other move.
    • Custom 1 - Hyper Voice: Instead of causing opponents to fall asleep, Jigglypuff damages them.
    • Custom 2 - Screech: Instead of causing opponents to fall asleep, Jigglypuff causes windboxes as it sings, pushing opponents back.
    • Custom 3 - Sing Plus: Jigglypuff covers a wider area while singing, but it cannot cancel the move if it manages to cause an opponent to fall alseep.
  • Down Special - Rest: Jigglypuff falls asleep before waking up after a short time. Just as it falls asleep, a burst of energy is released, dealing heavy damage and knockback to opponents touching it, as well as causing a flower to grow on their head. Additionally, as it sleeps, it will begin replenishing health, restoring 15% damage if not interrupted. Repeated uses of the move will decrease how much it heals however. Has a lot of endlag, making it extremely vulnerable.
    • Custom 1 - Deep Sleep: Jigglypuff doesn't damage opponents, but as it sleeps, it can heal 25% damage if left undisturbed.
    • Custom 2 - Wakie Wakie: Jigglypuff deals less damage as it sleeps, but it creates an explosion once it wakes up, launching any opponents in the blast radius.
    • Custom 3 - Heavy Sleeper: Jigglypuff has super armor as it's sleeping. However, it deals less knockback and will not replenish health as it sleeps.
  • Final Smash - Twinkle Tackle: Jigglypuff pulls out a microphone and sings into it, causing stars to bounce around the stage, ricocheting off the surfaces and screen edges. If an opponent is hit by one of the stars, they will become stunned. Jigglypuff will then roll into all of them, dealing heavy damage and knockback.
  • Charged State - Puff Up: Jigglypuff inflates itself to massive size, allowing it to deal more damage and and cover more range. Though it is a bigger target in this state, it is also significantly heavier, making it more difficult to KO.

  • Pichu
    Pokémon Gold and Pokémon Silver (1999)
    Pichu SSBUltimate
    Pichu (ピチュー, Pichu) is an Electric-type Tiny Mouse Pokémon introduced in Generation II. It evolves into Pikachu, which evolves into Raichu. It is a social Pokémon known for its playfulness and mischievous behavior. It has the ability to store electricity, and may discharge it when amused, startled, or shocked. However, because this skill is underdeveloped, it will damage itself when it happens. Pichu are commonly found in groups, and will touch tails with each other to create a shower of sparks as a show of courage.

    Pichu is one of the lightest characters in the game. Though it can be easy to launch, it has good mobility overall, with quick ground and air speed. Its attacks are also surprisingly powerful, being able to KO opponents easily. Uniquely, any electric-based attacks that hit opponents will cause it to suffer recoil damage. When it accumulates 30% damage from these attacks however, Pichu will begin discharging electricity around its body. When this happens, Pichu's electric attacks are able to deal more damage. Furthermore, every time it takes 10% damage after this effect takes place, it continues to grow stronger. This caps when it takes 60% recoil damage total. It should be noted that only recoil damage from attacks that successfully hit opponents will count towards this mechanic.

    Pichu has low range overall, so it can be difficult for it to hit opponents with attacks that aren't electric-based. It is also noticeably different in terms of moveset to Pikachu, who it as considered a clone of in previous games. Overall, though it is light and can be KO'ed easily, Pichu can deal heavy damage to opponents, as well as effectively combo them.
    SSB Pokemon Series PichuHeadSSBU SSBM Icon
    Pichu's Moveset

    • Neutral Attack: Pichu throws a kick, followed by a tail whip, followed by a headbutt.
    • Forward Tilt: Pichu throws a spinning kick.
    • Forward Smash: Pichu discharges electricity from its cheeks in front of itself, damaging opponents multiple times before launching them. The attack deals 3% recoil damage if all hits connect.
    • Up Tilt: Pichu swing sits tail in an overarching motion.
    • Up Smash: Pichu throws an upward headbutt.
    • Down Tilt: Pichu swipes its tail along the ground.
    • Down Smash: Pichu quickly spins in place while emitting electricity, damaging opponents multiple times before launching them. The attack deals 6% recoil damage if all hits connect.
    • Dash Attack: Pichu performs a leaping headbutt.
    • Counter: Pichu shocks the opponent, inflicting paralysis on them. The attack deals 1% recoil damage.

  • Neutral Aerial: Pichu performs a somersault.
  • Forward Aerial: Pichu performs an electrically-charged horizontal corkscrew spin, damaging opponents multiple times before launching them. The attack deals 2% recoil damage if all hits connect.
  • Forward Crash: Pichu throws a downward headbutt while performing a somersault. The attack can meteor smash opponents.
  • Back Aerial: Pichu spins around with its arms and legs outstretched, damaging opponent multiple times before launching them.
  • Back Crash: Pichu throws an electrically-charged back kick. The attack deals 3% recoil damage.
  • Up Aerial: Pichu performs a forward flip to swing its tail upward.
  • Up Crash: Pichu performs a back flip to swing its tail upward, discharging electricity with it. The move deals 2% recoil damage.
  • Down Aerial: Pichu performs a front flip to swing its tail downward.
  • Down Crash: Pichu performs an electrically-charged downward corkscrew spin, damaging opponents multiple times before launching them. The attack deals 5% recoil damage if all hits connect.

  • Grab: Pichu reaches out to grab the opponent.
  • Pummel: Pichu shocks the opponent. The attack deals 1% recoil damage.
  • Forward Throw: Pichu places the opponent on its back and shocks them. The attack deals 2% recoil damage.
  • Back Throw: Pichu rolls backward with the opponent and throws them.
  • Up Throw: Pichu flings the opponent upward.
  • Down Throw: Pichu pins the opponent on the ground and body slams them.

  • Neutral Special - Electro Ball: Pichu discharges electricity from its cheeks in the form of an orb of electricity that slowly travels forward. The orb will lightly home in on nearby opponents and damage them multiple times as it passes through them. The move deals 3% recoil damage regardless if the orb attacks opponents or not.
    • Custom 1 - Electroweb: The orb of electricity travels much faster in a straight line. If it hits an opponent, it expands into a web of electricity that damages opponents multiple times before launching them. The orb does not home in on opponents.
    • Custom 2 - Spark: The orb of electricity is much smaller and travels through the air faster. Instead of damaging opponents multiple times, it inflicts paralysis on them.
    • Custom 3 - Zap Cannon: The orb of electricity is larger and travels slower. It launches opponents rather than damaging them multiple times, and it will not pass through them, as it explodes on contact.
  • Side Special - Fling: Pichu leaps forward, damaging opponents it hits. If used in midair, it enters a semi-helpless state afterwards. If the special button is pressed again, it discharges electricity around itself, dealing more damage, though also dealing 5% recoil damage.
    • Custom 1 - Wild Charge: Pichu travels less distance, but the electric discharge covers more range and deals more damage.
    • Custom 2 - Volt Tackle: Pichu grabs an opponent if it hits one as it leaps. It then shocks them with electricity before leaping off of them.
    • Custom 3 - Fling Far: Pichu leaps farther, but cannot damage opponents.
  • Up Special - Agility: Pichu dashes in the direction the control stick is held in at warp speed. The move can be performed up to three times in rapid succession before it falls into a helpless state afterward. If the special button is held, Pichu will only dash once, but will discharge a massive amount of electricity around itself that deals heavy damage to opponents. This deals 6% recoil damage.
    • Custom 1 - Quick Feet: Pichu travels faster, but there is a longer delay between dashes, making it more vulnerable.
    • Custom 2 - Quick Attack: Pichu can only dash twice, but it deals electric damage to opponents as it moves. The first use deals 1% recoil damage, while the second deals 3% recoil damage.
    • Custom 3 - Volt Switch: Pichu discharges small bursts of electricity at the end of each dash, which deal 2% recoil damage each. There is no stronger variant if the special button is held.
  • Down Special - Thunder: A bolt of lightning crashes on Pichu from above. It damages opponents multiple times before launching them, and if the bolt touches Pichu, it discharges electricity that deals heavy damage and knockback. The attack deals 4% recoil damage.
    • Custom 1 - Discharge: There is no lightning bolt. Instead, Pichu simply discharges electricity in a massive blast. The attack deals 7% recoil damage.
    • Custom 2 - Thunder Shock: Pichu doesn't discharge electricity if the lightning bolt hits it. The bolt also inflicts paralysis on opponents instead of damaging them multiple times.
    • Custom 3 - Fusion Bolt: The lightning bolt crashes on a random opponent instead of Pichu.
  • Final Smash - Volt Tackle: Pichu surrounds itself in electricity as it dashes around the stage, damaging opponents multiple times before launching them with a stage-wide burst of electricity.
  • Charged State - Ion Deluge: Pichu enters a state where its electric attacks are even stronger than when it receives 60% total recoil damage. These attacks deal more damage and knockback, and don't even deal recoil damage. Pichu will also lightly shock opponents with electricity when they touch it.

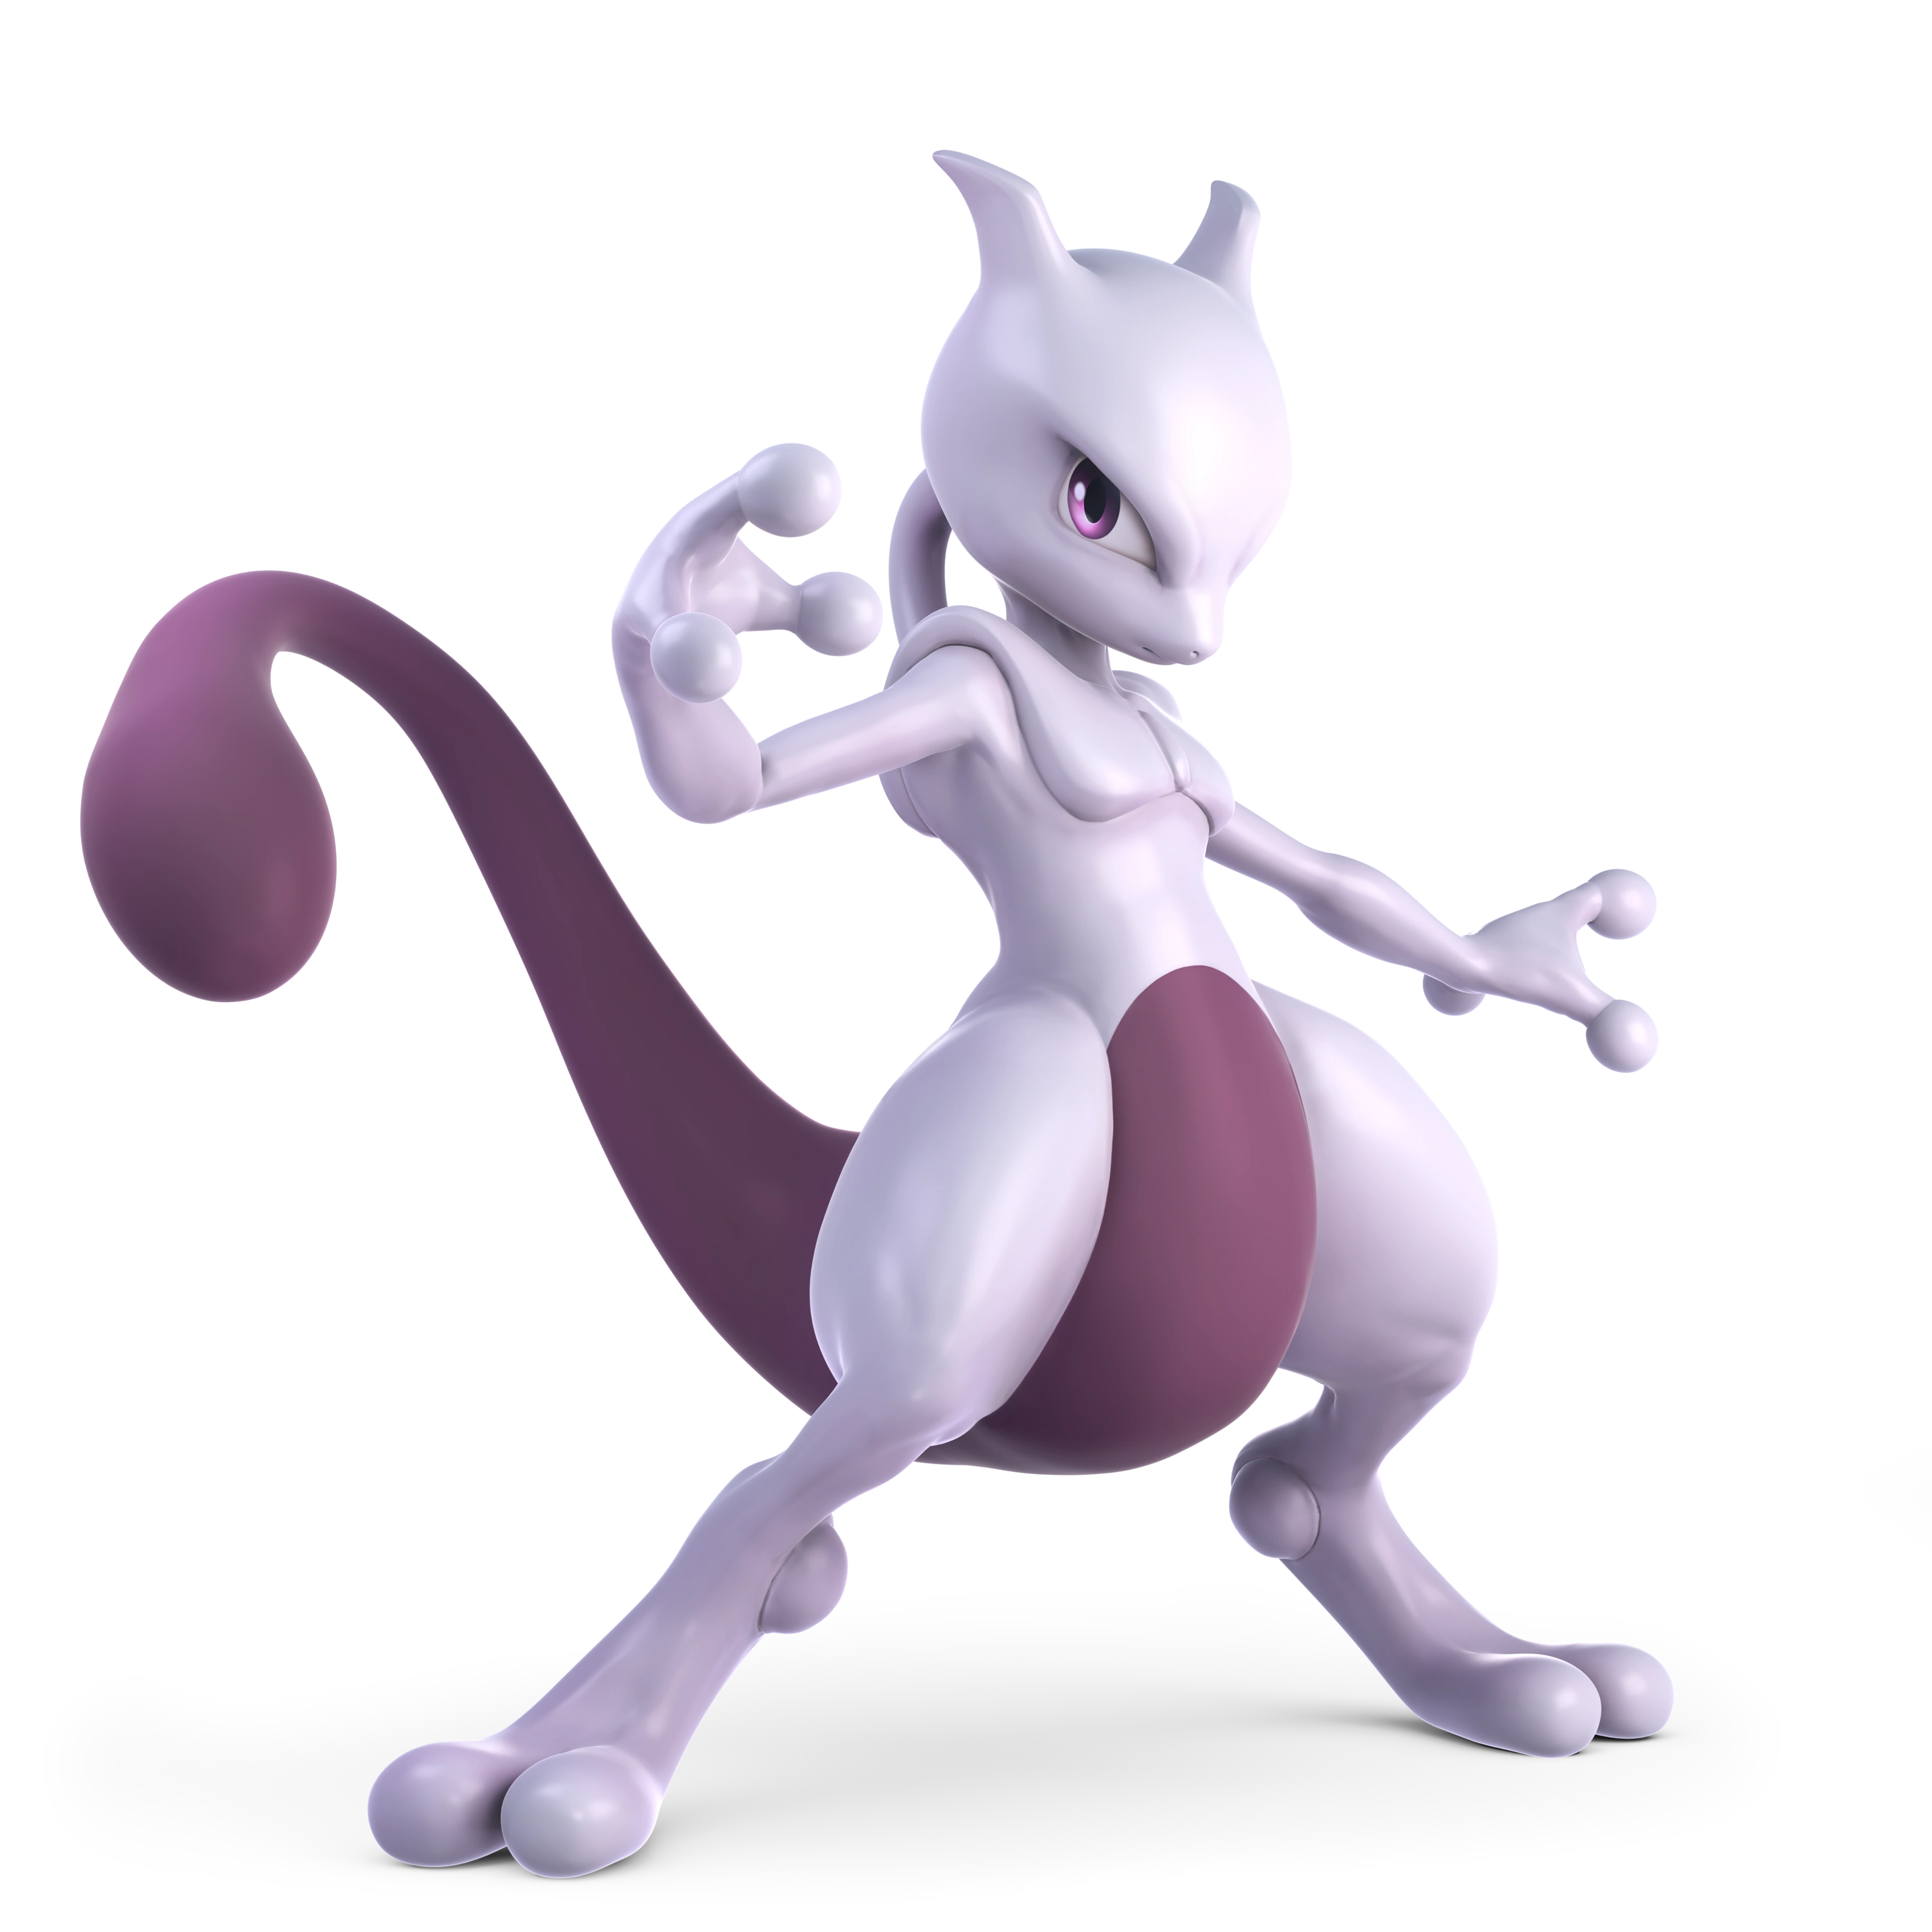
  • Mewtwo
    Pokémon Red and Pokémon Green (1996)
    Mewtwo (ミュウツー, Mewtwo) is a Psychic-type Legendary Pokémon introduced in Generation I. It is not known to evolve into or from any known Pokémon. It was created by science to be the ultimate Pokémon, made after years of genetic splicing from Mew's DNA. It is said to have the most savage heart of all Pokémon, lacks compassion, and strikes fear into others with its eyes. Since it was created as the ultimate Pokémon, it can only think about defeating its foes.

    Mewtwo is very polarizing as a fighter; despite having powerful moves and having a relatively large frame, it is one of the lightest characters in the game and possesses good mobility. It also boasts high jump height, with a very good double jump, and particularly low gravity that allows it to maneuver around the air unlike any other character. This also helps Mewtwo when recovering. Because of all of these attributes, Mewtwo ca e considered a glass cannon, having powerful attacks that can KO early but also being rather vulnerable itself.

    Mewtwo's best attacks are its aerials, which have a variety of uses from comboing to KOing. Most of its moveset consists of psychic attacks with unique and strange properties; it rarely attacks physically, though some attacks involve swiping its long tail.
    SSB Pokemon Series MewtwoHeadSSBU SSBM Icon
    Mewtwo's Moveset

    • Neutral Attack: Mewtwo extends its arm to emit a pulse of dark energy, before swaying its arm up and down to emit multiple pulses, damaging opponents multiple times before launching them with a larger pulse.
    • Forward Tilt: Mewtwo spins around to swing its tail forward.
    • Forward Smash: Mewtwo throws a double pal thrust forward while emitting a blast of dark energy forward.
    • Up Tilt: Mewtwo performs a backflip to swing its tail upward.
    • Up Smash: Mewtwo thrusts its arm upward to emit a blast of dark energy, damaging opponents multiple times before launching them.
    • Down Tilt: Mewtwo crouches and spins around to swing its tail forward. The move can trip opponents.
    • Down Smash: Mewtwo points at the ground in front of itself and emits a blast of dark energy on the ground, then turns around and does the same behind itself.
    • Dash Attack: Mewtwo throws a lunging palm thrust, emitting a blast of dark energy.
    • Counter: Mewtwo throws a palm thrust while emitting dark energy.

  • Neutral Aerial: Mewtwo emits electric energy around itself, damaging opponents multiple times before launching them.
  • Forward Aerial: Mewtwo swipes its arm forward while emitting dark energy.
  • Forward Crash: Mewtwo closes its eyes and emits a giant blast of dark energy in front of itself.
  • Back Aerial: Mewtwo swings its tail behind itself in an upward arc.
  • Back Crash: Mewtwo closes its eyes and emits a giant blast of dark energy behind itself.
  • Up Aerial: Mewtwo backflips to swing its tail upward.
  • Up Crash: Mewtwo closes its eyes and emits a giant blast of dark energy above itself.
  • Down Aerial: Mewtwo backlfips before throwing a stomp while emitting dark energy. The move can meteor smash opponents.
  • Down Crash: Mewtwo closes its eyes and emits a giant blast of dark energy below itself. The move can meteor smash opponents/

  • Grab: Mewtwo telekinetically grabs an opponent.
  • Pummel: Mewtwo releases a pulse of dark energy on the opponent.
  • Forward Throw: Mewtwo lifts the opponent telekinetically diagonally upward before throwing several spheres of dark energy at them.
  • Back Throw: Mewtwo telekinetically throws the opponent backward.
  • Up Throw: Mewtwo telekinetically spins the opponent around itself before throwing them upward.
  • Down Throw: Mewtwo telekinetically slams them into the ground before backflipping to strike them with its tail.

  • Neutral Special - Shadow Ball: Mewtwo creates a sphere of dark energy from its hands, charging it to make it bigger. The charging can be cancelled and stored by performing any other action. Holding the special button allows Mewtwo to resume charging. Pressing the special button allows Mewtwo to throw the sphere forward, where it will travel in an erratic path but still move forward. At full charge, the sphere moves in a straight line. The longer the move is charged, the faster and further it will travel and the more damage it will deal.
    • Custom 1 - Shadow Swarm: The move cannot be charged, and instead of throwing one sphere, Mewtwo throws four spheres in rapid succession, each being thrown at different heights.
    • Custom 2 - Psysphere: The sphere takes longer to charge and travels slower, but opponents hit by it will become stunned for a short time before being launched away with a psychic blast. The sphere can travel through opponents.
    • Custom 3 - Crazy Ball: The sphere deals more damage and charges faster, but will not fly forward, and instead travel in random, erratic paths. However, it will lightly home in on the opponent.
  • Side Special - Barrier: Mewtwo swipes forward. If an opponent is nearby, it will encase them in a sphere of psychic energy and launch them in the direction the control stick is held. If Mewtwo manages to land the move, then its energy-based attacks will gain a 1.5x damage and knockback buff for a short time. Howeverm these buffs cannot stack if the move is used multiple times. The move can also be used to reflect projectiles.
    • Custom 1 - Confusion: Mewtwo creates a ripple of dark energy in front of itself. This will flip opponents around and leave them vulnerable for a follow-up.
    • Custom 2 - Absorb: Instead of reflecting projectiles, Mewtwo will absorb them, replenishing its health.
    • Custom 3 - Ripple: The move has a longer range and can be used easier, but the buffs to its attacks don't last as long.
  • Up Special - Teleport: Mewtwo teleports to a different location in the direction the control stick is held, falling into a helpless state afterwards. It is completely invincible during the move.
    • Custom 1 - Explosive Teleport: Mewtwo's teleport path is telegraphed, but it creates an explosion when it disappears and reappears, damaging opponents caught in the blast radius.
    • Custom 2 - Auto-Teleport: Mewtwo will automatically teleport to the stage, but it doesn't travel as far.
    • Custom 3 - Fast Teleport: Mewtwo can only teleport in the four cardinal directions, but the move is significantly faster.
  • Down Special - Disable: Mewtwo emits a spark of dark energy from its eyes. If an opponent is close enough, they will be stunned for a short time, leaving them vulnerable. The attack will only connect with opponents facing Mewtwo. Aerial opponents will suffer light knockback.
    • Custom 1 - Mind Scramble: The move has less range, but it can affect opponents regardless if they are facing Mewtwo or not.
    • Custom 2 - Stare: The move has a longer range, but opponents are not stunned for as long.
    • Custom 3 - Explosion: About two seconds after using the move, an explosion appears in front of Mewtwo's original position, damaging opponents in the blast radius heavily.
  • Final Smash - Psystrike: Mewtwo Mega Evolves into Mega Mewtwo Y before throwing a massive sphere of dark energy forward. Opponents hit by it will be stunned for a short time before suffering a blast of psychic energy, launching them. Mewtwo will then return to its original form.
  • Charged State - Mega Mewtwo X: Mewtwo Mega Evolves into Mega Mewtwo X. In this state, it is significantly stronger, has a higher jump height, and its psychic attacks cover a lot more range.

  • Incineroar
    Pokémon Sun and Pokémon Moon (2016)
    Incineroar SSBUltimate
    Incineroar (ガオガエン, Gaogaen) is a Fire / Dark dual-type Heel Pokémon introduced in Generation VII. It evolves from Torracat and is the final form of Litten, as well as being on one of the Alolan starter Pokémon. Incineroar has a muscular build, and a belt of fire that it can produce flames from. It is a violent Pokémon that will use underhanded tactics to win a battle. It may also attack the trainers of an opponent, and may not listen to a trainer's orders if it doesn't want to.

    Incineroar, being a heavyweight character, is difficult to knock away, and can deal heavy damage with its attacks. Though it lacks any projectiles, it has decent range, giving it a very offensive-based playstyle. Incineroar's throws are extremely potent and a vital part to its moveset, with each of them either being combo starters or KO moves. This, however, means that it must get close to opponents to damage them. Incineroar also has a rather lackluster recovery despite its decent jump height, and is among the slowest characters in the game.

    Much of Incineroar's moveset is based off of pro-wrestling moves, with fire attacks sprinkled in. Uniquely, after performing certain attacks, Incineroar will either taunt or express frustration depending on if they hit opponents or not. However, these can be cancelled by performing any action.
    SSB Pokemon Series IncineroarHeadSSBU SSBUltimate Icon
    Incineroar's Moveset

    • Neutral Attack: Incineroar throws a chop followed by a spinning backhanded punch. If the attack button is held, it will expel flames from its belt that damage opponents multiple times, finishing with a burst of flames.
    • Forward Tilt: Incineroar throws a chop.
    • Forward Smash: Incineroar throws a standing dropkick.
    • Up Tilt: Incineroar throws an upward headbutt.
    • Up Smash: Incineroar throws a double-hand axle upward.
    • Down Tilt: Incineroar throws a sweep kick.
    • Down Smash: Incineroar performs a splash.
    • Dash Attack: Incineroar throws a knee strike.
    • Counter: Incineroar grabs the opponent. In this state, it can either fling the opponent forward or spin around and throw them backward depending on directional inputs.

  • Neutral Aerial: Incineroar spins around with its arms outstretched, damaging opponents multiple times before launching them.
  • Forward Aerial: Incineroar throws a dropkick.
  • Forward Crash: Incineroar shoots a burst of flame from its belt.
  • Back Aerial: Incineroar throws a back kick.
  • Back Crash: Incineroar turns around and throws a chop.
  • Up Aerial: Incineroar throws a bicycle kick.
  • Up Crash: Incineroar throws an upward headbutt.
  • Down Aerial: Incineroar stomps downward. The move can meteor smash opponents.
  • Down Crash: Incineroar performs a splash.

  • Grab: Incineroar reaches out to grab the opponent.
  • Pummel: Incineroar headbutts the opponent.
  • Forward Throw: Incineroar performs a giant swing, throwing the opponent forward.
  • Back Throw: Incineroar performs a German suplex, throwing the opponent backward.
  • Up Throw: Incineroar performs an Argentine backbreaker.
  • Down Throw: Incineroar performs a chokeslam.

  • Neutral Special - Darkest Lariat: Incineroar spins around with its arms outstretched, damaging opponents that hit it. While spinning, it can move back and forth. The attack grants Incineroar super armor and ignores shields.
    • Custom 1 - Rising Lariat: Incineroar damages opponents multiple times while spinning. If the special button is repeatedly pressed, Incineroar will rise into the air. It does not grant super armor.
    • Custom 2 - Fire Spin: The move does not grant super armor, and Incineroar cannot move while spinning, but it will deal more damage. The move also has added fire effects.
    • Custom 3 - Sliding Lariat: Incineroar moves quickly across the ground while spinning. The move deals less damage and does not ignore opponents' shields.
  • Side Special - Alolan Whip: Incineroar grabs the opponent. A set of boxing ring ropes appear behind it as it spins and throws the opponent at them. The opponent bounces off of the ropes and runs back at Incineroar. If the special button is pressed again, it will perform different attacks depending on when. If pressed at the right time, Incineroar will perform a lariat, dealing heavy damage and knockback. If pressed earlier, it will throw a chop, causing the opponent to trip. If pressed later, it grabs the opponent and performs a German suplex, which can set up for combos. If the special button is not pressed at all, the opponent runs into Incineroar and deals 5% recoil damage.
    • Custom 1 - Reverse Alolan Whip: The boxing ring ropes appear in front of Incineraor instead of behind hit. As such, it will launch the opponent backward.
    • Custom 2 - Far Alolan Whip: The boxing ring ropes appear farther from Incineroar. This makes timing on its different attacks easier, but they all deal less damage.
    • Custom 3 - Bouncy Ropes: Incineraor's attacks deal much less damage and knockback, and opponents can react out of being thrown. However, the rope rings will remain on stage for a short time or until the move is used again. These can be used to bounce high upward.
  • Up Special - Cross Chop: Incineroar leaps upward, damaging opponents. It them rushes at a downward angle while covered in flames, causing an explosion upon landing and dealing more damage.
    • Custom 1 - Cross Chop Blast: Incineroar doesn't cause an explosion upon landing, but rather when it hits opponents while dashing downward. When this happens, it bounces off of the opponent and can use the move again. The first attack does not combo into the second, and it deals less damage.
    • Custom 2 - Angled Cross Chop: Incineroar does not rise as high, but it can dash in any direction via directional inputs.
    • Custom 3 - Lateral Cross Chop: Instead of rising straight upward and dashing at a downward angle, Incineroar rises in an upward angle and dashes straight downward.
  • Down Special - Revenge: Incineroar ignites itself in flames for a short time. If it is attacked in this state, it pushes the opponent away and begins glowing red. In this state, its next attack will be 3x stronger in damage and knockback, and has an added fire effect. The strength of the attack will gradually decrease after consecutive uses.
    • Custom 1 - Raging Revenge: The counter window is shorter, but Incineroar's next attack deals more damage at the cost of more endlag.
    • Custom 2 - Easy Revenge: The counter window is longer, but Incineroar's next attack deals less damage.
    • Custom 3 - Dark Revenge: Instead of empowering its next attack, the move will boost Incineroar's stats for 10 seconds. After this, its stats will be lower than normal for five seconds, and five more seconds must pass before Incineroar can use the move again.
  • Final Smash - Max Malicious Moonsault: Incineroar dashes forward to grab an opponent. If successful, they are locked in a cinematic where Incineroar throws them in the ropes of a boxing ring as they rebound back at it as it counters with an uppercut, sending them in the air. It then leaps in the air and attacks with a high kick and another uppercut before dashing above them and slamming them into the middle of the ring, causing an explosion. This sends them back to the stage and launches them.
  • Charged State - Rage: Incineroar ignites itself in flames after roaring. In this state, many of its attacks are empowered with fire, and it also runs faster and jumps higher.

  • Pheromosa
    Pokémon Sun and Pokémon Moon (2016)
    795Pheromosa
    Pheromosa (フェローチェ, Pheroache) is a Bug / Fighting dual-type Lissome Pokémon introduced in Generation VII. It is one of the Ultra Beasts and is known by the code name UB-02 Beauty. It is not known to evolve into or from any other Pokémon. Its lithe, elegant body allows it to twitch its limbs at an incredible speed of 120 mph. It displays reluctance to touch anything, as if it finds the Pokémon world unclean.

    In terms of stats, Pheromosa is a tall, yet lightweight fighter. In fact, it is one of the lightest characters in the game, and can be launched easily because of it. To compensate, it has very fast ground and aerial mobility, and has equally as fast frame data, allowing it to beat opponents to the punch. It has a unique mechanic based on its Beast Boost ability in the Pokémon games; every time it manages to KO an opponent, its stats and attack power will increase by 1.3x. Its defensive capabilities will also increase by 1.2x, but only after the first KO. It can continue boosting its power as it KOs opponents, but if Pheromosa gets KO'ed, all of these boosts will be lost, and it will return to its original state.

    Pheromosa's moveset is based on its lightning-quick reflexes. While they don't deal a lot of damage, they have little to no startup and endlag, making them good for combos. The majority of its moveset consists of kicks, offering it decent range as well thanks to its long limbs.
    SSB Pokemon Series Pheromosa Stock Icon SSBCharged Icon
    Pheromosa's Moveset

    • Neutral Attack: Pheromosa throws a side kick followed by an axe kick. The second attack can meteor smash opponents.
    • Forward Tilt: Pheromosa throws a 180 kick from low to high.
    • Forward Smash: Pheromosa throws a roundhouse kick, followed by a side kick.
    • Up Tilt: Pheromosa throws a scorpion kick.
    • Up Smash: Pheromosa performs a back flip to kick upward.
    • Down Tilt: Pheromosa throws a shin kick.
    • Down Smash: Pheromosa performs a split kick.
    • Dash Attack: Pheromosa leaps forward with a knee smash.
    • Counter: Pheromosa throws a spinning kick.

  • Neutral Aerial: Pheromosa throws a sexy kick.
  • Forward Aerial: Pheromosa throws a dropkick.
  • Forward Crash: Pheromosa throws a spinning kick.
  • Back Aerial: Pheromosa throws a back kick.
  • Back Crash: Pheromosa throws a dropkick.
  • Up Aerial: Pheromosa turns upside down and performs a corkscrew spin, damaging opponents multiple times before launching them.
  • Up Crash: Pheromosa performs a back flip to kick upwards.
  • Down Aerial: Pheromosa performs a stall-then-fall axe kick. The move can meteor smash opponent.
  • Down Crash: Pheromosa throws a stomp downward. The move can meteor smash opponent.

  • Grab: Pheromosa reaches out to grab the opponent.
  • Pummel: Pheromosa knee smashes the opponent.
  • Forward Throw: Pheromosa kicks the opponent away.
  • Back Throw: Pheromosa performs a Judo throw.
  • Up Throw: Pheromosa kicks the opponent upward.
  • Down Throw: Pheromosa throws the opponent onto the ground and throws an axe kick.

  • Neutral Special - Double Kick: Pheromosa throws a roundhouse kick. If it connects, it can perform another, stronger kick if the special button is pressed again. After the first kick, the opponent is stunned for a short time, allowing it to follow up with other moves.
    • Custom 1 - Automatic Double Kick: Pheromosa kicks twice automatically, instead of needing to depend on button inputs. This makes attacking with the second kick easier but it cannot be cancelled into other moves.
    • Custom 2 - Shocking Kick: Pheromosa can only kick once, and deals less damage. The move inflicts paralysis on opponents though, and leaves them stunned for longer.
    • Custom 3 - Triple Kick: Instead of kicking once when the special button is pressed again, Pheromosa kicks twice. This deals more damage, but less knockback.
  • Side Special - Lunge: Pheromosa dashes forward at warp speed. If the move is used in midair, it falls into a helpless state afterwards. Uniquely, the move changes depending on how many opponents it KO'ed. Initially, the move deals light damage to opponents. After KOing an opponent once, Pheromosa travels farther, and opponents that hit it at the end of the dash will be meteor smashed. After KOing opponents twice, and after each subsequent KO, the move deals more damage, allows Pheromosa to travel farther, and it can end with a jumping kick at the end of the move to deal more damage and gain vertical height.
    • Custom 1 - Slow Lunge: Pheromosa travels slower, but damages opponents multiple times before launching them.
    • Custom 2 - Slip Lunge: Pheromosa deals less damage, but opponents it hits while on the ground will slip, leaving them vulnerable.
    • Custom 3 - Lunge Kick: Lunge will not change depending on how many KO's Pheromosa has scored. Instead, it can use the strongest version by default. Albeit, it is weaker and it travels less distance.
  • Up Special - High Jump Kick: Pheromosa leaps upward at a diagonal angle. If the special button is pressed again, it will perform a stall-then-fall kick that covers itself in flames as it falls downward, meteor smashing opponents it hits. If it does not hit an opponent however, it will suffer 8% recoil damage.
    • Custom 1 - High Jump: Pheromosa leaps much higher, but it cannot kick downward.
    • Custom 2 - Quick Jump Kick: The kick deals less damage and Pheromosa doesn't jump as high, but it travels much faster. The kick is automatic.
    • Custom 3 - Safe Kick: The kick deals much less damage and cannot meteor smash opponents, but Pheromosa will not take recoil damage if it misses.
  • Down Special - Feint: Pheromosa jumps backward, gaining invincibility frames. If the special button is pressed again, it can throw a flying kick that damages opponents. Otherwise, the jump can be cancelled into its aerial moves.
    • Custom 1 - Feint Escape: Pheromosa jumps a greater distance backward.
    • Custom 2 - Front Feint: Pheromosa jumps forward instead of backward.
    • Custom 3 - Feint Bounce: The move cannot be cancelled into its aerial moves. However, if it lands on an opponent, it can bury or meteor smash them before bouncing off of them depending on if they are grounded or not.
  • Final Smash - Ultra Space: Pheromosa opens up an Ultra Wormhole that sucks in opponents. If an opponent is sucked in, they are sent to Ultra Space where they are heavily damaged by energy beams. They are then sent back to the stage as the Ultra Wormhole explodes, dealing heavy damage and knockback.
  • Charged State - Ultra Beast Boost: Pheromosa begins glowing a yellow aura. In this state, it becomes as strong as if it had KO'ed 10 opponents in a row, significantly boosting its mobility, attack power, and jump height. It also has more launch resistance in this state.

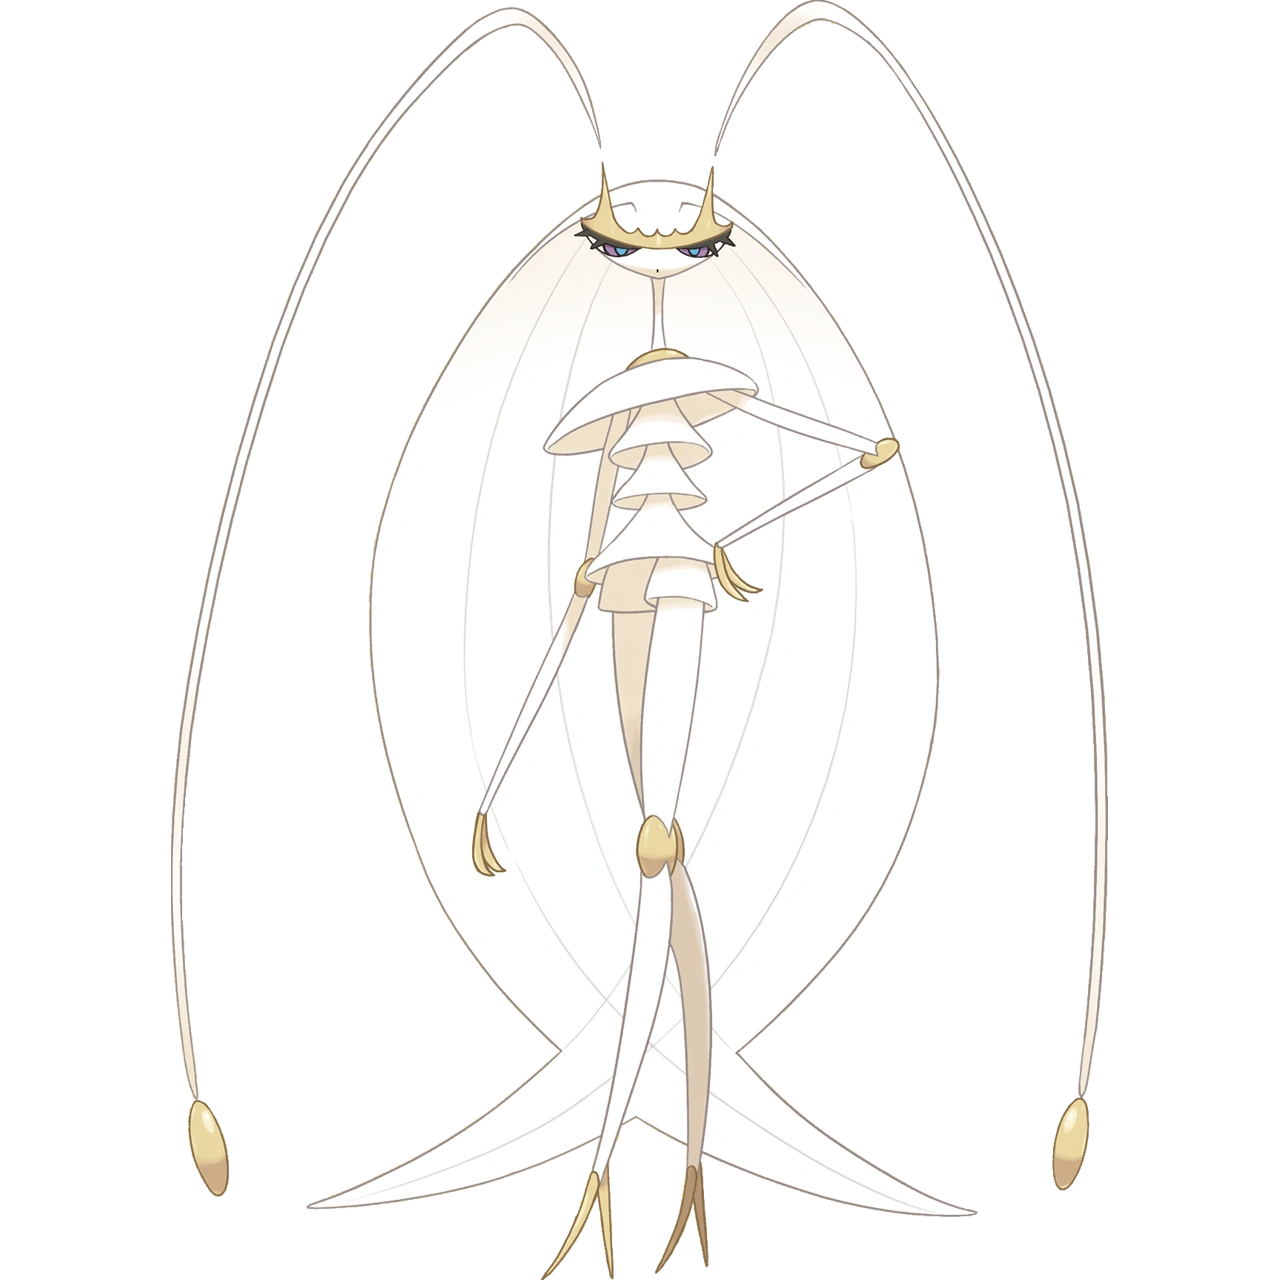
  • Meloetta
    Pokémon Black and Pokémon White (1996)
    Meloetta (メロエッタ, Meloetta) is a Normal / Psychic dual-type Melody Legendary Pokémon introduced in Generation VII. It is not known to evolve into or from any other Pokémon. According to artists in the Unova region, Meloetta's beautiful singing and dancing inspired many works of art, music, and songs, making it a very popular Pokémon among musicians and dancers. It's signature ability, Relic Song, allows it to change into its Pirouette forme, becoming a Normal / Fighting dual-type.

    Meloetta can be seen as a reinvention of character transformations in previous games, most notably Zelda and Shiek in Melee and Brawl. By using her down special Relic Song, it can shift between its Aria and Pirouette formes. The moveset is the same while in either forme, though their properties can change. In particular, Meloetta's Aria forme is lighter and has slower falling speed, with stronger attacks. Meanwhile, its Pirouette forme is much faster and has faster falling speed, with weaker attacks. As such, the latter is better suited for aggressive play and combos, while the forme is more suited for defensive play and securing KOs.

    Meloetta's moveset consists of several attacks based on dance moves. Because of this, its moves don't have a lot of range, and its light weight can make wading in risky. However, its ability to shift formes can mix up approaches and allow it to adapt to situations better.
    SSB Pokemon Series Meloetta Stock Icon SSBCharged Icon
    Meloetta's Moveset

    • Neutral Attack: Meloetta throws two alternating swipes.
    • Forward Tilt: Meloetta throws a 180-degree high kick.
    • Forward Smash: Meloetta throws a flying kick.
    • Up Tilt: Meloetta waves its arm above itself in an overarching motion.
    • Up Smash: Meloetta spins around like a ballerina, damaging opponents multiple times before launching them. While spinning, directional inputs can be used for it to move back and forth.
    • Down Tilt: Meloetta throws a kneeling shin kick.
    • Down Smash: Meloetta throws a split kick.
    • Dash Attack: Meloetta leans forward while throwing an outward swipe with its arm.
    • Counter: Meloetta throws a high kick.

  • Neutral Aerial: Meloetta spins around with its arms outstretched.
  • Forward Aerial: Meloetta throws a flying kick.
  • Forward Crash: Meloetta throws a spinning dropkick, damaging opponents multiple times before launching them.
  • Back Aerial: Meloetta throws a back kick.
  • Back Crash: Meloetta throws a dropkick.
  • Up Aerial: Meloetta waves its arm above itself in an overarching motion.
  • Up Crash: Meloetta performs a backflip to kick upward.
  • Down Aerial: Meloetta throws a drill kick, damaging opponents multiple times before launching them.
  • Down Crash: Meloetta throws a stomp. The move can meteor smash opponents.

  • Grab: Meloetta reaches out to grab the opponent.
  • Pummel: Meloetta slaps the opponent.
  • Forward Throw: Meloetta spins around and flings the opponent forward.
  • Back Throw: Meloetta spins around and throws the opponent backward.
  • Up Throw: Meloetta heaves the opponent upward.
  • Down Throw: Meloetta slams the opponent into the ground.

  • Neutral Special - Echoed Voice: Meloetta sings, producing a music note projectile. It flies forward, damaging opponents it hits, and bounces off of surfaces and the edges of the screen. Up to two of these projectiles can be at play at once.
    • Custom 1 - Painful Voice: The projectiles are larger and deal more damage, but they will travel slower and don't last as long.
    • Custom 2 - Motor Mouth: Meloetta releases three small projectiles at once in different directions. They will disappear on contact rather than bouncing around.
    • Custom 3 - Soothing Voice: The projectile puts opponents asleep rather than damaging them. Aerial opponents suffer minor damage and knockback.
  • Side Special - Acrobatics: Meloetta flips through the air in the direction the control stick is held. It is invincible during this move, and if it lands on an opponent, it will bury or meteor smash them. If the special button is pressed again while jumping, Meloetta instead attacks with a flying kick forward or backward.
    • Custom 1 - Great Feat: Meloetta travels more distance while flipping, but it cannot land on opponents and the kick deals less damage.
    • Custom 2 - Hammering Feet: Meloetta travels less distance while jumping, but it deals more damage after landing on an opponent.
    • Custom 3 - Fast Reflexes: Landing on an opponent will not bury or meteor smash them and it is not invincible while flipping, though after landing on an opponent, Meloetta can cancel the attack into any other move.
  • Up Special - Gravity: Meloetta grows green or red depending on its forme, and dashes through the air in the direction the control stick is held.
    • Custom 1 - Flaming Gravity: Meloetta travels less distance, but is covered in flames during the move and damages opponents it hits.
    • Custom 2 - Singing Gravity: Meloetta doesn't travel as fast, but it sings while flying, creating a ring of music notes that damages opponents multiple times before launching them.
    • Custom 3 - Zero Gravity: Meloetta can only fly upward initially, though directional inputs can be used to change its direction during flight.
  • Down Special - Relic Song: Meloetta sings as it shifts formes, changing its stats and the properties of some of its attacks. While transforming, it is invincible, though repeated uses of the move will have it lose its invincibility. Due to its nature as a transforming move, it does not have any custom moves.
  • Final Smash - Perish Song: Meloetta sings as a counter appears over its head, starting from five. While singing, opponents nearby will fall asleep. When the counter counts down to zero, it will cause a massive explosion as Meloetta finishes singing, dealing extreme damage and knockback to opponents in the blast radius.
  • Charged State - Dazzling Show: Meloetta begins glowing with aura. In this state, its Aria forme is significantly faster and can jump higher, while its Pirouette forme can deal a lot more damage with its attacks.

  • Alonan Meowth (ε)
    Pokémon Sun and Pokémon Moon (2016)
    052Alolan Meowth
    Alolan Meowth (アローラ地方ニャース, Alola Nyrath) is a Dark-type Scratch Cat Pokémon introduced in Generation I. It evolves into Alolan Persian. It is the regional form of Meowth, indigenous to Alola. Meowth were given as a gift of royalty to Alola, and this luxurious lifestyle made it a selfish, prideful, and cunning Pokémon, deviating from its origins.

    Alolan Meowth is an Echo Fighter of Meowth, and their movesets are almost identical. However, a lot of Alolan Meowth's claw slashes produce darkness. Its frame data is also a bit slower compared to Meowth, though its attack deal more damage to compensate.
    SSB Pokemon Series Alolan Meowth Stock Icon SSBCharged Icon
    Alolan Meowth's Moveset

    • Neutral Attack: Alolan Meowth throws three alternating swipes followed by a flurry of claw swipes, damaging opponents multiple times before launching them with an upward claw swipe.
    • Forward Tilt: Alolan Meowth throws a claw swipe.
    • Forward Smash: Alolan Meowth throws an overhead claw swipe with both arms.
    • Up Tilt: Alolan Meowth throws an uppercut.
    • Up Smash: Alolan Meowth jumps upward and performs a backflip to throw two claw swipes upward.
    • Down Tilt: Alolan Meowth slashes its claws while kneeling to the ground.
    • Down Smash: Alolan Meowth slashes its claws across the ground in front of itself and behind itself.
    • Dash Attack: Alolan Meowth runs forward while throwing several claw swipes, damaging opponents multiple times before launching them.
    • Counter: Alolan Meowth throws a downward claw swipe.

  • Neutral Aerial: Alolan Meowth performs a somersault.
  • Forward Aerial: Alolan Meowth throws a downward claw swipe.
  • Forward Crash: Alolan Meowth throws three claw swipes.
  • Back Aerial: Alolan Meowth throws a dropkick.
  • Back Crash: Alolan Meowth turns around and throws a claw swipe.
  • Up Aerial: Alolan Meowth throws a claw swipe in an overarching motion.
  • Up Crash: Alolan Meowth performs a backflip to kick upward.
  • Down Aerial: Alolan Meowth swipes its claws downward. The move can meteor smash opponents.
  • Down Crash: Alolan Meowth performs a stall-then-fall claw swipe at a diagonal angle.

  • Grab: Alolan Meowth reaches out to grab the opponent.
  • Pummel: Alolan Meowth slashes the opponent with its claws.
  • Forward Throw: Alolan Meowth tosses the opponent forward.
  • Back Throw: Alolan Meowth suplexes the opponent.
  • Up Throw: Alolan Meowth heaves the opponent above itself before slashing them with its claws.
  • Down Throw: Alolan Meowth pins the opponent on the ground before slashing them several times with its claws.

  • Neutral Special - Pay Day: Alolan Meowth throws a gold coin forward, damaging opponents it hits. If the special button is repeatedly tapped, Alolan Meowth can continually throw gold coins in rapid succession, dealing high combined damage. The gold coins travel in random directions, though the first will always fly forward. Additionally, every time a coin is thrown, it will be added to the Gold that the player earns at the end of the match, much like how the move works in the official Pokémon games.
    • Custom 1 - Payload: Alolan Meowth throws a bunch of gold coins at once. It isn't as easily spammable, though the opponents take more damage with each use.
    • Custom 2 - Paycheck: The coins travel faster and farther, but they deal more damage and the angles they can be thrown in are wider.
    • Custom 3 - Payback: Alolan Meowth throws larger coins. They travel slower, but it deals significantly more damage.
  • Side Special - Thief: Alolan Meowth leaps forward before grabbing onto an opponent and slashing them with its claws, damaging them. Uniquely, if the opponent is holding an item, Alolan Meowth will take it for itself. It can also snatch thrown items in midair if they are thrown at it while using the move. This can also be used on projectiles that can be held like items.
    • Custom 1 - Fling: Alolan Meowth deals more damage when he slashes an opponent, but he cannot take items.
    • Custom 2 - Sneaky Thief: It is easier for Alolan Meowth to take items thrown at him. He can also travel farther, though he deals less damage.
    • Custom 3 - Flying Slash: Instead of latching onto an opponent, Alolan Meowth will simply slash its claws at them, dealing more damage. It cannot take items that they are holding.
  • Up Special - Fury Swipes: Alolan Meowth rushes in the direction the control stick is held while swiping its claws, damaging opponents it hits. It can use the move five times in a row, and it can travel in different directions each time. It falls into a helpless state afterwards.
    • Custom 1 - Heavy Swipe: Alolan Meowth can only swipe its claws once before it falls into a helpless state. However, the swipe travels much more distance and it deals heavy damage and knockback.
    • Custom 2 - Lightning Swipes: Alolan Meowth can only use the move three times instead of five, and the swipes deal less damage. However, it travels much faster and can paralyze opponents it hits.
    • Custom 3 - Safe Swipes: Alolan Meowth is invincible while using the move, though it can only use the move four times and deals less damage and knockback.
  • Down Special - Fake Out: Alolan Meowth taunts. If an opponent attacks him during this time, he will leap upward and clap, sending a shockwave forward. If he counters a physical attack, the opponent will be stunned, leaving them vulnerable. If he counters a projectile or an aerial opponent, then the shockwave will deal light damage and knockback.
    • Custom 1 - Facade: Alolan Meowth taunts longer, making the counter easier to land, though opponents aren't stunned for as long.
    • Custom 2 - Foul Play: Instead of stunning the opponent, the shockwave inflicts paralysis before knocking them away with the strength of the countered attack.
    • Custom 3 - Dark Pulse: Instead of taunting, Alolan Meowth simply claps to use the shockwave. It deals much more damage and knockback, but doesn't make opponents dizzy.
  • Final Smash - Golden Claws: Alolan Meowth rushes forward. If he hits an opponent, they are dragged to the center of the stage as it begins slashing the opponent multiple times. It finishes the move with a downward swipe.
  • Charged State - Jackpot: Alolan Meowth's entire body turns golden. In this state, it is significantly heavier and harder to launch. Its attacks are also a lot stronger and have slightly more range.

  • Scizor
    Pokémon Gold and Pokémon Silver (1999)
    212Scizor
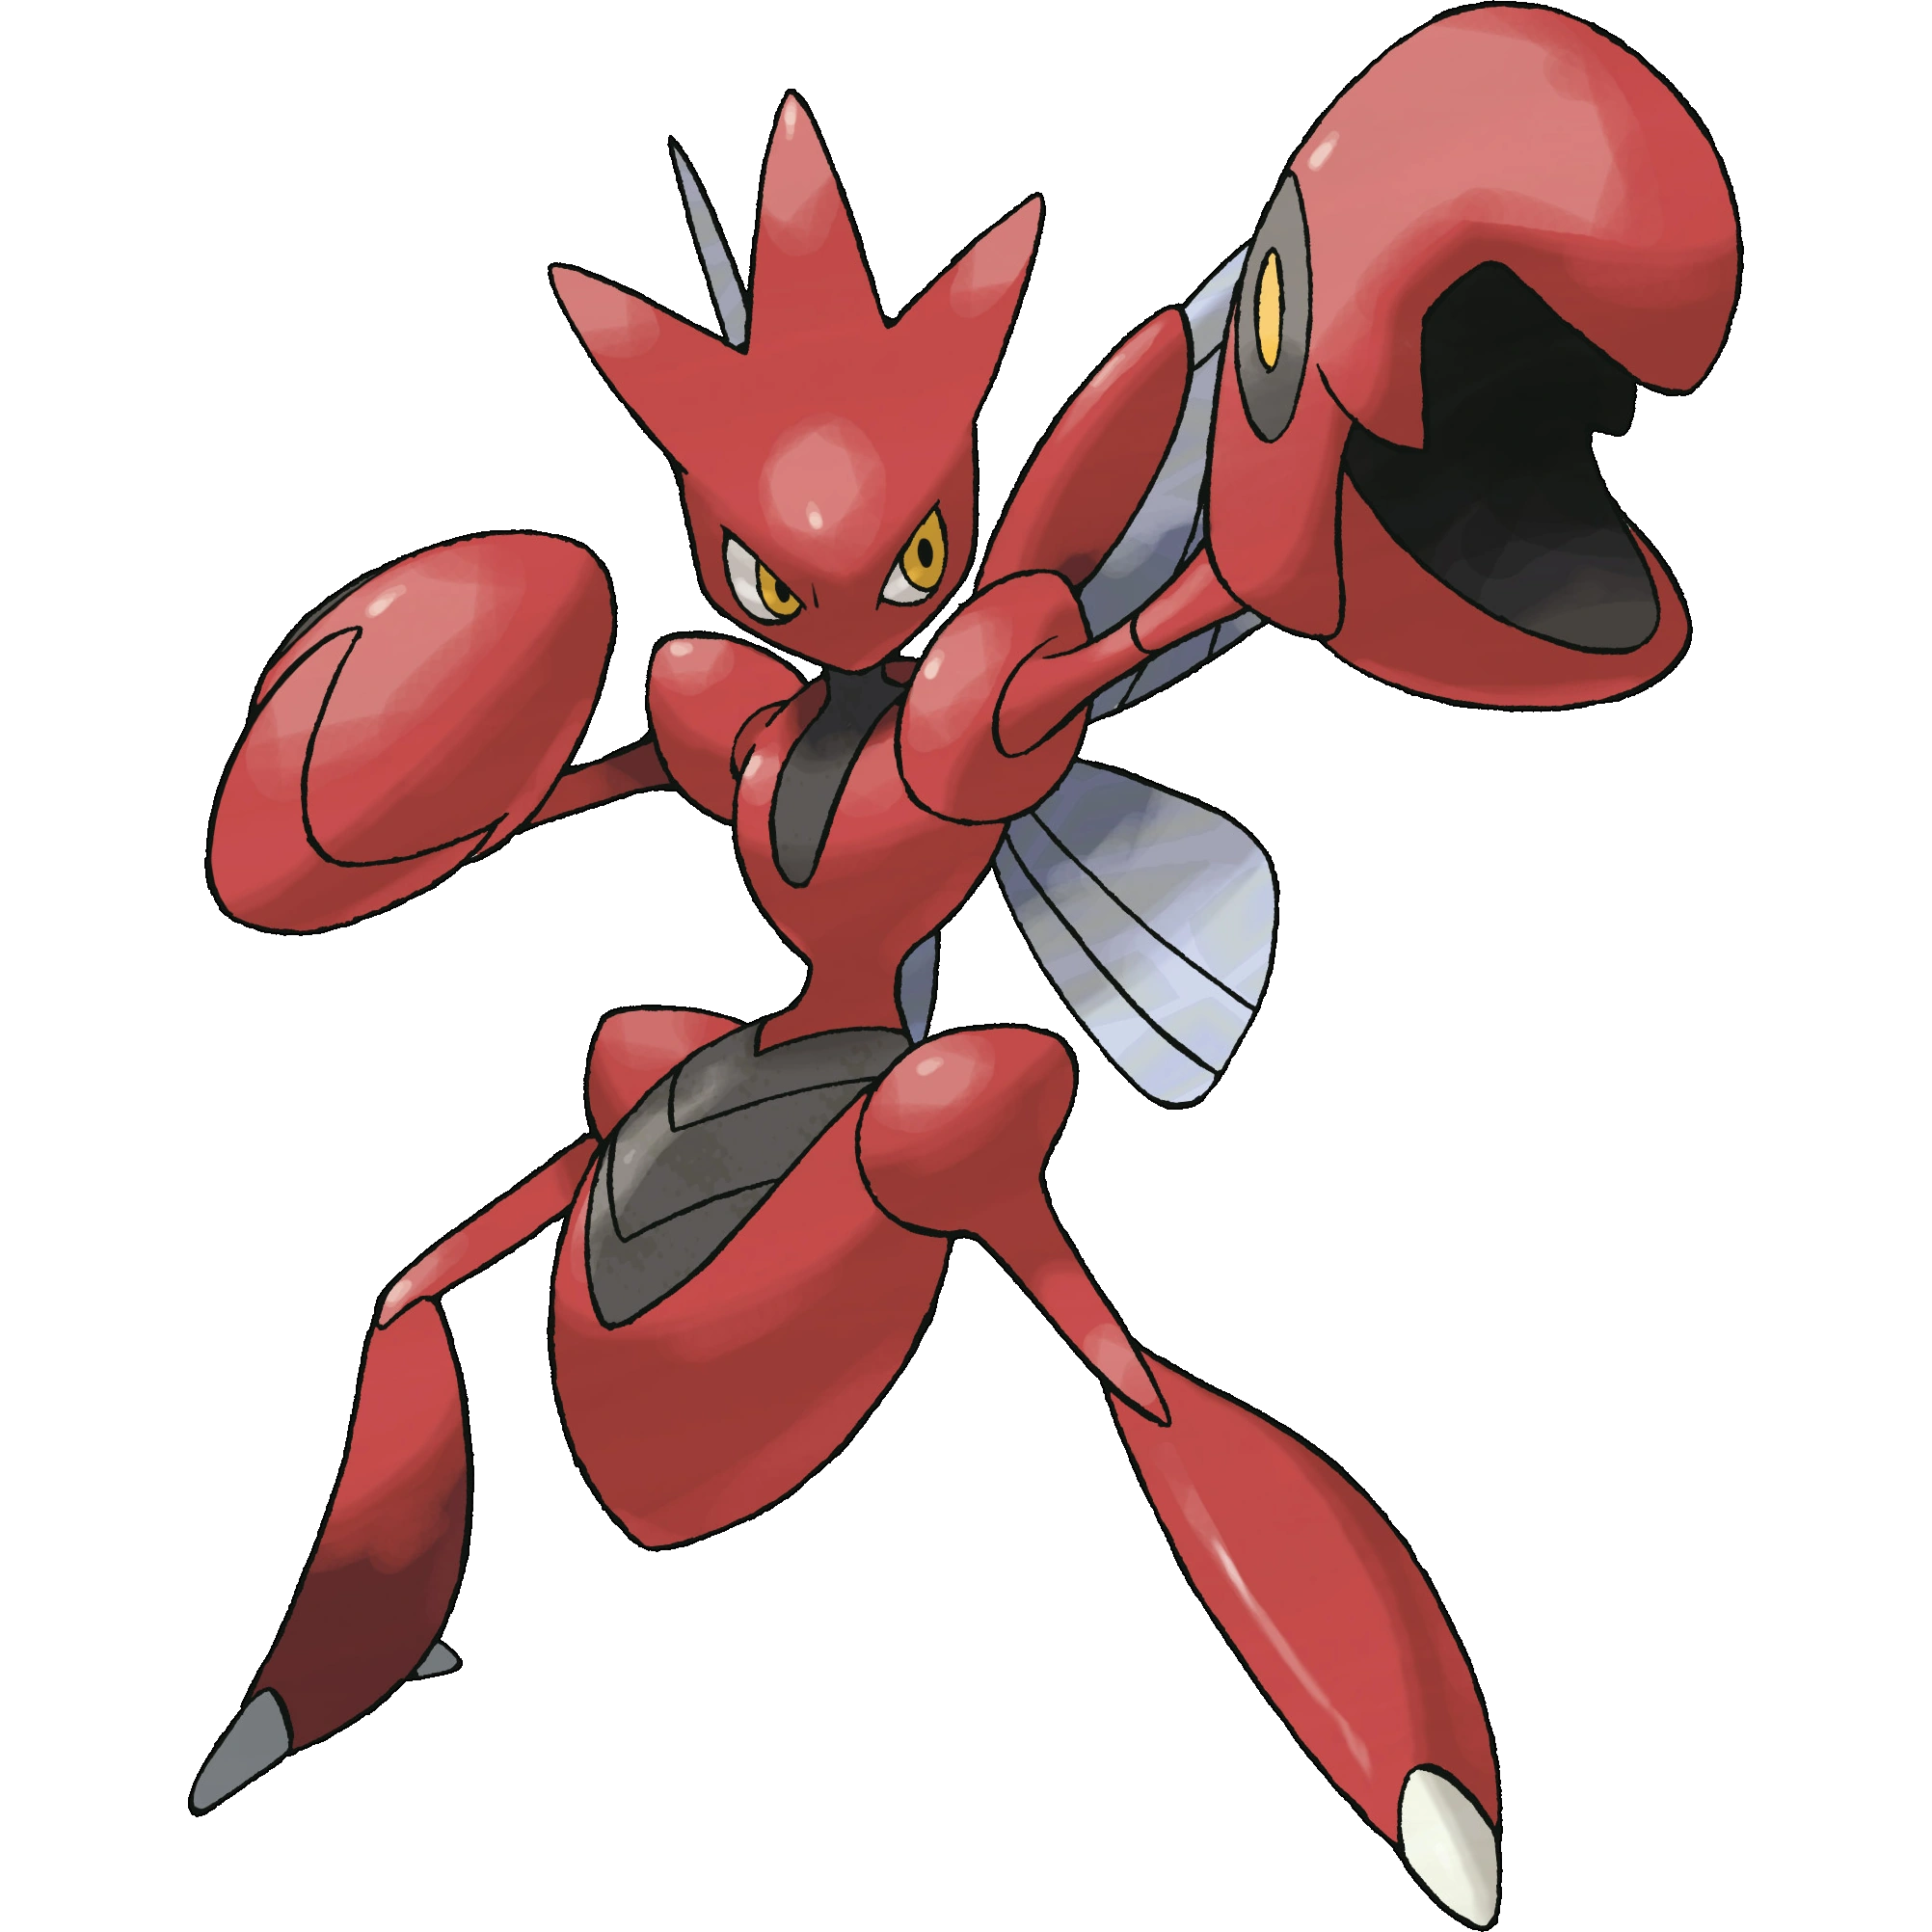
    Scizor (ハッサム, Hassam) is a Bug / Steel dual-type Pincer Pokémon introduced in Generation II. It evolves from Scyther. Its body is hard as steel, its claws are strong enough to crush any object, and it is said its muscles are made of metal. Scizor mainly fights with its claws, using them to beat opponents so hard that there's nothing but scrap afterwards. Despite having wings, Scizor can't fly, and instead beats them to lower its body temperature.

    Scizor has a unique Body Temperature meter, seen by its icon. It will rise as Scizor takes damage, as well as lower as it damages its foes. As the meter rises, Scizor's attack power will scale with it. However, should the meter fill up, Scizor will overheat and explode, dealing 20% recoil damage and fixed knockback, and is also weakened until the Body Temperature meter is lowered by attacking opponents. Control of the meter and being careful not to let it get too high is key to mastering Scizor's playstyle.

    As a fighter, Scizor is unsurprisingly a heavyweight, and has very high mobility to boot. However, its attack power is quite low compared to others in his weight class, meaning it can have trouble securing KOs. This is rectified if the Body Temperature meter is used efficiently, however.
    SSB Pokemon Series ScizorIcon PXSSB SSBCharged Icon
    Scizor's Moveset

    • Neutral Attack: Scizor throws three quick punches with its claws.
    • Forward Tilt: Scizor snaps its claw forward.
    • Forward Smash: Scizor clamps its claw down.
    • Up Tilt: Scizor throws an upwards snap.
    • Up Smash: Scizor's wings burst into flame.
    • Down Tilt: Scizor fires a row of staple-like projectiles across the ground.
    • Down Smash: Scizor fires four buzzsaw-like projectiles around itself.
    • Dash Attack: Scizor throws a flurry of slashes with its claws, damaging opponents multiple times before launching them.
    • Counter: Scizor snaps it's claw forward.

  • Neutral Aerial: Scizor coats its wings in flames.
  • Forward Aerial: Scizor throws quick punch.
  • Forward Crash: Scizor throws a strong snap.
  • Back Aerial: Scizor fires a buzzsaw projectile behind itself.
  • Back Crash: Scizor fires a claw construct behind itself.
  • Up Aerial: Scizor throws a midair somersault kick.
  • Up Crash: Scizor throws backflip kick, damaging opponents multiple times before launching them.
  • Down Aerial: Scizor throws a stall-then-fall dive kick, bouncing off opponents it lands on.
  • Down Crash: Scizor throws double-footed stomp. The move can meteor smash opponents.

  • Grab: Scizor reaches out with its claw to grab the opponent.
  • Pummel: Scizor clamps down on the opponent.
  • Forward Throw: Scizor punches the opponent away.
  • Back Throw: Scizor swings the opponent behind itself and throws them backward.
  • Up Throw: Scizor tosses the opponent above itself.
  • Down Throw: Scizor slams the opponent on the ground and stomps on them.

  • Neutral Special - Bullet Punch: Scizor throws a high-speed volley of punches, which are so fast that only the impact can be seen. Cam deal high damage, but deals little knockback and has some startup lag.
    • Custom 1 - Vacuum Wave: Scizor punches so hard it creates impacts a short distance away from itself. Weaker, but has better range.
    • Custom 2 - Mach Punch: Scizor throws a single punch instead of a volley of punches. Deals massive damage and has very little startup, but suffers from high endlag.
    • Custom 3 - Fury Cutter: Scizor throws a series of rapid slashes with its claws. Deals less damage, but comes out faster.
  • Side Special - Metal Claw: Scizor rushes forward, a claw construct forming around its pincer. A standard rush move, good for recovery and closing the gap, but leaves Scizor vulnerable.
    • Custom 1 - Crush Claw: Scizor clamps down at the end of the move. Deals massive damage, but has more endlag to make up for it.
    • Custom 2 - Shadow Claw: Scizor sends out a shadowy claw construct. instead of rushing forward. Weaker, but has better range and is safer.
    • Custom 3 - Tough Claws: Scizor rushes forwards with its claws held out. Weaker, but it protects Scizor against attacks from the front and gives it super armor.
  • Up Special - Bug Buzz: Scizor flies into the air, leaving sound waves in it's wake and falling into a helpless state afterwards. It can damage opponents it hits, but it won't fly very high.
    • Custom 1 - Iron Head: Scizor soars upwards, damaging enemies in the way. Has higher vertical distance and gives Scizor super armor, but isn't as good for quick getaways.
    • Custom 2 - Air Slash: Scizor rises upwards, creating cutting winds around itself. Weaker, but covers a wider radius.
    • Custom 3 - Giga Impact: Scizor rises upwards, then comes crashing back down with such force it damages itself in the process. The riskiest of Scizor's customs, but by far the strongest.
  • Down Special - Swords Dance: Scizor forms a pair of energy swords behind it. When the swords are out, they follow up Scizor's attacks when the special button is pressed a second time. However, after a certain amount if attacks or a short period of time, the swords will disappear. In addition, they decrease some of Scizor's heat initially, but cause them to gain more heat over time, putting the Pokemon at risk of overheating. Performing the down special input again causes the swords to deliver a quick, powerful slash before disappearing.
    • Custom 1 - Iron Defense: Scizor forms shields around itself instead of swords, decreasing the damage it takes. However, it's temperature rises faster.
    • Custom 2 - Focus Energy: Scizor concentrates and flaps its wings, lowering its body temperature. While it doesn't bolster any stats, it massively helps in regulating its temperature.
    • Custom 3 - Double Hit: Scizor forms a pair of fists behind itself instead. While weaker, decreasing less of Scizor's heat, and having less range than the sword, they last longer and barely increase the amount of heat Scizor gains, making them much safer.
  • Final Smash - X-Scissor: Scizor rushes forward. It it hits an opponent, it grabs them and throws them into the air. Scizor then delivers two diagonal slashes across them, forming an X-shaped trail behind it. The second hit launches them away.
  • Charged State - Mega Scizor: Scizor Mega Evolves, gaining an increase to it's attack power, weight, and speed. However, it's heat increases at an alarming rate, putting it at risk of overheating.

  • Dragapult
    Pokémon Sword and Pokémon Shield (2019)
    887Dragapult
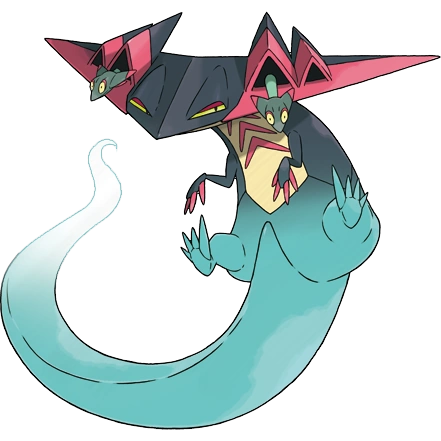
    Dragapult (ドラパルト, Dorapult) is a Dragon / Ghost dual-type Stealth Pokémon introduced in Generation VIII. It evolves from Drakloak, and is the final form of Dreepy. It is known for its great stealth and speed, being able to virtually disappear. It keeps two young Dreepy inside of the holes in its head. During battle, it shoots out the Dreepy just like missiles to damage opponents.

    Dragapult is a very fast fighter, having excellent ground and air speed. However, it's heavy weight and large size make it so that it is more easily to get comboed by attacks and it struggles to stay in the air for long. Dragapult's main mechanic revolves around the Dreepy resting in its head, which activate whenever Dragapult uses a move relating to shooting out the Dreepy's. If one or both of them are shot out, they will need to take time to return to Dragapult. This prevents the spamming of some moves, even rendering some moves useless if at least one Dreepy has not returned to Dragapult.

    Aside from attacks that fire its Dreepy's, Dragapult's moveset revolves around headbutts, tail swipes, and arm swipes. This overall gives it a balanced moveset of close- and far-ranged combat, differing from most other heavyweights.
    SSB Pokemon Series Dragapult Stock Icon SSBCharged Icon
    Dragapult's Moveset

    • Neutral Attack: Dragapult throws two-hit combo with it's tail.
    • Forward Tilt: Dragapult rams the side of it's head forward.
    • Forward Smash: Dragapult holds in Dragon Breath before releasing it in front of it, attacking with a burst of purple flames.
    • Up Tilt: Dragapult swings it's tail overhead.
    • Up Smash: Dragapult charges it's tail before swinging it over itself, even able to hit opponents beside it.
    • Down Tilt: Dragapult shoots a single Dreepy at the ground, not too far from where it is. Dreepy will then return to Dragapult.
    • Down Smash: Charges up both Dreepy and shoots them into the ground on both of it's sides. Both Dreepy will then return to Dragapult.
    • Dash Attack: Dragapult swoops forward and Rams into opponents with it's head.
    • Counter: Dragapult shoots both Dreepy forward to counter opponents. Both Dreepy will then return to Dragapult.

  • Neutral Aerial: Dragapult fully spins around with it's tail damaging opponents nearby.
  • Forward Aerial: Dragapult shoots a single Dreepy forward as a projectile. Dreepy will then return to Dragapult.
  • Forward Crash: Dragapult shoots both Dreepy simultaneously. Both Dreepy will then return to Dragapult.
  • Back Aerial: Dragapult waves it's tail behind it, hitting the opponent three times in succession.
  • Back Crash: Dragapult swings it's tail behind it and hits downward, acting as a meteor smash.
  • Up Aerial: Dragapult rams it's head upward to hit opponents above.
  • Up Crash: Dragapult swings it's head upward before spinning to hit the opponent a second time with it's tail.
  • Down Aerial: Dragapult whips it's tail downward to hit opponents below from a far range.
  • Down Crash: Dragapult charges it's tail longer so that it extends farther.

  • Grab: Dragapult swipes forward with its tail, trying to grab opponents.
  • Pummel: The two Dreepy bite the captured opponent, one after the other.
  • Forward Throw: Dragapult shoots the opponent with one Dreepy. Dreepy will then return to Dragapult.
  • Back Throw: Dragapult rams the side of its head into the opponent, sending them back.
  • Up Throw: Dragapult throws the opponent up before shooting both Dreepy at them. Dreepy will then return to Dragapult.
  • Down Throw: Dragapult slams the opponent down with its tail.

  • Neutral Special - Dragon Darts: Dragapult shoots both of its Dreepy out to do damage to opponents far off. The more distance the opponent is, the more damage this move does, so opponents farther away will take more damage. Both Dreepy will then return to Dragapult.
    • Custom 1 - Close Darts: The distance mechanic of this move is reversed; closer opponents will take more damage instead of farther ones and farther opponents will take less damage.
    • Custom 2 - Poison Darts: Opponents hit by the move will become poisoned. However, the duration of the poison depends on what distance they were hit. Farther opponents stay poisoned for longer.
    • Custom 3 - Breaking Darts: The moves overall power is weaker but it does much more damage to shields, eventually breaking them if both Dreepy hit a shield.
  • Side Special - Dragon Rush: Dragapult rushes forward very quickly. If it hits an opponent, Dragapult will ram into the opponent, doing great damage. However, if the move doesn't hit anything, Dragapult will suffer from endlag, leaving it vulnerable for some time.
    • Custom 1 - Fiery Rush: Dragapult zooms forward with fiery energy surrounding it, making the move do more damage but also leaving a coating of fire around it that damages opponents near it during the endlag portion.
    • Custom 2 - Ghostly Rush: Dragapult zooms forward with ghostly energy surrounding it, making the move slower but also granting a random status effect upon hit opponents.
    • Custom 3 - Wind Rush: Dragapult zooms forward with wind energy surrounding it. This instead makes the move a multi-hit move that can trap opponents if they are hit by Dragapult.
  • Up Special - U-Turn: Dragapult will perform a dive downward before swooping directly upwards. If used on the ground, the dive downward and the upward swoop can connect to hit opponents. In the air, the dive downward can meteor smash opponents below Dragapult, but the upward swoop does not do damage.
    • Custom 1 - V-Turn: Dragapult goes in a V formation in which it goes downward and upward diagonally. The move still spikes opponents with it's downward movement.
    • Custom 2 - Z-Turn: Dragapult goes in a Z formation in which it zigzags through the air. The move can't meteor smash opponents, but it can trap opponents hit by the move and hit them each time Dragapult zooms upward.
    • Custom 3 - Y-Turn: Dragapult simply zooms upwards, but shoots both Dreepy out to make coverage at it's sides. Both Dreepy will then return to Dragapult.
  • Down Special - Phantom Force: ​​​​​​Dragapult disappears for a short moment, sinking into a dark portal in the ground. It will then reappear, bursting upward from another portal that opens up a short distance away. The move does good damage, but is punishable if the opponent dodges the attack and simply counterattacks.
    • Custom 1 - Spooky Force: The second portal does not appear far, but the moment Dragapult bursts out of the second portal, it can paralyze opponents.
    • Custom 2 - Banshee Force: The move is incredibly slow, but the moment Dragapult bursts out of the second portal, it can cause a special-zoom and does large amounts of damage.
    • Custom 3 - Wisp Force: Instead of reappearing in a different area, Dragapult retreats into the first portal, pokes out of a second portal to do damage, and then retreats back to the first portal, eventually ending up where it was originally.
  • Final Smash - Max Wyrmwind: Dragapult swipes forward with its tail. Any opponents hit are taken in an animation where the captured opponents appear in a setting similar to the Dynamax Dens. Dragapult will begin to Dynamax and summon a purple-colored tornado that spins around the opponent. Opponents are trapped inside of the tornado and take great damage as two dragon-esque wings emerge from the tornado. The cinematic will fade to white before the captured opponents are launched.
  • Charged State - Dragon Dance: Dragapult's raises its attack power and speed. This also makes it so that the Dreepy's that are separated from Dragapult will return faster.

  • Ness
    EarthBound (1994)
    Ness SSBUltimate
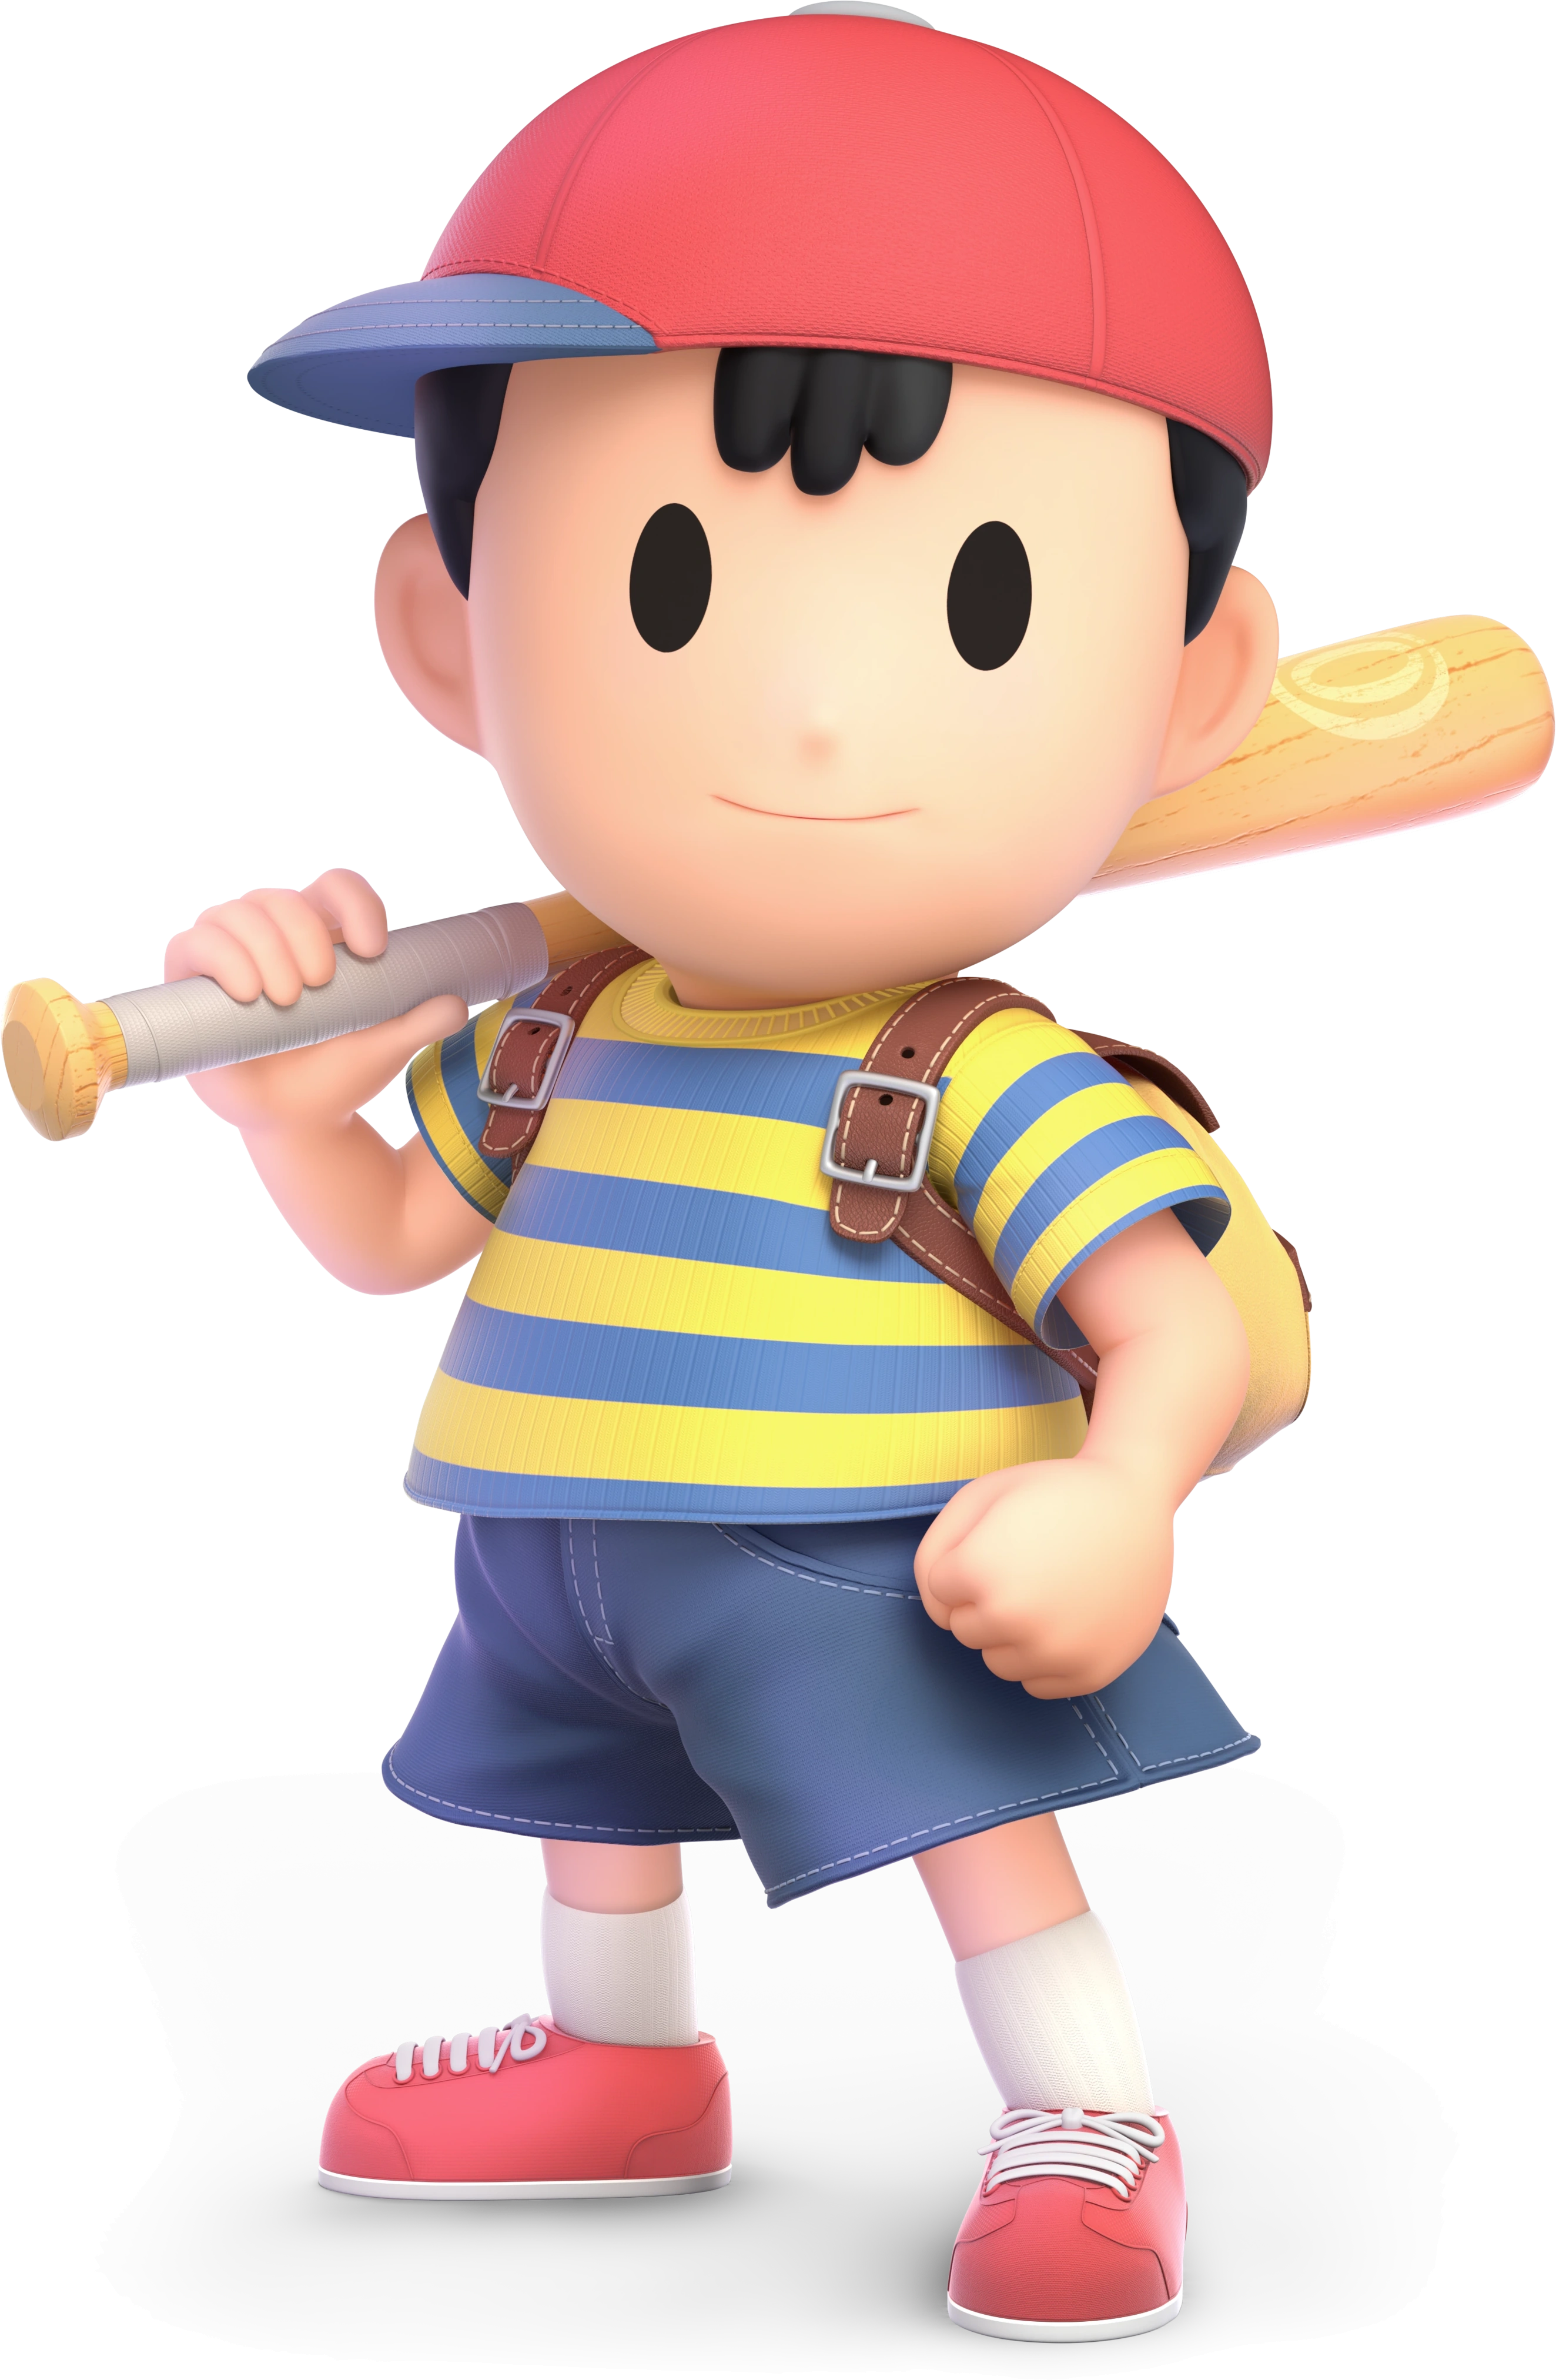
    Ness (ネス, Ness) is the main protagonist of the EarthBound, the second game in the MOTHER series of RPGs. he is helpful, cheerful, and courageous, living in Onett. He has the strange ability to utilize PSI moves, granting him strong psychic powers. One night, he wakes up from a meteor crash and investigates it. Here, he finds an alien named Buzz Buzz, who says Ness is the one destined to save the world. To accomplish this, he must collect the Eight Melodies and string them together.

    Ness is an unusual blend of character archetypes. He is a middleweight with powerful and ranged attacks, as well as a decent recovery. He also has high jump height and slow falling speed. His aerial moves are quite versatile, allowing him to space, combo, and KO opponents reliably. Ness' grab game is also really potent, having some of the strongest throws of the roster. He also possesses several projectiles that can deal heavy damage to opponents. However, he suffers from poor mobility.

    Ness' moveset mostly consists of PSI moves, damaging opponents and granting him some range. However, he can also use his baseball bat and yo-yo for his smash and crash attacks. Though his moveset is a mixed bag, mastery of each of his moves is necessary for using him effectively.
    SSB EarthBound Series NessHeadSSBU SSB64 Icon
    Ness' Moveset

    • Neutral Attack: Ness throws a one-two punch combo followed by a kick.
    • Forward Tilt: Ness throws a roundhouse kick empowered by PSI.
    • Forward Smash: Ness takes out his baseball bat and swings it forward. If used properly, it can reflect projectiles.
    • Up Tilt: Ness pushes upward with both hands while producing PSI sparks.
    • Up Smash: Ness sends his yo-yo in an "around the world" motion. Uniquely, while charging, his yo-yo spins and can damage opponents.
    • Down Tilt: Ness throws a shin kick.
    • Down Smash: Ness sends his yo-yo backward and performs a "walk the cat" motion with it. Uniquely, while charging, the yo-yo spins and can damage opponents.
    • Dash Attack: Ness sends three PSI sparks in front of himself while thrusting his hands forward.
    • Counter: Ness creates a burst of PSI magic around himself.

  • Neutral Aerial: Ness spins diagonally in the air with his arms outstretched, producing PSI sparks around himself.
  • Forward Aerial: Ness holds his palm outward, producing PSI sparks that damage opponents multiple times before launching them.
  • Forward Crash: Ness performs a front flip while swinging his yo-yo downward, damaging opponents multiple times before launching them.
  • Back Aerial: Ness throws a dropkick empowered by PSI.
  • Back Crash: Ness turns around and swings his yo-yo backward.
  • Up Aerial: Ness throws an upward headbutt.
  • Up Crash: Ness sends his yo-yo straight upward before reeling it back in.
  • Down Aerial: Ness stomps downward. The move can meteor smash opponents.
  • Down Crash: Ness sends his yo-yo straight downward before reeling it back in.

  • Grab: Ness reaches out with both hands to grab the opponent.
  • Pummel: Ness headbutts the opponent.
  • Forward Throw: Ness psychokinetically spins the opponent in a circle in front of himself before flinging them forward.
  • Back Throw: Ness psychokinetically swings the opponent over his head before flinging them backward.
  • Up Throw: Ness psychokinetically spins the opponent around himself before flinging them upward.
  • Down Throw: Ness throws the opponent on the ground and scorches them with PK Fire.

  • Neutral Special - PK Flash: A green plasma-like energy projectile appears above Ness. As the special attack button is held, the sphere moves downwards and increases in power, until the attack button is released or until it is fully charged, it explodes. Ness is left vulnerable while charging.
    • Custom 1 - PK Flash Finder: The projectile targets the nearest opponent as it is charging. Deals less damage.
    • Custom 2 - Safe PK Flash: Ness glows green while charging, gaining super armor. The projectile has less range and deals less damage.
    • Custom 3 - Extreme PK Flash: The projectile takes longer to charge, but the explosion covers more range and deals more damage.
  • Side Special - PK Fire: Ness fires a yellow, lightning-bolt shaped projectile, that travels in a straight line until it hits an opponent or surface, at which point it explodes into a gradually-fading pillar of fire, damaging opponents multiple times. If used in midair, Ness fires the bolt diagonally downward.
    • Custom 1 - PK Bonfire: The bolt travels less distance, but the fire is larger and lasts longer, damaging opponents more.
    • Custom 2 - PK Fire Burst: The bolt explodes on impact, launching opponents instead of damaging them multiple times.
    • Custom 3 - PK Wildfire: The bolt creates pillars of flames along the ground as it travels, which gradually damage opponents that stand in it. If used in midair, the bolt will explode on impact, launching opponents in the blast radius.
  • Up Special - PK Thunder: Ness creates an orb of electricity that can be controlled with directional inputs. It can also pass through surfaces. It damages opponents it hits, making them paralyzed. Hitting Ness allows him to use PK Thunder 2, where he launches in the opposite direction he was hit in, damaging opponents he hits. If he hits an opponent, he can use the move again. Otherwise, he enters a helpless state.
    • Custom 1 - Lasting PK Thunder: The orb lasts longer and can pass through opponents. It is harder to control, however.
    • Custom 2 - Automatic PK Thunder: The orb travels in a set path around Ness and hitting him from behind, having him use PK Thunder 2 in a digaonally-upwards angle. He travels less distance, deals less damage, and cannot use it a second time regardless if he hits an opponent or not.
    • Custom 3 - Rolling PK Thunder: The orb is larger and deals more damage to opponents, but travels slower. Ness deals more damage while using PK Thunder 2, but travels less distance.
  • Down Special - PSI Magnet: Ness creates a purple PSI field around himself. He can hold the field up if the special button is held. In this state, projectiles that touch the field will be absorbed, healing Ness slightly.
    • Custom 1 - Damaging PSI Magnet: Instead of healing himself from projectiles, Ness damages opponents from inside the field.
    • Custom 2 - Mega PSI Magnet: The field is much larger, but Ness replenishes less damage from projectiles.
    • Custom 3 - Reflecting PSI Magnet: The field reflects projectiles instead of absorbing them.
  • Final Smash - PK Starstorm: Ness summons Paula and Poo, and together they use PK Starstorm, sending meteor-like projectiles onto the stage and damaging opponents they hit. After awhile, Paula and Poo disappear.
  • Charged State - Lifeup: Ness begins channeling PSI energy within himself, causing him to glow green aura. In this state, he attacks much faster and can launch opponents farther. His projectiles also travel more distance and he can jump higher. His falling speed is also slightly slower.

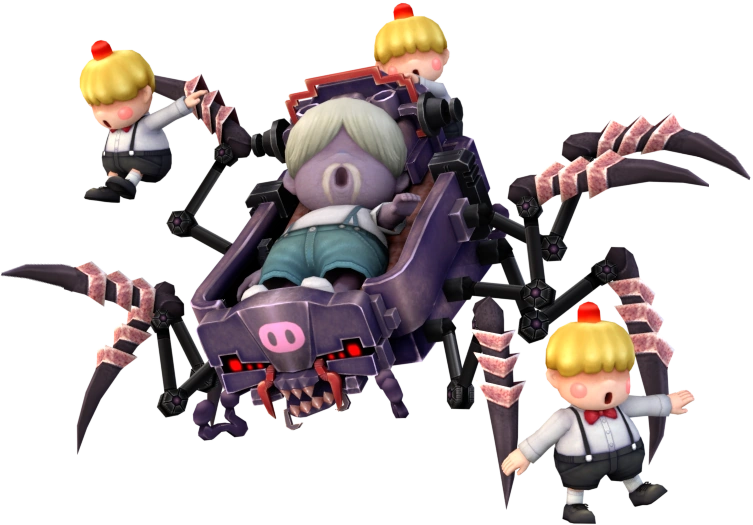
  • Giygas
    MOTHER (1989)
    Giegue concept render by primantis-d4evk99
    Giygas (ギーグ, Gyiyg) is the main antagonist of MOTHER and EarthBound. Known as the Embodiment of Evil, he comes from an alien race that originally had the power of PSI, and after failing to reclaim it from humans, he set out to trap all of reality in infinite darkness. His design in Super Smash Bros. is taken from his prototype design, though his final design, called his "true form", is used in some of his attacks.

    Giygas has a lot of strange moves. At first glance, they don't look coherent with each other like other characters, but are in fact coherent for that reason alone. Many of his attacks have unique properties, such as oddly-placed hitboxes, attacks that can cause effects on opponents, and a very strange set of special moves. Mastery of all of these moves is very difficult, but each one of them serve a purpose; in practice, he is very combo-oriented, with many moves such as his dash attack and neutral special being good combo starters, and quick frame data to keep combos going.

    Giygas' stats are a mixed bag; despite being tall, he is rather light and can be knocked away easily. However, he also has high jump height and slow falling speed. Ground and air mobility are also above average. These traits make him seem like a glass cannon, even though he lacks a lot of strong attacks. Rather, the attacks that have oddly-placed hitboxes and attacks that inflict negative effects can be used in interesting areas to fend for himself.
    SSB EarthBound Series Giygas Stock Icon SSBCharged Icon
    Giygas' Moveset

    • Neutral Attack: Giygas transforms into his true form and begins expelling dark energy, damaging opponents multiple times before launching them.
    • Forward Tilt: Giygas swipes his hand forward. The move can meteor smash opponents.
    • Forward Smash: Giygas slowly levitates forward with his arms crossed. The move deals heavy upward knockback and can be cancelled into other moves.
    • Up Tilt: Giygas creates two red pillars of darkness on either side of himself.
    • Up Smash: Giygas ducks and swipes his tail upward. The move has set knockback, launching opponents in front of him.
    • Down Tilt: Giygas creates a red pillar of darkness above himself that protrudes forward.
    • Down Smash: Giygas begins increasing in size as he charges the move. He then punches the ground, inflicting paralysis on all opponents but dealing no damage.
    • Dash Attack: Giygas lunges forward while slashing. Instead of damaging opponents, he puts them to sleep.
    • Counter: Giygas transforms into his true form and expands to cover the entire screen, heavily damaging the countered opponent and dealing light damage and no flinching to other opponents.

  • Neutral Aerial: Giygas creates a black ring around himself that expands, eventually disappearing. At close range, opponents will be inflicted with paralysis, while at farther range they will simply be knocked away.
  • Forward Aerial: Giygas throws a red sphere of darkness at a diagonally-downwards angle.
  • Forward Crash: Giygas gains backward momentum before striking with his tail.
  • Back Aerial: Giygas swings his tail backward, damaging opponents multiple times before launching them.
  • Back Crash: Giygas gains forward momentum before turning around and throwing an energy-empowered slash with his hand.
  • Up Aerial: Giygas throws a red sphere of dark energy upward. It then splits into five smaller spheres that deal less damage.
  • Up Crash: Giygas creates a burst of red energy above himself. He warps to the ground immediately afterwards.
  • Down Aerial: Giygas creates a red pillar of darkness and protrudes it downward. Opponents are knocked upward.
  • Down Crash: Giygas leaps upward and creates a blast of red energy below himself.

  • Grab: Giygas grabs opponents psychokinetically, holding them where they are regardless if it is in front of him or not.
  • Pummel: Giygas shakes the opponent psychokinetically.
  • Forward Throw: Giygas slams the opponent into the ground in front of him.
  • Back Throw: Giygas throws the opponent upward behind himself.
  • Up Throw: Giygas psychokinetically lifts the opponent into the air before striking them with red energy, launching them.
  • Down Throw: Giygas psychokinetically lifts the opponent above the upper blast zone before slamming them into the ground, freezing them.

  • Neutral Special - Danger Zone: Giygas transforms into his true form and expands for a short time before returning to normal. Any opponents that touch Giygas in this state will be inflicted with a random status ailment, such as freeze, flower, mushroom, and sleep.
    • Custom 1 - Harmful Zone: Giygas damages opponents instead of inflicting effects.
    • Custom 2 - Expanding Danger Zone: Giygas expands farther and covers more range, but the effects on opponents are less pronounced.
    • Custom 3 - Quick Danger Zone: Giygas covers less range, but he can act out of the move faster.
  • Side Special - Warp: Giygas instantly warps behind an opponent in range, and can cancel the move into any attack. It can be used as a situational recovery, though it leaves him in a semi-helpless state if he ends up in midair.
    • Custom 1 - Stunning Warp: Giygas stuns the opponent he warps behind, giving him more time to attack, but he can't warp as far.
    • Custom 2 - Ailment Warp: Giygas deals less damage, but the attack he performs after warping behind an opponent can freeze them, stun them, or cause paralysis.
    • Custom 3 - Long Distance Warp: Giygas can warp farther, but it is more difficult to cancel the move into other attacks as he has noticeable lag after warping.
  • Up Special - Corruption: Giygas transforms into his true form and floats slowly in the direction the control stick is held, damaging opponents multiple times before launching them. He reverts to his normal state and falls into a helpless state afterwards.
    • Custom 1 - Quick Corruption: Giygas travels faster and farther, but deals less damage.
    • Custom 2 - Heavy Corruption: Giygas can deal more damage and covers more range, but travels less distance.
    • Custom 3 - Corruption Overload: Giygas is less controllable, but deals more damage and knockback.
  • Down Special - Devil's Blast: Giygas holds a defensive pose for a short time; in this state, he can float freely through the air with directional inputs. After awhile, he releases a massive blast of red energy that heavily damages opponents in range before falling into a helpless state afterwards. Before he releases the blast, the move can be cancelled into other attacks.
    • Custom 1 - Devilish Blast: The blast can inflict random effects on opponents instead of damaging them, such as freeze, paralysis, flower, and mushroom.
    • Custom 2 - Armored Blast: Giygas has super armor throughout the duration of the move, but the blast covers less range and deals less damage.
    • Custom 3 - Trueform Blast: Giygas transforms into his true form before performing the blast. It takes more time to charge and he is less mobile, but the blast has much more range and deals more damage.
  • Final Smash - Ultimate Giygas: Giygas transforms into his true form and begins expanding, covering the entire stage. He will gradually damage opponents, and by pressing the attack button, he can cause an energy-based explosion by a random opponent, dealing heavy damage and knockback. After awhile, he will revert to his normal state.
  • Charged State - PSI Giygas: Giygas begins glowing red with energy. In this state, the weirdness of his attacks are even more pronounced, with even more awkwardly-placed hitboxes, more exaggerated effects, and more polarizing stats. Additionally, nearly all of his attacks are empowered with red energy.

  • Porky
    EarthBound (1994)
    Porky Charged
    Porky (ポーキー, Pokey), full name Porky Minch, is a recurring antagonist in the MOTHER series. He first appeared in EarthBound as a neighbor of Ness, being a self-centered and spoiled brat. However, he falls under the influence of Giygas and becomes a self-aggrandizing, sadistic monarch. After Ness and his team defeat him, he travels through time to the events of MOTHER 3, where he serves as the main antagonist and the leader of the Pigmask Army. Once again, he is defeated, this time by Lucas and his party.

    Porky battles inside his Bed Mecha in MOTHER 3. Because of this, he is a heavyweight who lacks in mobility, but has surprisingly high jump height. He also has quick, rapid attacks that can cover a lot of range, and he also has a really flexible recovery. However, he suffers from having a really big hurtbox, making him extremely easy to combo, even in comparison to his fellow heavyweights, and this is further compounded by his slow mobility. This is mitigated slightly but the points of the Bed Mecha's legs not having a hurtbox, allowing the moves using them to be disjoints.

    Porky's moveset mostly consists of attacks he uses within the Bed Mecha in MOTHER 3, as well as attacks he uses in The Subspace Emissary in Super Smash Bros. Brawl. The mech's legs are used for a lot of his attacks, where they mainly lunge forward to stab opponents. There are also times where Porky himself attacks.
    SSB EarthBound Series Porky Stock Icon SSBCharged Icon
    Porky's Moveset

    • Neutral Attack: Porky throws a flurry of jabs with one of the Bed Mecha's legs, damaging opponents multiple times before launching them with an upward slash.
    • Forward Tilt: Porky throws three rapid jabs with one of the Bed Mecha's legs.
    • Forward Smash: Porky throws four PSI projectiles with the Bed Mecha's legs forward.
    • Up Tilt: Porky raises two of the Bed Mecha's legs upward.
    • Up Smash: Porky creates a red ball of energy above the Bed Mecha with two of its legs, damaging opponents multiple times before launching them.
    • Down Tilt: Porky leans out of the Bed Mecha and spits out green goo, which creates a puddle when it lands. The spit can damage opponents and the puddle can make them slip.
    • Down Smash: Porky jumps with the Bed Mecha and slams into the ground with it. The move can meteor smash opponents.
    • Dash Attack: Porky slides forward with the Bed Mecha, causing the legs to create sparks on the ground, damaging opponents multiple times before launching them.
    • Counter: Porky lunges forward and stabs with one of the Bed Mecha's legs.

  • Neutral Aerial: Porky discharges electricity from the Bed Mecha, damaging opponents multiple times before launching them.
  • Forward Aerial: Porky throws three rapid jabs with one of the Bed Mecha's legs.
  • Forward Crash: Porky leans out of the Bed Mecha and burps, creating a gas cloud that flies forward.
  • Back Aerial: Porky leans backward with the Bed Mecha.
  • Back Crash: Porky leans out of the Bed Mecha and burps, creating a gas cloud that flies backward.
  • Up Aerial: Porky turns upside down with the Bed Mecha and repeatedly jabs its legs upward, damaging opponents multiple times before launching them.
  • Up Crash: Porky leans out of the Bed Mecha and burps, creating a gas cloud that flies upward.
  • Down Aerial: Porky throws a stomp with the Bed Mecha's legs. The move can meteor smash opponents.
  • Down Crash: Porky leans out of the Bed Mecha and burps, creating a gas cloud that flies downward.

  • Grab: Porky reaches out with one of the Bed Mecha's arms and to grab the opponent.
  • Pummel: Porky electrically shocks the opponent.
  • Forward Throw: Porky throws the opponent forward.
  • Back Throw: Porky throws the opponent backward.
  • Up Throw: Porky hovers upward with the Bed Mecha before falling down and slamming the opponent into the ground.
  • Down Throw: Porky slams the opponent into the ground before the Bed Mecha steps on them repeatedly.

  • Neutral Special - Stinky Gas: Porky discharges gas from the Bed Mecha round himself. Opponents caught in it will have lower attack power and knockback resistance for a short time. The effects will get weaker with repeated uses of the move.
    • Custom 1 - Silent But Deadly: The gas repeatedly damages opponents nearby, but deals no hitstun. Also doesn't lower damage or defense.
    • Custom 2 - Charging Gas: The gas will charge over time when not being used, being very weak if used with no charge. When fully charged, it covers much more range and the effects last longer.
    • Custom 3 - Icy Gas: The gas can damage and freeze opponents instead of lowering their attack and defense.
  • Side Special - Mecha-Porky: A Mecha-Porky leaps out of the Bed Mecha and runs forward, turning at ledges and exploding on contact with opponents. If it is left alone for some time, it will stop and explode on its own. Porky can pick a Mecha-Porky up like an item and throw it at opponents, where it explodes on impact.
    • Custom 1 - Impatient Mecha-Porky: The Mecha-Porky leaps much farther, but doesn't run around and instead explodes upon landing.
    • Custom 2 - Timed Mecha-Porky: The Mecha-Porky runs through opponents, instead working on a six-second timer where it explodes once that amount of time has passed. The explosion is much bigger.
    • Custom 3 - Multi-Porkies: Porky releases three smaller Mecha-Porkies at once. Each of them have a smaller blast radius and deal less damage.
  • Up Special - Hover Strike: Porky leaps into the air with the Bed Mecha as its legs fold into itself and it morphs into a hovercraft. In this state, he has super armor and can float forward or backward freely, launching a red lightning bolt downward that deals heavy damage. Afterwards, the Bed Mecha morphs back to normal and he falls into a helpless state. Pressing the special button lets him fire the lightning bolt early, and the move can also be cancelled into an airdodge.
    • Custom 1 - Death By Pig: Porky cannot float forward and backward, and instead fires the lightning bolt once he reaches the peak of his height. The bolt does more damage and knockback.
    • Custom 2 - Hover Multistrike: Porky can fire up to four bolts while hovering by pressing the special button. However, he loses his super armor.
    • Custom 3 - Hover Pulse: Instead of firing a bolt downward, the Bed Mecha discharges a field of red energy around itself, damaging opponents multiple times before launching them.
  • Down Special - Pig Laser: The Bed Mecha creates a red ball of energy above itself, which fires a laser aimed at the nearest opponent, damaging them. The laser can be delayed for a bit if the special button is held. If no opponents are in range, no laser will appear.
    • Custom 1 - Pig Beam: Porky fires a red beam instead of a laser, which is slower and easier to dodge, but damages opponents multiple times before launching them.
    • Custom 2 - Aimed Laser: Instead of firing the laser at the nearest opponent, it can be fired in any direction with directional inputs.
    • Custom 3 - Ranged Laser: The laser deals less damage, but it can be fired at opponents from farther away.
  • Final Smash - Porky Statue: Porky summons the Porky Statue, which falls from above and starts walking around the stage. It will heavily damage opponents it walks into, and it will also jump and attack by extending its arms. After awhile, it will disappear.
  • Charged State - Porky Means Business: Porky's Bed Mecha begins short-circuiting, causing it to glow with red energy. In this state, Porky is much faster and can jump higher. Many of his attacks are also enhanced by electricity, dealing more damage and knockback.

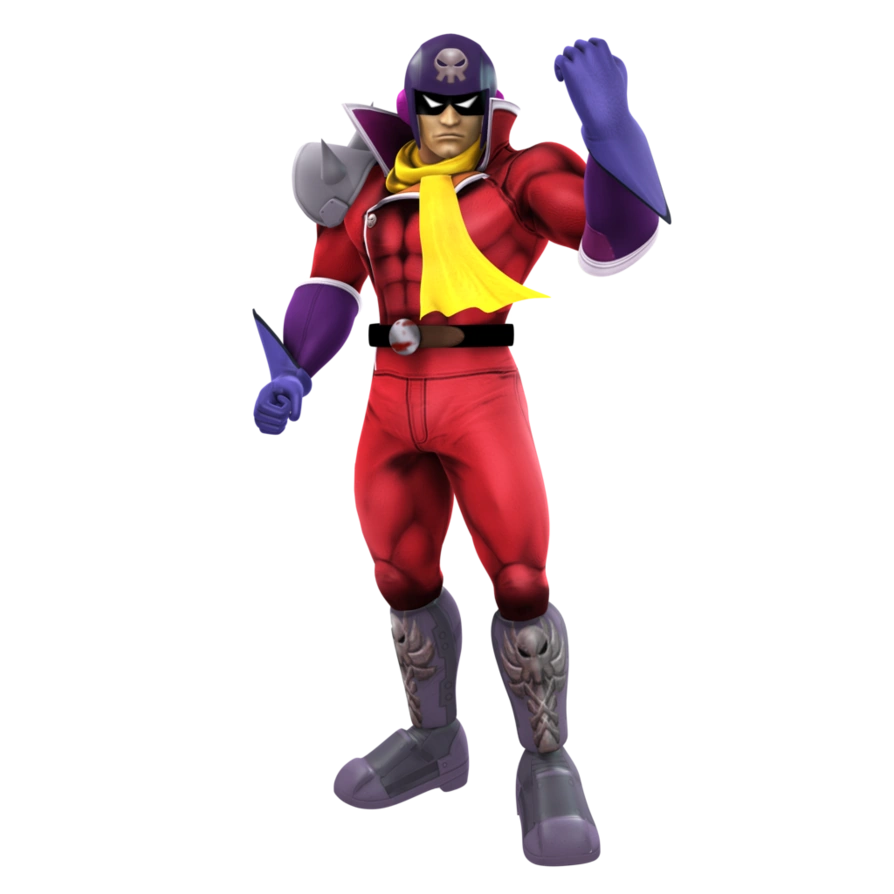
  • Captain Falcon
    F-Zero (1991)
    CaptainFalcon SSBUltimate
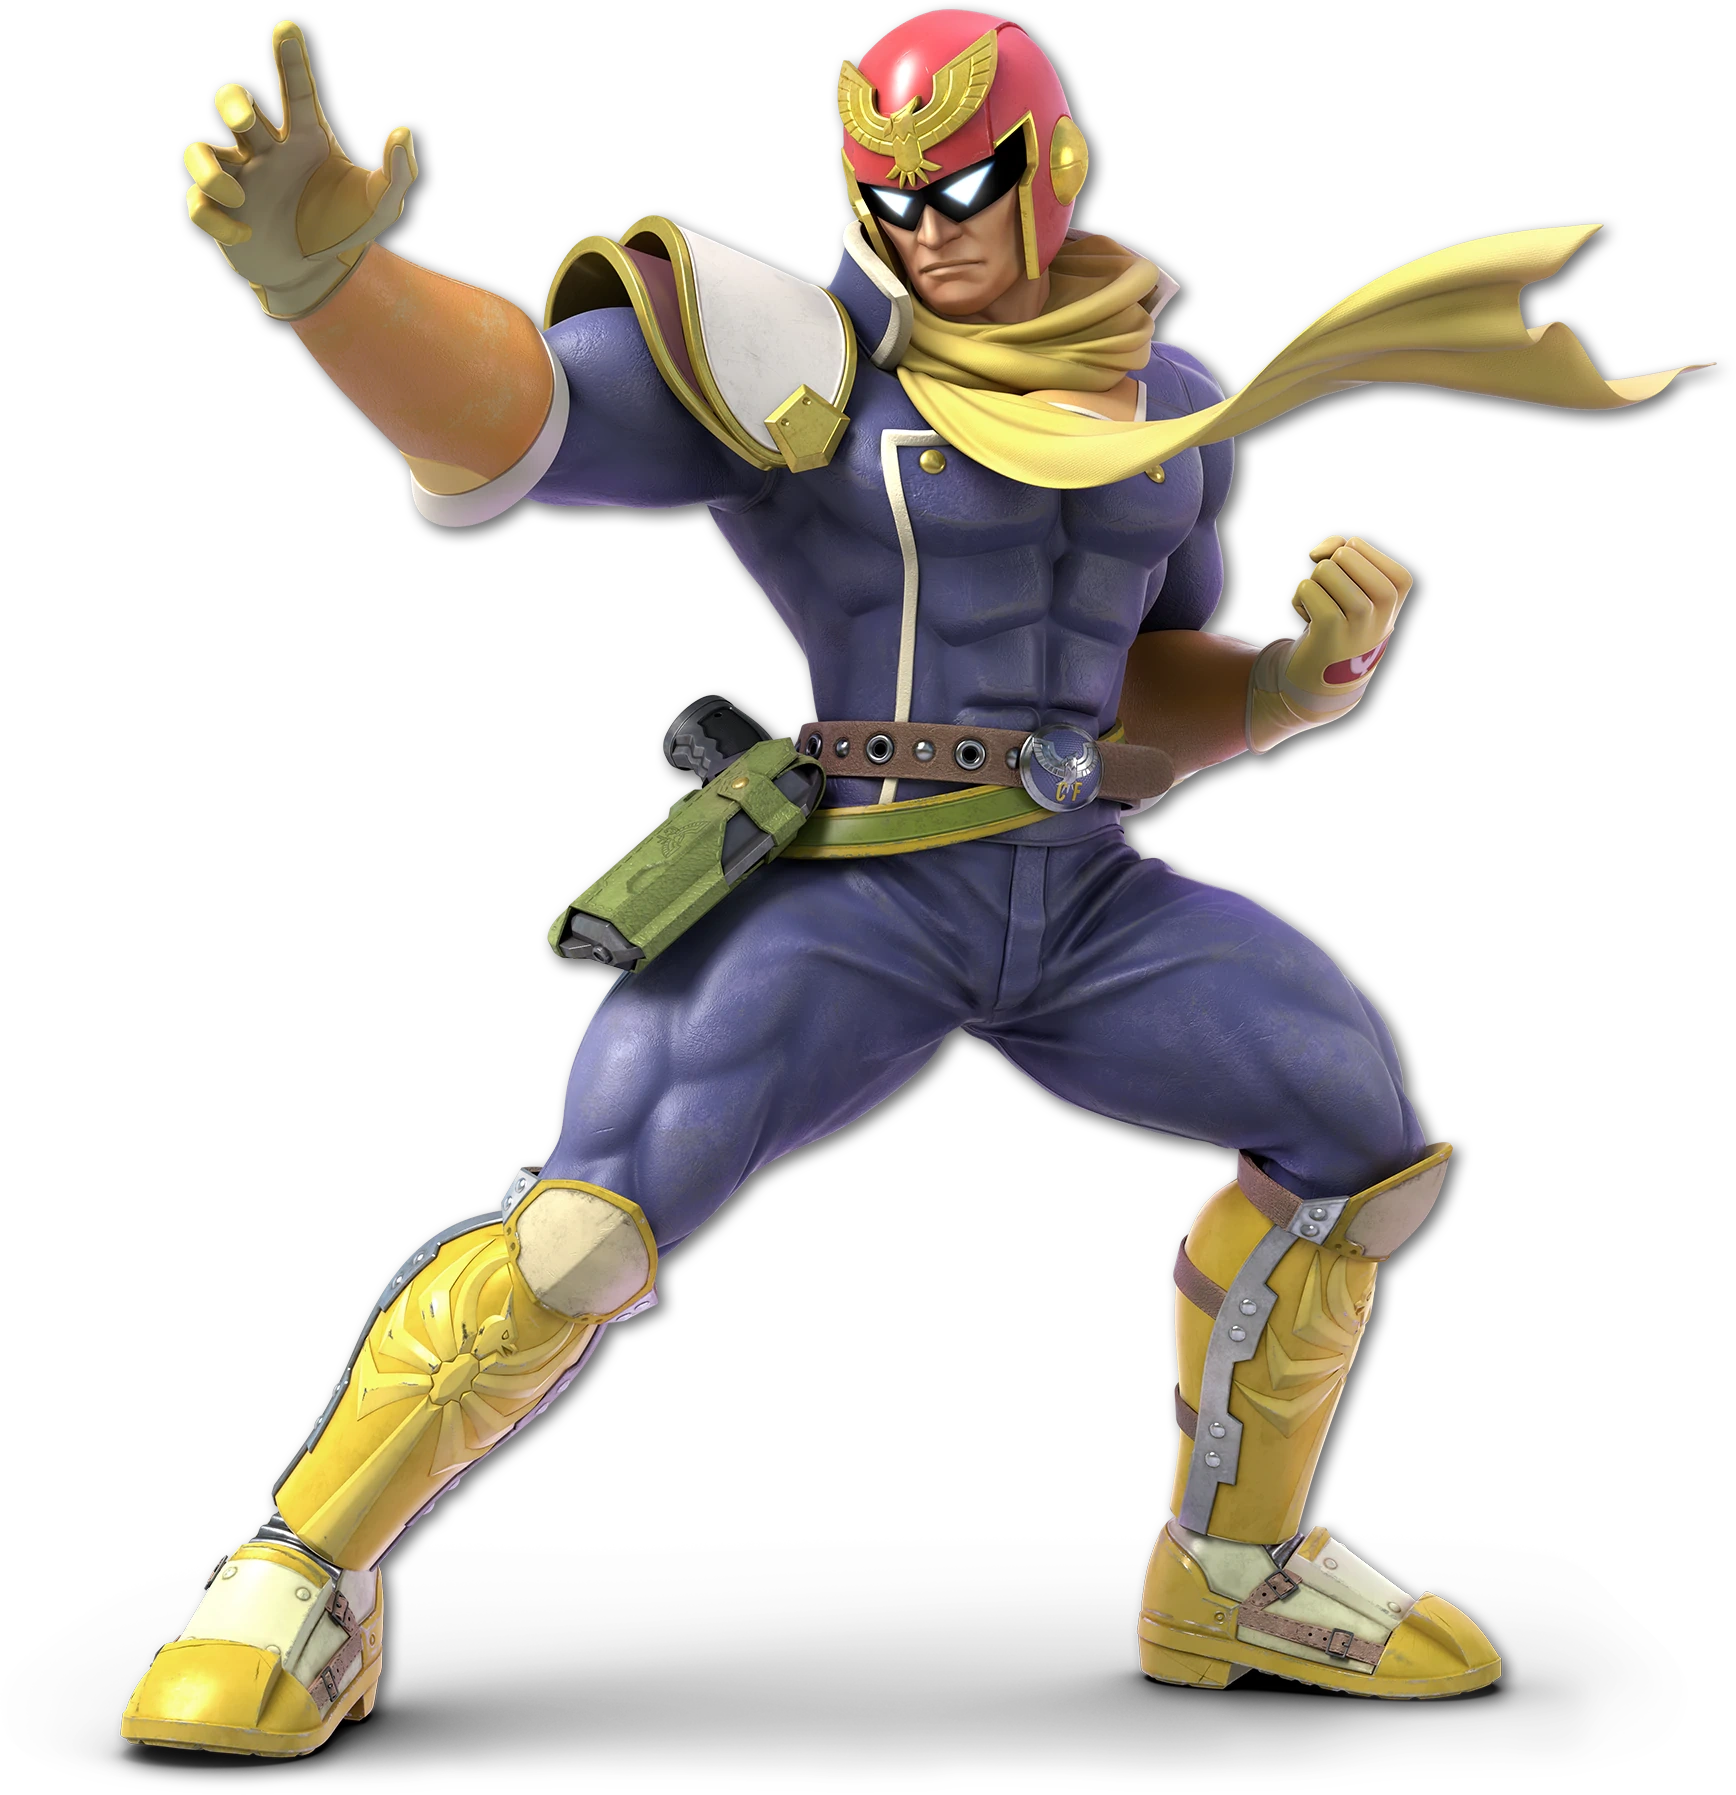
    Captain Falcon (キャプテンファルコン, Captain Falcon), full name Douglas Jay Falcon, is the main character of the F-Zero racing series, and the mascot of the series. In races, his personal machine is the Blue Falcon, a balanced vehicle with stats suited to beginner racers. When not racing, he takes up bounty hunting.

    Captain Falcon is one of the fastest characters in the game, boasting fast ground and air speed. This allows him to rush at opponents with ease. The power of his attacks is also equally strong, allowing him to KO as quickly as the heavyweight fighters. Key to his character is his impressive combo game, where he can combine speed and power to rack up damage on opponents and set up for a KO. However, he has trouble with recovery, and his fast falling speed and lead him to get comboed as well.

    Captain Falcon's moveset from previous games is more or less retained. However, he has been given more options and tools that give his moveset some additional flare, as well as making him a more offensive fighter overall.
    SSB F-Zero Series CaptainFalconHeadSSBU SSB64 Icon
    Captain Falcon's Moveset

    • Neutral Attack: Captain Falcon throws two punches followed by a knee smash. If the attack button is tapped repeatedly, he instead follows with a flurry of punches, finishing with an uppercut.
    • Forward Tilt: Captain Falcon throws a roundhouse kick.
    • Forward Smash: Captain Falcon rears back and throws a fire-enhanced elbow strike.
    • Up Tilt: Captain Falcon throws an axe kick. The move can meteor smash opponents.
    • Up Smash: Captain Falcon performs a spinning double hop kick.
    • Down Tilt: Captain Falcon throws a sweep kick. The move can trip opponents.
    • Down Smash: Captain Falcon throws a kick forward then throws a kick backward.
    • Dash Attack: Captain Falcon throws an electrically-charged flying knee smash. The move has a sweetspot that deals heavy damage and knockback.
    • Counter: Captain Falcon throws a fire-enhanced elbow strike.

  • Neutral Aerial: Captain Falcon throws two kicks forward.
  • Forward Aerial: Captain Falcon throws an electrically-charged knee smash. The move has a sweetspot that deals heavy damage and knockback.
  • Forward Crash: Captain Falcon throws a fire-enhanced haymaker. The move can meteor smash opponents.
  • Back Aerial: Captain Falcon throws a backhanded punch backward.
  • Back Crash: Captain Falcon throws a fire-enhanced back kick.
  • Up Aerial: Captain Falcon throws a bicycle kick.
  • Up Crash: Captain Falcon throws a fire-enhanced bicycle kick.
  • Down Aerial: Captain Falcon stomps downward. The move can meteor smash opponents.
  • Down Crash: Captain Falcon performs a stall-then-fall fire-enhanced stomp.

  • Grab: Captain Falcon reaches out to grab the opponent.
  • Pummel: Captain Falcon knee strikes the opponent.
  • Forward Throw: Captain Falcon punches the opponent, sending them forward.
  • Back Throw: Captain Falcon kicks the opponent backward.
  • Up Throw: Captain Falcon uppercuts the opponent upward.
  • Down Throw: Captain Falcon holds the opponent overhead before slamming them into the ground.

  • Neutral Special - Falcon Punch: Captain Falcon throws a fire-enhanced punch, with a falcon symbol appearing as he punches. If the special button is held, the move will charge, allowing it to deal more damage and knockback, as well as cover more range. While charging, he can turn around if the opposite direction on the control stick is held.
    • Custom 1 - Falcon Dash Punch: Captain Falcon dashes forward when he punches, with the distance increasing depending on how long the move is charged. It deals much less damage however.
    • Custom 2 - Stored Falcon Punch: The move takes longer to charge and deals less damage, but the charging can be cancelled by performing any other action, allowing the charge to be stored.
    • Custom 3 - Mighty Falcon Punch: Captain Falcon automatically charges the move fully. This gives it much more startup lag, though he has super armor while charging and the punch deals much more damage and knockback, as well as cover more range.
  • Side Special - Raptor Boost: Captain Falcon dashes forward. If the move is used in midair, he enters a semi-helpless state afterwards. If he hits an opponent while dashing, he will either uppercut them upward and meteor smash them with a haymaker depending on if the move is used on the ground or in midair. Alternatively, while dashing the move can be cancelled into any other attack.
    • Custom 1 - Heavy Raptor Boost: Captain Falcon dashes slower and cannot cancel the move, but deals more damage and has super armor.
    • Custom 2 - Wind-Up Raptor Boost: Captain Falcon goes backward a bit before dashing forward. The move has more startup lag, but he dashes faster and farther.
    • Custom 3 - Raptor Boost Rush: Captain Falcon dashes faster and farther, but doesn't attack opponents he runs into, and instead knocks them away as he is dashing. This deals less damage.
  • Up Special - Falcon Dive: Captain Falcon leaps upward before falling into a helpless state afterwards. If he hits an opponent while rising, he will grab onto them as an explosion happens, meteor smashing them. Captain Falcon leaps away and can use the move again.
    • Custom 1 - Rising Falcon Dive: Instead of grabbing opponents, Captain Falcon damages them multiple times before launching them as he rises.
    • Custom 2 - Falcon Strike: Captain Falcon travels higher, but will not grab opponents. Instead, he creates an explosion at the peak of his jump, damaging opponents in the blast radius.
    • Custom 3 - Explosive Falcon Dive: Captain Falcon has more startup lag and doesn't travel as high, but the explosion deals much more damage. It doesn't meteor smash opponents, but rather sends them upward.
  • Down Special - Falcon Kick: Captain Falcon bursts forward with a fire-enhanced kick. If the move is used in midair, he performs a stall-then-fall kick that travels in a diagonally-downward angle. He damages opponents he runs into, and the move can be cancelled into any other attack.
    • Custom 1 - Lightning Falcon Kick: Captain Falcon has more startup lag, but travels faster. Instead o launching opponents, he inflicts paralysis on them, leaving them vulnerable.
    • Custom 2 - Falcon Kick Fury: Captain Falcon travels less distance, but damages opponents multiple times before launching them.
    • Custom 3 - Falcon Kick Blast: When Captain Falcon runs into an opponent, he causes an explosion that damages all opponents in the blast radius before leaping backward.
  • Final Smash - Blue Falcon: Captain Falcon summons the Blue Falcon, which rushes across the stage in front of himself. If it hits an opponent, they are locked in a cinematic where Captain Falcon runs them over with the Blue Falcon. This sends them back to the stage, dealing heavy damage.
  • Charged State - Fiery Falcon: Captain Falcon ignites himself in flames. In this state, his attacks are much more stronger, and most of them are now fire-enhanced. Falcon Punch also takes much less time to charge, and Raptor Boost and Falcon Kick travel much farther.

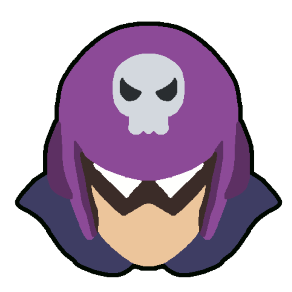
  • Blood Falcon (ε)
    F-Zero X (1998)
    BloodFalconSSBC
    Blood Falcon (ブラッドファルコン, Blood Falcon) is a genetic clone made from Captain Falcon's DNA, stolen when he was hospitalized after a huge crash four years prior. He is capable of everything his original counterpart can do, and has been taught to strictly obey orders from his master, Black Shadow. His personal machine is the Blood Hawk; though originally made to be a replica of the Blue Falcon in terms of stats, though it has slightly more speed at the cost of handling.

    Blood Falcon is Captain Falcon's Echo Fighter, and as such they share a lot of the same moves. They are similar in stats, though Blood Falcon is slightly slower in exchange for having more power. He also borrows some attacks from Ganondorf, and as such serves as an in-between for Captain Falcon and Ganondorf.
    SSB F-Zero Series Bloodfalconstock SSBCharged Icon
    Blood Falcon's Moveset

    • Neutral Attack: Blood Falcon throws two punches followed by a knee smash. If the attack button is tapped repeatedly, he instead follows with a flurry of punches, finishing with an uppercut.
    • Forward Tilt: Blood Falcon throws a roundhouse kick.
    • Forward Smash: Blood Falcon rears back and throws a fire-enhanced elbow strike.
    • Up Tilt: Blood Falcon throws an axe kick. The move can meteor smash opponents.
    • Up Smash: Blood Falcon performs a spinning double hop kick.
    • Down Tilt: Blood Falcon throws a sweep kick. The move can trip opponents.
    • Down Smash: Blood Falcon throws a kick forward then throws a kick backward.
    • Dash Attack: Blood Falcon throws an electrically-charged flying knee smash. The move has a sweetspot that deals heavy damage and knockback.
    • Counter: Blood Falcon throws a fire-enhanced elbow strike.

  • Neutral Aerial: Blood Falcon throws two kicks forward.
  • Forward Aerial: Blood Falcon throws a fire-enhanced haymaker.
  • Forward Crash: Blood Falcon throws a fire-enhanced flying kick.
  • Back Aerial: Blood Falcon throws a backhanded punch backward.
  • Back Crash: Blood Falcon throws a fire-enhanced back kick.
  • Up Aerial: Blood Falcon throws a bicycle kick.
  • Up Crash: Blood Falcon throws a fire-enhanced bicycle kick.
  • Down Aerial: Blood Falcon stomps downward. The move can meteor smash opponents.
  • Down Crash: Blood Falcon performs a stall-then-fall fire-enhanced stomp.

  • Grab: Blood Falcon reaches out to grab the opponent.
  • Pummel: Blood Falcon knee strikes the opponent.
  • Forward Throw: Blood Falcon punches the opponent, sending them forward.
  • Back Throw: Blood Falcon kicks the opponent backward.
  • Up Throw: Blood Falcon uppercuts the opponent upward.
  • Down Throw: Blood Falcon holds the opponent overhead before slamming them into the ground.

  • Neutral Special - Falcon Punch: Blood Falcon throws a fire-enhanced punch, with a falcon symbol appearing as he punches. If the special button is held, the move will charge, allowing it to deal more damage and knockback, as well as cover more range. While charging, he can turn around if the opposite direction on the control stick is held.
    • Custom 1 - Falcon Dash Punch: Blood Falcon dashes forward when he punches, with the distance increasing depending on how long the move is charged. It deals much less damage however.
    • Custom 2 - Stored Falcon Punch: The move takes longer to charge and deals less damage, but the charging can be cancelled by performing any other action, allowing the charge to be stored.
    • Custom 3 - Mighty Falcon Punch: Blood Falcon automatically charges the move fully. This gives it much more startup lag, though he has super armor while charging and the punch deals much more damage and knockback, as well as cover more range.
  • Side Special - Blood Choke: Blood Falcon dashes forward. If the move is used in midair, he enters a semi-helpless state afterwards. If he hits an opponent while dashing, Blood Falcon will instead hold the opponent by the throat upward and send them into the ground. If this is done in midair, he will grab the opponent and fall downwards with them until they hit a surface or blast zone. Pressing the attack button in this state will allow Blood Falcon to cause an explosion and leap off of them, dealing heavy damage. Alternatively, while dashing the move can be cancelled into any other attack.
    • Custom 1 - Heavy Blood Choke: Blood Falcon dashes slower and cannot cancel the move, but deals more damage and has super armor.
    • Custom 2 - Wind-Up Blood Choke: Blood Falcon goes backward a bit before dashing forward. The move has more startup lag, but he dashes faster and farther.
    • Custom 3 - Blood Choke Rush: Blood Falcon dashes faster and farther, but doesn't attack opponents he runs into, and instead knocks them away as he is dashing. This deals less damage.
  • Up Special - Falcon Dive: Blood Falcon leaps upward before falling into a helpless state afterwards. If he hits an opponent while rising, he will grab onto them as an explosion happens, meteor smashing them. Blood Falcon leaps away and can use the move again.
    • Custom 1 - Rising Falcon Dive: Instead of grabbing opponents, Blood Falcon damages them multiple times before launching them as he rises.
    • Custom 2 - Falcon Strike: Blood Falcon travels higher, but will not grab opponents. Instead, he creates an explosion at the peak of his jump, damaging opponents in the blast radius.
    • Custom 3 - Explosive Falcon Dive: Blood Falcon has more startup lag and doesn't travel as high, but the explosion deals much more damage. It doesn't meteor smash opponents, but rather sends them upward.
  • Down Special - Falcon Kick: Blood Falcon bursts forward with a fire-enhanced kick. If the move is used in midair, he performs a stall-then-fall kick that travels in a diagonally-downward angle. He damages opponents he runs into, and the move can be cancelled into any other attack.
    • Custom 1 - Lightning Falcon Kick: Blood Falcon has more startup lag, but travels faster. Instead o launching opponents, he inflicts paralysis on them, leaving them vulnerable.
    • Custom 2 - Falcon Kick Fury: Blood Falcon travels less distance, but damages opponents multiple times before launching them.
    • Custom 3 - Falcon Kick Blast: When Blood Falcon runs into an opponent, he causes an explosion that damages all opponents in the blast radius before leaping backward.
  • Final Smash - Blood Hawk: Blood Falcon summons the Blood Hawk, which rushes across the stage in front of himself. If it hits an opponent, they are locked in a cinematic where Blood Falcon runs them over with the Blood Hawk. This sends them back to the stage, dealing heavy damage.
  • Charged State - Fiery Falcon: Blood Falcon ignites himself in flames. In this state, his attacks are much more stronger, and most of them are now fire-enhanced. Falcon Punch also takes much less time to charge, and Raptor Boost and Falcon Kick travel much farther.

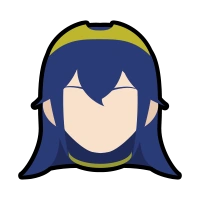
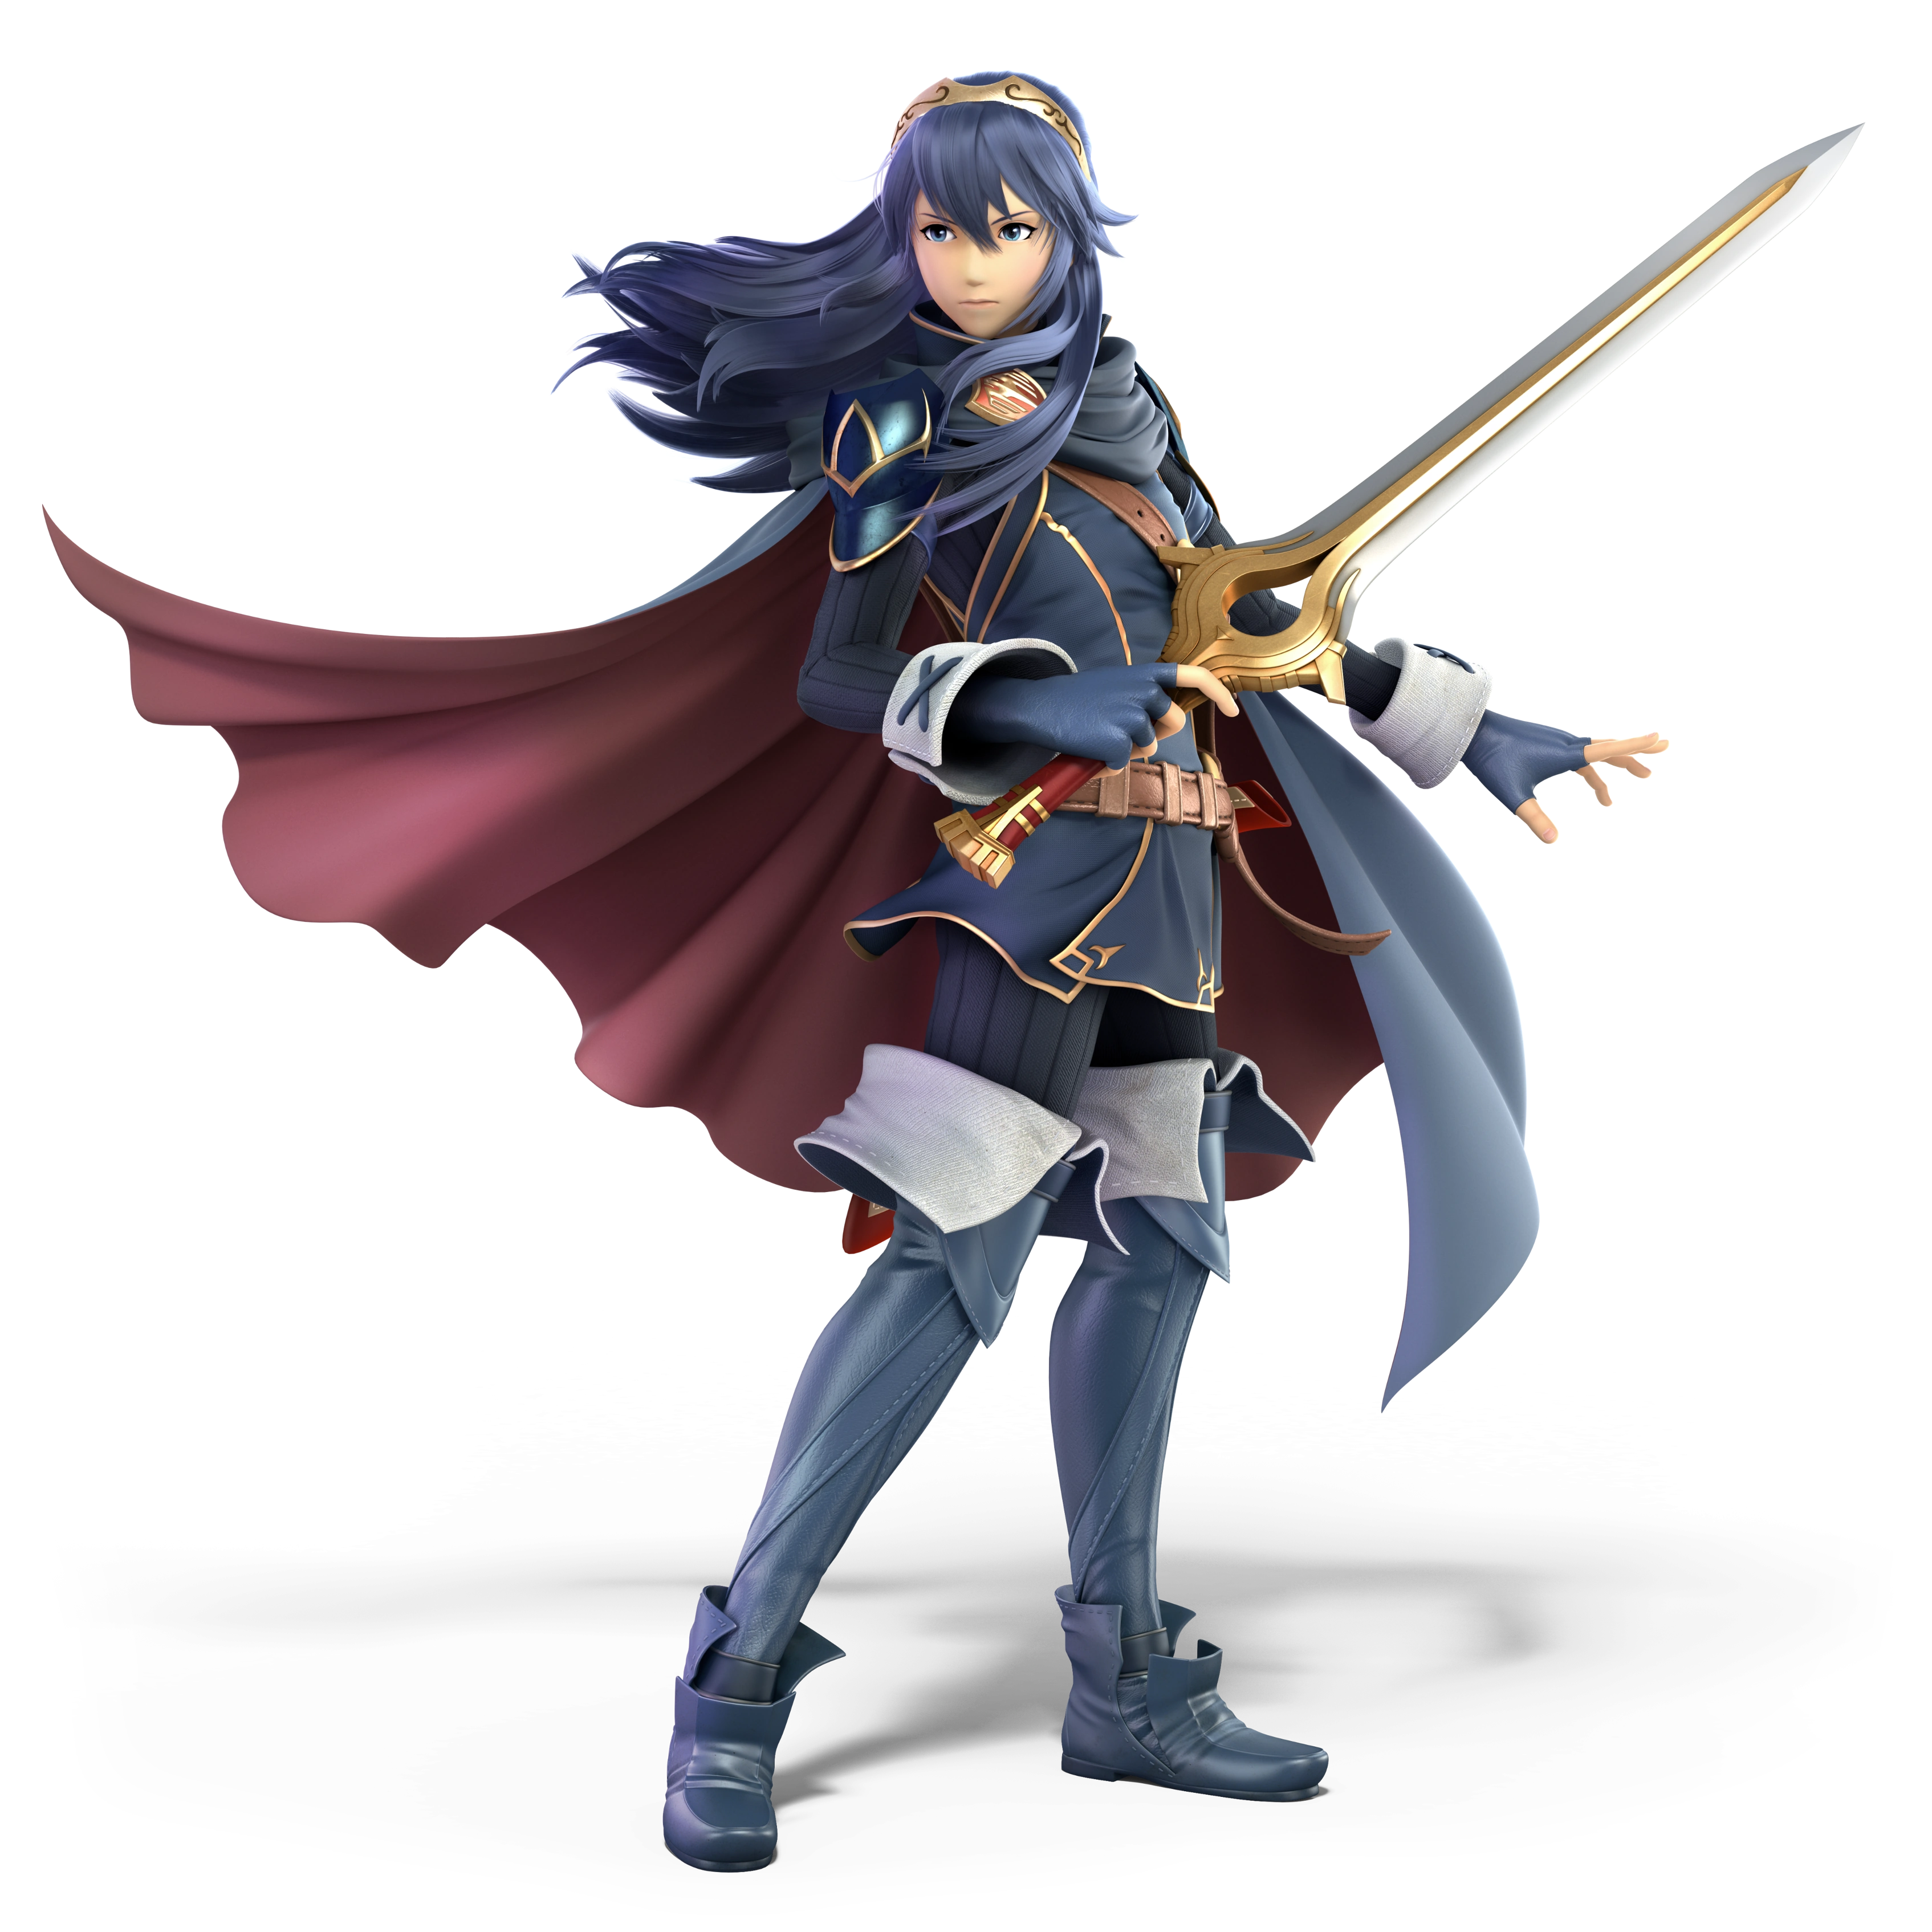
  • Lucina (ɛ)
    Fire Emblem Awakening (2012)
    Lucina (ルキナ, Lucina) is one of the main protagonists of the thirteenth game in the Fire Emblem series. She, alongside her father Chrom, are descendants of Marth. She is the princess of Ylisse. In the game, she travels to the past to help save the world from a future threat. She disguises herself as Marth, and takes up his anme to keep from being found.

    Lucina is Marth's Echo Fighter, and as such they share many of the same attacks and traits. Their movesets are identical, but Lucina wields a different sword; the Falchion Parallel. Compared to Marth's Falchion, the Falchion Parallel doesn't have any sweetspots or sourspots, and instead deals an equal amount of damage across the blade. However, she benefits from having faster frame data than Marth, as well as having slightly faster mobility, meaning she doesn't need to rely on the sourspots for combos.
    SSB Fire Emblem Series LucinaHeadSSBU SSB4 Icon
    Lucina's Moveset

    • Neutral Attack: Lucina slashes the Falchion Parallel twice in front of herself.
    • Forward Tilt: Lucina slashes the Falchion Parallel upward.
    • Forward Smash: Luicina spins around before throwing an overhead slash from her head to the ground.
    • Up Tilt: Lucina swings the Falchion Parallel upward in an overarching motion.
    • Up Smash: Lucina thrusts the Falchion Parallel upward.
    • Down Tilt: Lucina kneels while poking the Falchion Parallel forward.
    • Down Smash: Lucina sweeps the ground in front of herself with the Falchion Parallel before turning around and sweeping behind herself.
    • Dash Attack: Lucina throws a diagonal slash with the Falchion Parallel while running forward.
    • Counter: Lucina slashes the Falchion Parallel.

  • Neutral Aerial: Lucina throws an inward slash with the Falchion Parallel followed by an outward slash while spinning.
  • Forward Aerial: Lucina throws a descending crescent slash with the Falchion Parallel.
  • Forward Crash: Lucina throws an outward slash with the Falchion Parallel.
  • Back Aerial: Lucina throws an inward slash with the Falchion Parallel backward.
  • Back Crash: Lucina throws an upward crescent slash with the Falchion Parallel backward.
  • Up Aerial: Lucina thrusts the Falchion Parallel upward.
  • Up Crash: Lucina throws an overhead crescent slash with the Falchion Parallel.
  • Down Aerial: Lucina throws a downward crescent slash with the Falchion Parallel. The move can meteor smash opponents.
  • Down Crash: Lucina performs a stall-then-fall slash with the Falchion Parallel.

  • Grab: Lucina reaches out to grab the opponent.
  • Pummel: Lucina knee strikes the opponent.
  • Forward Throw: Lucina throws the opponent forward.
  • Back Throw: Lucina turns around and throws the opponent backward.
  • Up Throw: Lucina tosses the opponent upward.
  • Down Throw: Lucina slams the opponent into the ground.

  • Neutral Special - Shield Breaker: Lucina stabs the Falchion Parallel forward. If the special button is held, the move will charge, increasing the damage dealt. The move deals impressive shield damage, to the point where it can immediately break a shield. If used in midair, Lucina will propel forward upon using the move.
    • Custom 1 - Storm Thrust: Lucina creates windboxes as she stabs the Falchion forward, pushing opponents away. The move deals less damage and significantly less shield damage.
    • Custom 2 - Dashing Assault: Lucina propels herself forward while stabbing the Falchion Parallel, with him travelling farther depending on the charge of the move. Deals less damage and significantly less shield damage.
    • Custom 3 - Shield Slash: Luicina throws an overhead slash with the Falchion Parallel instead of stabbing it forward. The move deals less damage but has a wider range.
  • Side Special - Dancing Blade: Lucina slashes the Falchion Parallel forward. If she hits an opponent, repeatedly tapping the special button allows her to perform a fast sequence of slashes before launching them. Directional inputs can be held during the sequence to alter the attacks she performs, which have varying damages and knockback trajectories. The special button can be tapped continually for her to infinitely continue slashing, but each consecutive slash is easier for the opponent to escape.
    • Custom 1 - Effortless Blade: The attacks are easier to link, but Lucina can only perform a certain chain of slashes.
    • Custom 2 - Heavy Blade: The move has more startup and endlag, and the attacks are harder to link, but they deal significantly more damage and knockback.
    • Custom 3 - Quick Blade: The attacks link faster and are harder to escape, but Lucina will perform significantly less slashes.
  • Up Special - Dolphin Slash: Lucina leaps upward while performing an upward crescent slash with the Falchion Parallel, damaging opponents she hits and falling into a helpless state afterwards.
    • Custom 1 - Crescent Slash: Lucina leaps at a more horizontal angle, improving horizontal distance but decreasing vertical distance.
    • Custom 2 - Dolphin Jump: Lucina leaps higher, but will not damage opponents.
    • Custom 3 - Dolphin Assault: Lucina damages opponents multiple times before launching them as he rises. She leaps slightly slower and has more startup lag, but travels higher.
  • Down Special - Pavise: Lucina holds the Falchion Parallel in a defensive way, allowing her to reflect projectiles and have super armor against attacks aimed in front of her. She can hold this position if the special button is held, and releasing the special button allows her to slash forward.
    • Custom 1 - Pavise Attack: Lucina slashes the Falchion Parallel immediately. This slash can reflect projectiles and turn opponents around.
    • Custom 2 - Defensive Pavise: Lucina has more startup lag when using the slash attack, but it deals more damage.
    • Custom 3 - Focused Pavise: Lucina doesn't have super armor, but any damage she takes while in Pavise state will replenish her health. However, the slash is weaker and she cannot reflect projectiles.
  • Final Smash - Critical Hit: Lucina dashes forward with the Falchion Parallel, slashing the first opponent she runs into, dealing heavy damage and knockback.
  • Charged State - Falchion Power: Lucina holds the Falchion Parallel upward as it starts glowing. In this state, her attacks deal more damage and have slightly more range. She is also a bit faster on the ground and in the air.

  • Roy
    Super Smash Bros. Melee (2001)
    Roy SSBUltimate
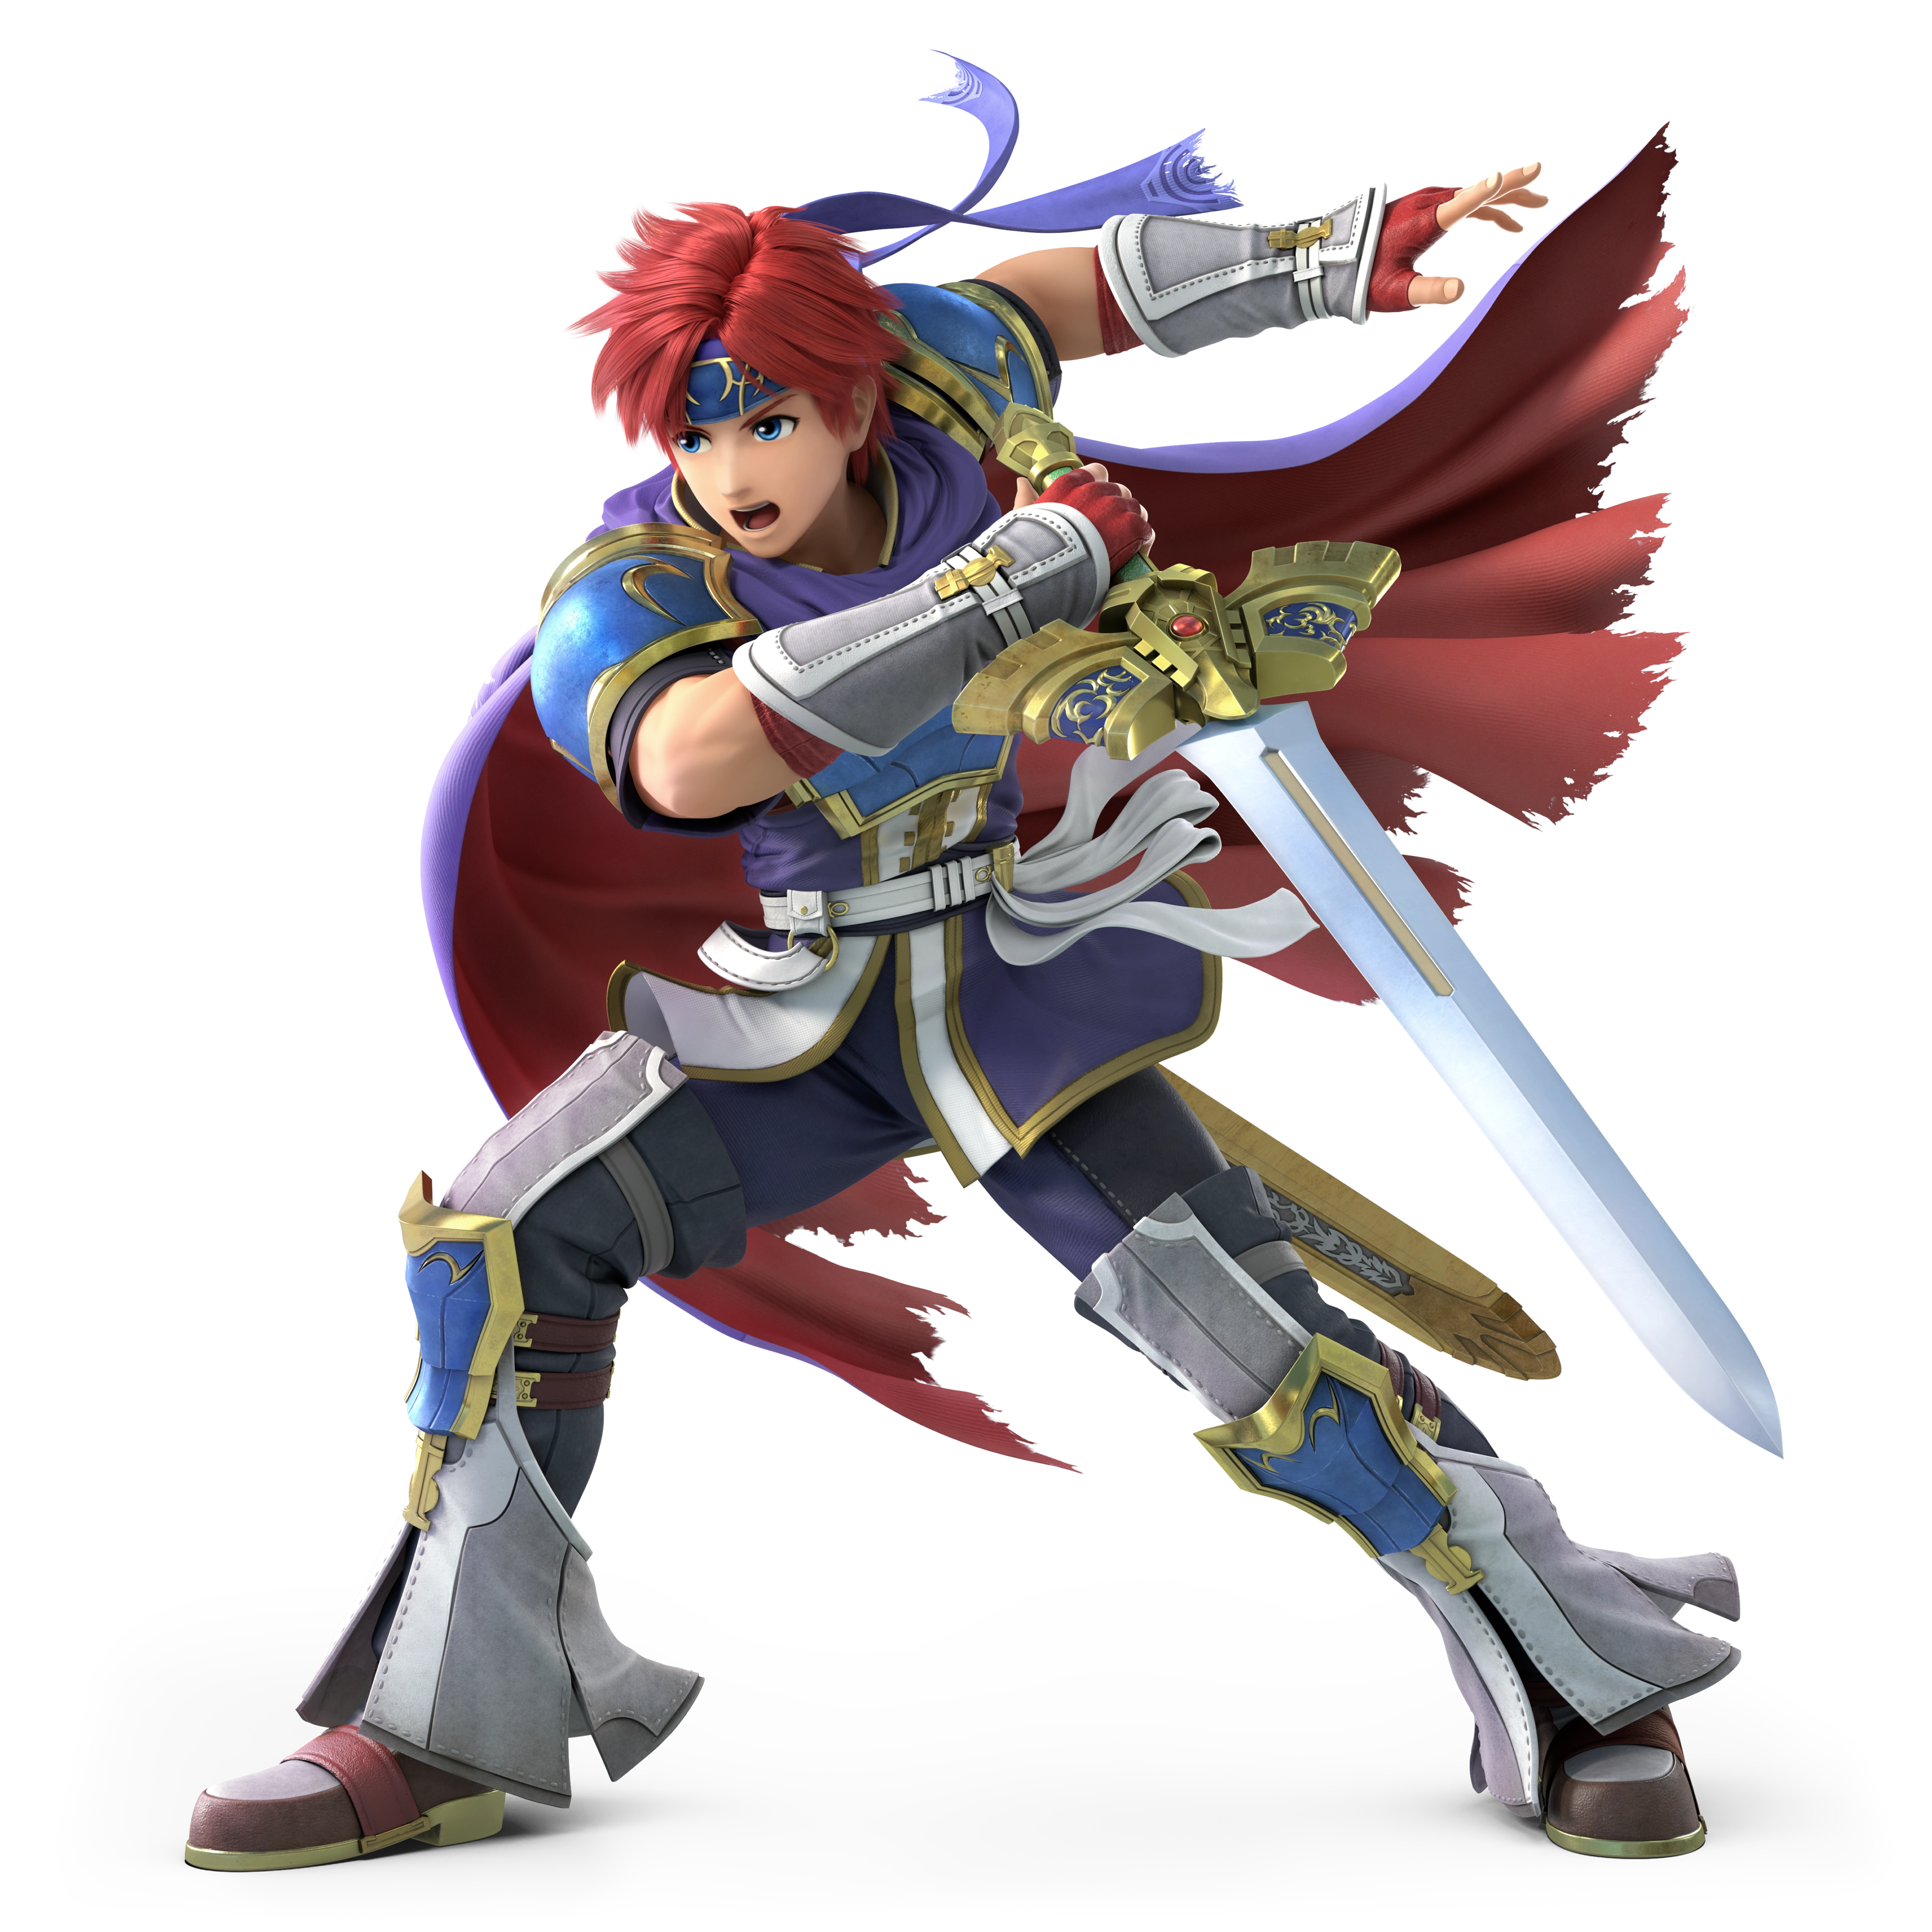
    Roy (ロイ, Roy) is the main protagonist of the sixth game of the Fire Emblem series. He is the son of Eliwood, the lord of Pharae. He was studying Ostia when the kingdom of Bern was invaded by the league of Lycia, and his father also fell ill around this time. Because of this, Roy assumed lordship and lead the troops of Pharae in his steed. Fire Emblem: The Blazing Blade serves as a prequel to this story and features Eliwood as the main character, its events leading to Fire Emblem: The Binding Blade.

    Roy is a bit of a semi-clone of Marth. He wields the Sword of Seals in battle, but unlike Marth, the blade is strongest at the hilt rather tan the tip. This means that while his sword does provide range like other swordfighters, Roy plays most effectively at close range. He has low jump height and a predictable recovery, though his ground speed is good and his attacks are quick and fast. He also has strong KO power should opponents be struck with the hilt.

    Roy's entire moveset consists of swings and slashes from the Sword of Seals. Uniquely, if an opponent is struck by Roy's sweet spots at the hilt, a flame effect will be added to the attack, dealing more damage and knockback. Overall, he has a strong offense, but poor defense.
    SSB Fire Emblem Series RoyHeadSSBU SSBM Icon
    Roy's Moveset

    • Neutral Attack: Roy throws a reverse-grip upward slash with the Sword of Seals.
    • Forward Tilt: Roy throws a reverse-grip downward slash with the Sword of Seals.
    • Forward Smash: Roy throws a two-handed downward slash with the Sword of Seals.
    • Up Tilt: Roy throws a reverse-grip upward arching slash with the Sword of Seals.
    • Up Smash: Roy thrusts the Sword of Seals upwards, causing it to ignite in flames, damaging opponents multiple times before launching them with an explosion.
    • Down Tilt: Roy throws a kneeling stab with the Sword of Seals.
    • Down Smash: Roy throws a kneeling downward slash with the Sword of Seals in front of himself, then behind himself.
    • Dash Attack: Roy throws an inward horizontal slash across the ground with the Sword of Seals.
    • Counter: Roy slashes the Sword of Seals as it ignites in flames.

  • Neutral Aerial: Roy throws an inward slash with the Sword of Seals followed by an outward slash.
  • Forward Aerial: Roy throws a downward slash with the Sword of Seals.
  • Forward Crash: Roy throws a stab with the Sword of Seals as it causes an explosion at the tip.
  • Back Aerial: Roy throws an upward slash with the Sword of Seals behind himself.
  • Back Crash: Roy turns around and throws a downward slash with the Sword of Seals. The move can meteor smash opponents if it connects at the hilt.
  • Up Aerial: Roy throws an upward arching slash with the Sword of Seals while performing a backflip.
  • Up Crash: Roy thrusts the Sword of Seals upward.
  • Down Aerial: Roy throws a two-handed downward slash with the Sword of Seals between his legs. The move can meteor smash opponents.
  • Down Crash: Roy performs a stall-then-fall downward slash with the Sword of Seals.

  • Grab: Roy reaches out to grab the opponent.
  • Pummel: Roy knee strikes the opponent.
  • Forward Throw: Roy throws an elbow strike, launching the opponent away.
  • Back Throw: Roy tosses the opponent behind himself.
  • Up Throw: Roy heaves the opponent upward.
  • Down Throw: Roy slams the opponent into the ground.

  • Neutral Special - Flare Blade: Roy throws a two-handed downward slash with the Sword of Seals, generating an explosion. The move can be charged by holding the special button, increasing its power and the size of the explosion. At full charge, it will deal 10% recoil damage to Roy.
    • Custom 1 - Burn Blade: Roy can only attack once the move is fully charged, and it deals less damage, but also charges faster and deals no recoil damage.
    • Custom 2 - Devouring Flare Blade: The move creates a vacuumbox while charging, pulling opponents towards Roy. The move deals less damage and knockback, however.
    • Custom 3 - Freeze Blade: Instead of launching opponents away, the attack will freeze them. At full charge, the resulting explosion is much larger and covers more range, and the move charges slightly faster.
  • Side Special - Double-Edge Dance: Roy slashes the Sword of Seals forward. If it hits an opponent, the special button can be repeatedly tapped for him to continue slashing, and directional inputs can be used to alternate what kind of slash Roy uses to finish off the attack.
    • Custom 1 - Burning Edge Dance: The move has a fire effect and burns opponents. Roy can perform more slashes, dealing more damage, but the finishing strike is weaker.
    • Custom 2 - Scorching Edge Dance: Each of Roy's movements travel farther, allowing him to cover more range. However, the slashes are more difficult to connect with each other and don't deal as much damage.
    • Custom 3 - Sudden Edge Dance: The move deals less damage and knockback, but at any point of the move, Roy can cancel the attack into any of his other moves.
  • Up Special - Blazer: Roy jumps upward while throwing a reverse-grip upward slash with the Sword of Seals as it ignites, damaging opponents multiple times before launching them. Afterwards, he falls into a helpless state. His jump angle can be altered to cover more horizontal distance for less vertical distance.
    • Custom 1 - Burst Blazer: Roy travels higher and faster. The attack is weaker and only its opponents once.
    • Custom 2 - Pyro Blazer: Roy doesn't travel as high, but the attack can hit opponents more times and ends in an explosion, dealing more damage and knockback.
  • Custom 3 - Jump Blazer: Roy jumps straight upward instead of at an angle. This covers more vertical distance, but no horizontal distance.
  • Down Special - Flame Spear: Roy plunges the Sword of Seals into the ground, causing a spear-shaped burst of flame to blast upwards. The sword connects into the flame hitbox and launches upwards, dealing more knockback if both hits connect.
  • Custom 1 - Blazing Spear: The flame rises much higher and can thus launch opponents higher, though it deals less damage.
    • Custom 2 - Blast Spear: The sword plunge has no hitbox, and thus the move can only hit opponents above Roy. However, it deals much more damage and knockback.
    • Custom 3 - Flame Geyser: As the flame rises upward, it will damage opponents multiple times before launching them.
  • Final Smash - Critical Hit: Roy will sway the Sword of Seals around himself as it ignites in flames, damaging opponents around him. Any opponents he hits will be struck with a sword strike that causes a massive explosion, dealing high damage and knockback. The move is also accompanied with a health bar similar to those found in the Fire Emblem series, which will deplete completely if successful.
  • Charged State - The Binding Blade: Roy replaces the Sword of Seals with the Binding Blade. It deals the full amount of damage no matter what part of the blade opponents are hit with, making him much better offensively. His special moves are also stronger, with Flare Blade taking much less time to charge and Blazer travelling higher.

  • Chrom (ε)
    Fire Emblem Awakening (2012)
    Chrom SSBUltimate
    Chrom (クロム, Chrom) is the main protagonist of the thirteenth game of the Fire Emblem series. A descendant of Marth, Chrom is the prince of the Haildom of Ylisse, as well as the leader of a group of soldiers known as the Shepherds. During a war against the warmongering empire of Valm, he, a time-travelling Lucina, and the rest of the Shepherds to defeat the Fell Dragon Grima, who destroyed the world in Lucina's timeline.

    Chrom is an Echo Fighter of Roy, and as such shares many similarities with him. Rather than the Sword of Seals, Chrom wields the Falchion, which provides no sweetspot at the base and instead deals consistent damage throughout the blade, identical to how Lucina functions as an Echo Fighter of Marth. This makes him far more consistent, though his attacks are weaker than Roy's sweetspots, and lack the distinct flame effect when the sweetspot hits. He also borrows some attacks from Ike in his moveset.
    SSB Fire Emblem Series ChromHeadSSBU SSBUltimate Icon
    Chrom's Moveset

    • Neutral Attack: Chrom throws an upward slash with the Falchion.
    • Forward Tilt: Chrom throws a downward slash with the Falchion.
    • Forward Smash: Chrom throws a two-handed downward slash with the Falchion.
    • Up Tilt: Chrom throws an upward arching slash with the Falchion.
    • Up Smash: Chrom thrusts the Falchion upwards, damaging opponents multiple times before launching them.
    • Down Tilt: Chrom throws a kneeling stab with the Falchion.
    • Down Smash: Chrom throws a kneeling downward slash with the Falchion in front of himself, then behind himself.
    • Dash Attack: Chrom throws an inward horizontal slash across the ground with the Falchion.
    • Counter: Chrom slashes the Falchion.

  • Neutral Aerial: Chrom throws an inward slash with the Falchion followed by an outward slash.
  • Forward Aerial: Chrom throws a downward slash with the Falchion.
  • Forward Crash: Chrom throws a stab with the Falchion as it causes an explosion at the tip.
  • Back Aerial: Chrom throws an upward slash with the Falchion behind himself.
  • Back Crash: Chrom turns around and throws a downward slash with the Falchion.
  • Up Aerial: Chrom throws an upward arching slash with the Falchion while performing a backflip.
  • Up Crash: Chrom thrusts the Falchion upward.
  • Down Aerial: Chrom throws a two-handed downward slash with the Falchion between his legs. The move can meteor smash opponents.
  • Down Crash: Chrom performs a stall-then-fall downward slash with the Falchion.

  • Grab: Chrom reaches out to grab the opponent.
  • Pummel: Chrom knee strikes the opponent.
  • Forward Throw: Chrom throws an elbow strike, launching the opponent away.
  • Back Throw: Chrom tosses the opponent behind himself.
  • Up Throw: Chrom heaves the opponent upward.
  • Down Throw: Chrom slams the opponent into the ground.

  • Neutral Special - Falchion Slash: Chrom throws a two-handed downward slash with the Falchion, generating a burst of energy. The move can be charged by holding the special button, increasing its power and the size of the burst. At full charge, it will deal 10% recoil damage to Chrom.
    • Custom 1 - Burn Slash: Chrom can only attack once the move is fully charged, and it deals less damage, but also charges faster and deals no recoil damage.
    • Custom 2 - Devouring Falchion Slash: The move creates a vacuumbox while charging, pulling opponents towards Chrom. The move deals less damage and knockback, however.
    • Custom 3 - Freeze Slash: Instead of launching opponents away, the attack will freeze them. At full charge, the resulting explosion is much larger and covers more range, and the move charges slightly faster.
  • Side Special - Double-Edge Dance: Chrom slashes the Falchion forward. If it hits an opponent, the special button can be repeatedly tapped for him to continue slashing, and directional inputs can be used to alternate what kind of slash Chrom uses to finish off the attack.
    • Custom 1 - Burning Edge Dance: The move has a fire effect and burns opponents. Chrom can perform more slashes, dealing more damage, but the finishing strike is weaker.
    • Custom 2 - Scorching Edge Dance: Each of Chrom's movements travel farther, allowing him to cover more range. However, the slashes are more difficult to connect with each other and don't deal as much damage.
    • Custom 3 - Sudden Edge Dance: The move deals less damage and knockback, but at any point of the move, Chrom can cancel the attack into any of his other moves.
  • Up Special - Soaring Slash: Chrom throws the Falchion upward as it spins, damaging opponents multiple times. Chrom them leaps upward to grab it before performing a stall-then-fall downward slash, meteor smashing opponents. Alternatively, pressing the special button again allows Chrom to cancel the move and fall into a semi-helpless state instead of falling. With directional inputs, Chrom can throw the Falchion at a more diagonal angle, sacrificing vertical height for more horizontal distance.
    • Custom 1 - Soaring Wave: The attack itself deals less damage and Chrom can only travel straight upwards, but he creates a beam-like projectile upon landing that travels across the ground.
    • Custom 2 - Enticing Soaring Slash: The move travels less distance and it takes longer to perform, but the Falchion creates vacuumboxes as it spins, pulling opponents into it. Because of the longer animation, it also deals more damage.
    • Custom 3 - Grounding Soaring Slash: The Falchion cannot damage opponents as it spins, but Chrom deals more damage as he falls. He will bury opponents he lands on.
  • Down Special - Flame Spear: Chrom plunges the Falchion into the ground, causing a spear-shaped burst of flame to blast upwards. The sword connects into the flame hitbox and launches upwards, dealing more knockback if both hits connect.
  • Custom 1 - Blazing Spear: The flame rises much higher and can thus launch opponents higher, though it deals less damage.
    • Custom 2 - Blast Spear: The sword plunge has no hitbox, and thus the move can only hit opponents above Chrom. However, it deals much more damage and knockback.
    • Custom 3 - Flame Geyser: As the flame rises upward, it will damage opponents multiple times before launching them.
  • Final Smash - Awakening Aether: Chrom will rush forward and strike with the Falchion. If successful, the opponent is trapped, as Chrom throws another powerful slash that deals high damage and knockback.
  • Charged State - Falchion Power: Chrom holds the Falchion upward as it starts glowing. In this state, Chrom's attacks are stronger and faster, making him much more of a threat offensively. Some of his special moves are also better, with Falchion Slash charging much faster and Soaring Slash travelling higher.

  • Black Knight
    Fire Emblem: Path of Radiance (2005)
    0.3.Black Knight posing
    Black Knight (漆黒の騎士, Dark Knight), also known by his real identity as Zelgius, is a major character in the ninth and tenth installments of the Fire Emblem series, serving as Ike's rival. He serves the kingdom of Daein. He wields the sword Alondite, a counterpart to Ike's Ragnell, and goddess-blessed armor, regarding him by both his enemies and allies as virtually invincible. Ike first witnesses the Black Knight killing his father, Greil, in a duel, and vows to avenge his death. He is encountered multiple times throughout the games, with Ike eventually emerging triumphant.

    Black Knight serves as the extreme of heavyweights. In addition to being one of the heaviest characters in the game, all of his attacks are powerful and can KO opponents at ridiculously low percents. Aiding his KO power are the disjointed hitboxes he has, thanks to wielding the Alondite. He also has excellent survivability, with his weight making him hard to knock away and a decent recovery. However, he is one of the slowest characters in the game, and has a low jump height.

    While the majority of Black Knight's attacks are powerful, they are quite laggy, meaning that they can be easily punished. Inversely, Black Knight has one of the best punish games in the roster, with long range on all of his attacks and great shield breaking capabilities. These attributes make him resemble an evolved form of Ganondorf's playstyle in Brawl and Smash 4.
    SSB Fire Emblem Series Blackknightstock SSBCharged Icon
    Black Knight's Moveset

    • Neutral Attack: Black Knight thrusts the Alondite forward.
    • Forward Tilt: Black Knight throws an outward thrust with the Alondite.
    • Forward Smash: Black Knight throws two outward slashes with the Alondite, followed by a downward slash.
    • Up Tilt: Black Knight thrusts the Alondite upward while holding it parallel to the ground.
    • Up Smash: Black Knight swings the Alondite overhead.
    • Down Tilt: Black Knight throws a crouching inward slash with the Alondite.
    • Down Smash: Black Knight stabs the Alondite into the ground, creating an explosion.
    • Dash Attack: Black Knight charges forward with the Alondite.
    • Counter: Black Knight throws a downward slash with the Alondite.

  • Neutral Aerial: Black Knight spins around while throwing two inward slashes with the Alondite.
  • Forward Aerial: Black Knight throws an outward slash with the Alondite.
  • Forward Crash: Black Knight throws a downward slash with the Alondite. The move can meteor smash opponents.
  • Back Aerial: Black Knight turns around and throws an outward slash with the Alondite.
  • Back Crash: Black Knight thrusts the Alondite backward.
  • Up Aerial: Black Knight thrusts the Alondite upward.
  • Up Crash: Black Knight swings the Alondite upward.
  • Down Aerial: Black Knight thrusts the Alondite downward. The move can meteor smash opponents.
  • Down Crash: Black Knight falls while thrusting the Alondite downward, damaging opponents multiple times before launching them when he hits the ground, creating an explosion.

  • Grab: Black Knight reaches out to grab the opponent.
  • Pummel: Black Knight hits the opponent with the hilt of the Alondite.
  • Forward Throw: Black Knight throws the opponent forward.
  • Back Throw: Black Knight throws the opponent backward.
  • Up Throw: Black Knight heaves the opponent upward.
  • Down Throw: Black Knight slams the opponent into the ground.

  • Neutral Special - Alondite Strike: Black Knight throws a downward slash with the Alondite. The move has a lot of startup lag, but it deals massive damage and knockback to opponents it hits. The move can also immediately break a shield.
    • Custom 1 - Quick Strike: The move has much less startup lag, but deals less damage.
    • Custom 2 - Rushing Strike: Black Knight steps forward while slashing the Alondite, allowing the move to cover more range. However, it doesn't deal as much knockback.
    • Custom 3 - Guard-Breaking Strike: The move ignores shields instead of breaking them. However the move has slightly more endlag.
  • Side Special - Twin Slash: Black Knight throws an inward slash with the Alondite. If the move hits an opponent, the special button can be pressed again for him to throw another attack dependent on directional inputs; an upward slash, an outward slash, and a downward crouching thrust. The first hit has set knockback, and all three variants of the second hit deal heavy damage and knockback. Additionally, the move can be cancelled into any other attack if the first hit connects.
    • Custom 1 - Leaning Twin Slash: Black Knight rushes forward during the initial slash, allowing him to hit opponents easier. However, the second hit deals less damage, and the move cannot be cancelled.
    • Custom 2 - Auto Twin Slash: Black Knight automatically performs both slashes, with no additional button presses needed. However, only the forward variant of the second hit can be used.
    • Custom 3 - Breaking Twin Slash: The window for performing the second slash is smaller, the move cannot be cancelled, and there is additional endlag. However, the second hit is much more powerful.
  • Up Special - Rising Darkness: Black Knight leaps upward while slashing the Alondite, damaging opponents multiple times before launching them. At the peak of his jump, he will crash down to the ground at an angle, dealing heavy damage to opponents he hits.
    • Custom 1 - Darkness Leap: Black Knight leaps much higher, but he will not fall afterward and simply falls into a helpless state.
    • Custom 2 - Falling Darkness: Black Knight doesn't rise as high, but while falling, he can bury and meteor smash opponents he hits.
    • Custom 3 - Armored Rising: Black Knight has super armor for the whole duration of the move, but he deals less damage.
  • Down Special - Eclipse: Black Knight holds the Alondite outward and begins charging energy. If he isn't attacked during this, he will glow blue, increasing his already great attack power exponentially, as well as gain a boost in mobility and jump height. He can remain in this state for as long as he wants as long as he hits an opponent or an opponent hits him within five seconds. After the effects wear off, his attack power will be significantly worse than it normally would for 15 seconds, though this does not apply to his mobility, which reverts to its normal values. Once this has passed, the move can be used again.
    • Custom 1 - Timed Eclipse: Black Knight remains in his Eclipse state for 10 seconds consistently. The cooldown is also 10 seconds, though his attack power during cooldown will be even weaker.
    • Custom 2 - Violate Eclipse: Black Knight can remain in his Eclipse state if he or an opponent attack each other within eight seconds as opposed to five. The cooldown period is 25 seconds.
    • Custom 3 - Safe Eclipse: It takes twice as longer for Black Knight to enter his Eclipse state, but his attack power isn't as bad during cooldown.
  • Final Smash - Blackening Blade: Black Knight slashes the Alondite forward. If he hits an opponent, he throws a second slash that deals heavy damage and knockback, launching the opponent.
  • Charged State - New Moon: Black Knight begins glowing purple. In this state, he has increased knockback resistance and has much faster attacks. While in Eclipse state, he can also keep it as long as he or an opponent hit each other within 15 seconds; there is still 15 seconds of cooldown, but it will nt make his attack power worse than normal.

  • Dark Pit
    Kid Icarus: Uprising (2012)
    DarkPit SSBUltimate
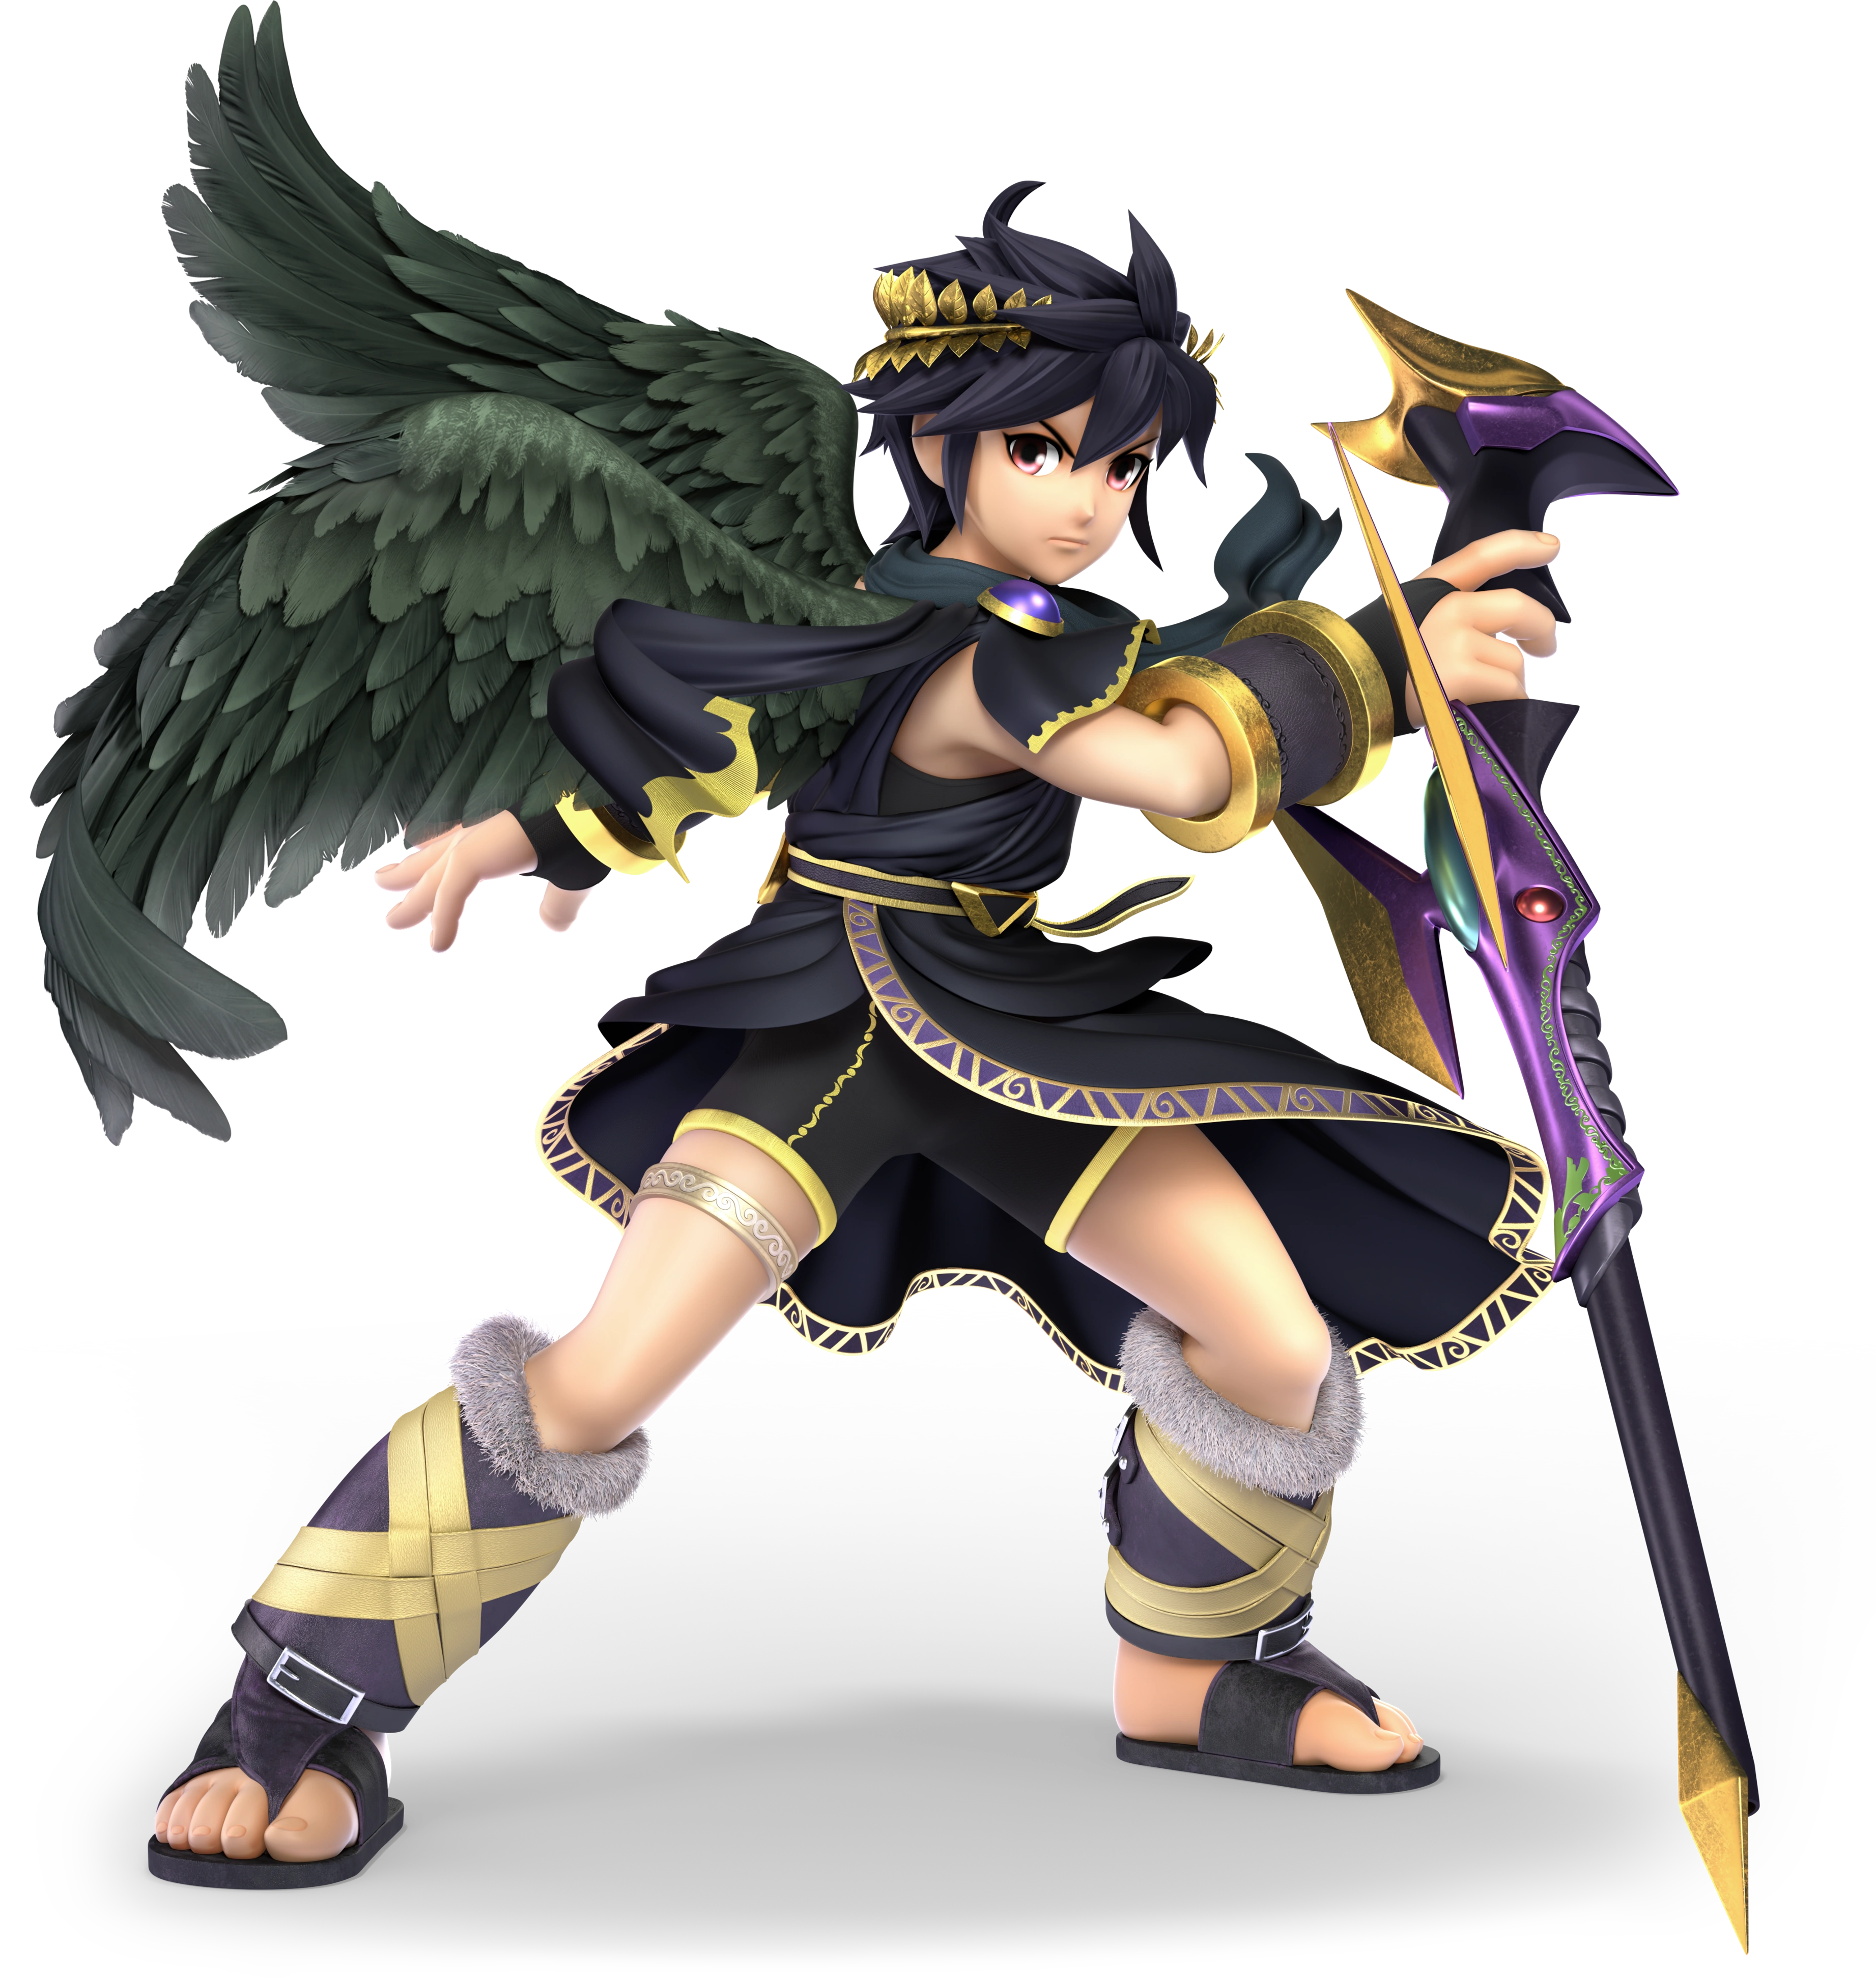
    Dark Pit (ブラックピット, Black Pit) is a clone of Pit created in Kid Icarus: Uprising after he destroyed the Mirror of Truth. He resembles Pit, but has black wings, hair, and outfit, as well as a more aggressive personality. Though he sees himself as a rival of Pit, he helps him during the battle against the Underworld Army. Since then, he has gone on to serve as an officer of the Forces of Nature, under Viridi.

    In previous Smash games, Dark Pit was an Echo Fighter of Pit, having a nearby identical moveset. He is now no longer considered as such, and has been changed so much that they hardly shares any moves with each other. Like Pit, Dark Pit is a middleweight with access to five midair jumps thanks to his wings. Instead of the Palutena Bow, Dark Pit mainly uses the Dark Pit Staff, allowing him to fire very precise projectiles that can travel a far distance and deal more damage to opponents farther away. This grants him a very sniper-esque playstyle where he must keep his distance and carefully aim to deal the most damage.

    Dark Pit's basic moveset either uses the Dark Pit Staff as a battering weapon or to fire long-ranged projectiles. His special moves also make use of various weapons in Kid Icarus: Uprising, much like Pit.
    SSB Kid Icarus Series DarkPitHeadSSBU SSB4 Icon
    Dark Pit's Moveset

    • Neutral Attack: Dark Pit throws throws a jab, followed by a knee strike, followed by an outward swing with the Dark Pit Staff.
    • Forward Tilt: Dark Pit fires the Dark Put Staff forward, shooting a stage-wide laser that deals more damage to opponents the further they are away.
    • Forward Smash: Dark Pit throws a cross with the Electroshock Arm. The move can reflect projectiles.
    • Up Tilt: Dark Pit fires the Dark Put Staff upward, shooting a stage-wide laser that deals more damage to opponents the further they are away.
    • Up Smash: Dark Pit throws an uppercut with the Electroshock Arm. The move can reflect projectiles.
    • Down Tilt: Dark Pit kneels and fires the Dark Put Staff forward, shooting a stage-wide laser that deals more damage to opponents the further they are away.
    • Down Smash: Dark Pit throws a down-angle hook with the Electroshock Arm. The move can reflect projectiles.
    • Dash Attack: Dark Pit throws a lunging knee thrust.
    • Counter: Dark Pit shoots the opponent with the Dark Pit Staff.

  • Neutral Aerial: Dark Pit throws a sex kick.
  • Forward Aerial: Dark Pit fires the Dark Put Staff forward, shooting a stage-wide laser that deals more damage to opponents the further they are away.
  • Forward Crash: Dark Pit swings the Dark Pit Staff forward.
  • Back Aerial: Dark Pit fires the Dark Put Staff backward, shooting a stage-wide laser that deals more damage to opponents the further they are away.
  • Back Crash: Dark Pit swings the Dark Pit Staff backward.
  • Up Aerial: Dark Pit fires the Dark Put Staff upward, shooting a stage-wide laser that deals more damage to opponents the further they are away.
  • Up Crash: Dark Pit thrusts the Dark Pit Staff upward.
  • Down Aerial: Dark Pit fires the Dark Put Staff in a diagonally-downward angle, shooting a stage-wide laser that deals more damage to opponents the further they are away.
  • Down Crash: Dark Pit thrusts the Dark Pit Staff downward. The move can meteor smash opponents.

  • Grab: Dark Pit reaches out to grab the opponent.
  • Pummel: Dark Pit knee strikes the opponent.
  • Forward Throw: Dark Pit throws the opponent away.
  • Back Throw: Dark Pit grabs the opponent by the head, spins around with them in tow, and slams them into the ground headfirst.
  • Up Throw: Dark Pit kicks the opponent upward.
  • Down Throw: Dark Pit pins the opponent on the ground with his foot and shoots them with the Dark Pit Staff.

  • Neutral Special - Viridi Palm: Dark Pit uses the Viridi Palm to launch projectiles. It has different effects depending on how damaged Dark Pit is; at below 100%, he will fire small, heart-shaped projectiles in rapid succession that damage opponents, and at above 100%, he will fire a large mass of rose petals that travel slowly and explode on impact, dealing heavy damage and knockback.
    • Custom 1 - Midnight Palm: Dark Pit fires crescent moon projectiles instead of hearts. They deal more damage and can travel further, but it will not fire larger projectiles when Dark Pit reaches 100%.
    • Custom 2 - Cursed Palm: Dark Pit fires a large, black projectile instead of rose petals. He doesn't need to be at 100% to launch the stronger projectile, but it travels slower.
    • Custom 3 - Great Reaper Palm: Dark Pit fires Reapettes instead of rose petals These won't damage opponents, but will cause them to trip, leaving them vulnerable.
  • Side Special - Tiger Claws: Dark Pit rushes forward while continually slashing the Tiger Claws, damaging opponents. If the special button is tapped repeatedly, he can continue slashing, and directional inputs can be used to end the move with an upward slash, a frontal slash, or a downward slash that meteor smashes opponents. Dark Pit falls into a helpless state afterward if the move is used in midair.
    • Custom 1 - Bear Claws: Dark Pit doesn't travel as far and the slashes are slower, but they deal a lot more damage.
    • Custom 2 - Hedgehog Claws: Dark Pit simply ruses forward while slashing, with no additional button presses needed. Only the forward finisher can be used.
    • Custom 3 - Pandora Claws: Dark Pit deals less damage, but the finishing move can inflict different effects on opponents, such as flower, mushroom, or freezing.
  • Up Special - Power of Flight: Dark Pit uses the Power of Flight to fly in the direction of the control stick, falling into a helpless state afterward. He cannot damage opponents he hits, but he travels quite far.
    • Custom 1 - Striking Flight: Dark Pit will damage opponents he hits as he flies, but he can only travel upward.
    • Custom 2 - Safe Flight: Dark Pit doesn't travel as far, but he is invincible throughout the entire duration of the move.
    • Custom 3 - Wings of Icarus: Instead of launching himself in a single direction, Dark Pit can fly freely in any direction. However, he travels much slower.
  • Down Special - Guardian Orbitars: Dark Pit activates the Guardian Orbitars on either side of him, and can keep them out if the special button is held. They will push opponents backward and reflect projectiles. If they are hit with too many attacks, they will break and cannot be used for awhile.
    • Custom 1 - Mirror Shield: Instead of activating the Guardian Orbitars, Dark Pit pulls out the Mirror Shield. It only covers the front of him, but reflected projectiles are stronger.
    • Custom 2 - Impact Orbitars: The Guardian Orbitars will damage opponents when they appear rather than shield him or reflect projectiles.
    • Custom 3 - Sturdy Orbitars: The Guardian Orbitars cannot be destroyed, but reflected projectiles are weaker.
  • Final Smash - Lightning Chariot: Dark Pit boards the Lightning Chariot and flies into the background. A cursor will appear on the stage, which can be controlled by directional inputs. After a short while or when the special button is pressed, Dark Pit will ride through the stage on the Lightning Chariot where the cursor is, heavily damaging any opponents he hits on the way.
  • Charged State - Thanatos Staff: Dark Pit tosses the Dark Pit Staff aside and pulls out the Thanatos Staff to use it instead. With it, his sniping attacks are not only stronger and don't require opponents to be as far away, but they will also home in on opponents, making them much more dangerous.

  • Beady Long Legs
    Pikmin (2001)
    Beady Long Legs
    Beady Long Legs (ダマグモ, Orb Spider) is a recurring boss in the Pikmin series, appearing in Pikmin and Pikmin 2. A member of the Arachnorb family, it is a massive, spider-like creature with long legs that hold up a small, spherical head with no facial features. It will walk around slowly and squish any Pikmin it stomps on. To defeat it, Pikmin must be thrown at the head. When defeated, its head opens and drops items as it disintegrates. Similar enemies of the Arachnorb family appeared throughout the series, such as the Raging Long Legs and Man-at-Legs in Pikmin 2, and the Baldy Long Legs and Shaggy Long Legs in Pikmin 3.

    Beadly Long Legs is a tall, heavyweight fighter. Most of its model is in the z-axis, meaning that a lot of its body is intangible. Additionally, while it has a wide hurtbox, the head and legs have separate hurtboxes; attacks that only hit its legs will affect Beady Long Legs with 0.6x knockback than they normally would, while attacks that reach the head will deal regular knockback. This does not apply to damage output. This means that, combined with its relatively heavy weight, Beady Long Legs is rather difficult to KO. However, its other stats,such as mobility and recovery, leave a lot to be desired.

    Beady Long Legs mainly attacks with its legs. It has a lot of range, even compared to swordfighters like Marth and Shulk, and having less knockback on its legs means that it can safely poke from a distance. It's combo game isn't particularly strong, but it does hae some powerful attacks that can KO opponents easily. As such, Beady Long Legs mainly relies on punishing and hard reads, which it can easily do with its long range.
    SSB Pikmin Series Beady Long Legs Stock Icon SSBCharged Icon
    Beady Long Legs' Moveset

    • Neutral Attack: Beady Long Legs throws a kick with one of its legs, followed by another kick.
    • Forward Tilt: Beady Long Legs swipes one of its feet across the ground. The move can trip opponents.
    • Forward Smash: Beady Long Legs thrusts its head forward.
    • Up Tilt: Beady Long Legs thrusts its body upward to strike with its head.
    • Up Smash: Beady Long Legs leaps upward while spinning around.
    • Down Tilt: Beady Long Legs stomps on the ground. The move can bury opponents.
    • Down Smash: Beady Long Legs jumps upward and stomps with all four of its feet. The move can bury and meteor smash opponents.
    • Dash Attack: Beady Long Legs throws a battering ram.
    • Counter: Beady Long Legs stomps on the ground. The move can bury opponents.

  • Neutral Aerial: Beady Long Legs spins around with its legs outstretched.
  • Forward Aerial: Beady Long Legs thrusts one of ts legs forward.
  • Forward Crash: Beady Long Legs thrusts its head forward.
  • Back Aerial: Beady Long Legs throws a back kick with one of its legs.
  • Back Crash: Beady Long Legs thrusts its body backward.
  • Up Aerial: Beady Long Legs performs a front flip to strike upward with its feet.
  • Up Crash: Beady Long Legs thrusts its body upward.
  • Down Aerial: Beady Long Legs throws a stomp with all four of its feet. The move can bury and meteor smash opponents.
  • Down Crash: Beady Long Legs performs a stall-then-fall headbutt. The move will meteor smash opponents.

  • Grab: Beady Long opens opens its head and lunges forward, trapping opponents inside.
  • Pummel: Beady Long Legs shakes its head around.
  • Forward Throw: Beady Long Legs throws the opponent forward.
  • Back Throw: Beady Long Legs throws the opponent backward.
  • Up Throw: Beady Long Legs throws the opponent upward.
  • Down Throw: Beady Long Legs throws the opponent at the ground.

  • Neutral Special - Man-at-Legs: Beady Long Legs transforms into a Man-at-Legs and fires an energy blast from below its head. By holding the special button, the move can charged, and the charge can be canceled and stored by performing any other action. The longer the move is charged, the more energy shots will be fired in rapid succession. All shots are aimed in a downward angle.
    • Custom 1 - Blasting Shots: The move takes longer to charge, but the shots deal more damage and knockback.
    • Custom 2 - Quick Shots: The shots travel faster and take less time to charge, but they don't deal any knockback and only make opponents flinch. The shots are also aimed forward rather than at a downward angle.
    • Custom 3 - Precision Shot: The move cannot be charged and only fires one shot. However, it is stronger than a regular shot and deals more damage and knockback, and by using directional inputs, it can be aimed in any direction.
  • Side Special - Web Sling: Beady Long Legs tosses a wad of web forward, which traps an opponent it hits. It it lands on the ground, it can instead slow down opponents who walk over it. Trapped opponents are vulnerable to attacks, though they can escape the web faster by button mashing. Webs that land on the floor can be eaten by Baldy Long Legs to restore 2% damage each.
    • Custom 1 - Toxic Web: The web cannot trap opponents for as long, but it will gradually damage them. This also applies to opponents who walk over the web.
    • Custom 2 - Tough Web: The web doesn't travel as far, but it its more difficult for trapped opponents to escape it.
    • Custom 3 - Filling Web: The web is less effective at trapping opponents and cannot slow opponents down if it lands on the ground, but it will replenish 8% damage if eaten rather than 2%.
  • Up Special - Beady Jump: Beady Long Legs leaps upward and comes crashing down. Its jump trajectory can be altered with directional inputs. Upon landing, it will bury opponents it lands on. Alternatively, holding up on the control stick will cancel the move and have it fall into a helpless state.
    • Custom 1 - Beady Long Jump: Beady Long Legs doesn't jump as high, but it travels more distance horizontally.
    • Custom 2 - Beady Stomp: Beady Long Legs doesn't bury opponents it lands on, but landing causes a stage-wide earthquake that causes any ground-bound opponents to take damage.
    • Custom 3 - Beady Rise: Beady Long Legs damages opponents while rising upward, but falls into a helpless state at the peak of its jump rather than falling down.
  • Down Special - Shaggy Long Legs: Beady Long Legs transforms into a Shaggy Long Legs, gaining a large amount of hair on its body. It droops down and swings its head across the ground, damaging opponents it hits while also creating a windbox that pushes opponents backward. It is rather strong, and can be used to gimp recoveries easily.
    • Custom 1 - Static Hair: The attack is electric-based, and deals more damage. However, no windbox is created.
    • Custom 2 - Prickly Hair: The windbox is weaker, but the attack damages opponents multiple times before launching them.
    • Custom 3 - Sweeping Hair: The move has much more startup lag, but the attack deals more damage and the windbox is much stronger and covers more range.
  • Final Smash - Citadel of Spiders: Beady Long Legs stomps on the ground, summoning several Dweevils of various colors on the stage. They will roam around, attacking opponents by biting them. This causes them to be easily overwhelmed, and leave them vulnerable to Beady Long Legs' attacks. After awhile, all of the Dweevils will disappear.
  • Charged State - Raging Long Legs: Beady Long Legs transforms into a Raging Long Legs, becoming much bigger and having larger feet. In this state, the x0.6 knockback multiplier on its legs applies to its head as well. Its feet are also larger, and the longer legs allow it to cover more range and deal more damage. It is also significantly heavier.

  • Ankha
    Animal Forest+ (2001)
    Ankha NL
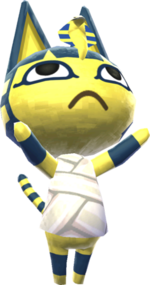
    Ankha (ナイル, Nairu) is a snooty cat villager in the Animal Crossing series, debuting in Animal Crossing: City Folk. She is arrogant, impatient, and rude towards the player at the start of the game, though will eventually warm up to them. She also likes gossip, and tends to live in an Egyptian-style home.

    In terms of moveset, Ankha acts as an in-between of Villaer and Isabelle, taking moves from both while also using some attacks of her own. Like them, she is a lightweight with average speed, and has surprisingly good KO power for her weight class. Her recovery is also good, allowing her to get back to the stage from virtually anywhere. Like Villager though, her moves are slow, and it can be hard to combo opponents. Like Isabelle however, she has a great edgeguarding game.

    Ankha's moveset utilizes various items and objects from the Animal Crossing series, like Isabelle and Villager. While some of her moves are identical in function to either of their attacks, they are themed after ancient Egyptian culture to give them more visual flare.
    SSB Animal Crossing Series Ankha Stock Icon SSBCharged Icon
    Ankha's Moveset

    • Neutral Attack: Ankha swings a staff forward.
    • Forward Tilt: Ankha swings an umbrella forward. If the attack button is pressed again, she will open it and deal more damage.
    • Forward Smash: Ankha drops a crystal ball downward.
    • Up Tilt: Ankha twirls a staff upward.
    • Up Smash: Ankha causes a mummy to rise from the ground in front of herself, which sinks back into the ground immediately.
    • Down Tilt: Ankha pulls a weed out of the ground.
    • Down Smash: Ankha takes out a shovel and digs in front of, then behind herself. The move will bury opponents.
    • Dash Attack: Ankha trips and drops a glass vase.
    • Counter: Ankha throws a high kick.

  • Neutral Aerial: Ankha performs a cartwheel.
  • Forward Aerial: Ankha swings a stone tablet forward.
  • Forward Crash: Ankha swings a stone tablet downward. The move can meteor smash opponents.
  • Back Aerial: Ankha swings a stone tablet backward.
  • Back Crash: Ankha thrusts a staff backward.
  • Up Aerial: Ankha swings two turnips upward.
  • Up Crash: Ankha slams two stone tablets together above herself.
  • Down Aerial: Ankha swings two turnips downward.
  • Down Crash: Ankha slams two stone tablets together below herself.

  • Grab: Ankha traps an opponent in a net.
  • Pummel: Ankha yanks the net backward.
  • Forward Throw: Ankha flings the opponent forward.
  • Back Throw: Ankha flings the opponent backward.
  • Up Throw: Ankha flings the opponent upward.
  • Down Throw: Ankha slams the opponent into the ground.

  • Neutral Special - Pocket: Ankha reaches out with her hand, grabbing a nearby item or projectile. She will then store it away, with the item or projectile she pockets being shown next to her icon; projectiles are represented by a yellow star. Using the move again will have her use the item or projectile herself, with the latter dealing increased damage and knockback.
    • Custom 1 - Garden: Instead of pocketing items or projectiles, Ankha causes opponents nearby to have a flower grow on their head.
    • Custom 2 - Purchase: Instead of pocketing items or projectiles, Ankha will pocket the opponent instead. She can only hold the opponent for three seconds, and the can escape quicker by button mashing. Pressing the special button again will have her throw the opponent forward, damaging them.
    • Custom 3 - Lunch: Instead of pocketing items or projectiles, Ankha turns them into food, which he eats to recover health.
  • Side Special - Lloid Missile: Ankha launches the Gyroid Lloid forward. It flies forward but stops for a brief period before targeting the nearest opponent and launching straight toward them, travelling faster. He explodes on impact.
    • Custom 1 - Homing Lloid: Lloid doesn't travel as fast, but he homes in on opponents instead of travelling in their direction.
    • Custom 2 - Targeting Lloid: Lloid deals less damage, but he immediately aims for an opponent after being launched.
    • Custom 3 - Remote Lloid: Lloid can be controlled with directional inputs, exploding on his own after awhile. However, Ankha is vulnerabkle while controlling him.
  • Up Special - Balloon Trip: Ankha jumps on a giant balloon to float upward. She can be controlled with directional inputs, and can ascend by tapping the special button repeatedly. After some time, she will fall into a helpless state. The balloon can also be popped with opponents' attacks. If it suffers 15% damage, it will pop, sending Ankha into a helpless state.
    • Custom 1 - High-Helium Balloon: Ankha can float for longer, but she doesn't rise as high when the special button is tapped.
    • Custom 2 - Durable Balloon: The balloon cannot be popped, but Ankha cannot float for as long.
    • Custom 3 - Balloon High Jump: Ankha jumps upward with the balloon, damaging opponents she hits rather than floating. She falls into a helpless state afterwards.
  • Down Special - Sarcophagus: Ankha summons a sarcophagus, which rises from the ground in front of her. It acts as a wall and a platform, and will disappear after while. If attacked, the sarcophagus' eyes will glow before firing a laser at the opponent that attacked it. Ankha can also attack it to fire a laser at a random opponent.
    • Custom 1 - Charging Sarcophagus: Rather than shooting a laser when attacked, the sarcophagus will shoot a laser before it disappears. The damage it takes is built up, making the laser stronger.
    • Custom 2 - Ancient Sarcophagus: The sarcophagus' laser deals less damage, but opponents hit by it will have a mushroom grow on their head.
    • Custom 3 - Sarcophagus Fire: The sarcophagus fires a laser immediately after rising, before sinking into the ground afterward.
  • Final Smash - Pyramid of Dreams: Ankha pays Tom Nook and the Nooklings to build a pyramid over an opponent, damaging them. Once the pyramid is complete, it will explode, launching the opponent and any others in the blast radius.
  • Charged State - Happy Camper: Ankha will smile while glowing yellow. In this state, she will move faster and her attacks are stronger. Pocket also covers more range, and Sarcophagus lasts much longer.

  • Celeste (ε)
    Animal Crossing: Wild World (2005)
    Celeste ACaF
    Celeste (フーコ, Celeste) is a recurring character in the Animal Crossing series. She is Blathers' younger sister, and operates the Museum alongside him, mainly working in the observatory. Whereas Blathers displays fossils, Celeste helps with constellations and stargazing. Like her brother, she is often sleeping during the day, though she can be woken up by the player to talk to.

    As Blathers' Echo Fighter, Celeste has a very similar moveset to him. Generally, while her attacks are weaker and cover less range, she is quicker and possesses one more midair jump than Blathers, making for five. She is more mobile than him, but has a more difficult time KOing opponents. Some of Blathers' fossil attacks are replaced with Celeste using objects like stars and meteors.
    SSB Animal Crossing Series Celeste Stock Icon SSBCharged Icon
    Celeste's Moveset

    • Neutral Attack: Celeste throws two alternating knifehand slashes with her wings.
    • Forward Tilt: Celeste swings a book forward.
    • Forward Smash: Celeste pulls out a swordfish and thrusts it forward, striking with its nose.
    • Up Tilt: Celeste swings her wing in an overarching motion above herself.
    • Up Smash: A centipede appears in front of Celeste, causing her to leap upward and scream in fear, damaging opponents she hits.
    • Down Tilt: Celeste pecks the ground with her beak.
    • Down Smash: Celeste drops an asteroid. If used at the ledge, it will fall past the stage.
    • Dash Attack: Celeste trips while holding papier-mâché moon.
    • Counter: Celeste pulls out a large meteor and thrusts it forward.

  • Neutral Aerial: Celeste flaps her wings frantically, damaging opponents multiple times before launching them.
  • Forward Aerial: Celeste holds a fish tank forward as an anchovy, a carp, or a sea bass leaps out of it. The fish deal different amounts of damage and the fish summoned is random.
  • Forward Crash: Celeste looks behind herself to see a butterfly, causing her to leap forward and scream in fear, damaging opponents she hits.
  • Back Aerial: Celeste holds a fish tank behind herself as an anchovy, a carp, or a sea bass leaps out of it. The fish deal different amounts of damage and the fish summoned is random.
  • Back Crash: A butterfly flies in front of Celeste, causing her to leap backward and scream in fear, damaging opponents she hits.
  • Up Aerial: Celeste claps her wings above her head.
  • Up Crash: Celeste holds a fish tank upward as a goldfish leaps out of it and performs flips, damaging opponents multiple times before launching them.
  • Down Aerial: Celeste throws a stomp. The move can meteor smash opponents.
  • Down Crash: Celeste drops a meteor downward.

  • Grab: Celeste traps an opponent in a net.
  • Pummel: Celeste yanks the net backward.
  • Forward Throw: Celeste flings the net forward.
  • Back Throw: Celeste flings the net backward.
  • Up Throw: Celeste flings the net upward.
  • Down Throw: Celeste slams the opponent into the ground.

  • Neutral Special - Yawn: Celeste yawns, causing Z's to appear in front of herself. Opponents caught in these Z's will fall asleep, leaving them vulnerable to a follow-up. The move will not affect aerial opponents, and opponents at higher damage will sleep for longer.
    • Custom 1 - Spreading Yawn: The Z's cover a wider range, but opponents don't fall asleep as long.
    • Custom 2 - Drawn-Out Yawn: The Z's are present for longer, making it easier to make opponents fall asleep, though also leaving her more vulnerable.
    • Custom 3 - Yawn Counter: Instead of simply yawning, the move acts as a counter, where if Celeste is attacked she will yawn and cause the opponent to fall asleep. If she counters a projectile, she will simply dodge it instead.
  • Side Special - Tarantula: Celeste very reluctantly releases a tarantula from its cage, letting it skitter around and chase nearby opponents. If it touches one, the tarantula will leap on them and start damaging them repeatedly. It disappears after it attacks or is damaged by an opponent.
    • Custom 1 - Tarantula Goliath: The tarantula is bigger and deals more damage, as well as more resilient towards attacks, though it takes longer for Celeste to release it.
    • Custom 2 - Tarantula Toss: Celeste quickly tosses the tarantula by thrusting its cage forward. It will disappear when it hits the ground instead of skittering around.
    • Custom 3 - Black Widow: Celeste releases a black widow instead of a tarantula. It moves slower, but deals a lot more damage.
  • Up Special - Atlas Moth: Celeste gets carried upward by an atlas moth as she flails around in fear. She can move forward or backward while ascending. If she is attacked or reaches the peak of her height, the atlas moth lets go and she falls into a helpless state.
    • Custom 1 - Common Butterfly: Celeste gets carried by a common butterfly instead of an atlas moth. It can fly higher and faster, but Celeste can't move forward or backward as much.
    • Custom 2 - Long Locust: Celeste gets carried by a long locust instead of an atlas moth. She gains much more horizontal distance in exchange for less vertical distance.
    • Custom 3 - Yellow Butterfly: Celeste gets carried by a yellow butterfly as opposed to an atlas moth. Celeste can't fly as high, but she does have super armor and cannot be hit out of the attack.
  • Down Special - Constellation Display: Celeste pulls out some stars and puts them on a stand on the stage. After this, Celeste can only use the move close enough to the stand, where she can place more starts on the constellation. It serves as a wall, and can be damaged by Celeste or her opponents to destroy it. After three sets of stars are added, the constellation will be complete and the move cannot be used again until it is destroyed. After taking enough damage, it will topple over and damage any opponents underneath it heavily, dealing more damage the more stars the constellation has.
    • Custom 1 - Fast Stars: Celeste instantly completes a constellation. However, it covers less range and deals less damage.
    • Custom 2 - Durable Stars: The constellation is more durable, but it deals less damage.
    • Custom 3 - Falling Stars: Celeste needs to place five sets of stars instead of three, making a bigger constellation. While it deals less damage with less stars, the complete constellation deals far more damage and knockback.
  • Final Smash - Dream Museum: Celeste pays Tom Nook and the Nooklings to build a museum over an opponent, damaging them. Once it is finished, it will explode, launching the opponent and any others in the blast radius.
  • Charged State - Happy Camper: Celeste will smile while glowing yellow. In this state, she will move faster and her attacks are stronger. She also places stars faster and jumps farther back after being scared by a bug.

  • Hoy Quarlow
    Super Punch-Out!! (1989)
    Hoy Quarlow
    Hoy Quarlow (今日はけんか, Hoy Quarlow) is a contender in the WVBA, appearing only in Super Punch-Out!! as the second opponent fought in the Special Circuit. Hailing from Bejing, China, he is both the oldest (at age 72) and lightest (at 100 lbs.) boxer in the WVBA. He is arguably the most unorthodox fighter in the Punch-Out!! series, as he utilizes kung fu and a wooden staff in his fighting style.

    Hoy Quarlow could be seen as an opposite to Little Mac. While he does have good ground speed and quick frame data, making him difficult to punish, most of his ground attacks don't deal a lot of damage, and his special moves don't have as much utility when used on the ground. However, he has a deceptively high jump height, among the highest air speeds in the roster, and a below-average falling speed. While this does make for a great recovery, he also sports extremely versatile aerials that can combo into each other, as well as crash attacks that can act as finishers.

    Much like his battle in Super Punch-Out!!, Hoy Quarlow utilizes elements of kung fu and kickboxing in his fighting style. He also wields a staff, which us used in some of his moves, granting him range for him to fight from afar.
    SSB Punch-Out Series Hoy Quarlow Stock Icon SSBCharged Icon
    Hoy Quarlow's Moveset

    • Neutral Attack: Hoy Quarlow throws a side kick, followed by a stationary dropkick, followed by a stretch kick.
    • Forward Tilt: Hoy Quarlow swings his staff inward.
    • Forward Smash: Hoy Quarlow winds up and steps forward, throwing a straight punch, an uppercut, or a cross depending on directional inputs.
    • Up Tilt: Hoy Quarlow waves his staff above himself in an overarching motion.
    • Up Smash: Hoy Quarlow performs a backflip to kick upward.
    • Down Tilt: Hoy Quarlow kneels and trusts his staff forward.
    • Down Smash: Hoy Quarlow thrusts his staff into the ground, creating a shockwave of golden aura around him. The move can trip opponents.
    • Dash Attack: Hoy Quarlow swings his staff outward.
    • Counter: Hoy Quarlow slams his staff on top of the opponent. The move can bury opponents.

  • Neutral Aerial: Hoy Quarlow spins while throwing discus clotheslines.
  • Forward Aerial: Hoy Quarlow thrusts his staff forward.
  • Forward Crash: Hoy Quarlow throws a hook kick followed by a dropkick.
  • Back Aerial: Hoy Quarlow thrusts his staff backward three times in rapid succession.
  • Back Crash: Hoy Quarlow throws a back kick.
  • Up Aerial: Hoy Quarlow throws a bicycle kick.
  • Up Crash: Hoy Quarlow throws an upwards scissor kick.
  • Down Aerial: Hoy Quarlow thrusts his staff at a downward angle. The move can meteor smash opponents.
  • Down Crash: Hoy Quarlow swings his staff downward. The move can bury and meteor smash opponents.

  • Grab: Hoy Quarlow reaches out to grab the opponent.
  • Pummel: Hoy Quarlow hits the opponent with the pommel of his staff.
  • Forward Throw: Hoy Quarlow throws the opponent forward.
  • Back Throw: Hoy Quarlow performs a judo throw to launch the opponent backward.
  • Up Throw: Hoy Quarlow heaves the opponent upward before hitting them with his staff.
  • Down Throw: Hoy Quarlow pins the opponent o the ground and stabs his staff into them six times.

  • Neutral Special - Exploding Staff: Hoy Quarlow's staff begins charging with golden aura before he thrusts it forward, dealing heavy damage and knockback to opponents it hits. If used in midair, it has less startup lag and allows Hoy Quarlow to gain forward momentum. Directional inputs can also be used to alter the direction he thrusts his staff in, which also alters his momentum in midair.
    • Custom 1 - Shocking Staff: The move deals less damage, but instead of launching opponents, they are inflicted with paralysis.
    • Custom 2 - Lunging Staff: Hoy Quarlow travels farther across the ground, and even moreso in midair. However, the aerial version has just as much startup lag as the grounded version.
    • Custom 3 - Armored Staff: Hoy Quarlow gains super armor while charging the move, but it has more startup lag.
  • Side Special - Kicking Onslaught: Hoy Quarlow rushes forward, and can travel at diagonal angles with directional inputs if used in midiar. If he runs into an opponent, he will deliver a flurry of kicks, damaging opponents multiple times. On the ground, he finishes with a backflip kick, and in midair, he finishes with an axe kick, which meteor smashes opponents.
    • Custom 1 - Burying Onslaught: On the ground, Hoy Quarlow finishes with a stomp, which buries opponents. However, the aerial variant will not meteor smash opponents.
    • Custom 2 - Furious Onslaught: The aerial variant of the move finishes with a dropkick, launching opponents instead of meteor smashing them.
    • Custom 3 - Rushing Onslaught: The aerial variant of the move can be aimed at higher and lower angles. However, both variants of the move don't travel as far.
  • Up Special - Rise and Fall: Hoy Quarlow leaps upward a great distance. After reaching the peak of his jump, he will hover in midair for a short time, and can move left and right. After this, he falls into a helpless state. However, if the special button is pressed again, Hoy Quarlow will fall downward with his staff, damaging any opponents he lands on. Alternatively, it can be cancelled into any of his aerial attacks, and he will fall into a helpless state afterwards.
    • Custom 1 - Falling Meteor: Hoy Quarlow doesn't leap as high, but while falling with the staff, he will meteor smash opponents.
    • Custom 2 - High Rise: Hoy Quarlow damages opponents as he rises, but cannot float afterwards and falls into a helpless state. Directional inputs can be used to alter the direction he jumps in.
    • Custom 3 - Hard Fall: Hoy Quarlow deals more damage and knockback while falling with the staff, and falls faster, but he cannot cancel the float.
  • Down Special - Golden Lotus Clap: Hoy Quarlow claps his hands together, sending a wave of golden aura around himself. Opponents in this aura will be inflicted with paralysis, leaving them vulnerable.
    • Custom 1 - Fiery Clap: A burst of flames emits from Hoy Quarlow after he claps, dealing heavy damage and knockback instead of inflicting paralysis.
    • Custom 2 - Golden Flower Clap: Instead of inflicting paralysis on opponents, Hoy Quarlow causes a flower to grow on the opponent's head.
    • Custom 3 - Concentrated Clap: Hoy Quarlow has more startup lag before clapping, but the move covers more range and the opponents are paralyzed for longer.
  • Final Smash - Golden Knockout: Hoy Quarlow rushes forward with his staff. If he hits an opponent, he throws a barrage of punches and staff swings before finishing with a dropkick that emits golden aura, launching the opponent.
  • Charged State - Golden Quarlow: Hoy Quarlow slams his staff into the ground and begins glowing golden aura. In this state, he not only gains an extra midair jump, but his air speed is also increased. His grounded attacks also deal much more damage and knockback.

  • Mechanica
    ARMS (2017)
    Mechanica
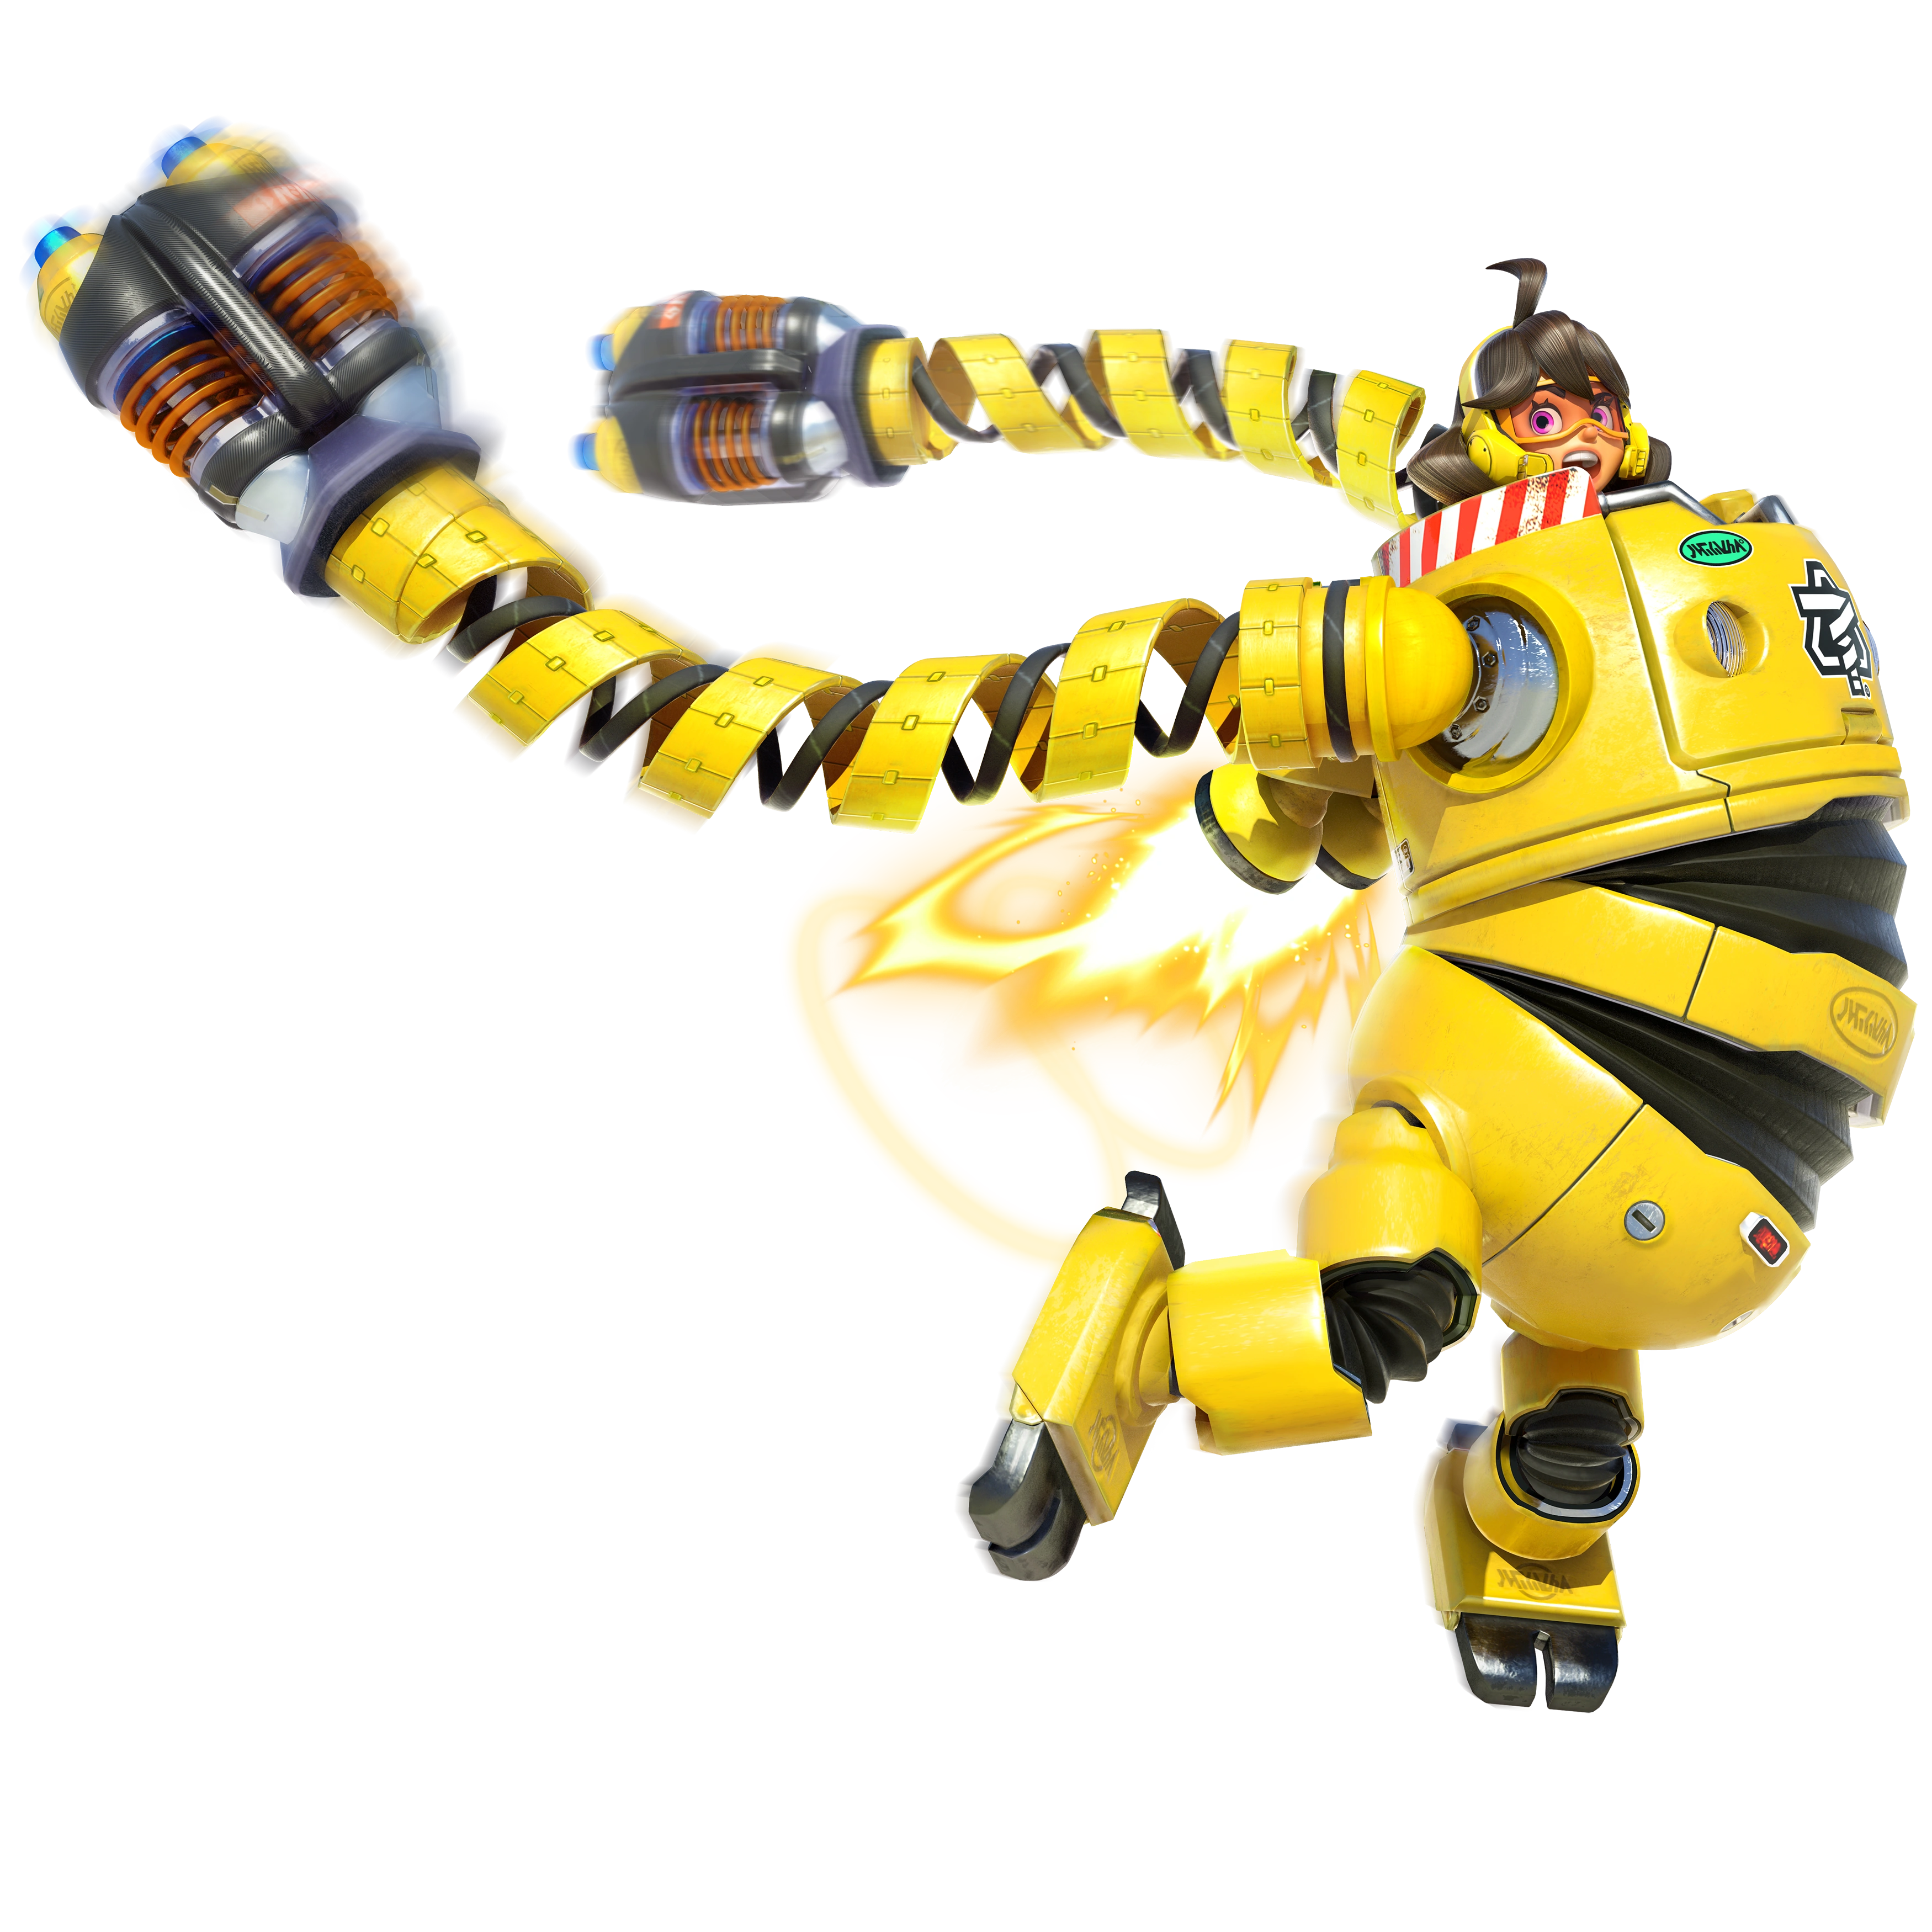
    Mechanica (メカニッカ, Mechanica) is one of the playable fighters inARMS. She competes in the ARMS Grand Prix alongside the other fighters, but unlike them she wasn't born with the gene that gives her long, extendable ARMS. Instead, she constructed a mechanical suit that enabled her to compete. She is a giant fan of the ARMS League and its contestants, especially Ribbon Girl. Some of the blueprints for her suit were stolen, presumably by Dr. Coyle, in order to construct Springtron.

    Like the other ARMS characters, she has a special mechanic where the attack button controls one ARM and the special button controls the other; they can be used and angled in many different ways, which altogether grant her impressive range. Mechanica is a heavyweight, and is also one of the largest fighters in the roster. Uniquely, she lacks a double jump. Instead, she can hover freely in midair by holding the jump input, similar to R.O.B.'s Robo Burner. This grants her a lot of aerial mobility, though she will eventually stop hovering. This ability will need to be recharged by not using it, which can harm her recovery tremendously if not managed properly.

    Mechanica's moveset utilizes her shit's ARMS, extending them in different directions to punch opponents from afar. Her attacks are powerful and can reach far, but are rather slow, and they can't be angled as much as the other ARMS characters. Each arm does grant her attacks unique properties however.
    SSB ARMS Series Mechanica Stock Icon SSBCharged Icon
    Mechanica's Moveset

    • Neutral Attack: Mechanica extends her left ARM.
    • Forward Tilt: Mechanica extends her left ARM.
    • Forward Smash: Mechanica extends her left ARM.
    • Up Tilt: Mechanica rises out of her suit and throws a overarching swipe above herself.
    • Up Smash: Mechanica jumps out of her suit and spins, damaging opponents multiple times before launching them.
    • Down Tilt: Mechanica stomps on the ground. This creates a shockwave that can trip opponents farther away.
    • Down Smash: Mechanica jumps and stomps on the ground.
    • Dash Attack: Mechanica activates jet thrusters behind her as she throws a belly-first lunge.
    • Counter: Mechanica punches with both of her ARMS.

  • Neutral Aerial: Mechanica swings her left ARM around herself.
  • Forward Aerial: Mechanica extends her left ARM.
  • Forward Crash: Mechanica extends her left ARM.
  • Back Aerial: Mechanica extends her left ARM behind herself.
  • Back Crash: Mechanica extends her left ARM behind herself.
  • Up Aerial: Mechanica swings her left ARM above herself.
  • Up Crash: Mechanica swings her left ARM above herself.
  • Down Aerial: Mechanica's suit starts to short circuit and emit electricity, damaging opponents multiple times before launching them.
  • Down Crash: Mechanica throws a stomp. The move can bury and meteor smash opponents.

  • Grab: Mechanica extends both her ARMS forward to grab an opponent.
  • Pummel: Mechanica leans out of her suit to slap the opponent.
  • Forward Throw: Mechanica throws the opponent forward.
  • Back Throw: Mechanica spins around and throws the opponent backward.
  • Up Throw: Mechanica grabs the opponent herself and throws them upward.
  • Down Throw: Mechanica slams the opponent on the ground and stomps on them.

  • Neutral Special - Punch: Mechanica extends her right ARM forward. If used in midair, she swings his right ARM around himself, similar to her neutral aerial. Its custom moves are shared with side special, and they also affect attacks that use her left ARM.
  • Side Special - Punch: Mechanica extends her right ARM forward. The move can be charged similar to a smash attack, allowing it to deal more damage and knockback. Its custom moves are shared with neutral special, and they also affect attacks that use her left ARM.
    • Custom 1 - Metal Punch: Mechanica's ARMS don't travel as far, but they will ignore opponents' attacks and punch through them.
    • Custom 2 - Quick Punch: Mechanica's ARMS travel faster, but don't deal as much damage or knockback.
    • Custom 3 - Charged Punch: Mechanica's ARMS are stronger when her ability to float is fully charged, and get weaker as she uses it.
  • Up Special - ARM Swipe: Mechanica swings her right ARM above herself, much like her up aerial.
    • Custom 1 - Quick ARM Swipe: The move is faster, but deals less damage.
    • Custom 2 - Powerful ARM Swipe: The move is stronger, but doesn't travel as fast.
    • Custom 3 - Combo ARM Swipe: The move deals less damage, but it has less endlag, allowing it to combo into other attacks.
  • Down Special - ARMS Change: Mechanica changes the type of ARMS she uses, affecting the moves that use it. She will always use two of the three kinds of ARMS, which are listed below:
      • Revolver: Fires three small projectiles consecutively, which deal electric damage and combo into each other. Grants the most range and the shots can be angled independently from the ARM, though it deals the least damage and isn't fast.
      • Homie: Unlike Mechanica's other ARMS, the Homie can't be angled, and instead it will automatically target the nearest opponent. After contact or reaching the end of its range, it explodes, dealing additional damage to opponents caught in the blast radius.
      • Whammer: At the end of its range, the Whammer will rise up before smashing downward, which can meteor smash aerial opponents. Is the strongest, but also the slowest and has the worst range.
    • Custom 1 - Rotating ARMS: Mechanica will alternate what ARM she uses for her left and right ARMS. For example, when using Homie on her right ARM, it will change to her left ARM, with her right ARM having Whammer.
    • Custom 2 - Dual ARMS: Rather than having different ARMS, both ARMS will be the same, allowing Mechanica to use the Sparky, Popper, and Slapamander on both his ARMS.
    • Custom 3 - Random ARMS: Each time the move is used, Mechanica's left and right ARMS will use a random combination of her three ARMS.
  • Final Smash - ARMS Rush: Mechanica charges up before throwing a punch forward. Her suit will then have four ARMS, which will repeatedly punch the opponent before Mechanica herself finishes with a punch of her own, dealing high damage and knockback.
  • Charged State - Scrapyard Scrapper: Mechanica makes quick alterations to her suit, causing it to emit electricity. In this state, she is much faster, her hovering ability recharges quicker, and her ARMS travel faster and can be angled in more directions.

  • Barbara
    Daigasso! Band Brothers (2004)
    BarbaraTheBat JamWithTheBand
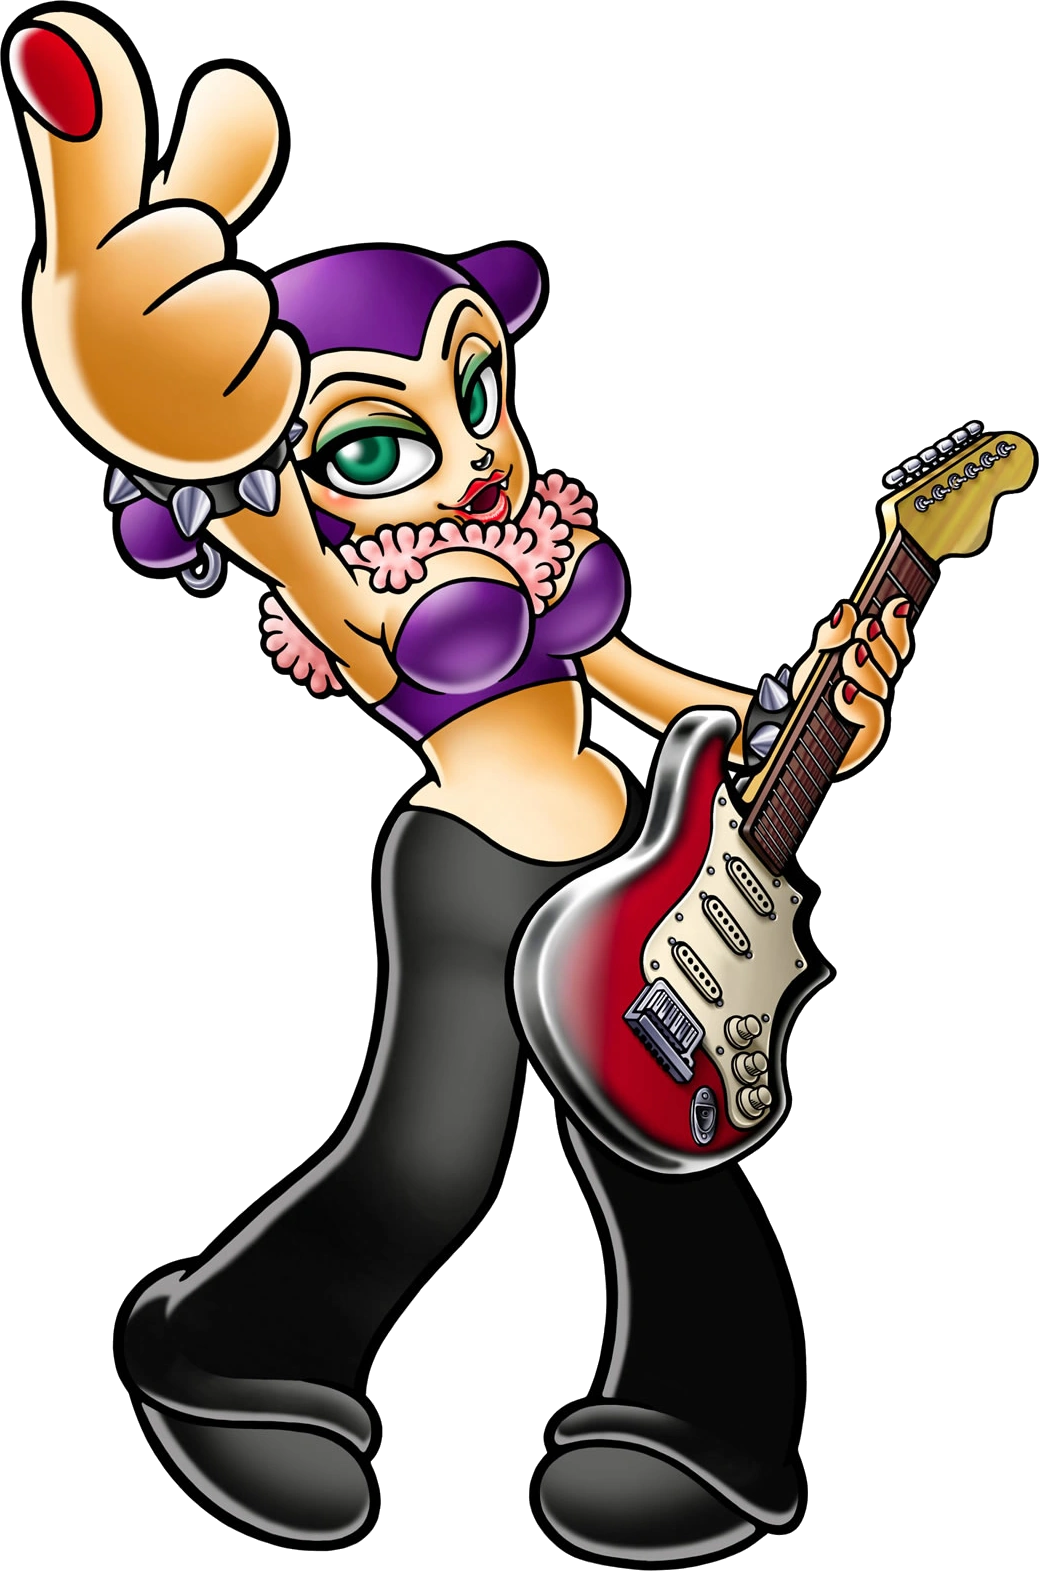
    Barbara (バーバラ, Barbara), full name Barbara the Bat, is the main character of the Jam with the Band series. She is an avid guitarist who runs her own music store, GB Music, in WaruWaru Town. She has a very arrogant attitude, and is known to work her employees hard. Outside of the series, she also appeared in Master of Illusion, where she teaches the player magic tricks and promotes her home series.

    Barbara's main weapon is an electric guitar, which grants her some disjointed range, though not as much as characters who utilize swords. She can be classed as a middleweight zoner, with decent mobility to boot. Some of her attacks see her play her guitar to create sound waves around her, which offer massive range. While they don't have much in the way of damage, these big hitboxes offer a variety of uses, mainly allowing her to keep opponents at bay as well as edgeguard and ledgetrap effectively.

    Barbara's attacks mostly revolve around swinging her guitar like a weapon or playing it to create sound waves. Despite her big range, she has trouble KOing opponents since her attacks deal relatively low damage and knockback. As such, she needs to rely on zoning out opponents with her big hitboxes.
    SSB Daigasso! Band Brothers Series Barbara Stock Icon SSBCharged Icon
    Barbara's Moveset

    • Neutral Attack: Barbara strums her guitar, emitting a sound wave.
    • Forward Tilt: Barbara throws a roundhouse kick.
    • Forward Smash: Barbara swings her guitar on the ground, breaking it. She quickly pulls out a new one. The resulting debris deals further damage after the initial blow.
    • Up Tilt: Barbara throws an upward headbutt.
    • Up Smash: Barbara twirls her guitar above herself, damaging opponents multiple times before launching them.
    • Down Tilt: Barbara throws a shin kick.
    • Down Smash: Barbara performs a breakdance spin on her head with her legs spread, damaging opponents multiple times before launching then.
    • Dash Attack: Barbara performs a cartwheel, damaging opponents multiple times before launching then.
    • Counter: Barbara strums her guitar to emit a sound wave.

  • Neutral Aerial: Barbara throws a sex kick.
  • Forward Aerial: Barbara throws an upward swing with the body of her guitar.
  • Forward Crash: Barbara strums her guitar, causing a sound wave directed in front of her.
  • Back Aerial: Barbara swings the body of her guitar backward.
  • Back Crash: Barbara strums her guitar, causing a sound wave directed behind her.
  • Up Aerial: Barbara thrusts the neck of her guitar upward.
  • Up Crash: Barbara strums her guitar, causing a sound wave directed above her.
  • Down Aerial: Barbara thrusts the body of her guitar downward. The move can meteor smash opponents.
  • Down Crash: Barbara strums her guitar, causing a sound wave directed below her.

  • Grab: Barbara reaches out to grab the opponent.
  • Pummel: Barbara knee strikes the opponent.
  • Forward Throw: Barbara spins around with the opponent in tow and throws them forward.
  • Back Throw: Barbara puts the opponent behind herself and throws a hip thrust, launching them backward.
  • Up Throw: Barbara heaves the opponent upward before throwing a flip kick.
  • Down Throw: Barbara slams the opponent on the ground.

  • Neutral Special - Guitar Solo: Barbara strums her guitar, emitting a sound wave. The neutral special can be pressed again for her to continue emitting sound waves, which combo opponents before launching them with a larger sound wave if the special button is pressed five times. Alternatively, she can stop strumming and use other moves to combo opponents, as the sound waves have set knocknack.
    • Custom 1 - Loud Wave: Barbara charges up for a bit before strumming a loud note, causing a larger shockwave that deals more damage. Only one wave can be used at a time and the move has some endlag.
    • Custom 2 - Stunning Play: The final sound wave inflicts paralysis rather than launching opponents. However, the preceding waves don't have set knockback and can be harder to connect.
    • Custom 3 - Sound Barrier: The sound waves deal less damage, but they will disable projectiles.
  • Side Special - Star Performance: Barbara slides on her knees, damaging opponents she hits. If the special button is pressed while she is sliding, she will strum her guitar and emit a sound wave, dealing more damage. If used in midair, Barbara will leap forward a bit, gaining some upward momentum.
    • Custom 1 - Sliding Star: Barbara slides much further and faster, but the sound wave deals less damage.
    • Custom 2 - Sliding Strike: Barbara deals more damage and knockback when she slides, but can't play her guitar.
    • Custom 3 - Superstar Performance: Barbara doesn't slide as far, but the sound wave is bigger and deals more damage.
  • Up Special - Wings of Bat: Fake wings extend from Barbara's back as she flies upward, falling into a helpless state at the peak of her jump. She can't damage opponents, but her flight can be angled with the control stick.
    • Custom 1 - Sharp Wings: Barbara doesn't fly as high, but she does damage opponents multiple times before launching them.
    • Custom 2 - Bat Strike: Barbara can only fly straight up, but at the peak of her height, she will swoop in a diagonally-downward direction and damage opponents she hits. This can be cancelled by holding up on the control stick, having her fall into a helpless state instead.
    • Custom 3 - Bat Flight: Barbara flies much higher, but can only fly straight upward.
  • Down Special - Amp: Barbara places an amplifier in front of herself; if used in midair, it will fall down and damage opponents it lands on. Any time Barbara uses an attack that creates a sound wave, the amplifier will create the exact same sound wave. The amplifier can be destroyed by opponents' attacks, and it will also disappear after a few seconds. Only one can be at play at once.
    • Custom 1 - Exploding Amp: If the amplifier is attacked, it explodes, damaging any opponents in the blast radius heavily. However, it has less health.
    • Custom 2 - Amp Plus: The amplifier creates bigger and stronger sound waves than Barbara, though it doesn't last as long.
    • Custom 3 - Durable Amp: The amplifier can take more damage before being destroyed, though there is a cooldown of eight seconds after it disappears before Barbara can place another.
  • Final Smash - Jam with the Band: Barbara summons her minions, who play their respective instruments. This creates several sound waves that cover a lot of area, damaging opponents multiple times before launching them.
  • Charged State - Guitar Upgrade: Barbara discards her current guitar for a bigger, fancier one. In this state, attacks that involve her guitar have more range and power, and the sound waves it produces are also stronger. Amplifiers also have higher health and last longer.

  • Flipnote Frog
    Flipnote Studio (2008)
    FlipnoteFrog SSBUltimate
    The Flipnote Frog (メモ帳のカエル, Notepad Frog) is the mascot of Flipnote Studio, an app for the Nintendo DSi using DSiWare. With it, the player can draw images on the screen, and string images together to make animation, similar to real-life flipbooks. The Flipnote Frog itself serves as the tutorial, teaching new players how to use the application, as well as providing tips and tricks. A sequel known as Flipnote Studio 3D was later released for the Nintendo 3DS.

    Flipnote Frog is unsurprisingly a lightweight character, and as such can be knocked away easily. However, it has quick ground mobility and high jump height, making it quite agile. One of its biggest strengths is the amount of options it has at its disposal at any given time, as all four of its special moves have variants with entirely different functions, which it uses randomly. These include projectiles, long-ranged attacks, combo starters and finishers, mobility- and recovery-based moves, powerful KO moves, reflectors, absorbers, and more.

    Flipnote Frog's basic moveset revolves around its legs and tongue. The bulk of its abilities is in its special moves, all of which involve it drawing something on a Nintendo DSi and projecting it to real life. Each special move has six different things it can draw, and many of these are references to classic Nintendo games.
    SSB Flipnote Flipnote Frog Stock Icon SSBCharged Icon
    Flipnote Frog's Moveset

    • Neutral Attack: Flipnote Frog throws two alternating slaps followed by a donkey kick.
    • Forward Tilt: Flipnote Frog sticks out its tongue.
    • Forward Smash: Flipnote Frog leaps forward, bouncing off of opponents it runs into.
    • Up Tilt: Flipnote Frog sticks out its tongue upward.
    • Up Smash: Flipnote Frog throws a flip kick.
    • Down Tilt: Flipnote Frog throws a shin kick. The move can trip opponents.
    • Down Smash: Flipnote Frog throws a breakdance sweep.
    • Dash Attack: Flipnote Frog leaps forward while throwing a battering ram.
    • Counter: Flipnote Frog kicks the opponent.

  • Neutral Aerial: Flipnote Frog performs a somersault.
  • Forward Aerial: Flipnote Frog throws a hook kick.
  • Forward Crash: Flipnote Frog throws a dropkick.
  • Back Aerial: Flipnote Frog throws a back kick.
  • Back Crash: Flipnote Frog throws three back kicks in rapid succession.
  • Up Aerial: Flipnote Frog throws a bicycle kick.
  • Up Crash: Flipnote Frog sticks its tongue out upward. Charging the move increases the length of the tongue.
  • Down Aerial: Flipnote Frog sticks its tongue downward.
  • Down Crash: Flipnote Frog throws a stall-then-fall stomp. The move can meteor smash opponents.

  • Grab: Flipnote Frog sticks out its tongue to grab the opponent. It can also latch to ledges as a tether grab.
  • Pummel: Flipnote Frog headbutts the opponent.
  • Forward Throw: Flipnote Frog shoves the opponent forward.
  • Back Throw: Flipnote Frog spins the opponent around in its tongue before throwing them backward.
  • Up Throw: Flipnote Frog throws the opponent upward.
  • Down Throw: Flipnote Frog slams the opponent into the ground.

  • Neutral Special - Projectile Sketch: Flipnote Frog takes out a Nintendo DSi and draws in it, randomly creating one of the following projectiles:
      • Green Shell: Slides across the ground and damages opponents it hits.
      • Crown: Flies forward before returning to Flipnote Frog like a boomerang.
      • Geemer: Crawls along the ground, hugging to walls and ceilings.
      • Staryu: Fires five star-shaped projectiles in rapid succession.
      • Bomb: Walks forward for a short time before exploding, damaging any opponents in the blast radius.
    • Custom 1 - Quick Projectiles: The projectiles overall travel faster, but deal less damage.
      • Green Shell: Travels faster, but is smaller and deals less damage.
      • Crown: Doesn't boomerang back to Flipnote Frog, and instead keeps flying in a straight line.
      • Geemer: Travels much faster, but deals less damage.
      • Staryu: Fires a single projectile that inflicts paralysis on opponents.
      • Bomb: Walks faster, but has a smaller blast radius.
    • Custom 2 - Homing Projectiles: The projectiles overall travel less distance, but have homing properties.
      • Green Shell: Travels slower, but homes in on the opponent.
      • Crown: Travels less distance, but attempts to follow the opponent laterally.
      • Geemer: Travels slower, but follows the opponent.
      • Staryu: Only fired two projectiles, but they are fired in the direction of the nearest opponent.
      • Bomb: Explodes faster, but follows the opponent.
    • Custom 3 - Wacky Projectiles: The projectiles overall deal more damage, but have a less reliable pattern and are harder to hit opponents with.
      • Green Shell: Jumps as it slides forward.
      • Crown': Travels around Flipnote Frog in a circle.
      • Geemer: Repeatedly jumps as it travels forward.
      • Staryu: Fires six projectiles upward.
      • Bomb: Stays in place and doesn't walk, but the blast radius is larger.
  • Side Special - Weapon Sketch: Flipnote Frog takes out a Nintendo DSi and draws in it, randomly creating one of the following weapons for it to use:
      • Master Sword: Flipnote Frog takes the Master Sword and rushes forward with it, damaging opponents it runs into.
      • Blue Falcon: Flipnote Frog hops in the Blue Falcon and rides it, damaging opponents it hits. It can turn around and jump off of it, though doing this or being attacked makes the Blue Falcon disappear.
      • Oil Panic: Flipnote Frog dumps oil on the ground from a bucket, which remains there for some time. Opponents that step over the oil will slip.
      • Upperdash Arm: Flipnote Frog rushes forward with the Upperdash Arm. If it hits an opponent, it throws an uppercut.
      • Star Punch: Flipnote Frog puts on a boxing glove and throws an uppercut, dealing heavy damage and knockback. The move has a lot of startup, but has super armor.
    • Custom 1 - Armored Weapons: The weapons overall deal less damage, but they grant Flipnote Frog super armor when using them.
      • Master Sword: Flipnote Frog deals less damage, but has super armor while charging.
      • Blue Falcon': Flipnote Frog travels slower and can only remain in the Blue Falcon for five seconds, but it can't be hit out of it.
      • Oil Panic: The oil covers more ground, but doesn't last as long.
      • Upperdash Arm: Flipnote Frog deals less damage, but has super armor while charging.
      • Star Punch: Flipnote Frog deals less damage, but has much less startup.
    • Custom 2 - Brutal Weapons: The weapons overall deal more damage, but they cover less range.
      • Master Sword: Flipnote Frog deals more damage, but travels less distance.
      • Blue Falcon': The Blue Falcon deals more damage, though Flipnote Frog cannot turn.
      • Oil Panic: Instead of remaining on the ground, the initial oil spill damages opponents.
      • Upperdash Arm: Flipnote Frog travels less distance, but it will meteor smash opponents it hits.
      • Star Punch: Flipnote Frog deals more damage, but loses its super armor.
    • Custom 3 - Giant Weapons: The weapons overall deal less damage, but are larger and easier to hit opponents with.
      • Master Sword: The sword is longer, but deals less damage.
      • Blue Falcon': The Blue Falcon deals less damage, but it is harder to knock Flipnote Frog off of it.
      • Oil Panic: The oil covers more ground, but it doesn't last as long.
      • Upperdash Arm: Flipnote Frog can travel farther, but deals less damage.
      • Star Punch: Flipnote Frog lunges while throwing the uppercut, giving it more range, but it deals less damage.
  • Up Special - Recovery Sketch: Flipnote Frog takes out a Nintendo DSi and draws in it, randomly creating one of the following objects to help it recover:
      • Spring: Flipnote Frog bounces on the spring and leaps upward, falling into a semi-helpless state afterwards.
      • Screw Attack: Flipnote Frog jumps while spinning and emitting electric energy, damaging opponents multiple times before launching them and falling into a helpless state afterwards.
      • Duck: Flipnote Frog grabs onto a duck as it flies upward. It will let go if the control stick is held down or if it is attacked, sending it in a semi-helpless state.
      • Warp Box: Flipnote Frog jumps in a Warp Box and reappears in the direction the control stick is held, falling into a helpless state if it ends up in midair.
      • Wings: Flipnote Frog flies in the direction the control stick is held using wings, falling into a helpless state afterwards.
    • Custom 1 - Recovery Smash: The attacks overall deal more damage in exchange for less recovery height.
      • Spring: Flipnote Frog damages opponents it hits, but gains less height.
      • Screw Attack: Flipnote Frog deals more damage to opponents, but gains less height.
      • Duck: The duck damages opponents it hits, but it doesn't fly as high.
      • Warp Box: The Warp Box damages opponents nearby, but Flipnote Frog doesn't travel as far.
      • Wings: Flipnote Frog damages opponents it hits multiple times before launching them, but travels less distance.
    • Custom 2 - Super Recovery: The attacks overall grant Flipnote Frog more vertical height, but are more limited in uses.
      • Spring: Flipnote Frog bounces higher, but falls into a helpless state afterwards.
      • Screw Attack: Flipnote Frog travels higher, but only damages opponents once.
      • Duck: The duck can fly higher, but Flipnote Frog falls into a helpless state if it gets hit or
      • Warp Box: Flipnote Frog can travel further, but will only travel straight upward.
      • Wings: Flipnote Frog can travel further, but will only travel straight upward.
    • Custom 3 - Quirky Recovery: The attacks overall grant less recovery, but have additional quirks that can be useful.
      • Spring: Flipnote Frog doesn't jump as high, but it can be used twice. After the first spring, the next use will always be a spring unless it lands.
      • Screw Attack: Flipnote Frog doesn't travel as high, but the move creates vacuumboxes that draw opponents into the move.
      • Duck: The duck can only travel straight upward, but Flipnote Frog has super armor and can't be knocked off of it.
      • Warp Box: Flipnote Frog can only travel in the cardinal directions, but the Warp Box explodes when it reappears, damaging any opponents in the blast radius.
      • Wings: Flipnote Frog travels less distance, but damages opponents multiple times before launching them.
  • Down Special - Shield Sketch: Flipnote Frog takes out a Nintendo DSi and draws in it, creating one of the following shields that surround itself:
      • Circle Shield: Reflects projectiles.
      • Square Shield: Aborsbs projectiles.
      • Hexagon Shield: Counters attacks with extreme damage and knockback.
    • Custom 1 - Big Shields: The shields are larger, but their effects are less powerful.
    • Custom 2 - Beefy Shields: The shields last longer, but they take more time to come out.
    • Custom 3 - All-in-One Shield: Flipnote Frog only creates the Circle Shield, which has the effects of all three, but all of its effects are less powerful.
  • Final Smash - Animation: Flipnote Frog takes out a Nintendo DSi and draws in it. It will make a poorly-drawn copy of the nearest opponent's Final Smash, indicated by drawing a circle around the opponent.
  • Charged State - Nintendo 3DS: Flipnote Frog replaces its Nintendo DSi with a Nintendo 3DS. In this state, all of its drawn attacks are much larger and faster, and its mobility and jump height are also increased.

  • Mr. Game & Watch
    Ball (1980)
    MrGameandWatch SSBUltimate
    Mr. Game & Watch (Mr.ゲーム&ウォッチ, Mr. Game & Watch) is an amalgamation of various games from the Game & Watch line, a series of handheld consoles created by Gunpei Yokoi and released during the early 1980s. Each console, as the name suggested, had a single game and a watch that players could set; when the watch was up, a character would ring a bell. Mr. Game & Watch himself is based off of the generic NPCs in Fire and Parachute.

    Because he is entirely 2D, Mr. Game & Watch is a typical lightweight; he sports low weight and can be launched easily, but has a good recovery and is quite fast on the ground and in the air. However, he boasts attacks with power comparable to those of the heavyweights. As such, he is a glass cannon; he can KO opponents easily, though his light weight allows opponents to KO him just as easily.

    The entirety of Mr. Game & Watch's moveset makes references to various Game & Watch games. In some attacks, he also transforms into the characters from those games to attack opponents. None of the attacks are actually consistent with each other, as they all make use of random objects found in these games.
    SSB Game & Watch Series MrGame&WatchHeadSSBU SSBM Icon
    Mr. Game & Watch's Moveset

    • Neutral Attack: Mr. Game & Watch pulls out an insecticide pump and repeatedly pumps gas. He can continue pumping gas if the attack button is pressed repeatedly.
    • Forward Tilt: Mr. Game & Watch thrusts a chair forward.
    • Forward Smash: Mr. Game & Watch swings a lit torch forward.
    • Up Tilt: Mr. Game & Watch swings a flag overhead.
    • Up Smash: Mr. Game & Watch throws an upward headbutt while wearing a diving helmet.
    • Down Tilt: Mr. Game & Watch flips a manhole. The move was windboxes that can push opponents upward.
    • Down Smash: Mr. Game & Watch swings two hammers downward on both sides of him. The move can bury and meteor smash opponents.
    • Dash Attack: Mr. Game & Watch performs a sliding headbutt while wearing a helmet.
    • Counter: Mr. Game & Watch swings a bell forward.

  • Neutral Aerial: Mr. Game & Watch opens a parachute.
  • Forward Aerial: Mr. Game & Watch drops a bomb downward that explodes on impact.
  • Forward Crash: Mr. Game & Watch swings a hammer downward. The move can meteor smash opponents.
  • Back Aerial: Mr. Game & Watch holds a turtle behind himself, damaging opponents multiple times before launching them.
  • Back Crash: Mr. Game & Watch swings a boxed package downward.
  • Up Aerial: Mr. Game & Watch blows air upward, sending cloud-like projectiles that damage opponents.
  • Up Crash: Mr. Game & Watch blows air upward. The move deals no damage, but it does create windboxes that push opponents upward, which get stronger the longer the move is charged.
  • Down Aerial: Mr. Game & Watch performs a stall-then-fall move while holding a key downward. The move can meteor smash opponents.
  • Down Crash: Mr. Game & Watch punches downward with a boxing glove. The move can meteor smash opponents.

  • Grab: Mr. Game & Watch reaches out to grab the opponent.
  • Pummel: Mr. Game & Watch hits the opponent with a bell.
  • Forward Throw: Mr. Game & Watch juggles the opponent, flinging them forward.
  • Back Throw: Mr. Game & Watch juggles the opponent, flinging them backward.
  • Up Throw: Mr. Game & Watch jiggles the opponent, flinging them upward.
  • Down Throw: Mr. Game & Watch juggles the opponent, flinging them downward.

  • Neutral Special - Chef: Mr. Game & Watch flings food from a frying pan. He will fling four food at once, which fly at varying angles that can lightly be controlled with directional inputs. The frying pan itself can also damage opponents.
    • Custom 1 - Short-Order Chef: Mr. Game & Watch flings food faster, which travel in shorter, longer arcs. The food is smaller and deals less damage.
    • Custom 2 - XXL Chef: Mr. Game & Watch flings bigger food that travels slower but deals more damage. He can only fling two at a time, and the arcs they fly in cannot be controlled.
    • Custom 3 - Rotten Food: Mr. Game & Watch can only fling one food at a time, but they can cause a flower or mushroom to grow on opponents' heads.
  • Side Special - Judge: Mr. Game & Watch swings a hammer forward while holding up a random number from one to nine. The number he holds up dictates how strong the move is. Below are a list of possible numbers and their effects:
      • 1: Deals no knockback to opponents and inflicts 12% recoil damage.
      • 2: Deals light damage and knockback.
      • 3: Causes a flower to grow on the opponent's head.
      • 4: Causes the opponent to fall asleep.
      • 5: Damages opponents multiple times with electric damage.
      • 6: Meteor smashes the opponent.
      • 7: Deals heavy damage and knockback. Also causes five Food items to appear.
      • 8: Freezes the opponent.
      • 9: KOs the opponent. Deals 999% damage.
    • Custom 1 - Extreme Judge: Mr. Game & Watch can only hold up a one or a nine. However, the nine is significantly weaker, but the one deals more damage and knockback.
    • Custom 2 - Chain Judge: Mr. Game & Watch damages the opponent multiple times before launching them, with the number he holds up dictating how many times he hits the opponent.
    • Custom 3 - Telegraphed Judge: The effects of each number are much weaker, though after using the move, a small number will appear by Mr. Game & Watch's icon, displaying what number will be used next.
  • Up Special - Fire: Mr. Game & Watch summons two firemen who bounce him upward with a trampoline, damaging opponents he hits. At the peak of his jump, he opens a parachute, letting him drift downward. If the control stick is held down, he closes the parachute and enters a semi-helpless state.
    • Custom 1 - Heavy Trampoline: Mr. Game & Watch is bounced higher, but he doesn't open a parachute and simply falls into a helpless state.
    • Custom 2 - Trampoline Launch: Mr. Game & Watch deals more damage, but he gains less height.
    • Custom 3 - Public-Use Trampoline: Mr. Game & Watch doesn't damage opponents he hits. However, the trampoline will remain on the stage for some time, allowing him or his opponents to use it again.
  • Down Special - Oil Panic: Mr. Game & Watch holds out a bucket, and can continue holding it out of the special button is held. He will absorb energy-based projectiles, and reflect physical projectiles. Once three energy projectiles have been absorbed, he can throw oil on the opponent, with its strength dictated by how strong the absorbed projectiles are. Stronger projectiles, such as Samus' fully-charged Charge Beam, will fill the bucket immediately.
    • Custom 1 - Efficient Panic: Mr. Game & Watch only needs to absorb one projectile to fill the bucket, but it deals less damage and has less range.
    • Custom 2 - Panic Overload: Mr. Game & Watch needs five projectiles to fill the bucket instead of three, but the oil is much larger and deals more damage.
    • Custom 3 - Immediate Panic: Once Mr. Game & Watch absorbs a projectile, he throws it back out of the bucket immediately as oil.
  • Final Smash - Octopus: Mr. Game & Watch transforms into an octopus. In this state, he moves forward across the stage, trying to catch opponents in his tentacles. Caught opponents will be dragged off-stage and KO'ed. After this, Mr. Game & Watch returns to his normal state.
  • Charged State - Game & Watch Me: Mr Game & Watch begins glowing white aura, and grows slightly larger. In this state, he becomes much stronger, his attacks have more range, and he can jump higher. He also has more weight and has slower falling speed.

  • R.O.B.
    Stack-Up (1984)
    R.O.B. (ロボット, Robot), short for Robotic Operating Buddy, was an accessory released for the NES in 1984. Following the video game crash of 1983, Nintendo sold R.O.B. and disguised him as a toy to convince customers to buy more video games. While R.O.B. was only compatible with two games - Stack-Up and Gyromite - he saved the video game industry and has since become an icon of gaming hardware. Within the Super Smash Bros. series, R.O.B. was the leader of a civilization called the Ancients, though when Tabuu took over and used their machinery to create Subspace Bombs, R.O.B. was forced to become the Ancient Minister and do his bidding.

    R.O.B. is a heavyweight, though has the mobility of a middleweight, allowing him to move faster than most fighters in his weight class. He has a myriad of projectiles at his disposal, allowing him to fight effectively from a distance. He can wade in if need be, though most of his normal attacks are generally weak in knockback, so he can have a hard time KOing opponents. However, he has an excellent, flexible recovery.

    R.O.B.'s special moves either reference the games he was compatible with or use original, stereotypical abilities of robots. His regular moveset mostly consists of arm swings, spins, and blasts from his burner.
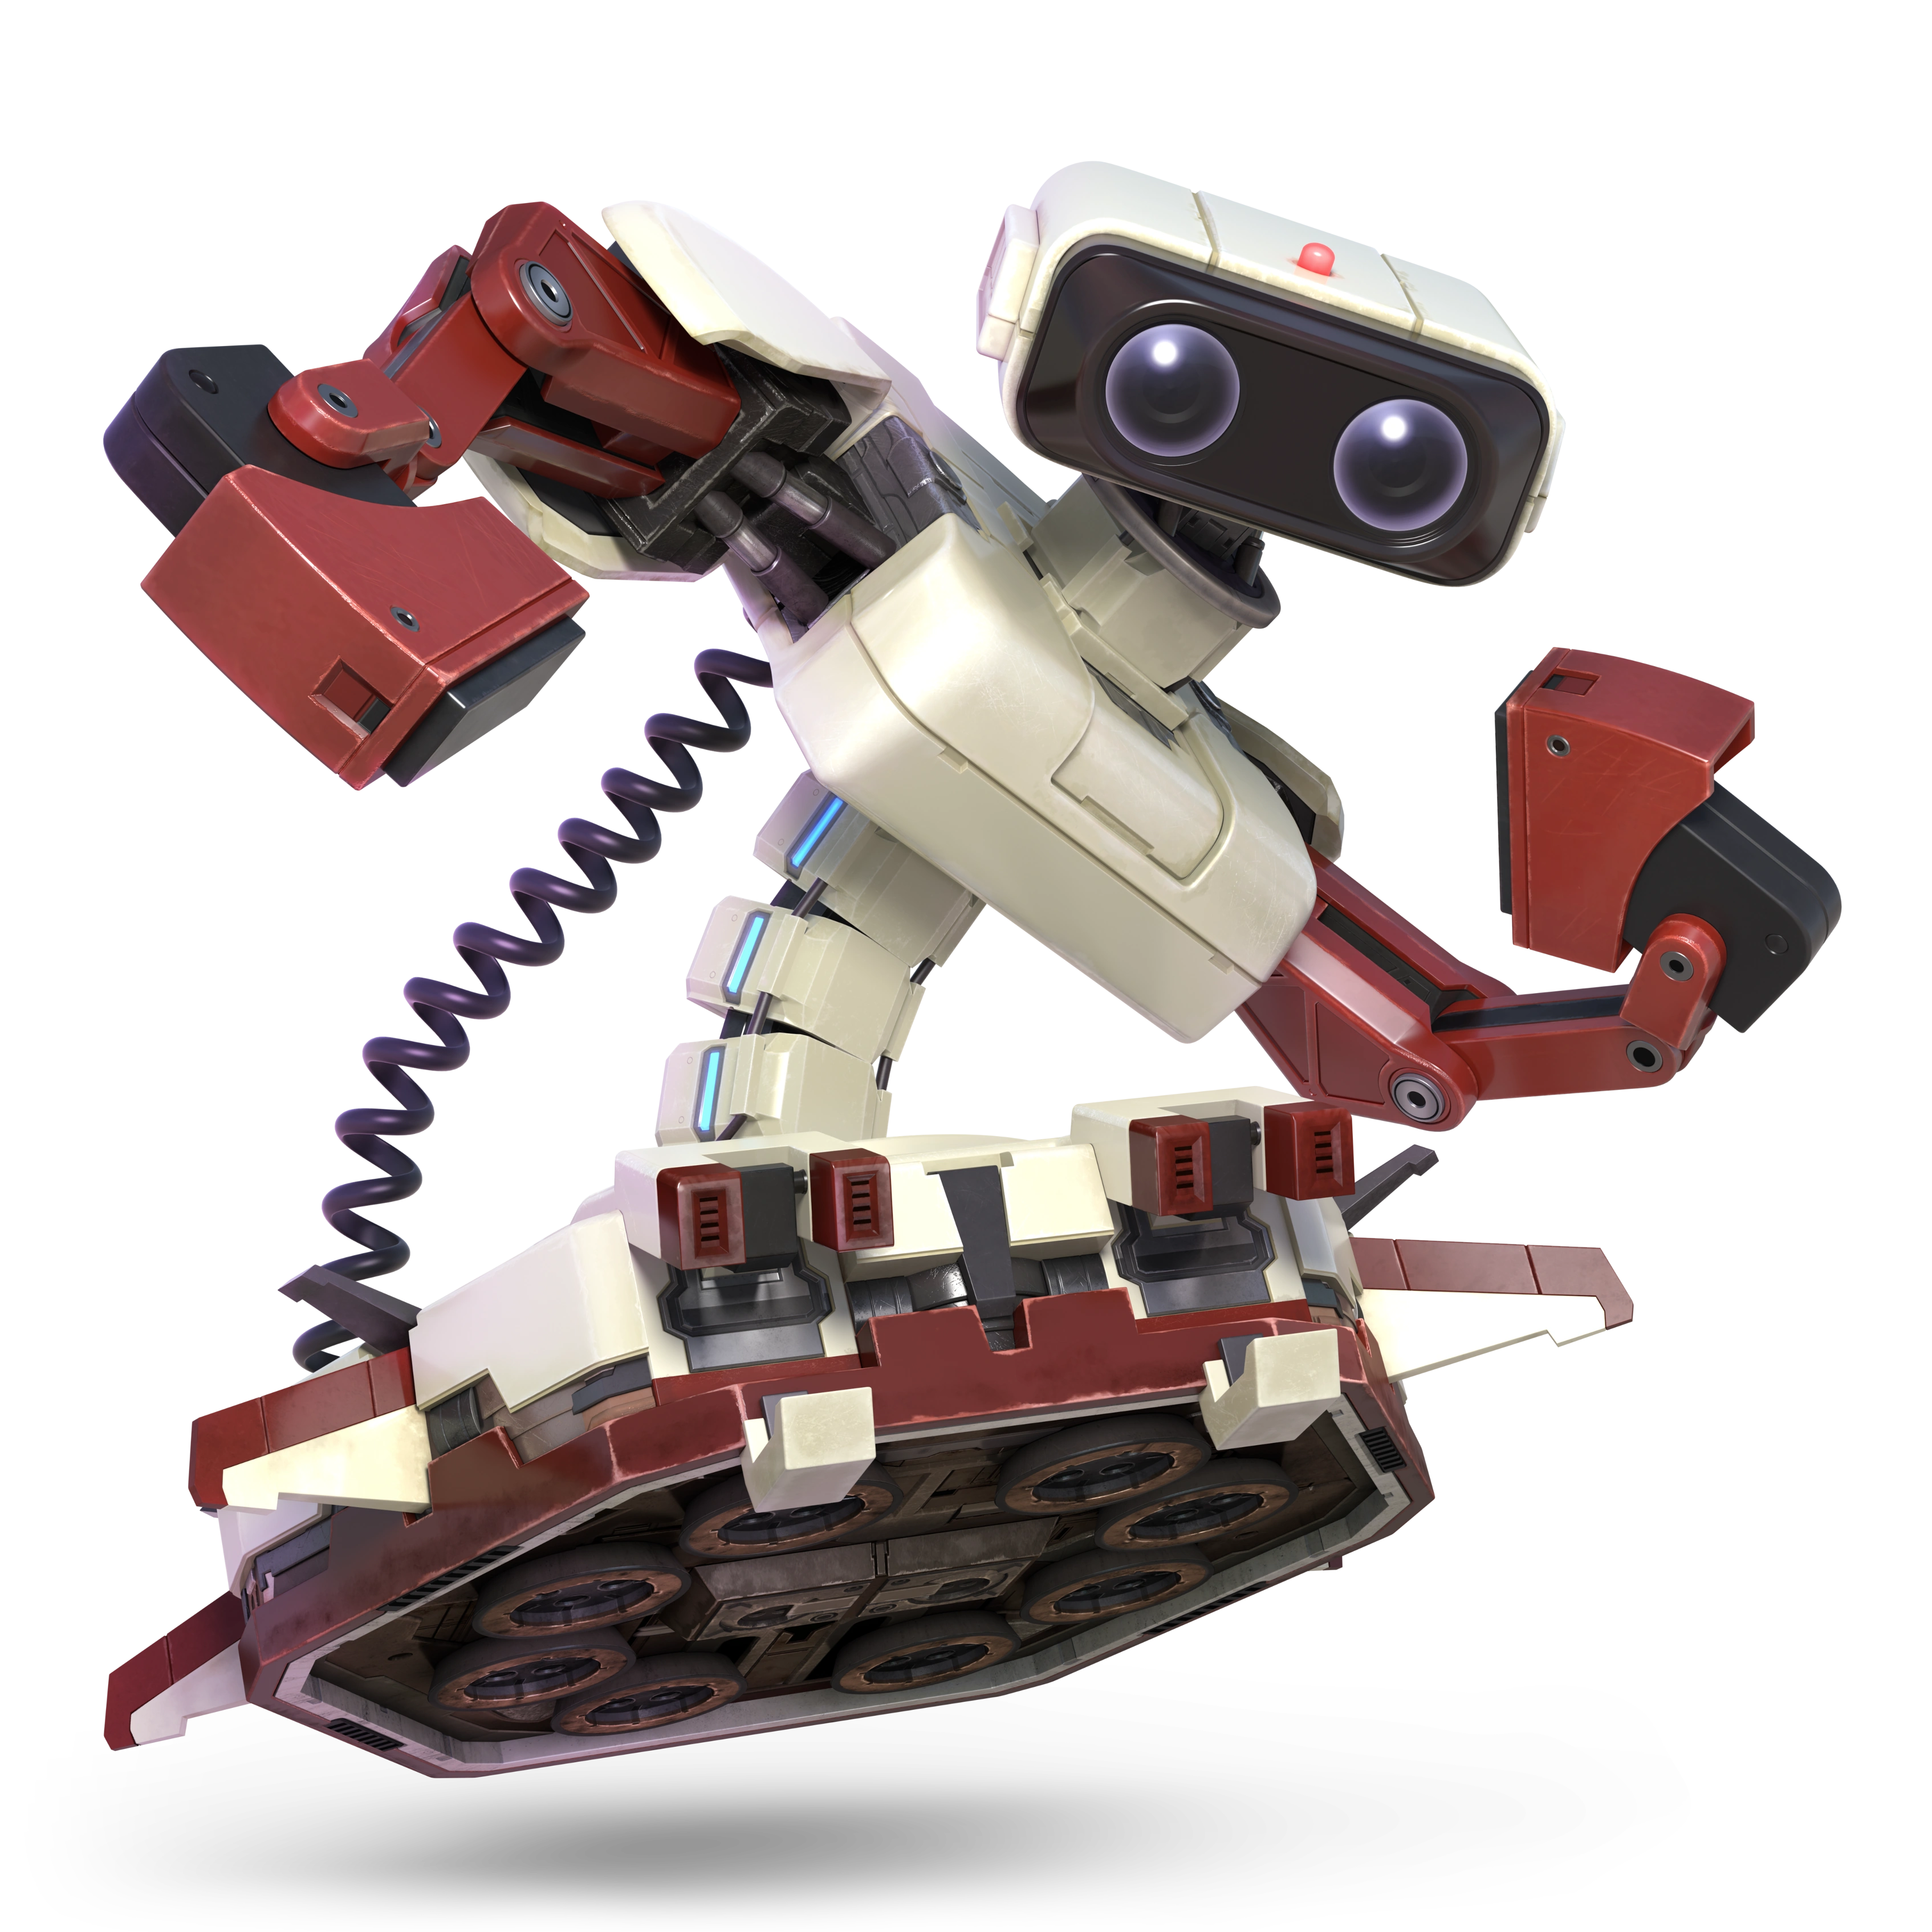
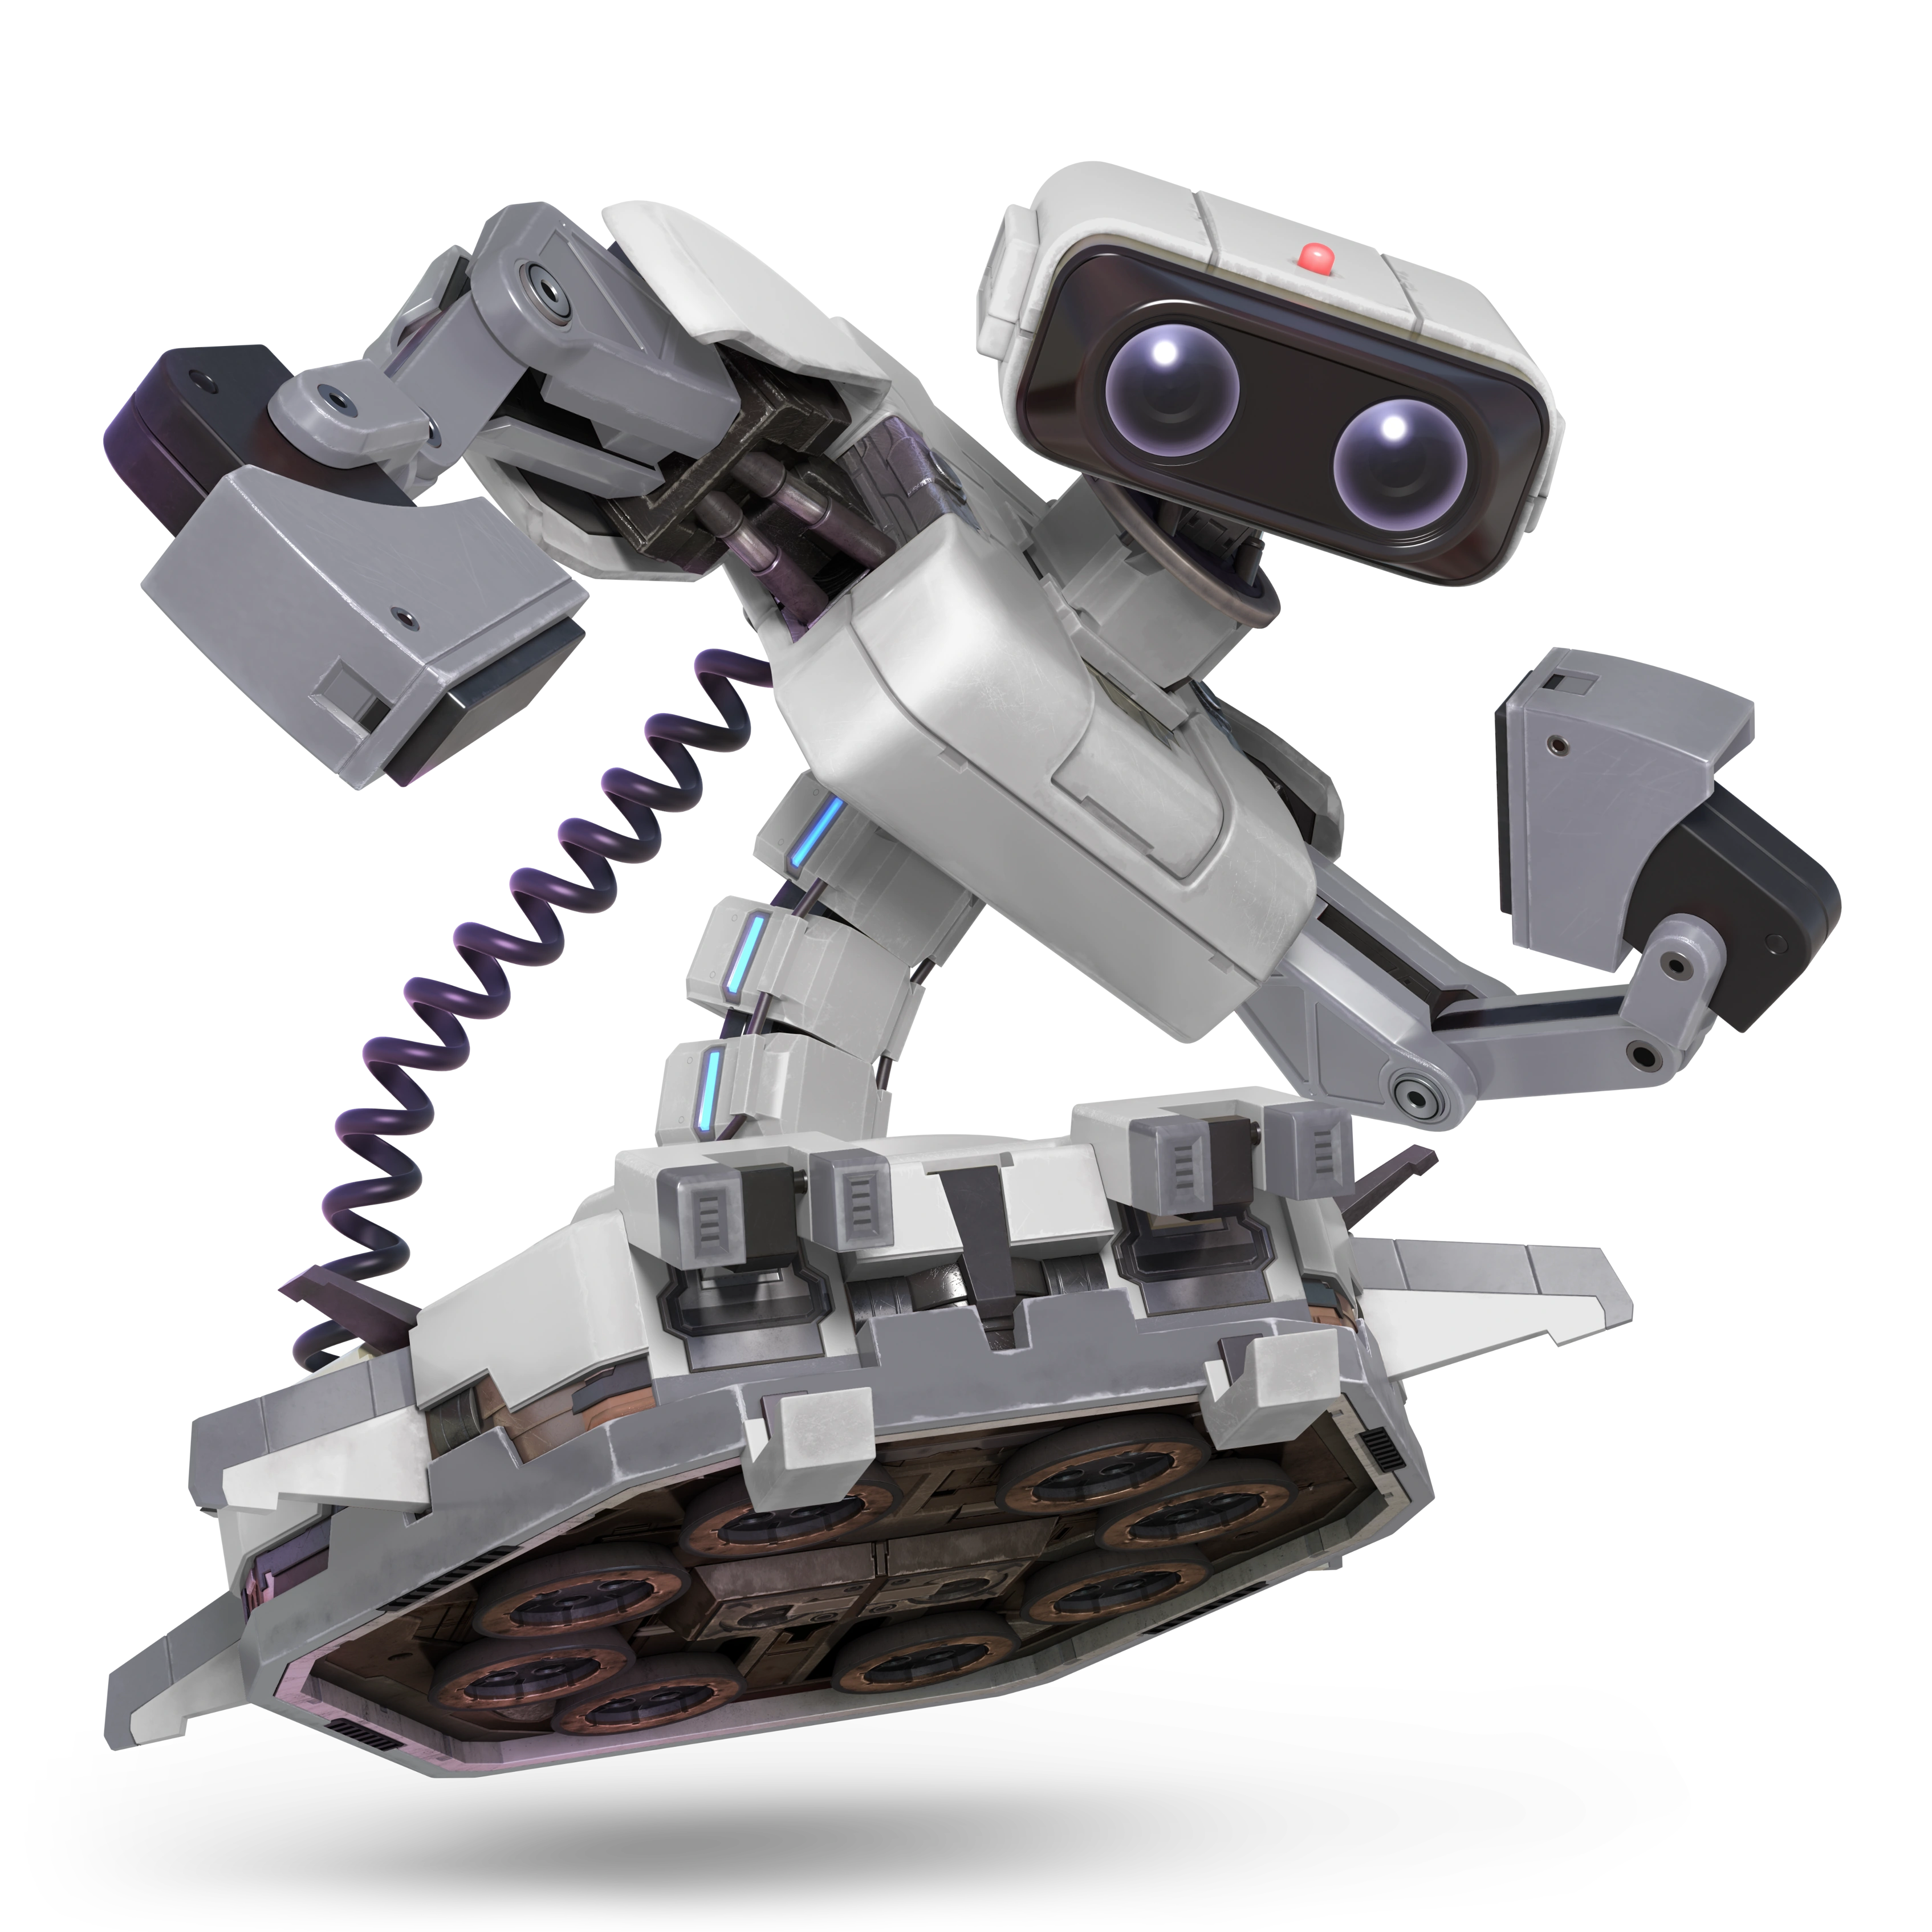
    SSB R.O.B. Series ROBHeadSSBU SSBB Icon
    R.O.B.'s Moveset

    • Neutral Attack: R.O.B. throws two alternating hooks.
    • Forward Tilt: R.O.B. throws a lunging hook.
    • Forward Smash: R.O.B. throws an optical, shotgun-like energy blast. The move deals more damage to opponents closer to him.
    • Up Tilt: R.O.B. raises both arms into the air.
    • Up Smash: R.O.B. performs a handstand and activates his thrusters to emit a fiery blast upward.
    • Down Tilt: R.O.B. thrusts his arms forward at a low angle.
    • Down Smash: R.O.B. lowers his torso and spins around with his arms outstretched, damaging opponents multiple times before launching them. While spinning, he can move left and right, and will also reflect projectiles.
    • Dash Attack: R.O.B. throws a double forearm club.
    • Counter: R.O.B. gets on his hands and activates his thrusters to emit a fiery blast forward.

  • Neutral Aerial: R.O.B. activates his thrusters and performs a somersault to emit a fiery blast in a circular motion.
  • Forward Aerial: R.O.B. throws a double forearm club.
  • Forward Crash: R.O.B. activates his thrusters to emit a fiery blast forward. The move gives him a burst of backward momentum.
  • Back Aerial: R.O.B. turns his torso around and throws a hook.
  • Back Crash: R.O.B. activates his thrusters to emit a fiery blast backward. The move gives him a burst of forward momentum.
  • Up Aerial: R.O.B. rapidly rotates his arms upward, damaging opponents multiple times before launching them.
  • Up Crash: R.O.B. activates his thrusters to emit a fiery blast upward. The move gives him a burst of downward momentum.
  • Down Aerial: R.O.B. performs a stall-then-fall stomp. He will bury or meteor smash opponents he lands on.
  • Down Crash: R.O.B. activates his thrusters to emit a fiery blast downward. The move gives him a burst of upward momentum.

  • Grab: R.O.B. reaches out to grab the opponent.
  • Pummel: R.O.B. squeezes the opponent.
  • Forward Throw: R.O.B. flings the opponent forward.
  • Back Throw: R.O.B. flings the opponent backward.
  • Up Throw: R.O.B. floats upward with the opponent and tow and performs a piledriver.
  • Down Throw: R.O.B. drills the opponent into the ground headfirst. The move can bury opponents.

  • Neutral Special - Robo Beam: R.O.B. fires a laser from his eyes. The move will charge over time, indicated by the red light on his head flashing. At no charge, he will fire a shotgun-like blast that only hits opponents at point blank range, but will inflict paralysis. With more charge, he will fire a laser that travels forward and damages opponents it hits. It can also be angled, and will ricochet off of surfaces.
    • Custom 1 - Diffusion Beam: The move takes longer to charge, but the fully-charged variant covers more range and damages opponents multiple times before launching them.
    • Custom 2 - Super Robo Beam: The move will not charge over time, and instead R.O.B. will only use the fully-charged version. It has considerably more startup lag and cannot be angled.
    • Custom 3 - Guided Robo Beam: R.O.B. fires a slow-moving laser forward that splits into five smaller lasers that home in on opponents.
  • Side Special - R.O.B. Sentinel: R.O.B. takes off his head and tosses it forward before getting a new one. The thrown head will become a sentry, and begin firing lasers forward that damage opponents. It can be attacked and knocked around to change the direction it fires in. Only one can be at play at a time.
    • Custom 1 - R.O.B. Bomb: Instead of becoming a sentry, the head will explode after a short time, damaging opponents in the blast radius.
    • Custom 2 - R.O.B. Rocket: Instead of shooting lasers, the sentry will fire missiles. They move slower and the sentry has a much slower fire rate, but it will home in on opponents and deal more damage.
    • Custom 3 - Sturdy Sentinel: The sentry cannot be moved with attacks from R.O.B. or his opponents.
  • Up Special - Robo Burner: R.O.B. activates his thrusters in order to fly. He can continue flying if the special button is held, and letting go will allow him to stop. He can fly for a limited amount of time before he falls into a semi-helpless state, as shown on a gauge on his chassis. The move will recharge over time.
    • Custom 1 - Robo Rocket: R.O.B. launches himself upward, damaging opponents he hits before falling into a helpless state afterwards.
    • Custom 2 - Robo Boost: R.O.B. boosts upward or forward very quickly. The move can be used three times before he falls into a semi-helpless state.
    • Custom 3 - High-Speed Burner: R.O.B. can fly much higher and the move recharges quicker, but he can only move straight upward and cannot stop flying until he reaches the peak of his height.
  • Down Special - Gyro: R.O.B. charges a spinning top on his base. The move can continue charging if the special button is held, and the charging can be cancelled and stored by performing any other action. The longer it is charged, the farther the top will fly and the more damage it will deal. The top spins in place, dealing light damage to opponents that touch it. It can be picked up and thrown as an item. Up to three tops can be at play at once.
    • Custom 1 - Fire Gyro: The top is on fire. It deals more damage to opponents, but it cannot be picked up and doesn't last as long.
    • Custom 2 - Slip Gyro: The move takes less time to charge and the top causes opponents to slip, but it deals less damage.
    • Custom 3 - Big Gyro: The move takes longer to charge, but the top is bigger and deals more damage. It is heavy and difficult to carry around.
  • Final Smash - Diffusion Death Ray: R.O.B. converts himself into a laser cannon and begins charging up for a massive blast. After awhile, he fires a large, red laser froward that damages opponents multiple times before launching them.
  • Charged State - R.O.K.: R.O.B. gives himself upgrades, making him larger and more fearsome. In this state, he is faster, can jump higher, is heavier, and deals a lot more damage. Robo Beam and Robo Burner also charge much faster.

  • Duck Hunt
    Duck Hunt (1984)
    DuckHuntCharged
    Duck Hunt (ダックハント, Duckhunt) are a trio consiting of a dog, a duck, and an unseen sharpshooter who are predominantly featured in the NES launch title Duck Hunt. The player, as the sharpshooter, would need to shoot ducks using the NES Zapper. If they successfully shot one down, the dog would hold it by the neck and smile at the player. If the duck flies away, the dog will laugh at them instead. This laugh has become infamous among video games.

    The player mainly controls the dog, while the duck and sharpshooter help with a few attacks. In terms of stats, they are fairly average, being middleweights sporting above-average mobility and slow falling speed. They have a very good zoning and camping game, thanks to an assortment of projectiles and long-ranged attacks that allow them to play from afar, as well as effectively edgeguard while on the stage. Aside from these moves however, Duck Hunt have pretty poor range and power in the rest of their moveset, and can have trouble scoring KOs.

    Duck Hunt's moveset mainly consists of paw swipes and body slams from the dog, pecks from the duck, and shots from the sharpshooter. It takes reference from several games compatible with the NES Zapper, including Duck Hunt, Wild Gunman, and Hogan's Alley.
    SSB Duck Hunt Series Duck Hunt Charged Stock Icon SSB4 Icon
    Duck Hunt's Moveset

    • Neutral Attack: The dog throws a paw swipe, followed by a headbutt, followed by a dropkick. If the attack button is tapped repeatedly, the duck will throw a flurry of pecks, damaging opponents multiple times before launching them with a stronger peck.
    • Forward Tilt: The dog leans on its chest and forepaws in order to thrust its lower back forward and propel the duck, who performs a peck.
    • Forward Smash: The sharpshooter fires three shots in front of the dog and duck while they comically dodge the shots. The longer the move is charged, the more distance the shots will cover.
    • Up Tilt: The dog leans on its chest and forepaws in order to thrust its lower back upward and propel the duck, who performs an upward headbutt while thrusting its wings upward.
    • Up Smash: The sharpshooter fires three shots upward while the dog and duck comically dodge the shots. The longer the move is charged, the more distance the shots will cover.
    • Down Tilt: The dog swings its lower back forward to propel the duck, who performs a turning peck. The move can cause opponents to trip.
    • Down Smash: The sharpshooter fires three shots around the dog and duck while they comically dodge the shots. The longer the move is charged, the more distance the shots will cover.
    • Dash Attack: The dog slides onto its chest and forepaws in order to thrust its lower back forward and propel the duck, who performs a peck.
    • Counter: The sharpshooter shoots the opponent.

  • Neutral Aerial: The dog performs an aerial cartwheel.
  • Forward Aerial: The dog thrusts its lower back forward to propel the duck, who performs a corkscrew peck.
  • Forward Crash: The dog thrusts his lower back forward to propel the duck, who pecks. If the attack button is pressed again, the sharpshooter will shoot the duck, dealing more damage.
  • Back Aerial: The dog thrusts its lower back backward to propel the duck, who performs a turning peck.
  • Back Crash: The dog thrusts its lower back backward to propel the duck, who pecks. If the attack button is pressed again, the sharpshooter will shoot the duck, dealing more damage.
  • Up Aerial: The duck pecks upward three times while carrying the dog in tow.
  • Up Crash: The duck pecks upward while carrying the dog in tow. If the attack button is pressed again, the sharpshooter will shoot at the duck, dealing more damage.
  • Down Aerial: The dog somersaults to propel the duck, who performs a somersaulting peck. The move can meteor smash.
  • Down Crash: The dog somersaults to propel the duck, who pecks. If the attack button is pressed again, the sharpshooter will shoot the duck, dealing more damage.

  • Grab: The dog bites the opponent.
  • Pummel: The duck pecks the opponent.
  • Forward Throw: The dog rears its head back and sways it forward to throw the opponent. If the attack button is pressed again, the sharpshooter will shoot the opponent, dealing more damage.
  • Back Throw: The dog spins around to throw the opponent backward. If the attack button is pressed again, the sharpshooter will shoot the opponent, dealing more damage.
  • Up Throw: The dog performs a handstand kick. If the attack button is pressed again, the sharpshooter will shoot the opponent, dealing more damage.
  • Down Throw: The dog slams the opponent into the ground. If the attack button is pressed again, the sharpshooter will shoot the opponent, dealing more damage.

  • Neutral Special - Trick Shot: The dog kicks a can from Hogan's Alley forward. If the special button is pressed again, the sharpshooter will shoot the can, allowing it to travel farther. It can also be moved with attacks from Duck Hunt and their opponents. The can will explode if it touches an opponent, after enough shots from the sharpshooter, or if it's left alone for enough time, damaging any opponents in the blast radius. If the special button is held after the sharpshooter shoots, the dog can kick another can. When this happens, the sharpshooter will shoot at both cans at once. Up to three cans can be active at once.
    • Custom 1 - Operation Wolf: The dog kicks a grenade from Operation Wolf instead of a can. It explodes on impact, and cannot be shot at by the sharpshooter. The blast radius is larger, but there is more startup and endlag.
    • Custom 2 - Chiller: The dog kicks a ghostly head from Chiller instead of a can. It travels farther if the sharpshooter shoots it, but it will change directions with each shot.
    • Custom 3 - Paint Bomb: The dog kicks a ball of paint from Gotcha! The Sport! instead of a can. It will remain on the ground after being kicked, and if shot by the sharpshooter, it will explode in a puddle of paint that causes opponents that step over it to trip. The explosion can damage opponents as well.
  • Side Special - Clay Shooting: The dog throws a clay pigeon forward. If Duck Hunt are standing still while using the move, it will travel in a slow, short angle. If they are moving, it will travel in a fast, long angle. If the special button is pressed again, the sharpshooter will shoot at the clay pigeon three times, damaging opponents multiple times before launching them. If it is not shot at, it will disappear after awhile.
    • Custom 1 - Rising Clay: The clay pigeon travels at a higher angle.
    • Custom 2 - Clay Break: The shots don't combo into each other as good, but they deal more damage.
    • Custom 3 - Hard Clay: The sharpshooter will not shoot at the clay pigeon, but it flies faster and farther, and deals more damage.
  • Up Special - Duck Jump: The duck begins flying with the dog in tow. While flying, they can move left and right. After awhile, they will fall into a semi-helpless state.
    • Custom 1 - Duck Jump Snag: The duck doesn't fly as high, but the dog will bite multiple times, damaging opponents.
    • Custom 2 - Duck Jump Gust: Duck Hunt can only fly straight upward, but while flying, the duck creates windboxes that push opponents back.
    • Custom 3 - Duck Jump Burst: Duck Hunt boost upward quickly before falling into a helpless state afterwards, damaging opponents they hit.
  • Down Special - Wild Gunman: Duck Hunt summon one of the five gunmen from Wild Gunman to shoot at opponents. Each gunman has their own fire rate, damage, and range. If a gunman takes 10% damage or more, they will be defeated. Up to three gunman can be at play at a time.
    • Custom 1 - Mechanized Attack: Duck Hunt summon a woman from Mechanized Attack instead of a gunman. She will simply stay there for a short time. However, if an opponent attacks her, she will retaliate by disappearing in a flash, causing opponents to be stunned. Aerial opponents suffer light knockback instead.
    • Custom 2 - Gumshoe: Duck Hunt summon Mr. Stevenson from Gumshoe instead of a gunman. He will run forward, damaging opponents he runs into. If the special button is pressed, the sharpshooter will shoot at him, causing him to jump and attack aerial opponents. He disappears after awhile.
    • Custom 3 - Baby Boomer: Duck Hunt summon Boomer from Baby Boomer instead of a gunman. He will crawl forward slowly, but if he is touched, the opponent will be affected with paralysis.
  • Final Smash - NES Zapper Posse: Duck Hunt call in a flock of ducks who fly through the stage in front of them. If they hit an opponent, they are locked in a cinematic where the five gunmen from Wild Gunman shoot at them as cans from Hogan's Alley fly everywhere and explode. The flock of ducks return to send opponents back to the stage, launching them.
  • Charged State - Ducklings: The duck lays three eggs that hatch into ducklings, who all ride on the dog's back. They will aid the duck in its pecking attacks, dealing more damage and knockback. In this state, Duck Hunt can also use four midair jumps and has much slower falling speed.

  • Alice
    Balloon Kid (1990)
    Alice the balloon kid by evilwaluigi-d55vngf
    Alice (気球の子供, Balloon Kid) is the main protagonist of Balloon Kid, the sequel to Balloon Fight released for the Game Boy. In the game, the player controls Alice, and would need to keep her afloat with her balloons. However, she also has the ability to remove these balloons so she can walk and jump on the ground. The goal of the game is to rescue Alice's brother Jim, who got stuck after playing with too many balloons.

    Alice is a typical lightweight in terms of stats; she has slow ground mobility but inversely has fast aerial mobility. Her attacks are also weak and cover little range, but are fast and can be used effectively for combos; meanwhile the attacks she has that can be used for KOing are generally laggy. Alice always carries two balloons with her; using them, she has the unique ability to change her momentum after being launched by an attack. By holding the attack or special button at any point while in knockback animation and holding any direction after exiting knockback animation, she will pop one of her balloons to travel very quickly in any direction. This technique can be cancelled into any move, allowing her to surprise opponents with combos or a KO move. This can also be used as a recovery tool. However, use of this technique will use up one of her balloons; if both are used then she cannot use this ability again unless she uses her neutral special to create more. Additionally, each balloon she has gives her an extra midair jump.

    Alice's moveset is fairly standard, mostly being punches and kicks, as well as utiliziation of balloons. However, her special moves take reference from Balloon Fight and Balloon Kid, using items and techniques from those games.
    SSB Balloon Fight Series Alice Stock icon SSBCharged Icon
    Alice's Moveset

    • Neutral Attack: Alice throws two hooks followed by a front kick.
    • Forward Tilt: Alice winds up and throws a double punch.
    • Forward Smash: Alice takes out a balloon and pops it.
    • Up Tilt: Alice hops while throwing an uppercut.
    • Up Smash: Alice takes out a balloon, jumps upward, and pops it above herself.
    • Down Tilt: Alice throws a shin kick.
    • Down Smash: Alice takes out a balloon and stomps on it to pop it.
    • Dash Attack: Alice throws a diving tackle.
    • Counter: Alice throws a slap.

  • Neutral Aerial: Alice performs a cartwheel.
  • Forward Aerial: Alice throws a sex kick.
  • Forward Crash: Alice takes out a balloon and pops it.
  • Back Aerial: Alice throws a back kick.
  • Back Crash: Alice takes out a balloon, turns around, and pops it.
  • Up Aerial: Alice raises both of her hands in the air.
  • Up Crash: Alice takes out a balloon, raises it above herself, and pops it.
  • Down Aerial: Alice performs a downward corkscrew battering ram, damaging opponents multiple times before launching them.
  • Down Crash: Alice takes out a balloon, places it below herself, and pops it.

  • Grab: Alice reaches out to grab the opponent.
  • Pummel: Alice slaps the opponent.
  • Forward Throw: Alice shoves the opponent forward.
  • Back Throw: Alice flings the opponent backward.
  • Up Throw: Alice raises the opponent upward.
  • Down Throw: Alice pins the opponent on the ground and jumps on them.

  • Neutral Special - Balloon: Alice takes out a pump and presses it. If the special button is tapped repeatedly, she will continue pressing it, allowing her to inflate a balloon that she will tie to her waist once it is fully inflated. She can have up to two balloons at once, and the move cannot be used if she has two balloons available.
    • Custom 1 - Balloon Bunch: Alice doesn't get additional jumps with balloons, though she can have four at a time instead of two.
    • Custom 2 - Big Balloon: Alice can only have one balloon at a time and it takes longer to inflate, but the third jump she gains from it is much higher.
    • Custom 3 - Forceful Balloons: Alice's unique knockback ability is less effective and it cannot be cancelled into other moves, but she has an active hitbox while performing it.
  • Side Special - Static Spark: Alice rubs a balloon into her hair, causing a spark of electricity to travel forward. It lightly damages opponents, and gets smaller the longer to travels.
    • Custom 1 - Shocking Spark: The spark is bigger and inflicts paralysis, but there is more startup lag and the spark travels slower.
    • Custom 2 - Homing Spark: The spark travels less distance and there is noticeably more endlag, but it will lightly home in on opponents.
    • Custom 3 - Spark Storm: Alice releases five sparks at once that travel in different directions around her. They travel less distance and deal less damage.
  • Up Special - Hungry Fish: An orange fish appears below Alice and leaps up to bite her, who leaps upward to dodge before falling into a semi-helpless state. The fish will fall downward below the stage. It can gobble opponents and spit them out before it travels downward, dealing heavy damage.
    • Custom 1 - Really Hungry Fish: The fish keeps opponents in its mouth. It will release them if it hits solid ground while falling, but it will keep them in its mouth and drag them to the lower blast zone otherwise, KOing them.
    • Custom 2 - Not-So-Hungry Fish: The fish deals less damage, and instead of gobbling opponents, it simply knocks into them. Alice gains more vertical height.
    • Custom 3 - Starving Fish: The fish chews on opponents before spitting them out, dealing more damage. However, Alice gains less vertical height.
  • Down Special - Flipper: Alice leaps upward and places a Flipper below herself. It will lightly damage opponents that touch it, but it deals considerable knockback. Alice can also pick it up and throw it like an item, placing it somewhere else. After awhile, it will disappear. Two Flippers can be at play at a time.
    • Custom 1 - Spiked Flipper: The Flipper has spikes on it. It deals more damage and knockback, but doesn't last as long.
    • Custom 2 - Small Flipper: The Flipper is smaller, but four can be at play at once instead of two.
    • Custom 3 - Long-Lasting Flipper: The Flipper deals less damage and knockback, but it lasts longer.
  • Final Smash - Big Balloon Blast: Alice takes out a pump and starts pressing it quickly, inflating a massive balloon behind herself. This balloon acts as a platform and a wall, meaning opponents can jump on it and they can't pass through it. After reaching maximum size, it pops, dealing massive damage and knockback to opponents in the blast radius.
  • Charged State - Balloon Party: Alice puts on sunglasses and gains a bunch of balloons tied to herself. In this state, she is much floatier, having slower fall speed, faster air speed, and seven jumps total. She can also use her balloon popping ability as many times as she wants with no limit.

  • Snake
    Metal Gear (1987)
    Snake (スネーク, Snake), real name David, is the main protagonist of Konami's Metal Gear stealth series. He is one of the cloned children of Big Boss, alongside Liquid Snake and Solidus Snake. Throughout the games, he carries out missions of espionage to disable massive war machines called Metal Gear, developed by FOXHOUND. His design in this game is taken from his appearance in Metal Gear Solid 2: Sons of Liberty, as in Brawl and Ultimate.

    Snake is armed with several unique projectiles that grant him stage control capabilities. Using these, he can quickly overwhelm opponents and rack up damage, and has some powerful attacks to seal KOs. In terms of stats, he's a heavyweight with average mobility, high jump height, and quick fall speed. He also has an interesting grab game, with his down throw being able to put opponents to rest.

    Snake's moves are very unorthodox compared to the rest of the roster, most notably his smash and crash attacks that act as projectiles. Because of this, he doesn't have any traditional means of KOing opponents, and instead must set up traps and use his unique abilities to his advantage.
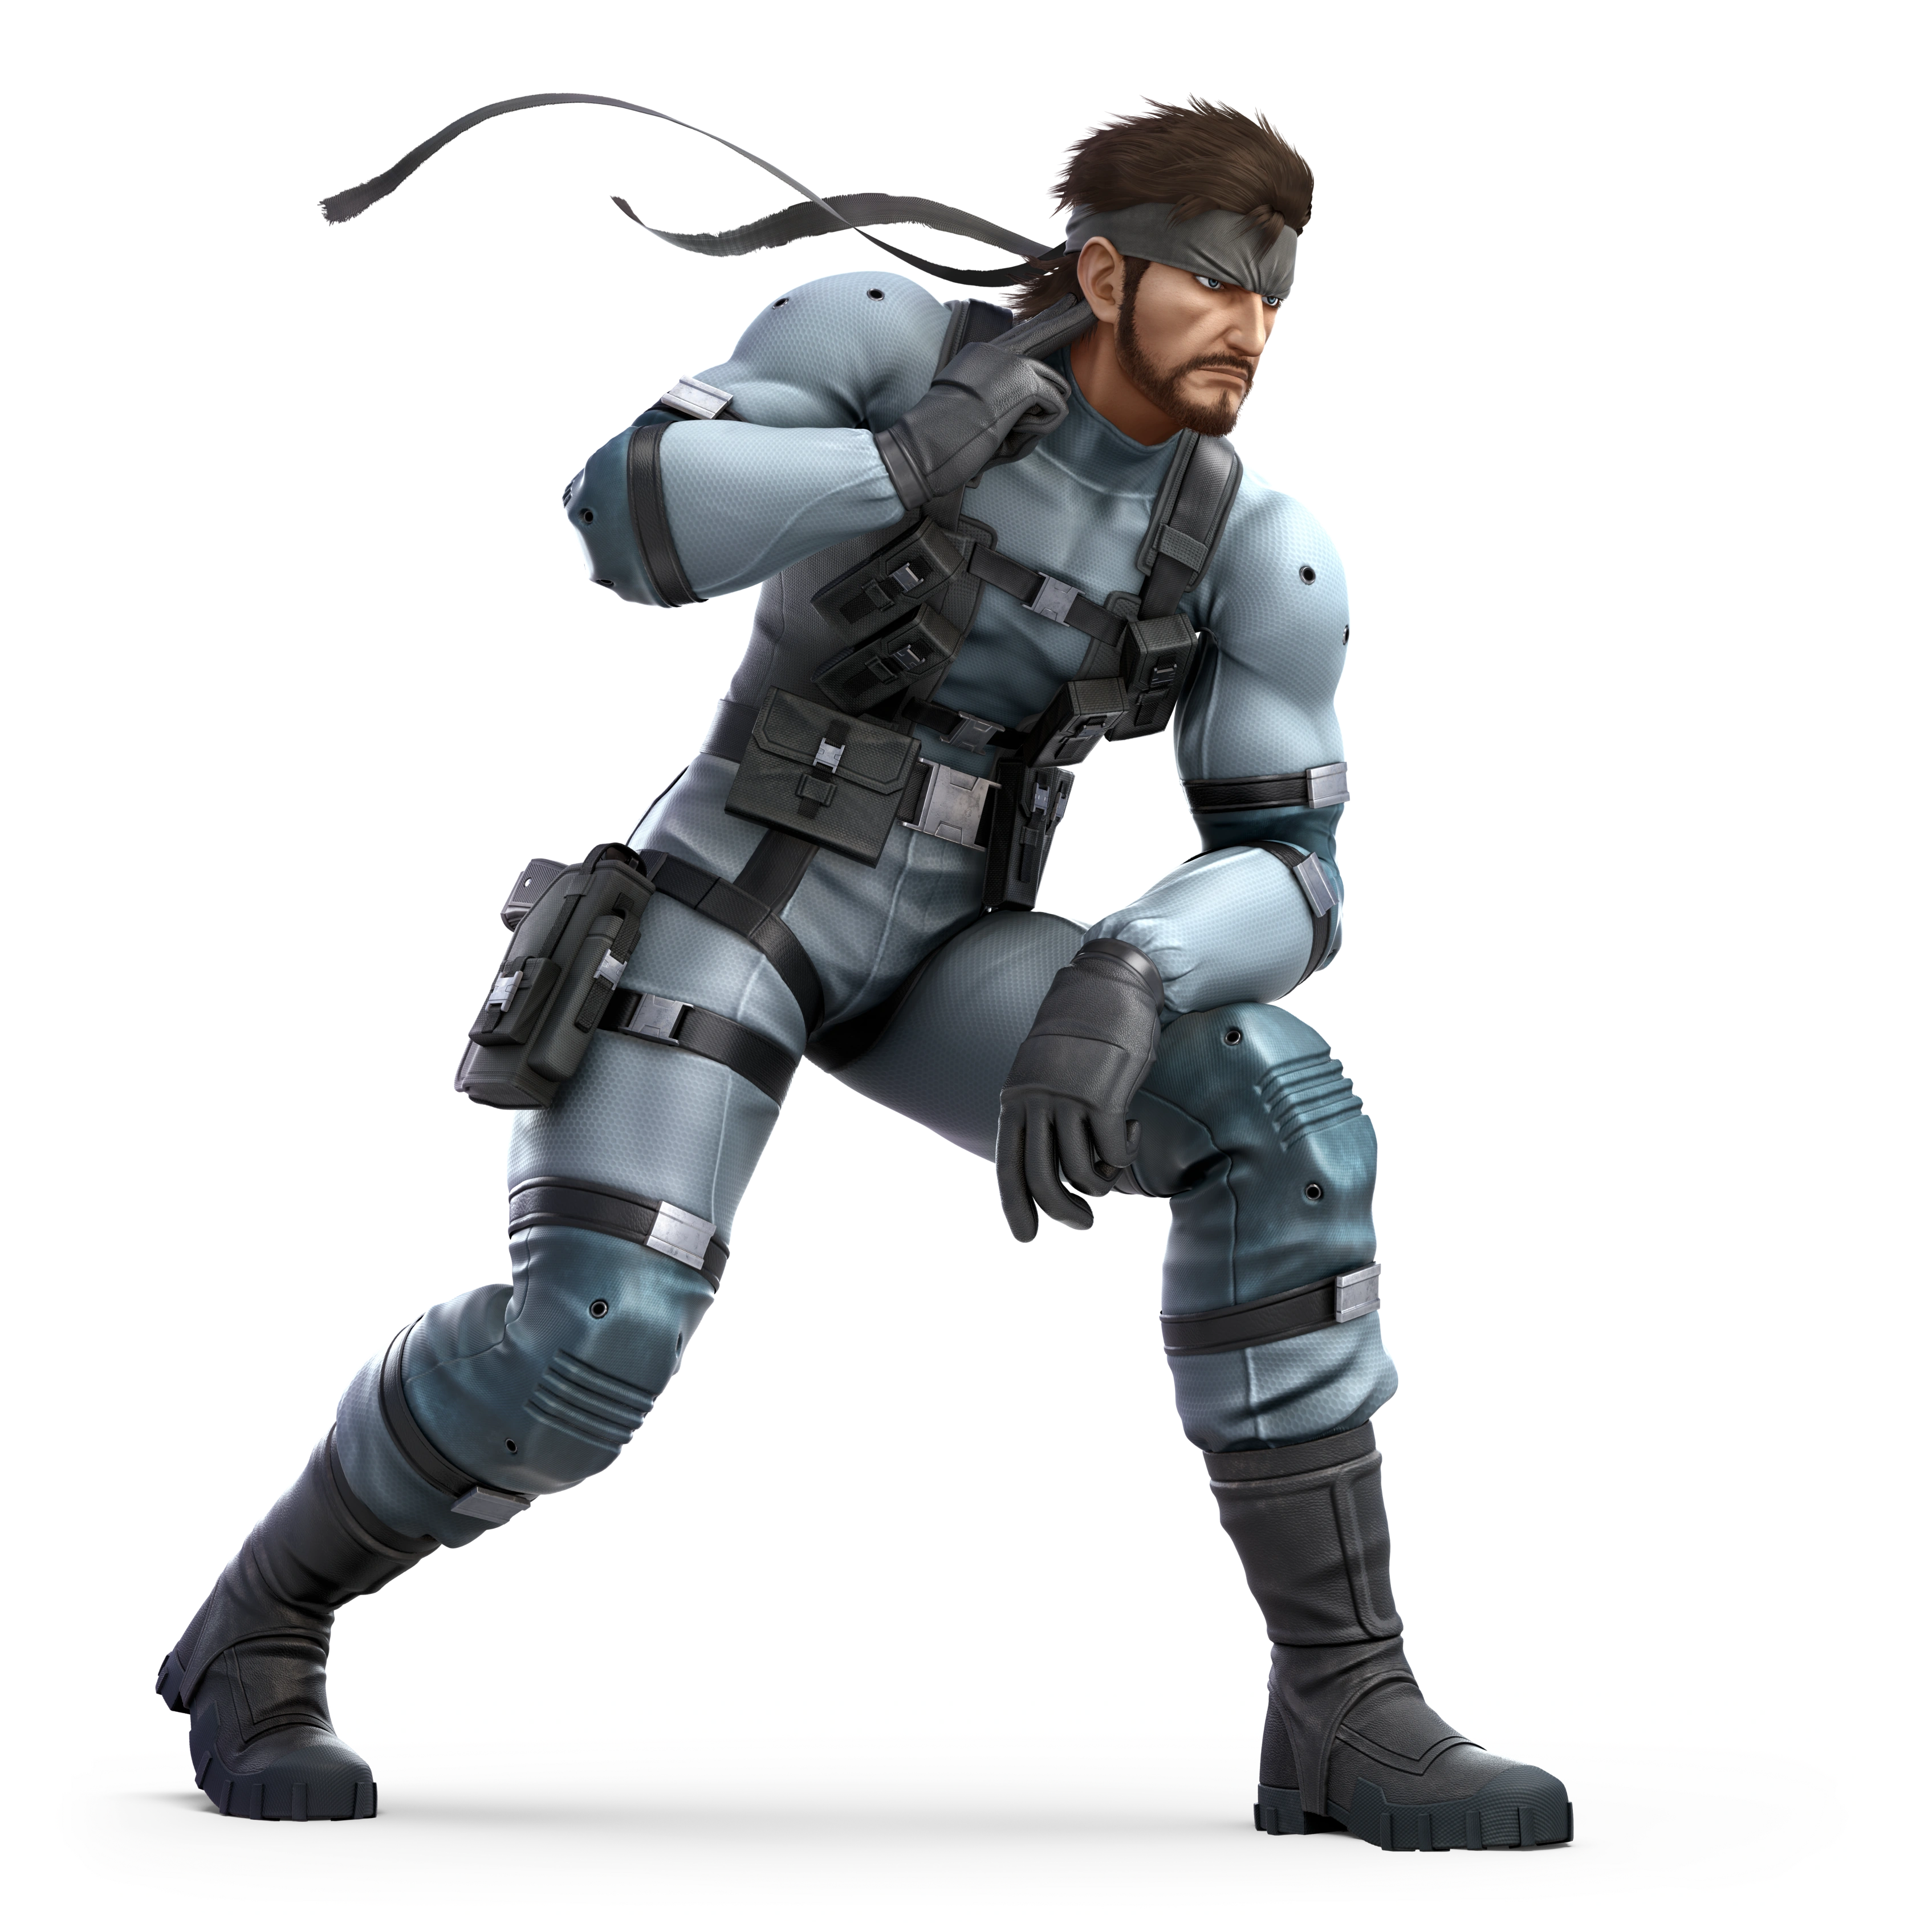
    SSB Metal Gear Series SnakeHeadSSBU SSBB Icon
    Snake's Moveset

    • Neutral Attack: Snake throws two punches followed by a spinkick.
    • Forward Tilt: Snake throws a forward knee thrust. Pressing the attack button again will have him follow up with an overhead swing with both arms.
    • Forward Smash: Snake takes out a tranquilizer gun and fires a dart forward, causing any opponent it hits to fall asleep. Aerial opponents will suffer slight damage and knockback. The longer the move is charged, the longer the opponent will sleep.
    • Up Tilt: Snake throws a scorpion kick.
    • Up Smash: Snake slams a mortar in front of himself and fires a shell upward, which explodes on impact. The longer the move is charged, the higher the shell will travel. While charging, directional inputs can also be used to alter the trajectory of the shell.
    • Down Tilt: Snake throws a low spin kick.
    • Down Smash: Snake digs into the ground and places a claymore mine. It will explode when an opponent steps on it. Up to three mines can be at play at once; placing a fourth will make the first one disappear.
    • Dash Attack: Snake does a somersault forward.
    • Counter: Snake pulls out an RPG-7 and fires a rocket directly at the ground in front of himself, causing an explosion.

  • Neutral Aerial: Snake throws four kicks in quick succession.
  • Forward Aerial: Snake throws an axe kick. The move can meteor smash opponents.
  • Forward Crash: Snake takes out an RPG-7 and fires a rocket forward, exploding on impact.
  • Back Aerial: Snake throws a dropkick
  • Back Crash: Snake takes out an RPG-7 and fires a rocket backward, exploding on impact.
  • Up Aerial: Snake throws an upward dropkick.
  • Up Crash: Snake takes out an RPG-7 and fires a rocket upward, exploding on impact.
  • Down Aerial: Snake throws four stomps downward in rapid succession.
  • Down Crash: Snake takes out an RPG-7 and fires a rocket downward, exploding on impact.

  • Grab: Snake reaches out to grab the opponent and hold them in a restraining chokehold.
  • Pummel: Snake tightens his chokehold.
  • Forward Throw: Snake twists the opponent's arms behind their back and shoves them into the ground with his foot.
  • Back Throw: Snake shifts the restrained opponent towards him, trips them with a sweep of his leg, and flips them over, slamming them on the ground behind him.
  • Up Throw: Snake suplexes his opponent, slamming them back-first.
  • Down Throw: Snake lays the opponent on the ground, causing them to fall asleep.

  • Neutral Special - Hand Grenade: Snake pulls out a grenade and unpins it. He can then hold it and throw it like an item. The grenade will explode three seconds after it is unpinned, but it will explode immediately if an opponent attacks it. Up to three grenades can be at play at once.
    • Custom 1 - Sticky Grenade: Only one grenade can be at play at once, but it will stick to any surface or opponent it touches.
    • Custom 2 - Detonating Grenade: The grenade explodes on impact once thrown, but it deals less damage.
    • Custom 3 - Big Grenade: The grenade is much larger and has a bigger blast radius, dealing more damage. However, it takes six seconds to explode and cannot be detonated by an opponent's attacks.
  • Side Special - Remote Missile: Snake pulls out a Nikita and fires a missile from it that travels forward, exploding on impact. The missile can be controlled with directional inputs, though Snake is left vulnerable. If he is attacked or if the move is cancelled, the missile will fall to the ground and explode.
    • Custom 1 - Quick Missile: The missile travels faster, but it cannot be controlled as well and deals less damage.
    • Custom 2 - Homing Missile: The missile cannot be controlled, and instead automatically homes in on the nearest opponent.
    • Custom 3 - Blasting Missile: The missile has a larger blast radius and deals more damage, but the move cannot be cancelled.
  • Up Special - Cypher: Snake grabs onto a Cypher and slowly hovers upward, and can move forward or backward with directional inputs. At the peak of his height, or if the control stick is held down, he falls into a semi-helpless state.
    • Custom 1 - Flying Cypher: Snake can hover higher, but he can only travel straight upward
    • Custom 2 - Electric Cypher: Snake cannot hover as high, but the Cypher is electrically charged and damages opponents that touch it.
    • Custom 3 - Leaning Cypher: Snake cannot float as high, but he can travel more horizontal distance.
  • Down Special - C4: Snake plants a C4 mine on the ground, or a wall or opponent if he is near one. Using the move again will have him pull out a remote and detonate it, damaging any opponents in the blast radius. It cannot be detonated otherwise.
    • Custom 1 - Timed C4: The C4 mine will explode after five seconds. This makes it harder to damage opponents, but the blast radius is much larger and deals more damage and knockback.
    • Custom 2 - Minefield: Snake can place three C4 mines in different locations; using the move a fourth time allows him to detonate all three at once. The mines each deal less damage and knockback.
    • Custom 3 - Invisible C4: The C4 mine is invisible, making it impossible to detect. However, it has a smaller blast radius.
  • Final Smash - Covering Fire: Snake tosses a flare grenade before crawling into a cardboard box. This causes a reticle to appear on the screen, and directional inputs can control it. If the reticle is on an opponent, they will be targeted. After awhile, missiles will fire and home in on all targeted opponents, dealing heavy damage and knockback.
  • Charged State - FOX ST-OD: Snake sticks a needle into his left arm, causing him to start glowing green. In this state, Snake is much faster, can jump higher, and his attacks deal more damage.

  • Richter (ε)
    Castlevania: Rondo of Blood (1993)
    Richter SSBUltimate
    Richter (リヒター, Richter), full name Richter Belmont, is one of the main characters in the Castlevania series. In his debut Castlevania: Rondo of Blood, he had to save his fiancée Annette from Dracula. Since then, he has went on to become an unlockable character in other games in the series.

    Richter, as Simon's Echo Fighter, shares a lot of his attacks and attributes. Their movesets are close to identical, though Richter is slightly faster and jumps higher. His Vampire Killer is also longer and covers more distance, but deals less damage. Specifically, the spiked ballat the end of his Vampire Killer doesn't deal as much damage as knockback as Simon's does.
    SSB Castlevania Series RichterHeadSSBU SSBUltimate Icon
    Richter's Moveset

    • Neutral Attack: Richter swings the Vampire Killer twice while holding it lengthwise. Pressing the attack button repeatedly will allow him to rapidly spin the whip, damaging opponents multiple times before launching them with an uppercut. If the attack button is held, Richter will hold out the Vampire Killer, allowing it to be moved around with directional inputs. This will disable projectiles.
    • Forward Tilt: Richter cracks the Vampire Killer forward.
    • Forward Smash: Richter rears back before cracking the Vampire Killer forward while taking a step forward.
    • Up Tilt: Richter twirls the Vampire Killer above himself.
    • Up Smash: Richter cracks the Vampire Killer upward.
    • Down Tilt: Richter throws a sliding kick. If the attack button is pressed again, Simon follows with a jumping kick.
    • Down Smash: Richter drags the Vampire Killer around himself from front to back.
    • Dash Attack: Richter rushes forward while twirling the Vampire Killer around himself, damaging opponents multiple times before launching them.
    • Counter: Richter cracks the Vampire Killer forward.

  • Neutral Aerial: Richter twirls the Vampire Killer around his body, damaging opponents multiple times before launching them.
  • Forward Aerial: Richter rears back before cracking the Vampire Killer forward. The move can snap to ledges and act as a tether recovery.
  • Forward Crash: Richter cracks the Vampire Killer forward. The move can snap to ledges and act as a tether recovery.
  • Back Aerial: Richter rears back and cracks the Vampire Killer behind himself. The move can snap to ledges and act as a tether recovery.
  • Back Crash: Richter cracks the Vampire Killer behind himself three times. The move can snap to ledges and act as a tether recovery.
  • Up Aerial: Richter rears back and cracks the Vampire Killer upward. The move can snap to ledges and act as a tether recovery.
  • Up Crash: Richter cracks the Vampire Killer upward. The move can snap to ledges and act as a tether recovery.
  • Down Aerial: Richter performs a stall-then-fall dive kick. The move can meteor smash opponents.
  • Down Crash: Richter cracks the Vampire Killer below himself. The move can snap to ledges and act as a tether recovery.

  • Grab: Richter reaches out to grab the opponent.
  • Pummel: Richter knee strikes the opponent.
  • Forward Throw: Richter flings the opponent forward.
  • Back Throw: Richter flings the opponent backward.
  • Up Throw: Richter heaves the opponent upward before cracking them with the Vampire Killer.
  • Down Throw: Richter slams the opponent into the ground.

  • Neutral Special - Axe: Richter throws an axe in an arc, damaging opponents it hits. Using directional inputs, the arc the axe flies in can be changed. The projectile is unique in that it can travel through solid platforms.
    • Custom 1 - Big Axe: The axe is much larger and deals more damage. However, the move has more startup lag and the axe doesn't travel as high.
    • Custom 2 - Tomahawk Axe: The axe is thrown in a low arc instead of a high arc. It travels faster and farther, but deals less damage.
    • Custom 3 - Cutting Axe: The axe travels slower and the move has more startup lag, but it damages opponents multiple times before launching them.
  • Side Special - Cross: Richter throws flings a cross forward, which travels back to him like a boomerang. Richter can throw the cross farther if he is moving while using the move. Only one Cross can be at play at a time.
    • Custom 1 - Cutting Cross: The cross damages opponents multiple times before launching them. It travels faster, but doesn't cover as much distance.
    • Custom 2 - Flying Cross: The cross travels much farther, but doesn't return to him, instead continuing to fly forward before disappearing.
    • Custom 3 - Bloodseeker Cross: The cross will lightly home in on opponents while traveling forward and backward. However it deals less damage.
  • Up Special - Uppercut: Richter throws a jumping uppercut with the Vampire Killer in hand, damaging opponents multiple times before launching them and falling into a helpless state afterwards.
    • Custom 1 - Belmont Leap: Richter travels higher, but doesn't damage opponents.
    • Custom 2 - Uppercut Dive: Richter travels in a more horizontal angle, sacrificing vertical distance for horizontal distance.
    • Custom 3 - Dual Uppercut: Richter travels less distance and deals less damage, though he can use the move twice before falling onto a helpless state.
  • Down Special - Holy Water: Richter drops a flask of Holy Water, which breaks and creates a pillar of flames that damage opponents multiple times before launching them. However, the flask can be caught as it is thrown and be thrown as an item.
    • Custom 1 - Holy Bonfire: The pillar of flames launches opponents instead of damaging them multiple times.
    • Custom 2 - Holy Wildfire: Multiple pillars of flames are created upon the flask breaking, which travel across the stage. However, they deal less damage.
    • Custom 3 - Holy Lava: Instead of a pillar of flames, the flask covers the ground in lava upon breaking. This will deal gradual damage to opponents who step in it.
  • Final Smash - Grand Cross: Richter summons a large coffin in front of himself. If it traps an opponent, they are locked in a cinematic where Richter grabs the coffin with the Vampire Killer and hauls it skyward. He then blasts the coffin with magical crucifixes, sending opponents back to the stage and launching them.
  • Charged State - Vampire Hunter: The spike on Richter's Vampire Killer grows in size, and he begins glowing white aura. In this state, attacks involving the Vampire Killer cover more range, and the spiked ball is easier to hit opponents with. He is also faster and can jump higher.

  • Alucard
    Castlevania III: Dracula's Curse (1989)
    Alucard Art
    Alucard (アルカード, Alucard), full name Adrian Fahrenheit Ţepeş, is the human / vampire hybrid son of Dracula and a recurring character in the Castlevania series. Unlike his father, Alucard valued humanity thanks to the influence of his human mother, and teamed up with the Belmont bloodline to destroy him. He first appeared in Castlevania III: Dracula's Curse where he helped Trevor Belmont defeat him, utilizing his vampire powers inherited from his father. After Dracula is vanquished, Alucard goes into eternal slumber, but wakes up 300 years later when a Belmont doesn't rise up investigate Dracula's Castle when it resurrects in Castlevania: Symphony of the Night.

    Alucard is a middleweight with averaging stats, with his ground and air speed, jump height, and weight all being middle of the road. He primarily wields a sword, the Crissaegrim, to attack opponents, which grants him good disjointed range and allows him to play at a safe distance. Alucard also has a plethora of magic abilities at his disposal thanks to his vampire heritage, many of which are projectiles that grant him even more range. A meter, called the Magic Meter, can be seen by Alucard's icon, which will fill as he takes and delivers damage. Once filled, Alucard can input special button combinations to use a powerful attack. The meter can be kept filled indefinitely, though using attacks will drain the meter at varying amounts, and it must be refilled again to use more.

    Even without the Magic Meter, Alucard's average stats and long-ranged but powerful attacks make him a well-rounded powerhouse. The attacks he can use from filling his Magic Meter make him significantly more dangerous however. Notably, these Magic Meter attacks are based off of the ones he can use in Castlevania: Symphony of the Night, whereas his special moves are based off of Dracula's attacks in the Castlevania series.
    SSB Castlevania Series Alucard Stock SSBCharged Icon
    Alucard's Moveset

    • Neutral Attack: Alucard throws two alternating slashes with the Cassaegrim.
    • Forward Tilt: Alucard throws an upward slash with the Cassaegrim.
    • Forward Smash: Alucard thrusts the Cassaegrim forward.
    • Up Tilt: Alucard swings the Cassaegrim in an overarching motion above himself.
    • Up Smash: Alucard thrusts the Cassaegrim upward.
    • Down Tilt: Alucard kneels and trusts the Cassaegrim along the ground.
    • Down Smash: Alucard slashes the Cassaegrim along the ground.
    • Dash Attack: Alucard dashes forward while slashing the Cassaegrim downward.
    • Counter: Alucard throws a downward slash with the Cassaegrim.

  • Neutral Aerial: Alucard spins around while slashing the Cassaegrim twice.
  • Forward Aerial: Alucard throws a downward slash with the Cassaegrim.
  • Forward Crash: Alucard slashes the Cassaegrim three times in rapid succession.
  • Back Aerial: Alucard slashes the Cassaegrim behind himself five times in rapid succession.
  • Back Crash: Alucard turns around and throws an upward slash with the Cassaegrim.
  • Up Aerial: Alucard thrusts the Cassaegrim in the air.
  • Up Crash: Alucard slashes the Cassaegrim three times above himself.
  • Down Aerial: Alucard performs a stall-then-fall stomp, falling at a diagonally-downward angle. The move can meteor smash opponents, and if he hits an opponent he will bounce off of them.
  • Down Crash: Alucard slashes the Cassaegrim below himself. The move can meteor smash opponents.

  • Grab: Alucard reaches out to grab the opponent.
  • Pummel: Alucard knee strikes the opponent.
  • Forward Throw: Alucard slashes the opponent with the Cassaegrim, launching them forward.
  • Back Throw: Alucard throws the opponent backward.
  • Up Throw: Alucard heaves the opponent upward before thrusting the Cassaegrim upward to strike them.
  • Down Throw: Alucard slams the opponent into the ground.

  • Neutral Special - Hellfire: Alucard wraps himself with his cape, then flings it open, firing three fireballs that spread as they travel forward, damaging opponents they hit.
    • Custom 1 - Homingfire: Alucard only fires one fireball instead of three, though it will home in on opponents instead of travelling a set path.
    • Custom 2 - Hellblast: The fireballs travel slower, but they are larger and explode on impact, dealing high damage and knockback.
    • Custom 3 - Hellstream: Instead of fireballs, Alucard creates a stream of fire that damages opponents multiple times. He can continue spewing flames if the special button is held, though it will get gradually weaker. The move recharges when not in use.
  • Side Special - Bat Moon: Alucard transforms into a swarm of bats and rushes forward, damaging opponents he hits, before reverting back to his normal form. He can stop early by pressing the special button again, and he won't go off ledges unless the control stick is held in that direction. He falls into a helpless state afterwards if he ends up in midair. When in this form, he is invincible.
    • Custom 1 - Bat Swarm: The bats damage opponents multiple times before launching them. The move overall deals more damage but less knockback.
    • Custom 2 - Vampire Bats: The bats will drain health from opponents they hit, replenishing Alucard. The move travels less distance.
    • Custom 3 - Quick Bats: Alucard travels faster and farther, though he doesn't damage opponents.
  • Up Special - Uppercut: Alucard throws a jumping uppercut with the Cassaegrim in hand, damaging opponents multiple times before launching them and falling into a helpless state afterwards.
    • Custom 1 - Vampire Leap: Alucard travels higher, but doesn't damage opponents.
    • Custom 2 - Uppercut Dive: Alucard travels in a more horizontal angle, sacrificing vertical distance for horizontal distance.
    • Custom 3 - Dual Uppercut: Alucard travels less distance and deals less damage, though he can use the move twice before falling onto a helpless state.
  • Down Special - Dark Inferno: Alucard wraps himself in his cape, then flings it open, firing two large, dark fireballs that travel straight forward. The first one travels along the ground, while the other is higher. They damage opponents they hit, as well as travel through them.
    • Custom 1 - Blazing Inferno: Alucard only launches one fireball, though it travels faster and deals more damage.
    • Custom 2 - Dark Fireball: The fireballs move slower, but they damage opponents multiple times before launching them.
    • Custom 3 - Inferno Target: Alucard only launches one fireball, but it will travel along the nearest opponent's location on the y-axis automatically. It has limited range on how far up or down opponents can be; otherwise, the fireball is just launched forward.
  • Final Smash - Grand Cross: Alucard summons a large coffin in front of himself. If it traps an opponent, they are locked in an animation where Alucard hauls the coffin skyward before blasting it with magical crucifixes, sending the opponent back to the stage and launching them.
  • Charged State - Vampire's Magic: Alucard starts glowing purple. In this state, not only is he faster and his attacks deal more damage, but his Magic Meter is permanently filled, allowing him to use his Magic Moves as much as he pleases.

  • Gas Cloud: By inputting ↓ ↙ ← + attack / special, Alucard will transform into a cloud of mist, gradually damaging opponents caught in it. He is invincible in this state and can move through the air freely, albeit slowly, and even pass through surfaces. The move gradually consumes his Magic Meter, though he can exit out of this form at any time by pressing the attack or special button.
  • Wolf Charge: By inputting ↓ ↘ → + attack / special, Alucard will transform into a wolf and run forward at an extremely quick speed, dealing heavy damage to opponents he hits. He can also jump while dashing, and holding the control stick in the opposite direction has him slow down. After travelling a set amount of distance, he will revert to his normal form, though he can cancel the move early by pressing the attack or special button. The move consumes one third of the Magic Meter.
  • Wing Smash: By inputting ↑ ↖ ← ↙ ↓ ↘ → + attack / special, Alucard will transform into a bat, and quickly rush in the direction the control stick is held, damaging opponents he hits. He will revert to his normal form after travelling a set distance, and fall into a helpless state if he ends up in midair. It is essentially a more versatile variation of Bat Moon. The move consumes one third of the Magic Meter.
  • Dark Metamorphosis: By inputting ← ↖ ↑ ↗ → + attack / special, Alucard will start glowing red for a short time. In this state, any attack he lands will replenish his health by 3/4 of the damage he deals, even if it hits a shield. The move consumes half of the Magic Meter.
  • Tetra Spirit: By inputting ↗ → ↘ ↓ + attack / special, Alucard will summon four spirits that travel upward as one before slitting, spreading around the area and homing in on nearby opponents, damaging them. The move consumes a fourth of the Magic Meter.
  • Soul Steal: By inputting → ↘ ↓ ↙ ← + attack / special, Alucard will start glowing white before creating an explosion of light around himself, damaging opponents in the blast radius multiple times before launching them. For every opponent hit, Alucard is also replenished by 15%. The move fully consumes the Magic Meter.

  • Blaze (ε)
    Sonic Rush (2005)
    Blaze Nibroc-Rock
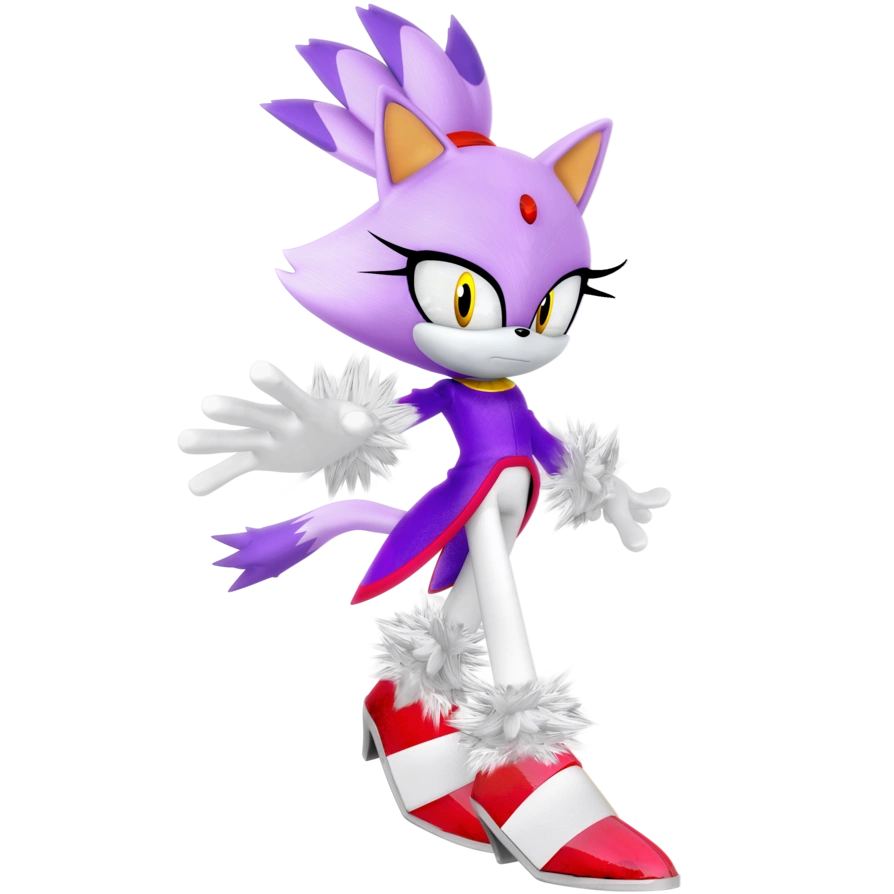
    Blaze (ブレイズ, Blaze) is a major character in the Sonic series, debuting in Sonic Rush. She is a pyrokinetic cat that hails from another dimension. The Sol Emeralds, her world's version of the Chaos Emeralds, were taken to Sonic's world, and Blaze sought to find them. She was initially a loner, but thanks to Sonic and Cream, she was able to discover the meaning of teamwork and help Sonic defeat Dr. Eggman and Eggman Nega.

    Blaze is Sonic's Echo Fighter, and as such shares a lot of the same attributes and attacks as him. She is slightly slower than him in both mobility and frame data, as she has slower running speed, less jump height, and more startup and endlag in her attacks. To compensate, Blaze's attacks are stronger than Sonic's and she has much less trouble KOing opponents. Additionally, many of her attacks are empowered with fire.
    SSB Sonic Series Blaze Stock Icon SSBCharged Icon
    Blaze's Moveset

    • Neutral Attack: Blaze throws a one-two punch combo followed by a side kick.
    • Forward Tilt: Blaze throws a roundhouse kick.
    • Forward Smash: Blaze thrusts her palm forward, expelling an burst of flames from it.
    • Up Tilt: Blaze throws a scorpion kick.
    • Up Smash: Blaze jumps while performing a Spin Dash, damaging opponents multiple times before launching them.
    • Down Tilt: Blaze throws a legsweep.
    • Down Smash: Blaze performs a split kick.
    • Dash Attack: Blaze performs the Spin Dash followed by a flying kick, damaging opponents multiple times before launching them.
    • Counter: Blaze performs the Spin Dash, rushing forward.

  • Neutral Aerial: Blaze curls into a ball and spins while slight undulating up and down.
  • Forward Aerial: Blaze performs a corkscrew battering ram, damaging opponents multiple times before launching them.
  • Forward Crash: Blaze performs a front flip while kicking downward. The move can meteor smash opponents.
  • Back Aerial: Blaze throws a back kick.
  • Back Crash: Blaze throws a backward hook kick.
  • Up Aerial: Blaze throws a scissor kick.
  • Up Crash: Blaze creates a burst of flames above herself.
  • Down Aerial: Blaze throws a stall-then-fall diagonal flying kick. The move can meteor smash opponents.
  • Down Crash: Blaze creates a burst of flames below herself.

  • Grab: Blaze reaches out to grab the opponent.
  • Pummel: Blaze knee smashes the opponent.
  • Forward Throw: Blaze throws a stretch kick, knocking the opponent away.
  • Back Throw: Blaze backflips repeatedly with the opponent in tow before performing a tomoe naga.
  • Up Throw: Blaze flings the opponent upward.
  • Down Throw: Blaze pins the opponent onto the ground and burns them with flames.

  • Neutral Special - Fire Claw: Blaze spins around as flames surround her while briefly ascending. If an opponent is nearby, a red reticle appears over them as Blaze dashes straight at them, striking them with a fire-infused chop. Otherwise, she dashes in a diagonally downwards angle. Pressing the special button while Blaze is ascending will have her perform the move sooner.
    • Custom 1 - Combo Fire Claw: Blaze deals much less knockback. After she lands the attack, if the special button is pressed again, Blaze instantly performs the attack on them again, or another opponent if they are close enough. This can be continued up to five times.
    • Custom 2 - Controlled Claw: Instead of Blaze dashing straight into an opponent, she will dash in the direction the control stick is held in. She falls into a semi-helpless state afterwards.
    • Custom 3 - Surprise Fire Claw: The move has less range, but Blaze attacks faster and deals more damage and knockback.
  • Side Special - Fire Blast: Blaze throws a fireball that travels straight forward, exploding on impact. It will grow weaker the farther it travels.
    • Custom 1 - Fast Fire Blast: The fireball travels faster but deals less damage.
    • Custom 2 - Big Fireball: The fireball is larger and damages opponents multiple times before launching them, but travels slower.
    • Custom 3 - Homing Fire Blast: The fireball deals less damage, but will lightly home in on opponents as it travels.
  • Up Special - Spring Jump: A Spring appears under Blaze, and she uses it to jump upward, falling into a semi-helpless state afterwards. If used on the ground, the Spring can be used by other characters before it disappears. If used in midair, the Spring falls to the ground and bounces for a bit, damaging opponents it lands on.
    • Custom 1 - Spring Jump Headbutt: Blaze damages opponents as she rises upward, but travels less distance.
    • Custom 2 - Double Spring Jump: Blaze can use two Springs at any time, but the move has her travel less distance overall.
    • Custom 3 - Angled Spring Jump: Blaze jumps in a diagonally upward angle, granting her less vertical height in exchange for more horizontal distance.
  • Down Special - Spin Dash: Blaze curls into a ball and dashes forward, damaging opponents. If the special button is tapped repeatedly, she will charge the move, allowing her to travel faster, farther, and deal more damage. While dashing, Blaze can change directions as well as jump. If the move is charged in midair, Blaze will dash as if the move was fully-charged as soon as she lands.
    • Custom 1 - Burning Spin Dash: Blaze damages opponents multiple times with fire damage while charging. The move takes longer to fully charge and the dash itself deals less damage.
    • Custom 2 - Spin Dash Burst: Blaze instantly dashes forward without the need of charging. However, she cannot change directions or jump.
    • Custom 3 - Bounce Attack: Blaze leaps in the air and falls downward. If used in midair, Blaze will simply rush downward. She causes an explosion on impact, launching opponents in the blast radius.
  • Final Smash - Burning Blaze Boost: Blaze uses the Sol Emeralds to become Burning Blaze. She then begins dashing around the stage at warp speed, damaging opponents she rams into. After some time, she reverts to his normal state.
  • Charged State - Burning Blaze: Blaze uses the Sol Emeralds to become Burning Blaze. In this state, she is slightly faster, but can jump higher. Her attacks also deal more damage and knockback, and has access to four midair jumps. Spin Dash also charges much sooner.

  • Mighty & Ray
    SegaSonic the Hedgehog (1993)
    Mighty & Ray Charged
    Mighty & Ray (マイティー&レイ, Mighty & Ray) are minor characters in the Sonic series. They are a duo consisting of an armadillo and a flying squirrel respectively, and debuted in SegaSonic the Hedgehog, where they alongside Sonic were captured and imprisoned by Dr. Eggman on Eggman Island, and had to work together to escape. After many years of absence, they returned in Sonic Mania Plus as playable characters, helping Sonic recover the Phantom Ruby from Dr. Eggman.

    Mighty & Ray act as a duo, and both have their own movesets that can be swapped between by holding shield and pressing the special button. Players can also choose which of the two they start with on the character select screen. While the player controls one character, the other will follow, though most of the time will go his own way. The partner can only be somewhat controlled by the player's movements, and they will try to attack enemies on their own. This can be seen as similar to the way Tails follows Sonic in the 2D Sonic games. If the partner is KO'ed, the player will be left alone and cannot switch. If the player is KO'ed, then the partner will disappear, reappearing on the regeneration platform.

    As for the characters themselves, Mighty is heavier than Ray, though Ray has higher jump height and more air speed. Mighty's attacks mainly focus on punches and kicks, while Ray has strong aerial attacks but weak ground attacks. Many of their special moves can also be cancelled into each other, making them both very combo-oriented.
    SSB Sonic Series Mighty & Ray Stock Icon SSBCharged Icon
    Mighty's Moveset

    • Neutral Attack: Mighty throws a one-two punch followed by a kick.
    • Forward Tilt: Mighty throws a side kick.
    • Forward Smash: Mighty throws a donkey kick.
    • Up Tilt: Mighty throws an uppercut.
    • Up Smash: Mighty spins around in ball form, damaging opponents multiple times before launching them.
    • Down Tilt: Mighty throws a shin kick.
    • Down Smash: Mighty throws a split kick.
    • Dash Attack: Mighty performs the Spin Dash followed by a flying kick, damaging opponents multiple times before launching them. The move can be cancelled into other attacks.
    • Counter: Mighty throws a stretch kick.

  • Neutral Aerial: Mighty spins around in ball form.
  • Forward Aerial: Mighty throws a corkscrew battering ram, damaging opponents multiple times before launching them.
  • Forward Crash: Mighty throws an axe kick. The move can meteor smash opponents.
  • Back Aerial: Mighty throws a back kick.
  • Back Crash: Mighty throws a dropkick.
  • Up Aerial: Mighty throws a scissor kick.
  • Up Crash: Mighty throws a spinning uppercut.
  • Down Aerial: Mighty throws a stall-then-fall diagonal flying kick. The move can meteor smash opponents.
  • Down Crash: Mighty throws a stall-then-fall stomp downward. The move can meteor smash opponents.

  • Grab: Mighty reaches out to grab the opponent.
  • Pummel: Mighty knee smashes the opponent.
  • Forward Throw: Mighty tosses the opponent forward.
  • Back Throw: Mighty spins around and tosses the opponent backward.
  • Up Throw: Mighty throws a stretch kick.
  • Down Throw: Mighty pins the opponent onto the ground and performs a stationary Spin Dash on them.

  • Neutral Special - Hammer Drop: Mighty leaps upward, enters his ball form, and falls downward at incredible speed. If used in midair, he will simply fall downward. While falling, he can meteor smash opponents he hits, and upon landing, he will create an explosion that damages opponents in the blast radius.
    • Custom 1 - Hammer Bury: Mighty doesn't create an explosion upon landing, but he will bury opponents he lands on.
    • Custom 2 - Hammer Drop Blast: Mighty deals less damage, but the blast radius upon landing is much bigger and covers more range.
    • Custom 3 - Hammering Meteor: Instead of falling through opponents, he will bounce off of them upon hitting them. They will still be meteor smashed.
  • Side Special - Somersault: Mighty flings forward while in ball form, damaging opponents he hits. The move can be cancelled into any other attack.
    • Custom 1 - Hard Somersault: Mighty doesn't travel as far, but he deals more damage.
    • Custom 2 - Protected Somersault: Mighty is invincible throughout the move's entire duration, but he cannot damage opponents either.
    • Custom 3 - Far-Flinging Somersault: Mighty travels farther, but he cannot cancel the move into other attacks.
  • Up Special - Spring Jump: A Spring appears under Mighty, and he uses it to jump upward, falling into a semi-helpless state afterwards. If used on the ground, the Spring can be used by other characters before it disappears. If used in midair, the Spring falls to the ground and bounces for a bit, damaging opponents it lands on.
    • Custom 1 - Spring Jump Headbutt: Mighty damages opponents as he rises upward, but travels less distance.
    • Custom 2 - Double Spring Jump: Mighty can use two Springs at any time, but the move has his travel less distance overall.
    • Custom 3 - Angled Spring Jump: Mighty jumps in a diagonally upward angle, granting her less vertical height in exchange for more horizontal distance.
  • Down Special - Spin Dash: Mighty curls into a ball and dashes forward, damaging opponents. If the special button is tapped repeatedly, he will charge the move, allowing him to travel faster, farther, and deal more damage. While dashing, Mighty can change directions as well as jump. If the move is charged in midair, Mighty will dash as if the move was fully-charged as soon as he lands.
    • Custom 1 - Pushy Spin Dash: The move takes more time to charge, but Mighty will damage opponents he hits with the move multiple times before launching them.
    • Custom 2 - Speedy Spin Dash: The move deals less damage, but Mighty can travel much faster.
    • Custom 3 - Burying Spin Dash: Mighty travels slower and he cannot jump while using the move, but he will bury opponents he hits.
  • Final Smash - Team-Up Takedown: Mighty uses a Spin Dash to rush forward. If he hits an opponent, they will be knocked to the top of the stage. He and Ray will then begin to throw a flurry of punches and kicks at them. They will finish the move by throwing a combined axe kick downward, launching the opponent downward
  • Charged State - Super Mighty & Super Ray: Mighty and Ray use the Chaos Emeralds to become Super Mighty and Super Ray. In this state, they are much faster faster, and can jump higher. Their attacks also deal more damage and knockback, and have access to four midair jumps.

  • Ray's Moveset

    • Neutral Attack: Ray throws a one-two punch combo followed by a bicycle kick.
    • Forward Tilt: Ray throws a donkey kick.
    • Forward Smash: Ray throws a dropkick.
    • Up Tilt: Ray ducks and swings his tail upward.
    • Up Smash: Ray performs a backflip to kick upward.
    • Down Tilt: Ray swipes his tail across the ground. The move can trip opponents.
    • Down Smash: Ray spins around while swinging his tail across the ground. While spinning, he can move left and right to cover more range.
    • Dash Attack: Ray performs the Spin Dash followed by a flying kick, damaging opponents multiple times before launching them. The move can be cancelled into other attacks.
    • Counter: Ray throws an uppercut.

  • Neutral Aerial: Ray spins around while in ball form.
  • Forward Aerial: Ray swings his tail forward.
  • Forward Crash: Ray throws a flying kick.
  • Back Aerial: Ray swings his tail backward.
  • Back Crash: Ray throws a dropkick.
  • Up Aerial: Ray throws a scissor kick.
  • Up Crash: Ray twirls his tail upward.
  • Down Aerial: Ray swipes his tail downward.
  • Down Crash: Ray throws a stall-then-fall stomp downward. The move can meteor smash opponents.

  • Grab: Ray reaches out to grab the opponent.
  • Pummel: Ray attacks the opponent with his tail.
  • Forward Throw: Ray tosses the opponent forward.
  • Back Throw: Ray backflips repeatedly with the opponent in tow before performing a tomoe naga.
  • Up Throw: Ray heaves the opponent upward before launching them with his tail.
  • Down Throw: Ray pins the opponent onto the ground and performs a stationary Spin Dash on them.

  • Neutral Special - Insta-Shield: Ray spins around in ball form, creating a small white field of energy around himself. This will damage nearby opponents, as well as provide temporary invincibility and reflect projectiles.
    • Custom 1 - Super Insta-Shield: Ray deals more damage with the move and can reflect projectiles easier, but the move has noticeably more endlag.
    • Custom 2 - Aggressive Insta-Shield: Ray leaps forward while using the move. It deals less damage but has less endlag.
    • Custom 3 - Lasting Insta-Shield: The move lasts longer, but deals less damage and Ray cannot reflect projectiles.
  • Side Special - Super Peel-Out: Ray dashes forward at a quick speed. The special button can be held for the move to charge, increasing the distance Ray travels. While running, he can jump to gain a lot of midair distance. Additionally, the move can be cancelled into any other attack.
    • Custom 1 - Rushing Peel-Out: Ray cannot cancel the move, but he will damage opponents he runs into.
    • Custom 2 - Supersonic Peel-Out: Ray runs much faster, but the move takes longer to charge.
    • Custom 3 - Invincible Peel-Out: Ray is invincible while running, though he can't dash as far.
  • Up Special - Air Glide: Ray leaps into the air and uses his skin flaps to glide by holding the special button. While gliding, the control stick can be held down for him to nosedive, and then held up for him to gain altitude. The gliding can be cancelled into any attack, where he will fall into a semi-helpless state afterward.
    • Custom 1 - Air Leap: Ray jumps higher initially, but will not glide before falling into a helpless state.
    • Custom 2 - Slicing Glide: Ray will damage opponents he hits while gliding. However, he falls faster and it is harder to regain lost altitude.
    • Custom 3 - Gliding Divebomb: When Ray nosedives while gliding, he will meteor smash opponents he hits, and will as bury opponents he lands on. However, he cannot glide back up.
  • Down Special - Spin Dash: Ray curls into a ball and dashes forward, damaging opponents. If the special button is tapped repeatedly, he will charge the move, allowing him to travel faster, farther, and deal more damage. While dashing, Ray can change directions as well as jump. If the move is charged in midair, Ray will dash as if the move was fully-charged as soon as he lands.
    • Custom 1 - Pushy Spin Dash: The move takes more time to charge, but Ray will damage opponents he hits with the move multiple times before launching them.
    • Custom 2 - Speedy Spin Dash: The move deals less damage, but Ray can travel much faster.
    • Custom 3 - Burying Spin Dash: Ray travels slower and he cannot jump while using the move, but he will bury opponents he hits.
  • Final Smash - Team-Up Takedown: Ray uses a Spin Dash to rush forward. If he hits an opponent, they will be knocked to the top of the stage. He and Mighty will then begin to throw a flurry of punches and kicks at them. They will finish the move by throwing a combined axe kick downward, launching the opponent downward
  • Charged State - Super Mighty & Super Ray: Mighty and Ray use the Chaos Emeralds to become Super Mighty and Super Ray. In this state, they are much faster faster, and can jump higher. Their attacks also deal more damage and knockback, and have access to four midair jumps.

  • Rouge
    Sonic Adventure 2 (2001)
    Rouge (ルージュ, Rouge) is a major character in the Sonic series, debuting in Sonic Adventure 2. She is a sultry bat thief, who is constantly looking for jewels to steal, as well as an agent on loan for G.U.N. Her motivations are always in question, though she usually only looks out for herself, and if she's helping the heroes, it's mostly for her own benefit. Despite this, she does have a close, loyal friendship to Sonic and friends, especially Shadow and Omega.

    Rouge is a quick, offensive powerhouse. A middleweight, she has very good ground and air mobility, five midair jumps thanks to her wings, and quick but powerful attacks that allow her to rush down opponents with ease. She gets the bulk of her damage via aerial combos, either stringing attacks together or juggling opponents to keep them off the ground. Despite the damage output of most of her other attacks, her smash attacks are relatively weak, and as such she either gets KOs from edgeguarding or dragging opponents far off-stage. Thankfully, she has a good recovery thanks to her decent jump height, air speed, and multiple jumps. She can also glide to further support her recovery.

    Aside from her jab, almost all of Rouge's normal attacks involve her legs, using a variety of different kicks. They're both quick and powerful, giving her an overall great offensive game. As such, the general game plan is to take advantage away from opponents and keep them in disadvantage as long as possible.
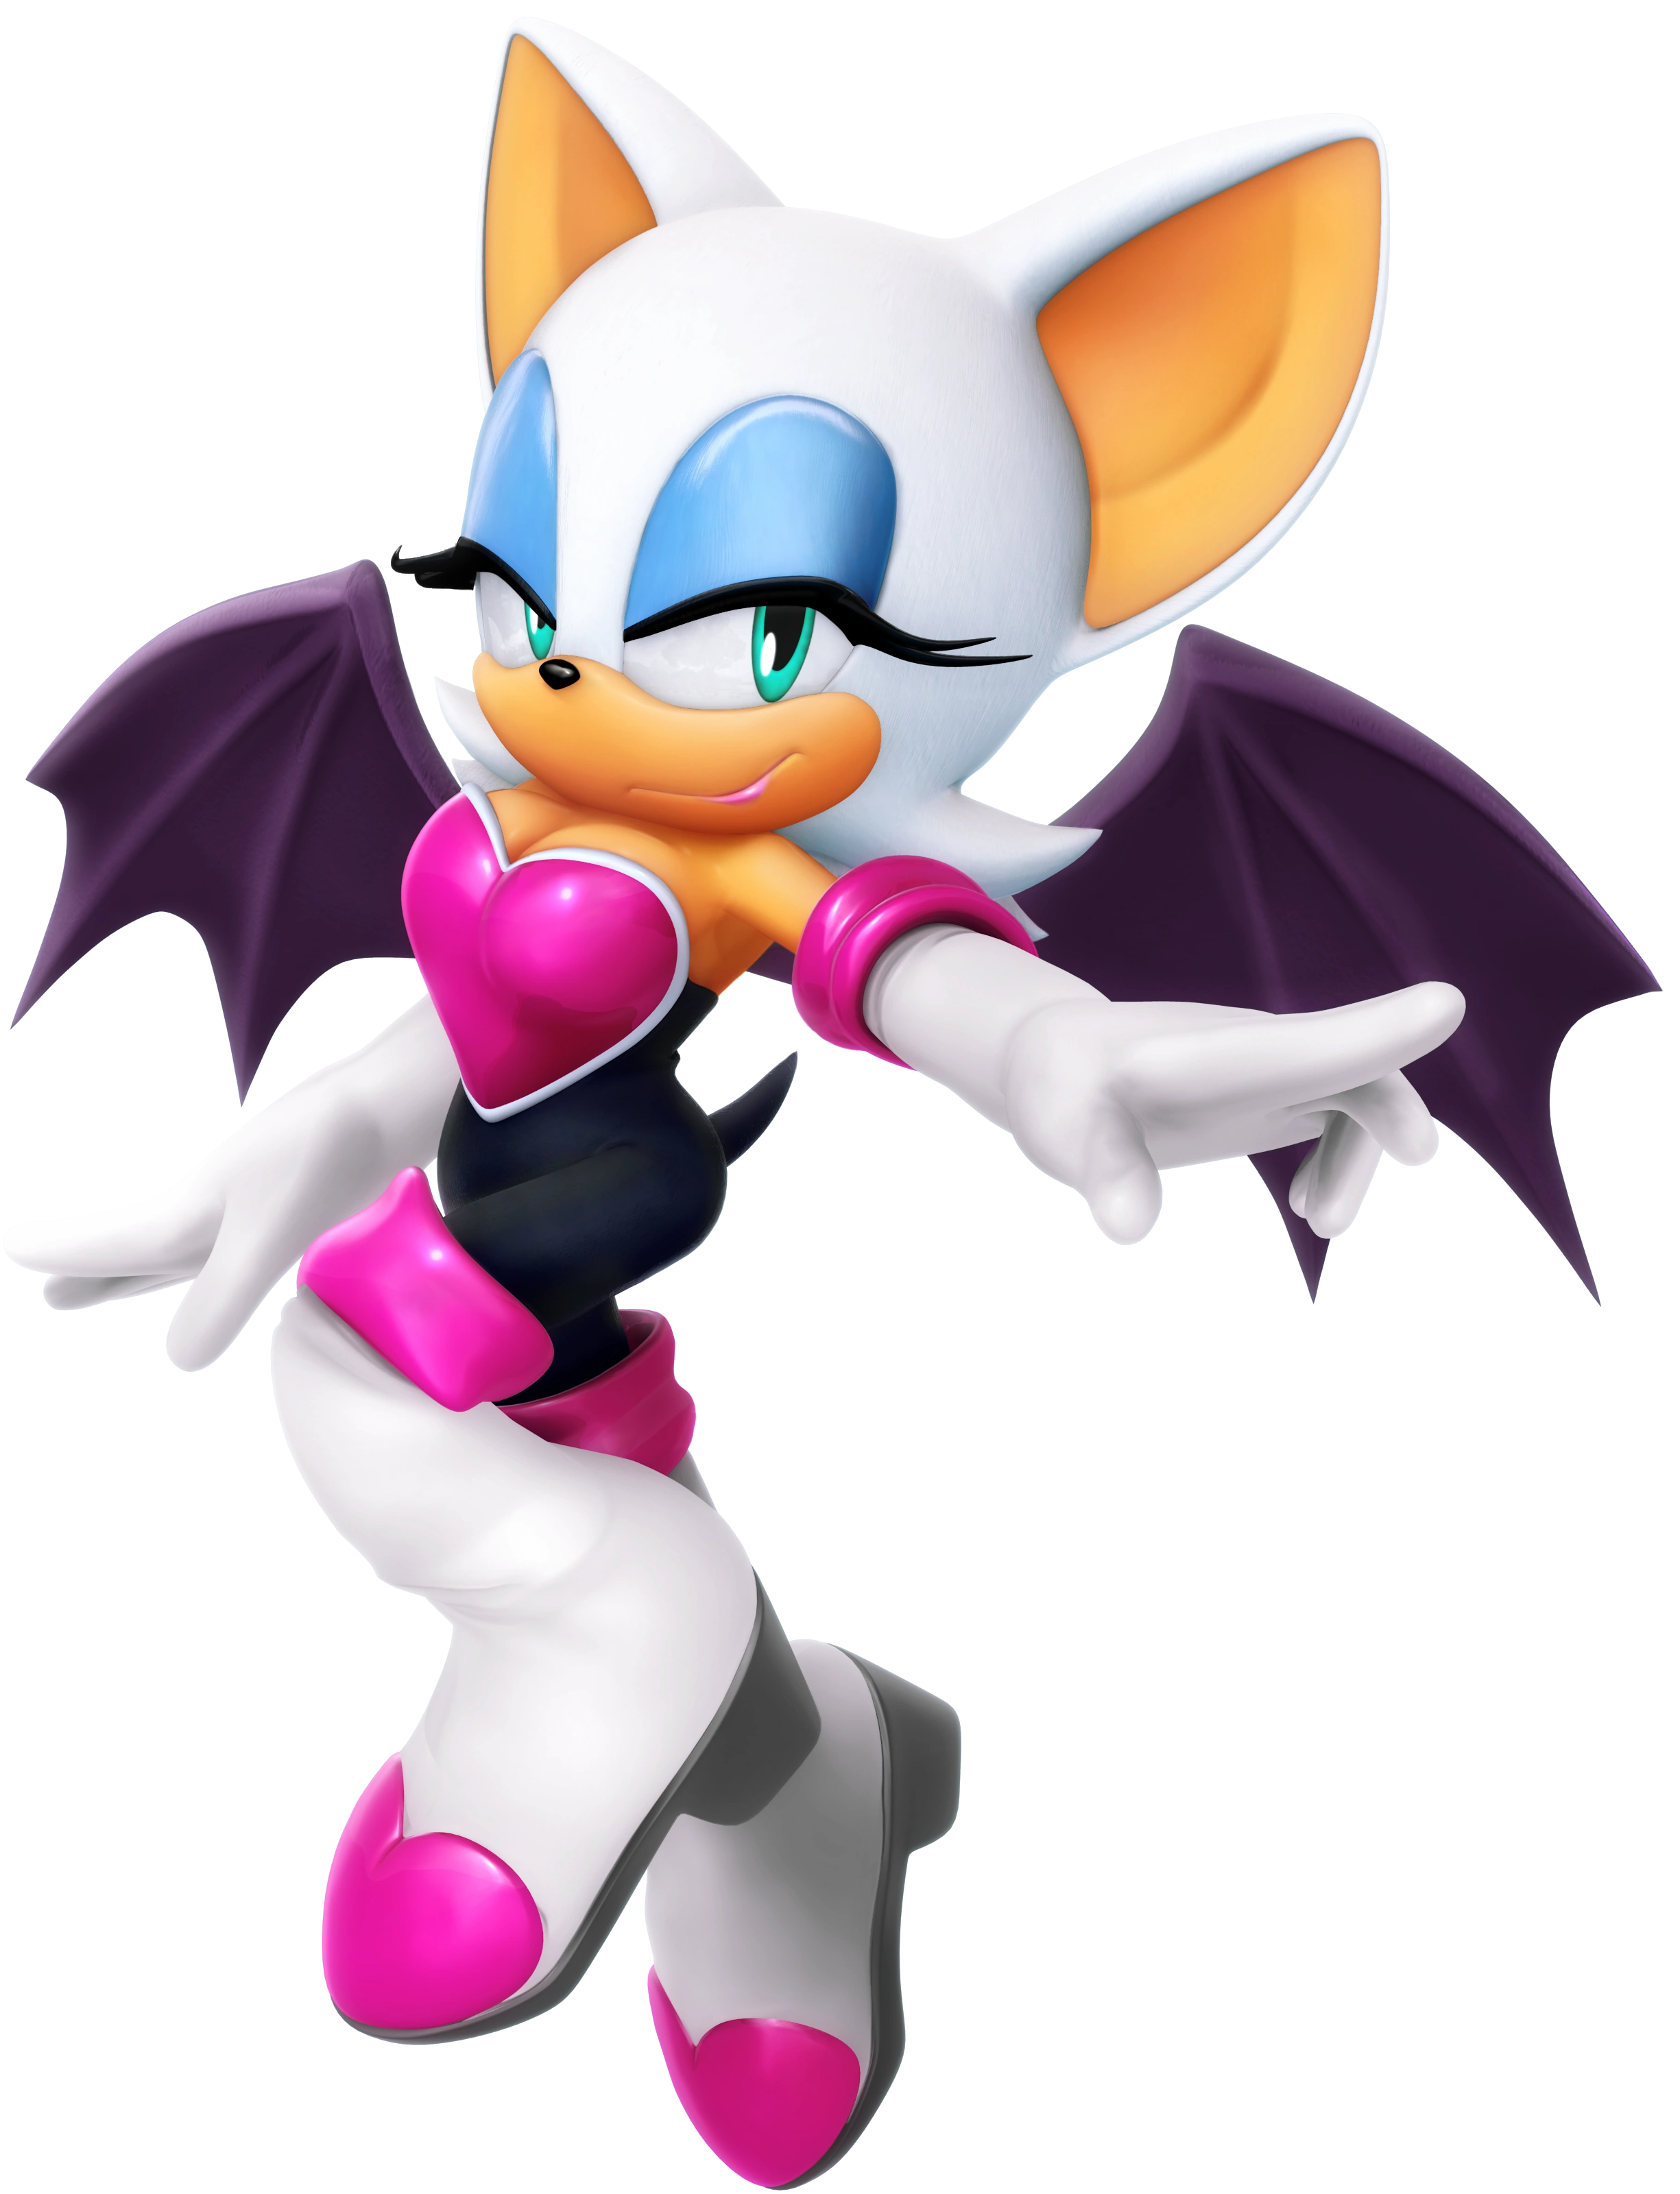
    SSB Sonic Series Rouge Stock Icon SSBCharged Icon
    Rouge's Moveset

    • Neutral Attack: Rouge throws two alternating jabs followed by a side kick.
    • Forward Tilt: Rouge throws a roundhouse kick.
    • Forward Smash: Rouge leaps forward and performs a scissor kick.
    • Up Tilt: Rouge performs a handstand to kick upward.
    • Up Smash: Rouge throws a flip kick.
    • Down Tilt: Rouge throws an axe kick. The move can meteor smash opponents.
    • Down Smash: Rouge performs a split kick.
    • Dash Attack: Rouge throws a flying kick.
    • Counter: Rouge throws a dropkick.

  • Neutral Aerial: Rouge throws five spinning kicks in rapid succession.
  • Forward Aerial: Rouge throws a sex kick.
  • Forward Crash: Rouge throws a dropkick.
  • Back Aerial: Rouge throws a back kick.
  • Back Crash: Rouge turns around and throws three spinning kicks in rapid succession.
  • Up Aerial: Rouge performs a scissor kick.
  • Up Crash: Rouge performs an upward corkscrew kick, damaging opponents multiple times before launching them.
  • Down Aerial: Rouge throws a corkscrew stomp. The move can meteor smash opponents.
  • Down Crash:Rouge performs a stall-then-fall stomp, falling at a diagonal angle. The move can meteor smash opponents.

  • Grab: Rouge reaches out to grab the opponent.
  • Pummel: Rouge slaps the opponent.
  • Forward Throw: Rouge kicks the opponent away.
  • Back Throw: Rouge holds the opponent in between her legs and slams them into the ground behind herself.
  • Up Throw: Rouge flies upward with the opponent in tow before falling to the ground and performing a piledriver.
  • Down Throw: Rouge slams the opponent on the ground before stomping on them.

  • Neutral Special - Heart Bomb: Rouge lobs a Heart Bomb in an arc, which can be altered if she is standing still or moving while using the move. It will explode on impact with an opponent, damaging them, though will otherwise stay in place on the ground where it lands. It will explode on its own after a short time. Only two Heart Bombs can be at play at once.
    • Custom 1 - Big Heart Bomb: The Heart Bombs are bigger and have a bigger blast radius, but can't be thrown as far.
    • Custom 2 - Held Heart Bomb: Instead of throwing the Heart Bomb, Rouge simply holds on to it. She can then throw it like an item, though it will explode in her hands and damage her if it is held for too long. It won't latch on the ground and will simply explode on impact.
    • Custom 3 - Burning Bomb: The Heart Bomb won't explode on contact with opponents, and only explodes when its timer is up. However, the explosion deals significantly more damage and knockback.
  • Side Special - Heart Effect: Rouge strikes a pose while sending a wave of hearts forward, which stun opponents caught in it, leaving them vulnerable to attack. Repeated uses of the move will decrease how long opponents are stunned.
    • Custom 1 - Widespread Heart Effect: The wave of hearts travels further, though opponents aren't stunned for as long.
    • Custom 2 - Beating Heart Effect: Instead of stunning opponents, the wave of hearts damages them multiple times before launching them.
    • Custom 3 - Cold Heart Effect: Instead of stunning opponents, the wave of hearts freezes them.
  • Up Special - Screw Kick: Rouge leaps upward while performing a spinning corkscrew kick, damaging opponents multiple times before launching them. She falls into a helpless state afterwards.
    • Custom 1 - Twister Kick: Rouge doesn't travel as high, but the move does create vacuumboxes that drag opponents into the move.
    • Custom 2 - Widescrew Kick: Rouge sacrifices vertical distance for more horizontal distance.
    • Custom 3 - Unbreakable Screw Kick: Rouge deals less damage, but she is invincible throughout the move's entire duration.
  • Down Special - Drill Drive: Rouge flies forward while performing a corkscrew kick, damaging opponents multiple times before launching them. If used in midair, Rouge instead travels in a diagonally-downward angle, and the last hit can meteor smash opponents. If she lands with the move, she will bounce upward after the last hit.
    • Custom 1 - Quick Drill: Rouge travels faster and farther, but doesn't deal as much damage. The aerial version also can't meteor smash.
    • Custom 2 - Drill Smash: Instead of damaging opponents multiple times, Rouge only damages them once before knocking them away. It deals more damage, but she travels slightly slower.
    • Custom 3 - Charging Drill: The move can be charged by holding the special button, which increases the distance she travels and the damage she deals. Only the fully charged aerial version can meteor smash.
  • Final Smash - Kick Onslaught: Rouge rushes forward. If she hits an opponent, she performs a 180-degree kick from down to up, launching the opponent in the air. She then throws a series of kicks, dealing heavy damage before launching them with a downwards corkscrew stomp.
  • Charged State - Bat of the Night: Rouge starts glowing purple and her wings become pitch black. In this state, Rouge has two more midair jumps and faster air speed, significantly improving her recovery and air combos.

  • Bayonetta
    Bayonetta (2009)
    Bayonetta (ベヨネッタ, Bayonetta), also known by her real name Cereza, is the titular main protagonist of SEGA and PlatinumGames' Bayonetta series. She is one of the last living members of the Umbra Witches, a clan of black magic practitioners. As an Umbra Witch, she makes contacts with Infernal, who grants her strength and power in exchange for her soul. She is tied to the demoness Madama Butterfly, who helps her battle with angels in Paradiso. Personality-wise, she is strong-willed, determined, flirtatious, and an endless supply of sarcastic one-liners.

    Bayonetta's platstyle is derived heavily from her games. In terms of stats, her ground and aerial mobility are average, and is among the light-middle weight class. Uniquely, she can use Bullet Arts after almost any attack by holding the attack or special button; she will continually shoot bullets that don't cause opponents to flinch, but will deal decent damage. She also has a reliable combo game, with a very good set of aerial attacks that can be chained together effectively and effortlessly to deal heavy damage. Aside from this, her smash and crash attacks also act as reliable finishers, and her down special Witch Time is good for making opponents vulnerable.

    Bayonetta's attacks primarily consists of kicks, though she can also use punches and her four pistols. Some of her aerial attacks also serve as combos much like other characters' neutral attacks. Her smash and crash attacks are Wicked Weaves, which she can use to summon Madama Butterfly's limbs to attack opponents and deal heavy damage and knockback.
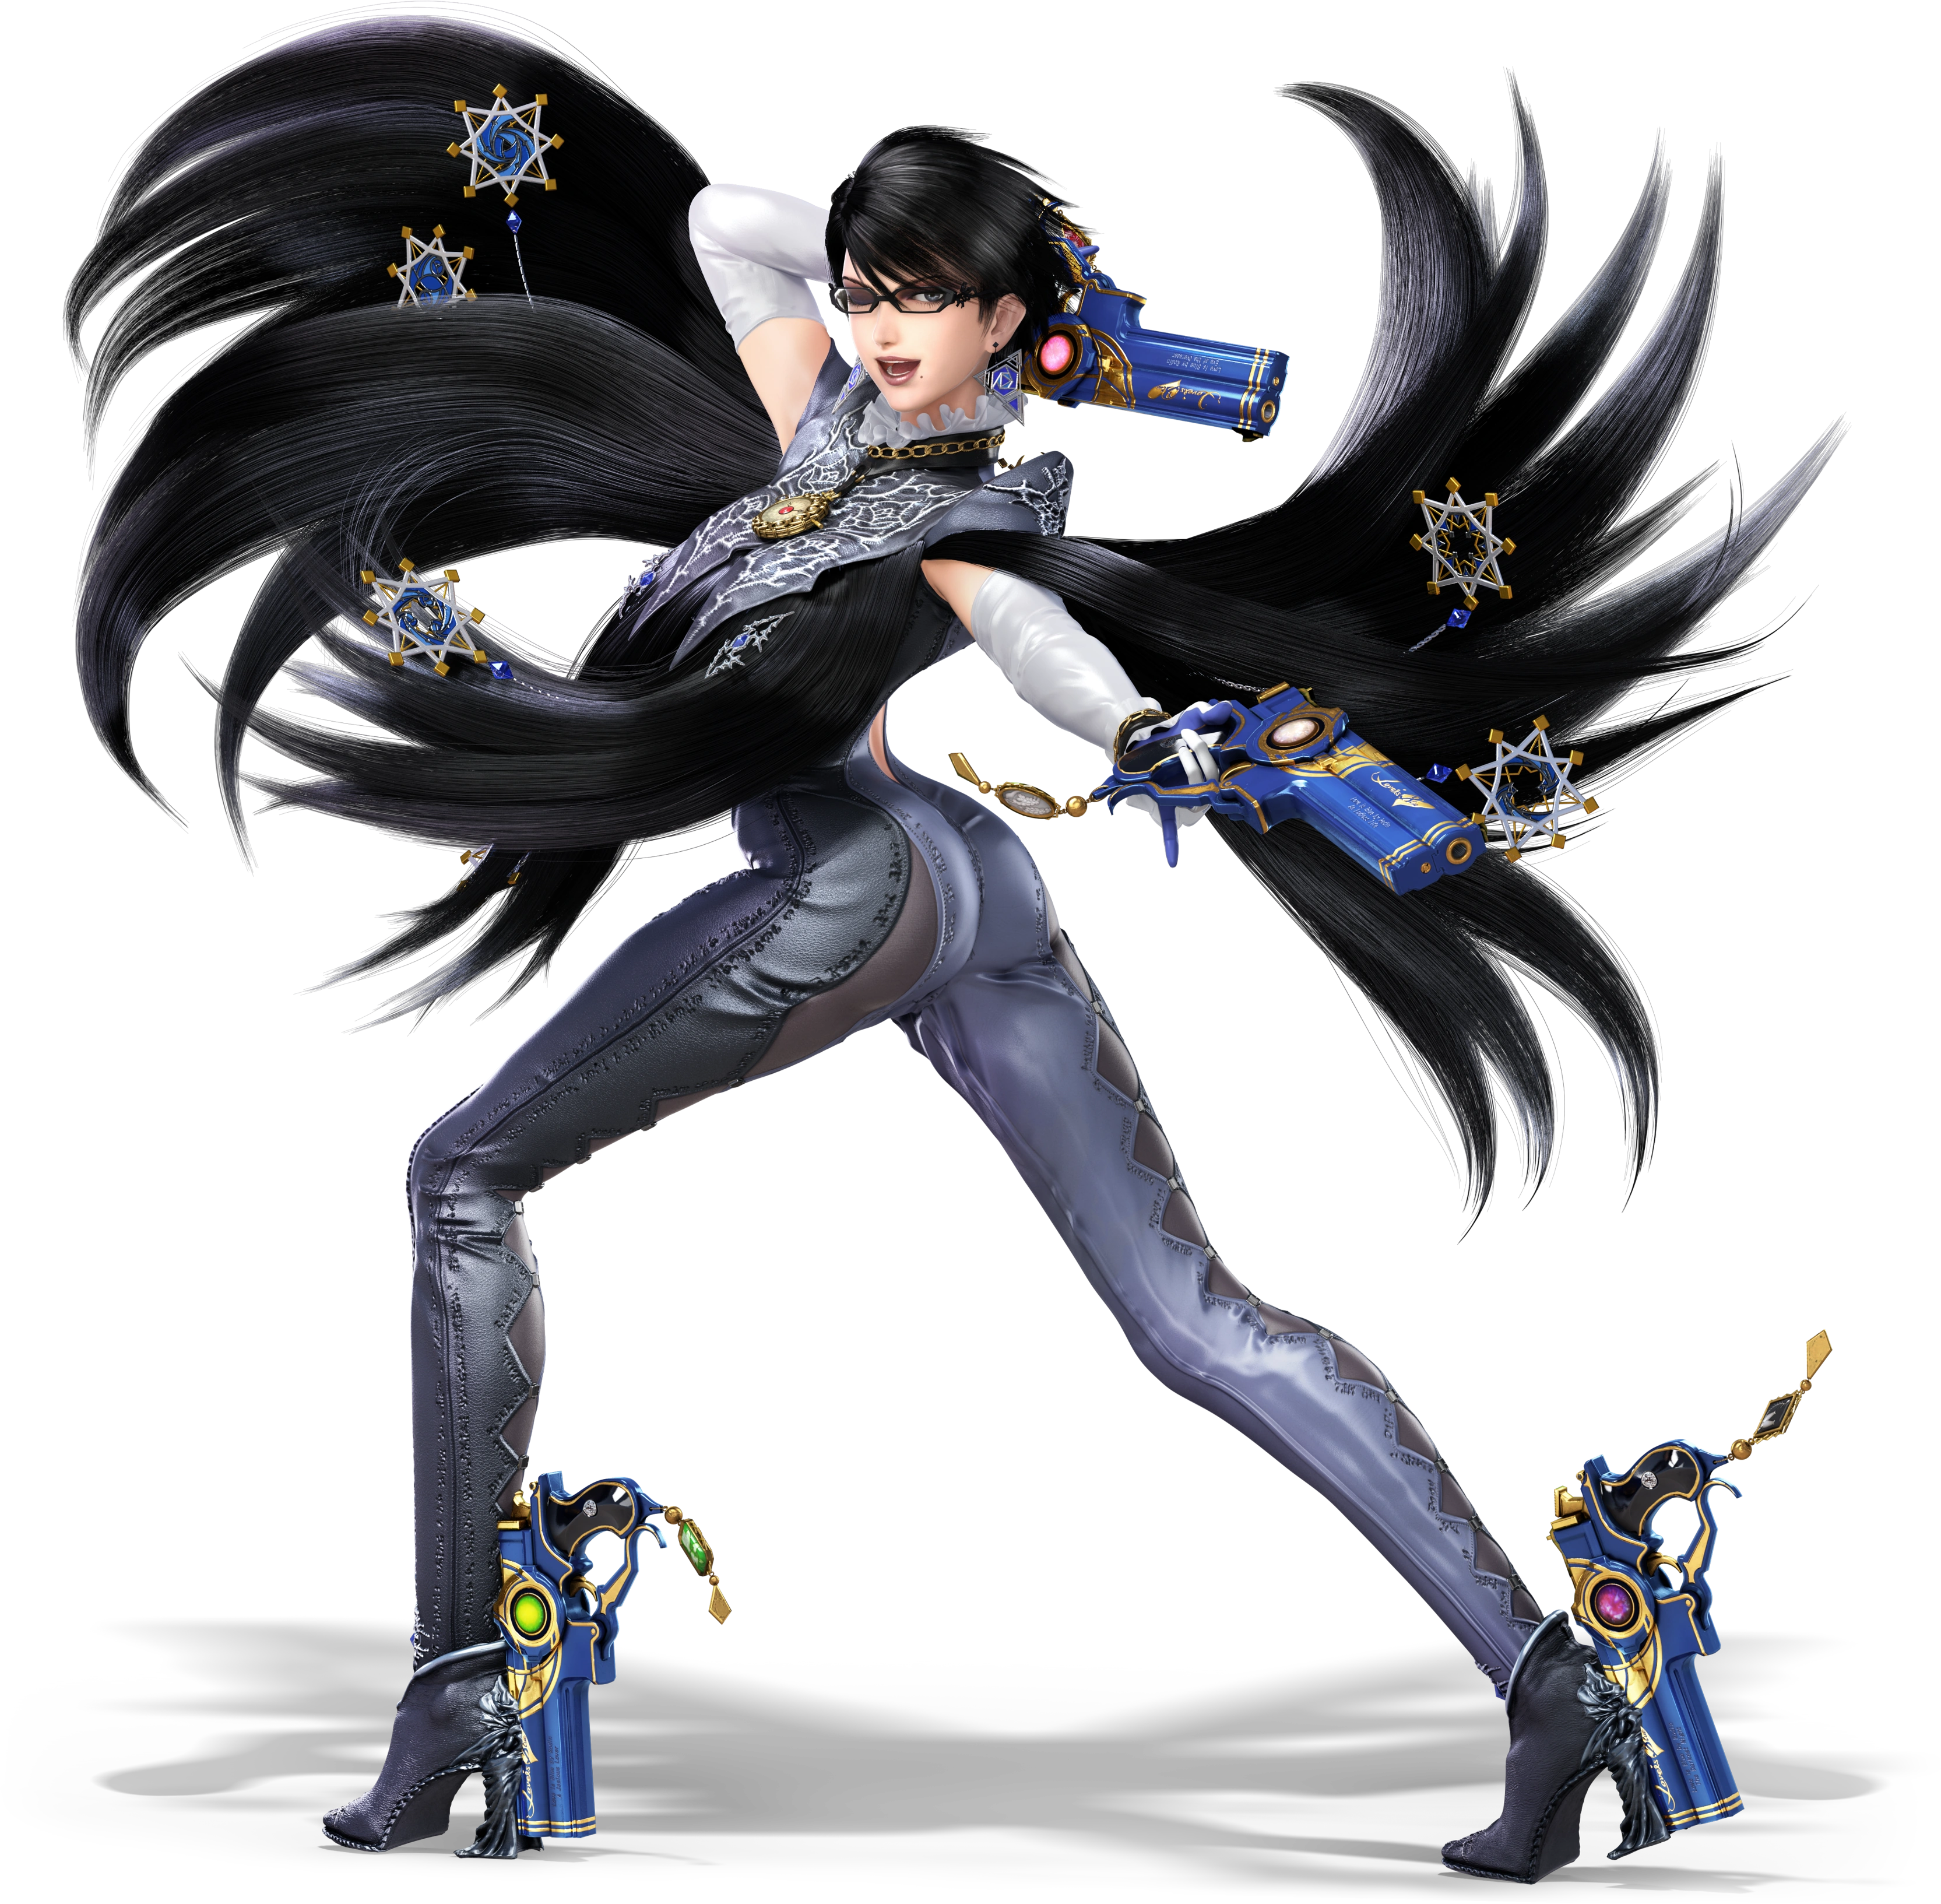
    SSB Bayonetta Series BayonettaHeadSSBU SSB4 Icon
    Bayonetta's Moveset

    • Neutral Attack: Bayonetta throws three punches in rapid succession. If the attack button is pressed repeatedly, she will throw a barrage of pistol whips, damaging opponents multiple times before launching them with a thrusting pistol whip.
    • Forward Tilt: Bayonetta throws a side kick. If the attack button is pressed again, she will follow with another kick, and a high kick if the button is pressed again.
    • Forward Smash: Bayonetta uses Wicked Weaves to summon Madama Butterfly's fist, who punches forward.
    • Up Tilt: Bayonetta throws an upwards pistol whip.
    • Up Smash: Bayonetta uses Wicked Weaves to summon Madama Butterfly's fist, who punches upward.
    • Down Tilt: Bayonetta throws a legsweep.
    • Down Smash: Bayonetta uses Wicked Weaves to summon Madama Butterfly's foot, who stomps downward. The move can meteor smash opponents.
    • Dash Attack: Bayonetta throws a shoulder tackle.
    • Counter: Bayonetta uses Wicked Weaves to summon two of Madama Butterfly's fists, who slams them into each other to crush the opponent in between them.

  • Neutral Aerial: Bayonetta throws a spinning roundhouse kick.
  • Forward Aerial: Bayonetta throws a roundhouse kick. If the attack button is pressed again, she will follow with two more kicks.
  • Forward Crash: Bayonetta uses Wicked Weaves to summon Madama Butterfly's fist, who punches forward.
  • Back Aerial: Bayonetta throws a back kick. If the attack button is pressed again, she will follow with two more kicks.
  • Back Crash: Bayonetta uses Wicked Weaves to summon Madama Butterfly's fist, who punches backward.
  • Up Aerial: Bayonetta throws a bicycle kick.
  • Up Crash: Bayonetta used Wicked Weaves to summon Madama Butterfly's fist, who punches upward.
  • Down Aerial: Bayonetta throws a stall-then-fall axe kick. The move can meteor smash opponents.
  • Down Crash: Bayonetta uses Wicked Weaves to summon Madama Butterfly's foot, who kicks downward. The move can meteor smash opponents.

  • Grab: Bayonetta reaches out to grab the opponent.
  • Pummel: Bayonetta slaps the opponent.
  • Forward Throw: Bayonetta shoves the opponent forward.
  • Back Throw: Bayonetta places the opponent behind herself before throwing a roundhouse kick.
  • Up Throw: Bayonetta heaves the opponent above herself before throwing an upward crescent kick.
  • Down Throw: Bayonetta slams the opponent into the ground.

  • Neutral Special - Bullet Climax: Bayonetta fires bullets from her arms or her heels while performing a handstand at a slight angle. The move can be charged by holding the special button, allowing the bullets to deal more damage and knockback.
    • Custom 1 - Bullet Barrage: Bayonetta fires bullets at a quicker rate that deal multiple hits before launching opponents.
    • Custom 2 - Charge Bullets: The move takes longer to charge, but the bullets deal more damage.
    • Custom 3 - Cracking Bullets: The bullets don't travel as far and Bayonetta has a slower fire rate, but on contact the bullets will explode in debris that deals further damage.
  • Side Special - Heel Slide / After Burner Kick: Bayonetta throws a sliding kick, followed by a backflip kick. If used in midair, she will rush forward while kicking diagonally either upward or downward depending on directional inputs. The aerial variant can be used twice as long as the first kick connects.
    • Custom 1 - Heel Slide Kick: The grounded variant's follow-up kick deals more damage and knockback, but is less suitable for combos. The aerial variant deals more damage and knockback as well.
    • Custom 2 - Heel Slide Wave: The grounded variant's follow-up kick deals less damage and knockback, but sends a projectile forward. The aerial variant is unaffected.
    • Custom 3 - Speeding Heel Slide: The grounded variant travels faster and farther, but there is no follow-up kick. The aerial variant is unaffected.
  • Up Special - Witch Twist: Bayonetta performs a rising crokscrew pistol whip, damaging opponents multiple times before launching them. It can be used twice before Bayonetta enters a semi-helpless state.
    • Custom 1 - High Witch Twist: Bayonetta travels higher, but the move can only be used once.
    • Custom 2 - Witch Twist Assault: Bayonetta doesn't travel as high, but she deals much more damage to opponents.
    • Custom 3 - Rising Witch Twist: Bayonetta doesn't rise as high, but she travels faster. Instead of damaging opponents multiple times, the move instead knocks them away.
  • Down Special - Witch Time: Bayonetta performs a backflip. If she is attacked during this state, she will retaliate by using her magic to slow the opponent down for a short time, leaving them vulnerable. Repeated uses of the move will lower the move's effectiveness.
    • Custom 1 - Inverse Witch Time: Instead of slowing down an opponent, Bayonetta will become faster for a short time, both in mobility and frame data.
    • Custom 2 - Witch Stun: Instead of slowing down an opponent, they are inflicted with paralysis.
    • Custom 3 - Witch Time Plus: The counter window is smaller and the move becomes even less effective after multiple uses, though opponents are slowed down for longer.
  • Final Smash - Infernal Climax: Bayonetta activates Witch Time, affecting the entire stage. Bayonetta must then attack her opponents to fill the Climax Gauge. After this, the damaged opponents are locked in a cinematic where Gomorrah is summoned with Wicked Weaves, who damages the opponents further by chomping on them. Opponents who are above 100% are KO'ed instantly.
  • Charged State - Witch Time Climax: Bayonetta activates Witch Time, making herself slightly faster, similar to her Inverse Witch Time custom move. Notably, her combo game is a lot better in this state, with her being able to use After Burner Kick and Witch Twist three times in a row instead of two. Her Bullet Arts also becomes more damaging.

  • Joker
    Persona 5 (2016)
    Joker (ジョーカー, Joker), whose real name is customizable by the player though is known as Ren Amamiya in related media, is the main protagonist of SEGA and Atlus' Persona 5, the fifth game in the Persona RPG series. He is the leader of a vigilante group known as the Phantom Thieves. At the start of the game, he is falsely accused of assault, is labeled a delinquent, and moved to Tokyo, Japan to attend Shujin Academy. Here, he awakens his Persona. He possesses the unique ability known as Wild Card, which allows him to wield multiple Personas at once. Throughout the game, he and the other Phantom Thieves pursue corrupt adults who terrorize the young and defeat them, gaining a bit of popularity over time.

    Joker possesses a unique Rebellion Gauge, shown next to his icon. This gauge can be filled with his down special Rebel's Guard, which will absorb attacks from opponents to fill the gauge. Once it is filled, Joker will take off his mask and summon his Persona Arsene. He will aid Joker in battle by attacking in tandem with him, increasing the strength of his attacks and giving his special moves more properties. While Arsene is active, the Rebellion Gauge will gradually decrease, with him disappearing once it is empty.

    In terms of stats, Joker is a quick and nimble middleweight fighter, with fast speed on both the air and ground. He has a good combo game, with weak attacks that deal little knockback, and great frame data that allows him to chain them together. Most of his attacks consist of acrobatics and strikes with his knife. When Arsene is summoned, he will help Joker by performing claw swipes alongside him to deal extra damage.
    SSB Persona 5 Series JokerHeadSSBU SSBUltimate Icon
    Joker's Moveset

    • Neutral Attack: Joker throws two swipes with his knife followed by a flurry of slashes, damaging opponents multiple times before launching them with a final swipe.
    • Forward Tilt: Joker swipes his knife downward.
    • Forward Smash: Joker swings his knife downward.
    • Up Tilt: Joker throws an upward swing with his knife and throws it directly into the air above himself. It spins in midair before he catches it, damaging opponents multiple times before launching them.
    • Up Smash: Joker throws an uppercut with his knife.
    • Down Tilt: Joker performs a baseball slide.
    • Down Smash: Joker slashes his knife along the ground on both sides of himself.
    • Dash Attack: Joker leans forward while slashing with his knife.
    • Counter: Joker glows blue before slashing the opponent with his hand. When Arsene isn't summoned, this will fill some of the Rebellion Gauge. When Arsene is summoned, it will instead allow Arsene to stay in battle for longer.

  • Neutral Aerial: Joker spins around while slashing his knife.
  • Forward Aerial: Joker throws a hook kick, followed by a roundhouse kick.
  • Forward Crash: Joker throws an outward slash with his knife.
  • Back Aerial: Joker throws a drilling drop kick, damaging opponents multiple times before launching them.
  • Back Crash: Joker turns around and slashes his knife backward.
  • Up Aerial: Joker throws an upside down corkscrew kick, damaging opponents multiple times before launching them.
  • Up Crash: Joker throws an upward slash with his knife.
  • Down Aerial: Joker throws a stall-then-fall stomp.
  • Down Crash: Joker slashes his knife downward. The move can meteor smash opponents.

  • Grab: Joker reaches out to grab the opponent.
  • Pummel: Joker knee smashes the opponent.
  • Forward Throw: Joker tosses the opponent forward.
  • Back Throw: Joker trips the opponent over their foot.
  • Up Throw: Joker throws the opponent upward before striking a pose.
  • Down Throw: Joker traps the opponent in blue energy before slamming them into the ground.

  • Neutral Special - Gun / Gun Special: Joker pulls out a gun and fires a bullet, damaging opponents in front of him. The special button can be held for Joker to continue shooting, and in midair, he can fire the gun in a circle above or below himself. When Arsene is summoned, the move becomes Gun Special, which allows him to fire three bullets at once.
    • Custom 1 - Rapidfire Gun: The bullets are shot faster, but they have less range and deal less damage.
    • Custom 2 - Impact Bullets: The bullets will explode on impact, dealing more damage and damaging other opponents caught in the blast radius. However, the move has a much slower fire rate.
    • Custom 3 - Gun Acrobatics: The bullets can be fired in more directions in midair, and it can even be aimed when on the ground. However, the bullets don't travel as far.
  • Side Special - Eiha / Eigaon: Joker snaps his fingers, sending a red projectile of energy downward in front of himself and exploding on impact. It deals minimal damage and knockback, but also inflicts opponents with further damage over time. When Arsene is summoned, he will use the stronger Eigaon, creating a blast that damages opponents multiple times before launching them and makes them take gradual damage longer.
    • Custom 1 - Eiha Blast: Eiha and Eigaon create a larger blast that deals more damage, but doesn't cause opponents to take gradual damage afterward.
    • Custom 2 - Everlasting Eiha: The projectile doesn't travel as far, but opponents will take gradual damage longer.
    • Custom 3 - Fungus Eiha: Instead of inflicting gradual damage on opponents, the move puts a mushroom on the opponent's head.
  • Up Special - Grappling Hook / Wings of Rebellion: Joker shoots his grappling hook either upwards or at an angle depending on directional inputs. He can grab onto ledges with it like a tether recovery, or pull opponents towards him, where he will attack with a high kick. When Arsene is summoned, Joker instead uses Wings of Rebellion, where Arsene uses his wings to carry Joker upward. He doesn't damage opponents, but he travels pretty high and is invincible throughout the duration of the move.
    • Custom 1 - Grappling Latch: The grappling hook has less range, but Joker will deal more damage to opponents he latches onto.
    • Custom 2 - Ranged Grappling Hook: The grappling hook has more range, but it cannot latch onto and drag in opponents.
    • Custom 3 - Grappling Whip: Instead of latching onto and dragging in opponents, the grappling hook simply damages and launches opponents it hits. Opponents that hit the tip of the hook take much more damage.
  • Down Special - Rebel's Guard / Tetrakarn / Makarakarn: Joker enters a defensive state while glowing blue. In this state, he will armor through any attacks that hit him, quartering the damage he takes while also filling his Rebellion Gauge. After using the move, he will throw a slash with his knife that damages nearby opponents. Once filled, the special move can be used again to summon Arsene. When he is summoned, Joker will instead use Tetrakarn or Makakarn; the former will counter melee attacks whole the latter will reflect projectiles.
    • Custom 1 - Rebel's Stance: Instead of filling the Rebellion Gauge by absorbing opponents' attacks, it will instead gradually fill while the move is in use.
    • Custom 2 - Rebel's Reward: The Rebellion Gauge takes longer to fill, and Joker will only halve the damage he takes rather than quarter it. However, once filled, Arsene will stay for twice as long when summoned.
    • Custom 3 - Rebel's Punish: The Rebellion Gauge will not be filled while using the move, and is instead filled by dealing and taking damage throughout the battle. Instead, the move allows him to charge up for a powerful swipe with his knife. The move has super armor and the opponent will be stunned if fully charged.
  • Final Smash - All-Out Attack: Joker rushes forward, then backward if he misses. If he hits an opponent, they are locked in an animation where he summons the other Phantom Thieves (either Ann, Ruiji, and Morgana or Makoto, Haru, and Yusuke) to repeatedly attack the opponent. After this, Joker lands in front of the opponent while the screen changes to a splash screen, which the text "The Show's Over" written on the side. This sends the opponents back to the stage, launching them. If Joker wins a stock or stamina battle with this move, the screen will remain on the splash screen without returning to gameplay, and instead transition to the victory screen.
  • Charged State - Arsene Summon: Joker begins glowing blue before summoning Arsene. In this state, Joker's Rebellion Gauge is permanently filled, allowing Arsene to attack alongside him indefinitely.

  • Demi-Fiend
    Shin Megami Tensei III: Nocturne (2003)
    SMTC - Demi-Fiend (Big)
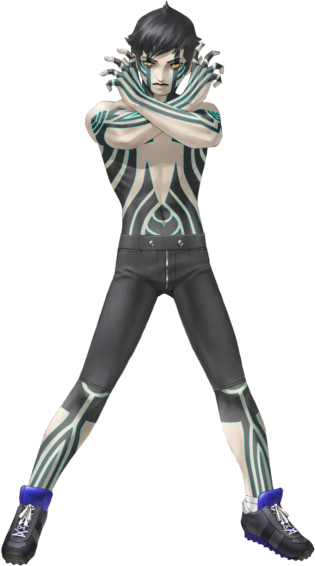
    The Demi-Fiend (人修羅, Demi-Fiend) is the main protagonist of Atlus' Shin Megani Tensei III: Nocturne. He was an average boy who gained demonic powers when the world turned inside out and undergoes an apocalyptic metamorphosis, populating itself with demons. The game sees Demi-Fiend in search of a Reason, a purpose by which he can shape the new world, with his powers helping along the way.

    Demi-Fiend is a jack-of-all-trades type character who focuses more on defense and survivability than agility or mobility. His biggest strength is his combo ability, having a multitude of attacks he can string together and rack up damage on opponents. This trait is exacerbated by his neutral special, Press Attack. An evolution of the Turn Press gameplay mechanic present in his home game, Demi-Fiend has a demonic head-shaped Press Attack symbol by his icon at all times. After using certain attacks, breaking an opponent's shield, or using items that would make the opponent dizzy such as Deku Nuts, the head's mouth will open as it shines brightly. When this happens, Demi-Fiend can perform a unique follow-up attack by pressing the special button.

    Demi-Fiend's basic moveset consists of physical moves like punches, kicks, and swipes. Some attacks also equip him with an energy sword, which provides both range and damage. Other moves have him summon demons to attack opponents for him, namely his special moves.
    SSB Shin Megami Tensei Series DSSB Demi-Fiend Stock Icon SSBCharged Icon
    Demi-Fiend's Moveset

    • Neutral Attack: Demi-Fiend throws two hand swipes followed by a flurry of swipes, damaging opponents multiple times before finishing with a punch.
    • Forward Tilt: Demi-Fiend throws a palm thrust.
    • Forward Smash: Demi-Fiend throws a right hook.
    • Up Tilt: Demi-Fiend throws a light uppercut.
    • Up Smash: Demi-Fiend holds an energy sword to the side, then spins the sword diagonally upward then down.
    • Down Tilt: Demi-Fiend throws a wheel kick.
    • Down Smash: Demi-Fiend slams both hands into the ground. The move can bury opponents.
    • Dash Attack: Demi-Fiend throws a chop.
    • Counter: Demi-Fiend throws a roundhouse kick.

  • Neutral Aerial: The tattoos on Demi-Fiend's body glow, damaging opponents multiple times before launching them.
  • Forward Aerial: Demi-Fiend throws a diagonal downward punch.
  • Forward Crash: Demi-Fiend throws an overhead. The move can meteor smash opponents.
  • Back Aerial: Demi-Fiend throws a backward left hook.
  • Back Crash: Demi-Fiend throws a back kick.
  • Up Aerial: Demi-Fiend twirls an energy sword upwards, damaging opponents multiple times before launching them.
  • Up Crash: Demi-Fiend throws an axe kick. The move can meteor smash opponents.
  • Down Aerial: Demi-Fiend swings an energy sword from left to right below himself.
  • Down Crash: Demi-Fiend swipes both hands downward. The move can meteor smash opponents.

  • Grab: Demi-Fiend reaches out to grab the opponent.
  • Pummel: Demi-Fiend throws a chop.
  • Forward Throw: Demi-Fiend throws the opponent forward.
  • Back Throw: Demi-Fiend throws the opponent behind himself before slashing them with an energy sword.
  • Up Throw: Demi-Fiend heaves the opponent upward before slashing them with an energy sword.
  • Down Throw: Demi-Field elbows the opponent into the ground.

  • Neutral Special - Press Attack: Under certain conditions, the emblem by Demi-Fiend's icon will open, causing him to glow a purple aura. Only in this state can he used a special follow-up, which is quick and grants invincibility. Tapping the special button has the move deal minimal knockback, allowing him to combo opponents further, while holding the special button lets it deal a lot of damage and knockback.
    • Custom 1 - Free Press Attack: Demi-Fiend can use the move independent from the icon, which isn't present when this custom move is used, nor can it be used in conjunction with his other specials. Instead it has more startup lag and deals a consistent amount of damage and knockback, making it a traditional attack.
    • Custom 2 - Perfect Press Attack: The window for using the move is more strict, but the tapped variant allows Demi-Fiend to act out of the move sooner and the held variant deals more damage and knockback.
    • Custom 3 - Granted Press Attack: Demi-Fiend is able to use the move as he takes and receives damage, indicated by him glowing. Like Cloud's Limit Break, he may use the move whenever he pleases when he obtains it, however it deals less damage.
  • Side Special - Mabufu: Demi-Fiend summons Jack Frost to his side, who spawns a cluster of ice a short distance in front of him. The ice quickly detonates into a frosty explosion, damaging and freezing foes around the blast radius. The move deals low damage and knockback, but frozen opponents get a unique Press Attack.
    • Custom 1 - Frosty Mabufu: Demi-Fiend can't use Press Attack against a frozen opponent, but the move can freeze opponents for longer.
    • Custom 2 - Frigid Mabufu: The move doesn't freeze opponents, but instead launches them.
    • Custom 3 - Delayed Mabufu: The ice blast is much larger and deals more damage, but Jack Frost delays a bit before using the move.
  • Up Special - Zio Dart: Demi-Fiend summons Pixie, who lifts him up in a burst of flight at a diagonal angle. The pair are surrounded in electricity as they ascend. The move is fast, but it can't be maneuvered. Opponents hit by them will allow Demi-Fiend to use a unique Press Attack, which can meteor smash them.
    • Custom 1 - Vertical Zio Dart: The move deals less damage, but Demi-Fiend travels higher and straight upward rather than at a diagonal angle.
    • Custom 2 - Press Zio Dart: Demi-Fiend automatically uses the Press Attack at the end of the move, meteor smashing opponents hit by him. However, he can't damage opponents as he rises.
    • Custom 3 - Guard Zio Dart: Demi-Fiend is invincible while rising, but he can't travel as high.
  • Down Special - Divine Shot: ​​​​​​Demi-Fiend charges energy in his hand and fires it out as a bullet of light. Charging the attack increases the attack's range and, as a consequence, the projectile's speed. Can stun foes at max charge and opens up an opportunity for a Press Attack. The charge can be interrupted and stored by performing any other action.
    • Custom 1 - Demonic Shot: The move takes longer to charge and can't stun opponents at full charge, but it does deal more damage and knockback and can either place a flower or mushroom on their heads.
    • Custom 2 - Divine Beam: Demi-Fiend will automatically charge the move fully, which can't be interrupted or stored. However, instead of a projectile, Demi-Fiend fires a long-ranged beam, damaging opponents multiple times before stunning them at the end, opening the opportunity for a Press Attack.
    • Custom 3 - Quick Divine Shot: The projectile travels much faster and farther, but it can't stun opponents, and as such Demi-Fiend can't use a Press Attack afterwards.
  • Final Smash - Freikugel: Demi-Fiend leans back as energy swarms into his body before leaning forward, firing a piercing beam of energy from his eyes, damaging opponents multiple times before launching them with a final blast. The beam can be angled up and down to cover more range.
  • Charged State - God's Eye: Demi-Fiend charges purple energy into his body, causing the markings on his body to flash constantly. In this state, all of his stats are slightly improved, and his Press Attacks are much more powerful and quick than normal. They are also performed automatically.

  • Enker
    Mega Man: Dr. Wily's Revenge (1991)
    MegaManEnker
    Enker (エンカー, Enker) is a minor antagonist in the Mega Man series. He is the first of the Mega Man Killer series built by Dr. Wily. He wields the Barrier Spear in battle, and will use his special weapon, the Mirror Buster, to defeat Mega Man. Though he is defeated in each encounter, he never gives up on his programmed goal to destroy Mega Man.

    Enker's main weapon is his Barrier Spear, which he can use to stab at enemies from afar and spin around for great coverage. This overall grants him disjointed range. However, the Barrier Sear is unique in that, if the attack button is held while using an attack, it will flash. In this state, the spear is able to reflect any projectiles it hits. In terms of attributes, Enker is a fast middleweight with low jump height, but rather fast air speed, allowing him to go pretty deep into edgeguarding.

    Enker's attacks mostly utilize the Barrier Spear, which as mentioned is one of the most useful tools for reflecting projectiles. Though his attacks are lacking in knockback, he has quick frame data that can make comboing opponents easy. His long range also allows him to escape combos himself.
    SSB Mega Man Series Enker Stock Icon SSBCharged Icon
    Enker's Moveset

    • Neutral Attack: Enker throws a punch, followed by a kick, followed by a stab with the Barrier Spear.
    • Forward Tilt: Enker swings the Barrier Spear outward.
    • Forward Smash: Enker throws a downward slash with the Barrier Spear.
    • Up Tilt: Enker swings the Barrier Spear upward in an overarching motion.
    • Up Smash: Enker stabs the Barrier Spear upward.
    • Down Tilt: Enker stabs the Barrier Spear at the ground.
    • Down Smash: Enker plunges the Barrier Spear into the ground. This creates windboxes on either side of him that push opponents way.
    • Dash Attack: Enker throws a sliding kick.
    • Counter: Enker swings the Barrier Sword inward.

  • Neutral Aerial: Enker spins the Barrier Spear around himself,damaging opponents multiple times before launching them.
  • Forward Aerial: Enker swings the Barrier Spear downward. The move can meteor smash opponents,
  • Forward Crash: Enker stabs the Barrier Spear forward. The move gives him a slight boost in forward momentum.
  • Back Aerial: Enker swings the Barrier Spear inward.
  • Back Crash: Enker throws a back kick.
  • Up Aerial: Enker hopes the Barrier Spear upward and twirls it, damaging opponents multiple times before launching them.
  • Up Crash: Enker stabs the Barrier Spear upward.
  • Down Aerial: Enker holds the Barrier Spear below himself and twirls it, damaging opponents multiple times before launching them.
  • Down Crash: Enter stabs the Barrier Spear downwards. The move can meteor smash opponents.

  • Grab: Enker reaches out to grab the opponent.
  • Pummel: Enker knee smashes the opponent.
  • Forward Throw: Enker throws a side kick to launch the opponent forward.
  • Back Throw: Enker puts the opponent behind himself and throws a back kick. The move can meteor smash opponents.
  • Up Throw: Enker throws the opponent upward.
  • Down Throw: Enker slams the opponent into the ground.

  • Neutral Special - Mirror Buster: Enker creates a shield of energy in front of himself with the Barrier Spear, and can keep it up if the special button is held. It doesn't damage opponents, but it will reflect projectiles. Releasing the special button has him fling the shield forward, damaging opponents it hits.
    • Custom 1 - Mirror Absorber: The shield will absorb projectiles to heal Enker rather than reflect them. It deals less damage when thrown.
    • Custom 2 - Mirror Blaster: The shield has a weaker reflect multiplier, but it deals more damage when thrown.
    • Custom 3 - Mirror Surge: The shield destroys projectiles rather than reflecting them, and cannot be thrown. However, it will damage opponents when it's held out.
  • Side Special - Spear Rush: Enker dashes forward while stabbing the Barrier Spear forward. If he hits an opponent, he will stab into them. From there, directional inputs can be used for him to perform one of three attacks; a second stab that damages the opponent, and upward thrust that sends opponents upward, and a downward stab that, if used in midair, can meteor smash opponents.
    • Custom 1 - Spear Tackle: Enker simply damages opponents he rushes into rather than grabbing them.
    • Custom 2 - Power Spear Rush: Enker dashes more distance, but the attack is weaker.
    • Custom 3 - Spear Surge: Rather than grabbing opponents, Enker will damage them multiple times before launching them.
  • Up Special - Spear Thrust: Enker jumps upward while thrusting the Barrier Spear upward, damaging opponents he hits and falling into a helpless state afterwards.
    • Custom 1 - Double Spear Thrust: Enker travels less distance, but it can be used twice before he falls into a helpless state.
    • Custom 2 - Spear Scabbard: Enker doesn't fall into a helpless state after jumping,but instead will perform a stall-then-fall attack where he stabs the Barrier Spear downward. The move can meteor smash opponents.
    • Custom 3 - Spear Leap: Enker gains more horizontal distance but less vertical distance.
  • Down Special - Spear Beam: Enker hoists the Barrier Spear in the air before slashing it downwards, sending a projectile that damages opponents. The move can be charged if the special button is held, allowing the projectile to travel farther and deal more damage.
    • Custom 1 - Spear Swing: Enker releases no projectile upon slashing, but the slash itself deals more damage. Takes slightly less time to charge.
    • Custom 2 - Spear Beam Flurry: The move takes longer to charge, but he will release three projectiles at varying speeds when fully charged.
    • Custom 3 - Armored Spear Beam: Enker has super armor while charging, but it takes longer to charge and the projectile travels slower.
  • Final Smash - Mega Killer: Enker rushes forward while stabbing the Barrier Spear forward. If he hits an opponent, they are knocked into the air where Enker will deliver a series of stabs, slashes, and swings to damage them, finishing with a downward thrust that sends them downward.
  • Charged State - Mirror Power: Enker holds the Barrier Spear upward to gain energy, causing him to glow yellow. In this state, Enker is much stronger and will deal more damage. He will also always reflect projectiles if he isn't standing still as if he has a Franklin's Badge.

  • Ken (ε)
    Street Fighter (1987)
    Ken SSBUltimate
    Ken (ケン, Ken), full name Ken Masters, is a recurring character in the Street Fighter series, and a childhood friend of Ryu. He was taken in by Gouken at the time he was training Ryu, and the two became sparring partners. Ken's fighting style is more aggressive, and he's a bit of a show-off. The iconic headband Ryu wears was actually a gift from Ken. He has a wife named Eliza, and they have a son named Mel.

    Much like how he functions in the Street Fighter series, Ken is Ryu's Echo Fighter, and as such the two share a lot of the same mechanics, such as always facing the opponent in 1-on-1 battles, tapped and held variants for ground attacks, and button inputs to perform stronger variants of special moves. However, reflecting his moveset in the series, some attacks are different than Ryu's.
    SSB Street Fighter Series KenHeadSSBU SSBUltimate Icon
    Ken's Moveset

    • Tapped Neutral Attack: Ken throws a jab, followed by a short-range punch, followed by a hook.
    • Held Neutral Attack; When close to an opponent, Ken throws an uppercut. When farther away, he throws an axe kick that hits twice.
    • Tapped Forward Tilt: When close to an opponent, Ken throws an inward hook. When farther away, he instead throws a tastumaki geri.
    • Held Forward Tilt: Ken throws a straight punch.
    • Forward Smash: Ken throws a roundhouse kick.
    • Tapped Up Tilt: Ken throws an uppercut-style elbow strike.
    • Held Up Tilt: Ken throws an uppercut.
    • Up Smash: Ken squats, then rises while throwing an uppercut.
    • Tapped Down Tilt: Ken throws a shin kick.
    • Held Down Tilt: Ken throws a lunging shin kick.
    • Down Smash: Ken throws a legsweep.
    • Dash Attack: Ken throws a flying kick.
    • Counter: Ken throws a stretch kick.

  • Neutral Aerial: Ken throws a downward-angled knee strike.
  • Forward Aerial: Ken throws a flying kick.
  • Forward Crash: Ken throws an overhead.
  • Back Aerial: Ken throws an outside crescent kick.
  • Back Crash: Ken throws a back kick.
  • Up Aerial: Ken throws an uppercut.
  • Up Crash: Ken throws a rising uppercut.
  • Down Aerial: Ken throws a downward punch. The move can meteor smash opponents.
  • Down Crash: Ken throws a stall-then-fall stomp, falling at a diagonal angle.

  • Grab: Ken reaches out to grab the opponent.
  • Pummel: Ken knee strikes the opponent.
  • Forward Throw: Ken performs the seoi nage, sending the opponent forward.
  • Back Throw: Ken performs the tomoe nage, sending the opponent backward.
  • Up Throw: Ken throws a stretch kick transitioned into an axe kick, sending the opponent upward.
  • Down Throw: Ken pins the opponent on the ground and throws a knifehand strike.

  • Neutral Special - Hadoken: Ken cups his hands and thrusts them forward, sending a blue fireball that travels forward slowly before disappearing. Only one fireball can be on-screen at a time. Holding the special button increases the fireball's speed and power. The inputted Hadoken (↓ ↘ → + attack / special) fires a larger fireball that travels faster and deals more damage. Compared to Ryu's Hadoken, Ken's is weaker.
    • Custom 1 - Denjin Hadoken: The move has noticeably longer startup lag and the fireball deals less damage, but it will stun opponents on the ground and lightly launch them in the air. The inputted variation can travel father and stun the opponent longer.
    • Custom 2 - Zanku Hadoken: Ken throws two purple fireballs consecutively; they deal less knockback, but more damage if both of them hit. If used in midair, Ken throws both fireballs at a diagonally-downwards angle. The inputted variation can travel farther and deal more damage.
    • Custom 3 - Shakuentsu Hadoken: Ken throws a large, red fireball that travels forward slowly, damaging opponents multiple times before launching them. The inputted variation travels farther and deals more damage.
  • Side Special - Tatsumaki Senpukyaku: Ken performs a jumping, spinning crescent kick while travelling in the direction he is facing. Holding the special button increases the move's duration, the damage dealt, and the distance Ken travels. The inputted Tatsumaki Senpukyaku (↓ ↙ ← + attack / special) travels even further and deals significantly more damage and knockback. Compared to Ryu's Tatsumaki Senpukyaku, Ken travels faster and damages opponents multiple times before launching them, but deals less knockback.
    • Custom 1 - Dankukyaku: Instead of performing a spinning kick, Ken leaps forward while throwing three kicks in rapid succession. The inputted variation covers more distance and the last kick deals more damage.
    • Custom 2 - Shunpukyaku: Ken leaps high and throws a spinning crescent kick as he floats back down. Covers more vertical distance, making it more useful for recovery, but deals less damage. The inputted variation deals more damage and travels further.
    • Custom 3 - Tatsumaki Zankukyaku: Ken only damages opponents once and travels slower, but the move has much more knockback, making it similar to Ryu's. The inputted variation increases the damage he deals and the distance he travels.
  • Up Special - Shoryuken: Ken throws a jumping uppercut, falling into a helpless state afterwards. The inputted Skoryuken (→ ↓ ↘ + attack / special) deals even more damage and grants Ken invincibility while rising upward. Compared to Ryu's Shoryuken, it's weaker but can hit opponents multiple times depending on how long the special button is held; tapping the special button fast has the move only hit once, tapping the special button mid-fast has the move hit twice, and holding the special button lets Ken use the Heavy Shoryuken, a flaming uppercut that damages opponents five times before heavily launching them.
    • Custom 1 - Shoryureppa: Ken throws three rising uppercuts consecutively. Pressing the special button again allows him to throw the next uppercut early. This allows him to gain more vertical and (if the uppercuts are timed correctly) horizontal distance, but the uppercuts deal less damage. The inputted version is faster.
    • Custom 2 - Forbidden Shoryuken: Ken doesn't travel as high, but he deals much more damage, especially at the start of the move. The inputted variant makes Ken travel higher as well as gain invincibility for the duration of the move.
    • Custom 3 - Goshoryuken: Ken travels slower, but he does travel more vertical and horizontal distance. The inputted variant deals significantly more damage.
  • Down Special - Focus Attack: Ken assumes a focused stance while emitting black aura, then throws a spinning kick. Holding the special button allows Ken to assume the stance longer, making the punch stronger. While in this stance, Ken has super armor that can withstand any attack, though the attack is cancelled if he is hit a second time. If he hits an opponent, they will be crumpled in a lengthy stun animation on the ground and be inflicted with paralysis in midair, allowing Ken to easily follow-up with another move. It can be cancelled on hit into any of his other attacks.
    • Custom 1 - Unbreakable Focus Attack: Ken has permanent super armor while in his focus stance and cannot be hit out of it, though opponents are crumpled and paralyzed for less time.
    • Custom 2 - Hyper Focus Attack: The move takes longer to fully charge, but it deals significantly more damage and knocks opponents away instead of crumpling or paralyzing them.
    • Custom 3 - Crippling Focus Attack: The move can crumple and paralyze opponents for longer, but Ken does not have super armor while in his focused state.
  • Final Smash - Shippu Jinraikyaku / Shiryuken: Ken has two Final Smashes depending on if he is close to an opponent or not. If he is close to an opponent, he uses Shippu Jinraikyaku; he throws a kick and if he hits an opponent, he follows with a series of kicks followed by rising hurricane kicks, heavily damaging and launching them. If he is far away from the opponents, he instead uses Shinryuken, an uppercut that produces a pillar of fire with immense vertical range, damaging opponents multiple times before launching them.
  • Charged State - Satsui no Hando: Ken unlocks the power of Satsui no Hando, and starts glowing bright red. In this state, Ken is much stronger and faster. Notably, his inputted special moves and held tilt attacks are extremely lethal.

  • MS. PAC-MAN (ε)
    MS. PAC-MAN (1981)
    MS. PAC-MAN (ミズパックマン, MS. PACMAN) is the main character of MS. PAC-MAN, the sequel of PAC-MAN. The object of the game is very similar, though with a few minor differences, such as different fruits that award more more points if collected. MS. PAC-MAN, as her name implies, is PAC-MAN's wife, and they live together with the rest of their family in a house in PAC-LAND.

    MS. PAC-MAN is PAC-MAN's Echo Fighter. Her moveset is almost identical to PAC-MAN's, with the bulk of their differences being in their neutral special Namco Roulette. In addition to having some items replaced, almost all of them have completely different properties, allowing for different mindgame and trapping options.
    SSB Pac-Man Series MS. PAC-MAN Stock Icon SSBCharged Icon
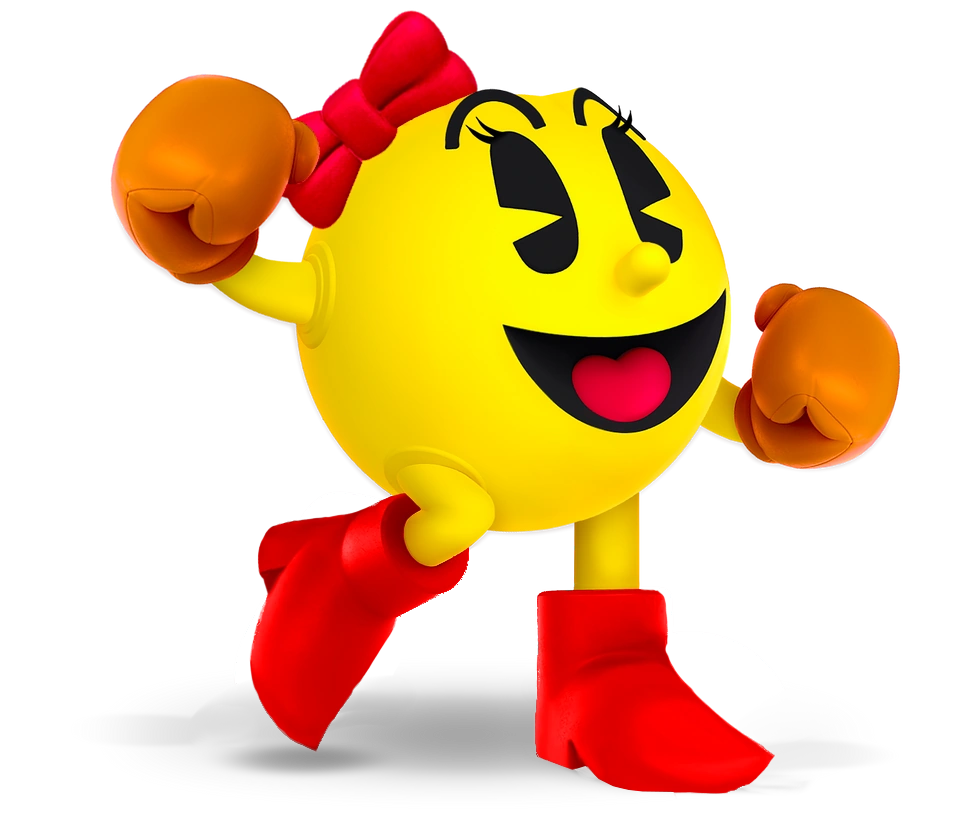
    MS. PAC-MAN's Moveset

    • Neutral Attack: MS. PAC-MAN throws a one-two punch combo followed by a bicycle kick.
    • Forward Tilt: MS. PAC-MAN throws a side kick.
    • Forward Smash: MS. PAC-MAN thrusts Blinky forward, who damages opponents.
    • Up Tilt: MS. PAC-MAN throws an uppercut.
    • Up Smash: MS. PAC-MAN thrusts Blinky upward, who damages opponents.
    • Down Tilt: MS. PAC-MAN turns into her wedge form and chomps at a diagonally-downward angle.
    • Down Smash: MS. PAC-MAN thrusts Pinky and Clyde on either side of her, who damage opponents.
    • Dash Attack: MS. PAC-MAN turns into her wedge form and chomps as she moves forward, damaging opponents multiple times before launching them. If the attack button is held, she can continue chomping while moving forward. It can also be cancelled into any other move.
    • Counter: MS. PAC-MAN turns into her wedge form and chomps forward.

  • Neutral Aerial: MS. PAC-MAN turns into her wedge form and backflips repeatedly.
  • Forward Aerial: MS. PAC-MAN throws a roundhouse kick.
  • Forward Crash: MS. PAC-MAN thrusts a blue ghost forward, who damages opponents.
  • Back Aerial: MS. PAC-MAN throws a dropkick.
  • Back Crash: MS. PAC-MAN thrusts Sue behind herself, who damages opponents.
  • Up Aerial: MS. PAC-MAN throws a bicycle kick.
  • Up Crash: MS. PAC-MAN thrusts Spunky upward, who damages opponents.
  • Down Aerial: MS. PAC-MAN stomps downward four times. The fourth stomp can meteor smash opponents.
  • Down Crash: MS. PAC-MAN thrusts Funky downward, who damages opponents.

  • Grab: MS. PAC-MAN uses Boss Galaga's tractor beam to grab the opponent. Uniquely, the move has a vacuumbox that pull opponents into his grasp. She can also pull in items to grab them.
  • Pummel: MS. PAC-MAN headbutts the opponent.
  • Forward Throw: MS. PAC-MAN flings the opponent forward before turning into her wedge form to chomp them.
  • Back Throw: MS. PAC-MAN spins and throws the opponent backward before turning into her wedge from to chomp them.
  • Up Throw: MS. PAC-MAN throws the opponent upward before turning into her wedge form to chomp them.
  • Down Throw: MS. PAC-MAN pins the opponent on the ground before turning into her wedge form to chomp them.

  • Neutral Special - Namco Roulette: A roulette appears above MS. PAC-MAN, displaying different items. If the special button is held, she can continue cycling, and directional inputs can be used to scroll through the items. Releasing the special button will have her throw the item, while holding up or down on the control stick will cancel the move. While cycling, the next two and previous two items in the cycle will be shown. If she stops cycling, using the move again will have her start where she left off. Every item, when thrown, has their own properties, trajectories, and damages. They can also be used in tandem with the trampoline in PAC-JUMP. Only one item can be at play at a time. After being thrown, MS. PAC-MAN can regrab the item if she is quick enough, allowing her to throw it again. If she is hit while cycling through an item, the item will drop and can be picked up by opponents. Below are the list of items MS. PAC-MAN can use and their properties, listed in the order they appear in the cycle.
      • Pooka: Travels forward, then backward.
      • Cherry: Travels downward. Deals very heavy shield damage.
      • Strawberry: Bounces twice in wide arcs.
      • Orange: Travels backward in a straight line.
      • Galaxip: Travels in a diagonally-upward angle.
      • Pretzel: Travels quickly in the shape of a pretzel. Damages opponents multiple times.
      • My Car: Travels downward until it hits the ground before travelling forward. Damages opponents multiple times.
      • Apple: Circles around MS. PAC-MAN four times.
      • Pear: Bounces along the ground 10 times in very short and fast arcs.
      • Fighter: Travels in a straight line while firing lasers upward.
      • Bell: Travels in a slightly diagonally upward angle. Inflicts paralysis on opponents.
      • Andor Genesis: Travels upward slowly. Shoots lasers in the direction of the nearest opponent.
      • Red Baron: Travels in a "V" path.
      • Banana: Travels forward extremely slowly. Deals heavy damage and knockback.
    • Custom 1 - Crazy Namco Roulette: The items move in much more bizarre angles and trajectories. In general, they deal less damage.
      • Pooka: Travels forward a short distance at a very quick pace.
      • Cherry: Bounces back and forth four times in gradually higher arcs.
      • Strawberry: Bounces back and forth fives times in gradually lower but farther arcs.
      • Orange: Travels very quickly in a straight line.
      • Galaxip: Travels forward in a straight line before travelling downward. It meteor smashes opponents it hits while flying down.
      • Pretzel: Bounces extremely quickly in progressively longer arcs.
      • My Car: Travels forward quickly before stopping, then travelling even faster.
      • Apple: Travels in a high arc before bouncing backwards.
      • Pear: Travels in a straight line, flies the opposite direction at a diagonally-upwards angle, loops around and travels in a straight line forward.
      • Fighter: Travels very slowly in a straight line, gradually getting faster. Fires lasers straight forward.
      • Bell: Travels forward before rising upward. Can inflic paralysis on opponents.
      • Andor Genesis: Travels very quickly in a circlular motion. Fires lasers in random directions.
      • Red Baron: Travels in a zigzag pattern forward, damaging opponents multiple times before launching them.
      • Banana: Disappears immediately after being thrown. Can meteor smash opponents.
    • Custom 2 - Lazy Namco Roulette: The items move much slower and stay out for longer. In general they deal less damage.
      • Pooka: Stays in place after being thrown.
      • Cherry: Slowly bounces across the ground five times.
      • Strawberry: Travels in a low arc and bounces in place four times upon landing.
      • Orange: Slowly travels in a straight line before disappearing.
      • Galaxip: Slowly travels in a circle around PAC-MAN.
      • Pretzel: Bounces across the ground three times before leaping high into the air.
      • My Car: Travels slowly in a straight line before looping three times.
      • Apple: Bounces in short, high arcs slowly.
      • Pear: Travels a short distance before performing eight shuttle loops.
      • Fighter: Moves slowly left and right. Fires lasers upward.
      • Bell: Travels straight upward before falling down. The move inflicts paralysis.
      • Andor Genesis: Travels slowly upward. Fires lasers in random directions.
      • Red Baron: Travels slowly while homing in on the nearest opponent.
      • Banana: Travels slowly forward a short distance, but deals heavy damage and knockback.
    • Custom 3 - Big Namco Roulette: The items are bigger and deal more damage, but in general will disappear much sooner.
      • Pooka: Bounces three times before disappearing.
      • Cherry: Travels in a slow, low arc.
      • Strawberry: Travels in a high arc.
      • Orange: Travels quickly a short distance.
      • Galaxip: Travels quickly in the direction of the nearest opponent.
      • Pretzel: Bounces across the ground four times. Thrown in a diagonally-downwards angle.
      • My Car: Travels forward in a straight line before turning around and going backward.
      • Apple: Travels slowly in a low arc.
      • Pear: Travels forward before performing a shuttle loop, then travelling at an upwards angle.
      • Fighter: Stays in place. Fires a large laser forward that damages opponents multiple times before launching them.
      • Bell: Travels across the ground before turning around and travelling backward. Inflicts paralysis.
      • Andor Genesis: Stays in place. Fires a large laser that rotates around itself, damaging opponents it hits.
      • Red Baron: Travels forward slowly. Damages opponents multiple times before launching them.
      • Banana: Travels in a diagonally-upwards angle quickly, dealing heavy damage an dknockback.
  • Side Special - Power Pellet: MS. PAC-MAN holds a Power Pellet and a trail of PAC-DOTs forward, which can be controlled with directional inputs. MS. PAC-MAN then turns into her wedge form to chomp the the path of the PAC-DOTs and Power Pellet, damaging opponents she hits. Opponents that touch the Power Pellet will be stunned, being vulnerable to MS. PAC-MAN. While rushing forward, the move can be cancelled into any other attack.
    • Custom 1 - Distant Power Pellet: The trail of PAC-DOTs can extend farther. However, MS. PAC-MAN deals less damage and travels slower.
    • Custom 2 - Enticing Power Pellet: The Power Pellet has vacuumboxes that draw opponents into it. The trail is much shorter however.
    • Custom 3 - Power Pellet Buffet: MS. PAC-MAN damages opponents multiple times before launching them as he chomps. The trail is slightly more difficult to control.
  • Up Special - PAC-JUMP: MS. PAC-MAN creates a trampoline below herself, bouncing her upward and damaging opponents she hits. Each time she bounces, she will travel higher, but using it again after the third bounce sends her in a helpless state. The trampoline can be used in tandem with items from Namco Roulette and Fire Hydrant. However, opponents who step on the trampoline are always sent into a helpless state.
    • Custom 1 - Power PAC-JUMP: MS. PAC-MAN jumps higher, but cannot use the trampoline again.
    • Custom 2 - Meteor PAC-JUMP: MS. PAC-MAN doesn't jump as high, but the trampoline can bury grounded opponents or meteor smash aerial ones that step on it.
    • Custom 3 - Lasting PAC-JUMP: MS. PAC-MAN doesn't damage opponents when she jumps, but the trampoline can last five bounces instead of three.
  • Down Special - Fire Hydrant: MS. PAC-MAN drops a Fire Hydrant downward, which damages opponents below her. The Fire Hydrant will squirt water, which can push opponents and PAC-MAN backward. After taking 13% damage, it will be sent flying, damaging opponents it hits. PAC-MAN, however, can launch the Fire Hydrant with any attack. It can also be used in tandem with the trampoline in PAC-JUMP. Only one can be at play at a time.
    • Custom 1 - Burying Fire Hydrant: The Fire Hydrant can bury and meteor smash opponents it lands on. MS. PAC-MAN needs to deal 13% damage to it before she can launch it however.
    • Custom 2 - On-Fire Hydrant: Instead of water, the Fire Hydrant shoots streams of fire that damage MS. PAC-MAN and his opponents.
    • Custom 3 - Dire Hydrant: The Fire Hydrant explodes on impact, damaging all opponents in the blast radius.
  • Final Smash - SUPER PAC-MAN: MS. PAC-MAN eats a Power Pellet and Super Pellet to become SUPER PAC-MAN. She will begin travelling forward at a quick speed, wrapping around the blast zones and damaging opponents she hits. After awhile, he will return to his normal state.
  • Charged State - Pac Power: MS. PAC-MAN eats a Power Pellet, making her glow a red aura. In this state, MS. PAC-MAN can travel much faster and his attacks deal much more knockback to opponents. He can also jump higher and has less falling speed.

  • Sephiroth
    FINAL FANTASY VII (1997)
    Sephiroth (セフィロス, Sephiroth) is the main antagonist of FINAL FANTASY VII. He was created as part of a series of experiments led by Shin-Ra known as the Jenova Project, injecting the cells of an extraterrestrial being known as Jenova into fetuses, Sephiroth being one of them. He became an exceptional member of SOLDIER, taking part in a war with the nation of Wutai and being hailed as a hero. He turned to the dark side during a mission on Nibelheim with Zack and Cloud, in an effort to find Jenova. He was seemingly killed by Cloud, but Sephiroth's consciousness resurfaced five years later, now able to control all beings with Jenova cells thanks to being merged with the Planet's Lifestream, including one in his image.

    Sephiroth's weapon is the Masamune, a blade that has extremely long reach. This grants him massive disjointed range, but at the cost of slow attack speed. He has a wide variety of powerful and versatile attacks, though he himself is a lightweight fighter and can be launched quite easily despite his size. Depending on how much damage he's taken and how far ahead or behind he is, Sephiroth can also take his Winged Form, where he unfurls his black wing and starts glowing purple. In this state, he gains a second midair jump, his attack power and movement speed increases, and his smash and crash attacks super armor, though he returns normal once he is KO'ed or he KOs an opponent.

    Sephiroth's moveset consists of sword slashes and stabs, which have a lot of reach and deal tons of damage, but have high startup or endlag and can leave him vulnerable if he misses. His special moves take inspiration from his attacks in FINAL FANTASY VII.
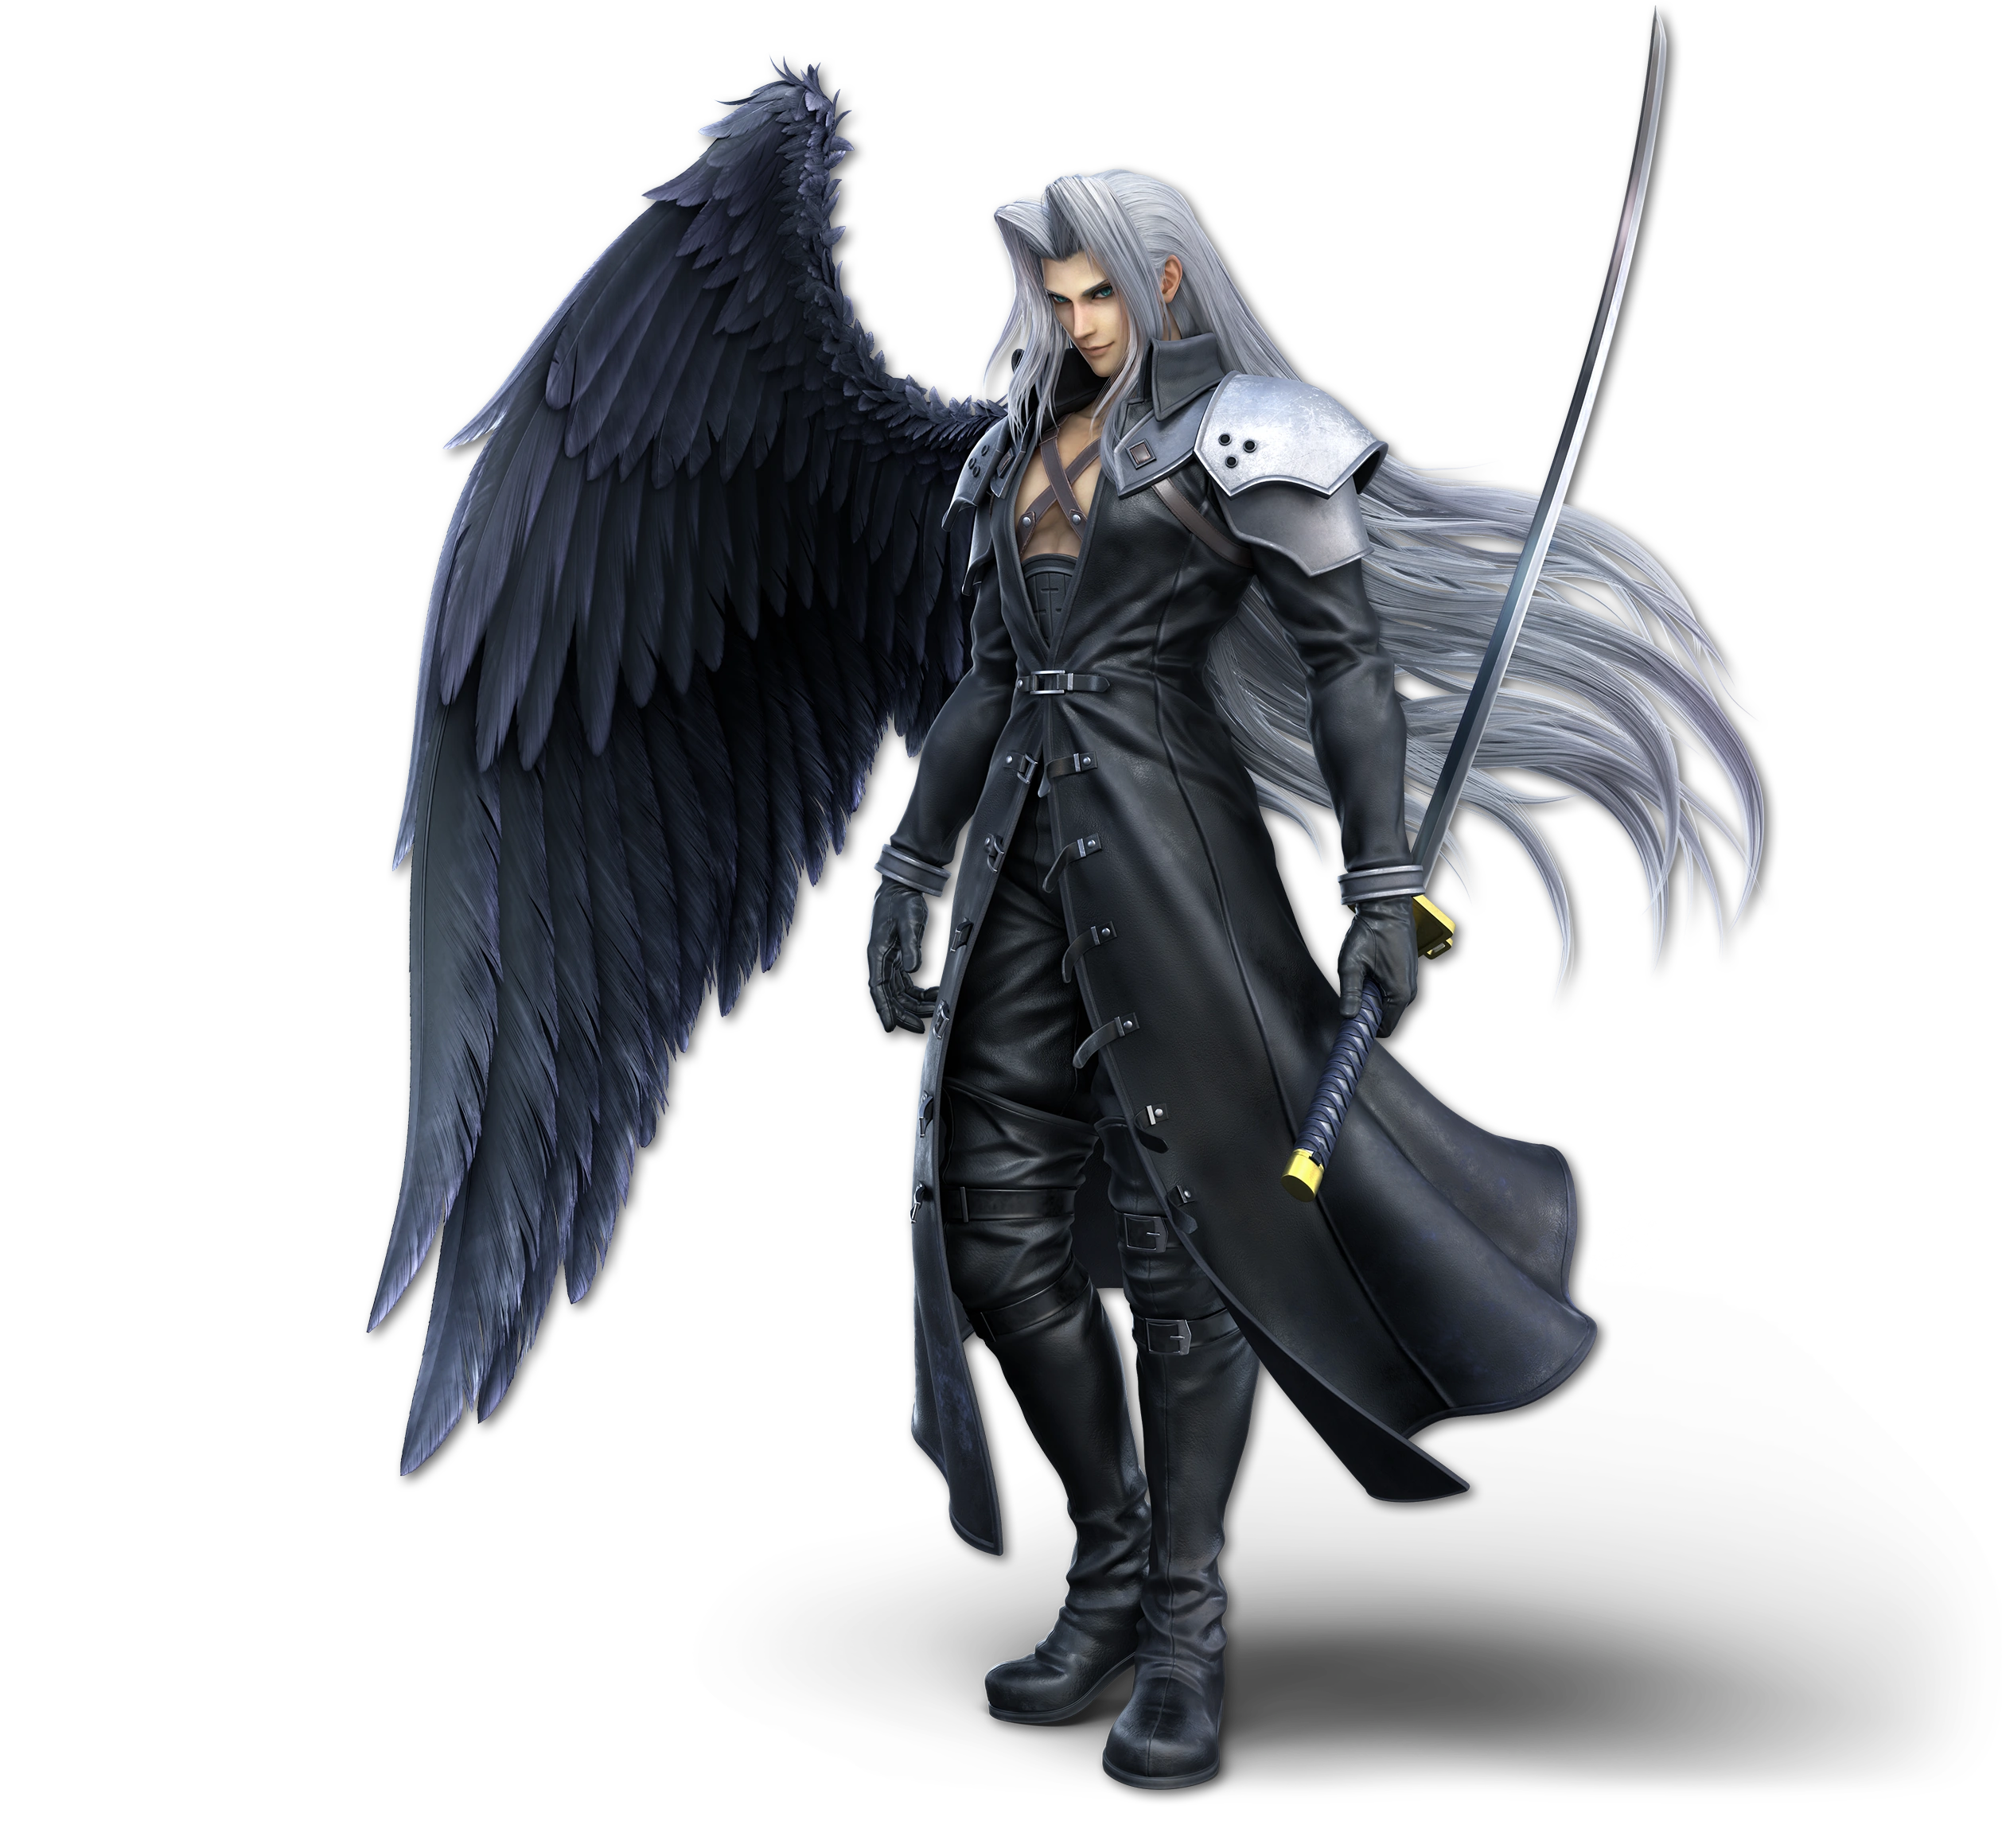
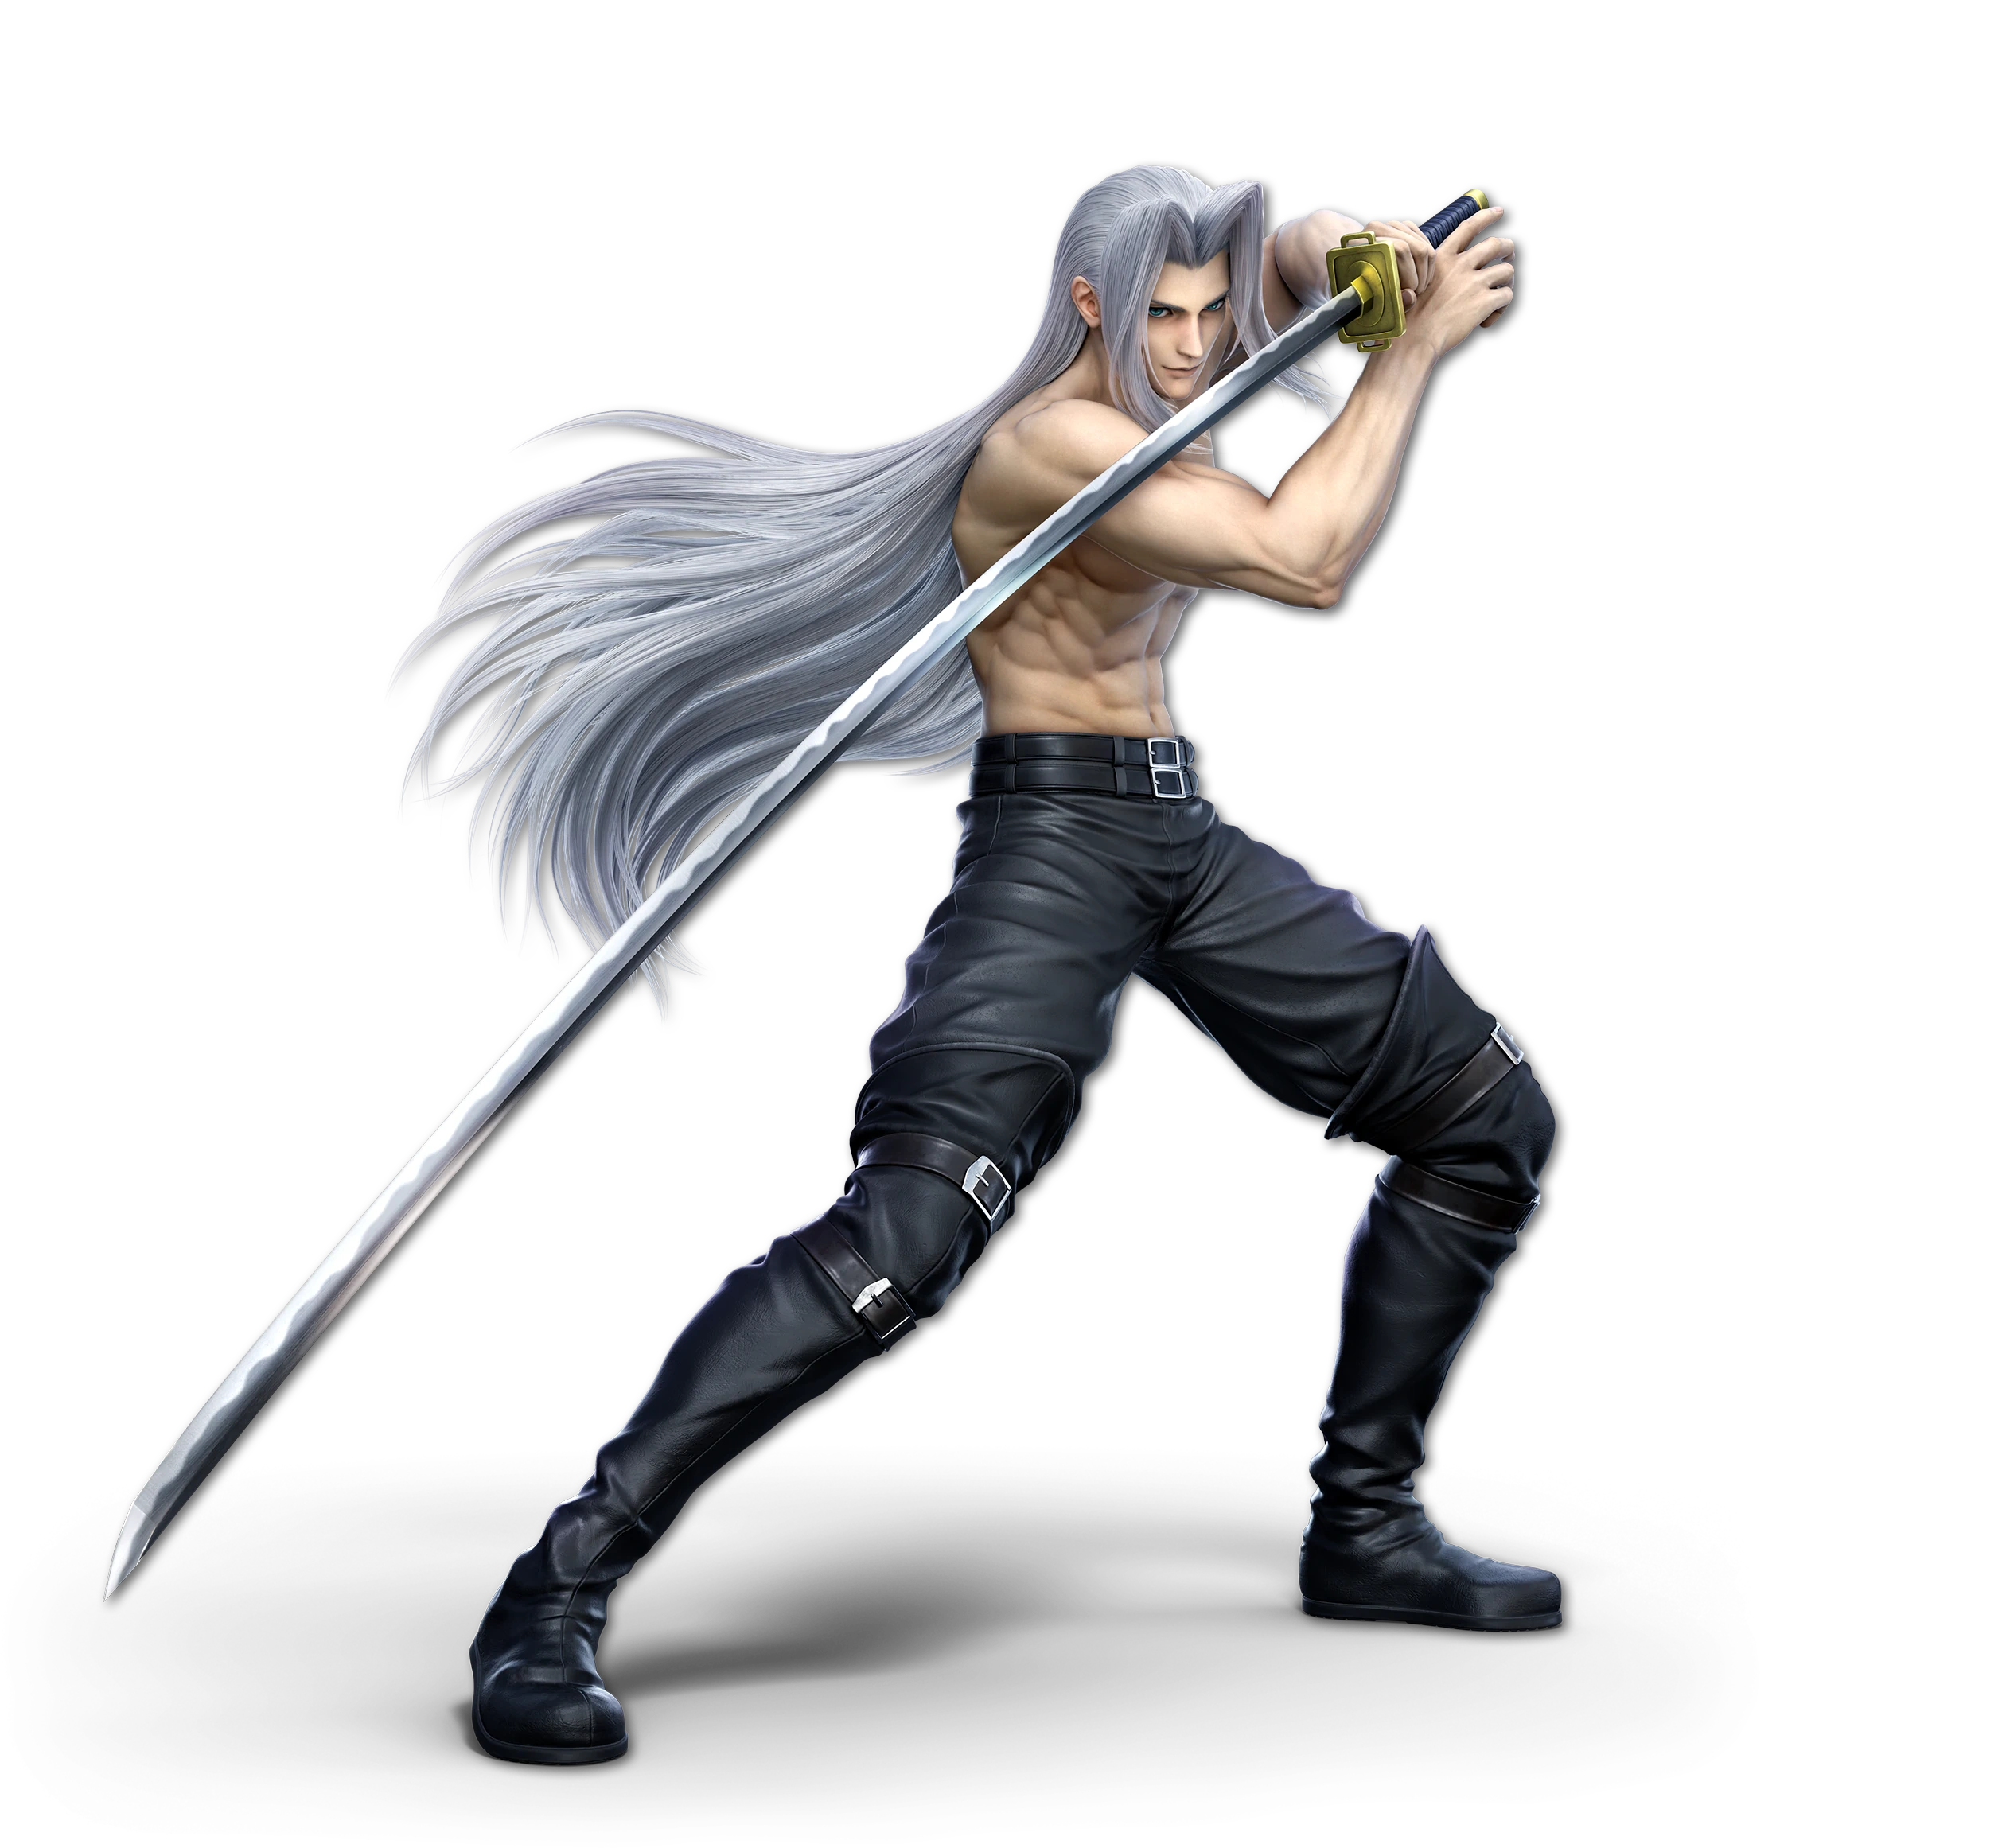
    SSB Final Fantasy Series SephirothHeadSSBU SSBUltimate Icon
    Sephiroth's Moveset

    • Neutral Attack: Sephirth throws a kick, followed by an arm club, followed by an outward slash with the Masamune.
    • Forward Tilt: Sephirth throws an outward slash with the Masamune. The move can be angled up or down.
    • Forward Smash: Sephiroth throws a two-handed upward slash with the Masamune.
    • Up Tilt: Sephiroth throws a stab with the Masamune upward.
    • Up Smash: Sephiroth throws an overarching slash with the Masamune above himself.
    • Down Tilt: Sephiroth throws a sliding kick.
    • Down Smash: Sephiroth stabs the Masamune downward. If it touches the ground, it sends debris that deal less damage but covers more range. The Masamune can still hit opponents if it doesn't touch the ground, such as if used next to the ledge.
    • Dash Attack: Sephiroth rushes forward while emitting dark energy.
    • Counter: Sephiroth summons a honeycomb-shaped barrier in front of himself, resembling his Scintilla ability. If the barrier is hit, the barrier splits and begins attacking the opponent. This also happens if he doesn't counter an attack. It will break as it counters stronger attacks, and unlike other counters, the damage it deals scales with how much damage it has taken rather than the strength of the opponent's attack. Once broken, it cannot be used again for a short time.

  • Neutral Aerial: Sephiroth emits a flash of dark magic around himself.
  • Forward Aerial: Sephiroth throws a stab with the Masamune forward. If used by a wall, it will stick to it, and Sephiroth can jump from it shortly after.
  • Forward Crash: Sephirth throws an outward slash with the Masamune.
  • Back Aerial: Sephiroth turns around and throws an outward slash with the Masamune.
  • Back Crash: Sephiroth turns around and throws an upward slash with the Masamune.
  • Up Aerial: Sephiroth throws an overarching slash with the Masamune above himself.
  • Up Crash: Sephiroth throws a stab with the Masamune above himself.
  • Down Aerial: Sephiroth throws a stall-then-fall downwards stab with the Masamune. The move can meteor smash opponents, and when used by the ledge, the Masamune will travel below the stage. It can also travel through platforms to hit opponents below.
  • Down Crash: Sephiroth throws a downward slash with the Masamune.

  • Grab: Sephiroth reaches out to telekinetically grab the opponent.
  • Pummel: Sephiroth attacks the opponent with dark energy.
  • Forward Throw: Sephiroth shoves the opponent forward.
  • Back Throw: Sephiroth teleports the opponent behind himself, then flings them backward.
  • Up Throw: Sephiroth launches the opponent upward.
  • Down Throw: Sephiroth telekinetically slams the opponent into the ground.

  • Neutral Special - Flare / Megaflare / Gigaflare: Sephiroth charges up a fireball before throwing it forward. He can use three different versions depending on how long the move is charged. If uncharged, he uses Flare, sending a slow-moving fireball forward that explodes after a short time or on impact. If half charged, he uses Megaflare, which doesn't travel as far, but has a bigger explosion. At full charge, he can use Gigaflare, which starts as a small spark of energy, then creates a huge explosion. The charging can be cancelled, but not stored.
    • Custom 1 - Nanoflare: The move isn't chargeable, so Sephiroth simply sends a fireball forward. It is smaller and creates a smaller explosion, but is faster, travels farther, and it has significantly less startup and endlag.
    • Custom 2 - Teraflare: Sephiroth slowly charges up a fireball before releasing it forward. Unlike the base move, Sephiroth can only use the fully-charged version, and it can't be stored, but it can still be cancelled. The fireball creates an even bigger explosion than Gigaflare, dealing significantly more damage and knockback. It will also instantly break shields.
    • Custom 3 - Freeze: Sephiroth charges up a ball of ice instead of a fireball, with similar stages of charge. It deals less damage, but it can freeze opponents.
  • Side Special - Shadow Flare: Sephiroth snaps his fingers and sends a thin purple projectile quickly in front of himself. The move can be charged for it to travel farther. It deals minimal damage, but causes a purple fireball to circle around the opponent, before it attacks them a few seconds after. The fireball can also damage other opponents if they touch it, but it won't damage Sephiroth. Charging the move, or hitting opponents with it consecutively, causes more fireballs to appear with up to five being able to circle a single opponent.
    • Custom 1 - Shadow Stun: The projectile doesn't travel as far, but opponents hit by it will be stunned for a short time, and be stunned longer the more they are damaged. It will deal light knockback to aerial opponents.
    • Custom 2 - Shadow Wave: The projectile is a lot larger, deals more damage, and causes five fireballs to circle opponents on hit. However, the move has more startup lag.
    • Custom 3 - Shadow Command: The move can't be charged, and it will create three fireballs that circle around opponents. They will continue to do so indefinitely, though using the move again as Sephiroth command the fireballs to attack the opponent, thus controlling when they will strike. This has no startup or endlag.
  • Up Special - Blade Dash / Octadash: Sephiroth dashes in the desired direction while slashing the Masamue, damaging opponents he hits before falling into a helpless state afterwards. If the special button is held, he uses Octaslash, where he travels farther while slashing the Masamune eight times, damaging opponents multiple times before launching them. It deals more damage, but has higher endlag.
    • Custom 1 - Blade Flash: Sephiroth can only travel upward, though the move can be angled diagonally. He travels farther and is invincible while dashing, but doesn't damage opponents and can't use Octaslash.
    • Custom 2 - Shield Slider: Sephiroth travels slightly farther. Octaslash deals less damage, but significantly more shield damage, breaking a full shield if all hits connect.
    • Custom 3 - Double Dash: Sephiroth doesn't travel as far with Blade Dash or Octaslash, but they both can be used twice in succession in different directions.
  • Down Special - Oblivion: Sephiroth readies the Masamune before charging forward with a sliding stab, damaging opponents multiple times before launching them. By holding the special button, he will delay the strike, and attempt to follow opponents up and down along the Y axis. Directional inputs can also be used to move forward or backward, but he won't change direction and he can't cancel the move.
    • Custom 1 - Sliding Strike: Sephiroth travels farther, especially if the move is used on the ground. However, he won't rise and fall to target opponents.
    • Custom 2 - Upward Strike: Instead of following opponents along the Y axis, Sephiroth targets opponents along the X axis before travelling upward. He falls into a helpless state afterwards.
    • Custom 3 - Armored Strike: Sephiroth doesn't deal as much damage, but he has super armor while the move is delayed.
  • Final Smash - Supernova: Sephiroth throws a slash with the Masamune. If he successfully hits an opponent, they are locked in an animation where he turns into Safter-Sephiroth, followed by summoning a meter that crashes through a planet and a star, causing the star to explode and destroy an Earth-like planet. This sends the opponent back to the stage, damaging them. All opponents are inflicted with a random status effect afterwards: they can have a flower or mushroom on their heads, be put to sleep, be stunned, be slowed down, or may not suffer a status ailment at all.
  • Charged State - Level Up: Sephiroth begins glowing purple. In this state, not only are his attacks faster and his smash, crash, and special moves charge quicker, he is permanently in his Winged Form, gaining all the buffs he has in that state in addition.

  • Slime
    Dragon Quest (1986)
    SlimeMSM
    Slimes (スライム, Slime) are common enemies in the Dragon Quest series, and serve as the series mascot. They are typically among the first monsters the player encounters, and as such can be beaten with ease. Several other Slime variants can also be found, such as the Metal Slime and She-Slime. Slimes can also merge together or stack on top of each other to create a new variant of Slime altogether, such as the King Slime or Slime Stack.

    Despite Slime being one of the smallest characters in the roster, it is actually one of the heaviest. Its smaller size gives it an advantage over other heavyweights in that it is more difficult to hit. However, it also has the slow mobility typically found in heavyweights, and its normal moveset doesn't have a lot of range, meaning that it will need to attack opponents head-on in most situations.

    Slime's normal attacks normally consist of body slams, which boast high launching power to make up for their pitiful range. Some of its attacks, most notably its special moves, also see it transform into other Slime variants to attack opponents in various ways.
    SSB Dragon Quest Series Slimestock SSBCharged Icon
    Slime's Moveset

    • Neutral Attack: Slime throws a body slam.
    • Forward Tilt: Slime pounces forward and throws a battering ram.
    • Forward Smash: Slime transforms into a Wild Slime and throws a claw slash forward.
    • Up Tilt: Slime jumps upward to throw a headbutt.
    • Up Smash: Slime performs a jumping backflip.
    • Down Tilt: Slime rolls forward a bit.
    • Down Smash: Slime jumps and lands on the ground with a splash.
    • Dash Attack: Slime rolls forward.
    • Counter: Slime throws a bdoy slam.

  • Neutral Aerial: Slime performs a somersault.
  • Forward Aerial: Slime swings its lower body forward.
  • Forward Crash: Slime spins around, damaging opponents multiple times before launching them. The move also grants Slime forward momentum.
  • Back Aerial: Slime swings its lower body backward.
  • Back Crash: Slime spins around, damaging opponents multiple times before launching them. The move also grants Slime backward momentum.
  • Up Aerial: Slime performs a backflip to swing its lower body upward.
  • Up Crash: Slime transforms into a Sea Slime and spins around, damaging opponents with its shell multiple times before launching them.
  • Down Aerial: Slime throws a stomp. The move can meteor smash opponents.
  • Down Crash: Slime transforms into a Box Slime and drops straight downward, burying and meteor smashing opponents it lands on.

  • Grab: Slime latches onto an opponent.
  • Pummel: Slime body slams the opponent.
  • Forward Throw: Slime shoves the opponent forward.
  • Back Throw: Slime flings the opponent backward.
  • Up Throw: Slime heaves the opponent upward and bounces them with its head.
  • Down Throw: Slime leaps upward and transforms into a Box Slime before falling down on the opponent, burying them.

  • Neutral Special - Healslime: Slime transforms into a Healslime and reaches forward with its tentacles. If it grabs an opponent, it will absorb them, and begin damaging them while also replenishing its own health. It can replenish a maximum of 15% per use, though opponents can escape faster via button mashing.
    • Custom 1 - Cureslime: Slime transforms into a Cureslime instead of a Healslime. It can absorb damage much quicker and can replenish up to 25% damage per use, but it is easier for opponents to escape.
    • Custom 2 - Drake Slime: Slime transforms into a Drake Slime instead of a Healslime. Instead of absorbing opponents, it swings its tail to damage them and knock them away.
    • Custom 3 - Mime Slime: Slime transforms into a Mime Slime instead of a Healslime. Instead of absorbing opponents, it will use its tentacles to damage opponents while putting a flower or mushroom on their heads.
  • Side Special - Bubble Slime: Slime transforms into a Bubble Slime and begins sliding across the ground. It will damage opponents it runs into, as well as leave goo behind that will slow down opponents who walk over it while also increasing Slime's speed. The goo will disappear eventually.
    • Custom 1 - Liquid Metal Slime: Slime transforms into a Liquid Metal Slime instead of a Bubble Slime. It creates no goo as t travels, but it will deal more damage to opponents it runs into and travels faster.
    • Custom 2 - Slimecicle: Slime transforms into an Icicle Slime instead of a Bubble Slime. It creates no goo behind itself and travels slower, but will freeze opponents it runs into.
    • Custom 3 - Muddy Slime: Slime transforms into a Muddy Slime rather than a Bubble Slime. The attack itself deals less damage, but the goo it leaves behind will cause opponents to slip, as well as take gradual damage when they step in it. The goo also lasts longer.
  • Up Special - Angel Slime: Slime transforms into an Angel Slime. Using its wings, it flies upward while damaging opponents it flies into. Directional inputs can also be used to change its flight angle. After reaching the peak of its flight, it will revert to normal and fall into a helpless state.
    • Custom 1 - Dragon Slime: Slime transforms into a Dragon Slime rather than an Angel Slime. It doesn't fly as high, but it will deal more damage to opponents it hits.
    • Custom 2 - Dark Slime: Slime transforms into a Dark Slime rather than an Angel Slime. It can't damage opponents it flies into, but it will create an explosion of purple energy that deals heavy damage and puts a flower on the opponent's head.
    • Custom 3 - Aqua Slime: Slime transforms into an Aqua Slime rather than an Angel Slime. It can fly at more horizontal angles, but it doesn't gain as much vertical distance.
  • Down Special - King Slime: Slime transforms into a King Slime. It will leap into the air before creating a shockwave, damaging any opponents in the radius. It will also damage opponents it lands on.
    • Custom 1 - Queen Slime: Slime transforms into a Queen Slime rather than a King Slime. The move has a larger shockwave, but Slime itself deals less damage to opponents it lands on.
    • Custom 2 - Mottle King Slime: Slime transforms into a Mottle King Slime rather than a King Slime. It doesn't create a shockwave, but it will meteor smash and bury opponents it lands on.
    • Custom 3 - Behemoth Slime: Slime transforms into a Behemoth Slime rather than a King Slime. It is significantly larger, but the impact and shockwave both deal less damage.
  • Final Smash - Super Slime Party: Slime rushes forward. If it hits an opponent, they are locked in a cinematic where it and several other Slimes begin attacking the opponents. The move ends with a Behemoth Slime stomping on them, sending them back to the stage and launching them.
  • Charged State - Slime Knight: Slime transforms into a Slime Knight. In this state, all of its attacks are enhanced by the knight's sword swings, allowing it to deal more damage and knockback. It is also significantly heavier in this state, and can jump higher.

  • Overkilling Machine
    Dragon Quest VI: Realms of Revelaton (1995)
    OverkillingMachineDQH2
    Overkilling Machines (キラーマシン2, Killing Machine 2) are enemies debuting in Dragon Quest VI: Realms of revelation. They are part of the Machine family of enemies and are seen as an advanced counterpart to the Killing Machine enemy. They are armed from top to bottom with hard armor and dangerous weapons that they can utilize in different ways. Their blue armor hides an intense program that allows them to turn on a dime and ruthlessly attack.

    Overkilling Machine is a heavy fighter, has fast falling speed, and low jump height all due to it's armor and stash of weapons. However, it has decent ground speed, allowing for it to take chase towards opponents. Its attacks hit hard, always aiming to output maximum pain upon its opponents.

    The moveset takes some elements from the various Dragon Quest games it has appeared in such as Dragon Quest VI, Dragon Quest Monsters 2, and Dragon Quest Heroes. It also takes inspiration from other Machine family enemies.
    SSB Dragon Quest Series Overkilling Machine Stock Icon SSBCharged Icon
    Overkilling Machine's Moveset

    • Neutral Attack: Overkilling Machine throws a one-two strike from its sword before it begins spinning its lower body, leading into a rapid-jab. The finisher to the rapid-jab is a strike from its tail.
    • Forward Tilt: Overkilling Machine swings its mace forward.
    • Forward Smash: Overkilling Machine holds back its mace before slamming the ground in front of it.
    • Up Tilt: Overkilling Machine rams its head upward, poking above opponents with its horned armor.
    • Up Smash: Overkilling Machine prepares its sword before slicing upward three times, sending opponents farther on the third strike.
    • Down Tilt: Overkilling Machine pokes the ground with its crossbow tail.
    • Down Smash: Overkilling Machine prepares its crossbow tail before shooting arrows downward at both of its sides around it.
    • Dash Attack: Overkilling Machine bashes forward with its spiked elbow armor.
    • Counter: Overkilling Machine strikes back with a triple-strike from its tail.

  • Neutral Aerial: Overkilling Machine spins its sword around itself, covering all around it with a weak slash.
  • Forward Aerial: Overkilling Machine waves forward its mace, hitting opponents away from it.
  • Forward Crash: Overkilling Machine forcefully swings its mace, sending opponents straight away.
  • Back Aerial: Overkilling Machine shoots a single arrow from its tail, acting as a projectile.
  • Back Crash: Overkilling Machine swings its tail about before shooting a single arrow from it.
  • Up Aerial: Overkilling Machine rams upward with its spiked head.
  • Up Crash: Overkilling Machine rams its spiked head up before spinning and waving its tail above, performing a full spin.
  • Down Aerial: Overkilling Machine twirls its mace, performing a multi-hit attack with a weak spike.
  • Down Crash: With its mace and its sword, Overkilling Machine swings them both down, meteor-smashing opponents down.

  • Grab: Overkilling Machine performs a tether grab with its tail. Can also be used to recovery from offstage, utilizing it to grab onto ledges from afar.
  • Pummel: Overkilling Machine headbutts the opponent.
  • Forward Throw: Overkilling Machine slashes the opponent with its sword.
  • Back Throw: Overkilling Machine holds the opponent and bashes into them with its spiked elbow armor.
  • Up Throw: Overkilling Machine throws the opponent upward before shooting a single arrow projectile at them.
  • Down Throw: Overkilling Machine hits the opponent into the ground with their mace.

  • Neutral Special - Hunters Arrows: A chargeable arrow move in which the arrow becomes faster and stronger the more it is charged. When barely charged, it is slow, does not have much distance, and is weak. If charged a bit, the arrow is faster and goes a little more distance, but still does weak damage. If it is fully charged, the arrow will be quick, have long distance, and even does more damage. If the button is held beyond charging and you let the move unload by itself, the move will be really strong, shooting a triple arrow bunch that is very fast and has great distance.
    • Custom 1 - Tipped Arrows: The move functions mostly the same, except for that the third and fourth charging states poison the opponent for a long time upon them getting hit with the move.
    • Custom 2 - Golden Arrows: The arrows travel slowly through the air no matter the charging time, but they all do much more damage than their normal counterpart.
    • Custom 3 - Fiery Arrows: The move works the same, except the arrows now do fire damage. If an arrow misses and falls onto the floor of the stage, it will leave a mini-fire that does small damage to opponents that walk through it.
  • Side Special - Dragon Slash: A strong move that comes with some startup lag. The Overkilling Machine pulls out the Dragonsbane weapon and uses Dragon Slash, slamming forward with the sword and doing great damage. During the startup portion, the Overkilling Machine has invincibility. It is very good at breaking shields. It may seem similar to Byleth's Aymr attack, but unlike said move, you can't turn around during the startup and you can't drop through platforms while using it.
    • Custom 1 - Fiery Dragon Slash: The move is weaker and is not as good at breaking shields, but there is less startup lag and a small fiery projectile is sent out across the ground when it is used, disappearing after a while.
    • Custom 2 - Slaying Dragon Slash: The invincibility of the move is gone, but the move does a lot of damage and can send opponents at even the lowest percents flying!
    • Custom 3 - Metallic Dragon Slash: The move is even slower on startup, but the execution of the attack itself is very fast. Just like Hero's Metal Slash, it instant KO's metal opponents.
  • Up Special - Weapon Spin: Upon spinning its sword and tail simultaneously, the Overkilling Machine acts like a helicopter, spinning in a chosen direction before going into a free-fall state. The move is weak but does minor multi-hit damage to opponents that get caught in it.
    • Custom 1 - Slow Spin: Using its mace instead of sword, the move is much slower, but the strength of the move is much bigger.
    • Custom 2 - Blade Spin: Only using its sword, the move has less vertical momentum, but has more horizontal gain.
    • Custom 3 - Super Spin: Using all weapons, the Overkilling Machine thrashes about wildly, spinning at good speed. However, the move is much much shorter than its normal counterpart and will end shortly after being used, sending the Overkilling Machine into free-fall. The damage of the move is high, keeping opponents away.
  • Down Special - Personality: Inspired by the mechanic in the Dragon Quest Monsters series in which monsters can have various personalities, the move acts as a sort of stat system that the Overkilling Machine can choose from a menu, just like Hero's Command Selection. The Overkilling Machine will bring up a menu in which one of three randomly given personalities can be chosen. The stat changes can effect Attack, Defense, and Speed, but after about 15 seconds, they go away. The menu does not use an MP system, rather, the player is prevented from choosing more than one personality at a time, having to wait for it to expire before choosing another. Below is a list of personalities that can be chosen:
      • Cool - Defense and Speed are up.
      • Daredevil - Attack and Speed are up, Defense is down.
      • Daring - Attack and Speed are up.
      • Humane - Defense and Speed are up, Attack is down.
      • Lone Wolf - Attack and Defense are up.
      • Smug - Attack and Defense are up, Speed is down.
    • Custom 1 - Hidden Personality: Instead of a menu popping up, one of the personalities is chosen at random automatically. The cooldown is shortened to 10 seconds.
    • Custom 2 - Chosen Personality: An extra slot is given to the menu, making it four instead of three. However, the cooldown is lengthened to 30 seconds.
    • Custom 3 - Questioning Personality: Instead of listing the names of the personalities, all of them are listed as "???", making completely random what the selected personality will be. Both the advantages and disadvantages are boosted.
  • Final Smash - Slashing Machinery: The Overkilling Machine glows with power and slashes forward with its sword. Opponents caught will be taken into a cinematic where the Overkilling Machine appears among other Machine family enemies such as Hunter Mech, Automaton, Robo-Robin, and others. As the enemies all attack the opponent, they are then finished off by a large stomp from a Metal Dragon enemy.
  • Charged State - Crimson Killing Machine: Updating to become the Crimson Killing Machine, the Overkilling Machine changes its coloration to red, dark purple, and black. Its attack power is greatly increased and its air & ground speed and jump height are all increased slightly.

  • Patty
    Dragon Quest III: The Seeds of Salvation (1990)
    PattyDQ
    Patty (ルイーダ, Luida) is a recurring character in the Dragon Quest series. She runs Patty's Party Planning Place, where the player can create or delete player-made characters or house party members unable to travel with them. There are multiple Patty characters across the series, the first one appearing in Dragon Quest III: The Seeds of Salvation. The Patty in Super Smash Bros. is the one that appears in Dragon Quest IX: Sentinels of the Starry Sky, where she additionally appears as an optional party member.

    Reflecting her class as a Thief, Patty's mobility and agility are high, with quick running speed and fast falling speed. She alternates between using a sword and knives for her moves, the former offering better range and the latter offering quicker options. As a fast character, she mainly specializes in combos, stringing attacks together to rack up damage and quickly overwhelm opponents. However, she lacks KO power overall, and can have a difficult time KOing foes without gimping their recovery. Patty's own recovery is also weak, due to her fast fall speed and average jump height.

    Patty's basic moveset switches between using a sword and using a knife, weapons that Thief-class characters can use in the Dragon Quest series. Her special moves are special abilities or magic attacks also primarily used by Thief-class characters.
    SSB Dragon Quest Series Patty Stock Icon SSBCharged Icon
    Patty's Moveset

    • Neutral Attack: Patty throws two slashes with a knife followed by a flurry of stabs with the knife, damaging opponents multiple times before launching them with an upward swipe.
    • Forward Tilt: Patty slashes a knife outward.
    • Forward Smash: Patty swings a sword downward.
    • Up Tilt: Patty slashes a knife upward.
    • Up Smash: Patty stabs a sword upward.
    • Down Tilt: Patty throws a sweeping kick.
    • Down Smash: Patty slashes a knife along the ground in front of her, then behind her.
    • Dash Attack: Patty throws an overhead slash with a sword.
    • Counter: Patty stabs a sword forward.

  • Neutral Aerial: Patty throws an inward slash followed by an outward slash with a sword.
  • Forward Aerial: Patty slashes a sword outward.
  • Forward Crash: Patty repeatedly slashes a knife in front of herself three times.
  • Back Aerial: Patty throws a slash behind herself with a knife.
  • Back Crash: Patty stabs a sword behind herself.
  • Up Aerial: Patty swings a knife above herself in an overhead motion.
  • Up Crash: Patty slashes a sword upward.
  • Down Aerial: Patty slashes a sword below herself.
  • Down Crash: Patty throws three slashes with a knife repeatedly below herself.

  • Grab: Patty reaches out to grab the opponent.
  • Pummel: Patty knees the opponent.
  • Forward Throw: Patty kicks the opponent away.
  • Back Throw: Patty turns around and throws the opponent behind herself.
  • Up Throw: Patty heaves the opponent upward before slashing at them with a sword.
  • Down Throw: Patty slams the opponent into the ground.

  • Neutral Special - Pickpocket: Patty quickly reaches outward to grab an opponent. If successful, she will quickly damage them before tossing them away. The move is weak, but she will steal and store any items they're currently holding, and using the move again has her pull it out and throw it. If the opponent has a stored charged projectile, or is currently charging a projectile, she will steal that instead, and using the move again has her throw the projectile. Items will take priority over projectiles.
    • Custom 1 - Expert Pickpocket: The grab has increased range, though the items and projectiles Patty stores are weaker.
    • Custom 2 - Straggle: Patty won't store projectiles or items opponents are carrying, though the grab attack deals more damage and knockback.
    • Custom 3 - Pickpocket Punish: The grab has decreased range. However, if opponents don't have a stored projectile or item, the move deals increased damage and will put a flower on their heads.
  • Side Special - Evac: Patty quickly moves at warp speed in the opposite direction the control stick is inputted in. She is invincible while dashing and the move can be cancelled into any of her attacks. If used in midair, she will fall into a semi-helpless state afterwards.
    • Custom 1 - Far Evac: Patty moves much farther backward, though the move has minor startup lag.
    • Custom 2 - Evac Attack: Patty will damage opponents she runs into while dashing backward. However, she isn't invincible.
    • Custom 3 - Evac Up: Patty doesn't move as fast, though she moves diagonally upward, giving the move more recovery utility.
  • Up Special - Thief Dash: Patty quickly dashes upward, damaging opponents she hits before falling into a helpless state at apex height. She can move slightly forward or backward.
    • Custom 1 - Thief Rush: Patty damages opponents multiple times before launching them, dealing more damage, though she moves slower.
    • Custom 2 - Thief Gust: Patty creates windboxes below her that push opponents backward when she dashes upward. However, she can only travel straight upward and the move has more startup lag.
    • Custom 3 - Thief Smash: Patty doesn't travel as high and won't damage opponents until the end of the move, though it has a powerful hitbox when she reaches apex height.
  • Down Special - Itemized Kill: Patty pulls out a sword and quickly slashes it, damaging and launching opponents. If the move connects, they will release an item that Patty can use. Usually it's a basic item like Food, Green Shells, or Smoke Balls, though it has a rare chance of spawning a Smart Bomb or Bob-omb.
    • Custom 1 - Itemized Greed: Patty takes longer to use the move, making it easier to dodge, though the chance of getting better items is higher.
    • Custom 2 - Quick Itemized Kill: The move is faster, but it deals less damage and the chance of getting better items is lower.
    • Custom 3 - Itemized Slide: Patty moves forward while slashing the sword. It covers more range, but deals less damage and will sometimes not spawn an item even if it connects.
  • Final Smash - Patty's Party Planning Place: The bar from Patty's Party Planning Place appears on the stage, and she gets behind it and starts dancing while serving drinks. Money is thrown around the bar, which will repeatedly damage nearby opponents. Eventually, the bar explodes and launches any opponents in the blast radius.
  • Charged State - Gold Digger: Patty tosses away her weapons to pull out a stronger sword and knife. In this state, she is quickler and her weapons deal more damage. Pickpocket also has a higher range and Itemized Kill has a higher chance of spawning powerful items.

  • Agnès
    Bravely Default (2012)
    Agnès (アニエス, Agnès), full name Agnès Oblige is one of the main characters of Square Enix's Bravely RPG series, being a playable character in the first game and a secondary character in the sequel. She was the vestal of the Wind Crystal, but by the second game became the pope of the Crystal Orthodoxy. Additionally, she also appears in Crash Co.'s crossover with the Mario series, Mario + Bravely Default.

    Agnès has a unique mechanic based on the Brave and Default mechanic from the Bravely series. She has a counter next to her icon, which starts at 0. She can use two tactics to move the counter up or down; her down special Default to increase her stats to be more defenisve-based for a short time, which boost the counter by 1. The counter can be moved up to 4. If the counter is at 0 or above, Agnès can cancel any of her attacks into a fully-charged smash or crash attack immediately, which decreases the counter by 2, a tactic referencing Brave. If the counter is below 0, she cannot use this tactic anymore, and must use Default to bring the number to above 0.

    Agnès' moveset utilizes various jobs from across the Bravely series. She puts on a different costume for each one, and use a different attack. Many of these attacks are vastly different from each other, drawing from multiple character archetypes. As such, she can be seen as a colleauge of different archetypes.
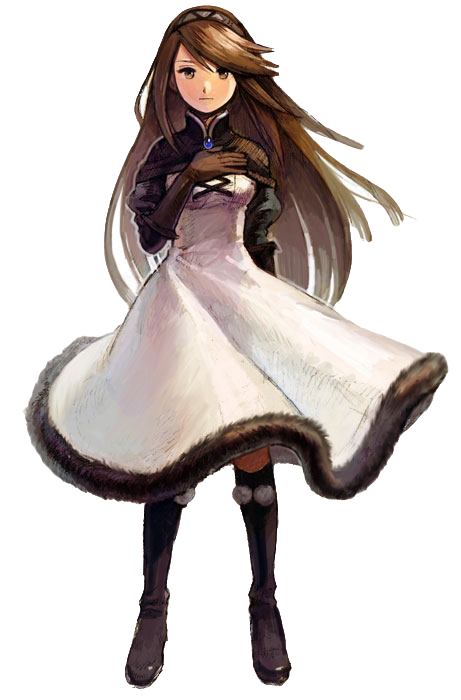
    SSB Bravely Default Series Agnes Stock SSBCharged Icon
    Agnès' Moveset

    • Neutral Attack: Agnès puts on the Ninja outfit and throws two alternating jabs followed by a flurry of punches, finishing with a high kick.
    • Forward Tilt: Agnès puts on the Performer outfit and throws a hip smash.
    • Forward Smash: Agnès puts on the Monk outfit and winds up to throw a backhanded punch.
    • Up Tilt: Agnès puts on the Knight outfit and swings a sword upward in an overarching motion.
    • Up Smash: Agnès puts on the Monk outfit and throws a stretch kick.
    • Down Tilt: Agnès puts on the Thief outfit and throws a shin kick.
    • Down Smash: Agnès puts on the Performer outfit and throws a split kick.
    • Dash Attack: Agnès puts on the Knight outfit as she slashes a sword forward.
    • Counter: Agnès puts on the Time Mage outfit and knocks the opponent away with a dark energy ball.

  • Neutral Aerial: Agnès puts on the Time Mage outfit and surrounds herself in electric energy, damaging opponents multiple times before launching them.
  • Forward Aerial: Agnès puts on the Monk outfit and throws an overhead. The move can meteor smash opponents.
  • Forward Crash: Agnès puts on the Arcanist outfit and releases a blast of dark energy forward.
  • Back Aerial: Agnès puts on the Ninja outfit and turns around to throw a knifehand strike.
  • Back Crash: Agnès puts on the Monk outfit and throws a dropkick.
  • Up Aerial: Agnès puts on the Thief outfit and throws a bicycle kick.
  • Up Crash: Agnès puts on the Ranger outfit and shoots a flurry of arrows upward, damaging opponents multiple times before launching them.
  • Down Aerial: Agnès puts on the White Mage outfit and waves her staff downward, releasing white magic that damages opponents multiple times before launching them.
  • Down Crash: Agnès puts on the Monk outfit and throws a stomp. The move can meteor smash opponents.

  • Grab: Agnès reaches out to grab the opponent.
  • Pummel: Agnès knee smashes the opponent.
  • Forward Throw: Agnès puts on the Ninja outfit and shoves the opponent forward.
  • Back Throw: Agnès puts on the Black Mage outfit and traps opponents inside a dark tornado before sending them backward.
  • Up Throw: Agnès puts on the Valkyrie outfit and leaps above the upper blast zone with the opponent in tow before stomping them into the ground.
  • Down Throw: Agnès puts on the White Mage outfit and pins the opponent on the ground, using light magic to damage them.

  • Neutral Special - Compounding: Agnès puts on the Salve-Maker outfit and reaches out. If she grabs an item or a projectile, she will take it and store it. This can be done to store another item or projectile. Once two are stored, using the move again allows Agnès to throw a unique, energy-based projectile forward that deals the damage of both items / projectiles combined.
    • Custom 1 - Lazy Compounding: Agnès can only grab one projectile or item, and using the move again has her throw a projectile of equal power.
    • Custom 2 - Energy Toss: Using the move simply has Agnès throw a projectile forward. She cannot absorb items or projectiles.
    • Custom 3 - Expert Compounding: Agnès can store up to three projectiles instead of two. However, the projectile moves a bit slower.
  • Side Special - Sword Magic: Agnès puts on the Spell Fencer outfit and slashes a sword forward. The slash has different effects depending on how many times it is used. The first use will have it fire-based, which deals the most damage and knockback. The second use will have it electric-based, which inflicts paralysis on opponents. The third use will have it ice-based, which freezes opponents. Finally, the fourth use will have it magic-based, which meteor smashes opponents. After this, the process repeats itself.
    • Custom 1 - Random Sword Magic: The sword deals more damage overall, but the effects are randomized.
    • Custom 2 - Sword Lunge: Agnès lunges forward while slashing the sword. It covers more range but the effects are less pronounced.
    • Custom 3 - Steady Sword Magic: The move can be charged, which dictates what effects will happen. Ice based is the weakest charge level, followed by electric, magic, and finally fire.
  • Up Special - Dark Bane: Agnès puts on the Dark Knight outfit and sends a blast of dark energy in the direction the control stick is held, damaging opponents and propelling her in the opposite direction. If she ends up in midair, she is left in a semi-helpless state afterwards. The move deals heavy damage and can propel Agnès very far, but the move deals 12% recoil damage. While being propelled, the move can be cancelled into any other attack.
    • Custom 1 - Dark Bane Blast: The blast covers much more range, but Agnès isn't propelled as far.
    • Custom 2 - Dark Bane Jump: Agnès can only fire the blast downward. It deals less damage, but she damages opponents while rising.
    • Custom 3 - Dense Dark Bane: The blast deals much more damage, but Agnès suffers 20% recoil damage as opposed to 12%.
  • Down Special - Default: Agnès begins glowing a light-blue aura. In this state, her stats are altered, with her being slower, having less jump height, and dealing less damage. However, she also gains knockback resistance and universal armor during this time. The effects will wear off after eight seconds, and the counter by her icon will be increased by one.
    • Custom 1 - Default Commitment: The effects of Default are much more extreme, but the counter will increase by two instead of one.
    • Custom 2 - Quick Default: The effects last slightly shorter and the counter increases by two instead of one. However, using her Brave tactic will decrease the counter by three instead of two.
    • Custom 3 - Default Focus: Agnès can hold the Default state indefinitely, and every seven seconds she holds it, the counter will increase by one. She can exit this state any time by using the move again.
  • Final Smash - Dark Nebula: Agnès puts on the Dark Knight costume and creates a dark nebula around herself. It has vacuumboxes that draw opponents into the attack. The nebula damages opponents multiple times before it explodes, launching them.
  • Charged State - Vestal of Wind: Agnès puts on the White Mage outfit and holds her staff in the air, causing her to emit green aura. In this state, she is much stronger, and can jump higher. Some of her attacks also have added windboxes, allowing her to push opponents away.

  • Bub & Bob
    Bubble Bobble (1986)
    Bub and Bob
    Bub & Bob (バブルンとボブルン, Bub & Bob) are twin brother Bubble Dragons, both debuting in Bubble Bobble. Both of them have contrasting personalities: the green one, Bub, usually being cheerful and seeking for the next adventure while the blue one, Bob, is quiet most of the time. In their home series, Bub acts as the main protagonist while Bob acts as the Player 2 character.

    Bub & Bob are middleweight fighters with fast ground and air speed. Their attacks don't do much damage, but similarly to the Ice Climbers, Bub & Bob come in a pair during battle. The leading Bubble Dragon (which changes depending on the costume chosen) is controlled by the player while the second one is controlled by the AI. The second Bubble Dragon can be KO'ed, though they won't be able to get a true KO unless the leading Bubble Dragon is. Some moves rely on the two working together, so if the player is only using one, some moves may be incomplete or weaker.

    Their moves take inspiration from their debut game Bubble Bobble, but also uses attributes from their other appearances such as Bust-A-Move or Bubble Bobble Part 2.
    SSB Bubble Bobble Series Bub & Bob Stock Icon SSBCharged Icon
    Bub & Bob's Moveset

    • Neutral Attack: Bub & Bob throw two claw swipes followed by a tail-slap forward.
    • Forward Tilt: Bub & Bob throw a forward claw swipe.
    • Forward Smash: Bub & Bob hold Metal Bubbles forward before dropping them. If they is held over a ledge, they will drop down, hitting opponents below.
    • Up Tilt: Bub & Bob hit upward with their tails.
    • Up Smash: Bub & Bob crouch down while preparing the spines on their back. Upon releasing, the spines extend and damage opponents above.
    • Down Tilt: Bub & Bob sweep their tails forward, possibly tripping opponents.
    • Down Smash: Bub & Bob blow bubbles before popping them below, hitting both sides of them. If one of them has been KO'ed, this move only attacks in the direction the player is facing.
    • Dash Attack: Bub & Bob dive forward and roll up, rolling a bit forward with their spines extended.
    • Counter: Bub & Bob blow bubbles at the opponents and clap them, the pop of the bubbles damaging opponents.

  • Neutral Aerial: Bub & Bob blow bubbles and then pop them by clapping.
  • Forward Aerial: Bub & Bob swipe forward with their claws.
  • Forward Crash: Bub & Bob slice their claws forward in a dunking motion. The move can meteor smash opponents.
  • Back Aerial: Bub & Bob hit back with their tails.
  • Back Crash: Bub & Bob wave their tails backwards, hitting opponents twice in succession.
  • Up Aerial: Bub & Bob arch over and hit opponents above with their backs.
  • Up Crash: Bub & Bob outstretch their back spines to poke opponents above.
  • Down Aerial: Bub & Bob blow bubbles and pops them by poking them.
  • Down Crash: Bub & Bob blow larger bubbles and pops them by poking them. The move is almost the same as the Down Aerial, but the blowing of the bubble itself takes longer and has a larger hitbox that can meteor smash opponents below.

  • Grab: Bub & Bob grab forward with their hands, almost falling forward in the process.
  • Pummel: Bub or Bob scratches the opponent with his claws.
  • Forward Throw: Bub or Bob throws the opponent forward with a claw swipe.
  • Back Throw: Bub or Bob throws the opponent back and whips his tail to hit them.
  • Up Throw: Bub or Bob traps the opponent in a bubble before throwing them upward, popping the bubble in the process.
  • Down Throw: Bub or Bob holds the opponent down and breathes bubbles onto them before they are sent flying.

  • Neutral Special - Bubble Blow: Bub & Bob both blow a bubble that is then sent forward across the screen. The move is a bit slow, but if it comes into contact with an opponent, they will become trapped inside. If they are trapped inside of a bubble, they slowly take take damage until they burst out either by mashing out or if they are attacked. If only one of the Bubble Dragons is present, the bubble is smaller and its tick damage is weaker.
    • Custom 1 - Water Bubble: The bubble is slower in travel but traps opponents for longer, making so that mashing out is more difficult.
    • Custom 2 - Fire Bubble: The bubble is faster in travel and does more deal damage, but it is easier to mash out of.
    • Custom 3 - Thunder Bubble: The bubble is extremely fast in travel, but instead of trapping opponents, it explodes on contact, doing damage while also paralyzing opponents.
  • Side Special - Fire Breath: Bub & Bob are able to spit fireballs that do fire damage upon hitting opponents. The move is similar to Ryu's Shakunetsu Hadoken, though it is faster and does not do multi-hit damage. If both Bubble Dragons are together, two are sent out together. However, if one is missing, only one is spit out.
    • Custom 1 - Ice Breath: The fireballs are turned blue, being slower in movement but possibly freezing opponent on contact if they are at high damage.
    • Custom 2 - Bad Breath: The fireballs are turned purple, being faster in movement and may also poison opponents on contact.
    • Custom 3 - Spinning Breath: The fireballs are turned yellow, having the same move speed but also turning around opponents once they come into contact.
  • Up Special - Bubble Hop: The two Bubble Dragons both blow a single bubble before holding it downward and bouncing on top of it, acting as a recovery move. They can only use this move once in the air, so if the miss their target after bouncing on the bubble, they are sent falling. The jump upward can also deal damage to opponents. If one of the two Bubble Dragons is missing, then the recovery has less vertical gain.
    • Custom 1 - Blast Hop: The move works similarly, but the bubble produced leaves an explosion behind once the two hop off of it. This makes it a good attacking move if the opponent is below and also trying to recover.
    • Custom 2 - Drop Hop: While using the move, the two are still falling. However, the move has more vertical gain to make up for it, even if one is left behind. After bouncing on the bubble, it drops, acting as a hitbox that can hurt opponents hit by it.
    • Custom 3 - Huge Hop: The bubble blown is much bigger, allowing for good vertical and horizontal recovery. However, it sticks around rather than popping, making it usable by any opponents that may come across it. To stop this, you are able to pop it by attacking it.
  • Down Special - Rapid-Fire: ​​​​​​A chargeable move in which the two charge up bubble in their mouth. Upon being released, a certain amount of bubbles will be released. If not fully charged, one from each of the two will come out, making two bubbles shoot forward. If charged at a medium rate, two from each of the two will come out, making four bubbles shoot forward. If fully charged, three from each of the two will come out, making six bubbles shoot forward. If one of the Bubble Dragons is missing, then the amount of bubbles will decrease to one, two, and three for each charge respectively.
    • Custom 1 - Slow-Fire: The bubbles shot out are slower but bigger. They do more damage as well.
    • Custom 2 - Large-Fire: Less bubbles produced (one, two, and three for each charge respectively), but they are much larger and do much more damage. If one of the two Bubble Dragons is KOed, then they are smaller in size, still doing the same amount of damage however.
    • Custom 3 - Small-Fire: The bubbles are smaller, but more can be produced. This helps with multi-hit damage. If not fully charged, two from each of the two will come out, making four bubbles shoot forward. If charged at a medium rate, four from each of the two will come out, making eight bubbles shoot forward. If fully charged, six from each of the two will come out, making twelve bubbles shoot forward. If one of the Bubble Dragons is missing, then the amount of bubbles will decrease to one, two, and four for each charge respectively.
  • Final Smash - Charge Bubble: Both of the Bubble Dragons blow a ginormous bubble that takes up a good portion of the screen. Any opponents that come into contact with the bubble are sucked in, being trapped and bouncing off the walls of the bubble, taking lots of damage. After a short time, the bubble explodes, sending opponents flying.
  • Charged State - Bubble Boost: A sparkling aura surrounds Bub & Bob as they are surrounded by multi-colored bubbles and gleaming sparkles. This raises their shield durability drastically, ground and air speed, and the power of their bubble-based moves.

  • Master Chief
    Halo: Combat Evolved (2001)
    Master chief
    Master Chief (マスターチーフ, Master Chief), also known by the SPARTAN code John-117, is a SPARTAN-II commando and the main protagonist of the Halo first person shooter series. With over 30 years of combat under his belt, he is one of the most decorated soldiers in the UNSC. During his ongoing battle with the Covenant, he has picked up and mastered many exotic weapons from the surface of Halo. He is also armed with Cortana, an AI designed to help him on his missions.

    Master Chief is a heavyweight that differs greatly from others his weight class; in addition to being mobile, he has many unique attacks that set him apart from the other characters. This is most notable in his neutral and down specials, which make use of his weapons mechanic inspired from Halo and other first person shooters. He wields two different weapons at any time, which can be changed with down special and used with neutral special. If he KOs an opponent, they will drop a weapon that he can pick up like an item, replacing the one he is currently using. He starts the battle with two random weapons, all of which fire projectiles forward.

    Outside of the weapons, Master Chief's regular moveset consists of punches and kicks, as well as swinging around his weapon. He also uses other tools from the Halo series, including the Energy Sword, grenades, and the Jump Pack, among others.
    SSB Halo Series Master Chief Stock Icon SSBCharged Icon
    Master Chief's Moveset

    • Neutral Attack: Master Chief shoves his weapon forward.
    • Forward Tilt: Master Chief shoves his weapon forward while walking.
    • Forward Smash: Master Chief throws a Plasma Grenade forward, with the arc changing depending on how long the move is charged. It will stick to surfaces and opponents like a Gooey Bomb for a short time before exploding.
    • Up Tilt: Master Chief swings his weapon upward.
    • Up Smash: Master Chief throws a Spike Grenade upward. It explodes at the peak of its jump; the explosion damages opponents in the blast radius, as well as send spikes in various directions to deal more damage.
    • Down Tilt: Master Chief throws a legsweep.
    • Down Smash: Master Chief places a Pulse Grenade below himself, which explodes after a short time. It creates vacuumboxes that draw opponents into the explosion, damaging them multiple times before launching them.
    • Dash Attack: Master Chief dashes forward. If he hits an opponent, he bounces back a bit.
    • Counter: Master Chief swings his weapon forward.

  • Neutral Aerial: Master Chief swings his weapon forward.
  • Forward Aerial: Master Chief throws a hook kick followed by a spinning kick.
  • Forward Crash: Master Chief pulls out the Gravity Hammer and swings it forward. If it hits an opponent, he bounces back a bit.
  • Back Aerial: Master Chief throws a back kick.
  • Back Crash: Master Chief pulls out the Chainbreaker and swings it backward.
  • Up Aerial: Master Chief swings his weapon above himself.
  • Up Crash: Master Chief thrusts the Energy Stave upward.
  • Down Aerial: Master Chief throws a stomp.
  • Down Crash: Master Chief throws a stall-then-fall stomp. The move can meteor smash opponents.

  • Grab:Master Chief reaches out to grab the opponent.
  • Pummel: Master Chuef gut punches the opponent.
  • Forward Throw: Master Chief slams the opponent on the ground in front of him.
  • Back Throw: Master Chief spins around with the opponent in tow before throwing them backward.
  • Up Throw: Master Chief uppercuts the opponent.
  • Down Throw: Master Chief slams the opponent into the ground.

  • Neutral Special - Weapon Use: Master Chief shoots the weapon he is currently holding. Holding the special button allows him to continually fire, and he can aim with directional inputs. A rheticle will also appear to help with aiming, which will turn red over opponents and green over teammates in Team battles. This move has no custom moves.
  • Side Special - Energy Sword: Master Chief pulls out the Energy Sword as a rheticle appears in front of him. If no opponents are nearby, he puts the Energy Sword away. If an opponent is over the rheticle, he lunges forward while slashing the Energy Sword, damaging them.
    • Custom 1 - Energy Eater: The attack deals less damage, but it deals significantly more shield damage.
    • Custom 2 - Energy Lunge: Master Chief lunges forward while slashing regardless if opponents are nearby or not. However, he doesn't travel as far.
    • Custom 3 - Energy Breaker: The Energy Sword deals more damage and knockback, but the rheticle is smaller and opponents must be closer for the move to be used.
  • Up Special - Jump Pack: Master Chief leaps upward, and floats downward, and can shift forward and backward with directional inputs. Holding down on the control stick has him fall into a helpless state.
    • Custom 1 - Jump Pack Propulsion: Master Chief doesn't jump as high, but the initial jump creates windboxes that push opponents backward.
    • Custom 2 - Gravity Lift: Instead of using the Jump Pack, Master Chief places a Gravity Lift below himself, which has him rise upward. It will remain on stage for a short time if used on the ground, allowing opponents to use it as well.
    • Custom 3 - Grenade Jump: Instead of using his Jump Pack, Master Chief places and sets off a grenade to launch himself upward. He doesn't float downward, but the explosion damages opponents.
  • Down Special - Weapon Switch: Master Chief switches out his current weapon for the one he isn't using. This move has no custom moves.
  • Final Smash - Warthog: Master Chief boards a Warthog, and rides around the stage, damaging opponents he runs over. He can jump while in the Warthog, and pressing the special button allows him to shoot with his assault rifle. After awhile, the Warthog will disappear.
  • Charged State - Overcharged: Master Chief starts glowing blue and emitting energy. In this state, not only is he faster and able to jump higher, but his weapons have much more range and faster fire rate.

  • Assault Rifle: Fires bullets at a very quick pace. Deals middling range and damage.
  • Spartan Laser: Fires a large laser that takes awhile to charge. Can be aimed while charging.
  • Magnum: Fires bullets that deal heavy damage but have low range. Has above-average fire rate.
  • Shotgun: Fires bullets that deal high damage, especially at close range, but don't travel far. Also doesn't have a fast fire rate.
  • Sniper Rifle: Fires a bullet that has infinite range, but deals below-average damage and has the slowest fire rate.
  • Plasma Pistol: Fires plasma shots that deal decent damage and have a quick fire rate, but doesn't have good range.
  • Needler: Fires 10 needle-like projectiles that home in and stick to opponents, exploding afterwards.
  • Focus Rifle: Fires a steady beam of energy, damaging opponents multiple times before launching them.
  • Rocket Launcher: Fires a slow-moving rocket that lightly homes in on opponents and explodes on impact. Only one rocket can be at play at a time.
  • Type-51 Calibrine: Fires radioactively-charged bullets that deal high damage and gradually damage the opponent. Has high range, but slow fire rate.

  • Rabbid Yoshi
    Mario + Rabbids Kingdom Battle (2017)
    Rabbid Yoshi
    Rabbid Yoshi (ラビッツヨッシー, Rabbit Yoshi) is one of the playable characters in Mario + Rabbids Kingdom Battle. As his name suggests, he is a Rabbid dressed as Yoshi, wearing a green suit in his image. He is decidedly more crazed and destructive than other Rabbids, tending to act first without thinking of the consequences. He also hides his weapons in his mouth, and spits them out before using them. Rabbid Yoshi is always cross-eyed and doesn't seem to be as bright as the other Rabbids.

    Rabbid Yoshi is a mobile lightweight, sporting high speed and good jump height. He mainly specializes in ranged play and multihit attacks, making him a zoner who can deal high pressure from afar. However, his damage output is fairly low, and outside of edgeguarding he struggles to take stocks. His close-range options are also fairly lackluster due to them having startup and endlag, leaving him open for punishes if he misses.

    Rabbid Yoshi's moveset mainly consists of punches, headbutts, and bites. He also utilizes weapons and abilities he can use in Mario + Rabbids Kingdom Battle, namely the Rumblebang and Grenaduck.
    SSB Rabbids Series Rabbid Yoshi Stock Icon SSBCharged Icon
    Rabbid Yoshi's Moveset

    • Neutral Attack: Rabbid Yoshi throws two alternating punches followed by a headbutt.
    • Forward Tilt: Rabbid Yoshi plants his face into the ground. The move can meteor smash opponents.
    • Forward Smash: Rabbid Yoshi winds up, then throws a straight punch while leaping forward.
    • Up Tilt: Rabbid Yoshi bobs his head, making his costume's nose wave around and damage opponents.
    • Up Smash: Rabbid Yoshi screams into the air loudly, which won't damage opponents but creates windboxes that push them backward.
    • Down Tilt: Rabbid Yoshi performs a somersault.
    • Down Smash: Rabbid Yoshi spins around on his back.
    • Dash Attack: Rabbid Yoshi throws a battering ram.
    • Counter: Rabbid Yoshi bites the opponent. If he counters a projectile, he will eat it, replenishing his health a bit.

  • Neutral Aerial: Rabbid Yoshi performs a splash.
  • Forward Aerial: Rabbid Yoshi throws a dropkick.
  • Forward Crash: Rabbid Yoshi lunges forward and bites.
  • Back Aerial: Rabbid Yoshi swings his costume's tail backward.
  • Back Crash: Rabbid Yoshi turns around and throws a straight punch.
  • Up Aerial: Rabbid Yoshi turns upside-down and repeatedly kicks his legs around, damaging opponents multiple times before launching them.
  • Up Crash: Rabbid Yoshi jumps upward and bites.
  • Down Aerial: Rabbid Yoshi throws a kick. The move can meteor smash opponents.
  • Down Crash: Rabbid Yoshi throws a stall-then-fall headbutt. He will bounce off of opponents he lands on.

  • Grab: Rabbid Yoshi grabs an opponent with his mouth.
  • Pummel: Rabbid Yoshi bites the opponent.
  • Forward Throw: Rabbid Yoshi spins around with the opponent in tow before throwing them forward.
  • Back Throw: Rabbid Yoshi turns around and spits the opponent downward.
  • Up Throw: Rabbid Yoshi flings the opponent upward.
  • Down Throw: Rabbid Yoshi slams the opponent into the ground.

  • Neutral Special - Mega Bite: Rabbid Yoshi spits out the Mega Bite, a Rumblebang, and begins firing a volley of small bullet-like projectiles from it. He can aim it in any direction with the control stick and continue firing with the neutral special, though it will eventually run out of ammo and will need to be recharged by not using it. The bullets will repeatedly damage opponents they hit, and they travel quite far.
    • Custom 1 - Egg Fry: Rabbid Yoshi uses the Egg Fry rather than the Mega Bite. It will fire bullets in a more spread fashion, though this makes hitting opponents from further away less reliable.
    • Custom 2 - Chomper Stopper: Rabbid Yoshi uses the Chomper Stopper rather than the Mega Bite. The bullets travel faster and deal more damage, though it will run out of ammo quicker and takes longer to recharge.
    • Custom 3 - Brutal Noodle: Rabbid Yoshi uses the Brutal Noodle rather than the Mega Bite. The billets don't spread out as much and deal more damage, though it can't be aimed as well.
  • Side Special - Yoshimite: Rabbid Yoshi spits out the Yoshimite, a Grenaduck, and tosses it in an arc, which can be altered depending on if the special button is tapped or held. It will bounce along the ground a few times before exploding, damaging opponents in the blast radius. It will also explode on contact with an opponent, but not if it hits their shield, where it will bounce off of it. If Rabbid Yoshi can catch up to it before it explodes, he can pick it up as an item and throw it again, though it can explode in his hands.
    • Custom 1 - Bowserbeak: Rabbid Yoshi uses the Bowserbeak rather than the Yoshimite. It doesn't bounce as much and its trajectory can't be aimed as much, but the blast radius is larger.
    • Custom 2 - Bowsertail Jr.: Rabbid Yoshi uses the Bowsertail Jr. instead of the Yoshimite. It explodes once it touches the ground or an opponent's shield rather than bouncing around, though it deals less damage.
    • Custom 3 - Mallardio: Rabbid Yoshi uses the Mallardio instead of the Yoshimite. It will bounce around much more erratically, often changing directions.
  • Up Special - Team Jump: A Rabbid appears below Rabbid Yoshi, and he jumps off of its feet to leap upward. The trajectory can be altered with the control stick and he can cancel the move into any attack. The Rabbid disappears immediately after the move.
    • Custom 1 - Super Team Jump: Rabbid Yoshi travels higher up, but he can only jump straight upward.
    • Custom 2 - Team Jump Slam: The move can't be cancelled into other moves. Instead, Rabbid Yoshi damages opponents he hits, and when he lands he smacks his face on the ground to create a shockwave, damaging anyone around him.
    • Custom 3 - Lateral Teal Jump: Rabbid Yoshi can't travel as high, but he can travel more horizontally.
  • Down Special - Outer Shell: Rabbid Yoshi surrounds himself in a blue barrier, which lasts for 10 seconds. It will completely negate any damage and knockback from any attack, though it will be broken once hit. Once broken, Rabbid Yoshi can't use the move again for 20 seconds. It doesn't protect him from grabs and thrown.
    • Custom 1 - Spiked Shell: The barrier has spikes on it, which allows Rabbid Yoshi to damage opponents he touches. However, the cooldown time if the barrier is broken is doubled.
    • Custom 2 - Half-Boiled Shell: The barrier will only half the damage and knockback Rabbid Yoshi takes. However, the cooldown time if the barrier is broken is halved.
    • Custom 3 - Reflect Shell: Instead of blocking Rabbid Yoshi from damage and knockback, the barrier instead reflects projectiles. It is broken once a projectile is reflected, though the cooldown time is shorter.
  • Final Smash - Raving Yoshi: Rabbid Yoshi spits out the Egg Fry and fires a volley of bullets forward. If he hits an opponent, they are locked in an animation where they fall into a well in Spooky Trails from Mario + Rabbids Kingdom Battle. Rabbid Yoshi them appears outside the well and repeatedly shoots them with the Egg Fry. He finishes with a giant Yoshimite, which explodes and heavily damages the opponents, sending them back to the stage and launching them.
  • Charged State - Bullion Blaster: Rabbid Yoshi pulls out the Bullion Blaster, spits out his Rumblebang, and replaces it, causing him to glow yellow. In this state, Rabbid Yoshi's attacks are faster and deal more damage, and he will use the Bullion Blaster for his neutral special, which is stronger and never runs out of ammo. He also uses Sir Goldwain for his Grenaduck, which has a larger blast radius.

  • Rabbid Cranky
    Mario + Rabbids Kingdom Battle (2017)
    RabbidCrankyMRKBDKA
    Rabbid Cranky (ラビッツクランキ, Rabbit Cranky) is one of the playable characters in the Donkey Kong Adventure DLC add-on for Mario + Rabbids Kingdom Battle. Like his name implies, he is an old Rabbid dressed as Cranky Kong, sporting his shirt, beard, and cane. However, his cane can form into a crossbow, which he uses to take down enemies. He shares a lot of traits with Cranky Kong, being gruff and grumpy, though somewhat more mature than his fellow Rabbids.

    Rabbid Cranky is a slow middleweight with a mix of close- and long-range options. His specials boast excellent projectiles that cover a long distance and deal high damage and knockback, though they do have a bit of lag. Meanwhile, his normal attacks are simple and close-ranged, and though they can be powerful, he lacks in combo game due to his mediocre ground and air speed. His jump height also isn't good. Effectively, this makes him more of a zoner than anything else.

    Rabbid Cranky's moveset mainly revolves around his cane, which he can swing to damage opponents. His specials are weapons and abilities he can use in Mario + Rabbids Kingdom Battle, particularly the Boombow, the Barrol Bolt, and Donkey Kong's Bwananarang.
    SSB Rabbids Series Rabbid Cranky Stock Icon SSBCharged Icon
    Rabbid Cranky's Moveset

    • Neutral Attack: Rabbid Cranky throws a downward swipe with his cane.
    • Forward Tilt: Rabbid Cranky thrusts his cane forward.
    • Forward Smash: Rabbid Cranky smacks the ground with his cane.
    • Up Tilt: Rabbid Cranky swipes his cane upward.
    • Up Smash: Rabbid Cranky repeatedly strikes upward with his cane.
    • Down Tilt: Rabbid Cranky slides across the ground while attacking with his cane.
    • Down Smash: Rabbid Cranky pulls out a book and tells a story, the charging animation being him flipping through the pages. It doesn't damage opponents, but it will make nearby opponents fall asleep, leaving them vulnerable.
    • Dash Attack: Rabbid Cranky throws a shoulder tackle.
    • Counter: Rabbid Cranky strikes with his cane.

  • Neutral Aerial: Rabbid Cranky performs a somersault.
  • Forward Aerial: Rabbid Cranky throws a sex kick.
  • Forward Crash: Rabbid Cranky swings his cane inward, then outward.
  • Back Aerial: Rabbid Cranky throws a back kick.
  • Back Crash: Rabbid Cranky throws a dropkick.
  • Up Aerial: Rabbid Cranky swipes his cane above himself in an overarching motion.
  • Up Crash: Rabbid Cranky twirls his cane above himself like a baton, damaging opponents multiple times before launching them.
  • Down Aerial: Rabbid Cranky thrusts his cane downward. He will bounce off opponents if he lands on them.
  • Down Crash: Rabbid Cranky throws a stall-then-fall stomp. The move can meteor smash opponents.

  • Grab: Rabbid Cranky reaches out to grab the opponent.
  • Pummel: Rabbid Cranky smacks the opponent with his cane.
  • Forward Throw: Rabbid Cranky spins around with the opponent in tow before throwing them forward.
  • Back Throw: Rabbid Cranky turns around and throws the opponent overhead.
  • Up Throw: Rabbid Cranky twirls the opponent on his cane before kicking them upward.
  • Down Throw: Rabbid Cranky slams the opponent on the ground.

  • Neutral Special - Wood Shop Walloper: Rabbid Cranky's cane transforms into the Wood Shop Walloper, a Boombow, as he shoots a blast that covers a spread area in front of himself, dealing more damage to opponents close to him. The special button can be held to charge the move, increasing the damage and distance of the blast.
    • Custom 1 - Expresso Atomizer: Rabbid Cranky uses the Expresso Atomizer rather than the Wood Shop Walloper. It charges faster, but opponents closer to Rabbid Cranky don't take as much damage.
    • Custom 2 - Exploding Elegance: Rabbid Cranky uses the Exploding Elegance rather than the Wood Shop Walloper. It covers a larger spread, but not as much range in front of him.
    • Custom 3 - Lawn Ornament Agony: Rabbid Cranky uses the Lawn Ornament Agony rather than the Wood Shop Walloper. It takes longer to charge, but the spread is slightly larger and opponents farther away from Rabbid Cranky will take more damage.
  • Side Special - Potassium Pulverizer: Rabbid Cranky pulls out the Potassium Pulverizer, a Bwananarang, and throws it forward, its path able to be aimed with the control stick. It travels forward before returning to Rabbid Cranky. However, if it hits an opponent, and another target is nearby, it will quickly attack them, and continue chaining hits until no more opponents are close by and return.
    • Custom 1 - Habanero Caballero: Rabbid Cranky uses the Habanero Caballero rather than the Potassium Pulverizer. It deals more damage and enhanced by fire, though the range for seeking more opponents to hit is shorter, and it also isn't thrown as far.
    • Custom 2 - Law of the Macaw: Rabbid Cranky uses the Law of the Macaw rather than the Potassium Pulverizer. It doesn't deal as much damage, but flies much farther and faster.
    • Custom 3 - Wiener Whacker: Rabbid Cranky uses the Wiener Whacker rather than the Potassium Pulverizer. It travels in a circle around him rather than being thrown forward, damaging opponents it hits. It also won't target other opponents after hitting one.
  • Up Special - Team Jump: A Rabbid appears below Rabbid Cranky, and he jumps off of its feet to leap upward. Pressing the special button again will have Cranky convert his cane into a Boombow and fire an icy shot downward, which can damage and freeze opponents below him. He falls into a helpless state afterwards.
    • Custom 1 - Super Team Jump: Rabbid Cranky jumps higher and farther, but he can't use his Boombow.
    • Custom 2 - Team Jump Blast: Rabbid Cranky can't jump as far, but the blast radius of his Boombow is larger and freezes opponents longer.
    • Custom 3 - Dual Team Jump: Rabbid Cranky can use the move twice, and can use his Boombow both times. However, he doesn't travel as high and the Boombow doesn't deal as much damage and knockback, and its range is also decreased.
  • Down Special - Barrel of Fun: Rabbid Cranky's cane transforms into a Boombow and he uses it to shoot the Barrel of Fun, a Barrel Bolt, in an arc in front of himself. It explodes on impact, and the blast radius is large and damaging, but it can damage Rabbid Cranky as well. The arc can be altered by directional inputs.
    • Custom 1 - Croaker Disposer: Rabbid Cranky uses the Croaker Disposer rather than the Barrel of Fun. It travels higher and faster, but the blast radius is smaller.
    • Custom 2 - Shellin' Melon: Rabbid Cranky uses the Shellin' Melon rather than the Barrel of Fun. The blast radius is larger and deals more damage, but it cannot be aimed.
    • Custom 3 - Harmburger: Rabbid Cranky uses the Harmburger rather than the Barrel of Fun. It can be aimed at a wider range of arcs, and how far it's thrown can also be altered by how long the special button is held, though the explosion deals less damage and knockback.
  • Final Smash - Bad Banana Bonanza: Rabbid Cranky's cane converts into a Boombow and he fires it forward. If successful, the opponents are trapped in an aimation where Ziggies and Smashers appear and start attacking them. Rabbid Cranky then swings on a vine above them and fires a Barrel Bolt downward, creating an explosion and sending them back to the stage, launching them.
  • Charged State - Boombow 2.0: Rabbid Cranky's cane becomes larger and gold-plated. In this state, attacks that use it cover more range and deal more damage. It also transforms into the First Class Crusader for his neutral special, and uses the Golden Gyre and Gold-Plated Paroxysm for his side and down specials respectively, all of which deal more damage and cover more range.

  • Mama
    Cooking Mama (2006)
    CookingMamaAnarchy
    Mama (ママ, Mama) is the titular character of the Cooking Mama cookery simulation series. In the series, the player follows her instructions to make food, from chopping vegetables, slicing meat, flipping foods in pans, and arranging food on a plate. Each of these objectives are completed by winning various minigames that last about 10 seconds each, which can range from drawing lines to slice food or rhythm games where players must add food on a skillet at the correct time. Mama herself is a master cook, and is usually very cheerful and willing to help others cook as good as her. There is also a subseries called Gardening Mama where the player plants and cares for flowers rather than cooking.

    Mama is a very light character, though unlike other characters in her weight class, her mobility and jump height are actually below-average. To make up for these unfavorable traits, Mama has very high KO and comeback potential. On top of having quick and effective combo starters that are very good at stringing opponents, her smash, crash, and special attacks become really strong if they are charged; the damage scaling on these moves is higher than most other characters, and when fully charged they become stronger variants that are even more effective, often dealing high damage and covering a lot of range. Furthermore, with exception of her up special, the charging for her specials can be cancelled and stored, allowing her to use their stronger variants later.

    Most of Mama's moves either use cooking utensils such as frying pans or spatulas, or food such as vegetables, meat, soup, or desserts. As mentioned, she has some of the strongest moves of the roster despite her weight and speed.
    SSB CookingMama MamaStock SSBCharged Icon
    Mama's Moveset

    • Neutral Attack: Mama throws three alternating strikes with a spatula.
    • Forward Tilt: Mama swings a frying pan forward.
    • Forward Smash: Mama reluctantly eats a jalapeno, causing her to spew flames from her mouth. If the move is fully-charged, the flames are much larger, damage opponents multiple times before launching them, and leaves a fire patch on the ground that gradually damages opponents that step in it.
    • Up Tilt: Mama thrusts a ladle upward.
    • Up Smash: Mama twirls a meat knife in her hand above herself, damaging opponents multiple times before launching them. If the move is fully charged, she drops the knife at the end, sending it flying forward in an arc like a projectile.
    • Down Tilt: Mama gets on the ground and rolls a rolling pin across the ground. The move can bury opponents.
    • Down Smash: Mama struggles to carry a stack of plates before letting them crash to the ground around herself, damaging opponents they hit. If fully charged, more plates are added to the stack, making the move spread further.
    • Dash Attack: Mama throws a pizza forward like a frisbee.
    • Counter: Mama swings a frying pan upward.

  • Neutral Aerial: Mama spins around while swinging a ladel.
  • Forward Aerial: Mama thrusts a whisk in front of herself and spins it, damaging opponents multiple times before launching them.
  • Forward Crash: Mama thrusts a pot of scalding water forward, damaging opponents it hits. If the move is fully charged, she throws soup instead of water, dealing more damage and covering more range.
  • Back Aerial: Mama swings a spatula behind herself.
  • Back Crash: Mama pulls out a bottle of mustard and squirts it behind herself, sending mustard backward and damaging opponents it hits. If fully charged, she squirts much more mustard and propels herself forward while using the move, which can also damage opponents.
  • Up Aerial: Mama pulls out a spatula and frying pan and claps them above herself.
  • Up Crash: Mama throws a fruit basket upward, which comes falling down and damaging opponents below. If fully charged, the fruits inside the basket will fly out as she throws it, letting the move cover much more range.
  • Down Aerial: Mama swings a frying pan downward. The move can meteor smash opponents.
  • Down Crash: Mama swings a giant slab of meat downward. The move can meteor smash opponents. If fully charged, the slab of meat is much larger and cooked, covering more range and burying grounded opponents as well.

  • Grab: Mama places the opponent on a frying pan.
  • Pummel: Mama flips the opponent with the frying pan.
  • Forward Throw: Mama flings the opponent forward.
  • Back Throw: Mama flings the opponent backward.
  • Up Throw: Mama flings the opponent upward.
  • Down Throw: Mama puts salt and pepper on the opponent before flinging them forward.

  • Neutral Special - Sauté: Mama sautés some vegetables on a frying pan before flinging them forward as projectiles, travelling in random arcs. The move can be charged by holding the special button, and it can be cancelled and saved by performing any other action. Charging the move lets the food deal more damage. When fully charged, there is much more food thrown, and it deals more damage to opponents. When flinging food, the control stick can be held upward or downward to alter the arcs they travel in.
    • Custom 1 - Seasoned Sauté: The food can cause random effects, from freeze, to flower, to mushroom, though it deals less damage.
    • Custom 2 - Super Sauté: Mama flings much more food from the frying pan, though she can only use the uncharged version or the fully charged version, and cannot cancel the charging.
    • Custom 3 - Spastic Sauté: The arcs the food travels in are much more varied and random, though this makes the move less condensed.
  • Side Special - Slice: Mama holds up a knife as a giant carrot, celery stick, or asparagus falls on the ground in front of her. She will then quickly move across the stage and slice the vegetable, damaging opponents multiple times before launching them. The move can be charged by holding the special button, and it can be cancelled and stored by performing any other action. Grounded opponents underneath the vegetable when it lands will be buried, trapping them in the attack. When fully charged, the vegetable is much longer, meaning Mama travels further and damages opponents more.
    • Custom 1 - Sharp Slice: The vegetable isn't as long, though Mama deals more damage and knockback.
    • Custom 2 - Sturdy Slice: Mama launches opponents hit with the knife as opposed to damaging them multiple times. She travels slower, however.
    • Custom 3 - Speedy Slice: Mama travels much faster, though the knife doesn't deal as much damage and knockback.
  • Up Special - Condiments: Mama pulls out bottles of mustard and ketchup and squirts them, propelling herself in the direction the control stick is held before falling into a helpless state. While flying, she can steer herself around. The mustard and ketchup don't damage opponents, but they will push them away.
    • Custom 1 - Cold Condiments: Mama doesn't travel as far, but instead of pushing opponents away, the mustard and ketchup will freeze them.
    • Custom 2 - Sticky Condiments: Mama can only travel in one direction, though the mustard and ketchup will stick to opponents, dealing gradual damage.
    • Custom 3 - Condiment Rockets: Mama uses bigger bottles to squirt more ketchup and mustard, pushing opponents further and letting her travel more distance. However, the move has more startup lag.
  • Down Special - Gardening Mama: Mama uses a shovel to plant a seed in the ground, causing a patch of flowers to grow. The move can be charged by holding the special button and it can be cancelled and stored by performing any other action. The patch of flowers won't damage opponents, but they will grow a flower if they step in it, which will become larger the longer the move is charged. If the move is fully charged, the patch of flowers covers a lot more range and will additionally slow opponents that step in it down. The flower patch will disappear after a short time. The move cannot be used in midair.
    • Custom 1 - Poison Ivy: The flower patch covers more range, especially when charged. Instead of placing a flower on the opponent's head, it gradually damages opponents the longer they stay in it.
    • Custom 2 - Scented Garden: Instead of causing a flower to grow on the opponent's head, they will fall asleep, leaving them vulnerable for an attack. The flower patch doesn't cover as much ground.
    • Custom 3 - Mushroom Mama: Mama grows mushrooms instead of flowers. These will put a mushroom on the opponent's head instead of a flower.
  • Final Smash - Kitchen Fever: A giant pot appears in front of Mama, and she clangs some ladles together. The pot will draw in nearby fighters as she cooks them, dealing constant damage. After awhile, opponents are flung out of the pot and launched as the pot transforms into a food dish, which she eats. Depending on how much damage the move deals and how many opponents are trapped, the food will heal Mama more.
  • Charged State - Sugar Rush: Mama eats some ice cream, causing her eyes to become wide. In this state, she is faster and can jump higher. Most of the food items she uses in her moveset are replaced with desserts such as ice cream, cookies, cakes, and pies. These can also sometimes freeze opponents.

  • Shantae
    Shantae (2002)
    ShantaeSmile
    Shantae (シャンティ, Shantae) is the titular protagonist of WayForward's Shantae platformer series, as well as the company's mascot. She is the half-genie protector of Scuttle Town, and lives in a lighthouse, which she uses as means to detect incoming ships that may pose a threat. She is a professional belly dancer, and her dances have the power to transform herself into different animals to accomplish certain tasks. Her main rival is the infamous pirate Risky Boots.

    Shantae is a quick middleweight fighter who possesses pretty good jump height and good air speed. Her down special, Transformation Dance, allows her to transform into one of four animal forms depending on inputs while dancing. She can turn into a monkey, a quick but lightweight form with a single aerial attack, a harpy, an aerial-based form with powerful aerial attacks and a single ground attack, an elephant, a powerful form that can only use smash attacks, and a crab, an edgeguarding-based form with a single attack, a claw pinch, but with the ability to cling to walls for a short time. The special button can be pressed to revert back to her normal state.

    Shantae's main attacks consist of utilizing her whip-like hair, kicks, and a variety of pirate gear such as a cannon and a cutlass. She can be seen as an amalgamation of all of her appearances, particularly Shantae and the Pirate's Curse and Shantae: Half-Genie Half-Hero.
    ACL Shantae SSB icon Shantaestock2 SSBCharged Icon
    Shantae's Moveset

    • Neutral Attack: Shantae throws two spinkicks followed by a flurry of whips with her hair, damaging opponents multiple times before launching them with a stronger strike.
    • Forward Tilt: Shantae throws a roundhouse kick.
    • Forward Smash: Shantae throws an enzuigiri.
    • Up Tilt: Shantae whips upward with her hair.
    • Up Smash: Shantae performs a backflip to kick upward.
    • Down Tilt: Shantae whips her hair forward while crouching.
    • Down Smash: Shantae spins around with her hair.
    • Dash Attack: Shantae runs forward while holding a cutlass.
    • Counter: Shantae whips her hair forward.

  • Neutral Aerial: Shantae spins around with her hair.
  • Forward Aerial: Shantae throws a flying kick.
  • Forward Crash: Shantae whips her hair forward.
  • Back Aerial: Shantae throws a hip thrust.
  • Back Crash: Shantae throws a back kick.
  • Up Aerial: Shantae twirls her hair above herself, damaging opponents multiple times before launching them.
  • Up Crash: Shantae performs a back flip to kick upward.
  • Down Aerial: Shantae throws four stomps downward. The fourth stomp can meteor smash opponents.
  • Down Crash: Shantae throws a scissor kick downward.

  • Grab: Shantae reaches out to grab an opponent.
  • Pummel: Shantae knee smashes the opponent.
  • Forward Throw: Shantae flings the opponent forward.
  • Back Throw: Shantae places the opponent behind herself and kicks them backward.
  • Up Throw: Shantae heaves the opponent upward.
  • Down Throw: Shantae slams the opponent into the ground.

  • Neutral Special - Pike Ball: Shantae begins dancing as a spiked ball appears and circles around her, damaging opponents it hits. If the special button is held, up to three balls can appear and circle around her.
    • Custom 1 - Pike Bomb: Only one spiked ball can be at play at a time, though it will explode when it touches an opponent, dealing more damage and knockback.
    • Custom 2 - Fast Pike Balls: The move takes less time to charge and the spiked balls will circle around Shantae faster, though they deal less damage.
    • Custom 3 - Pike Shield: The spiked balls don't circle around Shantae as fast, though they will reflect projectiles. They are also active for slightly longer.
  • Side Special - Fireball: Shantae throws a fireball that travels in a straight line. If the special move is held, Shantae can charge the move and throw up to three fireballs at once.
    • Custom 1 - Fireblast: Only one fireball can be thrown and it travels slowly, though it damages opponents multiple times before exploding, launching them.
    • Custom 2 - Fast Fireball: The fireball travels faster and the move takes less time to charge, but it deals less damage.
    • Custom 3 - Fire Storm: The move takes longer to fully charge, but she will throw five fireballs instead of three.
  • Up Special - Cannon: Shantae takes out a cannon and launches a cannonball downward, which explodes on impact and launches opponents. The shot cannonball will also send Shantae propelling upward. Up to three cannonballs can be fired before she falls into a helpless state.
    • Custom 1 - Angled Cannon: Only two cannonballs can be fired instead of three, though Shantae will travel more horizontal distance.
    • Custom 2 - Big Cannonball: Shantae can only fire one cannonball, but she propels herself higher. The cannonball also has a larger blast radius and deals more damage.
    • Custom 3 - Rocket Cannon: Instead of firing cannonballs, the cannon fires a stream of fire downward. This deals more damage, but cannot meteor smash opponents and has less range.
  • Down Special - Transformation Dance: Shantae begins belly dancing. In this state, directional inputs can be pressed for Shantae to turn into an animal, and can turn back whenever she wants by using the special button. Holding forward transforms her into a monkey, holding backward transforms her into a crab, holding up transforms her into a harpy, and holding down transforms her into an elephant.
    • Custom 1 - Quick Transformation: Shantae can turn into an animal much faster, but her attacks are slightly weaker.
    • Custom 2 - Timed Transformation: Shantae is much stronger when in a transformation, but she can only be in one for 10 seconds before automatically turning back.
    • Custom 3 - Violate Dancing: Shantae takes longer to transform, but the act of doing so causes an explosion that deals heavy damage and knockback.
  • Final Smash - Storm Puff: Shantae belly dances, summoning a large storm cloud above the stage. It will fire bolts of lightning downward, dealing heavy damage and knockback. After awhile, the cloud will disappear.
  • Charged State - Dancer Shantae: Shantae belly dances and switches her outfit for her dancer costume. In this state, her attacks deal a lot more damage and knockback, especially those in her transformations, and she can jump higher.

  • Kebako
    Cat Girl Without Salad: Amuse-Bouche (2016)
    Kebako Charged
    Kebako (ケバコ, Kebako) is the main character of WayForward's shoot-em-up Cat Girl Without Salad: Amuse-Bouche. The game was originally a fake April Fool's joke by WayForward in 2013, before being released officially in 2016. Kebako is a teenage cat-like girl with wings who used to be a famous idol pop singer, but is now a galactic bounty hunter. She's always willing to take up a bounty and serve justice, but is somewhat ditzy and light-headed. She is often accompanied by her squid partner, Squiddie, who communicates with her during missions.

    Kebako has a vast amount of weapons, each referencing various genres of video games such as platformers, RPGs, puzzles, and more. She can switch between them with down special Cartridge Swap, and she uses the weapon with her neutral special. The next cartridge she uses is displayed by her icon, and each one grants her a new projectile to use, each with differing mechanics. Her wings grant her five midair jumps, and she has pretty fast ground and air speed as well. She's fairly capable in close-quarters combat as well, with quick and high-damaging attacks. Mixing these with her projectiles and quick mobility is key to using her.

    Kebako mainly fights with her arm cannon, either when using physical attacks or shooting her projectiles with it. She can also use her wings and tail for attacks. Squiddie floats around with her in battle, and she can also use him to attack opponents.
    SSB Cat Girl Without Salad Series Kebako Stock Icon SSBCharged Icon
    Kebako's Moveset

    • Neutral Attack: Kebako fires her Pea Shooter from her arm cannon, sending a green projectile forward. Holding the attack button allows her to continue firing, and she can move around and jump while doing so. The projectiles deal less damage as they travel, and won't make opponents flinch if they're far enough away.
    • Forward Tilt: Kebako throws a forearm club with her arm cannon.
    • Forward Smash: Kebako throws a dropkick.
    • Up Tilt: Kebako performs a handstand and throws a scissor kick.
    • Up Smash: Kebako gets on all fours and stabs her tail upward.
    • Down Tilt: Kebako throws a legsweep.
    • Down Smash: Kebako grabs Squiddie and smashes him into the ground in front of herself, and then behind herself.
    • Dash Attack: Kebako performs a cartwheel, damaging opponents multiple times before launching them.
    • Counter: Kebako grabs Squiddie and swings him outward.

  • Neutral Aerial: Kebako fires her Pea Shooter from her arm cannon, sending a green projectile forward. Holding the attack button allows her to continue firing, and she can move around and jump while doing so. The projectiles deal less damage as they travel, and won't make opponents flinch if they're far enough away.
  • Forward Aerial: Kebako throws a sex kick.
  • Forward Crash: Kebako grabs Squiddie and swings him downward. The move can meteor smash opponents.
  • Back Aerial: Kebako claps her wings behind herself.
  • Back Crash: Kebako stabs her tail backward four times in rapid succession.
  • Up Aerial: Kebako throws a bicycle kick.
  • Up Crash: Kebako grabs Squiddie and swings him in an overarching motion above herself.
  • Down Aerial: Kebako throws a corkscrew kick, damaging opponents multiple times before launching them.
  • Down Crash: Kebako throws a stall-then-fall stomp. The move can meteor smash opponents.

  • Grab: Kebako reaches out to grab the opponent.
  • Pummel: Kebako slaps the opponent.
  • Forward Throw: Kebako spins the opponent around and throws them forward.
  • Back Throw: Kebako suplexes the opponent.
  • Up Throw: Kebako heaves the opponent upward.
  • Down Throw: Kebako hugs the opponent.

  • Neutral Special - Cartridge Weapon: Kebako uses the weapon she has, which is displayed by her icon. Each one gives her a different projectile to use. Because of its complexity and versatility, there are no custom moves.
      • Platformer Gun: Kebako fires a small humanoid from her gun that resembles Mario and Mega Man, who will run forward. If an opponent is nearby, he will jump and try to land on them, which will deal high damage and knockback. He deals less damage if he runs into the opponent.
      • RPG Gun: Kebako opens up a menu identical to Hero's Command Select, where she can scroll between four options.
        • Attack: Kebako swings a giant, holographic sword in front of herself, damaging opponents it hits.
        • Magic: Kebako throws a potion in an arc, which explodes on impact and damages opponents in the blast radius.
        • Heal: A potion appears above Kebako, which turns upside down and pours a drop of liquid on her, healing her by 15%. Can only be used once per stock.
        • Run: Kebako runs forward while screaming and flailing her arms. She is invincible while running, and it can be cancelled into any attack.
      • Arcade Gun: Kebako fires a PAC-MAN-esque projectile with cat ears that will chase down the nearest opponent, though it can only travel in the cardinal directions. If it hits them, they are knocked away as a set of eyes similar to ghosts in PAC-MAN. After awhile, it will disappear.
      • Sport Gun: Holding the special button makes a white reticle appear in front of Kebako's gun, which will move up and down. Releasing the special button has her shoot a white, golf ball-like projectile that flies forward and bounces off of surfaces and the edges of the screen. It will damage opponents it hits, though deals less damage and travels slower the longer it is out.
      • Rhythm Gun: Pressing the special button will cause a small bar to appear near Kebako's icon, and arrows pointing in the cardinal directions with move along it. If the special button is pressed at the right time, she fires a large blast of energy forward that damages opponents it hits. Its strength is determined by how accurate the button presses are.
      • Puzzle Gun: Kebako fires a red, blue, green, or yellow projectile forward, which stays in place after it hits an opponent, a surface, or travels a certain distance. The next color she will fire is shown by her icon. The projectiles have no effect in battle once they stay in place, but they will stick together. Connecting three of the same color will cause a massive explosion that deals high damage and knockback, even moreso if more than three connect.
  • Side Special - Salad: Kebako pulls out a bowl of salad, makes a disgusted face, and tosses it in an arc. The bowl will damage opponents it hits, and the bits of salad that spread out can also deal damage.
    • Custom 1 - Salad with Croutons: The bowl deals less damage, but croutons are added, which cover more range and deal more damage.
    • Custom 2 - Sealed Salad: Kebako tosses the bowl further away, but it's wrapped in plastic foil and no salad will fly out to cover more range.
    • Custom 3 - Fruit Salad: Kebako throws fruit salad instead of regular salad. It covers less range, but there are more bits of salad.
  • Up Special - Squiddie Jump: Kebako grabs Squiddie and shakes him, causing him to propel upward like a rocket. They will damage any opponents they hit. After reaching their apex height, Kebako falls into a helpless state.
    • Custom 1 - Squiddie Blastoff: Kebako and Squiddie fly higher, but they won't damage opponents they hit. Instead, Squiddie releases a blast below him on startup, which damages any opponents in the blast radius.
    • Custom 2 - Squiddie Rocket: Kebako and Squiddie don't travel as high, but they can travel in more directions than straight up.
    • Custom 3 - Charge Squiddie Jump: Kebako and Squiddie charge the move for a short time before travelling upward, leaving them vulnerable. However, they will travel higher, faster, and deal more damage.
  • Down Special - Cartridge Swap: Kebako changes the cartridge in her arm cannon, switching the weapon she uses for her neutral special. This move has no custom moves.
  • Final Smash - Dessert Time: Kebako pulls out a massive cartridge and comically shoves it in her arm cannon. This causes it to turn pink and glowing, where it fires a massive beam of frosting forward, damaging opponents multiple times before launching them. The beam can also be aimed up and down.
  • Charged State - Squiddie Blaster: Squiddie merges himself with Kebako's arm cannon, boosting its attack power and fire rate. Kebako herself can also move faster and jump higher. Attacks that involve her swinging Squiddie are replaced with her using her arm cannon instead.

  • Hat Kid
    A Hat in Time (2017)
    HatKid
    Hat Kid (ハットキッド, Hat Kid) is the main protagonist of Gears for Breakfast's A Hat in Time collect-a-thon 3D platformer. She is a human-like alien who, at the beginning of the game, is driving a spaceship to get home. However, she loses the ship's power source, hourglass-like objects called Time Pieces, which scatters all over a planet five light-years away from her home. As such, she must find all the Time Pieces, using various hats and badges to help her on her adventure.

    Hat Kid is a lightweight fighter who can be launched easily, and she has average movement speed both on ground and in midair. Her main weapon is an umbrella, which can be used to attack opponents from a distance. It can also be used to help her recovery, as holding up on the control stick while falling allows her to open it and drift slowly downward. Also helping her recovery is her unique wall run; if she hits a wall, she can run up it for a short time. With this, she ca either run towards the ledge and grab it or jump off it to fly in the opposite direction. She can only run up walls a certain distance however.

    Hat Kid's moveset mostly revolves around her umbrella, which she uses to whack opponents or open it up. She also makes uses of the various hats and badges from A Hat in Time, granting her some unique abilities.
    SSB A Hat in Time Series Hat Kid Stock Icon SSBCharged Icon
    Hat Kid's Moveset

    • Neutral Attack: Hat Kid swings her umbrella twice before opening it up. The third attack can reflect projectiles.
    • Forward Tilt: Hat Kid throws an outward swing with her umbrella.
    • Forward Smash: Hat Kid thrusts her umbrella forward before opening it. The second attack can reflect projectiles.
    • Up Tilt: Hat Kid jumps upward to attack with her hat.
    • Up Smash: Hat Kid thrusts her umbrella into the ground to leap upward.
    • Down Tilt: Hat Kid kneels and thrusts her umbrella forward.
    • Down Smash: Hat Kid spins around while swinging her umbrella near the ground in front of and behind herself.
    • Dash Attack: Hat Kid dives forward and slides across the ground. If the attack button is pressed again, she will follow up with a front flip that deals more damage. If used at the ledge, this can be followed up with an aerial attack.
    • Counter: Hat Kid swings her umbrella.

  • Neutral Aerial: Hat Kid throws a flying kick.
  • Forward Aerial: Hat Kid twirls her umbrella in front of herself, damaging opponents multiple times before launching them.
  • Forward Crash: Hat Kid throws a downward swing with her umbrella. The move can meteor smash opponents.
  • Back Aerial: Hat Kid twirls her umbrella behind herself, damaging opponents multiple times before launching them.
  • Back Crash: Hat Kid thrusts her umbrella backward.
  • Up Aerial: Hat Kid opens her umbrella. This allows her to gain some vertical momentum.
  • Up Crash: Hat Kid thrusts her umbrella upward.
  • Down Aerial: Hat Kid opens her umbrella and spins it around below herself, damaging opponents multiple times before launching them.
  • Down Crash: Hat Kid falls downward while swinging her umbrella. If an opponent is nearby, she will automatically home in on them.

  • Grab: Hat Kid launches a hookshot to grab opponents and reel them in. The grab can also be used in midair, and can act as a tether grab.
  • Pummel: Hat Kid smacks them opponent with her umbrella.
  • Forward Throw: Hat Kid shoves the opponent away.
  • Back Throw: Hat Kid suplexes the opponent.
  • Up Throw: Hat Kid heaves the opponent upward and bounces the on her umbrella.
  • Down Throw: Hat Kid pins the opponent on the ground and stomps on them.

  • Neutral Special - Brewing Hat: Hat Kid puts on the Brewing Hat, and takes out an explosive potion. The special button can be held for her to shake the potion, charging it up. It can then be thrown as an item, exploding on impact and damaging opponents in he blast radius.
    • Custom 1 - Big Blast Brewer: The blast radius is much larger and deals more damage. However, the explosion can also hurt Hat Kid if she is close enough.
    • Custom 2 - Poisonous Brewer: The explosion deals less damage, but instead of being fire-enhanced, the explosion is purple, and places both a mushroom and a flower on opponents' heads.
    • Custom 3 - Frozen Brewer: The explosion is blue and ice-enhanced, freezing opponents in the blast radius instead of knocking them away.
  • Side Special - Scooter Badge: Hat Kid summons a scooter and puts on the Sprint Hat. She begins riding it, damaging opponents she hits. While riding it, she can speed up, change directions, and jump. Pressing the special button again will allow her to jump off of it before it disappears. She can also be knocked off the scooter if she is hit with a hard enough attack.
    • Custom 1 - Speeding Scooter: Hat Kid travels faster, but deals less damage and the move is harder to control.
    • Custom 2 - Impact Scooter: Hat Kid deals more damage, but she can be knocked off the scooter easier.
    • Custom 3 - Burying Scooter: Hat Kid travels much slower, but the move can bury opponents.
  • Up Special - Umbrella Jump: Hat Kid jumps upward with her umbrella, damaging opponents multiple times before launching them. She falls into a semi-helpless state afterwards.
    • Custom 1 - Umbrella Leap: Hat Kid jumps higher, but doesn't deal damage to opponents.
    • Custom 2 - Lateral Umbrella Jump: Hat Kid jumps at a more lateral angle, sacrificing vertical distance for horizontal distance.
    • Custom 3 - Power Umbrella Jump: Hat Kid simply launches opponents rather than damaging them multiple times. She deals more damage, but travels less distance.
  • Down Special - Ice Hat: Hat Kid puts on the Ice Hat, transforming into an ice sculpture that leaps upward and falls onto the ground. If the move is used in midair she will simply fall downward. She freezes opponents nearby when she lands, and she will both freeze and meteor smash opponents she lands on.
    • Custom 1 - Burying Smash: Hat Kid will bury opponents she lands on, but will not freeze opponents.
    • Custom 2 - Slipping Smash: Instead of freezing opponents, opponents nearby will slip when she lands.
    • Custom 3 - Ice Meteor: Hat Kid deals more damage to opponents she falls on, but will not damage opponents near her when she lands.
  • Final Smash - Hyper Zone: Hat Kid pulls out a Time Piece and throws it downward. If it hits the stage or an opponent, it creates a black hole that draws nearby opponents into it. If at least one opponent is caught, they are locked in an animation where several Time Pieces fly around and hit the opponents, with Hat Kid finishing them with a laser fired from her umbrella. This sends them back to the stage, launching them.
  • Charged State - Hyper Hat: Hat Kid places a Time Piece under her hat, causing her to glow yellow. In this state, Hat Kid is significantly faster, she can attack faster, her wall run ability can take her higher, and her floating ability allows her to glide upward. Notably, while moving, she causes afterimages to appear.

  • Bow Kid (ε)
    A Hat in Time (2017)
    BowKid
    Bow Kid (ボウキッド, Bow Kid) is the second player character in A Hat in Time, added during the co-op DLC update in September 2018. She is functionally identical to Hat Kid, though has a bow to differentiate herself. Despite this, she still uses the various hats in the game.

    Bow Kid is Hat Kid's Echo Fighter. The two are almost identical in terms of moveset, though Bow Kid sacrifices some speed and flexibility in her floating and wall run techniques for her attacks to be stronger. She is also slightly slower in terms of mobility, but has more jump height.
    SSB A Hat in Time Series Bow Kid Stock Icon SSBCharged Icon
    Bow Kid's Moveset

    • Neutral Attack: Bow Kid swings her umbrella twice before opening it up. The third attack can reflect projectiles.
    • Forward Tilt: Bow Kid throws an outward swing with her umbrella.
    • Forward Smash: Bow Kid thrusts her umbrella forward before opening it. The second attack can reflect projectiles.
    • Up Tilt: Bow Kid jumps upward to attack with her bow.
    • Up Smash: Bow Kid thrusts her umbrella into the ground to leap upward.
    • Down Tilt: Bow Kid kneels and thrusts her umbrella forward.
    • Down Smash: Bow Kid spins around while swinging her umbrella near the ground in front of and behind herself.
    • Dash Attack: Bow Kid dives forward and slides across the ground. If the attack button is pressed again, she will follow up with a front flip that deals more damage. If used at the ledge, this can be followed up with an aerial attack.
    • Counter: Bow Kid swings her umbrella.

  • Neutral Aerial: Bow Kid throws a flying kick.
  • Forward Aerial: Bow Kid twirls her umbrella in front of herself, damaging opponents multiple times before launching them.
  • Forward Crash: Bow Kid throws a downward swing with her umbrella. The move can meteor smash opponents.
  • Back Aerial: Bow Kid twirls her umbrella behind herself, damaging opponents multiple times before launching them.
  • Back Crash: Bow Kid thrusts her umbrella backward.
  • Up Aerial: Bow Kid opens her umbrella. This allows her to gain some vertical momentum.
  • Up Crash: Bow Kid thrusts her umbrella upward.
  • Down Aerial: Bow Kid opens her umbrella and spins it around below herself, damaging opponents multiple times before launching them.
  • Down Crash: Bow Kid falls downward while swinging her umbrella. If an opponent is nearby, she will automatically home in on them.

  • Grab: Bow Kid launches a hookshot to grab opponents and reel them in. The grab can also be used in midair, and can act as a tether grab.
  • Pummel: Bow Kid smacks them opponent with her umbrella.
  • Forward Throw: Bow Kid shoves the opponent away.
  • Back Throw: Bow Kid suplexes the opponent.
  • Up Throw: Bow Kid heaves the opponent upward and bounces the on her umbrella.
  • Down Throw: Bow Kid pins the opponent on the ground and stomps on them.

  • Neutral Special - Brewing Hat: Bow Kid puts on the Brewing Hat, and takes out an explosive potion. The special button can be held for her to shake the potion, charging it up. It can then be thrown as an item, exploding on impact and damaging opponents in he blast radius.
    • Custom 1 - Big Blast Brewer: The blast radius is much larger and deals more damage. However, the explosion can also hurt Bow Kid if she is close enough.
    • Custom 2 - Poisonous Brewer: The explosion deals less damage, but instead of being fire-enhanced, the explosion is purple, and places both a mushroom and a flower on opponents' heads.
    • Custom 3 - Frozen Brewer: The explosion is blue and ice-enhanced, freezing opponents in the blast radius instead of knocking them away.
  • Side Special - Scooter Badge: Bow Kid summons a scooter and puts on the Sprint Hat. She begins riding it, damaging opponents she hits. While riding it, she can speed up, change directions, and jump. Pressing the special button again will allow her to jump off of it before it disappears. She can also be knocked off the scooter if she is hit with a hard enough attack.
    • Custom 1 - Speeding Scooter: Bow Kid travels faster, but deals less damage and the move is harder to control.
    • Custom 2 - Impact Scooter: Bow Kid deals more damage, but she can be knocked off the scooter easier.
    • Custom 3 - Burying Scooter: Bow Kid travels much slower, but the move can bury opponents.
  • Up Special - Umbrella Jump: Bow Kid jumps upward with her umbrella, damaging opponents multiple times before launching them. She falls into a semi-helpless state afterwards.
    • Custom 1 - Umbrella Leap: Bow Kid jumps higher, but doesn't deal damage to opponents.
    • Custom 2 - Lateral Umbrella Jump: Bow Kid jumps at a more lateral angle, sacrificing vertical distance for horizontal distance.
    • Custom 3 - Power Umbrella Jump: Bow Kid simply launches opponents rather than damaging them multiple times. She deals more damage, but travels less distance.
  • Down Special - Ice Hat: Bow Kid puts on the Ice Hat, transforming into an ice sculpture that leaps upward and falls onto the ground. If the move is used in midair she will simply fall downward. She freezes opponents nearby when she lands, and she will both freeze and meteor smash opponents she lands on.
    • Custom 1 - Burying Smash: Bow Kid will bury opponents she lands on, but will not freeze opponents.
    • Custom 2 - Slipping Smash: Instead of freezing opponents, opponents nearby will slip when she lands.
    • Custom 3 - Ice Meteor: Bow Kid deals more damage to opponents she falls on, but will not damage opponents near her when she lands.
  • Final Smash - Hyper Zone: Bow Kid pulls out a Time Piece and throws it downward. If it hits the stage or an opponent, it creates a black hole that draws nearby opponents into it. If at least one opponent is caught, they are locked in an animation where several Time Pieces fly around and hit the opponents, with Bow Kid finishing them with a laser fired from her umbrella. This sends them back to the stage, launching them.
  • Charged State - Hyper Bow: Bow Kid ties a Time Piece with her bow, causing her to glow yellow. In this state, Bow Kid is significantly faster, she can attack faster, her wall run ability can take her higher, and her floating ability allows her to glide upward. Notably, while moving, she causes afterimages to appear.

  • Lilac
    Freedom Planet (2014)
    Lilac (ライラック, Lilac), full name Sash Lilac, is the main protagonist of GalaxyTrail's Freedom Planet and its sequel. She is a half-dragon living in the world of Avalice, who can run at high speeds and use her ponytails as weapons. She was originally member of a rouge gang known as the Red Scarves, but abandoned them soon after to live in the woods in a treehouse she built. When an alien warlord known as Brevon aims to steal the Kingdom Stone, Avalice's source of energy and power, she and her friends go on a quest to reclaim it as well as restore peace to Avalice's three kingdoms.

    In a similar manner to Sonic, Lilac is a middleweight with among the best running speeds in the game, and is able to keep up the pace easily. She also has an edge over similar characters like Sonic and Rainbow Dash in that her moves that involve her ponytails provide disjoints, allowing her to attack from afar. She also has a really flexible recovery thanks to her specials, making it difficult to edgeguard her. These combined make her a solid fighter built for pressuring and comboing opponents.

    Lilac's moveset is directly derived from her attacks in Freedom Planet and Freedom Planet 2, mostly using her ponytails or legs to attack opponents. They're quick and sometimes long-ranged, making it hard for opponents to contest her without ranged attacks of their own.
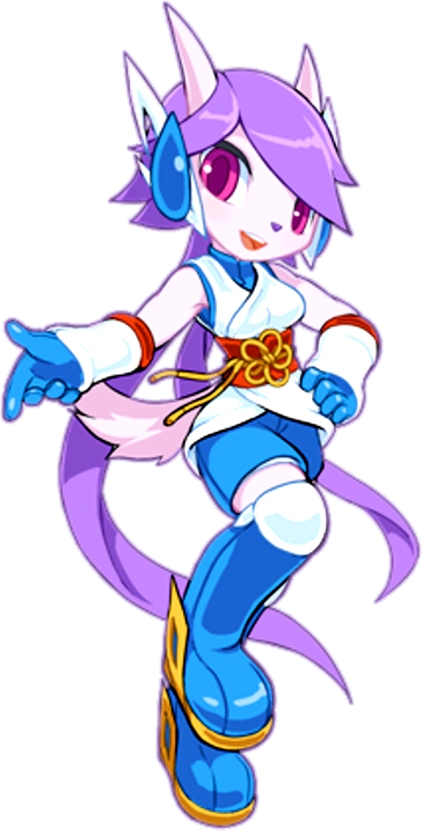
    SSB Freedom Planet Series Lilac Stock Icon SSBCharged Icon
    Lilac's Moveset

    • Neutral Attack: Lilac throws two alternating punches followed by a wheel kick.
    • Forward Tilt: Lilac grabs one of her ponytails and whips it forward.
    • Forward Smash: Lilac throws a roundhouse kick.
    • Up Tilt: Lilac swings her ponytails upward in front of herself.
    • Up Smash: Lilac throws a scissor kick upwards.
    • Down Tilt: Lilac throws a crouching kick.
    • Down Smash: Lilac grabs one of her ponytails and whips it across the ground.
    • Dash Attack: Lilac performs a spinning battering ram, damaging opponents multiple times before launching them.
    • Counter: Lilac throws a flip kick.

  • Neutral Aerial: Lilac performs a somersault.
  • Forward Aerial: Lilac grabs one of her ponytails and slashes it forward.
  • Forward Crash: Lilac throws a dropkick.
  • Back Aerial: Lilac grabs one of her ponytails and slashes it backward.
  • Back Crash: Lilac throws a back kick.
  • Up Aerial: Lilac swings both of her ponytails above herself in an overarching motion.
  • Up Crash: Lilac throws an upside down corkscrew kick, damaging opponents multiple times before launching them.
  • Down Aerial: Lilac throws a stall-then-fall stomp in a diagonal angle. The move can meteor smash opponents.
  • Down Crash: Lilac throws a stomp. The move can meteor smash opponents.

  • Grab: Lilac reaches out to grab the opponent.
  • Pummel: Lilac knee smashes the opponent.
  • Forward Throw: Lilac spins around with the opponent in tow before throwing them backward.
  • Back Throw: Lilac lifts the opponent over her head, turns around, and throws them backward.
  • Up Throw: Lilac tosses the opponent upward before slashing them with her ponytails.
  • Down Throw: Lilac slams the opponent into the ground.

  • Neutral Special - Dragon Cyclone: Lilac spins around while hitting opponents with her ponytails, damaging them multiple times before launching them. While spinning, she can move left or right, and if used in midair, she will gain some vertical height as well. It can be cancelled into any of her attacks.
    • Custom 1 - Dragon Clothesline: Lilac cannot cancel the move and it only hits opponents once, but she deals more damage and knockback.
    • Custom 2 - Dragon Hurricane: Lilac deals less damage, but she creates windboxes while spinning that push opponents away.
    • Custom 3 - Dragon Chopper: Lilac will rise regardless if the move is used on the ground or in the air, and travels higher, though she cannot damage opponents.
  • Side Special - Dragon Boost / Boost Breaker: Lilac rolls into a ball before launching herself in the direction the control stick is held, damaging opponents she hits. She can travel in any direction that isn't straight up or down, and she is given temporary invincibility while using the move. If she hits a surface or the special button is pressed again, she will instead use Boost Breaker, cancelling the boost to perform an energy shockwave around herself that damages opponents in range.
    • Custom 1 - Super Boost: Lilac can travel much faster and farther, though she deals less damage, loses her invincibility, and cannot use Boost Breaker.
    • Custom 2 - Charging Boost: Lilac can only travel forward, but she deals much more damage and knockback. The Boost Breaker also deals more damage.
    • Custom 3 - Piercing Boost: Lilac damages opponents she dashes into multiple times before launching them. The Boost Breaker covers less range and deals less damage.
  • Up Special - Rising Slash: Lilac throws a jumping uppercut while slashing her two ponytails upward, damaging opponents multiple times before launching them. She falls into a helpless state afterwards.
    • Custom 1 - Rising Blow: Lilac only hits opponents once, and the move has a sweetspot at the peak of her jump.
    • Custom 2 - Dragon Rise: Lilac jumps higher, but doesn't damage opponents.
    • Custom 3 - Rising Wind: Lilac doesn't travel as high, but she creates a windbox that pushes nearby opponents away.
  • Down Special - Crystal Flower: Lilac pulls out a Crystal Flower and smashes it on the ground, sending Crystal Shards outward. The Crystal Flower deals the most damage, while the Crystal Shards add onto it. If used in midair, Lilac throws the Crystal Flower downward, where it shatters on impact.
    • Custom 1 - Crystal Bomb: The Crystal Flower explodes on impact instead of sending Crystal Shards outward. This deals more damage, but covers less range.
    • Custom 2 - Crystal Hurl: Instead of throwing the Crystal Flower downward, Lilac tosses it in an arc.
    • Custom 3 - Crystal Shards: Instead of using a Crystal Flower, Lilac simply sends out Crystal Shards from her body that damage opponents. This deals less damage but is much faster.
  • Final Smash - Holodragon: Lilac summons the Holodragon, which will fly around above the stage. It will attack opponents by spitting fireballs below and occasionally swooping down. After awhile, it will disappear.
  • Charged State - Dragon's Wrath: Lilac starts glowing with blue energy. In this state, she is much faster and Dragon Boost covers much more distance. Her other attacks also get an increase in damage.

  • Carol
    Freedom Planet (2014)
    Carol (キャロル, Carol), full name Carol Tea and self-nicknamed Carol the Wildcat, is one of the playable characters of Freedom Planet and its sequel. She is Lilac's best friend, having met her during their time with the Red Scarves before abandoning them. She went on to live with Lilac in her treehouse. She's a tomboy and always ready for adventure, but is sometimes reluctant to listen to Lilac. She owns a motorcycle that she uses to keep up with Lilac's speed. She doesn't hesitate at all to join Lilac's quest to reclaim Avalice's Kingdom Stone.

    Much like Lilac, Carol is an agile fighter with a good amount of speed and strength; being a middleweight with above-average run and ground speed, she mainly relies on close-quarters combat. However, she has a limited recovery and is susceptible to being gimped. In addition to her regular moves, she has an entire other set of attacks whenever she is on her motorcycle; while on it, her speed increases drastically and can damage opponents by running into them. Though she can't stand still while on it and will always accelerate, she can turn around and even jump. The motorcycle, however, can be damaged and destroyed if she is attacked enough, and it leaves her without being able to use it for about 10 seconds. She can dismount it at any time by pressing the special button, which makes it disappear.

    Carol's moveset is derived from her abilities in Freedom Planet and Freedom Planet 2. When not on her motorcycle, she relies on claw slashes that deal a good amount of damage, as well as kicks. While riding it, she can both use her arms and feet to attack as well as smack opponents with the wheels.
    SSB Freedom Planet Series Carol Stock Icon SSBCharged Icon
    Carol's Moveset

    • Neutral Attack: Carol throws three claw slashes in rapid succession.
    • Forward Tilt: Carol throws a sweeping claw slash.
    • Forward Smash: Carol throws a dual claw slash.
    • Up Tilt: Carol throws a high kick.
    • Up Smash: Carol throws three high kicks in rapid succession.
    • Down Tilt: Carol throws a sliding kick.
    • Down Smash: Carol throws a claw slash across the ground in front of herself, then behind herself.
    • Dash Attack: Carol pounces forward, striking with her claws.
    • Counter: Carol throws a claw slash.

  • Neutral Aerial: Carol throws a sex kick.
  • Forward Aerial: Carol throws a downward claw slash.
  • Forward Crash: Carol throws a dropkick.
  • Back Aerial: Carol throws a claw slash behind herself.
  • Back Crash: Carol throws a backward corkscrew kick, damaging opponents multiple times before launching them.
  • Up Aerial: Carol slashes her claws above herself in an overarching motion.
  • Up Crash: Carol throws a dual claw slash above herself.
  • Down Aerial: Carol slashes her claws downward. The move can meteor smash opponents.
  • Down Crash: Carol throws a stall-then-fall stomp.

  • Grab: Carol reaches out to grab the opponent.
  • Pummel: Carol knee smashes the opponent.
  • Forward Throw: Carol kicks the opponent, launching them forward.
  • Back Throw: Carol spins around with the opponent in tow before throwing them backward.
  • Up Throw: Carol heaves the opponent upward before slashing at them with her claws.
  • Down Throw: Carol slams the opponent on the ground before repeatedly clawing at them.

  • Neutral Special - Jump Disc: Carol throws her jump disc in the direction the control stick is held, damaging opponents multiple times before launching them and returning to her like a boomerang. If the special button is pressed again, she will leap toward the jump disc and grab it.
    • Custom 1 - Shredding Disc: The disc deals more damage, but does not return to Carol, and she can't jump towards it.
    • Custom 2 - Ricochet Disc: The disc only damages opponents once before returning to Carol, though if another opponent is nearby, it will jump and damage them as well.
    • Custom 3 - Homing Disc: Carol can only throw the disc forward, though it will home in on opponents.
  • Side Special - Wildcat Roll: Carol leaps forward before curling into a ball and rolling forward, damaging opponents she hits while traveling fast. It can be cancelled into any of her other moves.
    • Custom 1 - Burning Roll: Carol is on fire while using the move, dealing more damage. However, she takes longer to slow down and the move cannot be cancelled.
    • Custom 2 - Rolling Charge: The move can be charged by holding the special button, allowing her to travel farther and deal more damage. However, she is vulnerable while charging.
    • Custom 3 - Bouncing Roll: Instead of rolling forward, Carol bounces across the ground, damaging opponents she hits while bouncing off of them.
  • Up Special - Wild Kick: Carol rises upward while throwing an upward kick, falling into a helpless state afterwards. She is invincible while kicking.
    • Custom 1 - Rising Kick: Carol damages opponents multiple times as she rises before she kicks, though she loses her invincibility.
    • Custom 2 - Wildcat Rise: Carol doesn't kick and simply rises, though she travels much higher.
    • Custom 3 - Wild Axe Kick: Carol doesn't travel as high, but at the peak of her jump, she follows the attack with a stall-then-fall axe kick, which can meteor smash opponents.
  • Down Special - Motorcycle: Carol snaps her fingers, which summons a motorcycle that she hops on. She will continually accelerate forward, and will speed up if the control stick is held forward, dealing more damage to opponents she hits. She can't stop, but can turn around and even jump. She has several attacks she can use while on the motorcycle, and can dismount it at any time by pressing the special button, which causes it to disappear. The bike can be destroyed if it takes enough damage, leaving her unable to use it for a few seconds.
    • Custom 1 - Nitro Motorcycle: The motorcycle can travel faster and deals more damage by running over opponents, though it is harder to control.
    • Custom 2 - Master Motorcycle: Carol's attacks while on the motorcycle deal more damage and knockback, though it is weaker and can be destroyed easier.
    • Custom 3 - Durable Motorcycle: The motorcycle is slower overall, but it can take much more damage before being destroyed.
  • Final Smash - Hot Rod Wildcat: Carol summons her motorcycle and hops on it before rushing forward. If she hits an opponent, they are locked in a cutscene where Carol is blazing through the forest on the motorcycle and runs over the opponent, sending them back to the stage and launching them.
  • Charged State - Wildcat Fury: Carol starts glowing yellow with electricity. In this state, she is much faster and her claw slashes deal much more damage. Her motorcycle is also faster and more durable.

  • Neutral Attack: Carol balances on the motorcycle while throwing three attacks with the front wheel.
  • Forward Tilt: Carol performs a donut before continuing forward.
  • Forward Smash: Carol jumps off of her bike and throws it in an arc, destroying it and dealing heavy damage to opponents it hits.
  • Up Tilt: Carol performs a wheelie.
  • Down Tilt: Carol will perform a speed boost with her motorcycle.
  • Neutral Aerial: Carol spins around with her motorcycle while striking a pose.

  • Milla
    Freedom Planet (2014)
    Milla (ミラ, Mira), full name Milla Basset, is one of the playable characters of Freedom Planet and its sequel. She is a young hound dog who was orphaned at a young age, and lived most of her life alone in the woods. When she met Lilac and Carol during their quest to take back the Kingdom Stone, she became instant friends with them and started living with them in Lilac's treehouse. Though she is sweet and naive, she possesses the power of alchemy, making her a formidable foe. Her efficiency in alchemy became so good that she built herself her own lab following the events of Brevon's defeat, which serves as her new home.

    Milla is a character of extremes. She is a light-middleweight with below average mobility. To make up for this, she has several effective close-range and long-range tools in her moveset, centered around her neutral special Cube Summon. Normally her side, up, and down special moves are unavailable, but using Cube Summon lets a small green cube float around her, which allows her to use one of them whenever she wants. These specials have different variants that utilize the cube, providing a myriad of options. Another trait of her is her signature Puppy Float being her double jump, which grants her a ludicrous amount of vertical distance; it is similar to Yoshi & Baby Mario's Flutter Jump, though it sacrifices super armor for the ability to float slowly downward.

    Milla has attacks derived her movesets in Freedom Planet and Freedom Planet 2, though mostly the latter. While her special moves revolve around alchemy and summoning cubes to attack opponents with, her normal moves utilize kung fu attacks that are quick and deal high damage.
    SSB Freedom Planet Series Milla Stock Icon SSBCharged Icon
    Milla's Moveset

    • Neutral Attack: Milla throws three front kicks followed by a spinning kick.
    • Forward Tilt: Milla throws a wheel kick.
    • Forward Smash: Milla throws a roundhouse kick.
    • Up Tilt: Milla throws a 180 kick from low to high.
    • Up Smash: Milla throws a flip kick.
    • Down Tilt: Milla throws a shin kick.
    • Down Smash: Milla throws a breakdance sweep.
    • Dash Attack: Milla curls into a ball and rolls forward, damaging opponents multiple times before launching them.
    • Counter: Milla throws a spinning kick.

  • Neutral Aerial: Milla throws a sex kick.
  • Forward Aerial: Milla throws an axe kick. The move can meteor smash opponents.
  • Forward Crash: Milla throws a corkscrew kick, damaging opponents multiple times before launching them.
  • Back Aerial: Milla throws a back kick.
  • Back Crash: Milla throws a dropkick.
  • Up Aerial: Milla throws a bicycle kick.
  • Up Crash: Milla throws a scissor kick.
  • Down Aerial: Milla throws a downward punch. The move can meteor smash opponents.
  • Down Crash: Milla throws a corkscrew kick, damaging opponents multiple times before launching them.

  • Grab: Milla pounces forward, pinning the opponent to the ground.
  • Pummel: Milla licks the opponent.
  • Forward Throw: Milla garbs the opponent by the feet with her mouth and throws them forward.
  • Back Throw: Milla grabs the opponent by the feet with her mouth and throws them backward.
  • Up Throw: Milla tosses the opponent upward with her head.
  • Down Throw: Milla digs into the ground and places the opponent in the hole she creates, burying them.

  • Neutral Special - Cube Summon / Cube Burst: Milla generates a green cube of energy that floats behind her. It will stay with her indefinitely until she uses a move that involves the cube. Using the move while she already has a cube lets her use Cube Burst instead, turning the cube into a long-ranged beam that can be fired in any direction, damaging opponents it hits.
    • Custom 1 - Shotgun Cube Blaster: The blast from a fired cube covers more range, though it deals the most damage to opponents close to Mia.
    • Custom 2 - Cube Beam: The blast from a fired cube damages opponents multiple times before launching them, but deals less knockback and is slower.
    • Custom 3 - Ranged Cube Blaster: The blast from a fired cube can only be fired forward, but it covers much more range.
  • Side Special - Spiral Attack: Milla uses her cube and turns it into a buzzsaw-like object and charges forward with it, damaging opponents multiple times before launching them. It cannot be used if she doesn't have a cube.
    • Custom 1 - Spiral Spin: Milla doesn't travel as far, but she deals more damage. The move only hits once.
    • Custom 2 - Spiral Throw: Milla throws the buzzsaw instead of dashing forward with it. It covers more range but deals less damage and cannot be used to help with recovery.
    • Custom 3 - Vortex Spiral: The buzzsaw creates vacuumboxes that drag opponents into the move, though it deals less damage.
  • Up Special - Phantom Cube: Milla holds her hands upward as the cube enlarges and falls into them. In this state, she can carry the cube around as if it were a heavy item, and can throw it in an arc. After being thrown, Milla can pick it up again. It it makes contact with an opponent, it will explode and damage them. Milla can summon another cube if she throws one and it doesn't hit an opponent, but she can't use the move. It cannot be used if she doesn't have a cube.
    • Custom 1 - Phantom Bomb: The cube will not damage opponents on contact, and instead cause an explosion three seconds after being thrown. The explosion is larger and deals more damage.
    • Custom 2 - Phantom Block: Instead of damaging opponents, the cube acts as a wall that blocks their path and can be stood on. Milla can also stand on it, and only she can pick it back up and throw it again. It will damage opponents while being thrown, and can bury them if it lands on them. It disappears after a short time.
    • Custom 3 - Cube Slide: Milla will slide the cube across the ground instead of throwing it, damaging opponents it hits. It will fall off ledges as well.
  • Down Special - Reflection Shield / Shield Burst / Cube Blaster: Milla uses the cube to generate a shield, which can be held by holding the special button and aimed in all directions. The shield will block all attacks and reflect projectiles coming from the direction it is held in. She will put the shield away after releasing the special button. However, if the attack button is tapped, she will use Shield Burst, sending a short-ranged burst in the direction the shield is facing that damages opponents. If the attack button is held, she instead fires a volley of 10 smaller cubes, damaging opponents multiple times before launching them. It cannot be used if she doesn't have a cube.
    • Custom 1 - Orbital Shield: The shield will cover Milla entirely and doesn't have to be aimed, but the Shield Burst and Cube Blaster deal less damage.
    • Custom 2 - Reflection Shield+: Milla cannot aim the shield and it will only aim it straight forward, though it is stronger against attacks and reflected projectiles deal more damage.
    • Custom 3 - Shield Surge: The shield can only reflect projectiles, though it will damage opponents that make contact with it.
  • Final Smash - Cube Collision: Milla uses all of her alchemy power to summon several cubes at once, which will drop on the stage around her. If they land on opponents, they will be buried and cannot escape the attack. The cubes will explode soon after, dealing heavy damage and knockback to opponents in the blast radius.
  • Charged State - Multicube: Milla starts glowing green, and summons three cubes at once. In this state, whenever she uses a move that uses a cube, another one is immediately summoned, meaning that she can freely use these attacks without needing to use Cube Summon. Her Puppy Float also gains even more height, and her mobility is faster.

  • The Beheaded
    Dead Cells (2017)
    The Beheaded
    The Beheaded (の斬首, The Beheaded) is the main protagonist of Motion Twin's Dead Cells roguelike metroidvania. Unaware of the circumstances, it finds itself in a large, sprawling prison. It appears to be a beheaded being, as suggested by the name, and has the ability to possess and occupy headless bodies. Using this, it presses on through the prison, equipping any gear to help it overcome challenges it faces.

    In battle, The Beheaded is somewhat balanced, having strong stats across the board with average walking, running, and falling speed, jump height, and weight. It wields an assortment of weapons, though they all generally have low range. This means The Beheaded can't really play it safe from a distance like other weapon users such as Link, Marth, and Shulk, and must get up close to get its attacks in. To compensate though, the majority of its moves are quick and can deal heavy damage, making it a good offensive powerhouse.

    The weapons The Beheaded uses in its moves all originate from Dead Cells. Its main weapon is the Rusty Sword, though other attacks have it utilize weapons such as the Twin Daggers, the Nutcracker, and more.
    SSB Dead Cells Series The Beheaded Stock Icon SSBCharged Icon
    The Beheaded's Moveset

    • Neutral Attack: The Beheaded throws two alternating slashes with the Rusty Sowrd before throwing a downward slash.
    • Forward Tilt: The Beheaded throws an outward slash with the Rusty Sword.
    • Forward Smash: The Beheaded throws an overhead slash with both arms with the Dual Daggers.
    • Up Tilt: The Beheaded throws an overhead slash with the Rusty Sword.
    • Up Smash: The Beheaded throws an upward swing with the Nutcracker.
    • Down Tilt: The Beheaded swings the Rusty Sword across the ground.
    • Down Smash: The Beheaded swings the Nutcracker around itself across the ground.
    • Dash Attack: The Beheaded throws a flying kick.
    • Counter: The Beheaded throws an upwards slash with the Rusty Sword..

  • Neutral Aerial: The Beheaded spins around while slashing the Dual Daggers, damaging opponents multiple times before launching them.
  • Forward Aerial: The Beheaded throws a downward swing with the Nutcracker. The move can meteor smash opponents.
  • Forward Crash: The Beheaded throws three rapid slashes with the Rusty Sword.
  • Back Aerial: The Beheaded swings the Nutcracker backward.
  • Back Crash: The Beheaded stabs the Rusty Sword backward.
  • Up Aerial: The Beheaded throws an upward kick.
  • Up Crash: The Beheaded swings the Nutcracker upward.
  • Down Aerial: The Beheaded swings the Nutcracker downward. The move can meteor smash opponents.
  • Down Crash: The Beheaded throws a stall-then-fall stomp. If it lands on an opponent, it will bounce off of them.

  • Grab: The Beheaded reaches out to grab the opponent.
  • Pummel: The Beheaded knees the opponent.
  • Forward Throw: The Beheaded kicks the opponent away.
  • Back Throw: The Beheaded throws the opponent backward.
  • Up Throw: The Beheaded tosses the opponent upward.
  • Down Throw: The Beheaded slams the opponent on the ground.

  • Neutral Special - Electric Whip: The Beheaded raises a hand and belts out a powerful tendril of electricity that zaps in front of it, dealing repetitious damage to those that are too close to it. Holding the special button will allow it to keep on zapping, continuing to damage the opponent if they're close enough. However, the longer the button is held, the more the beam's range decreases.
    • Custom 1 - Stun Whip: The whip can't damage opponents multiple times nor can it continue damaging if the special button is held. Instead, it's a single crack with the whip that can paralyze opponents hit by it.
    • Custom 2 - Whiplash: The whip is stronger and deals more damage, but will decrease in size faster if the special button is held.
    • Custom 3 - Whip Breaker: The move deals much more shield damage, but covers less range.
  • Side Special - Magnetic Grenade: The Beheaded hurls forwards a magnet-shaped grenade in an arc. After about 2.5 seconds, it explodes, giving off a gravity-like effect that pulls items and opponents towards it. This blast lasts about three seconds, and this move has a bit of start lag.
    • Custom 1 - Push Grenade: The grenade's explosion pushes opponents away instead of pulling them in.
    • Custom 2 - Homing Grenade: The grenade will follow opponents before exploding instead of travelling in an arc.
    • Custom 3 - Shrapnel Grenade: The grenade's gravity effect isn't as strong, but upon exploding it will release shrapnel in all directions, damaging nearby opponents.
  • Up Special - Wings of the Crow: The Beheaded is propelled high into the air, and once at the apex, it flips in the air before seeming to float down, a flurry of black feathers lingering around it. Its descent is significantly slower than before, meaning this is very useful for horizontal recovering.
    • Custom 1 - Crow Leap: The Beheaded travels much higher, but doesn't float down afterwards.
    • Custom 2 - Crow Uppercut: The Beheaded throws an uppercut as it travels upward, which damages opponents. However, it doesn't descend as slow.
    • Custom 3 - Crow Guard: The Beheaded doesn't travel as high, but while floating downward with its wings, it has super armor and can't be hit out of the move.
  • Down Special - Cleaver: The Beheaded tosses a trap down, it taking the form of a spinning buzzsaw when it touches the ground. While it stays on the ground, it will damage any opponents that walk over it multiple times before launching them. If it hits an opponent before it lands on the ground, it will form into a buzzsaw early, damaging opponents repeatedly and carrying them downward with it. A Cleaver lasts for about 2.5 seconds, and a new one can't be made until the old one vanishes.
    • Custom 1 - Cleaver Wheel: The Cleaver rolls across the ground instead of staying in place. It only damages opponents once.
    • Custom 2 - Cleaver Shred: The Cleaver lasts longer and deals more damage, though it takes longer to activate once it lands on the ground or hits an opponent.
    • Custom 3 - Thrown Cleaver: The Cleaver deals less damage, but it can be picked up by The Beheaded and uses again like an item.
  • Final Smash - Crusher: The Beheaded reaches into its pocket, before pulling up a very dangerous looking trap. It tosses it forwards, it going about half the length of a dash attack. If an opponent is in range of it when it falls to the ground, a glowing aura fills the area. And then, each foe trapped in the area will be dealt dangerous amounts of damage as if they're being crushed. Meanwhile, The Beheaded can move and try to hit enemies into the zone so they can be Crushed. After a short time, the attack ends with one final crush, launching foes far away.
  • Charged State - Corrupted Power: The Beheaded's defenses drop significantly. However, in exchange, its attack power is doubled, allowing it to do a lot to enemies that leave themselves open.

  • Sans
    UNDERTALE (2015)
    Sans SSBUltimate
    Sans (サンズ, Sans) is a major character in the indie RPG title UNDERTALE, developed by Toby Fox. He is a skeleton living with his brother Papyrus in the underground, snowy town of Snowdin. He's lazy and flippant, and has an affinity for sophomoric humor and practical gags, though as the game progresses he shows himself to be more self-aware than he lets on. His role in the game changes depending on what route the player takes, either joining his friends in escaping the Underground or serving as the final boss.

    Sans is a character of extremes. He is one of the lighter characters and can be knocked away easily. His walk speed is also slow and his initial jump's height is pitiful. However, he uses his telekinesis to propel himself for his dash and double jump, significantly increasing their speed and height respectively. His moveset is also a mixed bag, having attacks that range from really weak to incredibly strong. This gives him a good mix of combo potential and KO options. Lastly, if Sans is KO'ed for the first time and is below 45%, the blast that normally appears when a player is KO'ed can actually hit the opponent, dealing 100% and fixed knockback. This will not happen if Sans self-destructs.

    Sans' moveset is really varied, having attacks that range from lazy "joke" attacks to powerful moves using his magical powers and abilities. Many of his attacks are also themed around and use bones, similar to his and Papyrus' boss battles in UNDERTALE. Notably, many of his strongest attacks damage opponents multiple times.
    SSB Undertale Series Sans icon SSBCharged Icon
    Sans' Moveset

    • Neutral Attack: Sans throws three alternating slaps.
    • Forward Tilt: Sans throws a forward kick.
    • Forward Smash: Sans summons two bones in front of him that slam into each other, crushing opponents trapped between them.
    • Up Tilt: Sans claps his hands above himself while holding a whoopee cushion, emitting a fart sound. If the attack button is held, Sans keeps pressing on the whoopee cushion, damaging opponents multiple times before launching them.
    • Up Smash: Sans puts on a Gaster Blaster and uses it as an arm cannon, firing five fiery blasts above himself in an overarching motion, damaging opponents multiple times before launching them.
    • Down Tilt: Sans sticks his leg outward to the side. It can only hit if the opponent is moving toward Sans, though it will cause them to trip.
    • Down Smash: Sans summons several bones around himself that rise up from the ground, damaging opponents multiple times before launching them.
    • Dash Attack: Sans flies forward and performs a battering ram.
    • Counter: Sans slides out of the way before slamming into the opponent attacking him. If he counters a projectile, he simply slides out of the way. Humorously, there are no animations for this move, and he is in his idle animation when the Counter is initiated and when it lands.

  • Neutral Aerial: Sans emits telekinetic energy around himself, damaging opponents multiple times before launching them.
  • Forward Aerial: Sans throws a bone forward, which floats in place for a bit before coming back to him, damaging opponents multiple times before launching then.
  • Forward Crash: Sans throws a bone forward, which flies forward in a straight line, damaging opponents multiple times before launching them.
  • Back Aerial: Sans throws a bone forward, which flies backward.
  • Back Crash: Sans thrusts a long bone behind himself, damaging opponents multiple times before launching them.
  • Up Aerial: Sans' pupils disappear as his skull pops off of his body and flies upward before returning.
  • Up Crash: Sans throws a bone upward, which flies upward and damages opponents multiple times before launching them.
  • Down Aerial: Sans throws a stomp downward.
  • Down Crash: Sans puts on a Gaster Blaster and uses it as an arm cannon, firing a fiery blast downward. The move can meteor smash opponents.

  • Grab: Sans telekinetically grabs the opponent.
  • Pummel: Sans telekinetically slams the opponent into the ground.
  • Forward Throw: Sans telekinetically throws the opponent forward.
  • Back Throw: Sans telekinetically throws the opponent backward.
  • Up Throw: Sans telekinetically throws the opponent upward.
  • Down Throw: Sans telekinetically lifts the opponent above the blast zone before slamming them into the ground.

  • Neutral Special - Bone Slide: Sans summons a bone from the ground and sends it forward. It will travel across the ground and will travel along walls and ceilings, damaging opponents multiple times before launching them. The move can be charged by holding the special button, making the bone taller.
    • Custom 1 - Bone Wave: Instead of summoning a single bone, Sans summons several small bones in front of himself that travel forward. It deals less damage and can't be charged, but covers more range.
    • Custom 2 - Big Bone: Sans summons a much bigger bone, which is slower and travels less distance, but harder to dodge.
    • Custom 3 - Quick Bone: The bone travels at a very fast speed, damaging opponents once. It doesn't travel along ledges or ceilings.
  • Side Special - Gaster Blaster: Sans summons a Gaster Blaster, which faces the nearest opponent and fires a stage-wide laser beam, damaging opponents multiple times. It disappears afterwards, and Sans cannot summon another one until it does. Opponents trapped in the laser are inflicted with paralysis.
    • Custom 1 - More Gaster Blasters: Sans summons three Gaster Blasters at once, which always face forward before firing. It deals more damage, but is easier to dodge.
    • Custom 2 - Even More Gaster Blasters: Sans summons four Gaster Blasters that appear around him and fire lasers outward. The directions they fire in are random and opponents hit by them will not suffer paralysis.
    • Custom 3 - Gaster Missile: Sans summons a Gaster Blaster and uses it as an arm cannon, firing a missile that travels forward and homes in on opponents, damaging them.
  • Up Special - Shortcut: Sans fades into a black silhouette and disappears, reappearing at the ledge and immediately grabbing onto it. If he isn't close enough to the ledge, he instead teleports straight upward and falls into a helpless state afterwards.
    • Custom 1 - Shock Shortcut: The range for Sans to teleport to the ledge is shorter, but he emits a blast of energy when he does, damaging any nearby opponents.
    • Custom 2 - Super Shortcut: The range for Sans to teleport to the ledge is longer, though he won't immediately grab the ledge and is vulnerable.
    • Custom 3 - Shortcut Teleport: Sans doesn't teleport to the ledge, and instead teleports in the direction the control stick is held.
  • Down Special - Blue Bone Slide: Sans summons a blue bone and sends it forward. It acts identical in every way to the bones summoned with neutral special, but they don't damage the opponent. Instead, if an opponent throws an attack while the blue bone is touching them, the move is cancelled and the damage and knockback is reflected to them.
    • Custom 1 - Blue Bone Reflect: The blue bones don't cancel opponents' attacks, though they will reflect projectiles.
    • Custom 2 - Blue Bone Wall: Instead of cancelling opponents' attacks, the blue bones act as a wall, and push opponents away. They cannot be charged for as long.
    • Custom 3 - Big Blue Bone: Sans summons a much larger blue bone, which is slower and travels less distance, but is taller and can be charged longer.
  • Final Smash - Strongest Attack: Sans summons four giant Gaster Blasters, which fly in set formations and fire giant lasers, dealing heavy damage and knockback to opponents caught in them.
  • Charged State - Stronger Sans: Sans begins flashing blue. In this state, Sans' attacks deal more damage and knockback, and the Gaster Blasters he summons are larger. His bones and blue bones also travel faster.

  • Cuphead
    Cuphead (2017)
    Cuphead SSBUltimate
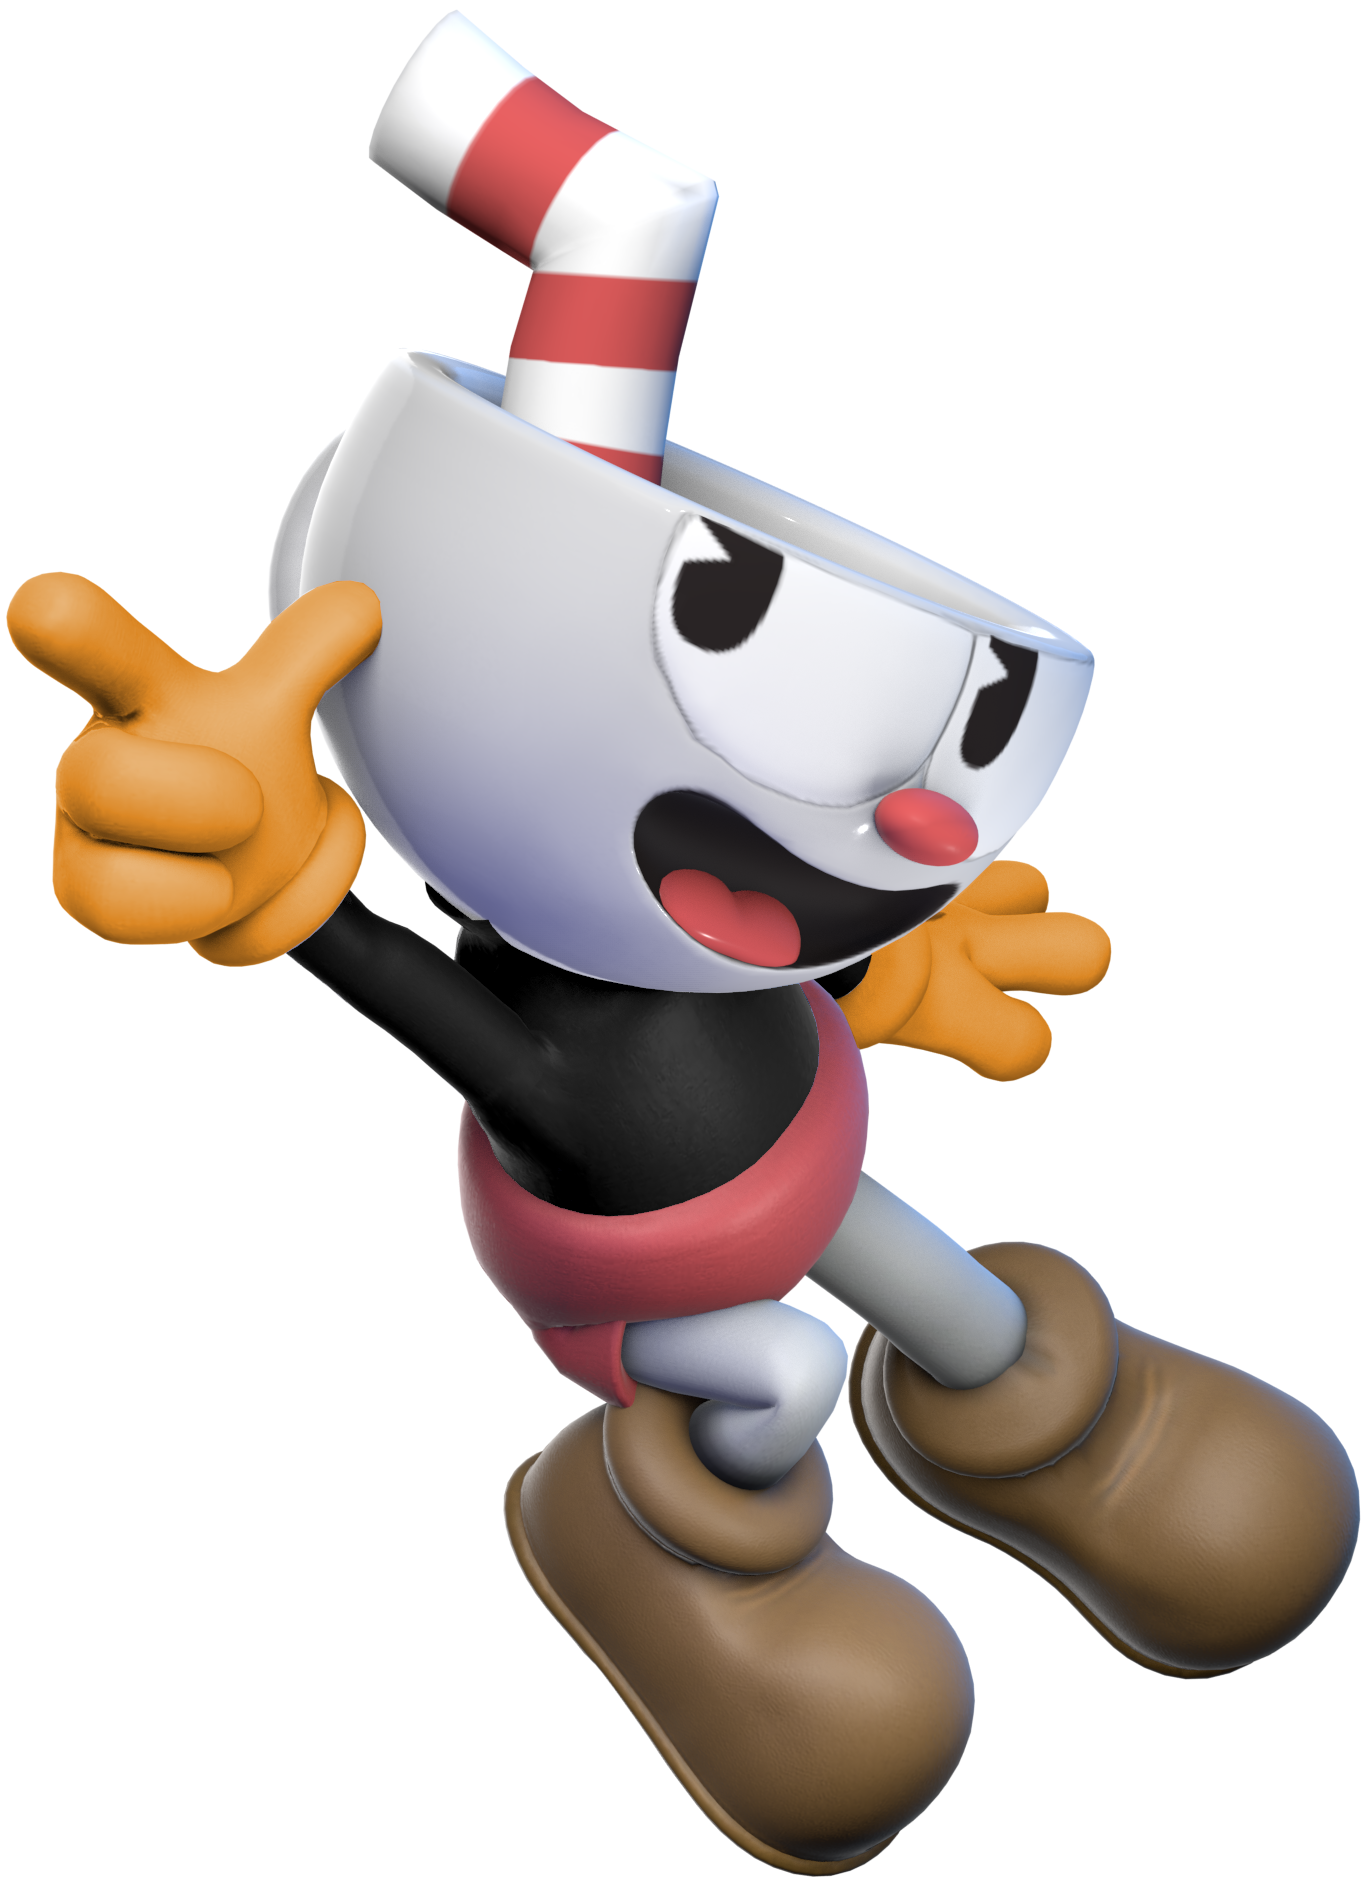
    Cuphead (カップヘッド, Cuphead) is the titular main character of StudioMDHR's run and gun 2D platformer Cuphead. He lives with his brother Mugman on Inkwell Isles, and they love to roll dice. They find themselves in the Devil's Casino, and their winning streak impresses the Devil. He bets the casino's riches in exchange for Cuphead and Mugman's souls; they take the bet but ultimately lose. They beg to be spared, and the Devil makes a deal with them, saying they can keep their souls if they hunt down the debtors who previously bet their souls with him.

    Cuphead is a mobile middleweight with serviceable ground and air speed, but really fast falling speed. His jump height is also average, making his recovery below-average and easy to gimp. Many of Cuphead's attacks are projectiles, and he can use them to keep opponents at range, as well as easily rack up damage. Uniquely, the projectiles fired from his tilts and aerials can be changed with his down special, each of them having different properties and uses.

    Aside from projectiles, Cuphead's physical attacks rely on melee moves such as punches, kicks, and headbutts. The projectiles themselves are pulled straight from Cuphead, as are his special moves.

    Whenever Cuphead is being used in battle, the announcer is changed to the one in Cuphead, who says the battle introductions whenever Cuphead starts a battle. In Stock and Stamina matches, if Cuphead lands the final hit, the announcer says "Knockout!" instead of "Game!"
    SSB Cuphead Series Cuphead Eyeless Stock SSBCharged Icon
    Cuphead's Moveset

    • Neutral Attack: Cuphead fires projectiles from his finger.
    • Forward Tilt: Cuphead fires projectiles from his finger while walking.
    • Forward Smash: Cuphead throws a hip thrust.
    • Up Tilt: Cuphead fires projectiles from his finger upward.
    • Up Smash: Cuphead throws a jumping uppercut.
    • Down Tilt: Cuphead fires projectiles from his finger downward.
    • Down Smash: Cuphead throws a breakdance sweep.
    • Dash Attack: Cuphead throws a sliding kick.
    • Counter: Cuphead disappears and reappears behind the opponent, attacking them with an uppercut.

  • Neutral Aerial: Cuphead fires projectiles from his finger.
  • Forward Aerial: Cuphead fires projectiles from his finger.
  • Forward Crash: Cuphead throws an overhead. The move can meteor smash opponents.
  • Back Aerial: Cuphead fires projectiles from his finger behind himself.
  • Back Crash: Cuphead throws a dropkick.
  • Up Aerial: Cuphead fires projectiles from his finger upward.
  • Up Crash: Cuphead throws a flip kick.
  • Down Aerial: Cuphead fires projectiles from his finger downward.
  • Down Crash: Cuphead throws two alternating stomps. The move can meteor smash opponents.

  • Grab: Cuphead reaches out to grab the opponent.
  • Pummel: Cuphead headbutts the opponent.
  • Forward Throw: Cuphead spins around with the opponent in tow before throwing them forward.
  • Back Throw: Cuphead throws the opponent behind himself before shooting them with a projectile.
  • Up Throw: Cuphead tosses the opponent upward.
  • Down Throw: Cuphead slams the opponent on the ground.

  • Neutral Special - EX Move: Cuphead uses an EX version of his projectile, which changes depending on what his projectile is. These can only be used after Cuphead has dealt enough damage, shown by a set of five cards being flipped up by his icon. Every 35% he deals makes one card, and each card allows him one EX Move. They are as follows:
      • Peashooter: Cuphead fires a large, blue projectile that can be aimed in any direction, damaging opponents it hits.
      • Spread: Cuphead fires eight slow-moving projectiles that travel outward, damaging opponents they hit.
      • Chaser: Four orbs orbit around Cuphead, damaging opponents they hit and reflecting projectiles.
      • Lobber: Cuphead fires a large, purple projectile that creates a shockwave upon landing on the ground, dealing heavy damage.
      • Charge: Cuphead creates an explosion around himself, dealing heavy damage and knockback to opponents in the blast radius.
      • Roundabout: Cuphead fires a larger version of the Roundabout projectile, which will chase him. He can dodge and it will keep trying to touch him, allowing it to hit opponents.
    • Custom 1 - Quick Use EX Moves: The EX Moves are weaker, but Cuphead doesn't need to deal as much damage to use them.
    • Custom 2 - Cooldown EX Moves: The EX Moves run on a cooldown of 25 seconds rather than needing cards to use.
    • Custom 3 - Free EX Moves: The EX Moves are considerably weaker, but Cuphead can use them at any time.
  • Side Special - Smoke Bomb: Cuphead disappears, and then reappears in the direction the control stick is held. In midair, he can only use the move once before landing.
    • Custom 1 - Smoke Blast: Cuphead doesn't travel as far, but the initial smoke can damage nearby opponents.
    • Custom 2 - Smoke Dash: Cuphead reappears farther away, though the move can only be used to travel forward or backward.
    • Custom 3 - Wind Bomb: Cuphead takes longer to reappear and his location is telegraphed, though the initial smoke creates windboxes that push opponents away.
  • Up Special - Parry Slap / Whetstone: Cuphead spins his straw and propels himself upward, falling into a helpless state. If he hits an opponent, he will slap them, turning them pink and propelling him upward even more. He can keep doing this to opponents and continue to gain height. If the special button is held, Cuphead instead throws an axe kick, which deals more damage and meteor smashes opponents at the cost of gaining less height.
    • Custom 1 - Straw Spin: Cuphead's straw damages opponents multiple times before launching them as he flies. He will not smack opponents.
    • Custom 2 - Straw Flight: Cuphead travels much higher, though he can't damage opponents at all.
    • Custom 3 - Super Slap: Cuphead doesn't travel as high, but the slap and axe kick give him more added height.
  • Down Special - Projectile Change: Cuphead changes his projectile, his current one being indicated next to his icon. These projectiles are fired from his finger during his tilts and aerials, each of them having different properties. The projectiles he can use are:
      • Peashooter: A small, blue projectile that can be fired rapidly. Travels a good amount of distance.
      • Spread: Five small, red projectiles that spread and can be fired rapidly. Travels a short distance.
      • Chaser: A small, green projectile that moves slow, but homes in on the nearest opponent. If no opponents are in range, it will travel forward a short distance before disappearing.
      • Lobber: A small, purple projectile that is fired in an arc and bounces across the ground two times before disappearing.
      • Charge: A weak projectile that can be charged by holding the attack button, which travels fast and deals heavy damage.
      • Roundabout: A small, green projectile that travels straight forward before looping back and travelling backward.
    • Custom 1 - Sniper Projectiles: The projectiles are weaker, but travel farther.
    • Custom 2 - Shotgun Projectiles: The projectiles deal more damage the closer the opponent is to Cuphead.
    • Custom 3 - Rapidfire Projectiles: The projectiles are fired even faster, but they travel less distance and are less damaging.
  • Final Smash - Energy Beam: Cuphead spills the liquid in his head as a giant horizontal beam, damaging opponents multiple times before launching them. The beam can be angled up and down.
  • Charged State - Suped-Up Cuphead: Cuphead gets eaten by a giant, eyeless version of his head before emerging, being much brighter and shinier. In this state, Cuphead can move faster, and his projectiles deal more damage. He can also use his EX Moves without needing to damage opponents beforehand.

  • Chomper
    Plants vs. Zombies (2009)
    ChomperCharged
    Chomper (チョッパー, Chomper) is one of the several towers available in PopCap Games' Plants vs. Zombies tower defense series. It is a large, purple plant with a big mouth and sharp teeth, based off of Audrey II from Little Shop of Horrors. Using its large mouth, it can instantly devour any type of Zombie instantly. However, there is a lot of lag to this ability, leaving them vulnerable to be eaten. As such, Chomper is considered a high-risk, high-reward tower and using it in conjunction with other plants, offensive and defensive alike, is recommended.

    Chomper is one of the roster's slower characters, and on top of having low jump height, it isn't very mobile at all. However, what it lacks in mobility it greatly makes up for in its grab game. With one of the longest-ranged grabs in the game as well as a command grab, as well as throws with a ton of utility, Chomper can be considered a grappler. Its strength is also on par with the heavyweight fighters, sporting some extremely strong attacks.

    Outside of Chomper's grabs, its attacks are mostly revolved around its mouth, head, and stem. They are typically powerful, though some of them have a lot of endlag. However, others are suitable for combo strings despite Chomper's poor mobility.
    SSB Plants vs. Zombies Series Chomper Stock Icon SSBCharged Icon
    Chomper's Moveset

    • Neutral Attack: Chomper bites forward twice.
    • Forward Tilt: Chomper throws a headbutt.
    • Forward Smash: Chomper lunges forward and throws a strong bite.
    • Up Tilt: Chomper bites upward.
    • Up Smash: Chomper throws an upward headbutt.
    • Down Tilt: Chomper buries itself in the ground and bites upward.
    • Down Smash: Chomper spins its head across the ground.
    • Dash Attack: Chomper throws a lunging bite.
    • Counter: Chomper throws a bite.

  • Neutral Aerial: Chomper performs a somersault.
  • Forward Aerial: Chomper performs a front flip to strike forward with its head.
  • Forward Crash: Chomper lunges forward and bites.
  • Back Aerial: Chomper throws a headbutt backward.
  • Back Crash: Chomper turns around and bites.
  • Up Aerial: Chomper throws an upward headbutt.
  • Up Crash: Chomper bites upward.
  • Down Aerial: Chomper throws a downward headbutt.
  • Down Crash: Chomper performs a front flip and bites downward. The move can meteor smash opponents.

  • Grab: Chomper lunges forward and bites on the opponent.
  • Pummel: Chomper chews on the opponent.
  • Forward Throw: Chomper spits the opponent forward.
  • Back Throw: Chomper spits the opponent backward.
  • Up Throw: Chomper spits the opponent upward.
  • Down Throw: Chomper spits the opponent at the ground.

  • Neutral Special - Chomper Jaws: Chomper lunges forward and bites, consuming an opponent and holding them in its mouth. The move can be charged by holding the special button, and at full charge, it will be stored for later use. At full charge, the mouth becomes significantly larger, allowing it to swallow multiple opponents, projectiles, and items as long as they are all in range. Swallowing any items and projectiles will replenish Chomper's health, and it chew on opponents by tapping the special button to chew on and damage them. It can also replenish damage this way, moreso if more than one opponent is swallowed, and they can be spit in any direction with directional inputs.
    • Custom 1 - Snapping Jaws: Chomper bits much faster, but doesn't swallow opponents and rather simply damages them and knocks them away.
    • Custom 2 - Chomper Spit: If Chomper only swallows a projectile, it can spit it back out like a reflector rather than eat it. The move deals less damage if used on opponents however.
    • Custom 3 - Super-Sized Jaws: Chomper can cover much more range with the move, though it cannot replenish health by chewing on opponents, and the move takes longer to charge fully.
  • Side Special - Burp: Chomper burps, sending a purple cloud of gas forward. It travels quickly across the stage, and damages opponents it hits. If it uses Chomper Jaws, then the strength of the burp will increase depending on how many opponents, items, and projectiles it swallowed throughout the battle, becoming a potentially strong KO move. After being used, the move will reset to normal strength.
    • Custom 1 - Hardy Burp: The cloud produced after burping is much stronger and deals more knockback, but cannot be strengthened by using Chomper Jaws.
    • Custom 2 - Bubbly Burp: Instead of burping clouds, Chomper burps bubbles. It won't damage opponents, but it will cause them to fall asleep. Using Chomper Jaws will increase the range of the bubbles and how long opponents will sleep.
    • Custom 3 - Gassy Burp: The use of Chomper Jaws will strengthen the move quicker, though it doesn't cover as much range.
  • Up Special - Kernel-pult: A Kernel-pult appears under Chomper, and flings it forward, damaging any opponents in its way and falling into a helpless state afterwards. The trajectory Chomper is flung in can be altered with directional inputs.
    • Custom 1 - Kernels-pult: Chomper isn't flung as far, but several kernels will fly along with him at random arcs, damaging opponents they hit.
    • Custom 2 - Power-pult: Chomper is flung much farther, but it cannot damage opponents it hits.
    • Custom 3 - Force-pult: Chomper isn't flung as high, but it deals more damage to opponents it hits.
  • Down Special - Potato Mine: Chomper plants a Potato Mine on the ground. It will remain in place indefinitely until an opponent steps over it, in which it will explode, and deal heavy damage and knockback. Chomper can also pick up the Potato Mine and throw it to stick on a wall or ceiling. It will also explode immediately if it hits an opponent when thrown. Only one Potato Mine can be in play at once.
    • Custom 1 - Timed Mine: Instead of exploding on contact with an opponent, it will explode two seconds after an opponent touches it. This makes it harder to use, but the blast radius is much larger, and deals more damage.
    • Custom 2 - Sticky Mine: Chomper throws the Potato Mine forward rather than sticking it on the ground. It explodes when it lands, but will stick to opponents should it hit one. It will explode after a few seconds, but can be passed onto Chomper or other fighters before exploding.
    • Custom 3 - Potato Mine Field: The Potato Mine has a much shorter blast radius and deals less damage, but up to three Potato Mines can be deployed rather than one.
  • Final Smash - Superbite: Chomper lunges forward and bites. It will continually chew on any swallowed opponents, dealing heavy damage before spitting them out. Should they be over 100%, Chomper will swallow them, KOing them instantly.
  • Charged State - Mutant Chomper: Chomper morphs into a grotesque, zombified form. In this state, while it is still slow, its attacks deal significantly more damage, and it also has knockback and damage resistance, making it harder to KO.

  • Dart Monkey
    Bloons (2007)
    Dart Monkey
    Dart Monkey (ダーツタワー, Dart Tower) is the mascot of NinjaKiwi's Bloons series. While it started as a puzzle / strategy game where the goal was to throw darts at balloons (named Bloons in the series) and pop all of them, the series evolved into a tower defense game where several towers could be placed to prevent Bloons from escaping. In these games, Dart Monkeys are among the cheapest and most basic towers, and attack Bloons by throwing darts to pop them. Though weak, they, along with all other towers, can be upgraded to become stronger.

    Dart Monkey is a quick, lightweight fighter who specializes in zoning opponents to deal most of his damage. His good mobility and fast frame data allows him to wade in easily if need be as well. Dart Monkey boasts a unique mechanic based on upgrading towers in the Bloons Tower Defense series; every time he attacks opponents, the damage he deals is converted into money (every 1% dealt converts to three Coins), which is shown by his icon. The money can be used with his down special to upgrade any his smash and special attacks. This also, uniquely, makes him the only character to not have any custom moves. The upgrades become more expensive as the fight goes on, but any move fully upgraded can make him a powerful fighter. If he is KO'ed, all of his money will be lost and he will need to upgrade his attacks again.

    Dart Monkey's main attacks consist of punches, kicks, and tail swipes, while his smash and special attacks take reference from other towers in the Bloons Tower Defense series. As such, the upgrades for said attacks are also based off of those from Bloons Tower Defense.
    SSB Bloons Tower Defense Series Dart Monkey Stock Icon SSBCharged Icon
    Dart Monkey's Moveset

    • Neutral Attack: Dart Monkey throws two slaps followed by a flurry of tail swipes, damaging opponents multiple times before launching them with a stronger swipe.
    • Forward Tilt: Dart Monkey throws a frontal clap.
    • Forward Smash: Dart Monkey throws a boomerang forward, which returns back to him.
    • Up Tilt: Dart Monkey throws an uppercut.
    • Up Smash: Dart Monkey places a mortar and fires a shell upward, which falls back down and explodes on impact.
    • Down Tilt: Dart Monkey throws a legsweep.
    • Down Smash: Dart Monkey takes out a glue gun and sprays it around himself. The move can cover opponents in glue, making them less mobile and lowering their jump height for a short time.
    • Dash Attack: Dart Monkey throws a dropkick.
    • Counter: Dart Monkey throws an uppercut.

  • Neutral Aerial: Dart Monkey performs a cartwheel, damaging opponents multiple times before launching them.
  • Forward Aerial: Dart Monkey throws a dropkick.
  • Forward Crash: Dart Monkey throws a haymaker. The move can meteor smash opponents.
  • Back Aerial: Dart Monkey throws a back kick.
  • Back Crash: Dart Monkey turns around before throwing a backhanded punch.
  • Up Aerial: Dart Monkey throws a bicycle kick.
  • Up Crash: Dart Monkey throws a jumping uppercut.
  • Down Aerial: Dart Monkey throws a double-handed axle. The move can meteor smash opponents.
  • Down Crash: Dart Monkey swings his arms downward rapidly, damaging opponents multiple times before launching them.

  • Grab: Dart Monkey reaches out to grab an opponent.
  • Pummel: Dart Monkey headbutts the opponent.
  • Forward Throw: Dart Monkey kicks the opponent forward.
  • Back Throw: Dart Monkey performs a suplex, launching the opponent backward.
  • Up Throw: Dart Monkey heaves the opponent upward before striking them with a handstand.
  • Down Throw: Dart Monkey slams the opponent into the ground.

  • Neutral Special - Dart Throw: Dart Monkey throws a dart forward, which travels in an arc. It deals minimal damage, but they can be thrown repeatedly.
  • Side Special - Bomb Shooter: Dart Monkey places a Bomb Shooter in front of himself, which fires a bomb forward that explodes on impact. The special button can be held or the move to charge, allowing the bomb to travel farther and deal more damage.
  • Up Special - Monkey Village: Dart Monkey leaps up into the air before dropping a Monkey Village below himself, falling into a semi-helpless state afterward. While around the Monkey Village, Dart Monkey's damage and knockback input will increase, as will his damage and knockback resistance. If the move is used while a Monkey Village is already in play, Dart Monkey will simply leap upward. The Monkey Village can be attacked by opponents, and it will be destroyed after taking 30% damage.
  • Down Special - Upgrade: If the special button is held, a row of six upgrades will open above Dart Monkey, one for each of smash and special attacks being marked by a symbol - a Dart, a Bomb, a Monkey Village, a Boomerang, a Mortar Shell, and Glue respectively. Using money, the player can scroll through the upgrades and select one by letting go of the special button, with the upgrade being active immediately after purchasing the upgrade. Each attack has five upgrades that can be bought, making them stronger. Only two of his special moves and two of his smash attacks can be upgraded; the rest will be unavailable. After that, only one special attack and one smash attack can be fully upgraded, and the other two attacks can only be upgraded twice. Once Dart Monkey is KO'ed, the upgrades will reset. Alternatively, a seventh option can be selected that resets all upgrades without needing to be KO'ed. This option also refunds 75% of the money Dart Monkey spent on the upgrades.
  • Final Smash - Super Monkey Storm: Dart Monkey whistles, summoning a swarm of Super Monkeys that fly across the stage. They deal heavy damage to opponents they hit.
  • Charged State - Super Monkey: Dart Monkey transforms into a Super Monkey. In this state, his mobility is significantly better, as is his jump height. Upgrades for his attacks are also cheaper, and he makes money more easily.

  • The first upgrade costs 50 Coins, the second upgrade costs 70 Coins, the third upgrade costs 90 Coins, the fourth upgrade costs 120 Coins, and the final upgrade costs 170 Coins.

  • Forward Smash
    • Improved 'Rangs: The boomerang deals more damage and knockback.
    • Flying 'Rangs: The boomerang travels faster and farther.
    • Glaive: Throws a glaive instead of a boomerang, which travels faster and deals more damage.
    • Bionic Arm: Throws three glaives at once.
    • Overdrive: Throws five glaives at once.
  • Up Smash
    • Bigger Shells: The shell is bigger and has a larger blast radius.
    • Burny Stuff: The explosion causes a patch of flames to appear on the ground, which gradually damages opponents that step in it.
    • Hard Drop: The shell falls downward much faster.
    • The Big One: The shell's blast radius is larger and deals more damage.
    • The Biggest One: The shell's blast radius is even larger, and deals extreme damage and knockback.
  • Down Smash
    • Stickier Glue: The glue sticks to opponents for longer.
    • Glue Splatter: The glue gun can cover more range.
    • Corrosive Glue: The glue will gradually damage opponents.
    • Glue Hose: The glue gun will shoot much more glue.
    • Liquifier Glue: The glue will damage opponents even faster.
  • Dart Throw
    • Fast Shots: Darts can be thrown faster.
    • Razor Darts: Darts deal more damage.
    • Crossbow: Darts are fired from a crossbow, allowing them to fly farther and deal more damage.
    • Sharpshooter: Darts deal more damage and can occasionally paralyze opponents.
    • Crossbow Master: Shoots three darts at once, and they can be shot even faster.
  • Bomb Shooter
    • Faster Charge: The Bomb Shooter charges faster.
    • Big Bombs: The Bomb Shooter launches bigger bombs that have a larger bast radius and deal more damage.
    • Frag Bombs: The explosion sends out fragments that deal even more damage.
    • Cluster Bomb: Instead of fragments, the explosion sends out smaller bombs, which also explode.
    • Recursive Cluster: The smaller bombs send out bombs of their own, covering a much wider radius and dealing even more damage.
  • Monkey Village
    • Wider Radius: The Monkey Village's range to help Dart Monkey is larger.
    • Jungle Drums: Dart Monkey's ground speed and frame data are increased by the Monkey Village.
    • Picket Fence: The Monkey Village can withstand 60% damage from opponents before disappearing.
    • Monkey Intelligence Bureau: The Monkey Village's range is even larger, and Dart Monkey's damage and knockback output are increased even further.
    • Homeland Defense: Dart Monkey is immune to negative status ailments when near the Monkey Village, and his damage and knockback resistance are increased further.

  • Engineer Monkey
    Bloons Tower Defense 5 Deluxe (2012)
    Engineer Monkey
    Engineer Monkey (エンジニアモンキー, Engineer Tower) is one of the towers in the Bloons Tower Defense series, debuting in Bloons Tower Defense 5 Deluxe and later being added in Bloons Tower Defense 6 as a Support-type tower. It is armed with a nail gun that it uses to shoot nails at Bloons. It also has unique abilities when upgraded, such as creating sentries that can fire more nails for more popping power, as well as Bloom Traps that can capture Bloons and convert them into money.

    Engineer Monkey is a lightweight fighter who utilizes several unique projectiles for zoning and stage control, even moreso than Dart Monkey. He has an identical mechanic where attacking opponents will give him money, which can be used to purchase upgrades for his special and smash attacks to make them stronger. Like Dart Monkey, only two of his smash attacks and two of his special attacks can be upgraded, and only one of each can be fully upgraded. If he is KO'ed, he will lose all his money and his upgrades will be reset.

    Engineer Monkey is armed with a nail gun, which he uses for a majority of his attacks, from using it as a battering weapon or to fire projectiles. Some of his attacks also take inspiration from other Towers in the Bloons Tower Defense series, such as Sniper Monkeys and Dartling Guns.
    SSB Bloons Tower Defense Series Engineer Monkey Stock Icon SSBCharged Icon
    Engineer Monkey's Moveset

    • Neutral Attack: Engineer Monkey throws a knee strike followed by two pistol whips with his nail gun.
    • Forward Tilt: Engineer Monkey throws a donkey kick.
    • Forward Smash: Engineer Monkey pulls out a Dartling Gun, which fires a volley of darts, damaging opponents multiple times before launching them.
    • Up Tilt: Engineer Monkey pushes himself upward with his tail to strike upward with his hard helmet.
    • Up Smash: Engineer Monkey turns into a Sniper Monkey, and aims his rifle upward before shooting. The move has infinite vertical range, and despite its appearance, is not a projectile and cannot be reflected or absorbed.
    • Down Tilt: Engineer Monkey fires a nail from his nail gun at the ground in front of him, pinning opponents he hits to the ground and leaving them vulnerable.
    • Down Smash: Engineer Monkey places a Bloon Trap on the ground, and remains there. It an opponent steps over it, it will trap them, leaving them vulnerable. Bloon Traps can be picked up and thrown like items.
    • Dash Attack: Engineer Monkey throws a battering ram.
    • Counter: Engineer Monkey throws an uppercut.

  • Neutral Aerial: Engineer Monkey performs a somersault.
  • Forward Aerial: Engineer Monkey throws a dropkick.
  • Forward Crash: Engineer Monkey fires his nail gun repeatedly forward, damaging opponents multiple times before launching them.
  • Back Aerial: Engineer Monkey throws a back kick.
  • Back Crash:Engineer Monkey fires his nail gun repeatedly backward, damaging opponents multiple times before launching them.
  • Up Aerial: Engineer Monkey throws an upward headbutt.
  • Up Crash: Engineer Monkey fires his nail gun repeatedly upward, damaging opponents multiple times before launching them.
  • Down Aerial: Engineer Monkey throws a stomp.
  • Down Crash: Engineer Monkey fires his nail gun repeatedly downward, damaging opponents multiple times before launching them.

  • Grab: Engineer Monkey reaches out to grab an opponent.
  • Pummel: Engineer Monkey headbutts the opponent.
  • Forward Throw: Engineer Monkey throws the opponent forward before firing at them with his nail gun.
  • Back Throw: Engineer Monkey spins around with the opponent in tow before throwing them backward.
  • Up Throw: Engineer Monkey heaves the opponent upward.
  • Down Throw: Engineer Monkey pins the opponent to the ground before shooting at them with his nail gun.

  • Neutral Special - Nail Gun: Engineer Monkey shoots a giant nail from his nail gun that flies forward, damaging opponents it hits. The special button can be held for him to continually fire nails.
  • Side Special - Sentry Gun: Engineer Monkey deploys a sentry in front of himself. It will aim around and shoot at nearby opponents with nails. They will last for six seconds before disappearing, though they can be destroyed by opponents' attacks. If Engineer Monkey is by a wall, the sentry will be placed on the wall instead. Up to three sentries can be at play at once.
  • Up Special - Cleansing Foam: If used on the ground, Engineer Monkey will spin around while spraying cleansing foam around himself, covering the stage and nearby opponents. If used in midair, Engineer Monkey will instead fly upward by shooting cleansing foam downward, with his trajectory able to be altered with directional inputs, falling into a helpless state afterwards. The cleansing foam will not only slow down opponents it covers or step in it, but it will also remove any positive status ailments they have.
  • Down Special - Upgrade: If the special button is held, a row of six upgrades will open above Engineer Monkey, one for each of smash and special attacks being marked by a symbol - a Nail Gun, a Sentry, Cleansing Foam, a Dartling Gun, a Sniper, and a Bloon Trap respectively. Using money, the player can scroll through the upgrades and select one by letting go of the special button, with the upgrade being active immediately after purchasing the upgrade. Each attack has five upgrades that can be bought, making them stronger. Only two of his special moves and two of his smash attacks can be upgraded; the rest will be unavailable. After that, only one special attack and one smash attack can be fully upgraded, and the other two attacks can only be upgraded twice. Once Dart Monkey is KO'ed, the upgrades will reset. Alternatively, a seventh option can be selected that resets all upgrades without needing to be KO'ed. This option also refunds 75% of the money Dart Monkey spent on the upgrades.
  • Final Smash - The Anti-Bloon: Engineer Monkey builds the Anti-Bloon, which will fire a beam of red energy forward, damaging opponents multiple times before launching them. After the beam, it creates a giant blast of red energy around itself, damaging any opponents in the blast radius, before disappearing.
  • Charged State - Overclock: Engineer Monkey puts on a white suit with a giant engine at the back. In this state, he is faster and heavier, and attacks involving his nail gun and other weapons deal much more damage and knockback. Nail Gun, Sentry, and his forward and up smash attacks also have much faster firing rate and less endlag.

  • The first upgrade costs 50 Coins, the second upgrade costs 70 Coins, the third upgrade costs 90 Coins, the fourth upgrade costs 120 Coins, and the final upgrade costs 170 Coins.

  • Forward Smash
    • Scattershot Darts: The darts fired from the Dartling Gun fly in more directions, covering more range.
    • Bloontonium Darts: The darts are glowing green, which will deal extra shield damage.
    • Extra Range Darts: The darts travel farther.
    • Laser Cannon: Instead of darts, the Dartling Gun fires lasers. They deal more damage and knockback.
    • Ray of Doom: Fires a single, solid beam of red energy, covering more range and dealing more damage.
  • Up Smash
    • Full Metal Jacket: The move deals more damage.
    • Large Calibre: The move deals more damage and knockback the farther away the opponent is.
    • Semi-Automatic Rifle: The rifle fires three bullets in rapid succession.
    • Cripple: The first and second bullets inflict paralysis on opponents, making them get hit by the rest of the bullets.
    • Full Auto Rifle: The rifle fires five bullets instead of three.
  • Down Smash
    • Super Trap: It is more difficult for opponents to escape a Bloon Trap.
    • Dual Trap: Two Bloon Traps can be at play instead of one.
    • Smart Trap: The Bloon Trap will move around slowly to chase opponents.
    • XXL trap: The Bloon Trap is larger and is easier to trap opponents.
    • XXXL Trap: The Bloon is even larger and can trap multiple opponents.
  • Nail Gun
    • Sprockets: The nail gun has a faster fire rate.
    • Oversized Nails: The nails are larger and deal more damage.
    • Heat-Seeking Nails: The nails will lightly home in on opponents.
    • Airburst Nails: The nails will split into three smaller nails when they hit an opponent, dealing further damage and covering more range.
    • Double Gun: Engineer Monkey uses two nail guns, doubling the fire rate and attack speed.
  • Sentry Gun
    • Armored Sentry: The sentry can take more damage before it is destroyed.
    • Larger Service Area: The sentry has more range.
    • Long-Lasting Sentry: The sentry lasts twice as long.
    • Self-Destructing Sentry: The sentry explodes when it disappears or is destroyed, damaging opponents in the blast radius.
    • Sentry Paragon: The sentry fires lasers instead of nails, dealing much more damage. It also has a faster fire rate.
  • Cleansing Foam
    • Spray: The cleansing foam covers more area
    • Sticky Foam: The foam stays on the ground and opponents for longer.
    • Foam Hose: Engineer Monkey fires more foam, allowing him to recover further.
    • Toxic Foam: The foam gradually damages opponents it covers and opponents that step in it.
    • Permafoam: The foam lasts significantly longer.

  • Twilight Sparkle
    My Little Pony: Friendship is Magic (2010)
    Twilight Sparkle (トワイライトスパークル, Twilight Sparkle) is one of the main characters of My Little Pony: Friendship is Magic, and represents the Element of Magic. She is a purple pony who used to be a unicorn, but became an alicorn when she became the Princess of Friendship. Hailing from Canterlot, she was enrolled into Princess Celestia's School for Gifted Unicorns, and became Celestia's protégé for her magic prowess. She was sent to Ponyville to study the magic of friendship, and the show revolves around the lessons she learns and the adventures she goes on with her new friends.

    Twilight Sparkle is a floaty middleweight who, thanks to her wings, can use four midair jumps and can glide. As almost all of her attacks utilize magic, she has a rather disjointed range, and can attack safely from a distance. Her multiple jumps and slow falling speed also grant her a flexible and difficult to counter recovery. Her aerials are best for racking up damage, and her smash attacks have very good KO potential. Lastly, her special moves have interesting properties that can give her an edge if used correctly.

    While Twilight Sparkle does have some physical attacks with her hooves and wings, most of them are magic-based, ranging from bursts to projectiles. Additionally, her assistant Spike is summoned for her forward smash, and also appears in a few other animations.
    SSB My Little Pony Series Twilight Sparkle Stock Icon SSBCharged Icon
    Twilight Sparkle's Moveset

    • Neutral Attack: Twilight Sparkle throws two punches with her front hooves followed by an uppercut.
    • Forward Tilt: Twilight Sparkle levitates a book with her telekinesis and swings it forward.
    • Forward Smash: Spike appears in front of Twilight Sparkle, who breathes a blast of green fire forward while Twilight shields herself with her wings.
    • Up Tilt: Twilight Sparkle emits a spark of magic energy from her horn.
    • Up Smash: Twilight Sparkle creates a beam of energy that rises from the ground below herself, damaging opponents multiple times before launching them.
    • Down Tilt: Twilight Sparkle creates a wave of magic energy from her horn that travels across the ground.
    • Down Smash: Twilight Sparkle slams both of her wings on the ground.
    • Dash Attack: Twilight Sparkle spins around while emitting magic from her body, damaging opponents multiple times before launching them.
    • Counter: Twilight teleports behind the opponent and kicks them with her back hooves. If she counters a projectile, she simply dodges the attack.

  • Neutral Aerial: Twilight Sparkle spins around while slashing with her wings, damaging opponents multiple times before launching them.
  • Forward Aerial: Twilight Sparkle throws a dropkick.
  • Forward Crash: Twilight sparkle fires a magic projectile forward with her horn.
  • Back Aerial: Twilight Sparkle swings her tail upward.
  • Back Crash: Twilight Sparkle fires a blast of magic forward, causing her to launch herself backwards and strike opponents with her rear.
  • Up Aerial: Twilight Sparkle strikes upward with her wings.
  • Up Crash: Twilight Sparkle fires a magic projectile upward with her horn.
  • Down Aerial: Twilight Sparkle throws a stomp. The move can meteor smash opponents.
  • Down Crash: Twilight Sparkle fires a magic projectile downward with her horn.

  • Grab: Twilight Sparkle telekinetically grabs the opponent with her horn.
  • Pummel: Twilight Sparkle telekinetically squeezes the opponent.
  • Forward Throw: Twilight Sparkle telekinetically flings the opponent forward.
  • Back Throw: Twilight Sparkle telekinetically flings the opponent backward.
  • Up Throw: Twilight Sparkle telekinetically spins the opponent around herself before flinging them upward.
  • Down Throw: Twilight Sparkle telekinetically throws the opponent at the ground, which will make the opponent lie down like Snake's down throw.

  • Neutral Special - Magic Barrier: Twilight Sparkle creates a purple barrier around herself. It will essentially act as a mobile shield, which will block attacks and reflect projectiles for a short time. Opponents attacking the barrier will cause it to shrink like a normal shield, and if it is fully depleted, it will break and stun Twilight. It can stack with Twilight's regular shield, though it has about half as much health. It can be cancelled by pressing the special button again, and it will recharge when not in use.
    • Custom 1 - Offensive Magic: Instead of creating a barrier around herself, Twilight Sparkle will begin glowing red. In this state, she will deal more damage and knockback, though she has much less knockback resistance, and can be KO'ed much easier.
    • Custom 2 - Magic Healer: The barrier is much smaller and can be broken easier, but Twilight Sparkle will gradually replenish 2% for every two seconds it is active.
    • Custom 3 - Magic Weight: Instead of creating a barrier around herself, Twilight Sparkle will begin glowing yellow. In this state, while her mobility and jump height is lower, she has significantly more damage and knockback resistance.
  • Side Special - Transformation Spell: Twilight Sparkle fires a blast of magic from her horn, which will turn opponents it hits into an orange, an apple, a book, or a teacup. In this state, they are unable to move, and are vulnerable to being attacked. Opponents can escape the transformation faster via button mashing.
    • Custom 1 - Transformation Flash: Instead of firing a projectile, Twilight Sparkle emits a blast of magic around herself, which will turn any opponents in the radius vulnerable. It has less range than the projectile, but it can affect more than one opponent.
    • Custom 2 - Vampire Spell: Instead of transforming opponents, the projectile will damage opponents while healing Twilight Sparkle.
    • Custom 3 - Permanent Transformation: The projectile travels slower and the move has noticeable startup lag, but it is much more difficult for opponents to escape from their transformation.
  • Up Special - Teleportation Spell: Twilight Sparkle teleports in the direction the control stick is held, falling into a helpless state afterwards if she ends up in midair. As she reappears, the special button can be pressed again for her to throw a stomp, which can meteor smash opponents.
    • Custom 1 - Far Teleportation: Twilight Sparkle will teleport farther, but cannot attack when she reappears.
    • Custom 2 - Downfall Spell: Twilight Sparkle will not only teleport upward, but opponents near her when she disappears will be meteor smashed.
    • Custom 3 - Teleport Freefall: Twilight Sparkle doesn't teleport as far and can't use her attack when she reappears, but she falls into a semi-helpless state and can use any of her aerials.
  • Down Special - Zero G: Twilight Sparkle creates a purple field around herself. This field will pull in opponents and projectiles and throw them in a random direction. It doesn't deal damage, but the distance they are thrown increases the more damaged they are. She also gains a small boost of vertical momentum, which can aid her recovery.
    • Custom 1 - Slow G: Instead of throwing around opponents, Twilight will inflict paralysis on them, leaving them vulnerable.
    • Custom 2 - Absorb Spell: Instead of throwing around opponents, Twilight will absorb projectiles, healing herself.
    • Custom 3 - Controlled Zero G: Opponents aren't thrown as far, but the direction they are thrown in can be controlled with directional inputs.
  • Final Smash - Friendship: Twilight Sparkle dons the element of Magic, and creates a giant white explosion of magic around herself, damaging opponents multiple times before launching them.
  • Charged State - Rainbowfied Twilight Sparkle: Twilight Sparkle becomes rainbowfied. In this sate, she is much faster and can fly higher. Her magic attacks also deal a lot more damage and knockback.

  • Rainbow Dash
    My Little Pony: Friendship is Magic (2010)
    Rainbow Dash (レインボーダッシュ, Rainbow Dash) is one of the main characters of My Little Pony: Friendship is Magic, and represents the Element of Loyalty. She is a light-blue pegasus who works for the Ponyville weather team. She is deemed "the fastest flyer in Equestria", and is able to fly at supersonic speeds after performing a Sonic Rainboom. While boastful and really tomboyish, she still loves her friends and will risk anything to help them.

    Rainbow Dash is one of the fastest characters in the roster, with running speed second to only Sonic and very good air speed. She also has five midair jumps thanks to her wings as well as the ability to glide. Her attacks are also fast, having really favorable frame data and can combo into each other. These attributes combined make her an extremely aggressive fighter, allowing her to put pressure on opponents and punish any mistakes they make. Her only downside is that she needs to rely on this to score KO's, as her attacks don't have a lot of KO power.

    Rainbow Dash will mainly use her hooves and wings for physical combat. Her aerial moves are the fastest in her arsenal, which can allow her to combo, string, and juggle opponents quite easily. Many of these attacks also have rainbow-like effects, which is more evident in her special moves.
    SSB My Little Pony Series Rainbow Dash Stock Icon SSBCharged Icon
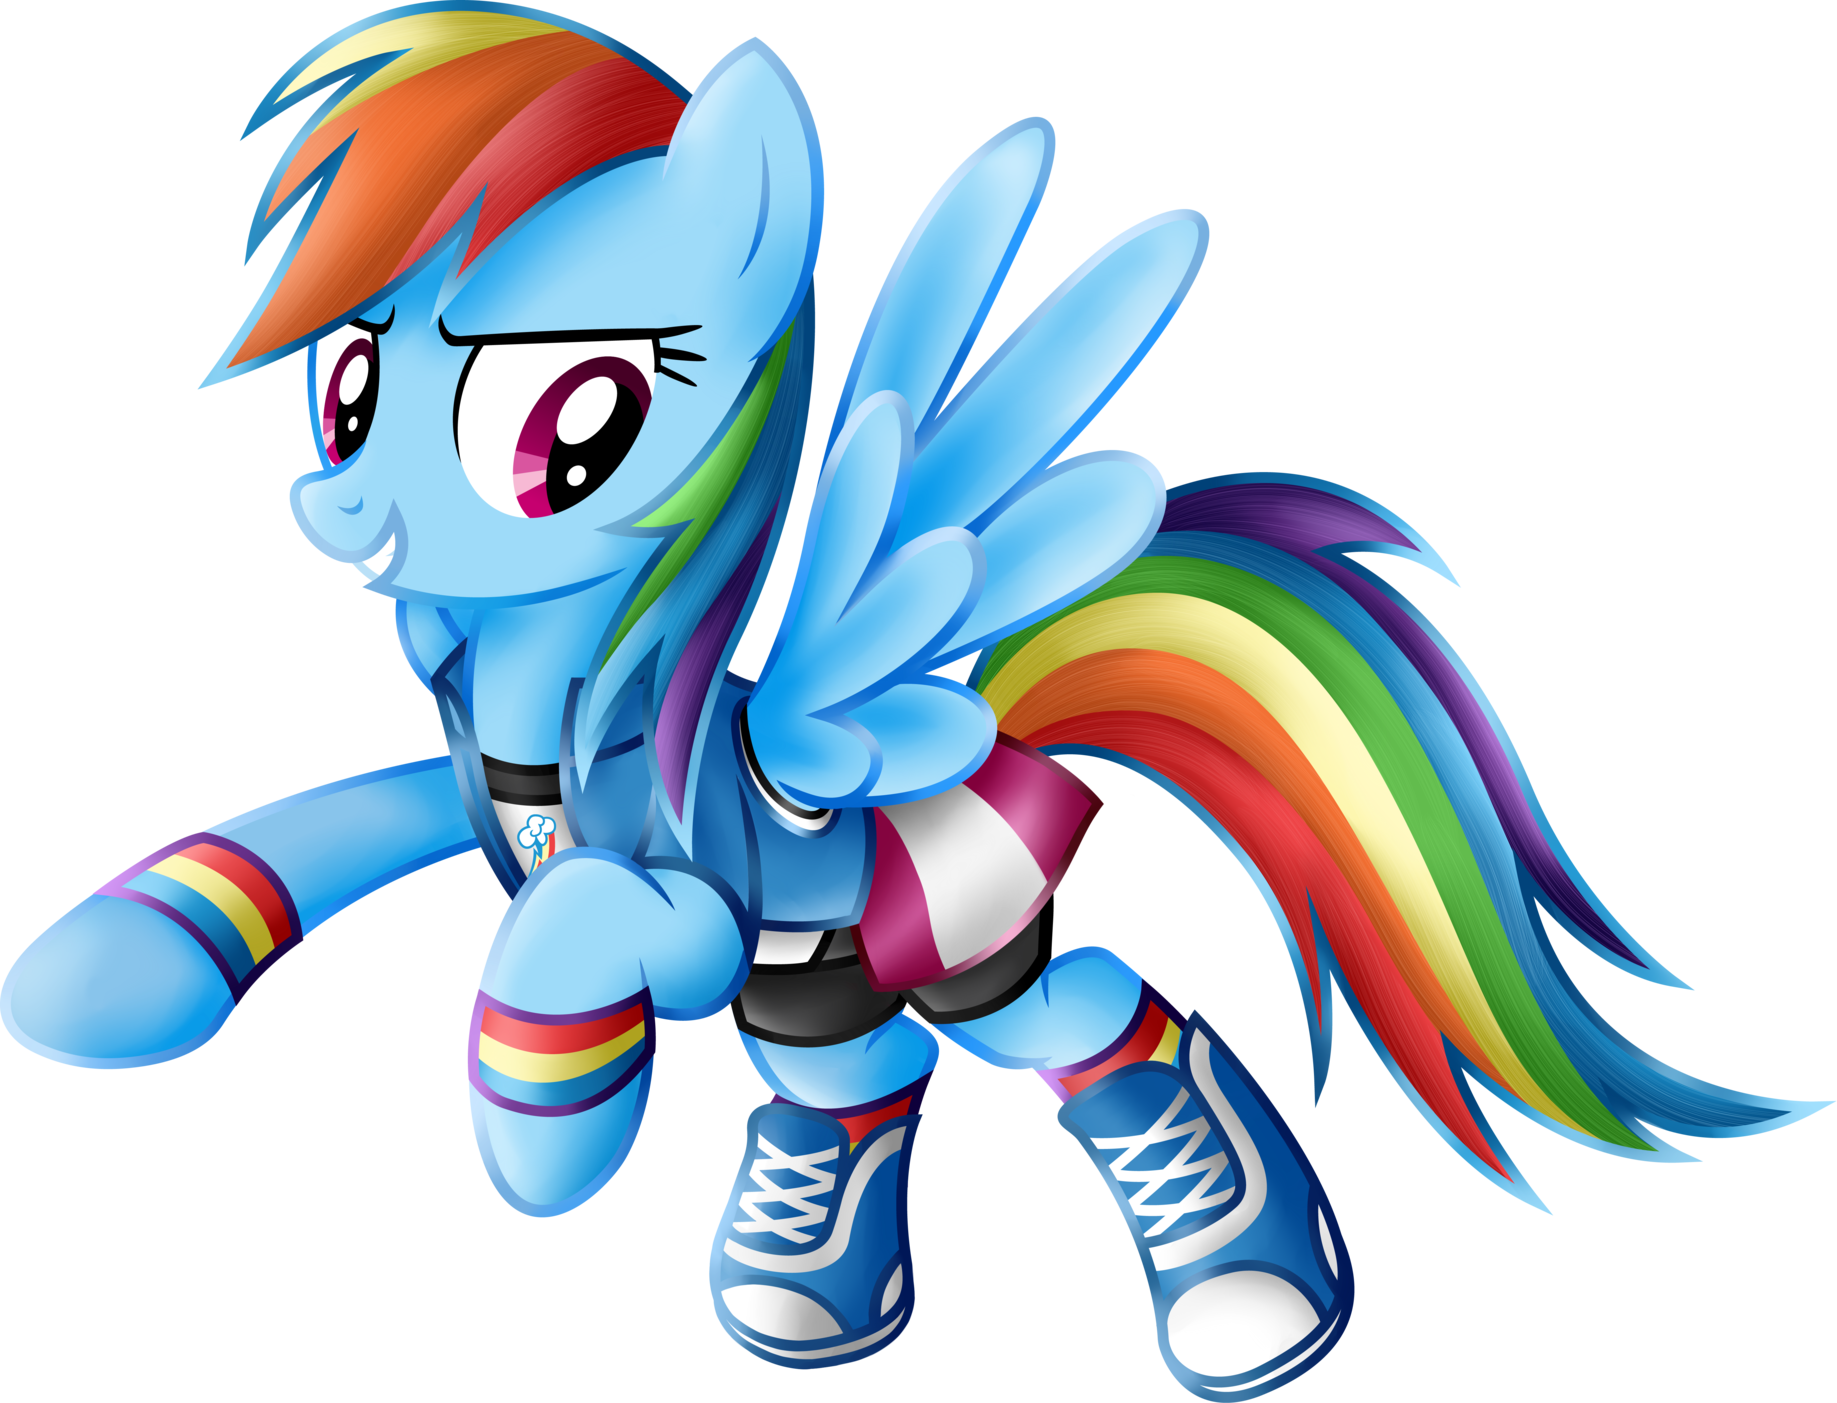
    Rainbow Dash's Moveset

    • Neutral Attack: Rainbow Dash throws two punches with her front hooves followed by an uppercut.
    • Forward Tilt: Rainbow Dash throws a kick with both of her back hooves.
    • Forward Smash: Rainbow Dash throws a dropkick, using her wings to push herself forward further. The move can go over edges because of this.
    • Up Tilt: Rainbow Dash thrusts her wings upward.
    • Up Smash: Rainbow Dash performs a backflip to throw a kick upward.
    • Down Tilt: Rainbow Dash throws a sliding kick, using her wings to propel herself forward.
    • Down Smash: Rainbow Dash throws a split kick with her back hooves.
    • Dash Attack: Rainbow Dash flies forward while throwing a battering ram.
    • Counter: Rainbow Dash throws an uppercut with her front hoof.

  • Neutral Aerial: Rainbow Dash performs a somersault.
  • Forward Aerial: Rainbow Dash throws an overhead with her front hoof. The move can meteor smash opponents.
  • Forward Crash: Rainbow Dash throws a spinning kick with her back hoof.
  • Back Aerial: Rainbow Dash throws a back kick with her back hoof.
  • Back Crash: Rainbow Dash turns around and throws a punch with her front hoof.
  • Up Aerial: Rainbow Dash claps her wings together.
  • Up Crash: Rainbow Dash spins around while facing upward, damaging opponents multiple times before launching them.
  • Down Aerial: Rainbow Dash performs a front flip, striking with her front hooves and then her back hooves. The second part of the attack will meteor smash opponents.
  • Down Crash: Rainbow Dash flies downward headfirst. She makes a rainbow explosion on contact with the ground, dealing massive damage and knockback, enough to break a full shield.

  • Grab: Rainbow Dash reaches forward with both front hooves to grab the opponent.
  • Pummel: Rainbow Dash headbutts the opponent.
  • Forward Throw: Rainbow Dash spins around with the opponent in tow before throwing them forward.
  • Back Throw: Rainbow Dash flings the opponent backward.
  • Up Throw: Rainbow Dash flies upward with the opponent in tow before flying downward and slamming them into the ground.
  • Down Throw: Rainbow Dash slams the opponent into the ground.

  • Neutral Special - Rainbow Wings: Rainbow Dash flaps her wings at incredible speeds, creating rainbows from them. The move creates windboxes that push opponents and projectiles away. If used in midair, she will gain some extra vertical height. The move can be cancelled into any other move.
    • Custom 1 - Rainbow Tornado: The wings create vacuumboxes instead of windboxes, pulling opponents toward Rainbow Dash.
    • Custom 2 - Rainbow Rotors: The wings will damage nearby opponents multiple times before launching them. No windboxes are created.
    • Custom 3 - Gusty Rainbow Wings: The windboxes are much bigger and stronger, though the move has noticeable startup lag.
  • Side Special - Sonic Rainboom: Rainbow Dash blasts forward in a burst of rainbows in the direction the control stick is held, damaging any opponents in her way. The move is especially strong at the start of the move. If she contacts a surface, she creates a rainbow explosion that deals heavy damage to opponents in the blast radius.
    • Custom 1 - Rainbow Torpedo: Rainbow Dash will damage opponents multiple times before launching them. She travels slightly slower.
    • Custom 2 - Rainboom Rush: Rainbow Dash travels much faster and is invincible while using the move, but she doesn't travel as far.
    • Custom 3 - Sonic RainBOOM: Rainbow Dash doesn't deal as much damage and travels slower, but the explosion that happens when she hits a surface has a much larger blast radius and deals more damage.
  • Up Special - Rainbow Coaster: Rainbow Dash flies upward in loops, damaging opponents she hits. She falls into a helpless state afterwards.
    • Custom 1 - Rainbow Loops: Rainbow Dash deals less damage, but her flight path can be slightly controlled with directional inputs, allowing her to combo opponents easier.
    • Custom 2 - Rainbow Flight: Rainbow Dash travels much higher, but she doesn't damage opponents. She also doesn't fly in loops, and instead travels in a straight line that can be slightly altered.
    • Custom 3 - Rainbow Stunt: Rainbow Dash flies in less loops, but she strikes a pose at the end of the move, dealing heavy damage and knockback.
  • Down Special - Weather Control: Rainbow Dash creates a cloud and puts it below herself. If used on the ground, she suspends it above herself instead. The cloud can be used as a platform for her to stand on, and can be pushed around by attacking it; opponents can't affect it in any way. Depending on the color, the cloud can do different things; black clouds shoot lightning down that damages opponents, white clouds create snow that freezes opponents below, and blue clouds rain, causing opponents on the ground below to slip. The cloud will disappear after a short time, and only one cloud can be at play at once.
    • Custom 1 - Thunderstorm: Only black clouds can be used, though they are much larger and the thunder bolts deal more damage.
    • Custom 2 - Cloudy Skies: Up to three clouds can be at play at once. However, they are smaller and don't stay around for as long.
    • Custom 3 - Relentless Weather: When summoned, the cloud will hover over the nearest opponent, making it much more difficult to dodge. It disappears right after it uses its effect.
  • Final Smash - Loyalty: Rainbow Dash dons the Element of Loyalty, and performs the Sonic Rainboom. She flies back and forth across the stage, damaging opponents she runs into repeatedly. She then rushes into the opponents head-on, creating a rainbow explosion that launches them.
  • Charged State - Rainbowfied Rainbow Dash: Rainbow Dash becomes rainbowfied. In this sate, many of her attacks have more rainbow effects, her attacks are stronger, and the clouds she summons last much longer.

  • Pinkie Pie
    My Little Pony: Friendship is Magic (2010)
    Pinkie Pie (ピンキーパイ, Pinkie Pie) is one of the main characters of My Little Pony: Friendship is Magic, and represents the Element of Laughter. She is a pink earth pony who lives at Ponyville; though originally a rock farmer, she found her calling as a party planner, and loves to make others happy. She's considered the show's comic relief, and often does things such as breaking the fourth wall or disobeying the laws of physics without any explanation.

    As a middleweight, Pinkie Pie has balanced stats, with average running speed, above-average air speed and jump height, and below-average falling speed. Her attacks have rather awkward mechanics that require mastery in order to use her effectively, especially her special moves, though they do give her the tools she needs to win any battle. Her KO power in particular is strong, specifically in her smash attacks, though she can have trouble comboing opponents, and her moves aren't very fast either.

    Pinkie Pie's attacks utilize a variety of different objects as weapons, from pies, to presents, to a rubber chicken, to a foam finger, to her pet alligator Gummy for her grab. Aside from this, she also uses punches and kicks with her hooves.
    SSB My Little Pony Series Pinkie Pie Stock Icon SSBCharged Icon
    Pinkie Pie's Moveset

    • Neutral Attack: Pinkie Pie throws a front kick with her back hoof, then leans forward to strike with her opposite front hoof, then spins around and throws a spinning kick.
    • Forward Tilt: Pinkie Pie pulls out a pie and swings it forward, splattering it if it hits an opponent.
    • Forward Smash: Pinkie Pie stands on her back hooves and thrusts a yellow foam finger forward.
    • Up Tilt: Pinkie Pie swings her tail upward.
    • Up Smash: Pinkie Pie places her party cannon in front of herself and aims it upward, shooting a burst of confetti.
    • Down Tilt: Pinkie Pie slides forward on her bottom.
    • Down Smash: Pinkie Pie jumps upward and stomps on a giant balloon, popping it.
    • Dash Attack: Pinkie Pie performs a cartwheel, damaging opponents multiple times before launching them.
    • Counter: Pinkie Pie kicks with both of her back hooves.

  • Neutral Aerial: Pinkie Pie spins around with all four of her hooves outstretched.
  • Forward Aerial: Pinkie Pie throws a sex kick.
  • Forward Crash: Pinkie Pie takes out a rubber chicken and swings it downward.
  • Back Aerial: Pinkie Pie performs a reverse corkscrew battering ram.
  • Back Crash: Pinkie Pie releases a party popper behind herself. The move grants her forward momentum when used.
  • Up Aerial: Pinkie Pie throws a scissor kick. The move can meteor smash opponents.
  • Up Crash: Pinkie Pie spins around while a disco ball shines above herself, damaging opponents multiple times before launching them.
  • Down Aerial: Pinkie Pie throws a corkscrew kick, damaging opponents multiple times before launching them.
  • Down Crash: Pinkie Pie throws a water balloon downward.

  • Grab: Pinkie Pie takes out Gummy and releases his tongue to grab the opponent. The move can also be used in midair as a tether grab.
  • Pummel: Pinkie Pie squeezes the opponent while hugging them.
  • Forward Throw: Pinkie Pie spins around with the opponent in tow before throwing them forward.
  • Back Throw: Pinkie Pie suplexes the opponent.
  • Up Throw: Pinkie Pie performs a backflip with the opponent before throwing them upward.
  • Down Throw: Pinkie Pie slams the opponent into the ground.

  • Neutral Special - Birthday Present: Pinkie Pie throws a birthday present forward, and she can pick it up and throw it again. Only one present can be at play at a time. If an opponent touches a birthday present, it will explode and one of the five events can occur at random:
      • Confetti will explode, which has no effect on the battle.
      • Large windboxes appear that push the opponent away.
      • The opponent is buried or meteor smashed depending on if they are on the ground or in the air.
      • The opponent is put to sleep with music notes.
      • The opponent has a mushroom grow on their head.
      • An explosion occurs and the opponent takes massive damage and knockback.
    • Custom 1 - Big Present: The present is bigger and the effects are more extreme, though it isn't thrown as far and Pinkie Pie can't pick it up and throw it again.
    • Custom 2 - Timely Present: The present's effect takes place after a set amount of time instead of when an opponent touches it. When picked up and thrown, it will damage and knock opponents it hits away.
    • Custom 3 - Birthday Party: Pinkie Pie can have up to three presents at play at once, though their effects are less effective.
  • Side Special - Party Cannon: Pinkie Pie jumps in her party cannon and launches herself forward, damaging opponents she hits. The move can be charged by holding the special button, allowing her to fly faster, farther, and deal more damage. Directional inputs can also be used to aim herself before launching.
    • Custom 1 - Pinkie Missile: Pinkie Pie doesn't travel as far or as fast, but she damages opponents she hits multiple times before launching them.
    • Custom 2 - Smart Party Cannon: Pinkie Pie automatically aims herself at the nearest opponent, though she deals less damage.
    • Custom 3 - Party Cannon Blast: Pinkie Pie doesn't deal as much damage and the move takes longer to charge, but at full charge, the Party Cannon will explode, dealing heavy damage and knockback.
  • Up Special - Balloon Pop: Pinkie Pie pops a balloon underneath herself with a needle, sending her upward and damaging opponents. The move can be used up to three times in midair.
    • Custom 1 - Loud Pop: The pops deal more damage and knockback, but Pinkie Pie doesn't travel as high.
    • Custom 2 - High-Pressure Pop: Instead of damaging opponents, the pops create windboxes that push them backward.
    • Custom 3 - Big Balloon Pop: Pinkie Pie pops a single balloon, which sends her much higher than a regular one before she falls into a semi-helpless state, making the move act like a traditional recovery move.
  • Down Special - Surprise!: Pinkie Pie quickly runs off-stage before appearing on the other side, striking the opponent form behind. If a Birthday Present is in play, then she will pop out of the present instead, damaging any opponents nearby. Pinkie is invincible while running away, though not when she reappears. The move can only be used on the ground, and cannot aid her recovery.
    • Custom 1 - Surprise from Under: Instead of appearing behind the opponent, Pinkie Pie pops out of the ground underneath them.
    • Custom 2 - Surprise from Above: Instead of appearing behind the opponent, she falls from the sky above them, burying or meteor smashing them depending on if the opponent is on the ground or in the air.
    • Custom 3 - Slip Surprise: Instead of damaging opponents, Pinkie Pie will cause them to slip. The move can be cancelled into her other attacks.
  • Final Smash - Laughter: Pinkie Pie dons the Element of Laughter before she pulls out a giant version of her Party Cannon and fires a beam of frosting forward, damaging opponents multiple times before launching them. The beam can be aimed upward or downward.
  • Charged State - Rainbowfied Pinkie Pie: Pinkie Pie becomes rainbowfied. In this sate, she can run faster, her attacks are stronger, and she can jump significantly higher. Her Party Cannon also charges faster, and her grab has more range.

  • Applejack
    My Little Pony: Friendship is Magic (2010)
    Applejack (アップルジャック, Applejack) is one of the main characters of My Little Pony: Friendship is Magic, and represents the Element of Honesty. She is an orange Earth pony who lives with her family in Sweet Apple Acres, where they harvest apples for a living. While she is messy and sometimes ill-mannered, she is extremely hardworking and will stop at nothing to help her friends.

    Despite her size, Applejack is a heavyweight fighter, and as such can be difficult to knock away. She also has decent mobility for a character her weight class, with fast falling speed to make her agile. Many of her attacks are powerful, and can KO opponents easily, and her speed and small frame can allow her to both combo opponents better and escape combos herself easier than other opponents. However, her recovery isn't particularly good.

    Applejack's attacks outside of her special moves are entirely physical, making use of her hooves, tail, and body. They are both string and are relatively quick, so she can KO opponents quite easily, though she struggles in the range department, and in most cases has to get close to opponents in order to land an attack.
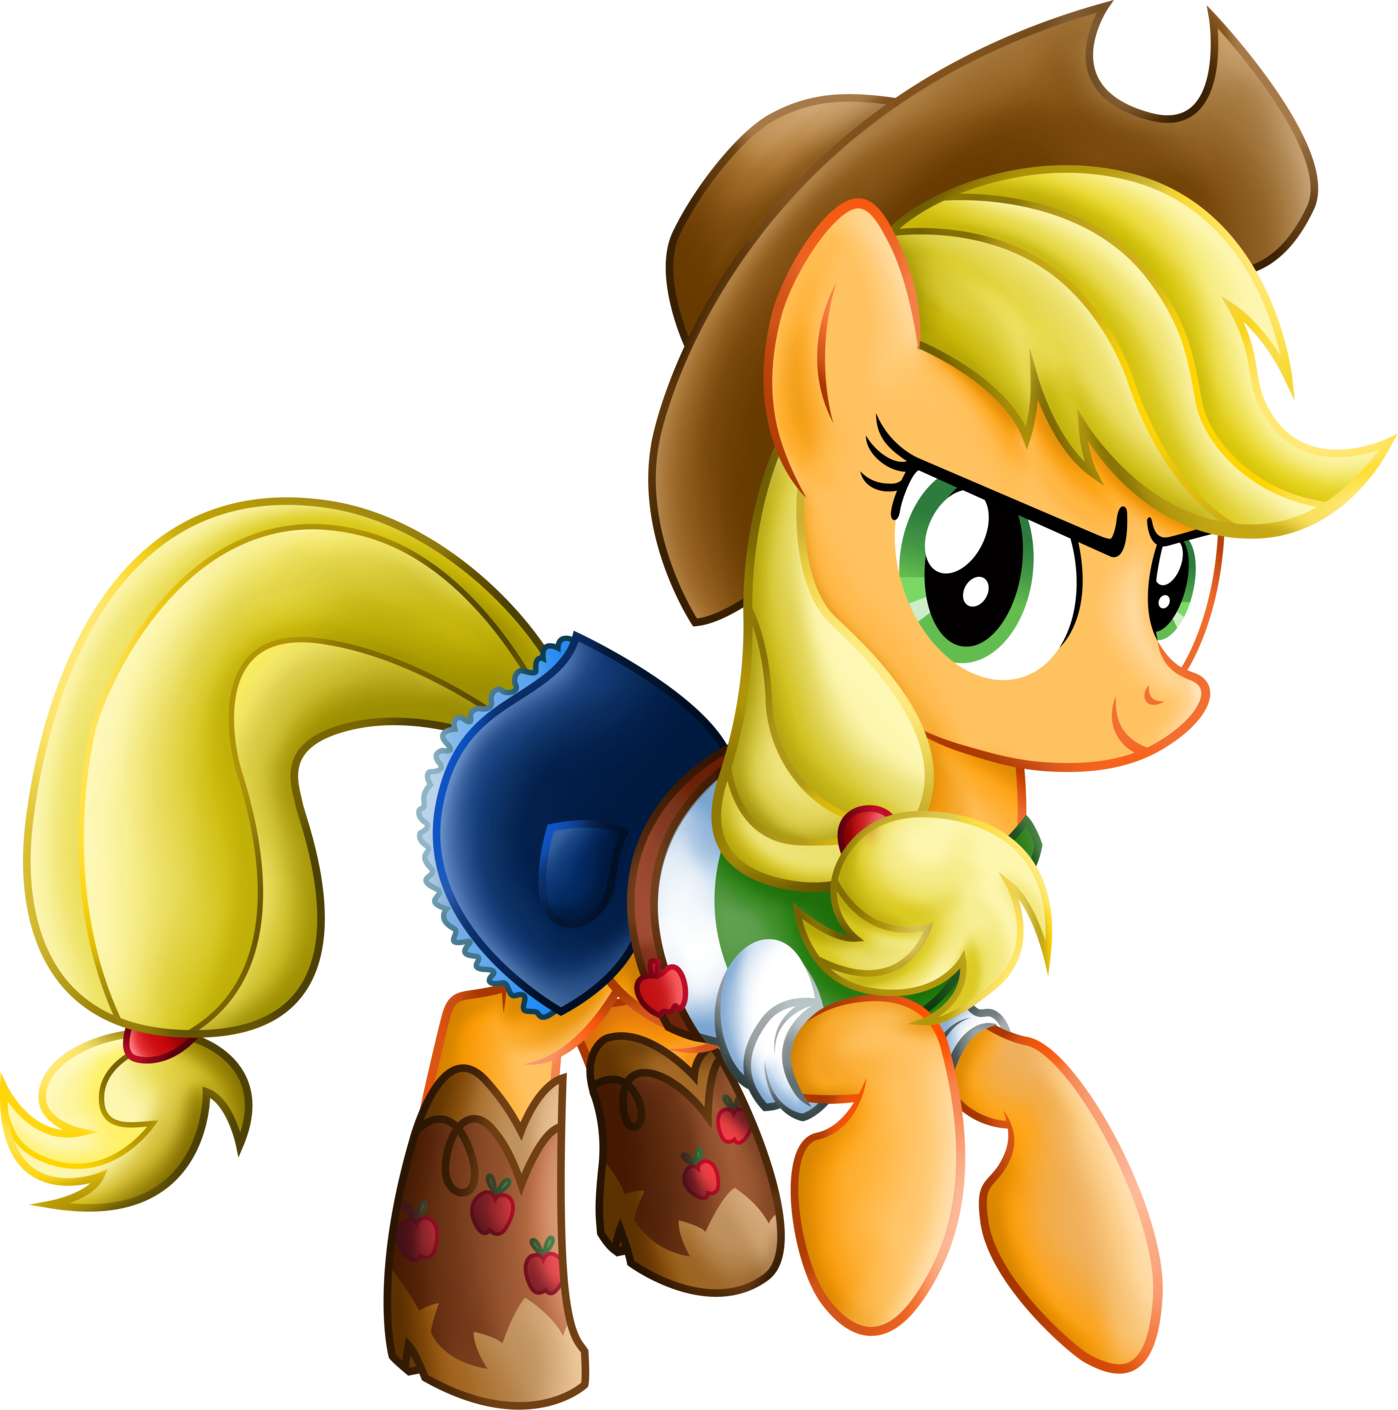
    SSB My Little Pony Series Applejack Stock Icon SSBCharged Icon
    Applejack's Moveset

    • Neutral Attack: Applejack throws a kick with her front hoof, followed by a side kick with her back hoof.
    • Forward Tilt: Applejack whips her tail forward.
    • Forward Smash: Applejack turns around and kicks with both of her back hooves.
    • Up Tilt: Applejack stands on her hind legs and throws several punches with her front hooves upward, damaging opponents multiple times before launching them.
    • Up Smash: Applejack performs a backflip to kick upward.
    • Down Tilt: Applejack throws a shin kick with her hind hoof.
    • Down Smash: Applejack performs a leaping belly flop.
    • Dash Attack: Applejack performs a battering ram.
    • Counter: Applejack throws a stretch kick with her back hoof.

  • Neutral Aerial: Applejack performs a splash.
  • Forward Aerial: Applejack throws a dropkick.
  • Forward Crash: Applejack performs a front flip before striking downward with her front hooves. The move can meteor smash opponents.
  • Back Aerial: Applejack throws a back kick with her back hoof.
  • Back Crash: Applejack turns around and throws a punch with her front hoof.
  • Up Aerial: Applejack throws an upward headbutt.
  • Up Crash: Applejack throws a bicycle kick.
  • Down Aerial: Applejack throws a downward stomp with her back hoof. The move can meteor smash opponents.
  • Down Crash: Applejack falls downward headfirst.

  • Grab: Applejack reaches out with both front hooves.
  • Pummel: Applejack headbutts the opponent.
  • Forward Throw: Applejack kicks the opponent away with her back hooves.
  • Back Throw: Applejack puts the opponent behind herself and kicks them away with her back hooves.
  • Up Throw: Applejack heaves the opponent upward before kicking them away with her back hooves.
  • Down Throw: Applejack slams the opponent into the ground.

  • Neutral Special - Apple Toss: Applejack tosses an apple upward. Pressing the special button again will have her kick the apple with her back hooves, sending it flying forward. The arc and trajectory the apple travels in depends on what time the special button is pressed again; pressing it sooner will send the apple in a slower, higher arc, while pressing it later will send the apple in a faster, shorter arc.
    • Custom 1 - Baked Apples: The apples don't travel as far, but they deal more damage and will burn opponents.
    • Custom 2 - Rotten Apples: The apples deal less damage, but they will cause the opponent to grow a flower on their heads.
    • Custom 3 - Apple Cider: Instead of kicking an apple, Applejack kicks a bottle of apple cider, which spills on the ground. Opponents who step on the cider will slip, leaving them vulnerable.
  • Side Special - Lasso: Applejack swings a lasso forward with her mouth. If she grabs an opponent, she can throw them forward, backward, or upward, dealing more damage the farther the opponent is away from her. The lasso can also grab onto ledges and act as a tether grab. It can only catch opponents who touch the ring of the lasso.
    • Custom 1 - Wide-Ring Lasso: The lasso doesn't deal as much damage, but it can catch opponents easier.
    • Custom 2 - Whip: Instead of swinging a lasso, Applejack swings a whip. It won't grab opponents, and instead damages and launches them, dealing the most damage at the tip.
    • Custom 3 - Longer Lasso: The lasso can be thrown farther, but the move has more startup lag and deals less damage.
  • Up Special - Apple Jump: Applejack performs a leaping uppercut, falling into a helpless state afterwards. The move has a sweetspot at the peak of her jump, though the rest of the move is pretty weak.
    • Custom 1 - Rising Apple Jump: The move has no sweetspot, and instead deals balanced damage throughout the entire attack.
    • Custom 2 - Quick Apple Jump: Applejack rises higher and faster, but she gains less horizontal distance and the sweetspot is weaker.
    • Custom 3 - Apple Bound: Applejack covers much more vertical and horizontal distance, but doesn't damage opponents.
  • Down Special - Apple Pound: Applejack pounds the ground with both of her front hooves. If used in midair, she falls downward to the ground instead. She creates a shockwave upon pounding., damaging nearby opponents, and she buries opponents that are close enough. She can also meteor smash opponents if used in midair, and the grounded version has super armor.
    • Custom 1 - Apple Quake: The shockwave is much larger and covers more range, but she doesn't have super armor.
    • Custom 2 - Turbulent Apple Pound: Applejack creates windboxes upon pounding the ground, pushing opponents away. The sweetspot doesn't bury opponents.
    • Custom 3 - Booming Pound: The move has much more startup and endlag, but pounding the ground causes an explosion, dealing heavy damage and knockback.
  • Final Smash - Honesty: Applejack dons the Element of Honesty before rushing forward. If she hits an opponent, she kicks them with both her back hooves, locking them in an animation where she bucks a giant apple tree, causing apples to fall on the opponents. After awhile, the opponents are sent back to the stage and launched away.
  • Charged State - Rainbowfied Applejack: Applejack becomes rainbowfied. In this sate, she can run faster, her attacks are stronger, and she can jump significantly higher. The apples used for Apple Toss are also much larger, and her lasso can catch opponents even if they don't touch the ring.

  • Rarity
    My Little Pony: Friendship is Magic (2010)
    Rarity (ラリティ, Rarity) is one of the main characters of My Little Pony: Friendship is Magic, and represents the Element of Generosity. She is a white unicorn who grew up in Ponyville as a fashion designer, running her own fashion store, the Carousel Boutique. She's very prim and proper and hates getting dirty, which sometimes makes her butt heads with her friends Rainbow Dash and Applejack. However, she has endless generosity, and willing to do whatever it takes to help those in need.

    Rarity exclusively uses her magic to pick up objects and smack opponents with them. As a quick and nimble middleweight, she has a decent combo game and good ways for racking up damage quickly, from her specials to combos with her aerials. Thanks to her high jump height and slow falling speed, she's more of an aerial-based fighter and isn't as effective on the ground. Rarity can have trouble KO'ing opponents, especially heavyweights, because of this. However, she can gimp recovering opponents easily with her safe and quick aerials.

    As mentioned, outside of her jab, Rarity doesn't use any physical attacks, instead swinging around objects such as scarves, jewels, and mannequins with her unicorn telekinesis. This gives her plenty of range and allows her to play at a safe distance, and thanks to her quick attacks, it can be hard for opponents to close the gap.
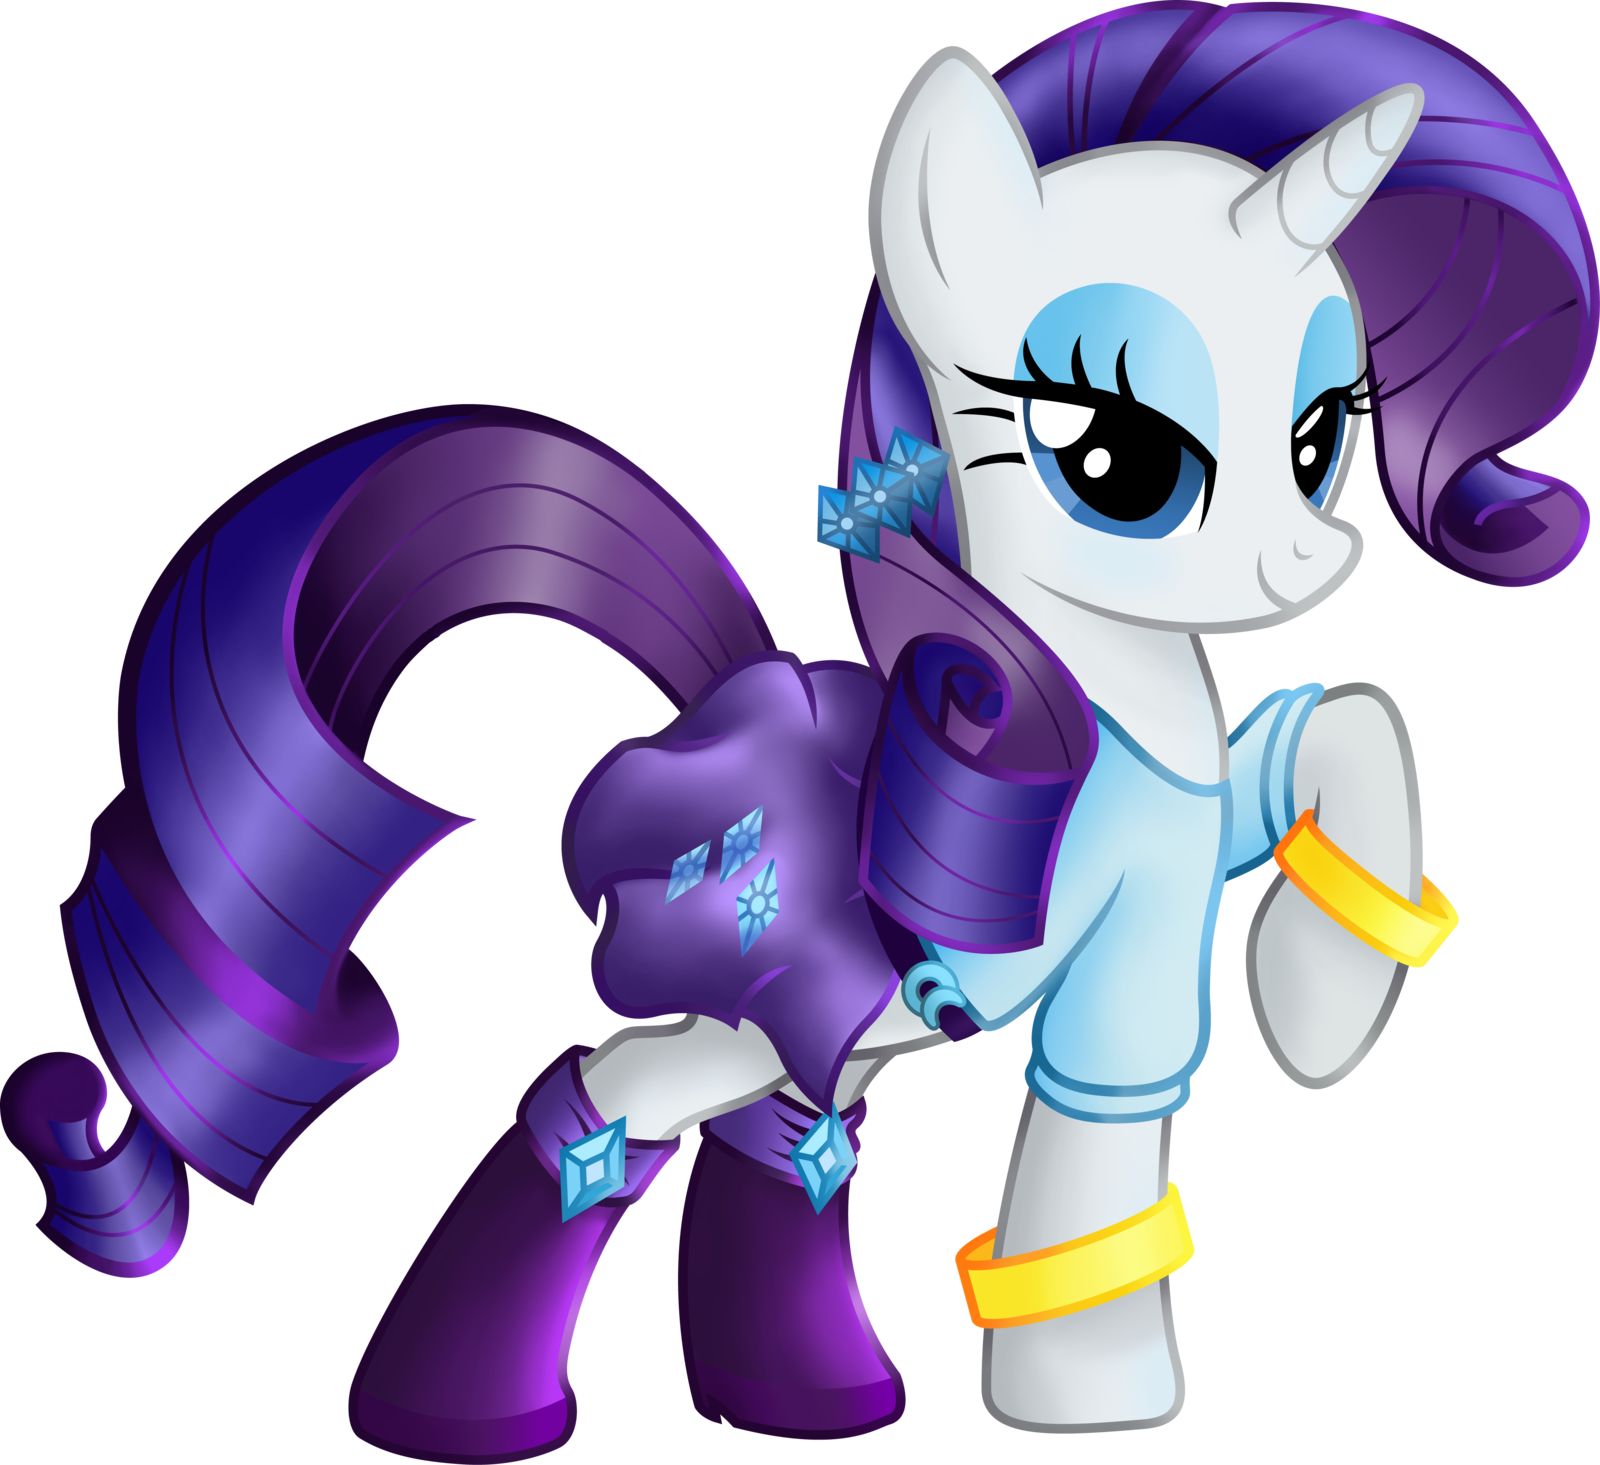
    SSB My Little Pony Series Rarity Stock Icon SSBCharged Icon
    Rarity's Moveset

    • Neutral Attack: Rarity throws a slap with her front hoof followed by a hip thrust.
    • Forward Tilt: Rarity telekinetically whips a scarf forward.
    • Forward Smash: Rarity telekinetically swings a mannequin on the ground.
    • Up Tilt: Rarity telekinetically swings a ribbon above herself.
    • Up Smash: Rarity causes two large jewels to emerge from the ground on either side of her.
    • Down Tilt: Rarity telekinetically plants a high heel into the ground. The move can meteor smash opponents. If used by the ledge, the heel will miss the ground and continue falling down.
    • Down Smash: Rarity spins around while telekinetically spinning jewels around herself, damaging opponents multiple times before launching them.
    • Dash Attack: Rarity telekinetically swings a scarf forward.
    • Counter: Rarity telekinetically drops a jewel on the opponent that hit her from above.

  • Neutral Aerial: Rarity telekinetically spins multiple jewels around herself, damaging opponents multiple times before launching them.
  • Forward Aerial: Rarity telekinetically swings a scarf forward.
  • Forward Crash: Rarity telekinetically swings a mannequin outward.
  • Back Aerial: Rarity telekinetically swings three jewels backward.
  • Back Crash: Rarity telekinetially throws a jewel downward behind herself. The move will meteor smash opponents.
  • Up Aerial: Rarity telekinetically waves a hat above herself.
  • Up Crash: Rarity spins around while telekinetically swirling two ribbons around each other above herself, damaging opponents multiple times before launching them.
  • Down Aerial: Rarity telekinetically shoves two high heels below herself. The move will meteor smash opponents.
  • Down Crash: Rarity telekinetically throws a barrage of jewels below herself, damaging opponents multiple times before launching them.

  • Grab: Rarity telekinetically swings a sweater downward to catch the opponent with it.
  • Pummel: Rarity telekinetically shakes the opponent.
  • Forward Throw: Rarity kicks the opponent forward.
  • Back Throw: Rarity spins around with the opponent in tow before throwing them backward.
  • Up Throw: Rarity telekinetically throws the opponent upward.
  • Down Throw: Rarity telekinetically lifts the opponent into the air before slamming them into the ground.

  • Neutral Special - Bejeweled: Rarity telekinetically spins several jewels around herself, and can continue doing so by holding the special button. They damage opponents multiple times before launching them, and will reflect projectiles.
    • Custom 1 - Flying Jewels: The jewels spin around further away from Rarity. This gives them more range, though she is vulnerable if it is used close enough to an opponent that they are within the circle. The jewels also won't reflect projectiles.
    • Custom 2 - Hard Jewels: The jewels will launch opponents instead of damaging them multiple times.
    • Custom 3 - Shiny Jewels: The jewels are much brighter. They don't deal as much damage, but reflected projectiles are much stronger.
  • Side Special - Crystal Pillar: Rarity causes a pillar of crystals to rise from the ground a set distance away from her, damaging opponents from under. If an opponent is close enough, the pillar will target them. The move can only be used on the ground.
    • Custom 1 - Tall Pillar: The pillar deals less damage, but it rises higher, covering more vertical distance.
    • Custom 2 - Crystal Wave: Instead of a single pillar, Rarity causes multiple pillars of crystal to rise in front of her. They're smaller and deal less damage, but it is easier to hit opponents.
    • Custom 3 - Icy Pillar: Rarity creates a pillar of ice instead of a pillar of jewels. It takes longer to rise from the ground, but it freezes opponents.
  • Up Special - Angelic Rise: Rarity grows butterfly-like wings and floats upward, and can be controlled with the control stick. She doesn't damage opponents and is vulnerable while flying, but she does fly very high. After awhile, she falls into a helpless state.
    • Custom 1 - Angelic Jump: Rarity leaps upward instead of flying. She only travels upward, but damages opponents along the way and flies much faster.
    • Custom 2 - Angelic Armor: Rarity has super armor while using the move, and can't be knocked out of it. However, she doesn't fly as high.
    • Custom 3 - Angel of Jewels: While flying, Rarity telekinetically spins jewels around herself, damaging opponents that hit them. She cannot be controlled as easily, and usually keeps flying upward.
  • Down Special - Spotlight: A large spotlight shines above Rarity as she strikes a pose. The light doesn't deal knockback, but it will gradually damage opponents that step in it. They take more damage the closer they are to Rarity.
    • Custom 1 - Stunlight: The light will paralyze opponents instead of damaging them.
    • Custom 2 - Heavenly Light: The light doesn't damage opponents, and instead gradually heals Rarity.
    • Custom 3 - Sunlight: The light doesn't cover nearly as much range, but it will damage opponents more.
  • Final Smash - Generosity: Rarity dons the Element of Generosity and creates a portal in front of herself, which has windboxes that drag opponents into it. If she catches an opponent, they are locked in an animation where Rarity throws several jewels at them, finishing by dropping a giant boulder on them that breaks into more jewels. This sends them back to the stage, launching them.
  • Charged State - Rainbowfied Rarity: Rarity becomes rainbowfied. In this state, she can cover more range with her projectiles and objects that she telekinetically swings around. She also covers more range with Spotlight and she can fly much further with Angelic Rise.

  • Fluttershy
    My Little Pony: Friendship is Magic (2010)
    Fluttershy (フラッターシャイ, Fluttershy) is one of the main characters of My Little Pony: Friendship is Magic, and represents the Element of Kindness. She is a cream-yellow pegasus who has the unique ability to talk to animals, and lives with a bunch of them in a small cottage just outside of Ponyville. As her name implies, she is extremely shy around others, and as such gets frightened easily and has trouble flying because of it.

    Fluttershy is a light-middleweight who, thanks to her wings, can jump in midair four times. Her jump height isn't very high, but she has a decent recovery regardless. She isn't particularly strong, but her attacks have very quick frame data and combo into each other easily, allowing her to rack up damage with long strings. Helping this aspect are her unique special moves, most of which either help set up combos or help continue them. Because her attacks don't deal a lot of knockback though, she can have trouble KOing outside of edgeguarding.

    Most of Fluttershy's normal moveset uses her hooves and wings, and as mentioned, they are pretty quick. Some of her moves also summon some of her animal friends, particularly her ground and aerial moves, and Angel Bunny for her down special. These attacks have disjointed range, allowing her to attack safely.
    SSB My Little Pony Series Fluttershy Stock Icon SSBCharged Icon
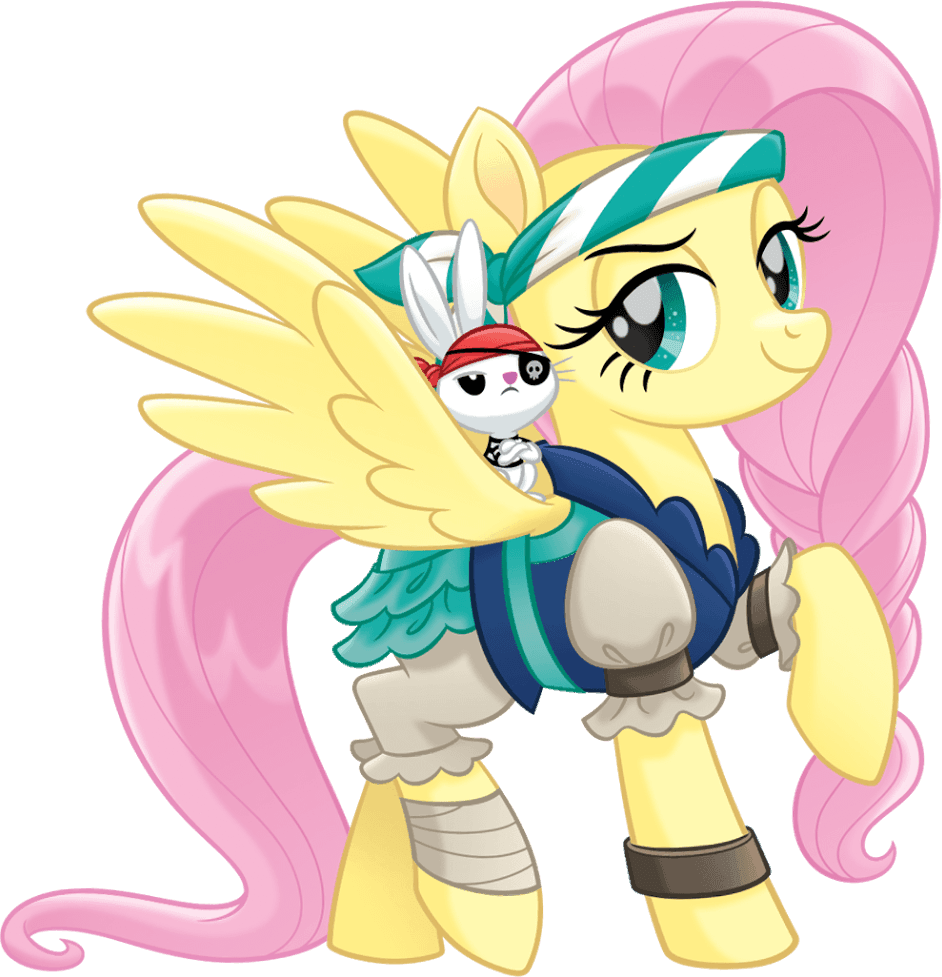
    Fluttershy's Moveset

    • Neutral Attack: Fluttershy throws two alternating swipes with her front hooves.
    • Forward Tilt: Fluttershy swings her behind forward, whipping with her tail.
    • Forward Smash: A bear appears behind Fluttershy and throws a claw swipe.
    • Up Tilt: Fluttershy throws a scorpion kick.
    • Up Smash: A gopher pops out of the ground in front of Fluttershy, who leaps in the air.
    • Down Tilt: Fluttershy ducks while thrusting her front hoof forward.
    • Down Smash: Two badgers pop out of the ground on either side of Fluttershy.
    • Dash Attack: Flutterhsy runs forward while flailing her front hooves, damaging opponents multiple times before launching them.
    • Counter: A bird flies through and pecks the opponent, damaging the opponent multiple times before launching them. If a projectile is countered, Flutershy simply dodges.

  • Neutral Aerial: Fluttershy performs a somersault.
  • Forward Aerial: Fluttershy throws a dropkick.
  • Forward Crash: Fluttershy uses her wings to thrust herself forward while throwing a kick.
  • Back Aerial: Fluttershy swings her tail backward.
  • Back Crash: Fluttershy throws a back kick.
  • Up Aerial: Fluttershy swings her wings upward.
  • Up Crash: Fluttershy uses her wings to thrust herself upward while throwing an upward kick.
  • Down Aerial: Fluttershy swings both her front hooves downward. The move can meteor smash opponents.
  • Down Crash: Fluttershy throws a corkscrew kick, damaging opponents multiple times before launching them.

  • Grab: Fluttershy reaches out with both hooves to grab the opponent.
  • Pummel: Flutterhsy headbutts the opponent.
  • Forward Throw: Fluttershy kicks the opponent forward with both her back hooves.
  • Back Throw: Fluttershy heaves the opponent upward and throws them behind her.
  • Up Throw: Fluttershy heaves the opponent upward.
  • Down Throw: Fluttershy slams the opponent into the ground.

  • Neutral Special - Stare: Fluttershy begins glaring forward menacingly, and can continue to do so if the special button is held. While in this state, she can also walk forward and backward, as well as jump. If an opponent is close enough and staring at her, they will be inflicted with paralysis, but suffer no damage. The move can be cancelled into any other attack. Opponents facing away from her are unaffected.
    • Custom 1 - Death Glare: Flutterhsy moves slower and can't jump as high while using the move, but opponents take damage in addition to being paralyzed.
    • Custom 2 - Stink Eye: Instead of being paralyzed, the opponents grow a flower on their head. The move has significantly more range.
    • Custom 3 - Stare Counter: Instead of being able to move around and stare indefinitely, the move acts as a counter; she enters a defensive state, and if attacked, she dodges and stares at the opponent, inflicting paralysis. How long the opponent is paralyzed depends on how strong their attack was. Midair opponents suffer light knockback.
  • Side Special - Gentle Breeze: Fluttershy rushes forward while flapping her wings, damaging opponents she hits. Directional inputs can be used to change her direction, and she can dash in any of the four cardinal directions. The move can be cancelled into any of her attacks if she hits an opponent, though she is vulnerable to attack.
    • Custom 1 - Flutter Rush: Fluttershy runs faster and deals more damage, but she cannot change directions.
    • Custom 2 - Tough Breeze: Fluttershy has super armor while dashing and cannot be attacked out of it, though the move can't be cancelled into other attacks.
    • Custom 3 - Strong Wind: Fluttershy can travel faster and farther, though she falls into a helpless state if the move finishes in midair.
  • Up Special - Flutter Hop: Fluttershy leaps upward before descending downward, and can use directional inputs to control her ascent and descent. If she lands on an opponent, she leaps off of them, meteor smashing them and gaining more height. Otherwise, she keeps falling until she hits ground.
    • Custom 1 - Flutter Leap: Fluttershy leaps upward higher, but doesn't fall down while stomping, and instead falls into a helpless state at the peak of her jump.
    • Custom 2 - Flutter Stomp: Fluttershy can gain much more lateral distance with her ascent, but she cannot control her descent and she falls straight down. She also falls faster.
    • Custom 3 - Flutter Bury: Fluttershy can't meteor smash aerial opponents she lands on, though if she lands on a grounded opponent, she can bury them.
  • Down Special - Angel Bunny: Fluttershy places Angel Bunny on the ground in front of her, who stays in place. If an opponent moves close enough to him, Angel Bunny will grab them and throw them in Fluttershy's direction. Fluttershy can also pick him up and throw him, where he grabs and throws opponents he hits. After throwing an opponent, Angel Bunny disappears. Since the move is technically a grab, shields and counters cannot beat it, nor can Banjo & Kazooie's Wonderwing.
    • Custom 1 - Angry Angel: Instead of grabbing and throwing an opponent, Angel Bunny will repeatedly swipe at nearby opponents, dealing more damage but making follow-ups more difficult.
    • Custom 2 - Impatient Angel: Instead of standing still, Angel Bunny will move around the stage on his own. His throw deals less damage and knockback and he cannot be picked up and thrown by Fluttershy.
    • Custom 3 - Rude Angel: Instead of throwing the opponent towards Flutterhsy, Angel Bunny throws them downward, burying them. If Flutterhy throws him and he hits an aerial opponent, he meteor smashes them instead.
  • Final Smash - Kindness: Fluttershy dons the Element of Kindness around her neck, which glows. She then whistles, summoning several animals that run across the stage, damaging opponents and launching them. The move ends with a Manticore running through the stage, which deals high damage and knockback.
  • Charged State - Rainbowfied Fluttershy: Fluttershy becomes rainbowfied. In this sate, she has an extra midair jump, significantly higher ground and air speed, and more damaging attacks. Her Stare also covers more range, and she gains the ability to glide.

  • LarryBoy
    LarryBoy! And the Fib from Outer Space! (1997)
    LarryBoy Render by Nintega-Dario
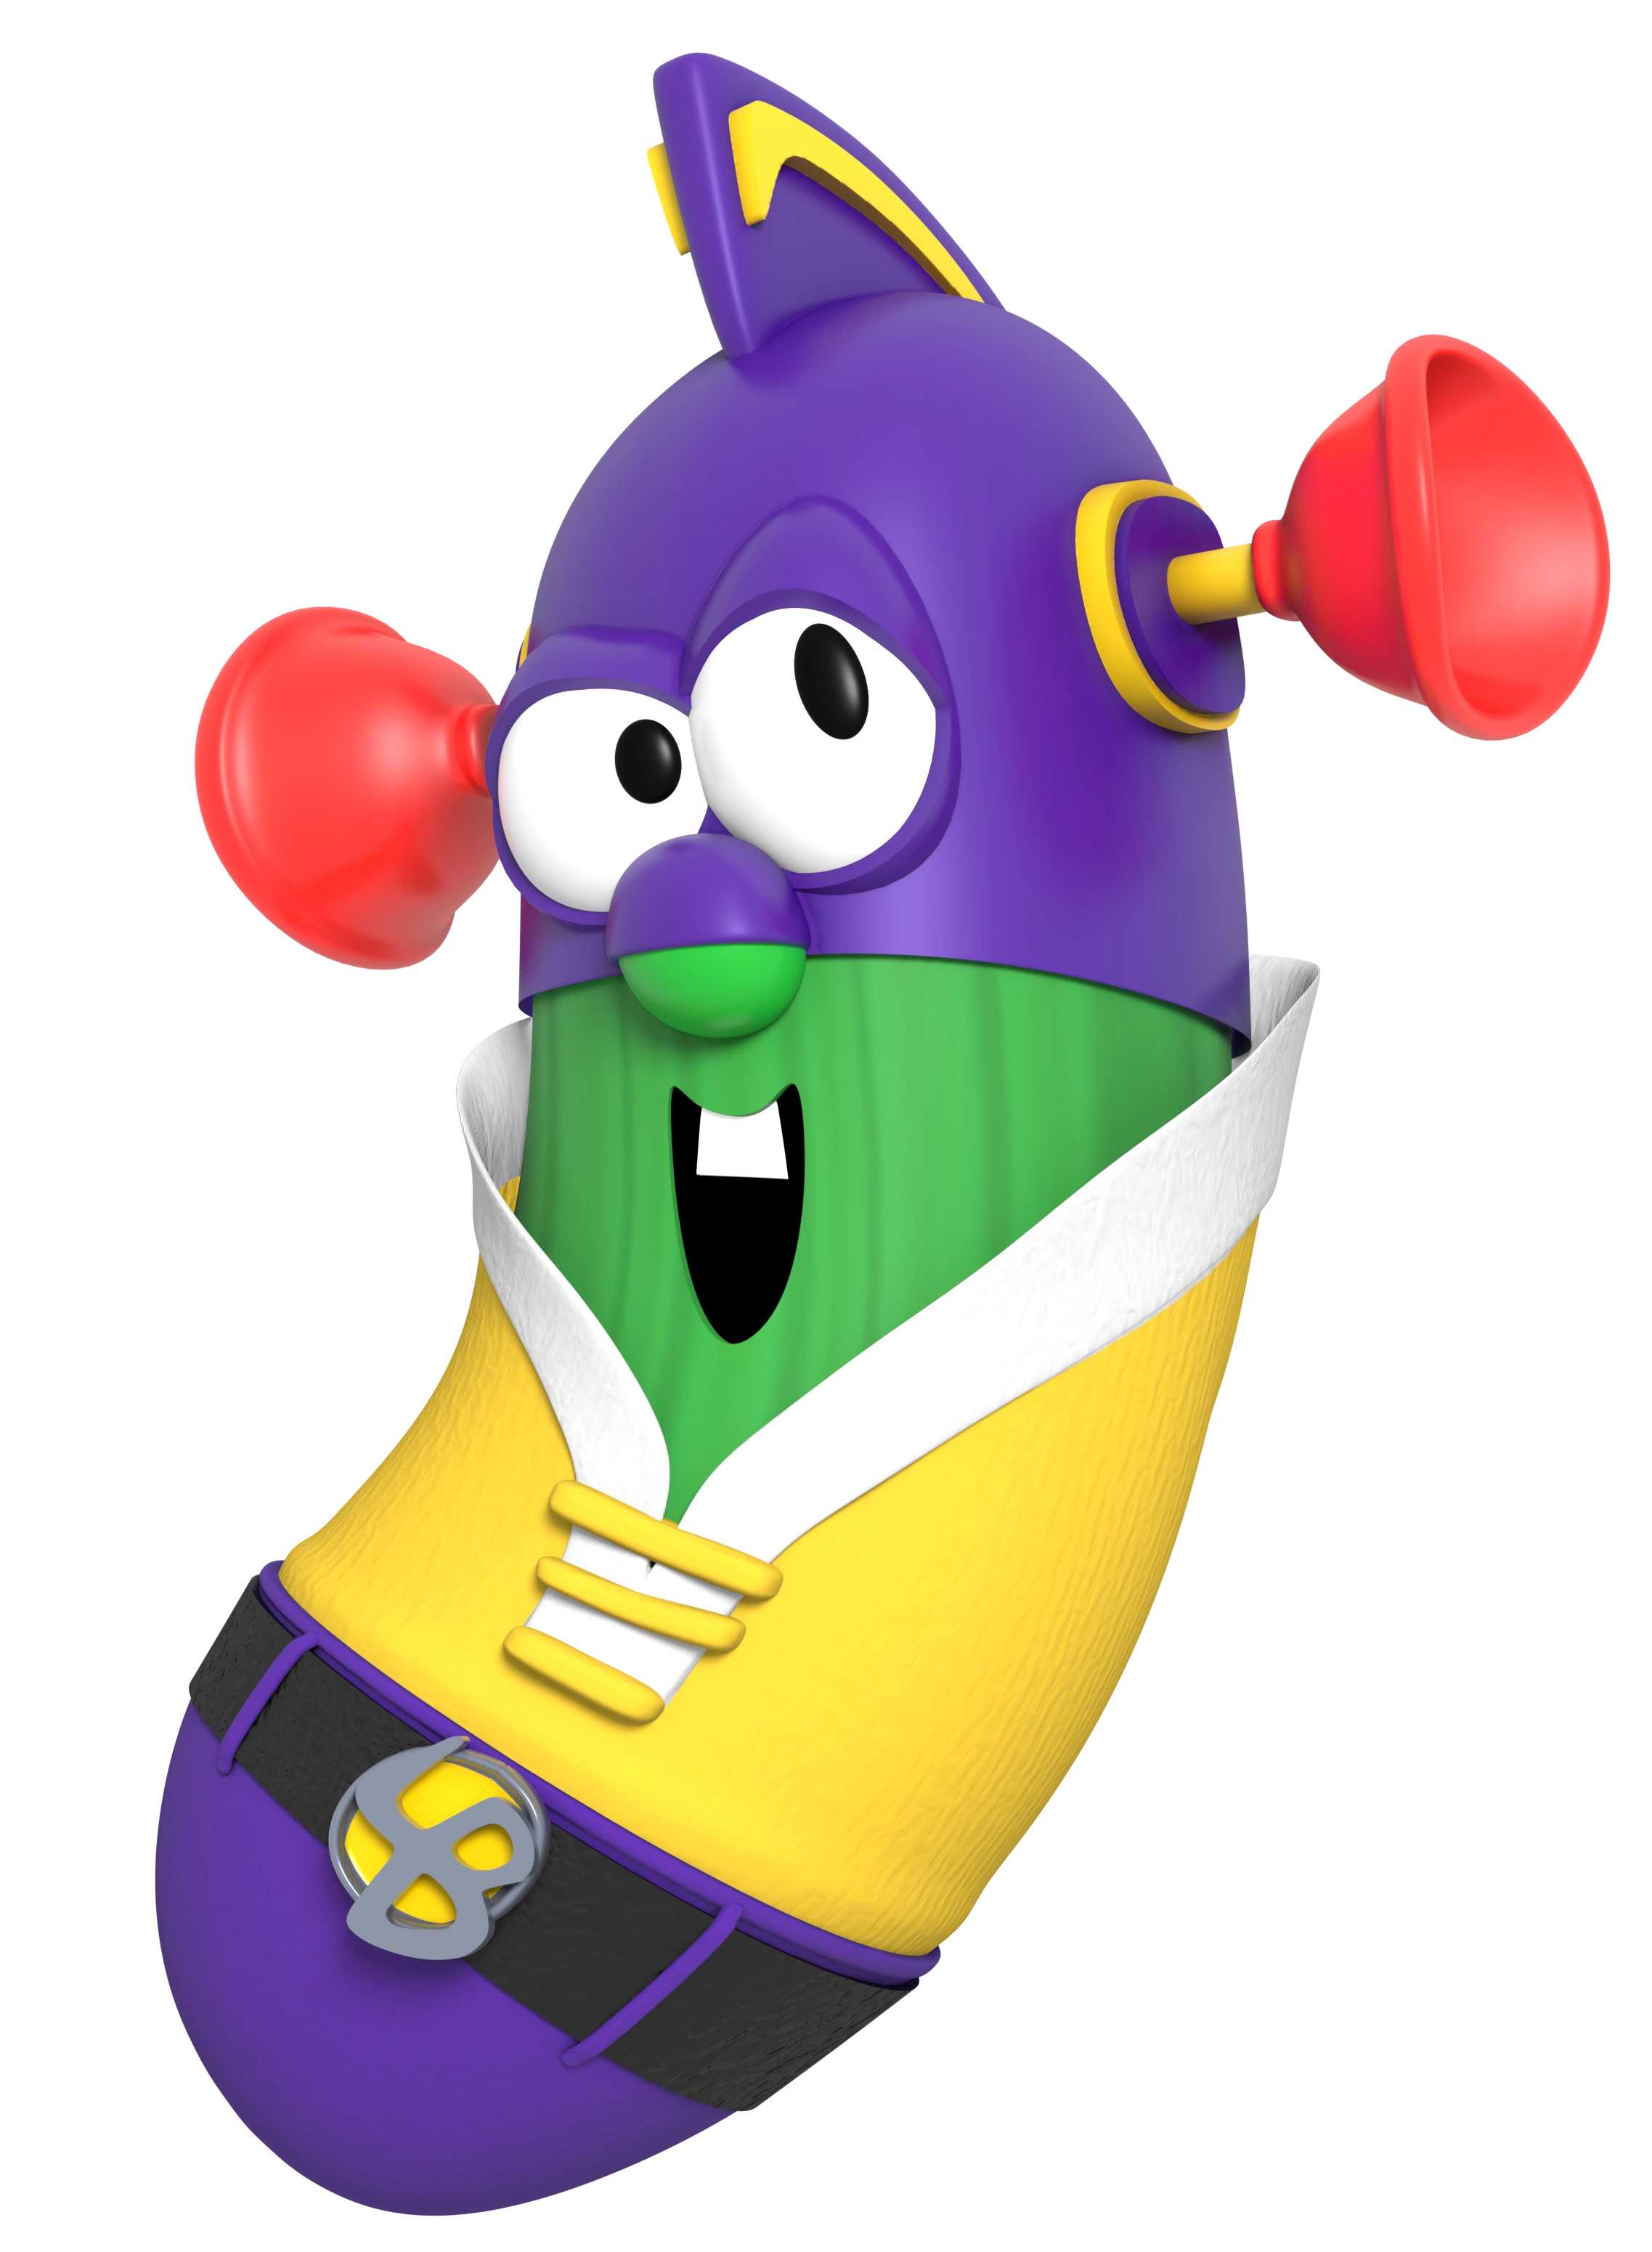
    LarryBoy (ラリーボーイ, Larry Boy) is the titular protagonist of the LarryBoy series, a subsidiary of the VeggieTales franchise. He is the superhero alter-ego of Larry the Cucumber, and protects the city of Bumblyburg from dangerous threats, such as aliens from outer space or monstrous weeds growing from out of the ground. His catchphrase is "The world needs a hero! I am that hero!"

    LarryBoy is a middleweight fighter with rather mixed mobility; he possesses poor ground speed but above-average air speed and falling speed. His grab game is one of the most unique in the roster; his grab has him extend one of his plunger ears forward. This not only gives it a far reach, but it also has the unique ability to cling to walls or floors. When this happens, pressing the grab button again allows him to reel the ear back in, which launches him in the direction the ear was sent. This can either be used for quick and aggressive pressure, escape, and even recovery. The pungers can also grab opponents, allowing him to slam into them and deal damage. Alternatively, tapping the grab button allows it to function as a normal grab, catching opponents he hits.

    LarryBoy's attacks are rather strange, mainly due to his lack of limbs. Instead, most of his moves are body slams or make use of his plunger ears. In contrast, his special moves make references to various VeggieTales episodes and silly songs.
    SSB LarryBoy Series LarryBoy Stock Icon SSBCharged Icon
    LarryBoy's Moveset

    • Neutral Attack: LarryBoy swings his head twice to attack with his plunger ears, then follows with a jumping kick.
    • Forward Tilt: LarryBoy swings a hairbrush forward.
    • Forward Smash: LarryBoy swings a cheeseburger forward.
    • Up Tilt: LarryBoy bounces upward to throw an upward headbutt whole wearing a tophat.
    • Up Smash: LarryBoy spins around whole holding a stuffed manatee, damaging opponents multiple times before launching them.
    • Down Tilt: LarryBoy throws a sliding kick.
    • Down Smash: LarryBoy performs a plank. The move can meteor smash opponents.
    • Dash Attack: LarryBoy throws a battering ram.
    • Counter: LarryBoy throws a flying kick.

  • Neutral Aerial: LarryBoy performs a cartwheel.
  • Forward Aerial: LarryBoy throws a hip thrust.
  • Forward Crash: LarryBoy throws a headbutt.
  • Back Aerial: LarryBoy throws a back kick.
  • Back Crash: LarryBoy lunges backward with his head.
  • Up Aerial: LarryBoyy throws an upward headbutt.
  • Up Crash: LarryBay throws an upward headbutt while wearing a sombrero.
  • Down Aerial: LarryBoy throws a stomp. The move can meteor smash opponents.
  • Down Crash: LarryBoy drops down to the ground headfirst. The move can bury opponents he lands on.

  • Grab: LarryBoy launches his plunger ear forward. If the grab button is held, it will stick to surfaces or enemies, and launch him forward. In the latter case, he slams into the opponent and damages them. Alternatively, if the grab button is tapped, it will function as a normal grab and reel in opponents to him. In either case, it can be used in midair and also functions as a tether grab.
  • Pummel: LarryBoy headbutts the opponent.
  • Forward Throw: LarryBoy flings the opponent forward.
  • Back Throw: LarryBoy flings the opponent backward.
  • Up Throw: LarryBoy flings the opponent upward.
  • Down Throw: LarryBoy flings the opponent to the ground.

  • Neutral Special - Tuba: LarryBoy pulls out a tuba and blows into it, creating a soundwave that pushes opponents backward. The soundwave also reflects projectiles. The move can be charged by holding the special button, with a longer charge providing a larger soundwave.
    • Custom 1 - Screechy Tuba: The soundwave stuns opponents instead of pushing them away.
    • Custom 2 - Painful Tuba: The soundwave damages and knocks away opponents instead of pushing them, but it cannot reflect projectiles.
    • Custom 3 - Tuba Warrior: The soundwave covers much more distance, but it takes longer to charge.
  • Side Special - Pirate Chair: LarryBoy climbs on a reclining chair and uses it to roll forward, damaging opponents he hits. He can use any attack while on the chair. Once it stops moving, it disappears.
    • Custom 1 - Fast Chair: The chair moves faster, but deals less damage.
    • Custom 2 - Rough Chair: The chair deals more damage, but it comes to a stop more quickly.
    • Custom 3 - Exploding Chair: The chair explodes on impact, dealing heavy damage and knockback.
  • Up Special - Squeeze and Jump: LarryBoy hops on a trampoline and jumps upward, damaging opponents he hits and falling into a semi-helpless state afterwards.
    • Custom 1 - Power Trampoline: LarryBoy bounces higher and deals more damage, but he falls into a helpless state instead of a semi-helpless state.
    • Custom 2 - Angled Trampoline: LarryBoy can't jump as high, but he can travel in a wider range of angles.
    • Custom 3 - Light Trampoline: LarryBoy cannot bounce in as many angles, but he travels higher.
  • Down Special - Larry Mobile: LarryBoy whistles, summoning the Larry Mobile. It flies through the stage horizontally where LarryBoy is standing, dealing heavy damage and knockback to opponents it hits.
    • Custom 1 - Locking Mobile: The Larry Mobile flies horizontally, aimed at a random opponent. However, it deals less damage.
    • Custom 2 - Boring Mobile: The Larry Mobile releases its boring drills while flying. This allows it to deal more damage, but it takes longer to appear.
    • Custom 3 - Falling Mobile:Instead of flying horizontally, the Larry Mobile flies downward where LarryBoy is standing. This allows it to meteor smash opponents it hits.
  • Final Smash - Fib from Outer Space: LarryBoy summons the Fib from Outer Space, which appears in the background of the stage. It can throw punches at opponents, dealing heavy damage and knockback. After awhile it will disappear.
  • Charged State - Suit Modifications: LarryBoy's suit begins radiating green energy. In this state, he can run faster and jump higher, and his attacks deal more damage. In addition, his grab is much faster and covers even more range.

  • Somari (ζ)
    Somari (1994)
    Somari Charged
    Somari (ソマリ, Somari) is the titular protagonist of Somari, a pirated version of Sonic the Hedgehog made for the NES, which replaces the sprites of Sonic with that of Mario. Originally released in 1994 in regions such as Asia and Russia where pirated NES cartridges were sold, Somari quickly became infamous for its uncanny sprite work and recreation of the levels in Sonic the Hedgehog on the NES. Somari's appearance in Super Smash Bros. is based on his sprite in the original game, which in turn is based off of Mario's sprites in Super Mario Bros. 2 and Super Mario Bros. 3.

    Fittingly for a character created to look like Mario to replace Sonic, Somari is a Fusion Fighter. He takes many iconic moves from both across the Super Smash Bros. series, which effectively makes him a Fusion Fighter of Dr. Mario and Sonic. This also carries over to Somari's statistics, having among the fastest ground speed in the game and having a good recovery. However, he is a lightweight and can be KO'ed rather easily.
    SSB Somari Series Somari Stock Icon SSBCharged Icon
    Somari's Moveset

    • Neutral Attack: Somari throws two alternating punches followed by a kick.
    • Forward Tilt: Somari throws a donkey kick.
    • Forward Smash: Somari thrusts his palm forward, emitting a fiery blast from it.
    • Up Tilt: Somari throws an uppercut.
    • Up Smash: Somari curls into a ball and jumps while spinning, damaging opponents multiple times before launching them.
    • Down Tilt: Somari throws a sweeping kick.
    • Down Smash: Somari throws a breakdance sweep.
    • Dash Attack: Somari throws a sliding kick.
    • Counter: Somari throws an uppercut.

  • Neutral Aerial: Somari throws a sex kick.
  • Forward Aerial: Somari throws an overhead. The move can meteor smash opponents.
  • Forward Crash: Somari throws a corkscrew battering ram, damaging opponents multiple times before launching them.
  • Back Aerial: Somari throws a back kick.
  • Back Crash: Somari throws a dropkick.
  • Up Aerial: Somari throws a bicycle kick.
  • Up Crash: Somari throws a scissor kick upwards.
  • Down Aerial: Somari throws a stall-then-fall stomp, falling at a diagonally downward angle. The move can meteor smash opponents.
  • Down Crash: Somari throws a stomp. The move can meteor smash opponents.

  • Grab: Somari reaches out to grab the opponent.
  • Pummel: Somari knee smashes the opponent.
  • Forward Throw: Somari spins around and throws the opponent forward.
  • Back Throw: Somari holds the opponent by the feet and spins them around three times before throwing them backward.
  • Up Throw: Somari heaves the opponent upward.
  • Down Throw: Somari slams the opponent on the ground and curls into a ball, spinning on them.

  • Neutral Special - Fireball: Somari throws a fireball from his hand, which bounces across the ground and damages opponents it hits. It travels fast, but doesn't deal a lot of damage.
    • Custom 1 - Iceball: Somari throws an iceball instead of a fireball. It doesn't travel as fast or as far, but it can freeze opponents.
    • Custom 2 - Fast Fireball: The fireball deals less damage, but travels much faster. Instead of bouncing, it flies forward in a straight line.
    • Custom 3 - Big Fireball: The fireball is slower and doesn't travel as far, though it is larger and damages opponents multiple times before launching them.
  • Side Special - Cape: Somari takes out a yellow cape and flips it forward. The cape can reflect projectiles as well as turn opponents around.
    • Custom 1 - Shocking Cape: Somari deals much more damage with the cape, and instead of flipping opponents around, it will simply launch them.
    • Custom 2 - Breezy Cape: Somari creates windboxes when he flips the cape, which push opponents backward. The cape cannot reflect projectiles.
    • Custom 3 - Sliding Cape: Somari slides forward while flipping the cape, making it easier to hit opponents. It deals less damage and reflected projectiles are weaker.
  • Up Special - Spring Jump: A Spring appears under Somari, and he uses it to jump upward, falling into a semi-helpless state afterwards. If used on the ground, the Spring can be used by other characters before it disappears. If used in midair, the Spring falls to the ground and bounces for a bit, damaging opponents it lands on.
    • Custom 1 - Spring Jump Headbutt: Somari damages opponents as he rises upward, but travels less distance.
    • Custom 2 - Double Spring Jump: Somari can use two Springs at any time, but the move has him travel less distance overall.
    • Custom 3 - Angled Spring Jump: Somari jumps in a diagonally upward angle, granting him less vertical height in exchange for more horizontal distance.
  • Down Special - Spin Dash: Somari curls into a ball and dashes forward, damaging opponents. If the special button is tapped repeatedly, he will charge the move, allowing him to travel faster, farther, and deal more damage. While dashing, Somari can change directions as well as jump. If the move is charged in midair, Sonic will dash as if the move was fully-charged as soon as he lands.
    • Custom 1 - Shredding Spin Dash: Somari damages opponents multiple times while charging. The move takes longer to fully charge and the dash itself deals less damage.
    • Custom 2 - Spin Dash Burst: Somari instantly dashes forward without the need of charging. However, he cannot change directions or jump.
    • Custom 3 - Bounce Attack: Somari leaps in the air and falls downward. If used in midair, Sonic will simply rush downward. The move can bury grounded opponents and meteor smash aerial ones.
  • Final Smash - Somari Finale: Somari rears back and fires two massive blue fireballs from his hands, which fly forward. The fireballs will damage opponents multiple times and carry them along the stage.
  • Charged State - Super Somari: Somari uses the power of the Chaos Emeralds to become Super Somari. In this state, he is much faster and his attacks deal more damage. He additionally gains two more midair jumps and his falling speed is slower.

  • Unlock Criteria[]

    Below lists the unlock criteria for every character. There are three methods for unlocking them; a standard method that involves playing one of the modes, playing VS matches, and having them join the player's party in Labyrinth of Ancients.

    Unlike previous games, characters aren't tied to a specific number of VS Matches, and are rather randomly unlocked by playing an increment of 10 matches. This change was made to allow players to unlock the characters more easily should they not desire to play through their normal unlock condition.

    Aside from unlocking them through Labyrinth of Ancients, should a character's unlock criteria be met, they will need to battle them in a one-on-one match, where defeating them will unlock them. Challenger's Approach also returns from Ultimate, where players can rematch characters they lose to so they can try to unlock them again. However, it will always be present on the menu as long as there are battles the player hasn't won, rather than randomly appearing and disappearing like in Ultimate, thus making it much more streamlined.

    Character Unlock Criteria
    Dry Bowser Clear Classic Mode on intensity 6.0 or higher as Bowser.
    Dr Clear 10 rounds of Crazy Orders, then defeat Crazy Hand.
    Daisy Clear Quest Mode.
    Piranha Plant Defeat 450 enemies in Smash Run DX.
    8-Bit Mario Clear 30 characters' Board the Platforms stages.
    Wart Get a combined distance of 150,000 feet in Home-Run Contest.
    Dr Clear Quest Mode on intensity 4.0 or higher as Luigi or Dr. Mario.
    Koopa Troopa Clear 15 characters' Race to the Finish stages.
    Power Star Guardians Defeat 200 Spirits.
    Meowser Clear Boss Rush Mode as Bowser or Dry Bowser.
    Lanky Kong Defeat Giant Donkey Kong on the Donkey Kong stage in Quest Mode.
    King K Clear Quest Mode on intensity 5.0 or higher as Donkey Kong or Diddy Kong.
    Colonel Pluck Defeat 10 Legendary-class Spirits.
    Sluggy the Unshaven Clear Quest Mode on intensity 5.0 or higher as Yoshi & Baby Mario or Kamek.
    Gotchawrench Create 10 custom stages.
    Geno Clear 3-Minute Smash as 10 characters.
    Rawk Hawk Clear 15-Minute Smash.
    Dark Star Defeat 30 bosses in Smash Run DX.
    Ganondorf Clear Boss Rush Mode as Link or Zelda.
    Phantom Zelda Play on the Hyrule Castle stage 10 times.
    Deku Baba Play Smash Run DX five times.
    Dark Samus Clear Boss Rush Mode on intensity 4.5 or higher as Samus or Zero Suit Samus.
    Ridley Clear Boss Rush Mode without using continues.
    Mother Brain Clear Quest Mode as 15 characters.
    Dark Meta Knight Defeat 20 Spirits in Master Orders.
    Marx Clear every stage in Quest Mode before going to Final Destination.
    Macho Dedede Defeat Boss Rush Mode as King Dedede.
    Daroach Defeat at least one enemy in Cruel Smash.
    Heavy Lobster Clear Classic Mode as Kirby or Meta Knight.
    Wolf On the Star Fox stage in Quest Mode, KO Falco before Fox. Afterwards, KO Wolf.
    Leon Clear Classic Mode on intensity 6.0 or higher as Falco or Wolf.
    Pigma Clear 30 characters' Target Smash!! stages.
    Jigglypuff Clear Classic Mode.
    Pichu Defeat Giant Kirby on the Kirby stage in Quest Mode.
    Mewtwo Defeat 80 Spirits.
    Incineroar Clear Classic Mode as five Pokémon characters.
    Pheromosa Defeat at least 120 enemies in Endless Smash.
    Meloetta Play on Unova Pokémon League 10 times.
    Alolan Meowth Clear Classic Mode as Meowth.
    Scizor Clear Classic Mode on intensity 7.5 or higher as five characters.
    Dragapult Defeat 10 Ace-level Spirits.
    Ness Clear Quest Mode on intensity 4.0 or higher without using continues.
    Giygas Max out at least one stat in Smash Run DX.
    Porky Clear Boss Rush Mode as 30 characters.
    Captain Falcon Clear Classic Mode in under 12 minutes.
    Blood Falcon Clear Boss Rush Mode as Captain Falcon.
    Ice Climbers Clear 15 characters' Board the Platforms stages.
    Lucina Clear Quest Mode as Marth.
    Roy Clear Quest Mode as five characters.
    Black Knight Clear Boss Rush Mode.
    Dark Pit Clear Quest Mode as Pit or Palutena.
    Beady Long Legs Defeat 1000 enemies in Smash Run DX.
    Ankha Clear 15 characters' Target Smash!! stages.
    Celeste Clear Quest Mode as Blathers without using continues.
    Hoy Quarlow Clear 30 characters' Race to the Finish stages.
    Mechanica Play on any ARMS stage 10 times.
    Barbara Defeat 10 stage bosses.
    Flipnote Frog Play on the Game Boy stage 10 times.
    Mr Clear Quest Mode as 20 characters without using continues.
    R.O.B. Defeat 30 Advanced-level Spirits.
    Duck Hunt Clear 3-Minute Smash as 20 characters.
    Alice Get a score of 25 or higher in Mob Smash.
    Snake Defeat Crazy Hand in Crazy Orders.
    Richter Clear Classic Mode as Simon.
    Alucard Clear Quest Mode as Simon or Richter without using continues.
    Blaze Clear 45 characters' Race to the Finish stages.
    Mighty & Ray Play on the Casino Night Zone stage 10 times.
    Rouge Clear Quest Mode as Shadow without using continues.
    Bayonetta Clear 45 characters' Board the Platforms stages.
    Joker Defeat 100 Spirits in Master Orders.
    Demi-Fiend Defeat 150 Spirits.
    Enker Clear Boss Rush Mode as Mega Man or Roll.
    Ken Clear Classic Mode on intensity 5.0 or higher as Ryu.
    MS Clear Classic Mode as PAC-MAN.
    Engineer Monkey Defeat 150 or more enemies in Endless Smash.
    Sephiroth Clear Quest Mode on intensity 7.5 or higher as Cloud.
    Slime Defeat 650 enemies in Smash Run DX.
    Overkilling Machine Play Smash Run DX as 15 characters.
    Patty Create 10 custom stages.
    Agnes Play on the Ancheim stage 10 times.
    Bub & Bob Defeat 15 bosses in Smash Run DX.
    Master Chief Clear 45 characters' Target Smash!! stages.
    Rabbid Cranky Play on the Ancient Gardens stage 10 times.
    Rabbid Cranky Clear Quest Mode as Donkey Kong or Rabbid Peach without using a continue.
    Mama Use 500 healing items.
    Shantae Clear Classic Mode as 20 characters without using continues.
    Kebako Get a combined distance of 250,000 ft. in Home-Run Contest.
    Hat Kid Clear Quest Mode on intensity 7.5 or higher as five characters.
    Bow Kid Clear Classic Mode as Hat Kid on intensity 5.0 or higher without using continues.
    Lilac Clear the first part of the Sonic stage in Quest Mode in under one minute.
    Carol Clear Quest Mode in under 15 minutes.
    Milla Clear Boss Rush Mode as Cream & Cheese without using continues.
    The Beheaded Clear 15 rounds of Crazy Orders and defeat Crazy Hand.
    Sans Create 10 Mii Fighters.
    Cuphead Clear Boss Rush Mode on intensity 7.5 or higher as five characters.
    Chomper Create 10 custom stages.
    Dart Monkey Defeat a Ceramic Bloon and all of the Bloons it spawns in Smash Run DX.
    Engineer Monkey Clear Classic Mode or Quest Mode as Dart Monkey.
    Twilight Sparkle Defeat 120 Spirits.
    Rainbow Dash Clear six rounds of Crazy Orders and defeat Crazy Hand in under eight minutes.
    Pinkie Pie Clear Classic Mode, Quest Mode, or Boss Rush Mode after selecting "random".
    Applejack Create 20 custom stages.
    Rarity Create 15 custom alternate costumes.
    Fluttershy Play Smash Run DX without defeating any enemies.
    LarryBoy Defeat at least five enemies in Cruel Smash.
    Somari Clear Classic Mode on intensity 7.0 or higher as Mario or Sonic without using continues.
    Advertisement