| This page is under construction. Please excuse its informal appearance while it is being worked on. We hope to complete it as soon as possible! |

Logo by HollowPharaoh (t∣b∣c)
Crestseeker is a 3D action-adventure game developed by Pyro Enterprises as a launch title for the Onyx. Developed as a spiritual successor to the beloved Legend of Zelda series, it takes inspiration from series Twilight Princess and Skyward Sword while implementing new concepts and design elements of its own.
Gameplay
Much like traditional Zelda titles, Crestseeker is played from an over-the-shoulder third-person perspective, with the player being able to control the camera freely. Players control Bynde in order to help navigate her through the environments and puzzles which the game places in her path, as well as dealing with various enemies which she must combat. Bynde's standard non-combat abilities are a simple jump and a sprint; while sprinting can be performed infinitely, she cannot draw her weapons or use items while doing so. Bynde can also block attacks if she happens to have a shield equipped.
Combat controls are simplified and hearken back to both Twilight Princess and Breath of the Wild, with a focus on timing counterattacks rather than specific coordinated blow directions such as in Skyward Sword. Bow combat is also a primary focus of Crestseeker's combat loop, being able to temporarily enter bullet time while Bynde draws her bow. Due to this, sword combat is often used to either outright damage enemies or open up their weakpoints, enabling precise strikes with the bow. An emphasis is also placed around the use of the game's myriad items to open alternate methods of combat, with various items having different effects on enemies that can be exploited to gain an advantage.
Many of Bynde's abilities are governed by a blue crescent-shaped meter next to her health called the Mana Meter. Using most items, as well as the bullet time feature on Bynde's bow and some advanced sword techniques, drains the meter, which automatically fills over time. In contrast, there are no resources such as arrows that are required to use items; all resource management is relegated to using the Mana Meter effectively.
Bynde can also carry multiple objects in her Pouch in order to aid her in the field. Pouch items range from Flasks, which can be used to store objects, Shields, which she can equip at any given time and are used to block incoming attacks, and passive effect-sharing Charms, which can influence her skills slightly. Only a limited amount of Pouch slots are available, meaning inventory management becomes important, though Bynde also has an infinite inventory for small collectible objects.
Controls

- Left Stick- Move
- Right Stick- Rotate Camera
- L- Lock-On/Re-center Camera
- X- Attack/Interact
- B- Jump
- Y/A- Use equipped Item
- ZL- Bow
- ZR- Shield (if equipped)
- D-Pad- Item Quick Switch
- Start- Pull up Menu
Story
The game's story begins with an odd dream sequence. Bynde is shown walking in a black void, frightened and confused, as a flash of lightning in the distance garners her attention. She watches in fear as a massive electrified mass of darkness, accompanied by some sort of flaming entity, rush towards her in a malicious manner. At the last second, she raises her arms to shield herself from the enroaching darkness, only to have the entire void suddenly burst with golden light, which dissipates the threat entirely. Bynde looks up to the sky and sees a strange symbol resembling a five-pointed star, one point glowing brighter than the others. The dream fades entirely to white, and Bynde promptly crashes out of her bed, startling a younger girl tuning a sitar next to her.
Bynde rubs her head to try easing the pain while the other girl grabs her a bag of ice, being introduced to the player as Tai. Tai expresses concern that Bynde has been repeatedly having these dreams as of late, and she's worried that her sister might be coming down with some form of illness. Bynde simply brushes this off, with a still concerned Tai stating that the two need to get started on farm work for the day anyways. Player control of Bynde is granted for the first time as they venture from outside of the sister's home into Lumin Town, a seemingly-mostly abandoned location on the Moon.
The player is then given a list of pseudo-tutorial events, which they can participate in to learn about crucial gameplay skills:
- One of the cows has run off from the herd, and Bynde is sent to chase it down, acting as a tutorial for Bynde's movement controls and acrobatic capabilities.
- Tai has set up a small practice range for the two sisters to practice archery, which can be used to hone the player's bow skills before the main game.
- The fields nearby the ranch have been infested with some small Lunefilth enemies, which are eating away at the crops. Bynde must venture out into the fields in a form of mini-dungeon in order to clear the enemies away.
Once every task for the day has been completed, Tai runs up to Bynde carrying a parcel of food and a flask of Lunar Milk, granting the player their first Flask and providing a short tutorial on the Pouch mechanic. The two decide to retire to the house early, and climb up to the house's roof to look out at the planet over the horizon. Bynde sighs sadly when looking at the far-off blue sphere, with Tai patting her on the back affectionately. Tai then expresses a desire to someday travel to the planet, knowing that Bynde has always wanted to go leave Lumin Town but has stayed out of a sense of duty. Bynde hugs her sister as they leave the roof, returning to the fields to continue their work.
After wandering around Lumin Town for a time, Bynde returns home to Tai having made lunch for the two. The two sit around the table for a time as Tai plays on her sitar, stating that the heirloom is the only thing the sisters have left to remember their parents by. Eventually, Tai manages to hit a strange note with the instrument, which sends a strange pain throughout Bynde's body. She grabs her head and begins blacking out as Tai jolts to her feet and tries carrying her back into bed. Bynde begins to rest once more as Tai examines her sitar, then back to her sister, wondering what exactly has been happening recently to mess with her head so much. A strange chiming sound echoes in the distance as Tai turns to the window, a bright red light shining on the planet for a short time before vanishing. Confused, she turns back to watch over Bynde.
Bynde eventually reawakens, seeking out Tai in order to check and see if she is alright. Exiting the house and looking out over Lumin Town, she senses that something is off, with a striking level of silence echoing through the town even more so than usual. Even Tai seems to be missing, with even the sound of her sitar inaudible. Eventually, she notices some strange ruby glow away from the town, emanating from some form of naturally-formed cave. Grabbing her sword and bow, Bynde heads in to investigate.
Fighting her way to the end of the cavern, Bynde comes across a wide clearing looking over the planet. On the clearing's edge, she sees Tai alongside a strange woman in odd black clothing that she had never seen before. The woman was talking to Tai about something or other, and she could tell from afar that her sister was feeling uncomfortable with the situation. Bynde waled over to figure out exactly what was going on, and the strange woman perked up almost immediately, greeting her and saying that she was simply talking with the young girl about her "wonderful music". Tai almost immediately cried out for Bynde's help, saying that the woman was harassing her over something that she couldn't understand. Bynde drew her sword to defend Tai, but the woman's hand reached out in a split second and grabbed her neck, her armored fingers growing red hot as Bynde struggled to break free. Tai ran up behind the woman, striking feebly at her back with a small rock, only to be knocked aside as she threw Bynde down to the ground. Clutching at her neck, Bynde attempts to reach for Tai, only to have her be torn away at the last minute by their assailant. Tai screams out to her sister for help, vanishing in a burst of ruby fire alongside her kidnapper and leaving nothing but a strange rune on the ground. In a fit of desperation and rage, Bynde rushes to the rune on the ground and stabs it with her sword, and in another burst of flames, she is whisked away as well.
Bynde eventually wakes in a strange landscape, with dense fog and towering, unfamiliar plants. Unsure of where she is, but still deadset on finding Tai and her captor, she rushes into the new land with sword in hand, carving her way through overgrown plantlife and strange, shadowy-looking creatures wielding primitive weapons. Eventually, Bynde makes her way to a clearing, where a large carcass of some great beast has been left with strange arrows stuck in its side. Bynde reaches out to investigate the corpse, only to be interrupted by a group of men in silver armor, aiming long weapons at her. As she draws her blade to defend herself, the armored men are interrupted by a young man in regal clothing, who calls them off in order to talk to the "strange lady".
The man asks Bynde for her name; Bynde attempts to answer, but cannot, instead attempting to use sign language. The man, seemingly being unable to read her hand gestures, understands that Bynde may be mute due to her demeanor; as such, he asks if he can call her "Moonstone", simply based on the earrings she is wearing. Seeing no other choice, Bynde nods in acceptance. The man, satisfied with her compliance in the face of potential danger, introduces himself as Logos, prince of Kalidia. Noticing Bynde's even more confused expression, Logos deduces that Bynde is not from Kalidia, seemingly having no idea what the nation is. Ordering his men to put away their weapons, he offers to escort Bynde to his palace in order to help her calm down and refresh her mind.
Eventually, Bynde arrives with Logos at Kalidia Castle Town, a bustling marketplace far busier and louder than anything she'd ever experienced. Staying close to Logos out of confusion for her surroundings, she follows him into the castle proper, being lead into a massive throne room with an elderly king on the throne. Logos introduces Bynde to his father, King Patheus, and explains to the old man that "Moonstone" seems to be unsure of exactly where she is or what exactly is going on. Patheus remains motionless a few seconds, but then suddenly has a jolt of realization, and asks Bynde to come close to him. He reaches out to examine Bynde's unnaturally white hair, reaching a conclusion that she is "one of those moon people". Confused, Logos asks what exactly his father means; Patheus simply states that something he's been fearing for a long time has begun to resurface, and that "Moonstone" should venture into Stalma Forest and seek the counsel of someone he calls "The Sage", who will guide her towards the one she seeks. Logos instinctively reaches for his left hand, which Bynde notices for the first time is scarred and burnt horribly.
As Bynde is sent from the palace with a map which leads to Stalma Forest, she is intercepted in the castle courtyard by Logos. The prince states that while he has no clue who she is, he will do anything in his power to assist her in her journey. He takes off a small earring and hands it to her, informing her that the gem is a magical artifact known as the Kingsbead and will enable him to talk to her from far off distances if need be. With a short hug and a blessing of luck on her journey, Bynde sets off to find Stalma Forest, hoping that the Sage will help her find Tai and her kidnapper.
Stalma Forest
Following the map given to her by King Patheus, Bynde ventures from Kalidia Castle into a deep evergreen forest to the north, civilization giving way to wild grassy frontiers and bright plains. It's certainly a different feeling from the emptiness Bynde has spent on the moon all her life, and along the trail, she decides to stretch out and soak up some of the sunlight. This is swiftly interrupted by a cry for help nearby, and Bynde rushes over to the source of the screams to find a creature resembling a cross between an insect and a flower shielding herself from attacks by more of the primitive creatures from the Foglands. Blade drawn, Bynde fends the attackers off, helping the insectoid woman out.
Fully calmed down, the young woman began thanking Bynde for her rescue, crying amber-colored tears of joy. When she noticed Bynde's confused expression, she introduced herself as Atra, a member of the Fleurde tribe residing deep in the forest. Atra sees the map in Bynde's hands and understands that she must be looking for the Fleurde Sage; by coincidence, her mother, and someone she was in search of assistance for. Atra explains that the Sage had been stolen away from her village by a great beast of some kind, and dragged into the abandoned temple nearby. Since then, the Mirekin that had just been attacking her had been pouring out of the temple non-stop, and as pacifists, they had no training by which to attempt a rescue. Her sense of duty prevailing, Bynde offered to help rescue the Sage; perhaps the kidnapper would be the same woman who took Tai.
Atra eventually leads Bynde to Lotus Village, the dwelling place of the Fleurde. The charming stained glass architecture and beautiful floral decorations around the village repeatedly begin catching Bynde's eye, leading to her attempting to wander off across the new locale, but Atra quickly catches her arm, explaining that there's no time to waste in rescuing the Sage. Bynde is lead by Atra towards a large stone building in the distance, overgrown with moss and decay. A large crowd of other Fleurde is waiting at the entrance, as if unsure what to do; Atra then announces to the crowd that she has arrived with a skilled swordswoman willing to help rescue the Sage. With the cheering of the crowd at her back, Bynde enters the Seer's Catacombs, blade in hand.
Venturing deep into the musty, glass-filled catacombs, Bynde begins fending off massive spiders and other overgrown platlife that has taken the location over. Along the way, she encounters a sealed chest that seems to magically open on contact with her hand; inside is some strange ring-like bladed weapon. Though she has never seen this object before, Bynde seems to recognize it as something called a "Windcutter", and decides to take it under the belief that it will act as a useful tool. Eventually, Bynde comes to a massive empty room resembling some form of worship hall, with a massive statue placed in the middle. As she walks further into the room, massive vines emerge from the statue, animating it and revealing an eye-like flower in the center. The statue roars to life and attacks Bynde, forcing her to take it down.
With the beast slain, Bynde approaches a frail pink and white person dropped by the golem, determining that it seems to be an elderly Fleurde; perhaps this could be the Sage she was told about? The Sage slowly stirs back to conciousness before thanking her savior for rescuing her from the clutches of the terrifying beast. Bynde picks her up and begins carrying her back to the catacomb entrance, only to be interrupted by Atra, who managed to make her way through safely due to Bynde clearing out the monsters. Atra and the Sage greet each other warmly as the former explains the situation; after realizing Bynde was sent by Patheus, the Sage begins to recieve a vision.
As if caught in a trance, the Sage speaks to Bynde- with her true name, most jarringly- about the woman who stole Tai from her, stating that as Bynde is now, she will not be able to pursue her quarry. However, the "maiden of flame" could have her location pinpointed with the help of an ancient relic known as the Dark Eye. The Dark Eye had been shattered in two centuries ago by an unknown force, and each half had been entombed in a different part of Kalidia for safekeeping. One half resided in "the ruin of flame", while the other resided in "the tomb of the sea". Bynde was filled with joy- she could find Tai using the Dark Eye! Before the Sage came back to reality, however, she made one more statement; the maiden of flame was merely the herald for another force, something much fiercer and more powerful than the one Bynde sought. With that, the Sage fell asleep, snoring loudly and peacefully. Bynde and Atra picked the old woman and began carrying her out of the catacombs, the latter once again crying tears of joy at Bynde helping her and her people so selflessly.
Cinis Wastes
Guided by the Sage's words, Bynde set off with directions from Atra and Logos towards the Cinis Wastes, supposedly one of the two burial sites of the pieces of the Dark Eye. According to Logos, the wastes were a vast arid landscape due to some strange event that had happened years before Patheus's time, where something fell from the heavens and turned the area into an almost lifeless wasteland. Bynde had to agree; aside from a few creatures scuttling about the red sandy canyons, almost nothing here could be considered alive by any means.
Eventually, Bynde and Atra come across a large sinkhole, with what appears to be faint noises coming from it. Despite Atra's urging, Bynde slides down into the sinkhole, falling for a bit until eventually arriving in what appears to be an underground city held up by a massive metal cage, landing on a large bag of ruby-colored dust. She gets up off the bag to see two small furry creatures with incredibly large ears, glaring at her angrily and yelling at her for ruining their product. Atra soon falls from the ceiling as well, landing in Bynde's lap; the Fleurde looks around and determines that the two must be in the city of Cineris, the underground home of the Effec people.
Wandering Cineris for a short while, the two eventually come across a smaller Effec with a nervous disposition about him, seemingly unaware of his surroundings as he walks right into Bynde's leg. Startled, the Effec screams for his life, and Atra only barely succeeds in calming him down before he breaks down into tears. When asked what exactly is wrong, the Effec introduces himself as Laiman, and he was the most recent in a member of guardians tasked with guarding a relic of his people known as the Aqua Stone. Unfortunately, someone managed to trick him into giving up the stone, and now both his own life and that of his people were in danger. Realizing she needed to help the Effec and Laiman out, Bynde looked for a method to return to the surface, setting out to look for the Aqua Stone.
After some exploration on the surface of the wastes, Bynde and her friends eventually come across a small encampment of strange people; they seem to resemble the Kalidians, but with much darker skin, and strange clothing that seems to be made out of golden bones of some kind. Laiman shudders and confirms that these "Mariders" are in fact the people who stole the Aqua Stone, pointing out a muscular man in the middle holding up a small blue gemstone in his hands and tossing it around carelessly while his comrades drank some strange amber-colored liquid. Determined not to simply rush in, as that could simply lead to conflict that they didn't need, Atra suggested the three sneak around the camp in order to retrieve the Aqua Stone.
Bynde circles the camp, waiting for the man with the stone to enter his small tent and seperate himself off from the other warriors. Giving a signal to her friends to alert them that the time was right, the three snuck in behind the man, with Bynde drawing her sword and pointing it at his back. The man yelped as he dropped the stone, which Laiman swiftly ran over and picked up. Laiman taunted the man, laughing that nobody would be able to keep ahold of the sacred relic of the Effec for as long as he was around; in response to this, the man, introducing himself as Mack, complained that Laiman had given the stone to him, and that he had no right to try hiring assassins like this to come after him. Confused, Atra asks what exactly is going on, and while Laiman sweats nervously, Mack explains that he had been gambling with the Effec a few days prior, and after running out of money, he had decided to put up the gemstone as a bargaining chip. Laiman lost, and Mack got the stone and the money, the latter of which he had used to buy both alcohol and important supplies that his tribe needed to return back home.
Atra slapped Laiman on the back of the head, ashamed of him for trying to use the ancient relic as nothing more than a gambling tool. Laiman apologized for his actions, but refused to return the stone to Mack due to a need to return it to its rightful place. Mack eventually asked why the Effec even needed the stone, seeing as Laiman had never told him it was anything more than a standard jewel; Laiman explained that the Aqua Stone was the effective key to some dungeon the Effec didn't want people entering, being the only thing capable of cooling off the lava sealing the entrance. With this, Bynde realized he must have been referring to the location where part of the Dark Eye was being kept, and she now knew that she'd need the Aqua Stone to get in. Attempting to express her situation with hand gestures, she once again couldn't get her message across without Atra as an interpreter explaining her need to get into that dungeon. Laiman didn't want to hand over the Aqua Stone for fear of losing it yet again, but with pressure from Mack, he eventually handed it over to Bynde.
After some time wandering, Laiman lead Bynde to what looked like a massive spout of lava bursting from the side of a mountain. The Effec instructed her to hold the Aqua Stone aloft, and after following his directions, a spout of water emerged from thin air to harden the lava, revealing the entrance to some temple buried in the mountain. With Atra unable to enter due to her plant-like body and fear of entering the lava-filled temple and Laiman deciding to keep watch over her, Bynde ventured into the foreboding location alone. Using the power of the Aqua Stone, she was able to redirect the constantly flowing streams of lava until eventually reaching a chamber of what appeared to be a giant demonic skeleton. Bynde, spurred on by a mysterious voice in the back of her mind, snapped off the skeleton's horn, which somehow burst into golden flames on contact with her skin; instead of hurting, however, the flames filled her with a sense of power and strength. Venturing onward with this newfound surge of energy, she made her way into a large central chamber filled with flames. Threatened by a massive demon made of stone and lava, Bynde nevertheless battled her way to victory, entering a small corridor on the other side of the room and obtaining a strange golden artifact dotted with purple crystal.
One piece down, one to go... and then she could find Tai.
Asyla Drifts
With one half of the Dark Eye obtained, Bynde merely needed to determine the location of the artifact's other half. However, neither Atra or Laiman seemed to have any concept of where this "tomb of the sea" could be; desperately, she turned to Mack, who may have had the answers she sought. Mack did seem to recall something about a tomb from his more learned sister, Marnetta, which could potentially be the location Bynde was looking for. With tentative looks from Laiman, the three decided to follow Mack and his crew back to their base of operations, where Marnetta could potentially fill the group in on the location of the Dark Eye piece.
Mack took the group to a small coastal town on the edge of a white, sandy beach, where people from all over the kingdom were relaxing and talking with each other. Bynde noticed a fair amount of women acting as merchants, who seemed to be wearing similar clothing to that of Mack; perhaps they were of the same tribe? At either rate, her guide was beckoning the trio to join him on a small wooden craft of some kind, saying that he'd take them over to a small building suspended on stilts in the water where Marnetta would be hanging out. Not used to the sort of craft Mack was piloting, Bynde held on for dear life during the trip, fearful to fall into the water as the others reassured her it was alright.
After the short ride over to the building, Bynde and crew left their vehicle and entered the building that Mack had taken them to. Inside, standing at a large table with a map on it, was a muscular woman who looked similar to Mack, a massive hammer at her side. Mack gave her a short greeting and the woman, presumably Marnetta, shifted from a serious expression to a more excited and sincere one, with the two siblings shaking hands in an exceedingly masculine gesture. Marnetta asked who exactly her brother had dragged in, and Mack explained the situation; when asked about the "tomb of the sea", Marnetta seemed to have some idea of what exactly the Sage meant.
Marnetta explained to Bynde that off the coast of Kalidia lay an oceanic citadel known as the Tomb of Remembrance, where the Marider had buried their dead for decades to honor the fallen. Recently, however, some foul tempest had taken over the tomb, infesting the dead and turning them into cursed beings they had recently dubbed Sea Wraiths. Bynde seemed to believe that the Dark Eye piece would be lurking inside the tomb, but when the question was brought up by Atra, Marnetta stated that outsiders were not permitted to enter the tomb out of respect for the dead. However, Mack brought up a suggestion; Bynde and company could assist Marnetta in clearing out the infestation of Mirekin that had been attacking the town in exchange for entry. Marnetta seemed to object at first, but eventually agreed, giving Bynde a hearty handshake to seal the deal.
After clearing out the Mirekin, Bynde returned to the Marider settlement, where Marnetta was beaming with pride at her accomplishments. Honoring her bravery and skill in combat, she placed her hand on Bynde's shoulder and gave her a blessing of sorts, stating that she was now considered an honorary member of the Marider tribe and could now enter the Tomb of Remembrance. She also handed her a small necklace made of silver scales; Marnetta titled it the Siren Necklace, a tool that would help her travel through the waters on the way to the tomb and enter without hassle. With approval garnered, Bynde asked Mack to sail her out into the Tomb of Remembrance, eager to get her hands on the Dark Eye piece.
Upon arrival to the tomb, Bynde immediately sensed something wasn't right. The air was immensely forboding, with the breeze feeling almost alive, and all around the area were the crumbling and broken husks of fallen warriors, glowing with a sickly green smoke. She cut her way through the area until coming across the fully intact remains of what looked like a knight, his blade swirling with wind. After defeating the knight, his body crumbled into ash, with the wind from his sword swirling into her body instead. At this point, Bynde had to wonder; why was she such a master with using and controlling the powers and items that she had found in all these ancient ruins? These were foreign objects, being wielded by a girl from the Moon, and yet she was using them as if she had known them all her life. It almost felt like these objects were seeking her out... She pushed the thought out of her head. She had to focus on obtaining the Dark Eye piece. As she ascended to the top floor of the tomb, she watched as the foul wind permeating the building fused into a massive creature, eager to fight her. Using the new wind powers she had obtained from the knight, Bynde beat the creature and walked into the next room to obtain her prize... the second half of the Dark Eye.
Now to find Tai and her kidnapper and make things right.
The Encounter
With both pieces of the Dark Eye assembled, Bynde received an urgent message through the Kingsbead. After responding, she discovered that it wasn't Logos like usual, but instead King Patheus, who was ordering she return to the castle with the two pieces of the Dark Eye; the Sage would be waiting there with him, and she would help them assemble and use the artifact. Concerned with the unusual coherence of the king, Bynde left the tomb and returned to the others in the village. Atra seemed to know something was up, and decided that the full group should accompany her to the castle. Laiman and Mack gleefully agreed to tag along, while Marnetta sighed to herself and reluctantly decided to ensure that Mack stayed out of trouble. With her friends backing her, Bynde began her trek back to the castle... With a mysterious figure watching in the distance.
Bynde and company soon returned to Kalidia Castle where they were greeted by Logos, Patheus, and the Sage. Though the mood among Bynde's friends was easygoing and excited- they were about to complete her task and save her sister- both the Sage and Patheus seemed much more somber about the events to soon transpire. The Sage asked to see both halves of the Dark Eye, and Bynde obliged; the elder Fleurde spoke some form of ancient language as the two halves of the purple crystal reformed into one, gold wires sprouting from thin air to entwine the two. With the artifact restored, Patheus asked Bynde to place her hand on the glowing jewel. Doing as instructed, Bynde felt herself getting lighter as her vision was engulfed in purple light.
Bynde found herself inside what appeared to be an eerie palace carved from bone and purple rock, standing in the middle of a garden filled with red flowers. Standing in the middle of the garden was none other than Tai, who Bynde could tell from a distance had burn marks on her arm. Sisterly instinct kicking in, she rushed over to the younger Lumina in order to check and see if she was okay. Tai turned around, her melancholy expression turning into a shocked and happy one upon seeing her older sister again. Confused and bewildered that Bynde had braved her fears and somehow managed to find her way to the planet below, Tai explained that she had no clue why the woman had taken her, but it had something to do with "unlocking her potential". Tai gave away her location- Darkiris Stronghold in the Foglands- and told Bynde to stay strong and keep fighting. Bynde felt her connection flicker away as a strange electric mist began filling the air, and she gasped for air as she felt herself return to the castle.
After Logos and Atra helped bring Bynde back to consciousness, Patheus asked her what exactly she had seen through the lens of the Dark Eye. The Sage seems to have a recollection of sorts when the name of Darkiris Stronghold is brought up, and the two elders in the room explain that the stronghold was a long-forgotten keep built by an order called the Stargazers... Though the Stargazers had since died out, the sealed keep was home to untold secrets that no Kalidian, not even Patheus, had seen before. The Dark Eye, being a supposed relic of the Stargazers, should allow Bynde access to the stronghold. The group set off to find Darkiris Stronghold, but were stopped by Patheus; he believed that, if his predictions were true, only Bynde herself would be worthy to enter the belly of the beast. Nervous, Bynde accepted, and ventured off alone to save Tai.
Bynde returned to the foggy forest where she had first arrived on the planet, and by following Patheus and the Sage's directions via the Kingsbead, she soon came across a vast fortress made of the same purple stone she had seen in her vision. Holding out the Dark Eye to the locked gate, she soon found the doors opening for her, as if welcoming a guest into its labyrinthine corridors. Plenty of Mirekin and other foes were waiting for her within the stronghold proper, but Bynde found herself more scared of the runes carved on the walls; aside from depictions of bloodshed and violence, she found some depicting a woman that felt familiar to her for some reason, deeply unnerving her. Nevertheless, she pushed onward, finally coming across the red garden she had seen in her vision. Tai was there... and so was the woman who had taken her, crouching in front of her and talking with her.
The woman finally turns, noticing Bynde behind her with her blade drawn. She doesn't seem frightened at all, rather turning to Bynde and introducing herself as Kathia. Tai rushed over to her sister's side, hiding behind her for protection and thanking her for coming all the way to help save her, but Kathia simply chuckled to herself as she drew out a flaming blade of her own from thin air; both sisters being here apparently only meant that she would be able to carve out both "Shards" with little to no effort. Both sisters were confused, but Kathia continued her speech, saying that with time and training, she'd be able to teach Tai how to "use her powers right". Calling out Bynde by name, however, Kathia claimed that the elder sister would need to have her Shard torn out of her body instead. Clashing swords, the duel between Bynde and Kathia began in earnest.
Finally triumphing over Kathia, Bynde ran over to Tai, who had been hiding off in a corner to avoid the fight. The two sisters hugged tightly, both crying tears of joy that the nightmarish ordeal was over. Kathia moaned as she tried to get up off the floor, charging a fireball in her hand before collapsing again. For some reason, Tai looked over to the mysterious woman and left Bynde's side for a second, kneeling down in front of her and chanting some mysterious language that Bynde couldn't understand. Kathia's wounds seemed to be healing as a strange gold light ran down her body; when Tai stopped singing, Kathia slowly got up and massaged her shoulder. Bynde's expression turned confused and bewildered as she wondered why Tai suddenly had healing powers, and why she would use them on her kidnapper and presumed torturer. Tai explained to her sister not to worry; Kathia had shown her how to use something she called the "Shard of the Crest", and it would be the wrong thing to just leave her for dead. Before Tai could explain any further, a bolt of lightning shot through the garden, cutting off Bynde from her sister. A powerful-looking man, wielding a spear and wreathed in electricity, emerged from a side door, glaring at Bynde with a gaze that felt both sorrowful and threatening.
As Bynde drew her sword in self-defense, Kathia bowed down in front of the man, greeting him as Lord Noske. Tai began backing off as the man walked in front of her, but instead of striking her as Bynde was expecting, he simply knelt down and held out his hand to the young girl, as if to comfort her. Bynde was even more confused as to what was going on, but Noske turned his head towards her and pointed his weapon directly at her, before berating Kathia about trying to kill somehow who was clearly strong enough to break all the way into their stronghold. The fiery woman began explaining that Bynde had followed her after she had located and taken the "Crest" away from the Moon, which only raised his suspicions even more. Noske gave Bynde a look-over quickly before thrusting his weapon directly at her. Caught off guard, Bynde raised her arms to block the attack, only to be thrown off by a blue light that seemed to be coming from her hand.
The spear hovering inches from her face, Bynde looked at her hand; somehow, a strange diamond-shaped symbol had burnt itself on the back of it, with strange runs and gear-like symbols floating around it. Noske put down his spear as a smile creeped across his face; he remarked that after decades of searching, the Seeker had finally arrived. Confused as to what exactly was going on, Bynde raised her sword once more, only for Noske to offer to explain the situation. Putting his hand on Tai's head, Noske stated that the gathering of all four of them was proof of the "cycle of reincarnation" beginning once more.
Noske explained that the world of Kalidia had always been subject to the whims and wishes of a quintet of creator deities; having accomplished the creation of what they saw as their perfect world, they instead focused their efforts on a second world, which became Kalidia's moon. Once life began developing on the moon, the gods decided to have a bit of fun with the race that would one day become the Lumina. Imbuing chosen individuals with great power and strength, they forced them to play out a little game that they had enacted, and once the game was done, the gods kept reincarnating the chosen players over and over, eager to see who would come on top. The eras changed, the world changed, and cultures changed, but the spirits and powers tied to this endless cycle would always remain constant. Noske shocked Bynde even further by stating that he too was a Lumina; having been cast down from the Moon by force centuries ago just for being born as the so-called "Dark Lord" that this endless cycle had forced him to be.
Noske took Tai's hand and walked her back over to her older sister. The man told Bynde to leave with her sister as Kathia looked confused behind him; with Bynde now unable to avoid her destiny as a Seeker, she would be unable to return home until her task in Kalidia was done. Following this statement, Noske told the two sisters to spend what time they could together and be happy, for it was only a matter of time before he and Kathia would have to fulfill their own destiny and slaughter Bynde. A heavy feeling weighing down in their hearts, the two sisters left Darkiris Stronghold.
Upon returning to the castle, the two sisters were greeted by Logos, who asked Bynde if everything was alright. Looking down to see Tai, he concluded that Bynde had succeeded in saving her sister, and welcomed the younger sibling to Kalidia Castle where she could rest. Tai was concerned, however, and asked Logos if he was aware of anyone named Noske. Logos denied this, sweating, while King Patheus slowly emerged from the other end of the corridor, a somber and serious look on his face. Knowing Bynde had faced the dark lord Noske, he determined that there were some things he would need to tell her.
Tai's initial reaction to Patheus was to ask whether or not Noske's speech was true; were she and Bynde really part of some cycle of reincarnation? Patheus confirmed this to be the case, as this cycle had been a part of Kalidian history for thousands of years, and that Patheus himself had actually known the previous incarnations of what he called the Crest and the Seeker long ago. Egged on to explain what that meant, the elderly king explained that the titles referred to the roles each spirit played. The Crest was a person or object of immense power, taken by the Lord and his disciple, the Obsessed, to attain some dark goal. The Seeker would be the one sent to retrieve or save the Crest, guided by the final reincarnated spirit known as the Guide. Bynde felt strange inside after hearing this; everything so far had happened exactly as Patheus described. Looking around, she realized that Logos seemed to be feeling off as well, as he kept fiddling with his left arm... which she only now realized was charred black, as if it had been violently burned and charred.
Patheus finally reiterated what Bynde had been dreading; with the cycle of reincarnation fully initiated, the two sisters were locked inside a battle that could not be avoided. While Bynde would be able to return to the Moon whenever she desired, Tai would be unable to leave the planet as she was now unable to escape the wrath of the Lord. If Bynde wanted to return home with her sister, she would have to slay Noske, killing him to ensure the end of the cycle once again. Suddenly, the Sage appeared from behind a corner, looking somber as well. The Sage explained that in order to prepare herself for the inevitable battle with Noske, Bynde would have to attain blessings from five shrines located across Kalidia, strengthening herself to be on par with the man she would need to kill. Bynde thought to herself about the situation; Noske seemed just as hesitant to fight as she was, and he even seemed to be encouraging her not to fight despite the inevitability. Could he really be as heartless and evil as Patheus was making him out to be? Regardless, Bynde accepted. Killing Noske would be the only way she could return home with Tai and finally bring an end to all this. Logos told Bynde that he would take care of and watch over Tai for her while she sought out the shrines, just to ease her worry. With everything prepared and a guide to the shrines prepared by the Sage, Bynde set out to prepare for her final battle. Just before she left, though, Tai handed her the sitar she had spent so much time practicing; Tai said it could help her on her journey more than it would sitting in the castle. With one final hug, Bynde set off.
Characters
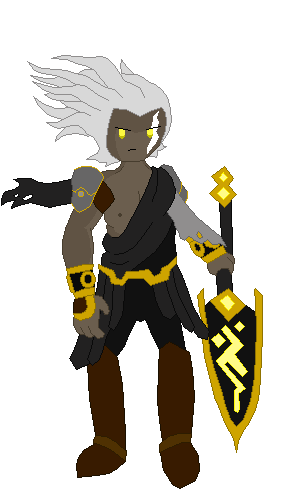
 Bynde Heroine from The Moon |
The young Lumina Bynde sees herself as nothing more than a farmhand, having spent her entire life alongside her younger sister Tai working on her family's farmstead on the Moon. She has always yearned to be something greater, but between her mysterious inability to speak and her fear of the unknown, she's always been scared to try. When a menacing figure kidnaps her sister and descends to the planet on the horizon, however, Bynde must venture forth into a strange new world to set things right. Bynde is the game's player character, acting as a bind between the player and the world of Kalidia. Being skilled with both sword and bow, she has a wide repertoire of skills one might consider perfect for adventuring, and it's up to you to guide her along the way. |
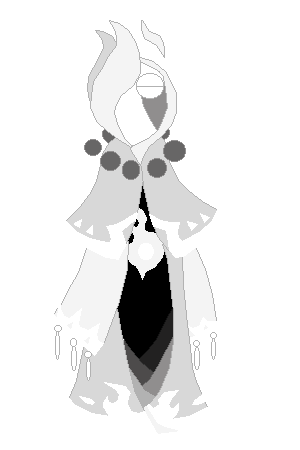
 Tai Pure-Hearted Maiden |
Bynde's younger sister, a woodcarver and instrumentalist who aids her in working on the ranch. With their parents long gone and nobody else to turn to, the two have become an inseparable pair, relying on each other just to get through the day. One day, however, Tai is kidnapped by a mysterious figure and taken down from the Moon they live on to the uncharted planet below. While Bynde searches the land for her, Tai's own fate is currently unknown... How is she faring in the hands of her mysterious captor? |
 Logos Wise Prince of Kalidia |
The prince of the kingdom of Kalidia, and the first to welcome Bynde to the strange world she finds herself in on her search for Tai. An avid hunter and adept swordsman, he has been occupied fending off a multitude of strange monsters that have recently been assaulting the kingdom, and while he desires to help Bynde on her quest, he cannot do so directly. He can, however, assist from the sidelines; with his magic Kingsbead, he is able to provide information on puzzles and enemy behavior if the player should require as such. |
 Atra Descendant of The Sage |
A Fleurde woman who Bynde encounters in the forest, being attacked by Mirekin. After being saved, she begs Bynde to come aid her village, which has been attacked by a strange monster that has kidnapped her ancestor, the all-powerful Sage. After clearing the Seer's Catacombs, Atra begins travelling alongside Bynde as a form of interpreter, aiding people in understanding the mute woman's thoughts. She's sweet, thoughtful, and timid, the pacifist nature of the Fleurde meaning she grows attached to Bynde as a bodyguard as well as a genuine friend. |
 Mack Marider Ravager |
A member of the Marider tribe and sister of their current leader, Mack is first met in Cinis Wastes after taking the Aqua Stone from Laiman in a game of chance. After Bynde makes the two reconcile their dispute, Mack offers to take her and her friends to where he believes the other half of the Dark Eye is located, becoming a sort of guide and boatman to the group. He's incredibly cocky, but means well and tends to get along with the group pretty well. He's also a man who values strength and determination, developing a sort of friendly rivalry with Bynde as time goes on. |
 Marnetta Marider Queen |
The current leader of the Marider tribe and sister of Mack. Marnetta is a fierce and level-headed woman who has a little bit of a temper issue, often owing to attacks on her people and the boneheaded antics of her brother. Despite that, she does have her softer, flirty side... Bynde first encounters Marnetta in her quest to reach the Tomb of Remembrance, and the hammer-wielding warrior becomes a steadfast ally in her journey afterwards. |
 Kathia Obsessed Follower of Darkness |
The red-maned woman who emerged from somewhere in Kalidia after hearing Tai's music in order to steal her away. A devout follower of Noske's beliefs and his right-hand woman, Kathia has a deep romantic connection towards Noske that is likely not reciprocated; in truth, she is attracted to the Shard of Eclipse that marks its bearer as the reincarnation of the Lord, not the man himself. Attempting to act as a teacher to Tai and unlock her powers as the Crest, she has a deep rivalry with Bynde, who she sees as nothing more than a stepping stone on Noske's path to victory. |
 Noske Dark Lord from the Moon |
A man claiming to be a Lumina, who was dragged down from the Moon centuries ago and cursed with the fate of bearing the Shard of Eclipse against his will. Noske is a somber individual, not desiring the destiny he has been forced to bear as the lord of darkness; as such, he's remarkably kind and sympathetic towards Bynde and Tai, seeing them as being stuck in the same situation he is. As the source of the dark forces, however, the player will inevitably be forced to confront him... |
Heralds of Flame Servants of the Gods |
Five spirits who work as the envoys of the five deities who created Kalidia and propagate the endless cycle of reincarnation. They are found in the dungeons that contain the Divine Springs, and offer great rewards to Bynde upon her completing them, as they must fulfill the duty of aiding the Seeker in their quest. If Bynde so chooses, however, she is able to kill the Heralds, denying the cycle and obtaining their essence as an alternate reward. Killing Heralds and denying Bynde's destiny alters the ending of the game, and if the player decides to kill all five, the fifth and final Herald will be replaced with a challenging boss known as the Executioner. |

Romancing
After clearing Darkiris Stronghold, Bynde becomes able to form a romantic bond with one of four characters: Logos, Atra, Mack, or Marnetta. Romancing a character involves undertaking four sidequests with them before entering an difficult optional dungeon known as the Diamond Cavern. At the end of this dungeon lies a unique item known as the Matrimonial Diamond, which can be made into a ring in Cineris and used to propose to the character of your choice. All romancing sidequests can be done in one save file, but as only one diamond exists, only one proposal can be made per save.
Successfully proposing to a character alters the ending of the game subtly, showcasing Bynde marrying the character the player proposed to. In addition, this also unlocks a unique upgrade or ability tied to the character, each of which is incredibly powerful yet mutually exclusive due to how the marriage system is implemented.
Logos
| Quest 1 | Logos's first quest can be initiated by simply travelling to Kalidia Castle Town, where Logos can be found consorting with the locals and expressing interest in the new stalls opening up. The quest simply involves helping him choose a gift for Tai, something he believes will help her relax in the potentially unnerving environment. Bynde can pick up a multitude of objects in the town, from instruments to books and even some small training weapons, and the player simply has to choose one they think Tai would appreciate. |
| Quest 2 | In an attempt to help Bynde get stronger for her inevitable fight against Noske, he volunteers to assist her in a sparring match in Aysli Town's Colosseum. The player must challenge the prince, who uses a fighting style akin to a Wraith Knight, but faster and exchanging wind-based attacks for various lunges and water projectiles. Upon defeating Logos, he applauds Bynde's skills, stating his admiration and desire to learn from her technique. |
| Quest 3 | Having garnered respect for Bynde and seeing her as a swordswoman on equal terms with him, Logos invites Bynde on a hunt for wild creatures in Almier Foglands, near her initial landing sight. This sidequest begins as a simple hunt for Mirekin, which the player must aide Logos in defeating, but eventually, a massive enemy known as a Deathhound appears, which the player must also defeat. Logos is injured in combat, revealing his left arm to be entirely burnt, and he thanks Bynde greatly for saving him before being taken back to the castle by his guards, giving her a hug to thank her for her support. |
| Quest 4 | Logos's final quest is a simple chat located in the hot spring in the bottom of Kalidia Castle, where he is recovering from his wounds. Bynde is able to enter and rest alongside him, triggering a conversation that has Logos explain much more of his background; he reveals himself to be the reincarnation of the Guide, perhaps why he feels such a special bond with Bynde and has been so willing to guide her. He then reveals that his burned arm has remained that way since childhood, as when the rune showcasing himself as the Guide first appeared on his hand, Patheus and his mother- who he believed to be a Marider, breaking who knew how many Kalidian laws- took his arm and burned it in an attempt to "drive the power out" and delay the cycle. Clearly, if Bynde was any indication, it hadn't worked, making the trauma all for naught. Eventually, Logos confesses that ever since Bynde had beaten him in combat, he had held some unknown feeling in his heart that had been kept him up at night ever since... He then stops, deciding to not bother her with simple thoughts. |
| Proposal | After clearing all quests, Bynde is able to propose to Logos in the main hall of Kalidia Castle. When given the Diamond Ring by Bynde, he appears flustered for a second, seemingly having prepared a speech for the occasion but having forgotten it in the heat of the moment. Logos then confesses that the feelings he had brought up were certainly romantic in origin; he simply felt awed by her presence, charm, and skill, and he didn't have the right words to express how wonderful it had been to be in her company over the past few days. Getting down on one knee, Logos thanks Bynde for caring about him as much as he did for her, and vows to make her the happiest queen in Kalidian history as the two embrace. |
| Matrimonial Gift | Royal Bow A legendary bow passed down generation to generation through the Kalidian royal family; as that now includes Bynde, it is hers to use by right. The Royal Bow acts as a permanent 2x attack multiplier to the standard bow, but also enables Bynde to charge her arrows by holding down both triggers at once. This powers up the devastating attack known as Divine Arrow, a laser bolt capable of piercing through armor and dealing immense damage, but exhausts all of Bynde's Mana to use. |
Atra
| Quest 1 | Atra's first quest begins in Fleurde Village, where Atra can be found attempting to brew some form of potion. She asks Bynde to deliver some ingredients to her, as the recipe requires constant stirring to get right. After returning with the ingredients, Atra thanks the player for assisting her, and explains that she has always desired to be a potion maker despite the Sage pushing her to become her successor. Bynde's body language seems to encourage Atra to follow her dream job, and the Fleurde thanks her for her support. |
| Quest 2 | The second Atra quest can be activated by finding her in Kalidia Castle, in which she is wrapped in an intense conversation with the Sage and King Patheus. After the conversation picks up, Atra seems worried, and tells Bynde that she and the king have run out of an important herb that only grows in Deepsky Woods. Spurred on by this need, Bynde is tasked with retrieving a sample of the plant from a deep grove in the woods. Upon return, Atra expresses immense gratitude, before explaining that the herb is for the Sage; as her body ages, she needs the life-giving essence from the herb in order to support herself, lest she die and Atra be thrust into the role of Sage herself. She hugs Bynde and thanks her yet again for being so supportive. |
| Quest 3 | Quest 3 can be triggered by entering Atra's house post-Quest 2, in which Bynde finds a note from Atra stating that after spending time around Bynde, she wants to learn to defend herself and prove she can be a warrior on par with "the one she admires". Concerned, Bynde is tasked with re-entering the Seer's Catacombs, entering a new side area only accessible through use of the Ancient's Horn. Eventually, Bynde encounters Atra attempting to fend off multiple Nocturnians and losing, with the player being tasked with defeating them in order to rescue her. After the Nocturnians have been defeated, Atra thanks Bynde for helping her once again, commenting that it's almost like how the two met in the first place. She smiles before a sudden expressional shift, stating that she has to go suddenly before running off. |
| Quest 4 | Atra's final romance quest takes place on a hilltop nearby Fleurde Village, where she is simply resting and looking up at the sky. When Bynde arrives, she invites her to sit by her, expressing interest in exactly what life is like on the Moon. The player is able to answer the questions however they wish, and once all the questions are complete, Atra expresses her admiration for what life must be like; after all, it seems to have produced a kind and caring woman who put herself in harm's way regularly just to help others. Atra claims that she has to go, but gives Bynde a final hug, saying that she's glad to have been Bynde's interpreter. |
| Proposal | After clearing all of Atra's quests, the player is able to propose to her on the same hill that Quest 4 took place on. After being given the Diamond Ring, Atra becomes emotional and bursts into tears of joy. She tells Bynde that after all the time they had spent together- and how often Bynde had risked her life and gone out of her way to help her- she had grown to have feelings for such a strong and heroic woman. Bynde offering to marry her and protect her even more had become the greatest moment in her life; she would be honored to spend her life with such a beautiful and selfless person. The two kiss as Atra vows to make Bynde as happy as she has made her. |
| Matrimonial Gift | Everlasting Bloom A special flower bred by Atra, grown on her special blend of potions to make it incredibly beautiful and vibrant. After receiving this gift, the flower acts as a passive upgrade remaining on Bynde's person at all times. Everlasting Bloom essentially acts as an extra life, reviving Bynde with full HP upon death and granting her infinite Mana for a short time. The flower will only reblossom if Bynde sleeps somewhere, and will not reblossom if the player quits and reloads. |
Map
TBA
Locations
| Lumin Town The Moon |
Bynde and Tai's home, a small town built by the Lumina on the moon. It's since been largely abandoned, and despite the size of the town, only a couple of civilians actually reside here. This town also houses the ranch where Bynde and Tai work, so there's plenty of wide expanse to explore. |
| Lunar Caverns The Moon |
Some natural caverns carved into the lunar surface. These caverns are a small tutorial dungeon, and basically consist of a straight path with some small side rooms. The end of the cavern leads to World's Eye, a massive flat clearing which ultimately leads to Bynde's quest. |
| Impact Ruins Almier Foglands |
A foggy ruin in a decaying forest, this location is where Bynde first enters the land of Kalidia. The only path that Bynde has to return to the Moon is in this location, and it's also where she meets Logos for the first time. |
| Kalidia Castle Heart of Kalidia |
The great castle made from silver and ivory stone built at the center of Kalidia. A towering monument for all to see in order to show who the presumed ruler of the land is, it is in truth only the home of King Patheus and his son Logos, a decrepid ruler long past his time clinging on to life to ensure what little peace he can. Kalidia Castle is an ideal place to rest and train Bynde's combat skills, as well as use the castle's hot spring as a place to bring friends for bonding. |
| Kalidia Castle Town Heart of Kalidia |
The town built around Kalidia Castle, acting as a hub of commerce all across the kingdom. The castle town is an easy place to stock up on potions, equipment, and other supplies, as well as a good central place to get your bearings. It's also full of people who'll take you up on sidequests! |
| Deepsky Woods Stalma Forest |
An evergreen forest to the north of Kalidia Castle. Bright and sunny, though plenty of shade is formed due to the thick tree growth. There are some signs of Fleurde settlement here, but it's ultimately very peaceful. |
| Fleurde Village Stalma Forest |
The forest village in which the Fleurde dwell. A charming little town specializing in selling floral Components as well as brewing more complex Potions than other towns may offer. Atra's residence is here, as well as the Sage. |
| Firestone Canyon Cinis Wastes |
A vast arid canyon rendered near-lifeless by a cataclysmic event that occured a long time ago. It's a bit of an unfriendly landscape to travelers, even discounting the monsters and lava flows that occur in the region. Popular haven for Mariders, however, and small settlements have popped up and been abandoned with regular frequency. |
| Underground Cinis Wastes |
The underground tunnels crafted by the Effec before their city truly blossomed. The Underground can be a bit tricky and spooky to navigate, but it might be a necessity early on, as the canyon above can be tough to traverse without this shortcut. |
| Cineris Cinis Wastes |
The grand capital city of the Effec, and the ultimate evolution of their tunneling skills. Cineris is one of the largest cities in Kalidia, home to the Effec industries of metalworking and gambling. Aside from the obvious games of chance Bynde can take advantage of, the Effec here can also upgrade Bynde's items through the use of various materials she collects. |
| The Sandforest Asyla Drifts |
The Sandforest is a strange biome that leads from the center of Kalidia to the Asyla Drifts proper, being filled with trees and flora of all shapes and sizes while having a layer of white sand carried all the way from the shoreline to the forest itself. Home to small settlements of Mirekin; be wary on your journey. |
| Asyli Town Asyla Drifts |
A coastal town inhabited by the Marider tribe; as the tribe is not allowed to live on Kalidian soil proper, the village is suspended on stilts in the water, while a small marketplace sits on the sand. Mack and Marnetta's residences are here, and alongside some stores that sell standard items, Bynde can challenge herself in the Colosseum for the chance at rewards. |
| Vast Ocean Asyla Drifts |
The vast western ocean bordering Kalidia, dotted with a multitude of tiny islands with various ruins and people residing on them. It's only truly explorable with the aid of Mack and his boat to help guide the player, but if one so desires, they can take a dive in shallower areas to find sunken treasure... or perhaps hidden caverns. |
Dungeons
| Seer's Catacombs Stalma Forest |
The first dungeon Bynde comes across on her journey, the Seer's Catacombs are a Fleurde religious site home to the Sage, an elderly woman with the power to see the fate of those who bid her question. Now, however, the catacombs have been taken over by a massive plant-like daemon, whose vines stretch all across the area. As a starting dungeon, it's more linear than most, effectively being a simple line of rooms with puzzles or combat challenges to solve. However, the area opens up considerably upon obtaining the dungeon item, the Windcutter, which can be used to slice down obstructing vines and webs in order to open previously inaccessible routes in previous rooms to progress onwards. The boss of this dungeon is Iconavar. |
| Flamespeak Dungeon Cinis Wastes |
An ancient temple buried under mounds of magma in an effort to seal away one half of the Dark Eye. Only accessible with the power of the Aqua Stone, the dungeon becomes more open and labyrinthine than the linear Catacombs that predate it. Many of the initial puzzles revolve around the flow of lava, using the Aqua Stone to redirect and block the flow of lava as well as walk atop it. Halfway through the dungeon, Bynde unlocks the destructive power of the Ancient's Horn as well, becoming able to further redirect the lava flow and break through blocked passages. The boss of this dungeon is Enfuega. |
| Tomb of Remembrance Asyla Drifts |
A large stone tower in the middle of the Vast Ocean in which the Marider tribe used to bury and honor fallen warriors, now infected by a foul breeze that wakes the dead and curses the ocean. Requiring the Siren's Necklace to enter due to the undersea entrance, the tomb has a large ground floor and a central shaft powered by an elevator, which is typically inactive. After obtaining the Gale Bombs from the Wraith Knight miniboss, the player can use the item as a form of wind propulsion, launching the elevator to higher levels and enabling Bynde to progress further. Many puzzles in the tomb rely on wind, be it from lifting up platforms to spinning windmills and powering mechanical parts. The boss of this dungeon is Dargale. |
| Darkiris Stronghold Almier Foglands |
A dark fortress where Tai is being held captive, only accessible through the Dark Eye. It's a more complex dungeon than previous ones, consisting of an upper and lower level that intersect multiple times. Though it has no dungeon item tied to it, it requires expert use of every item Bynde has obtained so far, and also has more combat segments. A classic dungeon through and through. The boss of this dungeon is Kathia. |
Items
Major
| Lumina Sword | A single-edged katana-like blade wielded by the people of the Moon, explicitly for self-defense. This is Bynde's simple starting weapon, with not much special about it. Still important to her, though! |
| Bow | A handcrafted wooden bow given to Bynde as a gift by Tai. It's not the best, but it's a beloved gift and still completely serviceable for combat. While the bow does have infinite arrows, holding out slowly drains Mana in order for Bynde to use its bullet time properties, letting her get off crucial shots. |
| Kingsbead | A glass earring filled with water. Using his magical skills, Logos is able to see and communicate through the Kingsbead in order to guide or inform Bynde. Press down on the D-Pad to analyze something that the player has locked onto. |
| Sitar | A wooden sitar belonging to Tai, who gives it to Bynde as a good luck charm. The instrument is infused with Tai's Crest-based powers, and by playing short songs, Bynde can perform magic spells with varying effects. She has to learn the song first, though! |
| Windcutter | A three-pronged bladed ring found in the Seer's Catacombs. Using magically empowered wind to guide it, Bynde can throw this ring at a multitude of targets to strike them all rapidly or to cut down rope-like objects. If thrown into a source of elemental attribute, it will retain the element until returning to Bynde's hand. Aiming, much like the bow, is handled in bullet time while slowly draining Mana, and targeting simply works by moving the reticle over the desired targets. Up to 5 targets can be selected at once. |
| Aqua Stone | An ancient amulet that's a relic of the Effec people, with a magical ability to control and summon water. When activated, a small reticle is placed on the ground, which Bynde can move by aiming. By using the stone, Bynde expends a big chunk of her mana to summon a floating orb of water at the reticle's position, which then drops down. The water can be used to extinguish flames, act as a conduit for electricity, or form stone platforms on lava; in certain environments, the water can act in alternate ways as well, such as evaporating into steam or turning into a block of ice. |
| Ancient's Horn | The horn of an ancient creature that Bynde snaps off in Flamespeak Dungeon. Acting as a passive upgrade, the Ancient's Horn allows her to perform a charged shield bash technique by holding the shield button for a short time, causing her to dart forward with immense amounts of force and enabling her to break both stones and enemy guard. The Ancient's Horn also enables Bynde to perform a ground-pound attack by pressing the shield button in midair, which has similar effects to the bash but direct the impact to the floor. |
| Gale Bombs | Manifestations of the evil essence permeating the Tomb of Remembrance, somehow purified by Bynde's touch. the wind now manifests itself in sphere-like form, which Bynde can summon for a large chunk of Mana. These spheres obey physics, and when the button is tapped again, the sphere explodes into a large burst of wind that turns into a small tornado. This can be used to lift objects upward, gain extra height, or when thrown into liquids, create large tornadoes of water or lava. Of course, they're also powerful offensive tools. |
| Thunder Brace | A gold and silver armbrace built in the Steelheart Sanctuary alongside other mysterious technology. Another passive upgrade, the Thunder Brace adds a new Charge meter on the rim of Bynde's Mana meter, which builds up as she repeatedly strikes enemies or objects with her sword in a combo attack. Once she builds up max Charge, her blade and body become imbued with electricity, giving her more damage and causing her to interact with specific objects in unique ways. On top of charging objects with her blade, she can fire off electric pulses via a shield bash, and can exhaust her energy and charge objects from a distance by firing an electricity-imbued arrow. |
Minor
| Heart | A small red heart that can fall out of enemies or pots when broken. Restores 1 heart to Bynde upon pickup. Can also be found growing on Heartflowers in the field itself. |
| Moonstone | An semi-rare item that can appear in place of a heart. Upon pickup, instantly refills Bynde's Mana Meter to full. |
| Kalo | The currency of Kalidia, a small diamond-shaped gem that is also obtained from defeating enemies and around the environment. They come in a variety of colors, denominating their value at a glance. Red gems are worth 1 Kalo, yellow gems are worth 5, green are worth 10, blue are worth 25, purple are worth 50, and silver are worth 100. |
| Flask | A silver container built by the Lumina to store any substance perfectly. Bynde can use these to carry potions or other objects into the field with her. There are four Flasks in the game, and each takes one Pouch slot to use. |
| Wooden Shield | A simple wooden shield crafted by the Fleurde tribe. Simple and durable, but crumbles away almost immediately when set ablaze. |
| Iron Shield | A simple metallic shield crafted by the Effec tribe. A bit sturdier than the Wooden Shield, but cannot block electric attacks and makes shield bashing take a bit longer. |
| Ivory Shield | A simple shield made out of shells, crafted by the Marider tribe. A tad smaller and less durable than other shields, but automatically regenerates its durability and is immune to all forms of attack. |
| Heart Shard | A fragment of red crystal. When four are collected, they merge into a Heart Vessel, granting Bynde one extra hitpoint. |
| Mana Shard | A fragment of blue crystal. When three are collected, Bynde's Mana expands by one unit, granting her longer use of her abilities. |
| Heart Vessel | A heart-shaped red crystal, dropped from fallen bosses. Grants Bynde one additional hitpoint upon obtaining it. |
| Siren's Necklace | A special charm worn by Marnetta who gives it to Bynde in order to access the Tomb of Remembrance. Enables one to hold their breath underwater for much longer than normal- or in Bynde's case, at all. |
| Dark Eye | This crystalline relic was forged by an ancient cult many decades ago, its purpose lost to time and its form split in two to prevent others from abusing its power. Simply acts as a key enabling access to Darkiris Stronghold. |
Flask Items
| Heart Potion | A red liquid that, when drunk, restores 8 hearts of health. |
| Heart Potion DX | A shimmering red liquid that, when drunk, restores all of Bynde's health. |
| Lunar Potion | A blue liquid that, when drunk, restores all of Bynde's Mana. |
| Swiftness Potion | A green liquid that, when drunk, grants Bynde double running speed for a short time. |
| Shadow Potion | A purple liquid that, when drunk, makes enemies ignore Bynde for a short time unless provoked. |
| Firepowder | Black-red powder that can be scooped up in a flask. Pour it out to act as an explosive when exposed to heat. |
| Shroom Spores | Spores from a large mushroom. Disorient enemies on contact, but don't do much else. |
| Magic Spores | Shimmering mushroom spores randomly dropped from glowing mushrooms. Have a variety of effects, ranging from damaging enemies to upgrading the value of currency that it is sprinkled on. |
| Water | Just normal water. Interacts with the environment the same way that the Aqua Stone's water spheres do. |
| Spring Water | Water from a divine spring. Heals people when you give it to them. After 3 minutes, it turns to normal water. |
Herald's Blessings
Herald's Souls
Enemies
| Lunefilth | Strange blue blobs that grow silver crystals from their backs. Simple pests found on the moon, they enjoy each crops and leave the farmers and cattle alone, making them more annoying than anything. Their only attacks are a slow jump strike and a cobra-like rearing strike. Good timing can counter these attacks, though Lunefilth are so weak it may not always be needed; simple spam attacks can be just as effective. |
| Mirekin | Strange humanoid monsters with a grey-blue color and glowing yellow eyes, Mirekin have appeared suddenly in the land of Kalidia. Though unintelligent, they are clearly capable of following orders, leading Logos to believe they work for somebody. Standard Mirekin only attack by rushing at Bynde andwinding up with punches, which can be countered fairly easily. |
| Mirekin Gladiator | A somewhat smarter Mirekin wielding a shield and spear, jabbing behind cover whenever he can. The shield blocks most incoming strikes, but the gladiator is left wide open when he reaches out to perform a long-ranged stab. Take advantage of this. |
| Mirekin Archer | A somewhat smarter Mirekin wielding a bow, launching standard arrows at Bynde whenever possible to attack her. Simply avoid the arrows, negate them with your shield, or retaliate with arrows of your own. |
| Red Mirekin | Reddish-colored Mirekin who can use the abilities of normal Mirekin, Gladiators, or Archers. Having been better attuned to the darkness, they have become faster and more durable than the standard Mirekin, making them a direct upgrade. |
| Acid Spider | Black and green spiders native to the Foglands, they reside on walls and ceilings waiting for prey to draw near. They can be taken out fairly easily with some sword strikes or an arrow to their exposed stomachs, but this may involve countering their toxic lunging attack to knock them over... or just shoot them off the wall if need be. |
| Vanar | A small flower-like entity with an eye within its petals, which grows on walls and closes itself up when approached. Its spiky thorns tend to obscure walls and doors, though the Vanar do not attack directly. Simply shoot it in the eye when you can to remove it. |
| Nocturnian | A spindly four-armed being made out of a slimy black tar, seemingly an evolved iteration of the Mirekin. Nocturians wield a large blade in each hand, and are master swordsmen capable of intercepting essentially any attack. Your only hope of getting in strikes is to intercept them as they wind up for attack- or, alternatively, slash in places they aren't blocking. Nocturnians are often fought as minibosses. |
| Greatshield Wyrm | A huge centipede-like insect with a massive crest on its skull that's as hard as stone. Generally these creatures tend to reside in caverns, poking their heads out at the nearest sign of trouble. Attacking any part of the body other than the head instantly kills them, but getting there could be tricky. |
| Flamewalker | Large creatures whose true appearance is unknown; as they spend their lives under the lava, all that is ever seen is their rockhard shell and small red eyes. Flamewalkers are passive enemies that cannot be killed, but instead act as floating platforms that traverse patches of lava so Bynde can get across. |
| Goreal | An armored pangolin-like monster residing in the arid deserts of Cinis Wastes. It attacks by rolling up into its armored shell, charging at Bynde in a wheel-like shape. While it's powerful and renders the Goreal invincible, it has a tendency to run itself off ledges... or it can be blown off them. Its vulnerable spot is on its belly. |
| Spryver | A tiny bird that resides in hot areas, known for its red and blue plumage alongside its drill-like beak. Spryvers dive at their prey beak extended, striking swiftly and unpredictably. Dodging their attacks or whacking them back with a sword may deflect them, but they can also be instantly killed with arrows if so desired. |
| Magmaiden | Female spirits inhabiting the lava around Cinis Wastes. They attack by spitting globs of fire in an arc towards Bynde, which remain on the ground for a short time. Using the Aqua Stone on them turns them into stone, making them immobile and vulnerable; however, one can also use the item on the lava globs, using them as stones that can assist in various puzzles. |
| Crablok | A crustacean overgrown with stone and barnacles to the point of basically becoming a stone itself. It strafes Bynde when provoked, occasionally swiping at her to attack. It's also capable of spitting out small bursts of water, but this deals no damage and only stuns Bynde. Using an Ancient's Horn attack can shatter their armor. |
| Urchion | A creature that resembles a crossbreed between a sea urchin and an antlion. Urchions dangle from ceilings, jaws agape, and latch onto things that pass under them with their fast and sticky tongue. While invincible, they don't discriminate on what they eat, meaning one can use the Urchions as an effective weapon as well as a hazard. |
| Aerofish | Strange fish with silver wing-like fins. Aerofish fly about and attack in swarms, leaping from the water to strike at prey. They can be scattered if the larger red Aerofish in the swarm's center is killed, and parrying the swarm's attacks can prove useful to exposing it... Or you could just plink away at it with arrows or the Windcutter. |
| Sea Wraith | A cursed Kalidian or Marider infused with some profane aquatic magics, turned into a ghastly revenant infused with the power of water. Despite being essentially zombies, Sea Wraiths are rather agile, and have a feral battle style that can easily overwhelm the players. They tend to both telegraph and overextend their attacks, however, leaving them massively vulnerable. |
| Sea Spirit | A Sea Wraith that's become so decayed that its body has broken into bits, consisting of nothing but floating bone and blue essence. They slowly pursue Bynde and curse her on contact, slowly draining her life until she can cure the curse by standing in light. Though immune to all forms of attack, a simple gust of wind, or perhaps a beam of sunlight, may do these specters in. |
| Wraith Knight | A Sea Wraith borne of a once-mighty Marider warrior, now entombed in the Tomb of Remembrance. The Wraith Knight harbors much more of its free will than a standard Sea Wraith, and strikes fluently and elegantly with its blade attacks while blocking strikes with the bracer on its arm. Harnessing the power of the Gale, it is able to fire blade beams which damage and curse Bynde; use the windup for this attack to whack it in the head with an arrow or two! |
| Scrantha | A multi-headed golem made from stone and bone, flailing about spiked tentacles to attack Bynde. Its weak points are the heads, but if all are not killed within a short time span, they will regenerate. Best to use the Windcutter to take them out, or arrow shots if your aim is precise and quick enough. |
| Ambion | Cycloptic suits of red armor which pretend to be inanimate, and then proceed to strike Bynde from behind after she walks past them. They are near invulnerable, but arrow shots to the eye can stun them for a while, and they can be killed by pushing them into environmental hazards. |
| Ice Slug | A blob-like creature made from the sorrow of those who have perished in Darkiris Stronghold. Moves slowly and spews cold breath to attack, often hiding itself in various nooks and crannies where it can become hard to strike. Gale Bombs can often be used to blow them out of cover if your aim is right, making them vulnerable. |
Bosses
| Iconavar Parasitic Divine Blossom |
Iconavar is a small, flower-like daemon set loose on the Seer's Catacombs in an effort to take the Sage hostage for some unknown reason. Threading its parasitic tendrils across the site, it eventually battles Bynde in a stone golem formed from an ancient statue. Normally, this beast is invulnerable due to its thick stone armor, and it is capable of attacks consisting of tendril strikes from the ground, AoE tendril spikes, and charged extendable punches using the golem's fists. However, while punching, Bynde can use the Windcutter item to sever the vines attaching the fist to the golem itself. This temporarily leaves the boss's core open as it tries to retrieve the fist, enabling a quick arrow strike the ability to stun the boss and leave the core open for a multitude of sword blows. Eventually, Iconavar will wise up and generate thicker limbs for the punches, preventing them from easily being sliced open. This means that in order to sever the fist, players must throw the Windcutter into a nearby torch and use the imbued flame to burn off the vines, requiring more precise timing than before. Following up with the same bow and sword strategy will eventually lead to the boss's defeat. |
| Enfuega Pyroclastic Guardian |
A massive being of earth and flames crafted as a guardian to protect one half of the Dark Eye, sealed away in Flamespeak Dungeon. It is battled in a large circular arena with a pit in the middle, which eventually fills up with lava and reducing Bynde's usable area. Enfuega attacks by breathing fire, launching fireballs from its back in an arc, performing various punches and arm slams, and exposing its chest to suck in energy before launching a powerful fire stream. Enfuega is only harmable in certain areas on its lava-like body, which are typically covered by rock. Due to this, the player must use the Ancient's Horn bashing techniques whenever possible to break Enfuega's rock covering, exposing the vulnerable blue bits. In some instances, Bynde can instead use her bow to strike tiny yellow dots on the rock armor, which also shatters it, but one must be very precise with this method. The Aqua Stone may be used to harden Enfuega's body and create platforms on the lava, enabling Bynde to safely traverse the arena. After taking enough damage to its various weakspots, Enfuega is defeated. |
| Dargale Embodiment of Cursed Wind |
A jellyfish-like creature made out of the foul wind infesting the Tomb of Remembrance, and implied to be a corrupted deity worshipped by the Marider tribe. Its weak spot- the internal core- is typically protected by a large transparent aura surrounding it, and its many tentacles strike at Bynde from every angle to attack her. In addition, the core itself can fire laser beams and spew cursed wind, requiring Bynde to play defensively and hide or climb the many pillars dotted around the room. The tentacles can be temporarily sliced off via sword or Windcutter, but they will eventually regenerate, and in order to deal damage to the core, one must throw a Gale Bomb underneath it and trigger it at the right time; the updraft will lift the veil surrounding the core, enabling Bynde to strike it with a couple of arrows. After taking enough damage, Dargale will stop using its tentacles to attack and instead begin sucking up air from the area underneath it, using that force to spew more cursed wind as well as exploding projectiles. The boss will also suck up Gale Bombs that have been placed underneath it and attempt to use them against Bynde; this is now an opportunity to detonate the bomb, which breaks the veil entirely and forces toe core to drop to the ground. After a good amount of hits, Dargale is slain. |
| Kathia Servant of Darkness |
The woman who stole Tai away from you and effectively trapped you on this planet. Serving under a mysterious force who seems to be the cause of all the shadowy monsters around Kalidia, Kathia finally challenges Bynde to a duel in Darkiris Stronghold. Kathia's battle has two phases, the first of which is battled with only her red-hot claws. This phase relies on using the bow in tandem with the items that Bynde has collected so far; Kathia's agile rush attacks leave her open to be staggered with a bash attack from the Ancient's Horn, her guard can be broken with a perfectly timed Windcutter strike to the back of her head, the Aqua Stone can be used to block the flamethrowers she fires and dodge to the side, and Gale Bombs can drive her away from you. When vulnerable, her aura of fire vanishes, letting you stun her with an arrow to the head and attack with Bynde's sword. Phase 2 is more focused on sword combat, with Kathia generating a blade of fire to combat you. This phase is comparable to Ghirahim battles from Skyward Sword, with Kathia attempting to remain a decent distance from the player and blocking at specific angles in order to counter with a strike. She can also perform thrusts, sideswipes, and ranged sword beams that resemble large flame wheels and roll at Bynde. In order to open up Kathia for attack, one must either parry her attacks with expert timing or swing her sword perfectly in order to strike her unprotected areas. After plenty of hits, Kathia surrenders. |
Trivia
- Much like SHIFT, Crestseeker began as a different project before switching over to an original IP- in this case, a Zelda title named The Legend of Zelda: The Cursed Crest. The project was retooled due to a desire to break free of series constraints as well as to tell a more original story, though elements of the original do remain.